1
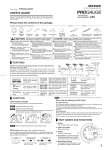
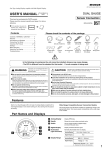
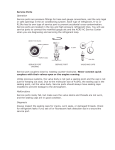
- Installation Manual 251 311 AJ35
Stabilizer / Anti-Sway Bar
CUSCO USA Inc.
16631 Gemini Lane
Huntington Beach, CA 92647
Tel: (714) 907 - 0033
Fax: (714) 369 - 8142
[email protected]
www.cuscousainc.com
- Installation Manual Stabilizer / Anti-Sway Bar
Thank you for purchasing CUSCO products. Please make certain that this instruction manual and the vehicle’s factory service manual is fully read and acknowledged prior to installation. When
transferring usage of the product, please make sure the instruction manual is given to the new owner with the product, or to anyone operating the vehicle. When this product or the vehicle
equipped with this product is given/let borrow to others, please hand this manual to the person who receive the product or vehicle.
Wear protective eyewear and gloves.
Please read this first
A potential possibility of malfunction and (or) breakage can result to the product and (or) to the vehicle if this indication is ignored, if
wrongful usage and (or) operation is performed.
This instruction manual includes the usage and installation. Read this manual thoroughly before operating. Please keep this instruction in the vehicle at all times.
This product is for off-road or competition use only. By reading this warning the customer acknowledges that Cusco products are not permitted for use on public highways.
This product includes all components listed in this instruction manual. If there are any missing or damaged parts, please contact an authorized CUSCO retailer.
Always disconnect the battery before beginning any type of work on the vehicle.
CUSCO cannot be responsible for any loss or damage to the product or the vehicle, when used in combination with other product(s) and (or) unauthorized tamperment to this product.
CUSCO cannot be responsible for any injury or damage caused to the individual or third party as well as malfunction of the vehicle, products and (or) accessories.
This product and accessories can be changed without prior notice due to production and manufacturing reasons.
CUSCO cannot be responsible for any factory OEM parts lost during temporary removal process when performing installation.
Some components such as car audio and clock can lose memory when the battery is disconnected while installating. After completion of the installation process, recover the setting refering to each instruction
manual. CUSCO cannot be responsible for lost settings.
Perform periodical inspection. The durability of this product can vary depending the surrounding conditions and usage.
CUSCO cannot be responsible for any voided factory warranty due to installation of this product.
Acknowledge that the installation of CUSCO products will alter vehicle control characteristics. Operate vehicle with extreme caution after product installation.
Always install products according to the automobile manufacturer factory service manual unless otherwise specified in this installation manual.
An immediate possibility of serious injury and (or) even death can be assumed to the individual and (or) to the third party if this indication is ignored
and wrongful usage and (or) operation is performed.
Any service to the car with removal of the parts shoulod be performed by trained professionals at a properly equipped workshop.
Resting, sleeping in the car, or working in the car or in the closed garage can cause carbon monoxide poisoning, which can be fatal. Must turn the engine off and keep the area well ventilated.
Always place wheel chock to prevent the vehicle from moving.
Be careful with wiring when making connections directly in relationship with driving equipment, such as engine, steering, brake, and air-bag.
Always make sure that the wiring is done properly. Take extra caution when dealing with positive and negative polarity. Make sure that the wires are insulated and there are no loose wires. If
any wiring is performed in error, it may cause a fire on this product and/or the vehicle. Please disconnect the battery terminal wires before beginning the installation process. In case if it is not possible to shut off the
power supply, it is your own responsibility to protect yourself from any injury as well as avoid electric shock and/or short circuit which can cause damage to the product and/or the vehicle.
Use and install Cusco products only as directed by the manufacturer. Do not modify product to fit unspecified application. Misuse of product may lead to serious injury or death.
An potential possibility of serious injury and (or) even death can be assumed to the individual and (or) to the third party if this
indication is ignored and wrongful usage and (or) operation is operformed.
Exhaust manifold, radiator, and engine can be very hot. Please provide sufficient cool down time before starting any installs.
Exhaust manifold, radiator, engine can be extremely hot while the vehicle is running immediately prior to vehicle usage. There is high possibility of injury when coming in contact with such components.
Keep clear from infants, small children, and animals. Keep small parts away to avoid accidents. (prevent the parts from being swallowed/inhaled)
Exhaust pipe can be very hot. Wear proper protective clothing when working in or around this area.
Avoid installing any product in areas that can interfere with vision of the front windshield, driving equipments, and/ or air-bag system and other safety features..
Take caution when installing this product near elecrtic wires, water hoses, and air hoses. and avoid inflicting and damages to them. Damaging the electric wires, water hoses, and air hoses can cause shot circuit and/or
critical engine damage.
An potential possibility of serious injury and (or) even death can be assumed to the individual and (or) to the third party if this
indication is ignored and wrongful usage and (or) operation is operformed.
Dropping and/or applying the excessive force to this product before or during installation can cause damage, resulting in malfunction of the product.
This product is designed to be used in 12V power vehicles only. Do not install this product in different voltage supplied vehicle.
Make sure to insulate the unused connector and wirings to avoid short circuiting.
Always use the supplied hardware.
Installiation of components on the passenger side or center section can interfere with safety standards. Please check within local regulations before installing.
Use a soft cloth to clean the product gently. Using cleaners or abrasive agents can damage the product.
Notes
Installation by non-professionals and unauthorized shops voids product warranty.
Always focus on driving first, and never on the gauge displays. This may cause vehicle accidents and can even result in death.
Perform product setting adjustment and other operation when the vehicle is parked at safe place.
Do not disassemble or apply any modifications to this product. Such alterations can cause vehicle accidents or product damage. This also voids the product warranty.
If any problem is found (wet/odor/smoke/erratic movement etc.), stop using the product IMMEDIATELY and contact your local retailer. Prolonged usage with such symptom can lead to accident or vehicle damage.
CUSCO cannot be responsible for any damages while using this product, or any damages caused by this product usage.
- Installation Manual Stabilizer / Anti-Sway Bar
[ Part Number ]
251 311 AJ35
[ Application ]
Nissan Fairlady Z 350Z [Z33]
Nissan V35 Skyline [V35]
Infiniti G35 [V35]
[
Stabilizer / Anti-Sway Bar
Product
]
[ Description ]
Front Adjustable 35mm Sway Bar
[ Contents
Sway Bar
Installation Manual
]
x1
x1
NOTE
Always use a proper vehicle lift when installing Cusco Sway Bars. Always follow OSHA safety
standards when working on or under a vehicle.
This installation manual serves as a general guideline for Cusco product install. Please refer to
the factory service manual for the proper procedure for sway bar install.
This sway bar is adjustable. In order to ensure safety and maximum product effectiveness,
please only set both sides to the same adjustment hole. (Do not use one side as A, and other as B)
Fig. A
- This sway bar is 2 way adjustable.
- A is less effective than B.
Factory Sway Bar = 100%
A = 120%
B= 137%
- Installation Manual Stabilizer / Anti-Sway Bar
Factory Sway Bar Removal
Fig. A
1.) Remove the 14 bolts + 1 pin shown in Fig. A to take off
the undercover tray.
Pin
Fig. B
2.) Removing the factory sway bar.
- Remove the nut that is securing the sway bar to
the end link. (Both sides) Fig. B #1
- Remove three bolts + one nut per bracket to
take off the sway bar bracket and bushing.
Fig. B #2
Front Sway Bar Installation
1.) Reuse the factory bushings and the brackets and install in the reverse order the factory sway bar was taken off.
Note
Use lubrication if the bushing is difficult to push into the bracket.
Install the endlinks according to the diagram below.
TOP
The stopper should be pointing down.
REAR
BOTTOM
*Periodically inspect and retorque all nuts and bolts after vehicle operation.