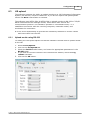
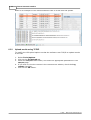
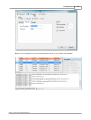
1
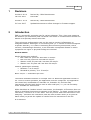
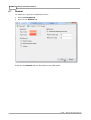
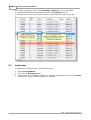
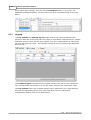
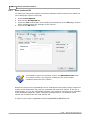
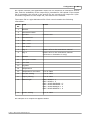
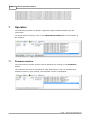
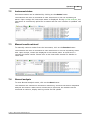
Diesse Vesmatic Interface
User Guide
© 2007 ... Micro-Active Australia Pty Ltd
Version 1.0.0.0
Friday, 24 August 2007
Diesse Vesmatic Interface
User Guide
by Mike Noordermeer
The Diesse Vesmatic Interface is a .NET 2.0 Winforms
application designed to control Vesmatic-10 and
Vesmatic-20 instruments.
This User Guide provides basic information regarding the
use of the Diesse Vesmatic Interface. It is your responsibility
to ensure you are using the latest version of the software,
and user guide.
Diesse Vesmatic Interface
© 2007 ... Micro-Active Australia Pty Ltd
All rights reserved. No parts of this work may be reproduced in any form or by any means - graphic, electronic, or
mechanical, including photocopying, recording, taping, or information storage and retrieval systems - without the
written permission of the publisher.
Products that are referred to in this document may be either trademarks and/or registered trademarks of the
respective owners. The publisher and the author make no claim to these trademarks.
While every precaution has been taken in the preparation of this document, the publisher and the author assume no
responsibility for errors or omissions, or for damages resulting from the use of information contained in this
document or from the use of programs and source code that may accompany it. In no event shall the publisher and
the author be liable for any loss of profit or any other commercial damage caused or alleged to have been caused
directly or indirectly by this document.
Printed: August 2007 in Brisbane, Queensland, Australia.
Publisher
Micro-Active Australia Pty Ltd
Special thanks to:
All the people who contributed to this document.
I
Diesse Vesmatic Interface
Table of Contents
Part I
Revisions
2
Part II
Introduction
2
Part III
System requirements
3
Part IV
Workflow
3
Part V
User interface
4
1 Results...................................................................................................................................
panel
5
2 Sample...................................................................................................................................
flags panel
7
3 Communications
...................................................................................................................................
panel
8
Part VI
8
Configuration
1 General
................................................................................................................................... 9
Operator release
......................................................................................................................................................... 10
2 Instrument
................................................................................................................................... 11
Instrument name,
.........................................................................................................................................................
device id and instrument type
12
Serial communications
......................................................................................................................................................... 12
Logging
......................................................................................................................................................... 13
Disabling an instrument
......................................................................................................................................................... 14
Checksum calculations
......................................................................................................................................................... 15
3 LIS upload
................................................................................................................................... 16
Upload results .........................................................................................................................................................
using RS-232
16
Upload results .........................................................................................................................................................
using TCP/IP
17
Save results to.........................................................................................................................................................
file
19
Part VII
21
Operation
1 Firmware
...................................................................................................................................
revision
21
2 Instrument
...................................................................................................................................
status
22
3 Manual
...................................................................................................................................
results retrieval
22
4 Normal
...................................................................................................................................
analysis
22
24
Index
© 2007 ... Micro-Active Australia Pty Ltd
Revisions
1
2
2
Revisions
Version 0.9.0.0
Revised by : Mike Noordermeer
18 June 2007
First draft
Version 1.0.0.0
Revised by : Mike Noordermeer
21 June 2007
Updated document to reflect changes in firmware support
Introduction
ESR is a nonspecific screening test for various diseases. This 1-hour test measures
the distance (in millimeters) that red blood cells settle in unclotted blood toward the
bottom of a specially marked test tube.
The erythrocyte sedimentation rate can be used to monitor inflammatory or
malignant disease. Although it is a screening test (i.e. it cannot be used to diagnose
a specific disorder), it is useful in detecting and monitoring tuberculosis, tissue
necrosis, rheumatologic disorders, or an otherwise unsuspected disease in which
symptoms are vague or physical findings are minimal.
Normal Values
Adults
·
·
·
·
(Westergren method):
Men under 50 years old: less than 15 mm/hr.
Men over 50 years old: less than 20 mm/hr.
Women under 50 years old: less than 20 mm/hr.
Women over 50 years old: less than 30 mm/hr.
Children (Westergren method):
· Newborn: 0 to 2 mm/hr.
· Neonatal to puberty: 3 to 13 mm/hr.
Note: mm/hr. = millimeters per hour.
The Diesse Vesmatic Interface is a simple .Net 2.0 Winforms application written in
C#. Prior to routine operation, the application must be configured. The application
can control any combination of Vesmatic-10, Vesmatic-20, and Ves-Easy
instruments provided each device uses its own serial port, i.e. you can not daisychain Vesmatic-20 instruments.
While described as 'random access' instruments, the Vesmatic-10 firmware does not
allow an interfaced instrument to operate in this fashion. To obtain results from the
instrument, it must be in a 'free' state. This only occurs when the instrument is not
analyzing - therefore the instrument must be used in batch mode (or a hybrid of
batch mode) to permit the upload of results from the instrument to the LIS.
It is assumed
© 2007 ... Micro-Active Australia Pty Ltd
3
Diesse Vesmatic Interface
· You are familiar with the operation of the Vesmatic-10/Easy and Vesmatic-20
instruments
· On each instrument you can enter service mode and determine the device id and
baud rate
· You can use Windows Device Manager to determine which serial port(s) is used
with the Vesmatic-10 instrument(s).
3
System requirements
Listed below are the minimum sofware and operating system requirements.
Prerequisite
software
Microsoft Core XML Services (MSXML) 6.0
Internet Explorer 6 SP1 or higher
Microsoft .NET Framework Version 2.0 Redistributable Package
(x86)
SQL Server 2005 Express
RAM
Minimum: 192 MB
Recommended: 512 MB or higher
Hard disk
space
700 MB free space
Processor
Pentium III Compatible or higher
Minimum: 500 MHz
Recommended: 1 GHz or higher
Operating
system
All editions of Microsoft
All editions of Microsoft
All editions of Microsoft
All editions of Microsoft
Service Pack 1
Windows
Windows
Windows
Windows
2000 with Service Pack 4
XP with Service Pack 2
Server 2003 Service Pack 1
Small Business Server 2003
If TCP/IP LIS upload is used, the instrument PC must be connected to the network.
4
Workflow
The following workflows are used when developing the interface:
Vesmatic 10/EASY
1. At Select Function, press the Menu button.
2. Press the Down button until ESR 1 Random is displayed.
3. Press the OK button. Run is displayed, the instrument initialises, and goes into
20 minute random mode.
4. FFFFF FFFFF is then displayed. Each letter corresponds to a test position. First
FFFFF position 1 – 5 and then 6 – 10.
5. Scan the bar code of a patient's tube and slot into any position from 1 – 10. The
instrument will display the barcode and start beeping until the tube is inserted
into a test slot.
6. The instrument will then scan the tube to read the starting levels and change
© 2007 ... Micro-Active Australia Pty Ltd
Workflow
4
the display for that slot from F to 1 to 2 to A. When finished analysis, W is
displayed.
7. Scan the next patient barcode and place in an available slot. The instrument is in
random mode so tests can be started at any time i.e, you don't have to wait for
analysis to be finished before starting another.
8. After 20 minutes the instrument takes final readings and computes the ESR.
Vesmatic 20
1. At Select Function, press the Menu button.
2. Analysis ESR F1 is displayed. Press the OK button.
3. Manual loading? is displayed. Press the OK button. The instrument will rotate
the carousel and find the home position.
4. Read 01 Codes
Position 01.
5. Scan the bar code of the first patient's tube and slot it into position 01. The
carousel will advance to position 02 and stored will be displayed followed by
step 6. If the barcode is not scanned within 10 seconds, a beep is emitted and
Disp to Edit OK to Retry is displayed. Press OK to rescan the barcode, or Disp
to enter manually.
6. Read 02 Codes
Position 02
7. Scan the second patient's tube and place in position two.
8. Continue until all tubes are scanned or all positions are filled.
9. The loading process will terminate automatically when all tubes are filled. If not
all tubes are filled, press Esc twice and then press OK.
10. Press Esc again to the question Print Joblist?.
11. The machine will then analyse all tubes.
5
User interface
The application uses a very simple user interface, and may be considered as 3
separate parts : the results panel, the communications control panel, and the
sample status panel.
© 2007 ... Micro-Active Australia Pty Ltd
5
5.1
Diesse Vesmatic Interface
Results panel
The results panel displays the results received from the instruments, and their
current status. Using the toolbar the user may
· Navigate the result data set. On selection of a new result, the sample flags panel is
updated with details of the currently selected request.
· Manually enter results for subsequent transmission to the LIS
· Delete old or erroneous results
· Save any changes to the result status
· Refresh the grid view of the results data set
· Print queued results (in the event the network is down and results need to be
manually entered into the LIS)
· Filter results based on certain parameters.
© 2007 ... Micro-Active Australia Pty Ltd
User interface
© 2007 ... Micro-Active Australia Pty Ltd
6
7
5.2
Diesse Vesmatic Interface
Sample flags panel
The sample flags panel displays details regarding the currently selected request in
the Results panel.
If screen 'real estate' is an issue, the appearance of the sample flags panel can be
controlled by checking/unchecking the View|Sample flags menu item.
© 2007 ... Micro-Active Australia Pty Ltd
User interface
5.3
8
Communications panel
The communications panel is used to display error conditions, display and control
instrument communications, and display LIS upload communications. In effect, the
communications panel provides diagnostic functionality. Details on how the user can
exploit the communications panel is provided later in this document.
If screen 'real estate' is an issue, the appearance of the communications panel can
be controlled by checking/unchecking the View|Monitor menu item.
6
Configuration
Software configuration is stored, to the most part, in the SQL Server database. To
make changes to the software configuration, select Tools|Options.
Some configuration information is stored in an
xml-based .config file. However, we do not
recommend editing this file outside the
application interface.
© 2007 ... Micro-Active Australia Pty Ltd
9
6.1
Diesse Vesmatic Interface
General
To modify the 'general' configuration items
1. Select Tools|Options.
2. Click on the General tab.
Fields on the General tab are described in the table below.
© 2007 ... Micro-Active Australia Pty Ltd
Configuration
6.1.1
10
Field
Description
Flag 1 colour
During normal operation, an encoded error flag may be
returned when results are queried from the
instrument, and reflects an error condition. If error
flag 1 is non-zero, the results background in the
results panel is shaded in this colour.
Flag 2 colour
During normal operation, an encoded error flag may be
returned when results are queried from the
instrument, and reflects an error condition. If error
flag 2 is non-zero, the results background in the
results panel is shaded in this colour. Error flag 2 has
'shading priority' over error flag 1.
Operator release
Usually, when results are received from the
instrument, they are placed in a 'queued' state. The
result set is queried every 5 minutes for queued
results - these results are uploaded to the LIS.
However, if Operator release is checked, when
results are received from the instrument they are
placed in a 'pending' state. It is the responsibility of
the operator to 'release' those results to a queued
state. This is achieved by using the dropdown
combobox, or double clicking on the row selection
column. A more detailed explanation is provided later
in this document.
Discard if barcode absent
To comply with certain regulatory requirements, the
software may be configured to ignore any sample
result which is not identified by a barcode.
Autostart
If checked, the software will immediately initiate
communications with configured and connected
instruments, and LIS.
Automatically delete aged
results
If checked, aged results are deleted by the software.
The maximum age is determined by its status and the
values defined in maximum results age and
maximum error age.
Maximum results age
In days, once the sample result (without an error
condition) has exceeded this age it will be deleted
during the next database 'cleansing'.
Maximum error age
In days, once the sample result (with an error
condition) has exceeded this age it will be deleted
during the next database 'cleansing'.
Operator release
Operator release is used when result validation/acceptance is required before
uploading results to the LIS. When Operator release is checked, new results are
initially tagged as Pending (rather than Queued).
© 2007 ... Micro-Active Australia Pty Ltd
11
Diesse Vesmatic Interface
Users may change the status from Pending to Queued in one of two ways
1. Dropdown the status combobox and select the Queued item, or
2. Double click on the row selection column on the left hand side of the grid.
6.2
Instrument
To modify the 'instrument(s)' configuration items
1. Select Tools|Options.
2. Click on the Instrument tab.
3. Instruments may be added, updated, or deleted. Remember to click on the Save
button once you are satisfied with your changes.
© 2007 ... Micro-Active Australia Pty Ltd
Configuration
6.2.1
12
Instrument name, device id and instrument type
The instrument name is a unique name given to each instrument, and should follow
an enterprise-wide policy for naming devices. The name is used when storing results
in a temporary folder.
As part of the communications protocol, each instrument is addressed by its device
id. By entering Service Mode (on the Vesmatic instruments), the device id can be
viewed and/or changed. Unless the correct device id is entered for the Device
identity field, the application can not communicate with the instrument. Please
consult the instrument Service Manual for more details.
It is important to select the correct instrument type. While the Vesmatic family of
instruments use the 'new protocol', each model has a slightly different command set.
By selecting the instrument type, the software knows which command set to use.
6.2.2
Serial communications
While determining the serial comm port for the Vesmatic-20 is easy (it is connected
to a serial port on the computer), the Vesmatic-10 is a little more difficult. After you
have installed the USB->serial port device driver (supplied with the Vesmatic-10
instrument), connected the Vesmatic-10 to a USB port, and powered it on, you will
need to open Device Manager to determine the serial port number assigned to this
instrument connection.
The easiest way to check you've established communications is to configure the
© 2007 ... Micro-Active Australia Pty Ltd
13
Diesse Vesmatic Interface
serial comm port settings, and click on the Firmware button. If you have not
established communications, you will receive an error message similar to the one
below.
6.2.3
Logging
The Log comms and Comms log file fields control the communications trace
output to both the screen and trace file. Bear in mind these instruments are 'comms
intensive' and the trace file will grow rapidly. It is your responsibility to ensure the
file does not grow too large - the software will fail if the file grows to the maximum
text file size.
The Comms log file field defines the full path to the trace file for the instrument.
The recommended convention is to use the same name as the instrument name.
The Log comms field is an encoded integer value. Determine your requirements,
sum the corresponding values, and enter the value into the instrument
configuration. Please refer to the table below.
© 2007 ... Micro-Active Australia Pty Ltd
Configuration
Comms requirement
Value
No logging
0
Log results comms to trace file
1
Log results comms to screen
2
Log firmware comms to trace file
4
Log firmware comms to screen
8
Log status comms to trace file
16
Log status comms to screen
32
14
Commonly used values are listed in the table below.
6.2.4
Value
Description
43
Log all comms to the screen, and result comms to the trace file
(1+2+8+32) [Recommended]
42
Log all comms to the screen only (2+8+32)
63
Log all comms to the screen and trace file (1+2+4+8+16+32)
23
Log all comms information to the trace file, and just the results
comms to screen (1+2+4+16)
21
Log all comms to the trace file only (1+4+16)
Disabling an instrument
In some circumstances you may wish to temporarily switch an instrument out-ofservice. Rather than deleting the corresponding instrument record, or setting its
state to Inactive in the database, you may uncheck the checkbox in the instrument
list.
© 2007 ... Micro-Active Australia Pty Ltd
15
Diesse Vesmatic Interface
The next time the software is restarted, the instrument(s)
configuration is read from the database and its 'active' state is
restored. Changing the 'active' state of the instrument via the
checkbox should be considered a temporary condition.
6.2.5
Checksum calculations
During testing it was discovered that certain firmware revisions did not calculate the
checksum as documented. To include the carriage return character in the checksum
calculation, check the Extended checksum checkbox.
At the time of writing this document, this applies to all Vesmatic-10/Vesmatic-Easy
instruments.
In all other cases, leave the Extended checksum checkbox unchecked.
If during initial setup the interface displays a checksum error (see below), toggle the
Extended checksum checkbox and try again.
© 2007 ... Micro-Active Australia Pty Ltd
Configuration
6.3
16
LIS upload
The software supports the ability to upload results to an LIS (Laboratory Information
System) via RS-232, TCP/IP or ASCII file. If you do not require LIS upload please
ensure the None radio button is selected.
The software uses ASTM 1381 & ASTM 1394 to upload results via RS-232 or TCP/IP.
ASTM 1394 defines the message format, while ASTM 1381 defines the
communication protocol. The softwarer operates in a broadcast mode, i.e. it
establishes connection with the receiving computer, transmits results, and
terminates the connection.
It is the users responsibility to provide the necesssary software to receive results
and insert them into the LIS.
6.3.1
Upload results using RS-232
To modify the LIS upload options so that the software uses RS-232 to upload results
to the LIS
1. Select Tools|Options.
2. Click on the LIS Upload tab.
3. Check the RS-232 radio button, and enter the appropriate parameters in the
RS-232 page.
4. If you wish to view the comms in the comms trace window, check the Log
comms checkbox.
5. Click on the OK button.
© 2007 ... Micro-Active Australia Pty Ltd
17
Diesse Vesmatic Interface
Below is an example of the communications trace of an RS-232 LIS upload.
6.3.2
Upload results using TCP/IP
To modify the LIS upload options so that the software uses TCP/IP to upload results
to the LIS
1. Select Tools|Options.
2. Click on the LIS Upload tab.
3. Check the TCP/IP radio button, and enter the appropriate parameters in the
TCP/IP page.
4. If you wish to view the comms in the comms trace window, check the Log
comms checkbox.
5. Click on the OK button.
© 2007 ... Micro-Active Australia Pty Ltd
Configuration
Below is an example of the communications trace of an TCP/IP LIS upload.
© 2007 ... Micro-Active Australia Pty Ltd
18
19
6.3.3
Diesse Vesmatic Interface
Save results to file
To modify the LIS upload options so that the software writes results to an ASCII file
(for subsequent import to the LIS)
1. Select Tools|Options.
2. Click on the LIS Upload tab.
3. Check the File radio button, and modify the parameters in the File page. Ensure
these settings match the settings of the receiver.
4. Click on the OK button.
The software places an exclusive lock on the Destination file when
it is writing results. The program reading the file must handle
situations when the file is locked.
Results are saved to the destination file for subsequent LIS upload. When results are
written to the destination file, the file is opened with exclusive access. If the file is
already open, e.g. by the LIS upload program, the results are archived to a subfolder
of the Windows temporary folder. Using the example above, on Windows Vista,
results will be saved into the local archive file
C:\Users\<user name>\AppData\Local\Temp\BRIVES10\BRIVES10.txt
© 2007 ... Micro-Active Australia Pty Ltd
Configuration
20
On regular intervals, the application checks for the existence of instrument archive
files, and the availability of the output file(s) intended for LIS upload. If the output
file is accessible, the records in the archive file are moved to the output file. Upon
successful migration to the output file, the archive file is deleted.
The output file is a pipe-delimitered file. Each record contains the following
information:
Field
no.
Field
Notes
1
Barcode
2
Instrument name
3
Operator
4
Instrument id
5
ESR 1 hour
6
ESR 2 hour
7
Katz Index
8
Flag 1
Please refer to the instrument manual
9
Flag 2
Please refer to the instrument manual
(Relevant to Vesmatic-10 only)
Current user
10
Position
11
Test cycle number
12
Test date
13
Log date
14
Temperature
15
Temperature correction
True or False
16
Barcode setting
True or False
17
Display setting
True or False
18
Method type
ESR
ESR
ESR
ESR
ESR
ESR
19
Printer setting
True or False
1
2
1
2
1
2
HOUR
HOUR
HOUR
HOUR
HOUR
HOUR
An example of an output file appears below:
© 2007 ... Micro-Active Australia Pty Ltd
=1
=2
RANDOM = 3
RANDOM = 4
KINETIC = 5
KINETIC = 6
21
Diesse Vesmatic Interface
1529877|BRIVES10|Matthew|1|13|0|0|0|0|5|0|4/06/2007 1:40:09 PM|18/06/2007 9:02:03 AM|35|True|True|True|3|True
1529876|BRIVES10|Matthew|1|18|0|0|0|0|4|0|4/06/2007 1:38:38 PM|18/06/2007 9:02:03 AM|33|True|True|True|3|True
1529875|BRIVES10|Matthew|1|31|0|0|0|0|3|0|4/06/2007 1:37:39 PM|18/06/2007 9:02:03 AM|32|True|True|True|3|True
1529874|BRIVES10|Matthew|1|1|0|0|0|0|2|0|4/06/2007 1:37:07 PM|18/06/2007 9:02:03 AM|32|True|True|True|3|True
1529873|BRIVES10|Matthew|1|15|0|0|0|0|1|0|4/06/2007 1:36:59 PM|18/06/2007 9:02:03 AM|32|True|True|True|3|True
1529892|BRIVES10|Matthew|1|8|0|0|0|0|10|0|4/06/2007 2:16:48 PM|18/06/2007 9:02:03 AM|32|True|True|True|3|True
1529891|BRIVES10|Matthew|1|17|0|0|0|0|9|0|4/06/2007 2:16:48 PM|18/06/2007 9:02:03 AM|32|True|True|True|3|True
1529890|BRIVES10|Matthew|1|6|0|0|0|0|8|0|4/06/2007 2:16:48 PM|18/06/2007 9:02:03 AM|32|True|True|True|3|True
1529889|BRIVES10|Matthew|1|1|0|0|0|0|7|0|4/06/2007 2:16:48 PM|18/06/2007 9:02:03 AM|32|True|True|True|3|True
1529888|BRIVES10|Matthew|1|28|0|0|0|0|6|0|4/06/2007 2:16:48 PM|18/06/2007 9:02:03 AM|32|True|True|True|3|True
7
Operation
The software provides the ability to perform simple communications with the
instrument.
To access these functions, click on the Instrument comms tab on the bottom of
the window.
7.1
Firmware revision
The instrument firmware revision can be obtained by clicking on the Firmware
button.
The software will issue a command to each instrument in the list requesting its
firmware revision. Upon receipt, the firmware revision is displayed.
© 2007 ... Micro-Active Australia Pty Ltd
Operation
7.2
22
Instrument status
Instrument status can be obtained by clicking on the Status button.
The software will issue a command to each instrument in the list requesting its
status. Upon receipt, the instrument status is displayed. During normal analysis, the
instrument is continuously polled for its status and the user interface is updated 'real
time'.
7.3
Manual results retrieval
To manually retrieve results from the instrument, click on the Results button.
The software will issue a command to each instrument in the list requesting result
sets. Upon receipt, results are displayed in the Results panel. A result set of 0
requests the latest results. Please refer to the instrument manual for details on
result sets.
7.4
Normal analysis
To enter Normal analysis mode, click on the Start button.
The software will commence instrument monitoring. As each instrument completes
analysis and enters a state where results can be retrieved, the software issues
commnds to retrieve, display and log results for LIS upload.
© 2007 ... Micro-Active Australia Pty Ltd
23
Diesse Vesmatic Interface
© 2007 ... Micro-Active Australia Pty Ltd
Index
Index
-I-
-AAnalysis 22
ASCII file 19
ASTM 1381 16, 17
ASTM 1394 16, 17
-LLIS 16, 17
logging 13
-Bbaud rate
-P-
12
-C-
parity 12
port 12
checksum 15
communications 8
configuration 9
general 9
instrument 11
-RResults 22
results panel
RS-232 16
-D-
5
-S-
data bits 12
device id 12
disable 14
sample flags 7
serial port 12
Status 22
stop bits 12
system requirements
-Eextended chksum
15
-Ffile 19
Firmware 21
flow control 12
-Ggeneral
instrument configuration
instrument name 12
instrument type 12
introduction 2
isdeleted 14
9
-TTCP/IP 17
trace 13
-Uupload 16
RS-232 16
TCP/IP 17
user interface
© 2007 ... Micro-Active Australia Pty Ltd
4
3
11
24
25
Diesse Vesmatic Interface
-Wworkflow
3
© 2007 ... Micro-Active Australia Pty Ltd
26
Notes:
© 2007 ... Micro-Active Australia Pty Ltd