1
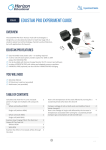
Part Number: ALS3T0009F Version: 1 FUEL CELL PROCESS SHEET Lotus Sport – Fitting Instructions 70ltr ‘FIA Approved’ FT3 ‘FUEL CELL’ Application Specific to Lotus Sport S2 Exige ‘Cup’ Vehicles with Toyota 2ZZ-GE Engines Difficulty Part Number: ALS3T0009F Version: 1 FUEL CELL PROCESS SHEET OVERVIEW This fuel cell sits in the same location as the standard tank, uses the carry over fittings and standard fuel pump. It holds 70 litres nominally. Internally it has three baffles running to 80% of the height of the tank, each with two fuel apertures at the bottom between chambers. The ‘fuel pump’ chamber additionally has 2 x TF331 trapdoors, to hold fuel close to the pump. The fuel pump operates as normal with the level/float giving correct indication (you will find that the fuel level gauge will not move for a period on a full tank of fuel – this is normal, as a proportion of the fuel will be above the pump) The fuel cell is made from ATL 810-C material in accordance with FT3 1999 specification and includes yellow foam in all chambers except in fuel pump chamber, 4x6 top plate with filler neck and vent. As manufactured it is FIA Approved. Fuel Cell - Full tank running times (full throttle, track only – dependant upon ambient conditions, driver, track, & vehicle) Fuel Cell – Weights CHASSIS SIDE VIEW Exige S2 Cup 240 (70ltr fuel cell) Exige S2 Cup 240 (standard tank) 70ltr fuel cell Standard production steel tank CHASSIS UNDERSIDE VIEW ~ 80 minutes ~ 45 minutes ~ 5.6 Kg ~ 12.8 kg Part Number: ALS3T0009F Version: 1 FUEL CELL PROCESS SHEET WARNING / NOTES THIS FUEL CELL IS FOR TRACK USE ONLY. MAJOR SANCTIONING BODIES SUCH AS FIA, HAVE RECOGNISED THAT FUEL CELLS ARE AFFECTED BY OZONE, ULTRAVIOLET, AGEING, AND THE CHEMICAL ACTION OF GASOLINE AND RACING FUELS. HENCE, A FIVE YEAR LEGAL LIFE SPAN HAS BEEN SET ON ALL FUEL CELLS. THE RUBBER BLADDER PORTION OF YOUR FUEL CELL SYSTEM MUST BE REPLACED WITHIN 5 YEARS OF ITS MANUFACTURE DATE. Gasoline, as well as other flammable materials and liquids (adhesives, solvents, etc.) and the vapours they produce are extremely dangerous. Be sure to read and follow the instructions. Failure to do so can result in property damage, bodily injury, or death. Take all reasonable precautions to guard against safety. This fuel cell is designed for the use of hydrocarbon gasoline only! The fuel cell may experience minor swelling when subjected to fuel. Due to the elastomeric nature of fuel bladders, a certain amount of vapour permeation or “diffusion” will occur. Always allow generous ventilation around the cell/vehicle so as to preclude the accumulation of fuel vapours. Water vapour and direct sunlight (UV) exposure can adversely affect fuel bladders. Keep the system externally and internally free of water and water vapour. When storing a fuel cell, drain the bladder completely, drained, dried out, close off all ports, and keep it in a dark, dry, cool environment. Fuel cell “capacities” are expressed herein as nominal values. Please be sure to study ATL’s Product Safety Bulletin #DS-381 before installing or using any ATL product. Remember, improper selection, installation or use can cause personal injury, property damage or death. Don’t take unnecessary risks. Your fuel cell should be serviced at least once a year. Most importantly, the bladder should be inspected for any fuel leaks or blistering. Any damage or broken components should be repaired or replaced before use. All fuel cells should be static ground during refuelling and during use on a track. Never use a PVC tube for refuelling. It will create enough static build up, causing a spark. Check specific series regulations to confirm that installation of fuel cell meets requirements (although that fuel cell is FIA approved the installation may have to vary between regulations) Do not over-fill or top-off your vehicle tank, which can cause gasoline spillage. Avoid prolonged breathing of fuel vapours. Use fuel only in open areas that get plenty of fresh air. Keep your face away from the nozzle or container opening. Never siphon fuel by mouth nor put fuel in your mouth for any reason. Fuel can be harmful or fatal if swallowed. If someone swallows gasoline, do not induce vomiting. Contact a doctor or and emergency medical service provider immediately. Keep fuel away from your eyes and skin; it may cause irritation. Remove fuel-soaked clothing immediately. Part Number: ALS3T0009F Version: 1 PROCESS SHEET FUEL CELL KIT CONTENTS 1 x 74ltr Fuel Cell 1 x Product Safety Bulletin 1 x Warning Documentation 1 x Product Warranty Card 1 x Certificate of Compliance 1 x Chassis Sticker (tamper proof) Note: Additional parts may be included or required dependant upon condition of existing fuel tank and fuel pump, i.e. Fuel Pipe Clip (A120L6012S) Part Number: ALS3T0009F Version: 1 For Use in FIA Competitions (on rear face) Torque Tightening Instruction PROCESS SHEET FUEL CELL Track Use Only Label Fuel Cell Fuel Type Use Instruction XXXXXXXXXX Please pay attention to the highlighted regions. These areas indicate important safety information Fuel Cell Dating Label, (states FIA Approval Number, Manufacturer, Serial Number, End of Life Date) Part Number: ALS3T0009F Version: 1 FUEL CELL PROCESS SHEET Part Number: ALS3T0009F Version: 1 FUEL CELL PROCESS SHEET TOOLS REQUIRED • • • • • • • • • • LOTUS SERVICE MANUAL (A120T0327J) TOYOTA SERVICE MANUAL RM733E TOYOTA SERVICE MANUAL RM929E VEHICLE SUPPORT RAMP FUEL DRAIN CAN RATCHETS SPANNERS – ASSORTED ALLEN KEYS - ASSORTED PHILLIPS HEAD SCREWDRIVER FLAT BLADED SCREWDRIVER • • • • • • • • • • BOILING WATER TO SOFTEN HOSE ENDS SOCKETS - ASSORTED CRAFT KNIFE CIRCLIP PLIERS MASKING TAPE WD40 DUCT TAPE MALLETS HACKSAW OR SUITABLE CUTTING TOOL PAINT PEN • • • CLEAN WORKING BENCH AND AREA TORQUE WRENCH EXTENSION BARS INSTRUCTIONS NOTE 1: ALL BOLTS SHOULD BE TORQUED CORRECTLY – SEE LOTUS SERVICE MANUAL FOR STANDARD PART OR TORQUE REFERENCE IN THIS DOCUMENT. NOTE 2: ALL BOLTS TORQUED SHOULD BE PAINT MARKED. NOTE 3: ENSURE ALL NESSECARY SAFETY PRODECURES ARE FOLLOWED. WARNING ! ! DO NOT ATTEMPT TO DO THIS MODIFICATION WITH THE ENGINE RUNNING OR WHEN THE ENGINE IS HOT. TAKE ALL NECESSARY PRECAUTIONS TO GUARD AGAINST FIRE AND EXPLOSION RISK WHEN DEALING WITH FUEL AND FUEL VAPOUR. READ ALL INSTRUCTIONS THOROUGHLY BEFORE COMMENCING WORK AND ENSURE ALL COMPONENTS ARE PRESENT. IF IN ANY DOUBT, CONSULT A LOTUS DEALER BEFORE UNDERTAKING THE WORK. ACTIVITY – REMOVE EXISITING TANK .............................................................................................................................................................................................................................................. 8 ACTIVITY – RELOCATE LATCH & CABLE.......................................................................................................................................................................................................................................... 9 ACTIVITY – PREPARE AREA.................................................................................................................................................................................................................................................................. 10 ACTIVITY – FUEL PUMP INSTALLATION.......................................................................................................................................................................................................................................... 11 ACTIVITY – FUEL CELL INSTALLATION .......................................................................................................................................................................................................................................... 12 ACTIVITY – FINALS................................................................................................................................................................................................................................................................................... 13 ACTIVITY – CHASSIS STICKER............................................................................................................................................................................................................................................................. 14 Part Number: ALS3T0009F Version: 1 SEQ 10 20 30 40 50 60 70 80 90 100 120 130 20 30 SEQ 10 10 10 CAREPOINT Be careful to take the necessary precautions when handling fuel and fuel vapours. Do not take any risks! Any damage or broken components should be repaired or replaced before use. PART NUMBER A120T0327J RM733E RM929E PART DESCRIPTION Lotus Service Manual Toyota Service Manual Toyota Service Manual PROCESS SHEET FUEL CELL QTY ACTIVITY – REMOVE EXISITING TANK Read all fuel cell literature supplied with the cell! Following instructions in Lotus Service Manual (A120T0327J), Toyota Service Manual (RM733E) and Toyota Service Manual (RM929E). Drain fuel from vehicle or run down the fuel to minimum levels. Remove fuel tank filler hose and breather clips on the upper side of the tank. From the fuel pump access aperture disconnect the quick connect fuel pipe, the fuel feed pipe and the pump electrical connector. Place the car a ‘two post’ vehicle lift and secure. Remove vehicle under tray and diffuser. Disconnect handbrake cable from the callipers. Disconnect cross gate and selector cables from gearbox. Remove shear panel from vehicle, and the ‘ground’ wire. Remove the fuel tank from the vehicle, and place on suitable work surface. Remove the fuel pump from the fuel tank and set aside. This will be used in the new fuel cell. Please check fuel and parts for condition. Keep braided earth strap, as this will be used later. QUALITY STANDARD F/C TORQUE TOOLING Part Number: ALS3T0009F Version: 1 PROCESS SHEET FUEL CELL SEQ 10 20 30 ACTIVITY – RELOCATE LATCH & CABLE Remove cockpit tailgate operations latch and bracket Disconnect the cable from the latch and remove the cable from the fuel cell area vicinity (as indicated) The cable should be moved so that it runs ‘over the top’ of the chassis through the plastic bulkhead and to the latch/handle. Remove tailgate latch operation cable, running through fuel cell area. 10 SEQ 10 10 10 CAREPOINT It is the general recommendation for road based - track use only vehicles, to relocate the latch and cable mechanism. However, an alternative is to remove the mechanism completely from the vehicle and fit ‘bonnet’ style pins to secure the tailgate/engine cover. PART NUMBER PART DESCRIPTION QTY QUALITY STANDARD F/C TORQUE TOOLING Part Number: ALS3T0009F Version: 1 SEQ ‘Cover’ or remove all obtrusions from fuel cell area. Duct tape over all sharp edges, corners, and joints. 10 20 Increase the size of the fuel hose aperture by 5mm (inboard side only) (indicated red) 20 30 20 SEQ 10 30 40 CAREPOINT IT IS IMPERATIVE THAT THE AREA WHERE THE NEW FUEL CELL WILL BE INSTALLED IS FREE OF ANY OBSTRUCTIONS, SHARP EDGES, POINTS, BOLT HEADS AND THREADS. THE COMPLETE INNER AREA SHOULD BE SMOOTH WHEN YOUR HAND IS RUN ACROSS THE SURFACE. ANY OBTRUSION ONTO THE FUEL CELL WILL DAMAGE THE FUEL CELL. Take care to cover all sharp edges, corners and obtrusions with tape. If absolutely necessary replace with ‘button’ type head bolts on the inner surface) PART NUMBER PART DESCRIPTION PROCESS SHEET FUEL CELL ACTIVITY – PREPARE AREA Remove approximately 5-10mm of materials from the inboard side of the fuel hose aperture on the chassis Clean all internal surfaces make sure free from dirt or deposition. REMOVE ALL BOLTS, NUTS AND PROTRUSIONS INTO THE FUEL CELL AREA PLACE ‘DUCT TAPE’ OVER ALL OBTRUSIONS, ALL SHARP EDGES AND CORNERS. QUALITY STANDARD QTY F/C TORQUE TOOLING Part Number: ALS3T0009F Version: 1 Key Way 1 5 20 degrees SEQ 10 3 7 20 30 40 8 4 Earth Strap Remove 8 off inner fixings from top plate of cell 50 6 2 CAREPOINT SEQ 50 PART NUMBER N/A PART DESCRIPTION Torque / Tooling Reference PROCESS SHEET FUEL CELL ACTIVITY – FUEL PUMP INSTALLATION Place the fuel pump into the fuel cell top plate, with the orientation shown nozzle should be 20degrees from pictorial horizontal. Place the plastic over ring on top Then the metal nut ring, ensuring that the ‘key’ locks into place on the fuel pump (indicated) Insert the 8off fixings, and loosely hand tightening in the torque tightening sequence shown, inserting the earth strap to #4 as indicated Follow the torque tightening sequence shown, and paint mark when correct torque has been reached. See torque tightening instructions on tank. Making sure that the earth strap is attached (previously removed from existing fuel tank) QUALITY STANDARD QTY 8 F/C - TORQUE 3.5Nm TOOLING Torque wrench Part Number: ALS3T0009F Version: 1 SEQ 10 20 30 40 50 ‘Pull’ fuel cell to corners, trying to ensure that underside is largely free from creases 60 70 It may be the case that the fuel cell appears ‘creased’ at the indicated corner(s). This should naturally ‘fill out’ when fuel is added to the cell. 10 20 50 60 SEQ 10 PART DESCRIPTION ACTIVITY – FUEL CELL INSTALLATION Offer the fuel cell up towards the chassis. Connect the ‘quick connect to tank pipe’ confirm that it has clicked home and is secure. Connect the fuel feed pipe confirm that it has click home and is secure Connect the fuel pump electrical connector and confirm that it has click home and is secure Begin to insert the ‘pump’ side of the fuel cell first pressing it into the upper corners and over the chassis lower rail lips front and rear. Offer the ‘filler’ side up, and press into the corners, and again over the chassis lower rail lips (front and rear) Reconnect Fuel filler hose and fuel breather hose fitting new retaining clips. 80 90 100 120 CAREPOINT The intricate design of the bag tank means that the physical installation of the fuel cell can be a delicate operation, generally necessary to be completed by two people. If necessary, ‘lubricate’ the inner surface of the chassis area to ease installation. The tank when seated corrected will appear into ‘pop’ into position. Please ensure that the fuel cell does not ‘curl’ up on itself as it progresses over the chassis rail lips. PART NUMBER PROCESS SHEET FUEL CELL QUALITY STANDARD QTY F/C TORQUE TOOLING Part Number: ALS3T0009F Version: 1 SEQ 10 20 30 Hole for earth strap Through aperture plates check all pipes are secure and correctly routed. 40 50 60 Check fuel filler and breather connections 70 Check pipes for routing and foul conditions. 80 90 50 60 SEQ 10 10 10 CAREPOINT You will be able to hear the fuel pump running and ‘picking’ up the fuel Never drive the vehicle without the shear panel and under tray in position. PART NUMBER PART DESCRIPTION PROCESS SHEET FUEL CELL ACTIVITY – FINALS Drill a hole in the access aperture to feed the earth strap through, insert a rubber grommet to seal. Feed the earth braid strap up through the hole in ‘access aperture’ and secure to the main roll hoop via a suitable fixing, ensuring that the connection is secure and earthed. Check that all hoses, clips, connectors and fixings have been correctly installed, and that no damage has occurred during the installation. Check all fuel lines for leaks. Check all fuel lines for fouling, rubbing or any interference. If satisfactory and correct, add 10litres of fuel to the fuel cell via the normal filling method. Turn on engine and idle for 5mins, checking for any fuel leaks, fuel pickup issues and other abnormalities. Rectify any issues. If satisfactory and correct, refit all the ancillary components removed initially, shear panel, handbrake cable, gear selector and cross gate cables, under tray. Safety check the vehicle before allowing out of the workshop. QUALITY STANDARD QTY F/C TORQUE TOOLING Part Number: ALS3T0009F Version: 1 SEQ 10 CHASSIS STICKER 20 30 40 10 10 SEQ 10 10 CAREPOINT It is recommended that if the vehicle is fitted with a Lotus Sport chassis plate, that it is fixed in the same region. Must be clearly visible Label only refers to specific serial number and as such must never be removed as long as the vehicle is fitted with the corresponding fuel cell. PART NUMBER PART DESCRIPTION PROCESS SHEET FUEL CELL ACTIVITY – CHASSIS STICKER IT IS IMPERATIVE THAT THE TAMPER PROOF CHASSIS LABEL IS STUCK INSIDE THE COCK PIT OF THE CHASSIS. Clean surface (area as indicated) with suitable fluid. Remove backing of tamper proof chassis sticker Adhere to chassis, making sure that no bubbles are underneath, press firmly to the corners. QUALITY STANDARD QTY F/C TORQUE TOOLING Part Number: ALS3T0009F Version: 1 FUEL CELL PROCESS SHEET Disclaimer Lotus accepts no liability for any direct, indirect or consequential damage or loss (including as a result of negligence) arising from the application of these fitting instructions by any person. For the avoidance of doubt, this does not affect your statutory rights and Lotus does not exclude liability (if any) to you for death or personal injury arising out of Lotus’ negligence. Please note that the fitting of any Lotus approved part(s) by anyone other than a Lotus approved engineer may invalidate the vehicle warranty.