1
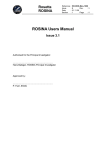
DH15/DH16
CONVECTED AIR
INSUL-PLUS
TM
Base Heaters
DH16 shown
INSTALLATION, OPERATION & MAINTENANCE MANUAL
Manual P/N 92553
Rev. C 03/14/2007
Copyright © 2002 Aladdin Temp-Rite
Changes may be made to the information in this document without notification.
DH15 / DH16
CONVECTED AIR INSUL-PLUSTM
BASE HEATERS
CONTENTS
I.
MODELS
4
II.
RECEIVING INSPECTIONS
4
III. INSTALLATION
5
IV. ELECTRICAL
6
V.
7
START-UP
VI. CLEANING
8
VII. TROUBLESHOOTING
9
VIII. PARTS LIST / DIAGRAMS
10
IX. PREVENTATIVE MAINTENANCE
14
X.
SERVICE
15
XI. WARRANTY
15
DH15 / DH16
CONVECTED AIR INSUL-PLUSTM
BASE HEATERS
I. MODELS
The Aladdin Convected Air Insul-Plus Base Heaters are available in two capacities. These units are designed specifically
for use with the Aladdin Insul-Plustm wax filled bases.
The Aladdin Convected Air Insul-Plus Base Heaters are mobile, modularly designed products which are able to be
used independently or in conjunction with other units in a tray line arrangement.
Aladdin Sales Codes
Number of Stacks
Capacity per Stack
Capacity (Total)
DH16
2
33
66
DH15
3
33
99
Overall Dimensions:
Length
Width
Height
33 3/8"
23 3/4"
42 13/16"
46 11/16"
23 3/4"
42 13/16"
Electrical Requirements:
Voltage / Phase
Amperage
Cycle
NEMA Plug Configuration
Approximate Shipping Weight
208 V /1
208 V /1
13.5
6.3
60
60
………………6-20P…………………
270 lbs.
300 lbs.
II. RECEIVING INSPECTIONS
NOTE: All Aladdin® units are factory tested for performance and certified free from defects and customer
ready prior to shipment.
You should carefully inspect your Insul-Plus Base Heaters to assure that no damage has occurred
in transit. If however, damage is detected see the following damaged goods policy. Under
no condition may a damaged unit be returned to Aladdin Temp-Rite without first obtaining
written permission (return authorization). No credit will be issued for claims not reported to
Aladdin within ten (10) business days from receipt of shipment.
4
ALADDIN DAMAGED GOODS POLICY
There are two types of damaged merchandise:
A. VISIBLE DAMAGE OR SHORTAGE
B. CONCEALED DAMAGE
A. VISIBLE DAMAGE OR SHORTAGE - (All claims should be reported within 10 business days)
1. Receiver should refuse the damaged portion of the shipment.
2. Receiver should sign the bill of lading indicating (delivery receipt) what merchandise is being
“refused due to damage” and have the driver initial the notation.
3. Receiver should note any shortages on the bill of lading (delivery receipt) in the same manner.
4. Receiver should contact Aladdin Customer Service at 1-800-888-8018 and alert them to the
situation.
B. CONCEALED DAMAGE- (All claims should be reported within 10 business days)
Any receiving operation should inspect for this type of damage.
IF PRODUCT IS DAMAGED
1. Receiver should hold the shipping container and its contents in the same condition as when the
damage was discovered insofar as possible and call the delivering carrier to arrange
III. INSTALLATION
NOTE: The installation instructions are similar for all the heaters.
A. All models are equipped with a self-leveling mechanism that is removable through the top of the unit.
No adjustments are required to the tension springs as they are preset at the factory.
B. See ELECTRICAL (section IV) and START-UP (section V) before plugging unit into power
supply.
5
DH15 / DH16
CONVECTED AIR INSUL-PLUSTM
BASE HEATERS
IV. ELECTRICAL
Refer to the specifications data on page 4, the serial tag, your local code or the National Electrical Code to be
sure the unit is connected to the proper power source. A protected circuit of the correct voltage and amperage
must be available for connection of the line cord.
All Insul-Plus Base heaters are provided with a NEMA plug type 6-20P
! WARNING
Every heater is fitted with a grounded power cord and must be connected to a properly
grounded receptacle. Each receptacle must be wired to a dedicated circuit breaker rated
at not more than 20 amps.
! WARNING
To prevent electrical shock hazard, the main power switch must be turned to "off " position
and the heater disconnected from the power source whenever performing service or
maintenance.
! WARNING
Hazardous voltage inside back of cabinet. Only qualified personnel totally familiar with
electrical circuits, service manual and service procedures should open or work inside
unit.
6
V. START-UP
A. OVERVIEW
These units are designed to heat Insul-PlusTM wax filled bases only. Once the unit is turned on,
the fan motor, heater and power indicator light will come on. There is a power indicator light to
let the operator know the power is on.
The fan motor will begin to circulate the heated air in and around the bases in a convection
process that promotes a quick and even heat absorption by the bases.
Once the air inside the cabinet has reached the desired and preset temperature, the thermostat
will continue to maintain this temperature by regulating the power to the heater. The fan motor
will run as long as the unit is energized.
B. LOADING
Load carrier tray by carefully stacking the bases in each cavity. Always keep the load leveled on
the carrier or it may bind. Never try to exceed the recommended base capacities that are shown
in the models chart on page 4.
C. POWER
Set the power switch to the "ON" position. The power switch will light up when the unit is on.
Keep the cover closed completely to insure proper and efficient heating . The heater should
always be turned on 75 to 90 minutes before dispensing.
D. DISPENSING
! CAUTION
Operators should always wear gloves or use base lifters when dispensing bases.
After the unit is turned off or unplugged, the bases remaining inside the unit will remain
hot for sometime. Leave the lid open to allow the unit and its contents to cool.
7
DH15 / DH16
CONVECTED AIR INSUL-PLUSTM
BASE HEATERS
VI. CLEANING
The following procedures should be followed during the regular cleaning regimen on all
of the dish heaters.
1. Turn the unit off and disconnect the plug from the outlet, and allow the cabinet to cool.
Remove plug by pulling it straight out. Never pull on the cord.
2. Pull the elevator mechanism up and out, place it on a work surface. You can now wipe
down the mechanism with a damp cloth to clean it.
3. Clean out any debris inside the cabinet and wipe the cabinet down with a damp cloth.
4. Place the elevator mechanisms back inside the cabinet and clean the outside of the
cabinet with a mild, non-abrasive soap or detergent in a warm water solution.
A commercial stainless steel cleaner can also be used for this procedure.
5. After the heater has been thoroughly cleaned and dried with a soft cloth the plug can
be replaced.
NOTE: Do not use abrasives, harsh chemicals, or chlorine products for cleaning.
! WARNING
Do not steam or pressure clean or hose down the cabinet. This could damage the
equipment and possibly cause an electrical shock to the operator.
! WARNING
Repairs to be done by qualified service personnel only.
8
VII. TROUBLESHOOTING
COMPLAINT
A. Unit does not operate and no
lights are on
B. Unit heats, but fan does not
operate
C. Unit does not heat, but fan
operates
D. Plate temperature is too low,
fan operating
PROBLEM
1. No power
2. Bad power switch
3. Loose wiring
1. Defective motor
SOLUTION
1. Make sure plug is connected
and switch is ON.
Check for power to the receptacle
2. Replace power switch
3. Check and secure wiring
1. Replace motor
2. Jammed or loose fan blade
3. Loose wiring
1. Defective heating element
2. Replace or tighten blade
3. Determine fault and correct
1. Replace heating element
2. Open high limit switch
3. Loose wiring
1. Thermostat set too low
2. Replace switch. Check for
causes before restarting equipment
3. Check and secure wiring
1. Readjust thermostat
2. Jammed or loose fan blade
3. Cover is open
2. Replace or tighten blade
3. Close cover
E. Plate temperature is too high, 1. Thermostat set too high
fan is operating
2. Closed thermostat
3. Closed high limit switch
1. Hinge screws are missing or
F. Cover is loose
loose
G. Elevator Binds
1. Improper springs
H. Cabinet does not roll easily
2. Debris on guide rods
1. Debris on wheel or axle
2. No lubrication
1. Readjust thermostat
2. Replace thermostat
3. Replace high limit switch
1. Replace or tighten screws
1. Check springs chart and use
correct number of springs. Make
sure identical number and size
of springs are on each side of
elevator
2. Clean off debris
1. Clean out debris
2. Lubricate axles with load bearing grease. Lubricate swivel bearings with 30-weight oil.
9
DH15 / DH16
CONVECTED AIR INSUL-PLUSTM
BASE HEATERS
VIII. PARTS LIST/DIAGRAMS
ITEM
#
1
2
3
4
5
6
7
8
9
10
11
12
13
14
15
16
17
18*
19*
20
21
22
23
24
25
26*
DESCRIPTION
ALADDIN DH16 DH15
PART#
Qty.
Qty.
Lid assembly-End
Lid assembly-Center
Hinge, RH & LH
Lid handle
Push/Pull handle
Rear louvered panel DH16
Rear louvered panel DH15
Cord-10 foot length
Plug- NEMA 6-20 straight blade
Plug-NEMA L6-20 twist lock
On/off switch
Motor-208/230V,60hz.1ph. 3200 rpm
High limit switch- manual reset 265F
Thermostat-230 °F, non-adjustable
Heating element-208V
Heating element-240V ("A" Models only)
Fan Blade, 5/16" bore
Wrap around bumper-DH16(Obsolete-Use 93052)
Wrap around bumper-DH15 (Obsolete-Use 93052)
Caster 5" swivel
Caster 5" swivel with brake
Elevator spring
Elevator bushing
Elevator guide rod
Elevator assembly
Corner Bumper
92496
92497
92203
92500
92501
92502
92503
24719
92504
39169
93989
92506
92507
93103
92510
92511
92512
92513
92514
92515
92516
93104
92518
92519
93105
93052
2
4
2
1
1
1
1
1
1
1
2
1
1
1
1
1
2
2
12
8
4
2
4
2
1
6
3
1
1
1
1
1
1
1
2
1
1
1
1
1
2
2
18
12
6
3
4
*Corner Bumpers are used in place of wrap around bumpers on units manufactured
after August 1999.
10
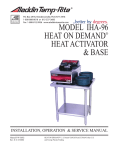
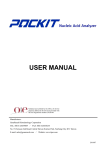
DH15
EXPLODED VIEW DRAWING
26
Corner Bumpers are used in place of wrap
around bumpers on units manufactured after
August 1999.
11
DH15 / DH16
CONVECTED AIR INSUL-PLUSTM
BASE HEATERS
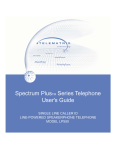
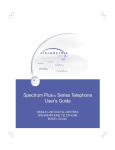
DH16
EXPLODED VIEW DRAWING
26
Corner Bumpers are used in place of wrap
around bumpers on units manufactured after
August 1999.
12
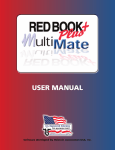
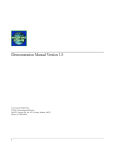
DH15/DH16
ELEVATOR ASSEMBLY EXPLODED VIEW DRAWING
23
25
22
24
13
DH15 / DH16
CONVECTED AIR INSUL-PLUSTM
BASE HEATERS
WIRING DIAGRAM
MANUALLY RESETABLE
MANUAL RESET
IX.PREVENTATIVE MAINTENANCE
CASTERS
1.
2.
3.
4.
Check casters for freedom of movement and proper brake retention.
Maintain casters free of debris. (mop strings, paper plastic, hair nets, etc.)
Clean or replace as required.
Replace caster when rubber tread is less than ¼" from rim.
CORD & PLUG
1. Inspect plug blades for distortion and replace if any blades are missing, bent or
broken.
2. Inspect cord wiring for integrity at termination points by having qualified service
person remove the back panel from cabinet. Make sure the cord sheathing
extends into the cabinet interior. If wires are showing on the outside of the cabinet,
remove the unit from use and have repairs made before turning on power to the
unit.
DISPENSING MECHANISM
1. Periodically check springs for proper base dispensing by filling each cavity with
bases and checking to see that it indexes as bases are removed. If bases do not
index properly, and unit is not overloaded replace springs.
14
X. SERVICE
In the event service is required on your Aladdin DH15 / DH16 Series
Base Heaters please call:
ALADDIN TEMP-RITE SERVICE DEPARTMENT 1-800-888-5426
XI. WARRANTY
ALADDIN TEMP-RITE®
EQUIPMENT
LIMITED WARRANTY
Effective April 1, 1998
Aladdin Temp-Rite ("ATR") warrants to the original purchaser that the equipment listed below shall be free from defects in material and workmanship under
normal use for the applicable warranty term set forth below. ATR's obligation under this warranty is limited to the repair or replacement, at the sole option of
ATR, of any part which upon inspection and examination by ATR or its authorized agent is found to be defective. A written description detailing the nature of
the claimed defect, together with the equipment claimed to be defective if required by ATR, must be delivered to ATR or its authorized agent within 30 days of
discovery of the claimed defect (but in no event later than 30 days after the expiration of the applicable warranty term).
EQUIPMENT
DH15 / DH16
WARRANTY TERM*
PARTS
LABOR
1 Year
90 Days
*The warranty term commences 30 days after Aladdins invoice for the equipment.
THE WARRANTIES AND REPRESENTATIONS OF ATR CONTAINED HEREIN ARE EXPRESSLY IN LIEU OF, AND THE BUYER
WAIVES, ANY AND ALL OTHER WARRANTIES EXPRESS OR IMPLIED, INCLUDING THE WARRANTIES OF MERCHANTABILITY
AND FITNESS FOR A PARTICULAR PURPOSE, AND ANY OTHER REMEDIES AGAINST ATR, WHETHER BASED UPON CONTRACT,
NEGLIGENCE, STRICT LIABILITY OR OTHERWISE. ATR SHALL NOT BE LIABLE FOR ANY CONSEQUENTIAL OR INCIDENTAL
DAMAGES OR ECONOMIC LOSS OF ANY NATURE (INCLUDING WITHOUT LIMITATION LOSS OF REVENUES AND/OR PROFITS)
THAT MAY BE CLAIMED TO RESULT FROM ANY NEGLIGENCE OR BREACH OF WARRANTY OR CONTRACT BY ATR.
Exceptions and Exclusions
This warranty is issued only to the original purchaser, and is not transferable and applies only to the products installed within the United States of America, its
territories and Canada. During the term of any labor warranty, ATR will pay all pre-approved shipping charges incurred in returning defective equipment to ATR and
labor costs incurred in the removal and reinstallation of such equipment. Contact ATR before returning any claimed defective equipment or otherwise performing
warranty repairs. ATR assumes no liability for any work or repair performed without its prior approval. After the expiration of any labor warranty, the original
purchaser is responsible for all shipping charges incurred in returning defective equipment to ATR and labor for removing and reinstalling such equipment. ATR
shall not be responsible for the replacement of expendable items like lamps and fuses or product failure resulting from normal wear and tear, improper installation,
misuse, sabotage, abuse, neglect, accident, unauthorized alterations or repair, or other factors beyond the control of ATR. Neither this warranty nor the liability
of ATR may be modified or extended by action of any agent, distributor or other person or by custom or practice.
CALL ALADDIN TOLL FREE AT 1-800-888-5426 IF YOU HAVE ANY QUESTIONS ABOUT THIS
WARRANTY OR YOUR ATR PRODUCT.
15