1
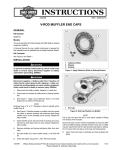
-J03082
REV. 2004-02-20
CHROME EFI COIL COVER KIT
sunk end first, over the screw threads inside the front
cover.
GENERAL
Kit Number
9.
74616-04
Models
This kit fits EFI (fuel injected) versions of 2001 and later Softail®
and 2004 and later Dyna™ model motorcycles.
Additional Parts Required
NOTE
A Service Manual for your model motorcycle is available from
your Harley-Davidson Dealer.
Install the cover over the coil so the coil towers fit into the
notches in the side of the cover. Line up the chrome
screws with the threaded holes in the rear cover, and
fasten securely with the Allen wrench from the kit.
10. Connect the spark plug wires through the holes in the side
of the coil cover onto the correct coil terminals.
11. Re-attach connector [83B] to the back side of the coil.
12. Refer to the Owner's Manual and follow the instructions
given to re-attach the negative battery cable and install
the seat.
Kit Contents
See Figure 1 and Table 1.
INSTALLATION
After installing seat, pull upward on seat to be sure it is
locked in position. While riding, a loose seat can shift
causing loss of control, which could result in death or
serious injury. (00070b)
To prevent accidental vehicle start-up, which could cause
death or serious injury, disconnect negative (-) battery
cable before proceeding. (00048a)
SERVICE PARTS
is02134
1.
2.
Note the position of each spark plug wire in the ignition
coil, then disconnect the two wires. If there is an existing
coil cover, remove and discard the coil-cover mounting
screws and spacers. Remove and discard the coil cover.
3.
Detach connector [83B] from the back side of the coil.
Remove the two coil mounting screws and set aside.
4.
See Figure 1. Position the rear coil cover (2) to the back
side of the coil with the electrical connector protruding
through the large opening.
5.
2
Refer to the Owner's Manual and follow the instructions
given to remove the seat and disconnect the negative
battery cable. Retain all seat mounting hardware.
Assemble the coil and rear cover to the motorcycle with
the two screws removed in Step 3. Adjust the cover to
center the coil towers in the notches in the side of the
cover. Tighten the screws to 50 in-lbs (5.6 Nm).
6.
Obtain the front coil cover (1), two spacers (3) and two
chrome flat head screws (4) from the kit.
7.
For Dyna models only: Also obtain the wear pad (6) from
the kit. Peel the liner from the adhesive backing of the
wear pad, and position the pad to the side of the front coil
cover as shown, on the side closest to the electrical box.
8.
For ALL models: Insert the screws through the mounting
holes in the cover face, and place the spacers, counter-
-J03082
3
1
4
5
3
6
4
Figure 1. Service Parts: Chrome EFI Coil Cover Kit
Many Harley-Davidson® Parts & Accessories are made of plastics and metals which can be recycled.
Please dispose of materials responsibly.
1 of 2
Table 1. Service Parts: Chrome EFI Coil Cover Kit
Item
Description (Quantity)
Part Number
1
Cover, coil (front)
Not Sold Separately
2
Cover, coil (rear)
Not Sold Separately
3
Spacer, coil cover (2)
74650-04
4
Screw, flat head (chrome) (2)
74649-04
5
Allen wrench, 5/32 inch
Not Sold Separately
6
Wear pad
Not Sold Separately
-J03082
2 of 2