1
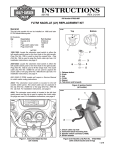
-J02759
REV. 2005-02-15
V-ROD MUFFLER END CAPS
GENERAL
is02061
Kit Number
2
65000-04
Models
This end cap kit fits all V-Rod models with P&A Slipfit or original
equipment mufflers.
1
A Service Manual for your model motorcycle is required for
this installation and is available from a Harley-Davidson Dealer.
Kit Contents
3
See Figure 3 and Table 1.
INSTALLATION
1. Adhesive Disks
2. Bosses
3. Endcap
To prevent accidental vehicle start-up, which could cause
death or serious injury, disconnect negative (-) battery
cable before proceeding. (00048a)
Figure 1. Apply Adhesive Disks to Endcap Bosses
is02062
Disconnect negative (-) battery cable first. If positive (+)
cable should contact ground with negative (-) cable connected, the resulting sparks can cause a battery explosion,
which could result in death or serious injury. (00049a)
1.
Disconnect the battery cables, Negative (-) cable first.
2.
Clean back end surface of muffler prior to starting installation.
3.
See Figure 1. Apply round adhesive disks (1) to three
bosses (2) on bottom of endcaps (3).
1
NOTE
Endcaps have a "U" or "L" stamped on them to identify which
muffler they fit.
4.
5.
See Figure 2. Position endcap on muffler and firmly press
into place to secure endcaps with adhesive disks being
careful not to let the endcaps move around. Repeat for
other muffler.
Insert transfer punch into each hole in endcap and use a
hammer to mark pilot holes on each endcap. Repeat for
other muffler.
6.
Remove endcaps and remove adhesive disks from endcaps.
7.
Drill pilot holes (3) in each muffler using a 1/16 inch drill
bit.
8.
Finish drill holes using a #11 (.192-.196 inch) drill bit.
-J02759
1. End cap
Figure 2. End Cap Position on Muffler
NOTE
Use a pop rivet gun that has a nose piece capable of fitting
into endcap rivet recesses.
Ensure all rivets can be inserted completely as rivets are difficult to set. Before setting, reaming of holes in end cap or muffler
may be required for best fit. Use several small steps in setting.
Do not ream holes too big as rivets may not hold properly.
9.
Insert rivets into holes in endcaps and rivet endcaps into
place.
Many Harley-Davidson® Parts & Accessories are made of plastics and metals which can be recycled.
Please dispose of materials responsibly.
1 of 2
10. Connect battery cables, Positive (+) cable first.
Connect positive (+) battery cable first. If positive (+) cable
should contact ground with negative (-) cable connected,
the resulting sparks can cause a battery explosion, which
could result in death or serious injury. (00068a)
11. Remove any fingerprints from endcaps resulting from
installation process before starting vehicle.
SERVICE PARTS
See Figure 3 and Table 1.
is02063
1
2
3
5
4
Figure 3. Service Parts: V-Rod Muffler End Cap Kit
Table 1. Service Parts Table
Item
Description (Quantity)
Part Number
Item
Description (Quantity)
Part Number
1
End cap, lower
Not sold
4
Disks, adhesive (6)
Not sold
2
End cap, upper
Not sold
5
Rivets, (8)
65040-04
3
Punch, transfer
Not sold
-J02759
2 of 2