1
Attaching Handpiece:
6. Finally, attach the handpiece by pushing it on the grooved QD (quick disconnect)
fitting on the sheath. Be sure that the keyed tip of the flexible shaft is properly
lined up with the slot in the handpiece shaft connector by looking into the rear of
the handpiece before pushing it on. If it is not in line, turn the shaft tip or the
handpiece to the correct position.
Connecting Foot Speed Control
Connect the foot control to the motor by inserting the 3-prong plug on the end of
the motor power cord into the socket connector on the shorter power cord on the
foot control. Insert the plug on the longer power cord from the foot control into a
proper 3-wire power outlet.
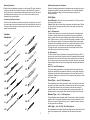
Foredom
Handpieces
7A
25
7AD
25C
8
28
8D
30®
10
35
15
18D
General Directions: Be sure to use the correct shank size. The correct shank
will fit snugly inside the collet.
Caution: Never tighten a collet unless an accessory has been inserted. Tighten
an empty collet or inserting an accessory which is too small or too large may
damage the collet.
Nos. 8, 8D Handpieces:
Pull back chuck guard sleeve to uncover the lower portion of the spindle hole.
Insert pin or wrench provided into the spindle hole or grip lower spindle with
wrench. Loosen chuck nut. Insert accessory shank as far as possible into the
collet. Tighten chuck nut. Test for a secure hold by pulling on accessory. Pull out
pin or release grip on spindle. To release an accessory, follow the same steps.
Accessories can be released when chuck nut is ready to be loosened. If accessory does not run true, loosen chuck nut, rotate accessory, and retighten.
To change the collet, simply unscrew the chuck nut and slip out collet. Slip in
new collet and screw chuck nut back in place.
No. 28 Handpiece:
The No.28 comes with a pin and wrench for opening and closing the collet. To
open the collet, insert the pin through the hole in the handpiece and the spindle
and loosen the chuck nut with the wrench. Insert the shank of the accessory as
far as it will go into the chuck nut and collet, then tighten the chuck nut securely
with the wrench. Remove the pin from housing before starting the flexible shaft
machine.
Nos. 25, 35, and 44T Handpieces:
To insert or exchange accessories, insert pin provided into the pilot hole and
through the spindle hole (turn spindle to align holes). Loosen chuck nut slightly
with wrench provided. Insert shank of accessory into collet. Tighten chuck nut
with wrench, keeping pin in pilot hole. Test for a secure hold by pulling on accessory. Remove pin.
These handpieces have Jacob's type chucks. Open chuck jaws as far as necessary with key provided. Insert shank of accessory into the chuck as far as possible. Tighten jaws with chuck key until accessory is secure and centered. If
accessory does not run true, reopen jaws, rotate accessory and retighten. To
release accessory, simply reopen chuck jaws with key and pull out accessory.
44T
18
Collet Types
Chuck Type — Nos. 25C, 30® Handpieces:
10D
15D
Attaching Accessories to Handpieces
Directions for attaching accessories to handpieces vary according to the type of
handpiece being used. Locate the model number of your Foredom handpiece
from the illustrations on page 5. Attach the accessory according to the
following directions:
52
Hammer Type — Nos. 15, 15D Handpieces:
These handpieces have a threaded spindle. Thread anvil or stylus into threaded
spindle as far as it will go with clockwise motion. Insert pin provided into cross
hole in anvil or stylus. Tighten and remove pin. To release accessory, insert pin
into the cross hole and unthread
52D
53
5
Latch Type — Nos. 55A, 55D, 56A, 56D Handpieces:
These handpieces have simple finger latches. Slide the latch over and insert the
shank of the accessory as far as possible. Slide the latch back into place.
6