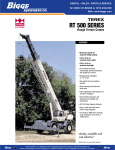
1
NO POSTAGE
NECESSARY
IF MAILED
IN THE
UNITED STATES
BUSINESS REPLY MAIL
FIRST CLASS PERMIT NO. 15, COLUMBUS INDIANA
-POSTAGE WILL BE PAID BY ADDRESSEE-
Cummins Engine Company, Inc.
Product Registration Dept. (CAC)
P 0 Box 3005
MIC 91200
Columbus, IN 47202-3005
Cummins Customized Parts Catalog
11
I
I
Cummins is pleased to announce the availability of a parts catalog compiled specifically for you.
Unlike the generic versions of parts catalogs that support general high volume parts content:
Cummins Customized catalogs contains only the new factory parts that were used to build your
engine.
The catalog cover, as well as the content, is customized with you in mind. You can use it in your
shop, at your worksite, or as a coffee table book in your RV or boat. The cover contains your name,
company name, address, and telephone number. Your name and engine model identification even
appears on the catalog spine. Everybody will know that Cummins created a catalog specifically for
you.
This new catalog was designed to provide you with the exact information you need to order parts
for your engine. This will be valuable for customers that do not have easy access to the Cummins
Electronic Parts Catalog or the Cummins Parts Microfilm System.
I
Additional Features of the Customized Catalog include:
Engine Configuration Data
Table of Contents
Separate Option and Parts Indexes
Service Kits (when applicable)
ReCon Part Numbers (when applicable)
Operation and Maintenance Manual
. Automotive, Recreational Vehicle,
Bus, and Industrial 53.9 and 55.9
Series Engines
U.S.A., CBnada, Australia, N
Copyright0 2000
Cummins Engine Company, Inc.
All rights reserved
nd Puerto Rico
Bulletin No. 3810205-14
Printed'3100
Foreword
This manual contains informat:on for the correct operation and maintenance of your Cummins engine. It alSO includes
important safety information. engine and systems specilications, troubleshooting guidelines. and listings of Cummins
Authorized Repair Locations and component manufacturers.
and follow all safety Instructions. Refer to the WARNING in the General Safety Instructions in Section i
-Read
Introduction.
Keep this manual with the equipment. If the equipment is traded or sold, give the manual to the new owner.
The information. specif;cations, and recommended maintenance guidelines in this manual are based on information
in effect at the time of printing. Cummins Engine Company. inc. resetves Ine rigtit to nlaka cliangis a: any time '1;;thout
obligation. If you find differences between your engine and the information in this manual, contact your local Cummins
Authorized Repair Location or call 1-800-DIESELS(1.800-343-7357)
toll free in the U S and Canada.
The latest technology and the highest quality components were used to produce this engine. When replacemenr parts
are needed, we recommend using only genuine Cummins or ReConT exchange parts. These parts can be identified
by the following trademarks:
"
Note: Warranty information is located in Section W. Make sure you are famlllar with the warranty or warranties
applicable to your engine.
Table of Contents
Section
Introduction
...............................
i
.............................................
E
.......................................................................................................................
1
......................................................................................................................
2
...........................................
3
....................
4
...............................................................
..
Engine Identification
..;.....................................................................
Operating Instructions
..
Maintenance Guidelines
Maintenance Procedures at Daily Interval
....s .......................................
....!
Maintenance Procedures at 10,000 Kilometers [SO00 Miles], 250 Hours, or 3 Months
Maintenance Procedures at 19,000 Kilometers [12,000 Miles], 500 Hours, or 6 Months
.Maintenance Procedures at 38,000 Kilometers [24,000Miles], 1000 Hours, or 1 Year
.....................
Maintenance Procedures at 77,000 Kilometers [48,000 Miles], 2000 Hours, or 2 Years
Adjustment, Repalr, and Replacement
System Diagrams
....................................................
.......;........................................
:....................................
.................
..................
;...................
:...........................................
5
6
7
A
D
E
I
I
'I
I
I
I
Section
Service Literature
................................................................................................................................
Component Manufacturers
.................................................................................................................
L
M
/'
Servlce Assistance
.....................................
:..........................................................................................
Troubleshooting Symptoms
.......................................
Maintenance Specifications
..........................................
Warranty
Index'
S
.......................................................................
TS
1....................................................................
V
.............................................................................................................................................
W
:........................................................................
X
.......................
..................................................
;
Important Reference Numbers
Part Name
.
Part Number
Part Number
-
Engine Model
Engine Serial Number (ESN)
I Control Parts List (CPL)
I Fuel Pump Part Number
I
I
I
I
~
I
I
~~
Electronic Control.Module (ECM)
I
I
Air Cleaner Element
I
Lubricatina Oil Filter
I
I
I
~
Fuel
Fuel-Water Separator
Coolant
Remote Gas
I
I
I
Part Name
____
I
Part Number
I
Part Number
Governor Control Module (GCM) (if applicable)
Belt Part Numbers:
.
I.
I
I
I
I
I
I
Model
Serial Number
Oil Type
Sea Water Pump
- Model
- Part Number
I
.
83.9 and 85.9 Series Engines
Sectiqn i .Introduction
Page i-a
Section i .Introduction
Section Contents
About the Manual ........................
General Information ..................
.............................................................
........................................... i-2
..............................................................
........................................... i-2
Acronyms and Abbreviations......................................................................................................................
..... 1-8
General Information .........................................................................
;..............................I
..............................
1-8
General Safety Instructions........ ..................................................................................................................
Important Safety Notice ....................
........................................................................... ................................
How to Use the Manual...........
:...........................................................................................................................
Generalblnformation .....................................................................
:.................................................................
..
Illustrations ............................................................................................
:
..........................................................
General Information ..............................................................
;......:...........................................
.....................
Symbols ..........................................
;............................. i ................................................ ....................................
General Information ...............................................................................................
...........:...........................
1-6
1-6
1-3
1-3
1-5
1-5
To the Owner and Operator .......................
:................... .............................................................................
General Information .....................................
;
.............................. :.......................................... ;........................
1-1
1-1
1-4
1-4
Page i-b
B3.9 and 85.9 Series Engines
Section i Introduction
-
THIS PAGE LEFT INTENTIONALLY BLANK
r
~~
~~
83.9 and 85.9 Series Engines
Section i Introduction
-
To the Owner and Operator
To the Owner and Operator
Page i-1
.
General Information
Preventive maintenance is the easiest and least expensive type of maintenance.
Follow the maintenance schedule
’
recommendations outlined in Maintenance Guidelines (Section 2).
Keep records of regularly scheduled maintenance.
Use the correct fuel, oil, and coolant in your engine as specified in Maintenance Specifications (Section V).
I
Cummins Engine Company, Inc. uses the latest technology and the highest quality componentsto produce its engines.
Cummins.recommends using only genuine Cummins parts and Recone exchange parts.
Personnel at,Cummins Authorized Repair Locations have been trained to provide expert service and parts support.
If you have a problem that can not be resolved by a Cummins Authorized Repair Location, follow the steps outlined
in the Service Assistance (Section S).
,
.
I
I
About the Manual
Page i;2
BS.9 and 85.9 Series Engines
Section i - lntroductlon
About the Manual
G'eneral Information
This manual contains information needed to operate and maintain your engine correctly as recommended by Cummins
Engine Company, Inc. Additional setvice literatlrre can be ordered from your local Cummins Distributor. For problems
with llterature orders, contact (800)DIESELS ((800)343-7357) for U.S.A. and Canada
This manual does not cover vehicle or equipment maintenance procedures. Consult the vehicle or original equipment
manufacturer (OEM) for specific maintenance recommendations.
Both metric and U.S. customary values are listed in this manual. The metric value is listed lirst, lollowed by the US.
customary in brackets.
Numerous illustrations and symbols are used to aid in understandingthe meaning of the text. Refer to Symbols (Section
i) for a complete listinq of symbols and their definitions.
Each section is preceded by a Section Contents to aid in locating information qu'ckly.
83.9 and B5.9 Series Engines
Section i 2 Introduction
How to Use the Manual
Page i-3
How to Use the Manual
General Information
Thismanual isorganizedaccordingtointervalsabwhichmaintenanceon yourengineisto beperformed.Amaintenance
chart (table) that gives required intervals and checks to be made is located in Section 2. Locate the interval at which
you are performing maintenance; then follow the steps given in that Section for all the procedures to be performed.
In addition, the procedures completed under previous maintenance intervals must also be performed.
Keep a record of ail the checks and inspections made. A record form for recording the date or hours at which
maintenance checks were performed is located in Section 2.
Refer to Section TS.for a guide to troubleshooting your engine. Follow the directions given in that section to locate and
correct engine problems.
Refer to Section V for specifications recommended by Cummins Engine Company, Inc. for your engine. Specifications
and torque values for each engine system are given in that section.
83.9 and 85.9 Series Engines
Section i.-~,lntro~duclion
Symbols
Page i-4
Symbols
General ,Information
I
The following symbols have been used in this manual to help communicate the intent of the instructions. When one
of the symbols appears, it conveys the meaning defined below:
WARNING Serious wmal injury of
MWUNQ
prapsrty damaga can result if
the warning instruclions are not
loilowcld.
~
' A
Am
A
-
CAUTION Minor peraonai injury can
rwult or a part, an assembly, 01 Me engine can be damage d Me ceution instructions am not biiaved.
@
Indicates a REMOVAL or DISASSEMBLY
step.
@
Indiwes an INSTALLATION or ASSEMBLY step.
..
@
ia
INSPECTION is required.
CLEAN the pan or assembly.
PERFORM a medlanlcal or time
%EM.VMEMENT.
WBRICATE the pwt or aasambly.
indicates that a WRENCH or TOOL SIZE
will be given.
TIGHTEN to a specific lorqIIe.
PERFORY M el6CUlCd
MEASUREMENT.
Refer to another location in this manual
another publication for additional
of
information.
The component weighs 23 kg [SO Ib1 or
more TO avoid persona injury, use a
hoist or get assi$tanm lo IiR Me compo
nenr.
I7mcm
_ _ _ _ ~
Illustrations
Page i-5
B3.9 and B5.9 Series Engines
Section i Introduction
-
Illustrations
General Information
Some of the illustrations throughout this manual are generic and will not lookexactly like the engine or parts used
in your application. The illustrations can contain symbols .
to indicate an action required and an acceptable or not
acceptable condition.
The illustrations are intended to show repair or replacement procedures. The procedure will be the same for all
applications, although the illustration can differ. '
~~~
'I
General Safety Instructions
Page i-6
,I
,
B3.9.and 85.9 Series Engines
Section i Introduction
-
General Safety Instructions
Important Safety Notice
Improper praatices or carelessness can cause burns, cuts, mutilation, asphyxiation or other bodily injury or
death.
Read and undersiand ali oi rhe saieiy precautions and warnings beiore periorming any repair. This list contains tne
general safety precautions that must be followed to provide peisonal safety. Special safety precautions are included
in the procedures when they apply.
Make sure the work area surrounding the product is dry, well lit, ventilated, free from clutter, loose iools, parts,
ignition sources and hazardous substances. Be aware of hazardous conditions that can exist.
Always wear protective glasses and protective shoes when working.
Rotating parts can cause cuts, hutilation or strangulation.
Do not weari loose-fitting or torn clothing. Remove ail jewelry when working;
Disconnect the battery (negative [-I cable first) and discharge any capacitors before beginning any repair work.
Disconnect the air starting motor if equipped to prevent accidental engine starting. ,Pula “Do Not Operate” tag
in the operator’s compartment or on the controls.
* Use ONLY the’proper engine barring techniques for manually rotating the engine. Donot attempt to rotate the
crankshaft by pulling or prying on the fan. This practice can cause serious personal injury, property damage,
or damage to the fan blade(s) causing premature2 fan failure.
Ifan engine has been operating and !he coolant is hot, allow the engine tocool before you slowly loosen the
filler cap and relieve the pressure from the cooling system.
Do not work on anything that is supported ONLY by lifting jacks or a hoist. Always use blocks or proper stands
to support the product before performing any service work.
Relieve ail pressure in the air, oil, fuel and the cooling systems before anyslines, fittings, or related items are
removed or disconnected. Be alert for possible pressure when disconnecting any device from a system that
utilizes pressure. Do not check for pressure leaks with your hand. High pressure oil or fuel can cause personal
P43 I8aIet”J
~~
83.9,and 85.9 Series Engines
-
Section i Introduction
General Safety Instructions
Page i-7
injury.
To prevent suffocation and frostbite, wear protective clothing and ONLY disconnect fuel and liquid refrigerant
(freon) lines in a well ventilated area. To protect the environment, liquid refrigerant systems must be properly
emptied and fdled using equipment that prevents the release of refrigerant gas (fluorocarbons) into the atmospnere. Federal law requires capturing and recycling refrigerant.
To avoid personal injury, use a hoist or get assistance when lifting components that weigh 23 kg [50 lbl or more.
Make sureall liftingdevicessuch aschains, hooks, or slingsarein goodcondition and areofthe correctcapacity.
Make sure hooks are pos;tioned correctly. Always use a spreader bar when necessary. The lifting hooks must
not be side-loaded
Corrosion inhibitor, a component of SCA and lubricating oil, contains alkali. Do not get the substance in your
eyes. Avoid prolonged or repeated contact with skin. Do not swallow internally. In case of contact, immediately
wash skin with soap and water. In case of contact, immed:ately flood eyes with large amounts of water for a
minimum of 15 minutes. IMMEDIATELY CALL A PHYSICIAN. KEEP OUT OF REACH OF CHILDREN.
Naptha and Methyl Ethyl Ketone (MEK) are flammable materials and must be used with caution. Follow the
manufacturer's instructions to provide complete safety when using these materials. KEEP OUT OF REACH OF
CHILDREN.
To avoid burns, be alert.for hot parts on products that have just been turned off, and. hot fluids in lines, tubes,
and compartments.
Always use tools thqt are in good condition. Make sure you understand how to use them before performing any
service work. Use ONLY genuine Cumrnins or Cummins Recon* replacement parts.
Always use the same fastener part number (or equivalent) when replacing fasteners. Do not use a faStener of
lesser quality if replacements are necessary.
Do not perform any repair when fatigued or after consuming alcohol or drugs that can impalr your functioning.
Some state and federal agencies in the United States of America have determined that used engine oil can be
carcinoaenic and can cause reoroductive toxicitv. Avoid inhalation of vaoors.
and orolonaed contact
. . inaestion,
with usgd engine oil.
Coolant is toxic. If not reused, dispose of in accordance with local environmental regulations.
W
Acronyms and Abbreviations
Page i-8
~
~
83.9 end 85.9 Series Engines
Section i Introduction
~
,
,#8
'
11
-
,
Acronyms and Abb'reviations
General Infoismation .
AFC
API
ASA
hSTM
OC
CAW
C.I.D.
CNG
CPL
CSt
ECM
ECS
EPA
EPS
OF
GVW
Hg
hp
H 8
ICM
km/l
Air Fuel Control
Amerioan Petroleum institute
Air Signal Attenuator
American Societv ot 'Testinn
- and Materials
Celsius
:I
California Air Resources Board
Cubic Inch Displacement
Compressed Natural Gas
Control Parts List
CentistOKes
Eleotronic Control Module
Emihion Control System
Environmental Protection Agency
Engine Position Sensor
Fahrenheit
Gross Vehicle Weight
Mercury
Horsepower
Water
ignition Control Module
Kilometers per Liter
kPa
LNG
LTA
MIP
"
Kiiopascal
Liquid Natural Gas
Low Temperature Aftercooling
Mixer lniet Pressure
Megapascal ,
Miles Per Hour
Miles Per Quart
Newton-meter
Natural Gas
Original Equipment Manufacturer
Parts Pfr Million
Pounds;Per Square Inch
P o e r Takeoff
ReVolulions Per Minute
Society of Automotive Engineers
Supplemental Coolant Additive
Step Timing Control
Variable Speed
Vehicle Speed Sensor
83.9 and B5.9 Series Engines
Section E Engine Identification
-
Page E-a
-
Section E Engine Identification
Section Contents
Page
Engine Diagrams ............
...........................................................................
.................................................... ..... ................
..
..................................
Engine Identification ...............................................
1........................
Cummins Engine Nomenclature ... .......................
.......................................
Engine Dataplate ................................................................................................
Fuel 'Injection Pump Dataplate ........................................................
:
............................................................ E-4
Bosch@'
.................................. t................................................................................................................. E-4
CAV .........................................................................................................................................................
E-5
Stanadyne ........................................................................................................................................
-. ...... E-5
. . .Speciflcations.......................................................... :.........................
..................................... ;...................E-7
Air Intake System
.................... .............................. -...<.....................
..................:..................................... E-19
.
.
Bafteries (Specific Gravity) ..........................................................................................................................
E-26
Cooling System ...............................................................
...................................... ............................... E-17
Electrical System ............................................................
..........:........................................................... E-23
Exhaust System .....................
:...,........:.............................. :......... ..............:........................................ E-21
i
I
i
~
i
$
Fuel System ...............................................................................................................................................
General Specifications ..................................................................................................................................
Lubricating Oil System ..........................
:...................................................................................................
:
E-11
E-7
E-14
I
Page E-b
83.9 and 85.9 Series Engines
Section E Engine ldentlfication
-
THIS PAGE LEFT INTENTIONALLY BLANK
v
83.9 and 85.9 Series Englnes
Engine Identification
Page E-1
-
Section E Engine Identification
*
Engine Identification
Engine Dataplate
The engine dataplate shows specific information about the
engine. The engine serial number (ESN) and control parts
list (CPL) provide information for ordering parts and for
service needs. The engine dataplate must not be changed
unless approved by Cummins Engine Company, Inc.
.
Engine Identification
Page E.2
83.9 and B5.9 Series Engines
Section E Engine Identification
-
Have the following engine data available when communicating with a Cummlns Authorized Repair Facility. The
information on the dataplate is mandatory when sourcing service parts.
1. Engine Serlal Number (ESN)
2. Control Parts List (CPL).
83.9 and 85.9 Series Engines
Section E Engine Identification
-
Cummins Engine Nomenclature
Automotive Applications
The model name for automotive engines provides the following engine data:
B5.9-C
B = Engine series
5.9 = DisDlacement
Industrial Applications
The model name for industrial engines provides the following engine data:
83.94
B = Engine series
3.9 = Displacement in liters.
Engine Identification
Page E-3
63.9 and 85.9 Seri'es Engines
Section E Engine4dentificati'tin
Engine Identification
Page E-4
-
Fuel Injection Pump Dataplate
1;
,
.
"
BoschP
The injection pump dataplate for the Boscha VE pump is
located on th'e side of the injection pump. The dataplate
provides information for fuel pump calibration.
6osch" In-line Dataplate
The injection pump dataplate for the Bosch" in-line pump
is located on the side of the injection pump The datadate
provides information for fuel pump calibration.
~~
83.9 and 85.9 Series Engines
Section E Engine Identification
-
CAV
The injection pump dataplate for the Lucas DPA pump is
located on the side of the injection pump. The dataplate
provides information for fuel pump calibration.
Stanadyne
The injection pump dataplate for the Stanadyne DB4 is.
located on the side of the injection pump. The dataplate
provides information for the fuel pump calibration. .
Engine Identification
Page E-5
83.9 and 86.9 S'eries'Engines
Section E Engine:Identification
Engine Identification
Page E-6
-
Denso Dataplate
The Denso fuel injection:pump dataplate Contains the follovving ihformation!
,' , '
(A) Fuel Injection pump part number
(6) Denso serial number
(C) Cummins part number
(D) Fuel injection pump bar code.
The Cummins part number for the fuel pump-governor
combination is located on the governor dataplate.
83.9 and 85.9 Series Engines
Section E Engine Identification
Specltlcatlons
Page E-7
-
Specifications
General Specifications
General 4 8 Engine Data (nonautomotive)
483.9
4BT3.9
4BTA3.9
Bore
102 mm [4.02 in]
102 mm 14.02 in]
102 mm [4.02in]
Stroke
120 mm 14.72 in]
120 mm [4.72 in]
120 mm [4.72 in]
Displacement
3.9 liters [238 in3]
3.9 liters [238 in3]
3.9 liters [238 in3]
308 kg [679 Ibj
320 kg [705 Ib]
329 kg [725 Ib]
1, 3, 4, 2
1,p,4,2
I., 3, 4, 2
0.25 mm [0.010in]
0.51 mm [0.020 in]
18.5:l
Clockwise
0.25 mm [O.OlO in]
0.51 mm [0.020 in]
17.5:l
0.25 mm [0.010 in]
0.51 mm [0.020 in]
16.51
clockwise
Clockwise
Engine Weight (dry) Less
Flywheel and Electric Components
Firing Order
Valve Clearances:
- Intake
Exhaust
Compression Ratio
Rotation, Viewed from the
Front 01 the Engine
Aspiration:
- Naturally Aspirated
~
X
I
83.9 and 85.9 Series Engines
Section E Engine Identification
Specifications
Page E-8
-
483.9
- Turbocharged
- Aftercooled
4BT3.9
48TA3.9
X
X
X
83.9 and 85.9 Series Engines
Section E Engine Identification
I
I
Specifications
Page E-9
-
General 6B Engine Data (nonautomotive)
Bore
685.9
102 mm [4.02in]
6BT5.9
102 mm 14.02in]
6BTA5.9
102 mm [4.02in]
Stroke
120 mm 14.72 in]
120.mm [4.72in]
120 mm [4.72in]
5.88 liters 1359 in3]
5.88 liters 135'9 in3]
5.88 liters I359 in']
388 kg [855Ib]
399 kg 1880 Ib]
411 kg 1906 Ibl
1, 5, 3,6,2,4
1, 5, 3,6,2,4
1, 5, 3,6,2,4
0.25 mm [0.010in]
0.51 mm [0.020in]
18.5:l
0.25mm [0.010in]
0.51 mm IO.020 in]
17.53
0.25 mm [O.OlO in]
0.51 mm [0.020in]
16.31
Clockwise
Clockwise
Clockwise
X
X
X
Displacement
Engine Weight (dry) Less
Flywheel and Electric Components
Firing Order
Valve Clearances;
-Intake ,
Exhaust
Compression Ratio
Rotation, Viewed from the
Front of the Engine
Aspiration:
Naturally Aspirated
Turbocharged
Aftercwled
~
X
83.9 and 85.9 Series Engines
Section E Engine Identification
Specifications
Page E-10
General Engine Data (automotive)
Bore
Stroke
Displacement
Engine Weight (dry) Less
Fiywheei ana Eleciric
Components
Firing Order
Valve Clearances:
-Intake
.Exhaust
Compression Ratio
Rotation, Vlewed from the
Front of the Engine
Aspiration:
-Turbocharged
Charge-Air Cooled
-
-
I
B3.9
85.9
102 mm [4.02 in]
120 mm (4.72 in]
3.9 liters j238 in3]
308 to 329'kg [679to 725 Ib]
102 mm [4.02 in]
5.9 liters 1360 in3]
388 to 411 kg [855to 906 Ib]
1, 3,4, 2
1, 5, 3, 6,2, 4
0.25 mm (0.010 in]
Clockwise
0.25mm [0.010in]
0.51 m m [0.020in]
(in-line pump) 17.9:l
CIockwi8e
X
X
X
X
0.51 mm [0.020in]
(rotary pump) 17.6:l
120 mm 14.72 in]
83.9 and 85.9 Series Engines
Section E Engine Identification
Specifications
Page E-11
-
Fuel System
'48 Fuel System Data (nonautomotive)
Distributor-Type Fuel Injection
483.9
4BT3.9
4BTA3.9
Pumps
Maximum Allowable Restriction
to !he Fuel Transfer Pump Must
100 mm Hg [4 in Hg]
100 mm Hg [4 in Hg]
100 mm Hg 14 in Hg]
Not Exceed
Maximum Allowable Return Line
518 mm Hg I20.4 in Hg] 518 mm Hg [20.4 in Hg] 518 mm Hg [20.4in Hg]
Restriction
Maximum.Allowable Pressure
. 35 kPa [5psi]
35 kPa [5 psi]
35 kPa [5 psi]
Drop across Fuel Filter
Maximum Inlet Pressure to the
70 kPa [I0 psi]
70 kPa [lo psi]
70 kPa [lo psi]
Injection Pump Must Not Exceed
In-Line..Type Fuel Injection
s
Pumps
Maximum Inlet Restriction to the
Fuel Transfer Pump Must Not
100 mm Hg [4 in Hg]
100 mm Hg [4 in Hg]
100 mm Hg 14 in Hg]
Exceed
Fuel Transfer Pump Minimum
172 kPa [25 psi\ High,
172 kPa 125 psi] High
172 kPa [25 psi] High
Output Pressure.
Flow and 90 kPa 13 psi] Flow and 90 kPa [13 psi] Flow and 90 kPa [ I 3 psi]
Low Flow @ Rated rpm
Low Flow 63 Rated rpm
Low Flow @ Rated rpm
Fuel Filter Restriction (maximum
35 kPa [5 psi]
35 kPa 15 psi]
35 kPa [Spsi]
pressure drop across filters)
Fuel Pump Gallery'Pressure
* 140 kPa [ZO psi] @
* 140 kPa [20psi] @
' 140 kPa [20 psi] @
Rated rpm
Rated rom
Rated rom
Fuel Return Maximum Restriction 518 mm Hg [20.4 in Hg] 518 mm Hg I20.4 in Hg] 518 mm Hg [20.4in Hg]
* The low-flow fuel transfer pump will have 82.7 kPa [12 psi].
' m
I
..
'
'
~~
~~~
~~
~
~~
~
Specificatlons
Page E-12
!I
68 Fuel System Data (nonautomotive)
li
Distributor-Type Fuel Injection
685.9 !
Pumps
Maximum Allowable Restriction
100 mm Hg 14 in Hg]
to the Fuel Transfer Pump Must
Not Exceed
Maximum kiiowabie Return i i w 518mm Hg [20.4 in~~1
Restriction
Maximum Allowable Pressure
35 kPa 15 psi]
Droo actoss Fuel Filter
Mahnum Inlet Pressure to the
70 kPs (10 psi]
Injection Pump Must Not Exceed
In-Line-vpe Fuel Injection
__
~
83.9 and 65.9 Series Engines
Section E Engine ldentifiolation
-
6BT5.9
6BTA5.9
100 mm Hg (4in Hgl
100 mm Hg [4 in Hg]
I
518 mm Hg [20,4in Hg]
518 mm Hg 120.4 in Hg]
35 kPa 145psi]
35 kPa [5psl]
70 kPa [lo psi]
70 kPa [lo psi]
100 mm Hg 14 in Hg]
100 mm Hg (4in Hgl
Pumps
Maximum Inlet'Restrictionto the
Fuel Transfer Pump Must Not
Exceed
Fuel Transfer Pump Mlnimum
Output Pressure
Fuel Filte,l Restriction (maximum
pressure drop across filters)
Fuel Pump Gallery Pressure
1100 mm Hg [4 in Hg]
172 kPa [25psi] High
172 kPa [25psi] High
172 kPa [25psl] High
Flow and 90 kPa [13psi] Flow.,and90 kPa 113 Dsil Flow and 90 kPa [I3psi]
Low Flow 63 Rated rpm
Low Flow 42 Rated rpm' Low Flow 42 Rated rpm
35 kPa [5psi]
* 140 kPa 120 psi] @I
Rated rpm
Fuel Return Maximum Restriction 518 mm Hg [20.4 in Hg]
* The low-flow fuel transfer pump will have 82.7 kPa [12 psi]
35 kPa [5psi]
35 kPa [5 psi]
* 140 kPa (20 psi] @
* 140 kPa 20 psi] @
Rated rprn
518 mm Hg p0.4 in Hg]
d
Rate rpm
518 mm Hg p0.4 in Hg]
Specifications
Page E-13
83.9 and 85.9 Series Engines
Section E Engine Identification
-
Fuel System Data (automotive)
Distributor-Type Fuel iniection Pumps
Maximum inlet Restriction to the Fuel Transfer Pump Must Not Exceed
Maximum Allowable Return Line Restriction
Maximum Allowable Pressure Drop across
Fuel
. - - . Filter
. ..
Maximum inlet Pressure to the injection
Pump Must Not Exceed
83.9
100 mm Hg [4in Hg]
B5.9
100 mm Hg [4in Hg]
518 mm Hg [20.4in Hg]
35 kPa (5 psi]
518 mm Hg 120.4 in Hg]
70 kPa [lo psi]
70 kPa 110 psi]
In-Line-Wpe Fuel Injection Pumps ''
83.9
Maximum Inlet Restriction to the Fuel Transfer
100 mm Hg [4 in Hg]
Pump Must Not Exceed
.Fuel Transfer Pump Minimum Output Pressure 175 kPa (25psi] CZ! Rated rpm
Fuel Filter Restriction (maximum pressure drop
35 kPa [5psi]
across filters)
140 kPa 120 psi] @ Rated rpm
Fuel Pressure Gallery Pressure
518 mm Hg [20.4 in Hg]
Fuel Return Maximum Restriction
35 kPa (5 psi1
85.9
100 mm Hg [4in Hg]
175 kPa 125 psi] @ Rated rpm
35 kPa [5 psi]
140 kPa [20 psi] 43 Rated rpm
518 mm Hg [20.4in Hg]
I
63.9 and 85.9 Series Engines
Section E Engine identification
Specifications
Page E-14
-
Lubricating Oil System
48 Lubrication System Data (nonautomotive)
483.9
4BT3.9
4BTA3.9
Lubricating 011 Pressure at Idle.
(minimurn alionuable)
69 kPa [lo psi]
69 kPa [I0psi]
69 kPa 110 psi]
Lubricating Oil Pressure at Rated (minimum allowable)
207 kPa [30psi]
207 kPa 130 psi]
207 kPa I30 psi]
ReguiFting Valve Opening
Pressure
449 kPa [65 psi]
449 kPa [65 psf]
449 kPa [65 psi]
Lubricating Oil Capacity:
Standard Pan Only
9.5 liters 110 qt]
9.5 liters [I0 qt]
9.5 liters [I0qt]
Total System
10.9 liters 111.5 qt]
11 liters [11.6 qt]
11 liters [11.6 qt]
Low to High
0.9 liter [I qt]
0.9 liter [I qt]
0.9 liter [I qt]
,
B3.9 and B5.9 Series Engines
Section E Engine Identification
Specifications
Page E-15
-
6B Lubrication System Data (nonautomotive)
665.9
Lubricating Oil Pressure at Idle (minimum allowable)
69 kPa [lo psi]
Lubricating Oil Pressure at Rated
(minimum allowable)
207 kPa [30psi]
'
6BT5.9
6BTA5.9
69 kPa [lo psi]
69 kPa [lopsi]
207 kPa [30psi]
.
207 kPa [30psi]
.*
Regulating Valve Opening
Pressure ,
449 kPa [65psi]
Lubricating Oil Capacity:
Standard Pan Only
14.2 liters [15qt]
Total System
Low to High
.
449 kPa [65psi]
449 kPa [65psi]
14.2liters [15 qt]
14.2liters [15qt]
16.3 liters [17.2qt]
16.4liters [17.3qt]
16.4 liters [17.3qtl
1.9liters 12 qt]
1.9 lifers [2 qt]
1.9liters [2qt]
'
"
Specifications
Page E-16
83.9 and 85.9 Series Engines
Section E Engine Identification
-
Lubrication System Data (automotive)
Lubricating Oil Pressure at idle
(minimum allowable)
69 kPa [lo psi]
69 kPa [lo psi]
Lubricating Oil Pressure at Rated (minimum allowable)
207 kPa 130 psi]
207 kPa [30 psi]
Regulating Valve Opening Pressure
449 kPa 165 psi]
449 kPa [65 psi]
Lubricating Oil Capacity:
Standard Pan Only
Total System.. Liters [US. qt]
Low to High
9:s liters [IO qt]
11 liters [H.6 qt]
0.9 liter [I qt]
14.2 liters [15 qt]
16,4 liters [17.3 qt]
1.9 liters [2 qt]
,
Specifications
Page E-17
83.9 and 85.9 Series Engines
Section E Engine Identification
-
Cooling System
48 Cooling System Data (nonautomotive)
483.9
Coolant CaDacitv fenaine onlvl
7 liters 17.4 at1
Standard Modu1ati;gihermo:'
Start 83OC i i 8 l 0 F ] i Fully
stat Range
Open 95 C [203°F]
Pressure Cap:
104% [220°F] Systems
99% [210°F] Systems
103 kPa 115 psi]
48 kPa [7psi]
4BT3.9
7 liters 17.4 at1
Start 83OC [i81°F];. Fully
Open 95% [203OF]
103 kPa [15 psi]
48 kPa [7psi]
.
4BTA3.9
9.7 liters 110.2 at1
I
Start 83% [18i°F],'Fully
Open 95% [203"F]
c
103 kPa [15 psi]
48 kPa [7 psi]
6 8 Cooling System Data (nonautomotive)
Coolant Capacity (engine only)
Standard Modulating Thermostat
Range
Pressure Cap:
104OC [220°F] Systems
99OC [210°F] Systems
685.9
6BT5.9 '
6BTA5.9
10.5 liters [ l l . l qt]
10.5 liters [11.1 qt]
14.5 liters [15.3 qt]
Start 83OC [18Io.F]; Fully Start 83OC [181°F Fully Start 83% (18l0F]; Fully
Open 95OC [203OF] .
Open 95OC [2Ok0F]
Open 95% [203"F]
103 &Pa 115 psi]
48 kPa [7 psi]
103 kPa [15 psi]
48 kPa [7psi]
103 kPa [15 psi]
48 kPa [7psi]
. -
83.9 and 85.9 Series Englnes
Section E Engine Identification
-
Specifications
Page E-18
Cooling System Data (automotive)
Coolant,Capacity (engine only)
Standard Modulating Thermostat Range
Pressure Cap:
10poC[220°F) Systems
99°C [210°FISystems
63.9
7 liters [7.4 qt]
Start 83OC [18loF]
85.9
10.5 liters [11.1 qt]
Fully Open 95OC [203OF]
103 kPa [15 psi]
48 kPa [7 psi]
103 kPa [15psi]
48 kPa [7psi]
Specifications
Page E-19
63.9 and 65.9 Series Engines
Section E Engine identification
-
Air .IntakeSystem
48 Air Intake System (nonautomotive)
Maximum Allowable Intake
Restriction at Rated Speed
and Loaded with Dirty Air
Filter Element
463.9
46T3.9
508 mm H,O
[20 in H,O]
635 mm H 0
[25in H,6]
4BTA3.9
635 rnm H,O .
[25in H,O]
6B Air Intake System (nonautomotive)
Maximum.Allowable Intake Restriction at Rated Speed and
Loaded with Dirty Air Filter Element
-
665.9
6BT5.9
6BTA5.9
508 mm H,O
[20 in H,O]
635 mm H 0
[25in H,6]
635 mm HO
,
[25in H,O]
93.9 and B5.9 Series Engines
Section E Engine Identification
Speclflcations
Page E-20
-
Air Intake System Data (automotive)
Maximum Allowable Intake Restriction
at Rated Speed and Loaded with Dirty
Air Filter Element
83.9
65.9
635 mm 0
[25 in U,6]
635 rnm H 0
[25 in H,6]
83.9 and 85.9 Series Engines
Section E Engine Identification
Specifications
Page E-21
-
Exhaust System
4 8 Exhaust System Data (nonautomotive)
Maximum Allowable Exhaust Restriction at Rated Speed and
Loaded
483.9
4BT3.9
4BTA3.9
76.2 mm Hg [3.0in Hgl
76.2 mm Hg [3.0in Hg]
76.2 mm Hg [3.0in Hg]
68 Exhaust System Data (nonautomotive)
665.9
Maximum Allowable Exhaust Restriction at Rated Speed and
76.2 mm Hg [3.0in Hg]
Loaded
6BT5.9
76.2 mm Hg [3.0in Hg]
.
6BTA5.9
76.2 mm Hg [3.0in Hg]
I
-
Specifications
Page E-22
83.9 and 85.9 Series Englnes
Section E Engine Identification
Exhaust System Data (automotlve)
Maximum Allowable Exhaust
Restriction at Rated Speed and
Loaded (1991 to 1993 €PA certified)
Maximum Allowable Exhaust
Restriction at Rated Speed and
Loaded (1994 to 1999 EPA certified)
B3.9
B5.9
114.3 mm Hg [4.5 in Hg]
114.3 mm Hg [4.5 in Hg]
152.4 mm Hg [6 in Hgl with oxidation 152.4 mm Hg 16 in Hgl with oxidation
catalyst
catalyst
Specifications
Page E-23
83.9 and B5.9 Series Engines
Section E Engine Identification
-
Electrical System
..
.
48 Electrical System Data (nonautomotive)
463.9
4BT3.9
4BTA3.9
Minimum Recommended Battery
Capacity @ -18% [OOF]
With Light Accessories*
12-VDC Starter
24-VDC Starter
625CCA
312CCA
625CCA
4OOCCA
625CCA
4OOCCA
With Heavy Accessories”
12-VDC Starter
24-VDC Starter
8OOCCA
4OOCCA
8OOCCA
4OOCCA
8OOCCA
4OOCCA
0.0012
0.0020
0.0012
0.0020
0.0012
0.0020
Maximum Allowable Resistance
of Starting Circuit
With 12-VDC Starter - Ohms
With 24-VDC Starter Ohms
-
* Typical light accessories include alternator, small steering pump, and disengaged clutch.
’* Typical heavy accessories include hydraulic pump and torque converter.
Specifications
Page E-24
83.9 end'B5.9 Series Engines
Section E Engine Identification
-
6B ElectricaLSystem Data (nonautomotive)
685.9
6BT5.9
6BTA5.9
Minimum Recommended Battery
Capacity @ -18OC [ O O F ]
With Liaht Accessories'
IZ-VDC Starter
24-VDC Starter
BOOCCA
4OOCCA
BOO'CCA
4OOCCA
BOOCCA
4OOCCA
Wiih Heavy Accessories**
12-VDC Starter
24-VDC Starter
95OCCA
475CCA
95OCCA
475CCA
95OCCA
475CCA
0.0012
0.0020
0.0012
0.0020
0.0012
0.0020
Maximum Allowable Resistance
of Starting Circuit
With 12-VDC Starter - Ohms
With 24-VDC Starter - Ohms
*
Typical light accessories include alternator, small steering pump, and disengaged clutch
**
Typical heavy accessories include hydraulic pump and torque converter.
.
. 83.9 and 85.9 Series Engines
Specifications
Page E-25
-
Section E Engine Identification
Electrical System Data (automotive)
Minimum Recommended Battery Capaclty
@ -18% [O'F]
With Light Accessories*
12-VDC Starter
24-VDC Starter
With Heavy Accessories*'
12-VRC Starter
24-VDC Starter
.
Maximum Allowable Resistance of Starting
Circuit
With 12-VDC'Starter - Ohms
With 24-VDC Starter - Ohms
83.9
85.9
E25CCA
4OOCCA
EOOCCA
4OOCCA
I
EOOCCA
4OOCCA
950CCA
475CCA
0.0012
0.0020
0.0012
0.0020
'Typical light accessories include alternator, small steering pump, and disengaged clutch.
*'Typical heavy accessories include hydraulic pump and torque converter.
Specifications
Page E-26
63.9 and 65.9 Series Engines
Section E Engine Identification
-
Batteries (Specific Gravity)
~
1.230 to 1.250
1.200 to 1.220
i
iin tn i i m
....
1.110 to 1.130
".-
75%
50%
25%
Discharoed
83.9 and 85.9 Series Engines
Section E Engine Identification
-
Engine Diagrams
Page E-27
Engine Diagrams
Engine Views
The following illustrations show the locations of the major external engine components, filters, and other service and
maintenance points. Some external components will be at different locations for different engine models.
NOTE The illustrations are only a reference to show a typical engine.
I
I
Engine Diagrams
Page E-28
83.9 and 65.9 Series Engines
Section E Engine Identification
-
~
~
Engine Diagrams
Page E-29
83.9 and 85.9 Series Engines
Section E Engine Identification
-
1. Intake air preheater (optional)
9. Engine dataplate
2. Fuel 'filter1water separator
10. Air compressor
3. Water heater (3/4inch NPTF)
11. Air compressor intake
4. Fuel inlet connection (114-inch NPTF)
12. In-line fuel injection pump
5. Magnetic pickup location (3/4-16UNF)
13. High pressure fuel lines
6. 'Fuel lift pump
14. Engine air inlet.
7. Dipstick
8. Oil pressure (118-inch NPTF)
83.9 and 85.9 Series Engines
Section E Engine Identification
-
Rear View
Engine'Diagrams
Page E-31
83.9 and 85.9 Series Engines .
Section E -Engine identification
1. Turbocharger exha& outlet
2. Clutch mounting plate
3. Flywheel housing
4. Flywheelflexplate
. 5. Fuel return connection
6. Rear engine lifting bracket.
Engine Diagrams
Page E-32
83.9 and 85.9 Series Engines
Section E Engine Identification
-
lbrbocharger Side View
Engjne Diagrams
Page E-33
83.9 and 85.9 Series Engines
Section E Engine Identification
-
1 , Turbocharger wastegate actuator
8. Water heater return (112-inch NPTF)
2. Oil ftil
9. Oil drain
3 Front engine lifting bracket
10. Provision for oil irnrnenion heater
4. Water outlet
11. Starter motor solenoid
5. Lubricating oil lilter
12. Fuel injection nozzles.
6 Lubricating oil cooler
7. Water inlet
.
.
83.9 and 85.9 Series Engines
Section E Engine Identification
-
13
1
2
12
I!
3
10
9
4
5
0
6
7
w
Front View
Engine Diagrams
Page E-35
83.9 and 85.9 Series Engines
Section E Engine Identification
-
1. Turbocharger air putlet
8. Water inlet
2. Engine air inlet
9. Water pump
3. Fuel pump drivq cover
10. Alternator
4. Air compressor air outlet
11. Fan pulley
5. Front gear cover
12. Automatic belt tensioner
6. Fan drive belt
13. Turbocharger air inlet.
7. Vibration damper
c
63.9 and 85.9 Series Engines
Section E - Engine Identification
NOTES
83.9 and B5.9 Series Engines
Section 1 .Operating Instructions
Page I-a
.
Section 1 Operating Instructions
Section Contents
Page
Cold Weather Operati
............................. 1-8
Operating Aids ......
............................................ 1-8
Shutters ................
.................................................................................... i..... 1-9
Winterfronts ..................................................................................................................................................
; 1-9
..
...................................................................................................................... 1-10
Cold Weather Starting Aids
Ether Starting Aids .......... .....................................................
................................................................. 1-11
1-12
Grid Heater .................................................................................................................................................
.............. .................... 1-10
With Mechanical or Electrical Metering Equipment (Ether) ...................................
.......................... 1................................................ ::..................................................
1-14
Engine Operating Ran
General Information
............................................................................................................................... 1-14
:......................
1-18
Engine Shutdown ...:.................... 1...........................................................................................
General Information.................................................................................................
:........................ :........... 1-18
'
Normal Starting Procedure ...............................................................................................................................
1-3
General Information ......................................................................................................................................
1-3
............................................................
...........................
i
.........
L
.........
1-1
Operitting Instructions Overview .
.....................................................................................................................
1-1
General Information .......
...
......................................................................................
1-15
Operating the Engine .... ...................................
General Information .......................................................................................................
:.............................
1-15
~
-
i
~
Starting Procedure After Extended Shutdown or Oil Change ......................................................................
1-13
General Information .......................................................................
:........................................... :................ 1-13
Page 1-b
83.9 and 85.9 Series Engines
Section 1 Operating Instructions
-
THIS PAGE LEFT INTENTIONALLY BLANK
-
83.9 and 85.9 Series Engines .
Section 1 Operating Instructions
-
Operating Instructions Overview
Page 1-1
-
Operating Instructions Overview
General Information
Correct care of your engine will help result in longer life,
better performance, and more economical operation.
Follow the daily maintenancechecks listed in Maintenance
Guidelines, Section 2.
The new Cummins engine associated with this manual
does not require a "break-in" procedure. Section 1 of this
manual provides all of the necessary information required
for proper engine operation.
Check the oil pressure indicator, temperature indicator,
warning lights, and other gauges daily ot' make sure they
are operational.
Avoid exposure of your engine to corrosive chemicals.
.
-
Operating lnstructlons Overview
Page 1-2
63.9 and 65.9 Series Engines
Section 1 operating Instructions
-
DO NOT OPERATE A DIESEL ENGINE WHERE THERE
ARE OR CAN BE COMBUSTIBLE VAPORS. These vapors can be sucked through the air intake system and
cause engine acceleration and overspeeding that can
result in a fire, an exploslon, and extensive property
damage. Numerous safety devices are available, such
as air intake shutoff devices, lo minimize the risk of
overspeeding where an engine, due to its application,
might operate In a combustible environment, such as
due to a fuel spill or gas leak. Remember, Cummins has
no way of knowing the use you have for your engine.
THE EQUIPMENT OWNER AND OPERATOR ARE RESPONSIBLE FOR SAFE OPERATION IN A HOSTILE ENVIRONMENT. CONSULT YOUR CUMMINS AUTHORIZED
REPAIR LOCATION FOR FURTHER INFORMATION.
*
83.9 and 85.9 Series Engines
Section 1 Operating Instructions
-
Normal ,Starting Procedure
General information
A
A
CAUTION
TO prevent damage to the starting motor, do not engage
the starting motor for more than 30 seconds. Wait 2
minutes between each attempt to start (electrical starting motors only).
Disengage the driven unit, or if equipped, put the
transmission in neutral.
With the throttle in the idle position, turn the key to
the ON position, and wait for the WAIT-TO-START
lamp to go out; then, turn the key to the START
position.
If the engine does not start after three attempts,
check the fuel supply system. Absence of blue or
white exhaust smoke during cranking indicates no
fuel is being delivered.
Normal Starting Procedure
Page 1-3
83.9 and 85.9 Series Engines
Section 1 Operating lnstrwctions
-
Normal Starting Procedure
Page 1-4
@
The engine must have adequate oil pressure within 15
secondsafter starting. lithe WARNING lamp indicating low
oil pressure has not gone out or there is 00 oil pressure
indicatedonagaugewithin 15saCOnds,shut Offtheengine
immediately to avoid engine damage. Confirm the correct
oil' level in the 011 pan.
esear rx
7
idle the engine 3 to 5 minutes before operating with a load.
83.9 and B5.9 Series Engines
Section 1 Operating Instructions
Normal Starting Procedure
Page 1-5
-
Increase the engine speed .(rprn) slowly to provide adequate lubrication to the bearings and to allow the oil pressure to stabilize.
Do not operate engine at low idle for long periods (more
than 10 minutes). Operating engine for long periods at
low idle can damage engine because combustion chamber temperatures will decrease and the fuel will not
completely burn. This will cause carbon to build up
around the injector spray holes and piston rings that
can cause the valves to stick. To avoid damage, operate
the engine at a higher idle.
.
83.9 and 85.9 Series Engines
Section 1 Operating Instructions
Normal Starting Procedure
Page 1-6
-
A
A
WARNiNG
Batteries can emit explosive g,ases. To avoid personal
injury, always ventilate the compartment before servicing the batteries. To avoid arcing, remove the negative
(-) battery cable first and attach the neg,ative(-) battery
cable last.
Tbe eccompenyina !Ii%!ra!kx shows I!ypicz! pard!@!hattery connection. This arrangement doubles the cranking
amperage.
/
\ e
"
A
A
CAUTiON
When using jumper cables to start the engine, make
sure to connect the cables in parallel: Positive (+) to
positive (+) and negative (-) to negative (+ When using
an external electrical'source to start the engine, turn
the disconnect switch to the OFF position. Remove the
key before attaching the jumper cables to prevent unintentional starter engagement.
This illustration shows a typical series battery connection.
This arrangement, positive (+) to negative (4, doubles the
voltage.
83.9 and 85.9 Series Engines
Section 1 Operating Instructions
Normal Startlng Procedure
Page 1-7
-
Starting Procedure Matrix
Automotivellndustrial
All pumps above 16% [60°F]- - - - Automotivellndustrial
All pumps below 16OC [60°F]- - - - ~
-
~
Starting Procedure Matrix
Idle Throttle
X (after 5 seconds, see Note)
Full Throttle
X Note
(1) Full throttle on the VE pump makes sure there is sufficient start-fuel delivery and helps keep the engine operating
once started. The in-line pumps with RQV and RQV-K governors require full throttle to position and hold the rack In
the stapfuel position.
NOTE Full throttle is applied after engaging the starter.
*‘Disengage the driven unit, or if equipped, put the transmission in neutral.
position the.fuel shutoff, electrical switch, or mechanism control to the RUN position.
. .
-~
~
-
83.9 and 86.9 Series Engines
lnstructio,ns
Section 1 Operating
, ,
Cold Weather Operation
Page 1-8
Col'd Weather 0perati:on
Operatiqg Aids,
,
';
.'
,
,
,
Use the following chart as a reference for required cold weather starting aids.
Operation in ambient temperatures below 0% [3Z0F]will possibly require special consideration be given to engine
starting.
A:!empcr3?,ures below O°C [32*Fj, oper.te the engice It moderate speeds fQr 5 m!nutes beforefull loads arc?applied.
STARTING AIDS
OIL PAN AND
BLOCK HEATERS
-+ i
BATTERY CAPACITY
____
UNAIDED
f
SUGGESTED
-18°C
Oo F
-
---
I
-STANDARD
---- -7- - - EXTRA CAPACITY
SUGGESTED
-
REQU'RED
- - - 9 - 4-
--
EXTRA CAPACITY
REQUIRED (l8O-ZOO%/o)
+
mslp
Cold Weather Operation
Page 1-9
83.9 and 85.9 Series Engines
-
Section 1 Operating Instructions
Winterfronts
Winterfrontscan be usedon avehicleequipped with charge
air cooling (CAC) but must be designed to cover part of the
frontal area of the cooling system. A minimum of 387 cmz
[60in2]of frontal area must be left open to allow airflow for
the CAC to function correctly.
..
Shutters
. .
.
installations of charge air cooler (CAC) engines with shutters also require an intake manifold air temperature switch
to open the shutters to prevent excessive intake manifold
temperatures. This prevents engine damage due to high
intake manifdld temperatures as a result of blocked airflow
across the CAC.
Cold Weather Starting Aids
Page 1-10
83.9 and 65.9 Series Engines
Section 1 Operating Instructions
-
Cold Weather Starting Aids
With Mechanioal or Electrical Metering Equipment (Ether)
Set the throttle at half speed.
Disengage the driven unit, or ifequipped, put the transmission in tIeUtral.
Activate the switch to open the fuel pump shutoff valve.
While cranking the engine, inject metered amounts of starting fluid.
'
Engine oil pressure must be indicated on the gauge within 30 seconds after starting.
83.9 and 65.9 Series Engines
Section 1 Operating Instructions
Cold Weather Starting Aids
Page 1-11
-
Ether Starting Aids
A
WARNING
A
Because of the potential for an explosion, do not use volatile cold starting aids in underground mine.or tunnel
operations. Ask the local U S . Bureau of Mines inspector for instructions.
A
WARNING
A
Startingjluid is highly flammable and explosive. Keep flames, sparks, and arcing switches away from starting
fluid.
A
A
WARNING
Do not breathe starting fluid.fumes. Startlng fluid fumes can be hazardous to your health.
‘A CAUTION A
Do not use excessive amounts of starting fluid when starting an engine. The use of too much starting fluid will
cause damage to the engine.
Spray starting fluid into the air cleaner intake while another person cranks the engine.
Cold Weather Starting Aids'
83.9 and 85.9 Series Engines
Section~l Operating Instructi'ons
-
Page 1-12
Grid Heater
, .
A
WARNING
A
1.
To avoid ersonal injury and property damage, never use starting fluid ifthe grid heater option is used. Starting
fluid, wh ch contains ether, can cause an explosion.
P
A grid heater is available that improves cold weather starting characteristics by heating the intake air. It is available
for B Series automotive ratingswith an in-line injection fuel pump and industrial jacket water aftercooledwith a Bosche
in-iine ingecilon pump. ,lican also serve to reduce White smoke ii it is energizedduring cold ambient temperatip% while
$heengine is at idle.
Theelectricgrid heateroperatesinapreheat and postheat mode.Thblengthof heateron-timeisafunction Oftheengine
temperature.
,
,
,I:.. .;,
'
If the engine ambient air temperature is greater than 7% [45OF], the electric grid air heater system will not b.9
. aot.ivated.
.
if the engine ambient 'air temperature is below 7OC [45:F], the syste,mwill operate as follows:
,
,
,
Engine Starting'Cycle
, ,
,
I
1. Turn the ignition key to the RUN position. When the key is in this position, the WAIT-TO-START llght will be
illuminated for approximately 25 seconds.
Do not crank the engine until the WAIT-TO-START light shuts off.
NOTE: The controller is rest each time the ignition is turned off and the cycle will start over.
2. When the WAIT-MSTART lamp goesout, the preheat cycle is complete. Depress the accelerator pedai and crank
the engine. Crank the starter as soon as the WAIT-TO-START lamp goes out.
3. Postheat Cycle:
Postheating occurs as the grid heater elements are cycled for a while with the engine running. Postheating helps
warm the engine up faster and eliminates white smoke. Postheating is determined by the engine ambient air
temperature upon start-up.
83.9 and 65.9 Series Engines
Section 1 Operating Instructions
-
Starting Procedure After Extended Shutdown or Oil Change.
Page 1-13
Starting Procedure After Extended Shutdown or Oil Change
General Information
Complete the following steps after each oil change, or after the engine has been shut down for more than 30 days to
make sure the engine receives the correct oil flow through the lubricating oil system.
1. Disconnect the electrical wire from the fuel pump solenoid.
2. Rotate the crankshaft, using the starting motor, until oil pressure appears on the gauge or the warning lamp goes
out.
3. Connect the electrical wire to the fuel pump solenoid valve.
4: Start the engine; refer to normal starting procedures in this section.
.,
-
5. Refer to fuel system bleeding, section 5 for instruction to vent fuel system,
I
83.9 and 85.9 Series Engines
Section 1 Operating Instructions
kngine Operating Range
Page 1-14
-
Engine Operating Range
General Information
A
A
CAUTION
Do not operate the engine at excessive full-throttle operation below peak torque rpm (refer to engine dataplate for peak torque rpm) for more than 30 seconds.
This condiiion will shorten engine :ile to overhai:, can
cause serious engine damage, and is corisidered driver
abuse.
Cummins engtnes ate designed to operate successfully at
full throttle under transient conditions down to peak torque
engine speed. This is consistent with recommended operating ppctices.
Opemration of the englhe below peak torque rpm can occur
during gear shifting due to the difference of ratios between
transmission gears, but engine operation must not be
sustained for more than 30 seconds at full throttle below
peak torque rpm.
Full Throttle
wumtq
'Operating the Engine
Page 1-15
83.9 and 85.9 Series Engines
Section I Operating Instructions
-
A
CAUTION
A
Do not operate the engine beyond high idle speed under any circumstances. Operating the engine beyond
high idle speedcan cause severe engine damage. When
descending a steep grade, use a combination of transmission gears and engine or service brakes to control
the vehicle and engine speed.
Operating the Engine
General Information
A
A
CAUTION
Continuous operation with a low coolant temperature
below 60% [140°F], or a high coolant temperature
above 100°C [212OF], can damage the engine.
Monitor the oil pressure and coolant temperature gauges
frequently. Refer to Lubricating Oil System Specifications
and Cooling System Specifications, in Section V, for recommended operating pressures and temperatures. Shut
off the engineif any pressure ortemperature does not meet
.the specifications.
e=
,
Operating the Engine
Page 1-16
83.9 and 85.9 Series Engines
Section 1 Operating Instructions
-
If an overheating condition startsto occur, reducethe power
output of the engine by releasing the throttle pedal pres.
sure or shifting the transmission to a lower gear, or both,
until the temperature returnstothe normal operating range,
Ifthe engine temperature does not return to normal, shut
off the engine and refar to Troubleshooting Symptoms,
Section TS, or contact a Cummins Authorized Repair
Location.
83.9 and B5.9 Series Engines .
Section 1~ Operating Instructions
Operating the Engine
Page 1-11
-
Most failures give. an early warning. Look and listen for
changes in performance, sound, 01 engine appearance
thawan indicate service or engine repair is needed. Some
changes to look for are as follows:
Engine
.~ misfires
Vibration
'
. .
Unusual ensine ioisgs
S,uddenchanges in engine operating temperatures
or pressures
Excessive smoke
Loss of power
An increase in oil consumption
An increase in fuel consumption
Fuel, .oil, or coolant leaks.
@
Engine Shutdown
Page 1-18
83.9 and 85.9 Series Engines
Section11 Operating Instructions
-
Engine Shutdown
General Information
I
1. Allow the engin'eto idle 3 to 5 minutes before shutting
it off after a full-load operation. This allows adequate
cooldown of pistons, cylinders, bearings, and turbocharger components.
2. Turn the ignition keyswitch to the OFF position.
3 TO 5 MINUTES
83.9 and 85.9 Series Engines
Sectlon 2 .Maintenance Guidelines
Page 2-a
.
Section 2 Maintenance Guidelines
Section Contents
Page
.
Maintenance Guidelines Overview................................................................................................................
General Information .............................
;
......................................................................... :..............................
2-1
2-1
2-10
Maintenance Record Form.............................................................................................................................
General Information ..................................................................................
1.................................................
2-10
..;............ 2-3
Maintenance Schedule ......................................................................................................................
General Information...................................................................................................
:...................................
2-3
Page References for Maintenance Instructions .....................................................
:....................................... 2-8
General Information ......................................
I...............................................................................................
2-8
Tool Requirements.............................
:.................................................................................................... r ........ 2-2
:....................................................... :............ 2-2
General Information ..................................................................
1
Page 2-b
83.9 and B5.9 Series Engines
Section 2 - Maintenance Guidelines
THIS PAGE LEFT INTENTIONALLY BLANK
83.9 and 65.9 Series Engines
Section 2 Malnfenance Guidelines
-
-
Maintenance Guidelines Overview
Page 2-1
-
Maintenance .Guidelines Overview
General Information
Cummins Engine Company, Inc. recommends that the engine be maintained according to the Maintenance Schedule
in this section.
.
If the engine is operating in ambient temperatures consistently below -18°C [O'F] or above 38% [lOO°F1, perform
maintenance at shorter intervals. Shorter maintenance intervals are also required if the engine is operated in an
abnormally dusly environment or if frequent stops are made. See your Cummins Authorized Repair Location for
recommended intervals.
If your engine is equipped with a component or an accessory not manufactured by Cummins Engine Company, Inc.,
refer to the component manufacturer's maintenance recommendations. Suppliers' addresses and telephone numbers
are provided in Component Manufacturers (Section M).
Use the chart provided at the end of this section as a convenient way to keep a record of maintenance performed.
Tool Reqluirernents
Page 2-2
83.9 and B5.9 Series Engines
Section 2 Maintenance Guidelines
-
Tool Requirements
General Information
In the text, a symbol followed by the wrench size or tool description is used to identify the tooling required to perform
each step. More than one tool is needed.
sockets
19 mm
Wrenches
19 mm
17 mm
17 mm
15 mm
14 mm
13 mm
10 mm
15 mm
Other Tools
Filter wrenches
(75 to 80 mm and 90 to 95 mm)
Ratchet (1/2-inch drive)
Flat-blade screwdriver
Torque wrench
Ailen wrench (5/16 inch)
Feeler gauges (0.25 mm and 0.51 mm)
Engine barring gear, Part No. 3824591
Maintenance Schedule
Page 2-3
83.9 and 85.9 Series Engines
Section 2 Maintenance Guidelines
-
Maintenance Schedule
General Information
63.9 and 85.9 Series El
Daily or Refueling
Maintenance Check
0
0
Oil level
Coolant level
Fan
Drive belt
Fuel-water separator.
ie Maintenance Schedul
Every 10,000 km [6000
mi] 250 Hours, or 3
Months
ChecWlnspect
rn Change lubricating oil
p.eplace lubricating oil
0
filter.
Inspect air cleaner
Inspect intake system.
Check charge air
cooler (4).
Every 19,000 km
[12,000mi 500 Hours,
or 6 knonths
ChangelRep acellnspect
0
Change lubricating oil
p.
,
. .
.
eplace lubricating oil
filter.
Replace fuel filter (5).
0 Inspect air cleaner.
0 Inspect air intake system.
0 Check antifreeze (3).
Check charge air
woler (4).
0
Every 38,000 km
[24,000 mi], 1000 Hours,
or 1 Year
Checkllnspect
(1) Refer to the Oil Chan! nterval tables provided in IS Seclm 10 f nd the spec
(2) Initial valve lash clear e adjustment, subsequen niiizlmenls m he nerfnrmi
change for automotive er es or 2000-hour, %year in
(3) Hea du year aroui intifreeze that meets the 1
3m.OO8m #OO,Oi;O'mil
iichever occurs first. Antif
(41 Servjce interval is 2 p 3 or 320.000 km [2W,OOO
(5 Service interval Is every other oilchange or 19,WC
Change lubricating oil
0
1).
eplace lubricating oil
filter.
Replace fuel filter 5)
0 Adjust valve lash Aearance (2).
inspect air cleaner.
0 Inspect intake system.
*Check oharoe air
cooler (4). "
Check antifreeze (3).
0 lnsoect fan hub.
Inspect be t tensioner
0 Check bell lension.
o i change interval lor ,no
it 77.000.km [48.000-m ] 11
0
8
0
1).
eplace iubricating oil
filter.
Replace fuel filter (5).
Change antifreeze (3).
Inspect air cleaner
Check charge air cooler
p
0
0
0
nspect Intake system.
Inspect fan hub.
Inspect belt tensioner.
Check belt tension.
Inspect damper.
lual applications.
~ a l or
s every 8th oil
4 must be used. The change interval is 2 years or
srheat, and corrosion protection.
I
Maintenance Schedule
Page 2-4
,
,
83.9 and 85.9 Series Engines
Section ,2 Maintenance Guideli1ne;s
-
Lubricating 011 Drain!Interval
Refer to tye following flowchart to deterni/ne the maximdm recommended oil change and filter change intervals in
kilometer$ hiles, hours, or months, whlcH6ver occurs first.
is the vehicle.an on-highway application?
If Yes
I
-
Refer to Table 1
Is the vehicle used in a construction, mining, or logging operation?
If Yes If NQ
Refer to Table 2
If No.
Is the vehicle used in an agricultural or stationary power application?
If Ye5
-
Refer to Table 3
If NdUse the following oil change interval, 10,000 km [SO00mi], 250 hours, or 3 months, whichever occurs first.
83.9 and B5.9 Series Engines
Section 2 Maintenance Guidelines
-
Maintenance Schedule
Page 2-5
Maintenance Schedule
Page 2-6
83.9 and 85.9 Series Engines
Section 2 Maintenance Guidelines
-
Maintenance Schedule
Page 2-7
63.9 and 85.9 Series Engines
Section 2 Maintenance Guidelines
-
Arctic Operation
A
A
CAUTION
The use of a synthetic-base oil does not justify extended oil change intervals. Extended oil change intervals
can decrease engine life due to factors such as corrosion, deposits, and wear.
If an engine is operated in ambient temperatures consistently below -23% [-lO°F] and there are no provisions to keep
the engine warm when it is not in operation, use asynthetic CElSF or higher API classification engine oil with adequate
low-temperature properties, such as 5W-20 or 5W-30.
The oil supplier is responsible for meeting the performance service specifications represented with its product.
. .
1
,
,, ,
.,.,
,
,
,
~~
,
,
i
I
~
,
~
Page References for Maintenan
Page 248
Page'References for Mai
For your convenience, listed below are the page n'umbebsth
tenance checks listed in the maintenance sc'hedul!eel , '
'
Fan'Cooling .lpspect ......
Fuel-Water Separator -.Dra
Lubricating 011 Level .Check
'
'
...........
-
Every 10,000 km [6000 ml], 250 Hours, or 3 Months Maintenance Ch,eck
Air Cleaner Restriction .Inspect ............
...............................................
Air Intake Pipin Inspect ....................
...... ..........ill,"........... ..,............
Charge Air Coo er ChecUCorrect ,.:....
Lubricating Oil and Filters .Change .....
...............................................
p-.
1
"(.d
I...:.,.j
-
Every 19,000 km [12,000 mi], 500 Hours, or 6 Months Maintenance Check ' '
Cooling System - Antifre
Fuel Filter (spin-on type)
...........................
Fuel Supply Lines Vent
Injector Supply Lines (hig
..............
.................................
~
5-2
Page References for Maintenance Instructions
Page 2-9
83.9 and B5.9 Series Engines
Section 2 Maintenance Guidelines
-
-
Every 38,000 km 124,000 mi], ~1000Hours, or 1 Year Maintenance Check
Drive Belt - Test ............................................................ ’.......................................................................
Drive Beit and Tensioner - Inspect ............_._............._...__._._..,,.,.....................................
.......................
Overhead Set - Measure .......................
:....................................................
............................................
~
~
~
-
6-8
6-8
6-2
Every 77,000 km [48,000mi], 2000 Hours, or 2 Years Maintenance Check
Air Compressor Inspect .........................................................................................................................
7-9
Cooling
System - Drain/Flush/Fill ..................................... 1...............:.....................................................
7-2
.
.
.
Vibration Damper - Inspect ................
;
................................................................................................... 7-8
Cooolant and Antifreeze - Change .......................................................................................
................ 7-2
-
::
,
I
83.9 and 85.9 Series Engines
Section 2 Maintenance Guidelines
Maintenance Record Form
Page 2-10
-
I,
Maintenance Record.Form
General Information
I
I
Maintenance Record
Owner's Name'
A
Equipment Name/Number.
8
C
D
E
F
83.0 and 85.9 Series Engines
Section 2 Maintenance Guidelines
-
Maintenance Record Form
Page 2-11
63.9 and 85.9 Series Engines
Section 2 - Maintenance Guidelines
Maintenance Record Form
Page 2-12
NOTES
63.9 and 5.9 Series Engines
Section 3 Maintenance Procedures at Daily interval
Page 3-a
Section 3 Maintenance Procedures at Daily Interval
-
Section Contents
Page
:............................................
......................
3-4
Coolant Level ...:.............................................................
Maintenance Check ................................................................................................
...................... 3-4
Daily Maintenance Procedures Overvlew .....................................................................................................
3-1 .
General Information .....................................................................
............................. ................:,1............... 3-1
-
~
~
Drive Belts........................................................................................................................................................
Maintenance Check .........................................................................................
;...:.......................................
3-7
3-7
Fan, Cooling.....................................................................................................................................................
Maintenance Check ................................
t .....................................................................
:.........................
.... 3-8
Fuel-Water Separator ........................................................................................................................................
Maintenance Check .............................................
;
.......................................................................................
3-2
3-2
:
...................:.....................................................................
Lubricating Oil Level .............................................
:............................
.....................................................................
Maintenance Check .......................
3-3
3-3
..
. .-
3-8
Page 3-b
83.9 and 5.9 Series Engines
Section 3 Maintenance Procedures at Daily InleNal
-
THIS PAGE LEFT INTENTIONALLY BLANK
B3.9 and 5.9 Series Engines
Section 3 Maintenance Procedures at Daily Interval
-
-
-
Daily Maintenance Procedures Overview
Page 3-1
..
Daily Maintenance Procedures Overview
General Information
Preventative maintenance begins with day-to-day awareness of the condition of the engine and its systems,
Beforo starting the engine, check the oil and coolant levels. Look for:
Leaks
Loose or damaged parts
Worn or damaged belts
Any change in engine appearance.
.,
-
Fuel-Water Separator
Page 3-2
83.9 and 5.9 Series Engines
Section 3 Maintenance Procedures at Daily Interval
-
j
Fuel-Water -Separator
Maintenance Check
A
CAUTION
A
Do not overtighten the valve. Overtightening Fan damage the threads.
Drain !he w!er and sediment !mm !he sepzrator daily,
Shut off the engine. Use your hand to open the drain valve.
Turn the valve counterclockwise four complete turns until
the valve drops down 1 inch. Drain the filter sump of water
until clear fuel is visible.
Push thevalveupandturn thevaiveclockwisetoclose the
drain Mive.
NOTE: If more that 2 ounces are drained, refiiling the filter
is required to prevent hard starting. Refer to Section 5 for
venting the low-pressure fuel lines.
83.9 and 5.9 Series Engines
Section 3 Maintenance Procedures at Daily Interval
-
Lubricating Oil Level
’
.
Maintenance Check
The vehicle must be level when checking the oil level to
make sure the measurement is correct.
Shut off the engine for an accurate reading.
Never operate the engine with the oil level below the L (low)
mark, or above the H (high) mark. Wait athast 10 minutes
after shutting off the engine to check the oil level. This
allows time for the oil to drain into the oil^ pan.
Refer to Lubricating Oil RecommendationslSpecifications
in Section V for oil recommendations.
Low Mark to High Mark Oil Capacity’
Four Cylinder
0.95 liter [lqt]
Six Cylinder
1.89 liters [2qtl
e
Lubricating Oil Level
Page 3-3
83.9 and 5.9 Series Engines
Section 3 Maintenance Procedures at Daily Interval
Coolant Level
Page 3-4
-
@
Coolant Level
Maintenance Check
A
A
WARNING
DO not remove a pressure cap from a hot engine. Wait
until the coolant temnerature is below 5O0C 1122°R
before removing the piessurecap. Heated coolahspray
a: saam cn: cnusc pcrscnnl Injury.
Never use a sealing additive to stop leaks in the cooling
system. This can result in cooling system plugging and
inadequate coolant flow, causing the engine to overheat.
The coolant level must be checked daily.
83.9 and 5.9 Series Engines
Section 3 Maintenance Procedures at Daily Interval
-
A
A
CAUTION
Do not add cold coolant t o a hot engine. Engine castings can be damaged. Allow the engine to cool to below
50°C [12Z0F] before adding coolant.
If additional coolant is added to the cooling system, a
50-perpnt mixture of water and antifreeze must be
premixed before being added to the system. Since the
ability of antifreeze to remove heat from the engine is not
as good as water,, pouring antifreeze into the engine first
could contribute to an overheated condition before the
liquids are completely mixed. Refer to Coolant Recommendations and Specifications in Section V.
NOTE: 0n.applicationsthat use a coolant recoverysystem,
check to make.sure the coolant is at the-appropriate level
on the coolant recoverv tank. dewndina on enaine
temperature.
Coolant Level
Page 3-5
83.9 and 5.9 Series Engines
Section 3 Maintenance Procedures at Daily Interval
Coolant Level
Page 3-6
-
@
Fill the cooling system with coolant to the bottom of the fill
neck in the radiator fill or expansion tank.
NOTE Some radiators have two fill necu. both of which
must be filled when the cooling system is drained.
83.9 and 5.9 Series Engines
Section 3 Maintenance Procedures at Dally Interval
-
Drive Belts
Maintenance Check
lnspectthe beltsdaily.Checkthe beltforintersecting cracks.
Traverse (across the belt width) cracks are acceptable.
Longitudinal (direction of belt length) cracks that intersect-,
with transverse cracks are not acceptable. Replace the belt
if it is frayed or has pieces of material missing. Refer to
Section Afor belt adjustment and replacement procedures.
Belt damage can be caused by:
Incorrect tension.
Incorrect size or length
Pulley misalignment
Incorrect installation
Severe operating environment
Oil or grease on'the side of belts.
Drive Belts
Page 3-7
Fan, Coolhg
Page 3-8
83.9 and 5.9 Series Engines
Section 3 Maintenance Procedures at Dally Interval
-
Fan, Cooling
Maintenance Check
A
A
WARNING
Do not straighten a bent fan blade or continue to use a~
damaged fan., A bent or damaged fan blade can fail
durlng operation end cause personal injury or property
damage.
NOfE: Rotate the crankshaft by using the engine barring
gear,
An inspection of the'coolingfan is required daily. Check for
cracks, loose rivets, and bent or loose blades. Check the
fan to make sure it is securely mounted. Tighten the capscrews if necessary. Replace any fan that is damaged.
83.9 and 85.9 Series Engines
Maintenance Procedures at 10.000 km I6000 mi]
Page 4-a
Maintenance Procedures at 10.000 Kilometers [GOO0 Miles].
250 Hours. or 3 Months
Section Contents
Page
. .
Air Cleaner Restriction.......................................
:...........................................................................................
4-11
:....................
:.......................................................
4-11
Maintenance Check .......................................................
Air Intake Piplng ..........................
............................................................................................................... 4-7
Inspect for Reuse ..
.............................................................................. ;.............................. :............... 4-7
.................................. 4-a
Charge-Air Cooler (CAC) .................................................................
.........................
.................................. 4-9
Clean ..................................................................................................................
Inspect for Reuse .......................................................
:
................................................................................. 4-8
Lubricating 011 and Filters ....................................................
:........................................................ .................4-2
Drain .............................................................................................................
.............................................. 4-2
..... 4-5
Fill ...........................................................................................................................................................
Install ........................
............................................................................................................................ 4-3
Remove .....................
........................................................................................................ :.................. 4-3
Maintenance Procedures - Overview..............................
................................................................................. 4-1
............................................................................................................................. 4-1
General Information ...
~
Page 4-b
83.9 and B5.9 Series Englnes
Maintenance Procedures at 10,000 km [6000 mi]
'I'
THIS PAGE LEFT INTENTIONALLY BLANK
,
i
83.9 and B5.9 Series Engines
Maintenance Procedures at 10,000 km [SO00 mi]
-
Maintenance Procedures Overview ”
Page 4-1
-
Maintenance Procedures Overview
General Information
Some state and federal agencies have determlned that used engine oil can be carcinogenic and cause reproductive toxicity. Avoid inhalation of vapors, ingestion, and prolonged contact with used engine oil.
Protect the environment:
Handling and disposal of used engine oil is subject to federal, state, and local laws and regulations. Use authorized
waste disposal facilities, including civic amenity site and garages providing authorized facilities for receipt of used oil.
If in doubt, contact state and environmental authorities or the Environmental Protection Agency for guidance about
proper handling and disposal of used engine oil.
' Lubricating Oil and Filters
Page 4-2
83.9 and 85.9 Series Engines
Maintenance Procedures at 10,000 km [SO800 mi]
,,.
@ Lubricating Oil an'd Filters
Drain
,
,
,
!,'
,
~
NOTE If the engine is in service, the oil drain Interval of
10,000 km [SO00 mi], 250 hours, or 3 m.onths (or approved
extended intedal from the table in Section 2) must be
used.
Change the 011 filters to remov0 the contaminants suspended In the oil.
oiqwc
NOTE Drain the oil only when it is hot and the contaminants are in suspension.
A
A
WARNING
To avoid personal injury, avoid direct contact of hot oil
with your skin.
@$$ 17mm
Operate the engine until the water temperature reaches
6OoC [140°F]. Shut the engine off. Remove the oil drain
Plug.
.
NOTE Use a container that can holdat least 20 liters [15
qt] of oil.
83.9 and 85.9 Series Engines
Maintenance Procedures at 10,000 km 16000 mi]
Lubricating Oil and Filters
Page 4-3
Remove
90- to 95-mm Filter Wrench
Clean the area around the lubiicating oil f i l p head. Remove the filter. Clean the gasket surface of the filter head.
NOTE The odng can stick on the filter head. Make sure
it is removed before installing the new filter.
Install
.
A
,
CAUTION
A
A six-cylinder oil filter can'be used on a four-cylinder
engine. Do not use a. four-cylinder .oil filter on a sixcylinder engine. Use of a four-cylinder oil filter on a
six-cylinder engine will result in engine damage.
Make sure the correct oil filter is used.
The filter for the six-cylinder engine is longer than the filter
for the four-cylinder engine.
A = Standard for fouricylinder appiicatiom
B = Standard for six-cylinder applications.
Ll
Lubricating Oil and Filters
Page 4-4
83.9 and 85.9 Series Engines
Maintenance Procedures at 10,000 km [6000 mi]
NOTE Fill the filter with olean lubricating oil bsforejnstallation.
Apply a llglbt film of lubricating oil to the gasket sealing
surface before installing the filter.
A
CAUTION
A
Mechanical overt'ightening of filter can distort the
threads or damage the filter element seal.
Install the filter as specified by the filter manufacturer.
Lubricating Oil and Filters
Page 4-5
83.9 and B5.9'Series Engines':
Maintenance Procedures at 10,000 kin 16000 mi]
Clean the sealing surface.
Check the oil drain plug threads.
.
.
Install the drain plug.
Steel Pan
'@
Torque Value: 80 N*m
[59 ft-lb]
Aluminum Pan
[44 ft-lb]
Torque Value: 60 N*m
Fill
.
.
NOTE Use a high-quality 15W-40 muitiviscosity lubricating oil, such as Valvoline Premium Blue", or its equivalent
in Cummins engines. Choose the correct lubricating oil for
your operating climate as outlined in Section 2.
Lubrlcating Oil and Fllters
Page 4-6
83.9 and 85.9 S,erlea Engines
Maintgnance Procedures at 10,000 km.[6000 mi]
~
Fill the engine with clean lubricating oil to the proper level.
NOTE Total system capacity assumes 1ubri:catingoil pan
plus lubricbting oil fllter.
Some applications use a slightly different lubricating oil
pan capacity, and all lubricating oil quantities must be
adjusted accordingly. Contact your local Cummins Distributor if you have any questions.
Pan Capacity
Tdal system
Capacity
Four
Winder
9.5 liiers [lo qt]
10.2 liters 110.8 qt]
Six
Cylinder
14.2 liters 115 qt]
15.1 liters 116 qt]
NOTE Some 6B applications use a reduced capacity pan
10.4liters 111 qts], andsome have increased capacity of 16
liters [17qt]. Fill quantities must be adjusted accordingly.
83.9 and 85.9 Series Engines
Maintenance Procedures at 10,000 km [600O.mil
Operate the engine, and check for leaks at the filters and
oil drain plug.
Air Intake Piping
Inspect for Reuse
inspect the intake piping for cracked hoses, loose clamps,
or punctures that can allow dirt and debris to enter the
engine.
Tighten or replace parts as necessary to make sure the air
intake system does not leak.
Air intake Piping
Page 4-7
Charge-Air Cooler (CAC)
Page 4-8
83.9 and 85.9 Series Engines
Maintenance Procedures at 10,000,km IS000 mil
‘Charge-Air Cooler (CAC)
Impeot for Reuse
-
Ifthe engine experiences a turbocharger failure or any
other occasion where oil or debris is put into the charge air
cooler, the charge air cooler must be cleaned.
V
Removethechargeaircoolerfrornthevehicle. Refertothe
vehicle manfacturer’s instructions.
@
lnspect the charge air cooler for cracks, holes, or damage.
Inspect the tubes, fins, and weldsfor tears, breaks, or other
damage.
Refer to Section A for the leak check procedure.
Charge-Air Cooler (CAC)
Page 4-9
83.9 and 85.9 Series Engines
Maintenance Procedures at 10.000 km [6000 mi]
Clean
A
A
A
A
WARNlNG
When using solvents, acids, or alkaline materials for
cleaning, follow manufacturer's recommendations for
use. Wear goggles and protective clothing lo avoid personal injury.
CAUTION
Do not use caustic cleaners to clean the charge air
cooler. Damage lo the charge air cooler will result.
Flush the charge air cooler internally with solvent in the
opposite direction of normal airflow. Shake the charge air
cooler and lightly tapon the end tanks wtrh a rubber mallet
to dislodge trapped debris. Continue flushing until all debris or oil is removed.
...
CPBODeS
'
Charge-Air Cooler (CAC)
Page 4-10
83.9 and 85.9 Series Engines
Maintenance Procedures at 10,000 km 16000 mi]
A
A
A
A
WARNING
When using solvents, acids, or alkaline materials for
cleaning, follow manufacturer's recommendations for
use. Wear goggles and protective clothing to avoid personal injury.
WARNING
Wear appropriate eyeand face protection when uslng
compressed air. Flying debris and dirt can cause bodily
injury.
After the charge air cooler has been thoroughly cleaned of
all oil and debris with solvent, wash the charge air cooler
internally with h d , soapy water to remove tYle remaining
solvent.' Rinse thoroughly with clean water.
Blow compressed air into the charge'air cooler inthe opposite direction of normal airflow until the charge air cooler
is dry internally.
Refer to the vehicle manufacturer's instructions for installation procedures.
83.9 and 85.9 Series Engines
Maintenance Procedures at 10,000 km [6000 mi]
Air Cleaner Restriction
.
Maintenance Check
*
Maximum intake air restriction is 635 mm [25.0in] of water
for turbocharged engines. Naturally aspiratedengines have
a maximum restriction of 510 mm [20.0in] of watec.
Turbocharged engines must be operated at a rated rpm
and full load.to check maximum intake air restriction. Replace the air cleaner element when the restriction reaches
the maximum allowable limit, or clean according to the
manufacturer's recommendations.
NOTE: Foi[owthe manufacturer's instructionswhen cleaning or replacing the air cleaner element.
e
Checktheair cleaner service indicator, if equipped. Change
the filter element when the red indicator flag (2
' ) is at the
rqised position in the window (1).
@
After the air cleaner has been Serviced, push the button (3)
to reset the service indicator.
NOTE Never operate the engine without an air cleaner.
Intake air must be filtered to prevent dirt and debris from
entering the engine and causing premature wear.
I
Air Cleaner Restriction
Page 4-11
Air Cleaner Restriction
Page 4-12
83.9 and 85.9 Series Engines
Maintenance Procedures at 10,000 km [6000 mi]
83.9 and 85.9 Series Engines
Maintenance Procedures at 19,000 km (12,000 mi]
Page 5.a
Maintenance Procedures at 19,000 Kilometers [I2,000
Miles], 500 Hours, or 6 Months
Section Contents
Page
.
Cooling System ....................
. Maintenance Check
:.......................................................................
.......................................
..
. 5-9
5-9
Fuel Filter (Spin-On Type) ...................
...................
:.......................................................... 1........;.......................
5-2
Install
...................................... ;................................................................... 1......_...5-2
Rem,ove ...........................................
:................................................
:....,................................... ............;...;.. 5-2
Fuel Supply Lines........................................ ..........................................................
............................................ 5-4
Vent ............................................
:................:...............................................................................................
5-4
Injector Supply lines (Hlgh Pressure) ......................................
.........,........................................................... 5-7
Vent ..................................................................................................
................................................ ,....: 5-7
Malntenance Procedures Overview.........................................
....:..................... .............................. :.....,...... 5-1
General Information .....................................................................................................................................
5-1
-
....
~
~
E
Page 5.b
83.9 and B5.9 Series Engines
Maintenance Procedures at 19,000 km [12,000 mi]
THIS PAGE LEFT INTENTIONALLY BLANK
83.9 and 85.9 Series Engines
Maintenance Procedures at 19,000 km [12,000 mi]
-
Maintenance Procedures Overview
Page 5-1
-
Maintenance Procedures Overview
General Information
All checks or inspections listed under daily or previous maintenance intervals must also be performed at this time, in
addition to those listed under this maintenance interval.
Fuel Filter (Spin-On Qpe)
Page 5-2
83.9 and 85.9 Series Engihes
Maintenance Procedures at 19,000 km [12,0001mi]
Fuel Filter (Spin-On Type)'
Remove
,
I
,
.
75 to 80 mm and 90 to 95 mm
W a n the area around the fuel filter head. Remove'the
filters. Clean'the gasket surface of the filter head.
REplaca the o-ring.
Install
Fill the new filterys) with clean fuel, and lubricate the o-rhg
seal with clean lubricating oil.
standard filter-usedassecondaryfilter indual-filter
applications
Fuel-water separator - used as primary filter in dualfilter applications
Fuel-water separator - used in single-filter applications.
83.9 and 85.9 Series Engines
Maintenance Procedures at 19,000 km [12,000 mi]
A
A
CAUTION
Mechanlcal overtighteningwill distort threads, filter el.
ement seal, or filter can.
Install the filter as specified by the filter manufacturer.
Fuel Filter (Spin-On Type)
Page 5-3
Fuel Supply Lines
Page 5-4
83.9"and;B5.9 Series Engines
Maintenance Procedures :at 1,9;00'0 km I12,OlOO ml]
I,, '
Fuel 'Supply Lines
vent
.
,8
'
.
,
,
,
,
, .
. ,, I .
Controlledventing is provided at theinjection pump through
the fuel drain manifold. Small amounts of air introduced by
changing the filters or injection pump supply line will be
vented autdmatically if the fuel filter Is changed in accordance with the instructions. Ns inariual bleeding is requlred.
NOTE:,Manual bleeding is required if:
The fuel filter is nbt filled prior to installation
lnjection pump is replaced
High-pressurefuel line connections are loosened or
lines replaced
Initial engine start-up or start-up after an extended
period of no engine operation
Vehicle fuel tank has run empty.
83.9 and 85.9 Series Engines
'-Maintenance Procedures at 19,000 km [12,000 mi]
Low-Pressure Lines and Fuel Filter@)
8 mm
Open the vent screw.
Operate the priming button on the lift pump until the fuel
flowing from the fitting is air free.
Tighten the bleed screw.
Torque Value: 9 N*m
[80 in-lb]
Fuel Supply Lines
Page 5-5
Fuel supply Lines
Page 5-6 ,
83.9 and 85.9 Series Engines
Maintenance Pmcedures at 19,000 km [12,000 mi]
Injection Pump Venting
8 mm
Bleed the Lucas CAV pump at the location shown in the
illustration.
Airlfuel can be pumped from this location with the hand
lever on the lift pump if the fuel solenoid valve is energized.
I
83.9 and 65.9 Series Engines
Maintenance Procedures at 19,000 km 112,000 mil
A
A
A
A
WARNING
It is necessary to put the engine in the RUN position.
Because theenginecanstart, besure to follow allof the
safety precautions. Use normal engine starting procedure.
CAUTION
When using the starting motor to vent the system, do
not engage it for more than 30 seconds at a time: Walt
2 minutes between engagements.
Air can vented from both pumps through the fuel drain
manifold line by operating the starting motor.
Injector Supply Lines (High Pressure)
Vent
A
A
WARNING
While testing the injectors, keep hands and body parts
away from the iniector nozzle. Fuel coming from the
injector is under ektreme pressure and can cause serious injury by penetrating the skin.
17 mm, 19 mm
Venting IS accomplished by loosening one or more fittings
at the injectors and cranking the engine to allow entrapped
air to bleed from the lines.
Injector Supply Lines (High Pressure)
Page 5-7
-
Injector Supply Lines (High Pressure)
Page 5-8
83.9 and 85.9 Serles Engines
Maintenance Procedures at 19,000 km [12,000 mi]
A
WARNING
A
Do not bleed the fuel system on a hot engine; this can
cause fuel to spill onto a hot exhaust manifold, which
can cause fire.
Start the engine and vent one line at a time until the engine
runs smoothly.
Tighten the line fittings.
Torque Value: 30 N*m
[22 ft-lb]
B3.9 and 85.9 Series Englnes
Maintenance Procedures at 19,000 km [12,600 mi].
Cooling System
Maintenance Check
A
A
CAUTION
Overconcentration of antifreeze or use of high-silicate
antlfrebze can cause damage to the engine.
Refractometer, Part No. C2800
Check the antifreeze concentration. Use a mixture of 50percent water and 50-percent ethylene glycol or propyiene
glycol-baseantifreezeto protecttheengineIo-32OC I-25OFJ
year-around.
The Fleetguard@refractometer, Part No.C2800, provides a
reliable, easy-to-read, and accurate measurement of freezing point protection and glycol (antifreeze) concentration.
Antifreeze is essential in every climate.
Use of antifreezebroadensthe operating temperature range
by lowering the coolant freezing point and by raising its
boiling point.
The corrosion inhibitors also protect the coolhg system
components from corrosion and provide longer component
life.
Cooling System
Page 5-9
Cooling System
Page 5-10
83.9 and 85.9 Series Engines
Maintenance Procedures at 19,000 km [12,000 mi]
NOTES
83.9 and 85.9 Series Engines
Maintenance Procedures at 38,000 km [24,000 mi]
Page 6-a
Maintenance Proceduies at 38,000' Kilometers'[24,000
Miles], 1000 Hours, or 1 Year
Section Contents
Page
............. 6-8
......................................................................................... : 6-8
Maintenance Procedures - Overview................................................................................................................
6-1
General 'Information ......................................................................................................................................
6-1
Overhead Set .....................................................................
............................................................................ 6-2
Adjust ............................................................................................................................................................
6-2
Drive Belts...............................................................
Test
.......................................................................
:.............................................................................
.
Page 6-b
83.9 and 85.9 Series Engines
Maintenance Procedures at 38,000 km 124,000 mi]
THIS PAGE LEFT INTENTIONALLY BLANK
83.9 and 65.9 Series Englnes
Maintenance Procedures at 38,000 km 124,000 mi]
-
-
Maintenance Procedures Overview
Page 6-1
Maintenance Procedures Overview
General Information
All checks or inspections listed under daily or previous maintenance intervals must also be performed at this time, inaddition to those listed under this maintenance interval.
The procedures given in this section for valve lash adjustment are to be performed at the initial 38,000km 124,000 mi]
adjustment. Subsequent adjustments are to be performed at 77,000 km [48,000mi].
Overhead Set
Page 6-2
B3.9 and B5.9 Series Engines
Maintenance Procedures at 36,000 km [24,000 mi]
.a
w
;;;ad
Set
:;
@$I
Remove the valve cover
1/2-lnch Drive, Engine Barring Tool, Part No. 3824591
Locate top dead center (TDC) for cylinder No. 1 by barring
the crankshaft slowly while pressing on the engine timing
pin. Barring the engine is recommendedfrom the flywheel
on the rear of the engine
83.9 and 85.9 Series Engines
Maintenance Procedures at 38,000 km [24,000 mi]
.Overhead Set
Page 6-3
When the timing pin engages in the hole in the camshaft
gear, cylinder No. 1 is at TDC on the compression stroke.
A
A
CAUTION
To avoid engine or timing pin damage, you must disengage the timing pin after locating top dead center.
I
83.9 and 85.9 Series Engines
Maintenance Procedures at i38,OOO km.[24,000 mi]
Overhead Set
Page 6-4
Feeler Gauge
NOTE The clearance is correct when some resistance is
“felt^ when the feeler gauge is slipped between the valve
stem and the rocker lever.
NOTE Caution must be used when setting the exhaust
valve lash on marine dylinder heads with rotators. The top
of the valve stem is slightly recessed below the top of the
valve rotator.
Intake Clearance:
Exhaust Clearance:
0.254 mm
[0.010in]
0.508 rnm 10.020 in]
14-mm Wrench, Flat-Blade Screwdriver
Four-Cylinder Engine Adjustment
Locate top dead center (TDC) for cylinder No. 1.
Set only valves indicated by the arrows (E = exhaust, I =
intake). Do not set valves that are not Indicated.
Holding the locknut steady with the wrench, adjust the
valve clearance with the swewdriver or Allen wrench.
Tighten the locknut, and measure the valve lash again.
4
3
2
1
ri79lvDD
Torque Value: 24 N-m
[18 ft-lb]
83.9 and 85.9 Serles Engines
Maintenance Procedures at 38,000 km [24,000 mi]
A
CAUTION
A
,
To avoid engine or pin damage, be sure the timing pin
is disengaged.
Mark the vibration damper, and rotate the crankshaft 360
degrees.
14-mm Wrench, Flat-Blade Screwdriver, or 5-mm Allen
Wrench
Adjust the valves as indicated ,in the illustration.
Torque Value: 24 N*m
[ia ft-ibi
Set onlyvalves indicated by the arrows (E = exhaust, I =
intake). Do not set valves that are not indicated.
Overhead Set
. Page 6-5
B3.9 and 85.9 Series Engines
Maintenance Procedures at 38,0100 km [24,0,00 mi]
Overhead Set
Page 6-6
,*.
14-mm .Wrench, Flat-Blade Sctewdrlver
Six-Cylinder Engine Valve Adjustment
,,
,
'
Locate top dead center (TDC) for cylinder Mo. 1.
@
Set only the valves indicated by'the arrow6 in the illustration (E = exhaust, I = intake).
Holding the locknut steady with the wrench, adjust the
valve clearance with the screwdriver or Allen wrench.
'
Tighten the locknut, and measure the valve lash again.
Torque Value: 24 N*m
A
118 ft-lb]
A
CAUTION
To avoid engine or pin damage, be sure timing pin is
disengaged.
Mark the pulley, and rotate the crankshaft 360 degrees.
83.9 and 85.9 Series Engines
Malntenance Procedures at 38,000 km I24,OOO ml]
Overhead Set
Page 6-7
Adjust the valves as indicated in the illustration.
Set only the valves indicated by the arrows in the illustration (E = exhaust, I = intake). Do not set valves that are
not indicated.
Torque Value: 24 N*m
[18 ft-lb]
6
5
4
3
'I
lnsYBrC
15 mm
Install the rocker lever covers, and tighten the capscrews.
Torque Value: 24 N*m
I18 ft-lb]
Drive Belts
Page 6-8 ,
83.9 and 85.9 Series Engines
Maintenance Procedures at 38,008Q km [24,000 mil
~
@
Drive belts
Test'
Drive Belt and Tensioner Inspection
Check the location of the drive belt on the belt tensiqner
pulley. The beit must be centered on, or centered close to
the middle of, the pulley. Belts aligned, either too far forward or backward, can cause belt wear, beit roll-off failures,
or increase uneven tensioner wear.
'
@
Check the belt deflection at the longest span of the belt.
The defiection,must be checked at the center (1) of the
span. The maximum deflection allowed in the belt is 9.5 to
12.7 mm [3/8 to 112 in].
63.9 and 85.9 Series Engines
Maintenance Procedures at 38,000 km [24,000 mil
Belt Tensioner Gauge, Part No. ST-1293
Use the Cummins belt tensioner gauge, Part No. ST-1293,
to measure the tension in the drive belt.
Check thetensionerarm, pulley, and slops forcracks. If any
cracks are noticed, the tensioner must be replaced.
Drive Belts
Page 6-9
Drive Belts
Page 6-10
I
,
63.9 and B6.9 Series Engines
Maintenance Procedures at 38,000 km [24,000 mi]
With the belt on, verify that neither tensioner arm slops ate
in contact with the spring casing stop. If either stop is
touching, the drive belt must be leplaced.
After replacing the belt, if the tensioner arm stops are still
in contact with the spring casing stop, replacethe tensioner.
318-lnch Breaker Bar, Extension
Remove the'drive belt,"and check torque of the tensioner
capscrew.
Torque Value: 43 Nmm
[32 ft-lb]
After checking the torque, use a 3/8-inch breaker bar with
an extension to rotate the tensioner slowly away from the
area of beit contact. Ifthe arm rotates with any roughness
or hesitancy, replace the tensioner.
Drive Belts
Page 6-11
83.9 and 85.9 Series Engines
Maintenance Procedures at 38,000 km [24,000 mi]
Check the belt for damage. Transverse (across the belt
width) cracks are acceptable. Longitudinal (direction of the
belt length) cracks that intersect with transverse cracks are
not acceptable. If the belt IS frayed or has any piece of
material missing, the belt is unacceptable and needs to be
replaced.
With the belt removed, verify that the tensioner arm stop is
in contact with the spring case stop. If these two are not
touching, the tensioner must be replaced.
@
Drive Belts
Page 6-12
83.9 and 65.9 Series Engines
Maintenance Procedures at 38,000 km [24,000 mi]
With the drive belt removed, check to be sure that the
tensioner pulley rotates freely.
83.9 and 85.9 Series Engines
Maintenance Procedures at 38,000 km [24,000 mi]
Measure the clearance between the tensioner spring case
and the tensioner arm to verify wear-out and uneven bearing wear. If the clearance exceeds 3 mm [0.12in] at any
point, the tensioner has failed and must be replaced as a
ComDlete assembly. Experience has revealed that tensioners generally will show a larger clearance gap near the
lower portion of the spring case, resulting in the upper
portion rubbing against the tensioner arm. Always replace
the belt when the tensioner is replaced.
Below is a breakdown of the tensioner.
1 . Tensioner cap
2. Tensiher arm
3. Spring case
4. Tensioner pulley
5. Clearance gap.
,
I
.
Drive Belts
Page;6-13
83.9 and 65.9 Series Engines
Malntenance Proceduies al 38,000 km 124,000 mi]
Drive Belts
Page 6-14
@
Inspect the tensloner for evidence of th0 tensionsr arm
contactingthe tensioner cap. Ifthere is evidence of the two
areas making contact, the pivot tube bushing has failed
and the tensloner must be replaced.
~__
~~~
83.9 and 65.9 Series Engines
Maintenance Procedures at 77,000 km [48,000 mi]
Page 7-a
Maintenance Procedures at 77,000 Kilometers [48,000
Miles], 2000 Hours, or 2 Years
Section Contents
Page
Air Compressor..........................................................................................................................
inspect .............................................................................
;......:................................................
.
.........................., . ................................................................
Cooling System ........................................
.............:............... .............................. U..................................
Drain ......................................................
Filf .....:...........................................................
................................................ ........................................
Flush .............................................................................................................................................................
-Maintenance Procedures Overview...................................................................................................................
General Information ......................:....... ..........................................................
:..............................................
7-2
7-2
7-6
7-4
7-1
7-1
Vibration Damper.,............................................................................
................................... ..........................
Inspect .................................................................................................
..........................................................
7-8
7-8
~
~
-
~
Page 7-b
83.9 and 85.9 Series Engines
Maintenance Procedures at 77,000 km 148,000 mi]
THIS PAGE LEFT INTENTIONALLY BLANK
83.9 and 85.9 Series Engines
Maintenance Procedures at 77,000 km [48,000 mi]
-
-
Maintenance Procedures Overview
Page 7-1
Maintenance Procedures Overview
General Information
All checks or inspections listed under daily or previous maintenance intervals must also be performed at this time, in
addition to those listed under this maintenance interval.
Cooling System
Page 7-2
83.9 and 65.9 Series Engines
Maintenance Procedures at 77,000 km [48,000 mi]
Cooling System
Drain
A
A
A
A
A
A
WARNING
Avoid prolonged and repeated skin contact with used
antifreeze. Such prolonged, repeated contact can cause
skin disorders or other bodily injury. Keep out of reach
of ChllGran.
CAUTION
Protect the environment: Handling and disposing of
used antifreeze is subject to federal, state, and local
regulations. Use authorized waste disposal facilities,
including civic amenity sites and garages providing
authorized facilities for the receipt of used antifreeze.
If in doubt, contact your local authorities of the €PA for
guidance as to proper handling of used antifreeze.
WARNING
DO not remove the pressure cap from a hot engine. Wait
until the coolant temperature is below 50% [122OF]
before removing the pressure cap. Heated coolant spray
or steam can cause personal injury.
Cooling System
. Page 7-3
83.9 and 85.9 Series Engines
Maintenance Procedures at 77,000 km [48,000 mi]
A
A
WARNING
Coolant is toxic. Keep away from children and pets. If
not reused, dis ose of in accordance with local environmental reguLtions.
Drain the cooling system by opening the drain valve on the
radiator and removing the plug in the bottom of the water
inlet. A drain pan with a capacity of 19 liters (5gall will be
adequate in most applications.
Check for damaged hoses and loose or damaged hose
clamps. Replace as required. Check the radiator for leaks,
damage, and buildupof dirt. Clean and replace as required.
@
Cooling System
Page 7-4
83.9 and 85.9 Series Engines
Maintenance Procedures at 77,000 krn [48,000 mil
Flush
A
A
CAUTION
During filling, air must be vented from the engine coolant passages. The air vents through the “jiggle pin”
openings to the top radiator hose and out the fill opening. Additional venting is provided for engiinesequipped
with an aftercooler. Open petcock during filling.
NOTEAdequateventing isprovidedforafill rateof 19 liters
15 gal] per minute.
A
A
CAUTION
Do not install the radiator cap: Th’e engine is to be
operated without the cap for this process.
Fill the Bystem with a mixture of sodium carbonate and
water (or commercially available equivalent).
NOTE Use0.5 kg[i.Olb]ofsodium carbonateforevery23
liters (6.0 gal] of water.
83.9 and 85.9 Series Engines
Maintenance Procedures at 77,000 km [48,000 mi]
Coolant is toxic. Keep away from children and pets. If
not reused, dispose of in accordance with local environmental regulations.
Operate the engine for 5 minutes with the coolant reaching
the temperature of above 8OoC [176PF].
Shut the engine off and drain the cooling system
Fill the cooling system with clean water.
'
.
NOTE: Be sure to vent the engine and aftercooler for complete filling.
NOTE Do not install the radiator cap or the new coolant
filter.
Cooling System
Page 7-5
Cooling System
Page 7-6
83.9 and 85.9 Series Engines
Maintenance Procedures at 77,000 km [48,000 mi]
A
A
WARNING
Coolant is toxic. Keep away from children and pets. If
not reused, dlspose of in acoordance wlth local environmental regulations.
Operate the engine for 5 minutes with the coolant reaching
the temperature of above 60% [176OF].
Shut the engine off and drain the cooling system.
NOTE: If the water being dralned is still dirty, the system
must be flushed again until the water is clean.
Fill
A
A
CAUTION
The system must be filled properly to prevent air locks.
During filling, air must be vented from the engine coolant passages. Be sure to open the petcock on the aftercooler for aftercooled engines. Wait 2 to 3 minutes
to allow air to be vented; then add mixture to bring level
to the top.
NOTE: The system has a design fill rate of 19 liters [5 gal]
per minute
83.9 and 85.9 Series Engines
Malntenance Procedures at 77,000 km [48,000 mi]
A
~
~
A
CAUTION
Never use water alone for coolant. Damage from corrosion can be the result of using water alone for coolant.
Use a mixture of 50-percent water and 50-percent ethylene
glycol antifreeze to fill the cooling system.
only)
Coolant Capacity. (engine
. .
..
liters
463.9, 4BT3.9
7
MAX
4BTA3.9'
7.9
MAX
665.9, 6BT5.9
9
MAX
6BTA5.9*
9.9
MAX
U.S.gal
1.85
2.1
2.38
2.61
'Jacket-water aftercoolers are used on the 4BTA and 6BTA
engines. If a charge air cooler IS used,'the coolant capacity
isthesameasthe naturallvasDirated
orturbocharaed-onlv
~.
engines.
~
Cooling System
Page 7-7
.
.
83.9 and 85.9 Series Engines
Maintenance Procedures at 77,000 km 148,000 mi]
Vibration Damper
,Page 7-8
Do not remove the pressure cap from a hot engine. Wait
until the coolant temperature is below 50°C [122aF].
Failure to do so can cause personal injury from heated
coolant.
Installthe pressure cap. Operate the englne until it reaches
a iemperature of 80% [i8G9Fj, and check for coolam
leaks.
B
fl
dasOOsa
Check the coolant level again to make sure system is full
of coolant, or that the coolant level has risen to the hot level
in the recovery bottle on the system, if equipped.
Vibration Damper
Inspect
Check the index lines (A) on the damper hub (B) and the
inertia member(C). If the lines are more than 1.59 mm [1/16
in] out of alignment, replace the damper.
Air Compressor
Page 7-9
83.9 and 65.9 Series Engines
Maintenance Procedures at 77,000 km [48,000 mi]
Inspect the rubber member for deterioration. If pieces of
rubber are missing or if the elastic member is more than
3.18 mm [l/8 in] below the metal surface, replace the
damper.
NOTE: Also, look for forward movement of the damper ring
on the hub. Replace the damper if any movement is
detected.
Air Compressor
Inspect
.
NOTE: All air compressors have a small amount of lubricating oil carryover that lubricates the piston rings and
moving parts. When this lubricating oil is exposed to normal air compressor operating temperatures over time, the
lubricating bil will form varnish or carbon deposits. If the
following inspections are not done, the air compressor
piston rings will be affected by high operating temperatures
and pressures and will not seal correctly.
mr
83.9 and 85.9 Series Engines
Maintenance Procedures at 77,000 km [48,000 mi]
Air Compressor Discharge Inspection
Drain the air system wet tank to release the system ajr
pressure. Remove the ah discharge line from the air
compressor.
ID of Discharge Llne
@
n
\
ID of Carbon Build Up
Measure the total carbon deposit thickness inside the air
dlscharge line as shown. If the total carbon deposit (X +
X) exceeds 2 mm 11/16 in], clean and inspect the cylinder
head, the valve assembly, and the discharge line. Replace
if necessary. Contact the Cummins Authorized Repair Location for procedures
83.9 and 85.9 Series Engines
Maintenance Procedures at 77,000 km [48,000 mi]
Air Compressor
, Page 7-11
If the total carbon deposit exceeds specifications, continue
checking the air discharge line connections Up to the first
tank until total carbon deposit is less than 2 mm [1/16 in].
Clean or replace any lines or connections that exceed this
specification.
@
Inspect any air driers, splitter valves, pressure relief valves,
and alcohol injectorsfor carbon deposits or malfunctioning
parts. Inspect for air leaks. Maintain and repair the parts
according to'the manufacturer's specifications.
@
. .
e=
Air Compressor
Page 7-12
83.9 and 85.9 Series Engines
Maintenance Procedures at 77,000 km 148,000 mi]
83.9 and 85.9 Series Engines
Section A Adjustment, Repair, and Replacement
Page A-a
Section A Adjustment, Repair, and Replacement
-
Section Contents
I
Aftercooler ............
...........................................................................................
Clean ...........................__......_._................................................................................................................,..
.Fill .;...........................................................................................................................................................
Install .........................................................................................................................................................
Preparatory .................................................................................................................................................
Remove .....................................................................................................................................................
.
....................................................... :..................................
..........................................................................................
._..;
...............................................................................................................
Air Intake Manifold...................................
................................................................... :.................................
Clean .............................................................................
:...........................................................................
install ..................................................
;......................................................................................................
Preparatory ................................................................................................................................................
Pressure Test ..........................................................................
;..................................................................
Remove ................................................
......................................................................................................
Differential Test ...............................................................................
1......................................
........................................ ................................................................ :.....................................
Air Intake System -Overview ...............................................
:
.......................................................................
General Information ..:............................................................
1.....................................................................
Alternator .............................................
>.......................................................................................................
Install .........................................................................
.............................................................................
: Remove
..................................................................................................................... ;.. ............................
Belt Tensioner, Automatic ...............................................................................................................................
Air Crossover ...........
Install ...................
Remove ..:...............................
I
Page
A-76
A-70
A-79
A-78
A-76
A-76
A-75
.
I
,!
i
i
A-74
A-74
A-112
A-113
A412
A-4
Page A-b
..................I
.......
............ ..............................................
'
I
install ..................
............
r..,.~
..........................
......,..I ..:................~:....:
........i....., A-5
i
l
l
,
Remove ...............................................
.,;.L./:./,..I.. .;................, ;.,, ~ , , , ~I , , , , ' ,
:! A-4
Charge-Air Cooler (CAC) .
.......................................................................................................................
A-80
,
........................................ ;..............................
:.......................... :
..................... A-80
Pressure Test .......................................................................................................................................................
A-81
'
.
!
Cold Start Timing Advance System (KSB)!.TemberatureSwitch
I
1.............. . A 4
Install. .........................................................
;. ...............................................................................................
A-45
,
.
,
Remove ................................
..,).
I
A-45
......
.....
I.....;.....I
........ ...........................
Coolant Thermostat
Clean ..........................................................
...................................................
................................... ......................................................
1.....................................
.......................................... .............
........... A-11
.......................................................................... <...<
A-I3
~
i.j
................................................................................................................ A-16
...................................
..................
.................
............................................ A-11
. .
1....................................
;................ A-12
.
i
....I....
,
,,,
,
,
,
,
, ,
.....................................
8.
,
8
,
....j.......................... L A-2
........................................................................................................ :.......... A-2
........................................
............................
.................................... A-3
Install ...........................
........................................
............................
.................................... A-3
Remove .......................................................
.:.....................;.............:........................................................... A-3
Electrical Equipment - 'Overview .................................................................................................................
A-109
General Information ................ .............................................................................................................
A-109
.,
Exhaust Manifold, Dry ........................
:..........................................................................................................
A-96
Clean ............................................................................................................................................ :............ A-97
....................................................
............................. A-98
...........................................
...........................................
...........................................
,
:
,
,
:
. ,
.............................................
...............................................
83.9 and 85.9 Series Engines
Section A .Adjustment. Repair. and Replacement
Page A-c
m e
Fan Spacer and Pulley .
............................... :................................. .........................................................
A-5
Install ..............,......... :
................................................................................................................ ;...........A-6
Remove .......................................
..................................................................................................... 1........... A-5
Fuel Filter Adapter .........................................................................................................................................
A-22
Preparatory ................................................................................................................................................
A-22
Remove .........................................
>. ...........................................................................................................
A-23
Fuel Injection Pump, Rotary ..........................................................................................................................
A-46
install ...................................................................................................................................................... A-51
Preparatory ................................................................................................................................................
A-46
......................................................................................................... ................................. A-47
Fuel Injection Pumps, In-Line ........................
............................................................................................... A-60
Install ......................................................................................................................
.................................. A-63
Preparatory ................................................................................................
:...............................................
A-60
Remove ......................................................................................................................................................
A-60
.
Fuel Lift Pump ................................................
........................................................................................... A-23
Clean ..........................................................
......................................................................................... A.24 .
Install ............................................
.......................................................................................................... A-25
........................................................................................................ A-23
Fuel Manifold (Drain) .....................................................................................................................................
A-31
.Install ................:................................................................................................. :.......................................
A-34
;..................
i..........
I...............................
........................................................ :................. A-31
............................................................................................................................................ A-31
.....
~
I
Fuel Pump .....................................................................................................................................................
Adjust ...........................................................................
.................................... L .........................................
..
Fuel Shutoff Valve ...........................................................................................................................................
Clean .......
............................................................................................................................................
I
A-73
A-73
A-41
A-42
~~
~
, .
;,,
,
, , ,, , .
;
PageA-d
.
,
,
, ,, . , , , "
, ,
,
,
i i
,
~
,
.
8
,
,
,
.~
'
~,
8
.
~
~
,
, ,
,
. I ,
'
'
,
!'
B3.9 and B5.9 !Series Engines
, , ,
'
,
,:
.
,
,
, ,,
,
,
.......
....,...1.,.......,.............
..... A-43
Preparatory ............,.h..~....~.l
~.,"!l
............... ..ii~....,..
.
.
.
.
.
.
.
.
.
.
.
.
.
.
.
.
.
.
.
.
.
.
.
.
.
.
. ....'4; ....L.n'g.. /.l. .........
r. ..il.....,
A-41Remove ......................................................................................................................................................
A-42
Fuel Supply Lines............................................................. :.........................
:.,I.......................................
i.......
A-18
Install ......................................................
........................................................... 1................................... A-I9
.............................. I.......... ;........... i. ............................... ...................... A-18
Preparatory
nemcse __._,
....................
........................
................................. 1................. A-18
Fuel System - Oyarview........................................
,1,. ................................
i........................................
General Information ............................
I ...........i ..........;...........
........................................
..
................ I... A-36
........................
Injector ...........................................................................................
IIIIU.I.II.IIiL
.................... A-37
Clean ..............................
:
.................... ...................................... :.......................................
.........
..................................................
, ,
,
,,
#
S
,
..i
.*.:_~
.
. ,
,
!
.
I'
!.
Ijtl:...b
,
,
.,
,
L
............................................................................................... ..................................
................................
...........;,.,"."...".,p..... .,.,,;.................... ....................................
...............
...............................................: :"..........
A-36
UW)'e):
........1...........1 ......;* .......L .....:!A...I.. ......i ...................... :.;!. ........ A726
................................................................................................................. A-29
.................................................................................................................. A-26
Remove ..................................................................................................................................................
Lubricating Oil Cooler:.......................,..I...........................................
;/,..........................
:............ ............. A-103
.......> .................................................
.............................
.................. A-104
Clean .............:............
..............................
................................................ A-I08
Install
L.d
".I
,
,
'
!
.
,
,
,
i.,.,;
L..;
~
................................................
A-I06
.................................
.......................................
................................................................................
............................................
............................................
14-104
......................................
..................................
A-100
A-101
83.9 and 85.9 Series Engines
Section A .Adjustment. Repair. and Replacement
Page A-e
Page
...............................................................
...................................
Install ...........................................
Preparatory ........ ...................................................................................................................................
Remove ......................................................................................................................................................
Lubricating Oil System Overview.................................................
..............................................................
General Information .............................
;
......i ..............................................................................................
Startlng Motor ..............................................................................................................................................
Install ................................................................................................................
1.......................................
Remove .....................................................................................................................................................
:
-
a-i02
A-100
A-100
A-99
A-99
A-110
A-111
A-110
Tool Requirements ................:.........................................................................................................................
General Information ......................................................................................................................................
A-1
A-1
Turbocharger ........................
:
.................................................. :......................................................................
Clean .........................................................................................................................................................
Install ...................................................
:......................................................................................................
Preparatory ................................................................................................................................................
Remove ......................................................................................................................................................
Test ............................................................................................................................ . :
................................
...
Water Pump .....................................................................................................................................................
Clean ............................................................................................................................................................
Install .......;.................
:...............................................................................................................................
Preparatory ........................
:............................................................ ............................................................
Remove ......................................
:.........................
.................................................................
A-86
A-89
A.89.
A-86
A-87
A-96
...........
. .
~
A-7
A-9
A-10
A-7
A-8
Page A-f
83.9 and 85.9 Series Engines
Section A Adjustment, Repair, and Replacement
-
THIS PAGE LEFT INTENTIONALLY BLANK
Tool Requirements
Page A-1
83.9 and 85.9 Series Engines
Sectlon A Adlustment, Repair, and Replacement
-
Tool Requiremenp
General Information
Tool Requirements
Repair Tools Required
Sockets
10 mm
12 mm
13 mm
15 mm
17 mm
18 mm
Wrenches
8 mm
10 mm
13 mm
15 mm
17 mm
(open end)
19 mm
Other
Allen wrench (8 mm)
Breaker bar (112-in sq. drive)
Flat screwdriver
Ratchet (3/8-in sq. drive)
Ratchet (1124sq. drive)
Filter wrenches'
(75to 80 mm and 90 to 95 mm)
Drill motor (1/4-in)
Drill bit (3 mm)
Slide hammer
Flat chisel
T-bar puller (75mm)
Sheet metal screw (No. 10)
Torque wrench
Pliers
Engine barring' gear, Part No.3824591
I
19 mm
22 mm
27 mm
22 mm
24 mm
I
Cooling System
Page As2
83.9 and 85.9 Series Engines
Section A Adjustment, Repair, and Replacement
-
Cooling System
General Information
A
WARNING
A
Coolant is toxic. Keep away from chlldren and pets. If not reused, dispose of in accordance with local environmental regulations.
A
iriAFiEiiEiG
.A
Do not remove the pressure cap from a hot engine. Wait until the coolant temperature is below S O T [122OF]
before removing the pressure cap. Heated coolant spray or steam can cause personal injury.
Components to
Drive belt
Belt tensioner
Fan hub
Water pump
Thermostat
Tools
PreDaratorv Stem
Breaker bar
(318-insq. drive)
Ratchet
(3/&in sq. drive),
13mm socket, and torque
wrench
13-mm socket/wrench
10-rnm socketlwrench
iO-mm, 18.mm, and 19-mm
socketlwrench
Remove drive belt
*
Remove drive belt and fan pulley
Drain coolant and remove drive belt
Drain coolant, remove drive belt, loosen alternator
link, remove alternator mounting capscrew, remove
thermostat housing
'
83.9 and 65.9 Series Engines
Sectlon A Adjustment, Repair, and Replacement
-
'
Drive Belt, Cooling Fan
Remove
3/8-lnch Square Drive
Lift the tensioner to remove the drive belt.
NOTE The belt tensioner is spring-loaded and must be
pivoted away from the drive belt. Pivoting in the wrong
direction can result in damage to the belt tensioner.
Install
A
A
CAUTION
Applying excessive force in the opposite direction of
windup or afterthetensioner has been wound up to the
positive stop can cause the tensioner arm to break.
318-lnch Square Drive
Lift and hold the belt tensioner. Installthe drive belt: release
the tensioner.
@
I S
Drive Belt, Cooling Fan
Page A-3
Belt Tensloner, Automatic
Page A-4
83.9 and 65.9 Series Engines
Section A Adjustment, Repair, and Replacement
mi
-
Belt Tensioner, Automatic
Remove
,
.
3/8-lnch Square Drive
Lift belt tensioner to relieve tension h t h e belt, and remove
the belt.
N%E: he bal: :ensicna: is sp:ing-ioaded and mua: be
pivoted away from the drive belt. Pivoting in the wrong
direction can result in damage to the belt tensioner.
13mm the belt tensioner.
Remove
Fan Spacer and Pulley
Page A-5
83.9 and 85.9 Series Engines
Section A Adjustment, Repair, and Replacement
-
Install
3/8-lnch Square Drive, 15-mm Wrench
install the belt tensioner and tighten. the capscrew.
Torque Value: 43 N-m
[32 ft-lb]
Lift and hold the tensioner. Installthe drive belt and release
the tensioner.
Service Tip: If difficulty is experienced installing the drive
beit: for example, the belt seems too short: positionthe belt
over the grooved pulleys first; then, while holding the tensioner up, slide the belt over the water pump pulley.
I
.
Fan Spacer and Pulley
Remove
3/8-lnch Square Drive
Lift belt tensioner to relieve tension in the beit, and remove
the belt.
NOTE: The belt tensioner is spring-loaded and must be
pivoted away from the drive belt. Pivoting in the wrong
direction can result in damage to the belt tensioner.
@
a r
c9
Fan Spacer and Pulley
Page A-6
83.9 and 85.9 Series Engines
Section A Adjustmeqt, Repair,, and qeplacement
I
l;!l
'
,I
-
Remove the four capsciews, fan, andNqpaceii
:I
,,
8
,
,
!
Install
3/8-lnch Square Drive
Lift the tensioner, and install the belt.
Service Tip: If difficulty is experienced installingthe drive
belt (the belt seems too short), position the belt over the
grooved pulleys first; then, while holding the tensioner up,
slide the belt over the water pump pulley.
83.9 and 85.9 Series Engines
Section A Adjustment, Repair, and Replacement
-
10 mm, 13 mm
install the four capscrews, fan, and spacer.
10-mm Wrench
Torque Value: 24 N*m
[18 ft-lbl
13-mm Wrench
Torque Value: 43 N*m
132 ft-lb]
Water Pump
Preparatory
' AWARNING A
Coolant is toxic. Keep away from children and pets. If
not reused, dis ose of in accordance with local environmental regul'ations.
Drain the coolant.
Water Pump
Page A-7
Water Pump
Page A-8
83.9 and B5.9 Series Engines
Section A Adjustment, Repair, and Replacement
-
Remove
Remove the drive belt.
Remove the two capscrews and water pump.
I
I
83.9 and 85.9 Series Engines
Section A Adjustment, Repair, and Replacement
-
Clean
Clean the sealing surface on the cylinder block.
Clean o-ring sealing surface on the water pump housing.
Install the o-ring onto the water pump housing.
Water Pump
Page A-9
Water Pump
Page &lo
83.9 and 85.9 Series Engines
Section A Adjustment, Repaiq and lReplacemlehnt
-
Install the water putnp.
[18 Rlb]
3/8-lnch Square Drive
Lift the tensiomer and install the belt.
Service Tip: If difficulty is experienced installingdrive beit,
such as the beit seems too short, position the belt overlhe
grooved pulleys first: then, while holding the tensioner up,
slide the belt over the water pump pulley.
83.9 and B5.9 Series Engines
Section A Adjustment, Repair, and Replacement
-
n coolant Thermostat
Preparatory
A
WARNING
A
Batteries can emit explosive gases. To avoid personal
injury, always ventilate the compartment before servic-.
ing the batteries. To avoid arcing, remove the negative
(-) battery cable first and attach the negative (-1 battery
-cable last.
A
WARNING
A
Coolant is toxic. Keep away from children'and pets. if
not reused, dispose of in accordance with local environmental regulations.
..
Disconnect the negative (-) battery cable.
Drain 2 liters [2.lqt] of coolant.
Remove the radiator hose from the outlet connection.
Remove the drive belt.
.Coolant Thermostat
Page A-11
Coolant Thermostat
Page A-12
83.9 and 85.9 Series Engines
Section A Adjustment, Repair, and Replacement
-
Remove
14 mm, 16 mm
Loosen the lower alternator link capscrew.
@$Remove the upper alternator mounting capscrew.
@
Lower and remove the alternator.
83.9 and 85.9 Series Engines
Section A Adjustment, Repair, and Replacement
-
10 mm
Remove the thermostat housing, lifting bracket, thermostat, and thermostat seal.
-Clean
Clean the gasket surfaces.
NOTE Do not let any debris fall into the thermostat cavity
when cleaning gasket surfaces.
Coolant Thermostat.
Page A-I3
.Coolant Thermostat
Page A-14
83.9 and 85.9 Series Engines
Section A Adjustment, Repalr, and Replacement
-
Install
A
CAUTION
A
Always use the correct thermostat and never operate
the engine without a thermostat. An incorrect thermostat can cause the engine to overheat or run too cold.
The engine will overheat if operated without B thermostat because the coolant flows back to the inlet of the
water pump instead of through the mdiaior ior cooiing.
Assemble the removed parts in the reverse order of removal.
Make sure the gasket is aligned with the capscrew holes.
Install the capscrews and finger-tighten.
The notched end of the~rubberthermostat seal points away
from the cylinder head.
Coolant Thermostat
Page A-15
83.9 and 85.9 Series Engines
Section A Adjustment, Repair, and Replacement
-
10 mm
Tighten the capscrews.
Torque Value: 24 N*m
[18 ft-lb]
14 mm, i6.mm
Position the alternator and install the mounting capscrews.
Torque Value: (A) 24 N*m
Torque Value: ,(B) 43 N*m
[18 ft-(b]
’
132 ft-lb]
‘a
Fa
@
.r
Coolant Thermostat
Page A-16
I
83.9 and 85.9 Series Engines
Section A Adjustment, Repair, end Replacement
-
13 mm
Install the drive belt.
NOTE: After the tensioner has been raised to remove/
install the beit, check the tensioner capscrew for the correct torque.
Torque Value: 43 N*m
@
A
132 ft-lb]
A
CAUTION
Be sure tovent theengineand aftercooler during filling,
to remove air from the coolant system, or overheating
will result.
Fill the cooling system. Operate the engine and check for
leaks.
.
83.9 and 85.9 Series Engines
Section A Adjustment, Repair, and Replacement
-
-
Fuel System Overview
Page A-17
-
Fuel System Overview
General information
Fuel System Repair Summary
Do not mix gasoline, alcohol, or gasc
Components to Be
Replaced
Lift Pump
High-pressure Lines
Injector Fuel
Drain Manifold.
Injectors
Injection Pump
Fuel Solenoid (Rotary
Pump)
Fuel 'Filter Head
,Iwith diesel fuel. Thls mixture can ci
ie an explosion.
Tools
Preparatory Steps
13-, 14-, and 17-mm wrenches
10-mm socket, 14-, 17-, and 19-mm openend wrenches, torque wrench
10- and 19-mm open-end wrenches
10- and 13-mm sockets, torque wrench
Ratchet, 24-mm deep well socket, torque
wrench
10-mm wrench, ratchet, 22-mm socket,
75-mm T-bar puller, 8-mm capscrews, 1/2inch open-end wrench, flat screwdriver,
13-mm socket, 15mm wrench, hammer, flat
chisel, torque wrench
Bosche 24-mm wrench, Lucas CAV 22-mm
wrench
24-mm, 75- to 80-mm and 90- to 95-mm
filter wrench.
Clean debris.
Clean debris.
Disconnect the high-pressure lines and
fuel drain manifold.
Remove high-pressure line, supply line,
and return line. Remove the AFC air
line, oil line(s), fuel shutoff solenoid,
and control linkage.
Label and disconnect wiring.
Clean debris.
Fuel Supply Lines
Page A-18
83.9 and 65.9 Series Engines
Section A Adjustment,, Repair, and Replacement
-
Fuel Supply Lines
, ,
~
,
Preparatory
Low Pressure Fuel Line
Thoroughly clean all fittings and components before removal. Make sure that the debris, water, steam, or cleaning
solution does not reach the inside of the fuel system.
Remove
Diaphragm Style Lift Pump
14 mm, 17 mm
@ Disconnect
the fuel line from the lift pump and filter head.
Use two wrenches disconnect the line from
lift pump.
to
the
Fuel Sup ly Lines
83.9 and B5.9 Series Engines
Section A Adjustment, Repair, and Replacement
-
Age ~ - 1 9
Piston Style Lift Pump
14 mm, 17 mm, 20 mm
Install
Diaphragm Style Lift Pump
14 mm, 17 mm
Install the fuel line to the lift pump and filter head. Use two
wrenches to tighten the connection to the lift pump.
Torque Value: 24 N*m
(18 ft-lbl
..
NOTE: Do not overtighten the connection. Fuel leaks can
result from overtightening.
Fuel Supply Lines
83.9 and 65.9 Series Engines
Section A Adjustment, Repair, and 'Replacement
-
Page A-20
Piston Style Lift Pump
14 mm, 17 mm, 20 mm
Install the fuel'lineto the lift pump and filter head. Use two
wrenches to tighten the connection to the lift pump.
l8rque Value: 24 N*m
[18 ft-lb]
Injection Pump Supply Line Replacement
17mm
634
Remove the bleed screw banjo fitting.
Fuel Supply Lines
Page A-21
83.9 and 85.9 Series Engines
Section A Adjustment, Repair, and Replacement
-
14 mm, 16 mm, and 24 mm
Remove the supply line (Boschm injection pump).
NOTE: Replace the seals (1) in the fittings if the line is
disassembled.
14 mm, 16 mm, 19'mm, and 24 mm
Remove the supply line (Lucas CAV injectio? pump). The
Lucas CAV pump has two fittings for the supply line.
Replace fitting sealing washers (l),and ferrules (2) each
time they are removed.
Torque Value: 32 N*m
[24 ft-lb]
NOTE": Replace the seals in the fittings if the line
disassembled.
IS
I
,
Fuel Filter Adapter
Page A-22
83.9 and 85.9 Series Engines
Section A Adjustment, Repair, and Replacement
-
..
@
Engi es rated at 2500 rpm and above require additional
fuel ine support. Install as illnstreted.
Torque Value: 24 N*m
Fuel Filter Adapter
Preparatory
@
Clean debris
Remove fuel filters
[I8 ft-lb]
63.9 and 85.9 Series Engines
Section A Adjustment, Repair, and Replacement
-
Remove
24 mm
Remove the retaining nut, filter head adapter, and sealing
washers.
Install in reverse order of removal.
Torque Value: 32 N*m
[24 ft-lb]
Fuel Lift Pump
Preparatory
Clean debris from around the lift pump
Disconnect the fuel supply lines.
Fuel Lift Pump
Page A-23
Fuel Lift Pump
Page A-24
~
83.9 and 85.9 Series Engines
-'Adjustment, 'Repair,!and hplhcement
;?
,
.
!
Clean the mounting surface on the cylinder block.
;;;FmStyle
Remove the lift pump.
' Clean the mounting surface on the cylinder block.
B3.9 and 85.9 Series Engines
Section A Adjustment, Repair, and Replacement
-
Install
Diaphragm Style
10 mm
Install the lift pump and a new gasket.
Torque Value: 24 N*m
[18 ft-lb]
Connect the fuel lines.
Piston"Style
A
A
CAUTION
Alternately tighten the mounting capscrews. AS the
capscrewsare tightened, the fuel transfer pump plunger
is pushed into the pump. Failure to tighten the capscrews evenly can result in the plunger being bent or
broken.
Install the pump.
Torque Value: 24 N*m
Connect the fuel lines:
[18 ft-lb]
Fuel Lift Pump
Page A-25
Injector Supply Lines (High Pressure)
Page A-26
1,
!
!'
w~
I '
~
1
i
I
83.9 and 85.9 Series Engines
Section A Adjustmmt, Repair, and Replacement
-
!
injector Supply Lines (High'Pressure)
I
Preparatory
,!
Clean all debris from around the fittings.
Remove
Rotary Pumps
@
:s:tnect
the fuel line(s) from the injector.
NOTE If individual lines are to be replaced, rkmove the
support clamp from the set of lines containing the line to be
replaced.
B3.9 and 85.9 S e r b Engines
Section A Adjustment, Repair, and Replacement
-
17 mm
,
Disconnect the.fuel line(s) from the fuel pump. Install protective covers onto the injectors and delivery valves to
prevent entry of dirt into the system.
.m
G9
lnline Pumps
0 mm, 17 mm, and.19 mm
Disconnect the line(s) from the injector(s).
NOTE: If individual lines are to be replaced, remove the
support clamp from the set of lines containing the line to be
removed.
@
Injector Supply Lines (High Pressure)
Page A-27
Injector Supply LInes (High Pressure)
Page A-26
83.9 and 85.9 Series Engines
Se.ction A Adjustment, Repair, and Replacement
-
Disconnect the line@)from the fuel pump.
83.9 and 85.9 Series Engines
Section A Adjustment, Repair, and Replacement
-
Install
Rotary Pumps
A
A
A
A
CAUTION
Install the support clamp in the original position and, to
prevent damage from high-frequency vibration, make
sure the lines have not been bent or do not contact each
other or another component.
CAUTION
To prevent damage to the fuel lines, they must be connected to the injectors and fuel injection pump in a free
state without forcing the connecting nuts. The fuel lines
are correctly sized for each application. Bending the
lines is not acceptable and can cause fuel leaks.
17 mm
Install the fuel lines in reverse order of removal.
Torque Value: (Line Fittings)
24 N*m
[18 ft-lb]
Torque Value: (Support Clamp)
6 N-m
[53 in-lb]
Torque Value: (Support Bracket)
24 N*m
[18 ft-lb]
Injector Supply Lines (High Pressure)
Page A-29
B3.9 and 85.9 Series Engines
Section A ;,,A$justment, Repair, 'and ReplaFernent
Injector Supply Lines (High Pressure)
Page A-30
lnline Pumps
19 mrn .
,
Install the iines in',reverseorder:of removal.
Toque Value: (Line Fittings)
24 N*m
[ I 8 ft-lb]
Torque Value: (Support Clamp)
6 N*m
152 in-lb]
Torque Value: (Support Bracket)
24 N-m
,
118 ft-lb]
NOTE If removed, reinstall the support clamp in the original position, and make sure the ilnesdo not contact each
other or another component. Install a protective cover on
the injectors and fuel delivery valves to prevent the entry of
dirt into the system.
83.9 and 85.9 Serles Engines
-
Section A Adjustment, Repair, and Replacement
Fuel Manifold (Drain)
Preparatory
Clean debris.
Remove
3
Rotary Pumps
10 mm
Remove the capscrew from the hold-down clamp.
Fuel Manifold (Drain)
Page A-31
,
83.9 and 85.9 Series Engines
Section A Adjustment, Repair, and Replacement
-
17 mm
Disconnect the drain line fitting from the injection pump
63.9 and 85.9 Series Engines
Section A Adjustment, Repair, and Replacement
-
inline Pumps
10 mm
Remove the drain line banjo capscrew from the fuel filter
head. Remove the capscrew from the bracket on the intake
cover.
10 mm
Remove the banjo capscrews from the injectors:
Fuel Manifold (Drain)
Page A-33
Fuel Manifold (Draln)
Page A-34
83.9 and 85.9 Series Engines
Section A Adjustment, Repair, and Replacement
-
,
,~
@
~1
NOTE: Use new seals and sealing'washers.
Assemble the drain line and fuel
reverse order of removal.
drain
Torque Va!ue: (Ban@ Fit:ing Screw)
15 N*m
[133 in-lb]
Torque Value: (Banjo Fitting)
9N.m
.
180 in-lb]
Torque Value: (Clamp Screw)
24 N*m
[ I 8 fi-lb]
manifold in the
Fuel Manifold (Drain)
Page A-35
83.9 and 85.9 Series Engines
Section A Adjustment, Repair, and Replacement
-
lnline Pumps
10 mm
NOTE: Use new seals and sealing washers.
Assemble the drain line and drain manifold in the reverse
order of removal.
Torque Value: (Banjo Fitting Screw)
15 N*m
[133 in-lb]
Torque Value: (Banjo Fitting)
9 N*m
[80 in-lb]
Torque Value: (Bracket Capscrew)
24 N*m
[18 ft-lb]
x
@
~
r 1
Injector
Page A-36
I
B3.9 and 85.9 Series Engines
Section A Adjustpent, Repair, and Replaceme;nt
-
I
I
I
, Injector
~
~
Preparatory, ,, ,
.
,
Thoroughly clean around the injectors.
Disconnect the high-pressure fuel lines.
Disconnect the fuel drain manifold.
Remove
I-.
~
'
16-mm and 24-mm Box Wrenches
A
A
'*
CAUTION
. .
The Injector must not rotate in the bore of the cylinder
head. This will damage the cylinder head.
Remove the injectors.
NOTE: Hold the injector body with a 16-mm wrench while
loosening the hold-down nut with a 24-rnm end wrench:
83.9 and 85.9 Series Engines
Section A Adjustment, Repalr, and Replacement
-
Clean
Injector Bore Brush, Part No. 3822509
. .
Install
Remove the injector hold-down nut, and apply a coat of
anti-seize compound to injector surface (A). Avoid getting
anti-seize compound in the fuel drain hole (5).
Injector
Page A-37
Injector
Page A30
83.9 and 85.9 Series Engines
Section A Adjustment, Repair, and Replacement
-
a-'
,
figorha
Install a new O-ring into the recessed groove on the top of
the hold-down nut. Make sure the O-ring is not cut or
twisted when installing (Boschm and Stanadyne).
NOTE: CAV injectors retain the O-ring inside the hold-down
nut.
Injector
Page A-39
83.9'and 85.9 Series Engines
Section A Adjustment, Repair, and Replacement
-
Apply a light coat of anti-seize compound to the threads of
the injector holddown nut.
AsFernble the injector and new copper washer.
Use only one copper washer.
,
.
NOTE: A light coat of clean lubricating engine oil between
. the washer and injector can help to keep the washer from
falling during Installation.
.
\.
@
14W! 081
-
83.9 and 85.9 Series Engines
Section A Adjustment, Repair, and Replacement
-
17 mm
Idstall the high-pressure fuel lines.
Torque Value: 24 N*m
[ l S ft-lbl
@
m r
.
.
Fuel Shutoff Valve
.
Preparatory
Label and disconnect wiring.
Fuel Shutoff Valve
Page A-42
83.9 and 86.9 Series'Engines
Section A Adjustment, Repair, and Repl,acepent
-
~5 -
.I1
,
,
!
,
Pumps
-
22 mm CAV, 24 mm BoschB
,
'
Clean around the valve.
@
=
@,
Remove the valve.
K T E : 3 e capful not io drop ihe pision and spring when
removing the valve.
Replace the valve and connect the electrical wire.
Torque Value: 43 N*m'
132 ft-lb]
Remove
Remove the electrical wiring.
Remove the fuel drain line.
Remove the throttle shutoff linkage.
Remove the fuel injection pump top cover.
Disassemble the fuel injection pump top cover
63.9 and 65.9 Series Engines
Section A Adjustment, Repair, and Replacement
Fuelshutoff Valve
Page A-43
-
Install
5/16 Inch
Install new insulating tubes onto the terminals on the terminal studs of the new solenoid.
Install the valve into the cover.
Torqhe Value: 14 N*m
[I24 in-lb]
i
. .
5/16 Inch
Install the cover and gasket onto the fuel injection pump.
NOTE Extreme care must be taken in assembling the
cover to the fuel injection pump to make sure the shutoff
arm is in proper contact with the linkage hook tab.
install the cover to the pump ata downward angle from the
driveshaft end of the fuel injection pump; then slide the
cover horizontally into position.
Torque Value: 5 N*m
[44 in-ib]
..
(@
Fuel Shutoff Valve
Page A-44
83.9 and 85.9 Series Engines
Section 'A Adjustment, Repair, and.,Replacement
-
I
RQVK Governor Shutoff 'Solenoid
Remove the hitch pin clip, mounting capsorews, and the
fuel shutoff solenoid.
Install the new sdlenoid in reverse order of removal and
connect the wires. Make sure the part number and cable
tie block is'facing away from the engine.
[89 in-lb]
10 mm, 16 mm
'
'-
Adjustthesolenoid linkageasnecessarysothattneplu~ger
is magnetically held in with the shutoff lever in the absolute
full-runposition.Turnthelargehexontheendoflheplunger
to make adjustments.
Cold Start Timing Advance System (KSB) Temperature Switch
83.9 and 85.9 Series Engines
Page A-45
Section A Adjustment, Repair, and Replacement
-
Cold Start Timing Advance System
(KSB) Temperature Switch
Remove
27 mm
Disconnect the KSB (1) wiring harness (2) from the switch
(3).
Install
T30 TORX, 12 mm
Replace the KSB, and wiring harness.
Torque Value: KSB Mounting Nuts:
9 N*m
180 in-lb]
RI
'Fuel Injection Pump, Rotary
lPage A-46
!
83.9 and B5.9 Series Engines
Section A -,Adjustment, Repair, and Replacement
~
1
Fuel Injection Pump,
;I
Rotary
Preparatory
;',
,
:,
,'
Remove. ail fuel lines.
Remove control linkage:
Remove fuel shutoff solenoid.
A
A
CAUTION
A diesel engine can not tolerate dirt or wi r in the el
system. A tiny piece of dirt or a few drops of water in
the injection system can stop the engine.
Clean all external surfaces of the injection pump, including
all 1ineconnectionsandfitlings)hatare to bedisconnected.
Clean the area around the injection pump gear cover to
prevent dirt from entering the crankcase.
83.9 and 85.9 Series Engines
Section A: Adjustment, Repair, and Replacement
Remove
A
A
CAUTION
To prevent damage to the timing pin, be sure to disengage the pin after locating top dead center.
Locate top dead center for cylinder No. 1. Push the top
dead center pin into the hole in the camshaft gear while
slowly barring the engine.
.
14 mm
Loosen the CAV injection pump lock screw and position the
special lock washer:
Tighten the lock screw against the driveshaft.
Torque Value: 7 N*m
[62 in-lb]
’
, ,
Fuel Injection Pump, Rotary
Page A 4 7
-
Fuel Injection Pump, Rotary
page A-40
83.9 and 85.9 Series Engines
Section A Adjustment, Repair, and Replacement
I
'ii'
~
Stanadyne DE4fuel,jnjectionpump lockscrew
the special washer.
'
contact is made,with the fuel
Torque Value: 12 N*m
[I06 in-lb]
The
lomm
specla1washer on the Eosch" injection pump must be
removed so the lock screw can be tightened against the
driveshaft.
Tighten the lock screw.
~
Torque Value: 30 N*m
[22 ft-lb]
83.9 and B5.9 Series Engines
Section A Adjustment, Repair, and Replacement
-
22 mm
Remove the gear cover access cap.
Remove the nut and washer from the fuel pump shaft
\
75-mm T-Bar Puller
Pull the fuel pump drive gear loose from the shaft.
Fuel Injection Pump, Rotary
Page A-49
I
Fuel Injection Pump, Rotary
Page A-50
83.9 and 85.9 Series Engines
Section A Adjustment, Repair, and Replacement
-
A
CAUTION
A
Do not remove the control lever. The lever is indexed to
the shaft during pump calibration. Removal of the lever
will alter the fuel pump calibration and affect engine
performance.
,
-
83.9 and 35.9 Series Engines
Section A Adjustment, Repair, and Replacement
-
lrrstall
Make sure the engine has cylinder No. 1 at top dead center.
The keyway in theshaft of new reconditioned pumps will be
locked in a position corresponding to the keyway in the
drive gear when cylinder No. 1 is at top dead center on the
compression stroke.
After verifying that cylinder .No. 1 is at top dead center,
install the pump. Make sure the key does not fall into the
gear housing.
. I
Attach the pump'by finger-tightening the three mounting
nuts. The pump must be free to move in the slots.
Fuel Injection Pump, Rotary
Page A-51
.
Fuel Injection Pump, Rotary
Page A-52
83.9 and 85.9 Series Engines
Section A Adjustment, Repair, and Replacement
-
22 mm'(CAV, Stanadyne), 24 mm (BoschOo)
@
Attach the pump driveshaft nut and spring washer. The
pump can rotate slightly due to gear helix and clearahce.
This isacceptableprovided the pumpisfreetomoveon the
flange slots and the crankshaft does not move.
I
NOTE: Do not overtighten. This is not the final torque.
Taiqtii V&~E: 15 to 20 Win ji33 to i77 h-lb]
m
A
CAUTION
A
The pump shaft must be unlocked after installation to
prevent pump damage.
(@
I =
13mm
@
If reinstalling the removed pump, install the pump onto the
engine. Rotate the pump to align the scribe marks. Tighten
the three mountihg nuts.
Torque Value: 24 N*m
[I8 ft-lb]
Fuel Injection Pump, Rotary
Page A-53
83.9 and 85.9 Series Engines
Section A Adjustment, Repair, and Replacement
-
13 mm
If installing a new or rebuilt pump without scribe marks,
take up the gear lash by rotating the pump against the
direction of drive rotation.
Tighten pump retaining nuts.
Torque Value: 24 N*m
,
[I8 ft-lb]
If a new or rebuilt pump is being installed, permanently
mark the injection pump flange to match the mark on the
gear housing.
@
83.9 and B5.9 Series Engines
Section A. Adjustment, Repair, and Replacemant
Fuel Injection Pump, Rotaiy
Page A-54
1
,
.
I
Loosen the CAV,pu~mp
lpck screw, and position the special
washer behind thei locR screw head.
@
Tighten the pump lock screw.
Torque Value: 20 N*m
[ I 5 It-lb]
318 Inch
Loosen the Stanadyne DB4 fuel injection pump lock screw,
and position the special washer behind the lock screw.
Tighten the lock screw.
83.9 and 85.9 Series, Engines
-
Section A Adjustment, Repair, and Replacement
10 mm
NOTE On the Boscha pump, the special washer is wired
to the pump and must be installed under the lock screw.
.Tighten the pump lock screw.
Torque Value: 13 N*m
[115 in-lb]
. NOTE: Be sure to disengage the timing pin.
Fuel Injection Pump, Rotary
Page A.55
Fuel Injection Pump, Rotary
Page A-56
.
83.9 and 85.9 Series Engines
Section A Adjustment,'Repair, and Replacement
,,
,
,
Install the injection p d p support bracket. Finger-tighten
all capscrews before final tightening.
;,
1,
I",'
,
,
,,
8
,
Tighten the capscrews
Torque Value: 24 N*m
[I8 ft-lb]
NOTE: Tighten the bracket-to-block mounting capscrews
(1) before tightening the bracket-to-injection-pump capscrew (2).
83.9 and 85.9 Series Engines
Section A Adjustment, Repair, and Replacement
-
22 mm
Tighten the drive gear mounting nut.
Torque Value: Boschs
65 N*m
148 ft-lb]
Torque Value: Stanadyne
65 N*m
148 ft-lb]
Install the. access cap.
Install the solenoid wiring and all fuel lines.
Fuel lnjectlon Pump, Rotary
Page A-57
. Fuel Injection Pump, Rotary
Page A-58
-
83.9 and 85.9 Series Engines
Se,ctionA Adjustment, Repair, and Replaaement
NOTE When connecting the cablelrod to the control lever,
adjust the length so the lever has stop-to-stod movement.
,
.
',;
,
~
~
NOTE: Similarly, adjust the length of the cablelrod to the
mechanical shutdown lever so there is a stop-to-stop
movement.
83.9 and 85.9 Series Engines
Section A Adjustment, Repair, and Replacement
-
Fuel Injection Pump, Rotary
Page A-59
Bleed all air from the fuel system.
If necessary, adjust the idle speed.
LUCAS CAV
I BOSCH VE I STANADYNE I
Fuel Injection Pumps, In-Line
Page A-60
83.9 and 85.9 Series Engines
Section A Adjustment, Repair, and Replacement
-
Fuel Injection Pumps, In-Line
Preparatory
Clean debris.
Remove all fuel lines.
Remove control linkage.
Remove fuel shutoff solenoid.
Remove AFC air line.
Remove oil line@).
Remove
A
A
CAUTION
A diesel engine can not tolerate dirt or water in the fuel
system. A tiny piece of dirt or a few drops of water In
the injection system can stop the unit.
Clean all external surfaces of the injection pump, including
all lineconnectionsandfittingsthatareto bedisconnected.
Clean the area around the injection pump gear cover to
prevent dirt from entering the crankcase.
83.9 and 85.9 Series Engines
Section A Adjustment, Repair, and Replacement
-
Engine Barring Gear, l/Z-lnch Ratchet or Breaker Bar
Locate top dead center for cylinder No. 1. Push the top
dead center pin into the hole in the camshaft gear while
slowly barring the engine.
NOTE Besuretodisengagethe pinafterlocating topdead
center.
The barring gear inserts into the flywheel housing and
engages the flywheel ring gear. The engine can then be
rotated by hand using a l/Z-inch ratchet or breaker bar.
10 mm
Remove the fuel pump mounting bracket,
Fuel Injection Pumps, In-Line.
Page A-61
Fuel Injection Pumps, In-Line
Page A-62
8
,
83.9 and 85.9 Series Engines
S,eciion A Adjusfment, .Repair, and,Replacement
-
30 min (P Pump)
Remove the gear cover access cap.
Remove the nut and washer from the fuel pump shaft.
75.mm FBar
Pull the fuel pump drive gear loose from the shaft.
63.9 and 85.9 Series Engines
Section A Adjustment, Repair, and Replacement
-
15 mm
Remove the four mounting nuts.
Remove the fuel pump.
In: --.I1
Engine Barring Tool, Part No. 3824591
Makesure theenginehascylinder No. 1 attopdeadcenter.
The barring gear inserts into the flywheel housing and
engages the flywheel ring gear. The engine can then be
rotated by hand using a 112-inch ratchet or breaker bar.
Fuel Injection Pumps, In-Line
Page A-63
Fuel lnjectlon Pumps, In-Line
Page A-64
83.9 and 85.9 Series Engines
Section A Adjustment, Repeir, and Replacement
-
Injection Pump Timing
The injection pump also has a timing pin, located in the
governor housing, to positionthe pump shaft to correspond
with top dead center for cylinder No. 1.
1$1
630
z:o:e
the access plug.
83.9 and 65.9 Series Engines
Section A Adjustment, Repair, andReplacement
-
Remove the timing pin.
If the timing tooth is not aligned with the timing pin hole,
rotate the pump shaft until thefiming tooth aligns.
Fuel Injection Pumps, In-Line
Page A-65
Fuel lniection Pumps, In-Line
Page A-66
-
83.9 and 85.9 Series Engines
Section A Adiustment, Repair, and Replacement
Reverse the position of the pin so the slot of the pin will fit
over the timing tooth in the pump.
Install and secure the pin with the access plug.
83.9 and 85.9 Series Engines
Section A Adjustment, Repair, and Replacement
-
A
A
CAUTION
The fuel pump drive inside diameter and the shaft outside diameter must be clean and dry before installing
the shaft into the gear. A nonpetrolum-based cleaner
can be used to clean the drive gear and shaft mounting
surfaces. Failure to do so will result in gear slippage in
the retarded direction.
Clean the drive gear and shaft with a nonpetrolurn-based
cleaner.
NOTE: If the mounting flange o-ring has a colored stripe,
it can not be reused. Replace with a new o-ring. Furthermore, do not lubricate the new-type o-ring. Instead, lubricate the seating area of the gear housing.
Lubricate the mounting,flange of the fuel injection pump with clean lubricating engine oil.
NOTE The P7100 fuel injection pump driveshaft has',a
provision for a Woodruff key: however, it is not required for
the P7100 drive gear.
Fuel Injection Pumps, In-Line
Page A-67
Fuel Injection Pumps, In-Line
Page A-68
83.9 and 85.9 Series Engines
.Section ,A Adjustment, Repair, and ,Replacement
-
@ , ,
Slide the pudp shaft through the drive gear, and posiiion
the pump flange onto the mounting studs.
P~shthepump
foMaKluntil themounting flangeando-ring
are properly fitted into the gear" housing bore.
If equipped, finger-tighten the capscrews for the support
,,
bradket" , ,
,#
15 mm
,
,
Tightei the mounting nuts.
Tighten the capscrews for the rear support bracket.
Torque Value: Mounting Nuts
44 N*m
,
[32 ft-lb]
,
,
Torque Value: Support Bracket
14 N*m
[I24 in-lb]
,
Fuel Injection Pumps, InmLine
Page A-69
83.9 and 85.9 Series Engines
Section A Adjustment, Repair, and Replacement
-
22 mm (A Pump), 30 mm (P Pump)
Install the fuel injection pump retaining nut and washer.
Torque Value: 10 to 15 N*m [89to 133 in-lb]
.=
(@
ipgnuht
Disengage the engine timing pin.
Fuel Injection Pumps, In-Line
Page A-70
63.9 and 85.9 Series Engines
Section A -Adjustment, Repair, and Replacement
Remove the fuel pump timing p/n plug. Reverse the positfon of the pin and'installthe phi; plug, and sealing washer.
@
G
'
Torque Value: 24 N*m
[18:ft-lb]
22 mm or 27 mm
Tighten the fuel pump drive nut.
Torque Value: P7100 Pump
178 N*m
,
[131 ft-lb]
Torque Value: A Pump
95 N*m
[70 ft-lb]
Torque Value: EPQ Pump
127 N*m
[94 ft-lb]
Install the gear cover access cap hand-tight.
83.9 and 65.9 Series Engines
Section A Adjustment, Repair, and Replacement
-
Fuel Injection Pumps, In-Line
Page A-71
10 mm
Install the fuel pump mounting bracket capscrews finger.
tight.
Install support mounting capscrews finger-tight.
Make sure alignment IS correct and tighten capscrews.
Torque Value: 24 N*m
[18 ft-lb]
I
Fuel injection Pumps, in-Line
Page A-72
,
83.9 and 85.9 Series Engines
Section A Adjustment, Repalr, and Replacement
-
A
A
CAUTION
If a replacement or repaired pump was installed, be
sure to fill the governor housing with clean lubricating
engine oil before starting the engine. Failure to do so
will result in damage to the governor fly weights.
Remove the access plug, and fill the governor housing with
c!oan lubricating engine G/: bshg specificaiionsin ilie table
below.
Oil Capacity
I
I
!I
v
!I
ipyuuoa I
RQVK Governor
RQV Governor
RSV Governor
RSV-H Governor
750 ml [0.71 qt]
750 ml 10.71 qt]
450 ml 10.48 qt] Bosch
500 mi p.53 qt] Denso
install the access plug.
Torque Value: 28 N v n
121 ft-lb]
B3.9 and 85.9 Series Engines
Section A Adjustment, Repair, and Replacement
-
Fuel Pump
Adjust
Idle Speed Adjustment, RQVK Governor
10-mm Screwdriver and Tachometer
Idle adjustment for the RQVK governor requires setting of
the idle adjustment screw.
Loosen the locknut and turn the screw counterclockwise
to raise the rpm; clockwise to decrease idle speed until the
dataplate-specified idle speed is attained with normal idle
operation accesspry loads (i.e., transmission, hydraulic, air
conditioning). Tighten the lock screw.
RSV Governor
Idle adjustment for industrial engines requires the setting
of both the low-idle screw (1) and the bumper spring screw
(2).
Fuel Pump
Page A-73
Air Intake System -Overview
Page A-74
83.9 and 85.9 Series Engines
Section A Acijustmlent, Repair, andlReplacement
-
I
Air Intake System = Overview
General Information
4
,
Air Sysrem Repair Summary
Tools
Component to be
Replaced
Air Crossovet Tubing
8-mm socket, screwdriver,
torque wrench
10-mm socket
Preparatory Steps’
Remove high-pressure fuel lines, disconnect cold
starting aid, il used, and air crossover tubing.
8 -mm and 10-mm sockets Disconnect cold starting aid if used: remove air crossover tube and drain coolant.
Disconnect intake and exhaust piping and remove
Turbocharger and Gasket, 10-mm, 15-mm, 16-mm,
crossover tublng.
and 7I16-inch’wrenches
Disconnect intake and exhaust piping; remove air
15-mm socket
Exhaust Manifold and
crossover tube and remove the turbocharger.
Gasket
‘Removal of some cnassis parts is sometimes necessary to gain access to some engine components. Follow
the equipment manufacturer’s procedures and precautions lor removing chassis parts.
Intake Manifold Cover and
Gasket
Aftercooler Gasket
~
~
~
~
83.9 and 85.9 Series Engines
Section A -Adjustment, Repair, and Replacement
Air Crossover
Remove
:
8 mm or Screwdriver
Loosen the hose clamps, and position the hose so the
crossover tube can be removed.
Install
8 mm or Screwdriver
Use new hose and clamps as required to install the crossover tube.
Torque Value: 8 N*m
'
[71 in-lb]
Air Crossover
Page A-75
Aftercooler
Page :A-76
83.9 and 65.9 Series Engines
Section A Adjustment, Repair, and Replacement
-
Af tercooIe r
Preparatory
A
A
WARNING
Coolant is toxic. Keep away from children and pets. If
not reused, dlspose of in accordance with local environmental regulations.
Disconnect the cold starting aid,
if used
Remove the air crossover tube
Remove the high-pressure fuel lines
Drain 2 liters [21 qt] of coolant.
Remove the coolant supply tube (1) and the coolant return
@ tube (2).
'
83.9 and 85.9 Series Engines
Section A Adjustment, Repair, and Replacement
-
Remove the high-pressure fuel lines.
10 mm
Remove the aftercooler housing and gasket.
Plug the opening with a clean shop rag to prevent foreign
material from entering the air intake.
Aftercooler
Page A-78
83.9 and 85.9 Series Engines
Section A;b Adjustment, pepair, and Replacement
!'
!
' , '
V ! ,
1'1
..
'
I:,
.,
8
and any other material out
of the air intake,
!
NOTE The holes shown in the illustration are drilled
@
through. Apply liquid Teflon'" sealant to the capscrews.
*=
Install the aftercooler housing and a new gasket.
Torque Value: 24 N*m
[I8 ft-lb]
.
83.9 and 85.9 Series Engines
Repair, and Replacement
. Section A - Adjustment,
8 mm
Install the coolant supply tube (1) and coolant return tube
(2). Install the air crossover tube (3).
Torque Value: 8 N-m
[71 in-lb]
Fill
A
"
A
CAUTION
During filling, air must be vented from the engine cooling passages. Open theenginevent petcock. Makesure
to open the petcock on the aftercooler for aftercooled
engines. The system must be filled slowly to prevent air
locks. Wait 2 t o 3 minutes toallow airto bevented; then
add coolant to bring the level to the bottom of the
radiator filler neck. Failure to do so will cause entrap?
ment of air in cooling system and will cause engine to
overheat. .
Fill the coolant system with a prernixture of 50-percent
water and 50-percent ethylene-glycol-type antifreeze.
Aftercooler
Page A-79
Charge-Air Cooler (CAC)
Page A 4 0
83.9 and 85.9 Series Engines
Section A Adjustment, Repair, and Replacement
-
~.
Charge-Air Cooler (CAC)
'
Leak Tqst
,
,
~
~
,
'
,,
8
~
NOTE The long-term integrity! of the charge air cooler
system is the responsibility of h
tme vehicle and component
manufacturers: however, the following symptoms can be
cheoked by any Cummlns Authorized Repair Location.
checkthe charge air cooler for cracked tubes'or header,
@ Toremove
thle inlet and outlet hoses from the cooler.
'i
Remove the charge air cooler.
Install a cap over the outlet side of the cooler. Install a
pressure gauge and a shop air supply line to the inlet side
of the cooler.
Air Intake Manifold
Page A-81
83.9 and 85.9 Series Engines
Section A Adjustment, Repair, and Replacement
-
.
Pressure Test
Apply 276 kPa [40 psi] of air pressure to the cooler. If the
pressure drop is 35 kPa [5 psi] or less in 15 seconds, the
cooler is okay.
If the pressure drop is greater than 35 kPa [5 psi] in 15
seconds, the charge air cooler must be repaired or replaced. Refer to the charge air cooler manufacturer for
repair instructions.
NOTE: A leak tank can be used to locate the air leak.
Air Intake Manifold
,
Preparatory
Remove the high-pressure fuel lines
Disconnecf the cold starting aid, if used.
Remove the air crossover tube (industrial).
e=
'Air Intake Manifold
Page A-82
83.9 and 65.9 Series Engines
Section A Adjustment, Repair, and Replacement
-
Remove the manifoh cover and gasket.
@ NOTE:
Plug the opening of the air intake with a clean shop
rag to prevent foreign matter from entering combustion
chamber.
Clean
Clean the sealing surface.
NOTE: Keep the gasket material and any other material out
of the air intake.
83.9 and B5.9 Series Engines
Section A Adjustment, Repair, and Replacement
Air Intake Manifold
Page A-83
-
Install
NOTE: The holesshown in theillustrationaredrilledthrough
and must be sealed by applying liquid Teflon" sealant to
the capscrews.
I
10mm
'
Install the cover and a new gasket.
Torque Value: 24 N-m
[18 ft-lb]
imecsxa
I
Air Intake Manifold
Page A-84
83.9 and 85.9 Series Engines
Section A Adjustment, Repair, and Replacement
-
Assemble the intake piping, and connect thQ cold starting
aid if used.
STOP
I
RUN
V i (83
a K
Vent
A
A
WARNING
Do not mix gasoline, alcohol, or gasohol with diesel
fuel. This mixture can cause explosion.
Install and bleed the high-pressure fuel lines.
. 83.9
and 65.9 Series Engines
Section A - Adjustment, Repair, and Replacement
Pressure Test
Pressure Gauge, Part No. ST-1273
Install the pressure gauge, Part No. ST-1273,to the fitting
in the turbocharger outlet.
Install another pressure gauge, Part No. ST-1273, in the
. intake manifold.
Operate the engine at rated rpm and load. Record the
readings on the two gauges.
If the differential pressure is greater than 21 kPa [3 psi],
Check the charge air cooler for plugging. Clean or replace
if necessary.
,Temperature Differential Test
1nstall.a temperature gauge in the intake manifold,
Lock the fan drive in the ON mode to prevent erratic test
results. This can be done by installing a jumper across the
temperature switch or supplying shop air to the fan. Refer
to the fan drive'manufacturer for lockup procedure.
NOTE Some trucks have a manual switch that will lockon
the fan,
Air Intake Manifold
Page A-85
Turbocharger
Page A-86
83.9 and 85.9 Series Engines
Section A Adjustment, Repair, and Replacement
-
Operate the engine at rate rpm and load. Recordthe intake
manifold temperature.
Measure the ambient temperature at least 2 feet in front of
the vehicle.
The maximum temperaturedifferential must not begreater
than 25OC [45OF].
ii ihe iemperaiure diiiareniiai is greaier ihan 25% i45OFj,
check the charge air cooler for dirt and debris on the fins,
and clean as necessary. If the problem still exists, check
the cooler for internal contamination or plugging.
Turbocharger
Preparatory
Remove the alr crossover tube.
9
Disconnect the intake and exhaust piping.
~
83.9 and 85.9 Series Engines
Section A Adjustment, Repair, and Replacement
-
Remove
10 mm
Remove the capscrews from the oil drain tube.
16 mm
Remove
?
oil supply line.
Turbocharger
Page A.87
83.9 and 85.9 Series Engines
Section A Adjustment, Repair, and Replacement
Turbocharger
Page A-aa
-
If equipped with a wastegate turbocharger, .remove the
intqke rnanifold,pressuresupplyline from the boost capsule.
8,
~
, , ' ,
11
!I'
; '
'
15 mm and 11 mm
Remove fhe exhaust clamp, turbocharger, and gasket.
@
Plug the opening with a clean shop rag to prevent foreign
material,from entering exhaust system.
83.9 and 85.9 Series Engines
Section A Adjustment, Repair, and Replacement
-
Turbocharger
Page A-89
Clean
Clean the sealing surface. Inspect the sealing surface and
mounting studs for damage.
xm9bdea
Install
NOTE: If the turbocharger is not'to be immediately replaced, cover the opening to prevent any material from
failing into the manifold.
Turbocharger
Page A-90
83.9 and 85.9 Series Engines
Section A Adjustment, Repair, and Replacement
-
Instali a new gasket and apply anti-seize compound to the
mounting studs.
I!
;n:i[nthe
turbocharger and a new gasket.
Torque Value: 43 N*m
[32 ft-lb]
83.9 and 85.9 Series Engines
Section A Adjustment, Repair, and Replacement
Turbocharger
Page A-91
-
13 mm
.If required, bend thelockplates backandloosen the turbine
housing capscrews. Position the bearing housingto install
the turbocharger drain tube.
13 mm
Install the hose and clamps on the turbocharger drain tube
loosely. Install the drain tube and gasket on the turbocharger.
Torque Value: 24 M*m
[18 ft-lb]
@
l r
B3.9 and 85.9 Series Engines
Section A,-,Adjustment,,Repair,,,and Replacement
1 :
Screwdriver
!
Positioj the turbpcharger drain hose to connect the drain .
tubes: tighten the clamps. '
!
13 rnm, Punch, Hammer
If loosened, tighten the turbine housing capscrews. Bend
the lockpletes onto the flats to prevent loosening.
(@
Torque Value: 20 N*m
[I5 ft-lb]
83.9 and B5.9 Series Engines
Section A Adjustment, Repair, and Replacement
-
10 mm
If required, loosen the compressor housing, and position
the housing to align with the crossover tube.
Torque Value: 9 N*m
[80 in-lb]
11 mm, Plastic Hammer
Tighten the band clamp. Tap around the clamp with a
plastic hammer and tighten again.
Torque Value: 9 N*m
.
[80 in-lb]
Turbocharger
Page A-93
.
,
Rl
Turbocharger
Page A-94
83.9 and 85.9 Series Engines
Section A Adjustment, Repair, and Replacement
-
A
A
CAUTION
To prevent bearing damage, neWtUhOQhafggemnustbe
prelubricated before start-up.
Pour 50 to 60 cc 13 to 4 021 of clean lubricating engine oil
into the oil supply fitting. Rotate the turbine wheel to allow
the oil to enter the bearing housing.
Install the exhaust outlet connection.
Do not tighten the two mounting c&screws until the band
clamp has been tightened.
Torque Value Band Clamp
8 N*m
[71 in-lb]
Torque Value: Capscrews
43 N*m
[32 ft-lb]
.
B3.9 and 65.9 Series Engine9
Section A Adjustment, Repair,'and Replacement
-
A
A
CAUTION
When installing the oil supply line, be sure the line is
not in direct contact with theturbine housing or the line
will burn durlng operation.
16 mm
Install the oil supply line.
Torque Value: 35 N*m
[26 ft-lb]
lfequippedwith awastegateturbocharger, installthe intake
manifold pressure supply line from the boost capsule.
83.9 and B5.9 Series Engines
Section A -,Adjustment, ,Repair, andI'Replacement
Exhaust Manifold, Dry
Page A-96
;
,
@ Test
install the air crossover tube, iniet, and exhaust piping.
Operate the engine and check for leaks.
i
Exhaust Manifold, Dry
Preparatory
Remove the air crossover tube "
Disconnect the air intake and exhaust piping
Remove the turbocharger, ifused.
83.9 and 85.9 Series Engines
Section A Adjustment, Repair, and Replacement
-
Exhaust Manifold, Dry
Page A-97
Remove
15 mm, 13 mm
Remove the exhaust manifold
Clean
Clean the sealing surfaces.
I
Exhaust Manifold, Dry
Page A-98
83.9 and 85.9 Series Englnes
Section A Adjustment, Repair, and Rephcement
-
lnstall .
15 mm, 13 mm
Apply anti-seize compound on exhaust manifold bolt
threads.
install the exhaust manifold and new gaskets.
8
Follow the tightening sequence shown in the illustration.
Then, follow the same sequence, and tighten to the same
torque values.
Torque Value: 43 N*m
132 fblb]
Install the parts previously removed Operate the engine
and check for leaks.
-
Lubricating Oil System Overview
Page A-99
83.9 and 85.9 Series Engines
Section A -Adjustment, Repalr, and Replacement
-
Lubricating Oil System Overview
General Information
Lubricating System Repair Summary
A
WARNING
A
Some state and federal agencies have determlned that used engine oil can be carcinogenic and cause reproductive toxicity. Avoid inhalation of vapors, ingestion, and prolonged contact with used engine oil.
Component to Be Replaced
Oil Pressure Regulator Valve
and/or Spring
Oil Cooler Element and/or
Gaskets
Tools
Ratchet, 19-mm Socket and
Torque Wrench
16-mm Wrench, Ratchet, 10-rnm
Socket and Torque Wrench
Preparatory Steps
Clean debris.
Drain coolant. Remove the oil filter.
~~
~~
~~
~~
~l
Lubricating Oil PreSsuk Regulator (Main Rifle)
I
Page A-I00
I
,
83.9 and 85.9 Series Engines
Section A Adjustment, Repair, and Replacement
-
Lubricating Oil P<eessureRegulator
(Main Rifle)
Preparatory
Clean debris.
@
Remove the plug and regulator valve.
'
83.9 and 85.9 Series Engines
Section A -Adjustment, Repair, and Replacement
Clean
Clean and inspect the regulator valve.
Clean and inspect the regulator valve bore.
NOTE In order to regulate the oil pressure, the valve must
move freely in the bore.
Lubricating Oil Pressure Regulator (Main Rifle)
Page A-101
Lubricating Oil Pressure Regulator (Main Rifle)
Page A-102
83.9 and 85.9 Series Engines
Section A -Adjustment, Repair, and Replacement
Install
Install a new sealing O-ring on the threaded plug and Iubricate with clean lubricating engine 011. install the pressure regulator assembly.
[59 ft-lb]
Torque Value: 80 N*m
83.9 and 85.9 Series Engines
Section A -Adjustment, Repair, and Replacement
Lubricating Oil Cooler
Preparatory
A
WARNING
Coolant is toxic. Keep away from children and pets. If
not reused, dispose of In accordance with local environmental regulations.
A
,
A
WARNING
Some state and federal agencies have determined that
used engine oil can be carciaogenic and cause reproductive toxicity. Avoid inhalation of vapors, ingestion,
and prolonged contact with used engine oil.
Drain the coolant.
Remove the oil filter.
Lubricating Oil Cooler
Page A-I03
Lubricating Oil Cooler
Page A-104
~
83.9 and 86.9 Series Englnes
Section A -Adjustment, Repair, aqd Replacqpqnt
i~
Clean
~!
~
I
Clean all debris from around the oil Gooier.
Id
!
1111
,,
,
;I!.
,
@$
Remove the turbocharger oil supply line from the oil filter
head.
83.9 and 65.9 Series Engines
Section A Adjustment, Repair, and Replacement
Lubricating Oil Cooler
Page A-105
-
Remove the oil cooler cover, element, and gaskets.
Clean the sealing surfaces.
@
83.9 and 65.9 Series Engines
Section A Adjustment,, Repair, and Replacement
Lubricating Oii Cooler
Page A-106
-
I
Pressure Test,
@'
Pressurize,the elemqnt to 690,kPa 1100 psi] p check it for
,
leaks.
18
Assemble the oil cooler gasket, element, cooler cover gas-
@ ket, and cooler cover to the cylinder block.
I.
NOTE Be sure to remove the shipping plugs (A) from the
@
new cooler element.
Torque Value: 24 N*m
118 ft-lb]
83.9 and 85.9 Series Engines
Section A -Adjustment, Repair, and Replacement
16 mm
Connect the turbocharger oil supply h e .
Torque Value: 35 N*m
[26 ft-lb]
Install a new oil filter.
Follow the manufacturer’sinstructions for tightening.
Lubricating Oil Cooler
Page A-107
83.9 and 85.9 Series Engines
Section A Adjustment, Repair, and Replacement
Lubricating Oil Cooler
Page A-108
-
Fill
A
A
CAUTION
The system must be filled slowly to prevent air locks. Be
sure to open the aftercooler to allow air to escape as the
system is filled.
Fill the coolant system and lubricating oil system. Oprate
,hG
^ m
^ g i m :G chacl: for ! o a k .
.
Stop the engine and check tne coolant and oil level.
-
83.9 and 85.9 Series Engines
Section A -Adjustment, Repair, and Replacement
Electrical Equipment Overview
Page A-109
-
Electrical Equipment Overview
General Information
Electrical System Repair Summary
A
WARNING
A
'Batteries can emit explosive gases. To avoid injury, always ventilate the compartment before servicing the
batteries. To avoid arcing, remove the negative (-) battery cable first and attach the negative (-) battery cable
last.
A
WARNING
A
.
Acid is extremely dangerous and can damage the machinery and canalso cause serious burns. Always provide
a strong tank of soda water as a neutralizing agent when servicing the batteries. Wear goggles and protective
clothing to avoid serious burns.
Component to Be ReDlaced
Starting Motor
Alternator
Tools
Preparatory Steps
Ratchet, 17-mm socket,
14-mm wrench, and torque
wrench
Ratchet, 8-mm, 14-mm, and
16-mm socket, torque
wrench, and 1IBdrive
breaker bar
Disconnect ground (-) cable to battery.
Disconnect ground 6) cable to battery and remove
drive belt.
83.9 and 85.9 Series Engines
Section A Adjustment, Repair, and Replacement
Starting Motor
Page A-110
-
Starting Motor
Remove
Disconnect the ground (-) cable from the battery.
Identify' each electrical wire with a tag indioating location.
eo:h,"
69
the battery cable from the solenoid.
83.9 and 85.9 Series Engines
Section A Adjustment, Repair, and Replacement
-
10 mm
Remove the starting motor.
Install
10 mm
Install the starting motor in the reverse order of removal.
Torque Value: 43 N-m
[32 ft-lb]
Starting Motor
Page A-Ill
Alternator
Page A-112
83.9 and 85.9 Series Engines
Section A Adjustment,,Repalr, and qeplacement
-
Alternator
Remove
Disconnect the ground (-) cable from the battery terminal.
Identify each electrical wire with a tag indicating location.
Remove the drive belt.
e :o: :
the capscrew from the alternator link.
83.9 and 85.9 Series Engines
Section A -Adjustment, Repair, and Replacement
16 mm
Remove the alternator mounting screws.
Remove the alternator.
Install
Positionthe alternator on the bracket, and secure it with the
mounting capscrews.
Do not tighten at this time.
Alternator
Page A-I13
Alternator
Page A-114
83.9 and 85.9 Series Engines
Section A Adjustment, Repair, and Replacement
-
Connect the alternator link to the alternator. Finger-tighten
NOTE Make sure the alternator link is properly positioned
for correct belt alignment.
14 mm, 16 mm
Tighten the alternator mounting capscrews,
@
Torque Value: A
24N.m
118 ft-lb]
Torque Value: B
43 N*m
132 ft-lb]
B3.9 and 85.9 Series Engines
Section D System Diagrams
-
-
Page D-a
Section D System Diagrams
Section Contents
Page
Flow Diagram, Air intake System .............................................
General Information ........................
.................................
Flow Diagram, Compressed Air System _.__
.......
General Information ..............................................................
Flow Diagram, Cooling System ................................................
General Information .......................................................................................
Flow Diagram, Exhaust System .................
.........
General Information ................................................................
Flow Diagram, Fuel System ............................................................................................................................
General Information .....................................................................................................................................
Flow Diagram, Lubricating Oil System ..................................
.........
........................................
General Information ............................................................
................................................................
-
System Diagrams Overview .................................................
....................................................................
General Information .....................................................................................................................................
D-2
D-2
D-6
D-6
D-1
D-1
Page D-b
83.9 and 85.9 Series Engines
Section D System Diagrams
-
THIS PAGE LEFT INTENTIONALLY BLANK
83.9 and 85.9 Series Engines
Section D System Diagrams
-
-
-
System Diagrams Overview
Page D-1
System Diagrams Overview
General Information
The following drawings show the flow through the engine systems. Although parts can change between different
applications and installations, the flow remains the same. The systems shown are:
Fuel System
Lubricating Oil System
Coolant System
Intake Air System
Exhaust System.
Compressed Air System.
Knowledge of the engine systems can help you in troubleshooting, service, and general maintenance of your engine.
Flow Diagram, Fuel System
Page D-2
Flow Diagram, Fuel System
General Information
83.9 and 85.9 Series Engines
Section D System Diagrams
-
~~
Flow Diagram, Fuel System
Page D-3
83.9 and 85.9 Series Engines
Section D System Diagrams
-
1. Fuel from supply tank
8. Bosch" P7100 Injection pump
2. Prefilter or screen
9. Boscha rotary injection pump
3. Fuel lift pump
10. Fuel drain manifold
4. FueVwater separator
11. High-pressure line
5. Fuel filter
12. Bosche 17-mm closed nozzle, hole-type injectors
6. Low-pressure fuel line
13. Fuel return to supply tank.
7. Turbocharger boost control line
Flow Diagram, Fuel System
Page D-4
63.9 and 85.9 Series Engines
-
Section D System Diagrams
Hydraulic Cold Start Injection Advance (Rotary Pumps Only)
Flow Diagram, Fuel System
Page D-5
83.9 and 85.9 Series Engines
Section D System Diagrams
-
1. KSB valve
2. Wiring harness
3. Temperature switch.
~
~~
Flow Diagram, Lubricating Oil System
Page D.6
Flow Diagram, Lubricating Oil System
General Information
83.9 and 85.9 Series Engines
Section D System Diagrams
-
83.9 and 85.9 Series Engines
Section D System Diagrams
-
Flow Diagram, Lubricating Oil System
Page D-7
1. Gerotor lubricating oil pump
4. Full-flow filter
I
2. Pressure-regulating valve
5. Filter bypass valve.
I
3. Lubricating oil cooler
Flow Diagram, Lubricating Oil System
Page D-8
Lubrication for the Turbocharger
83.9 and 85.9 Series Engines
Section D System Diagrams
-
83.9 and 85.9 Series Engines
Section D System Diagrams
-
1. Oil supply
2. Oil drain.
Flow Diagram, Lubricating Oil System
Page D-9
Flow Diagram, Lubricating Oil System
Page D-10
83.9 and 85.9 Series Engines
Seotion D System Diagrams
,
-
Lubrication for ihe Power Componenis
3
07SW187
83.9 and B5.9 Series Engines
Section D System Diagrams
-
Flow Diagram, Lubricating Oil System
Page D-11
1 . To valve train
6. Crankshaft, main journal
2. Main oil rifle
7. From main oil rifle
3. From oil cooler
8. To camshaft
4. Rod journal
9. To piston cooling nozzle.
5. To rod bearing
Flow Diagram, Cooling System
B3.9 and B5.9 Series Engines
Section D System Diagrams
-
Page D-12
Flow Diagram, Cooling System
General Information
A
3
2
1
3
5
a
7
089W138
Flow Diagram, Cooling System
83.9 and B5.9 Series Engines
Section D System Diagrams
-
Page D-13
Sections A and B
Sections C and D
1. Coolant inlet
1. Coolant flow from the cylinder head
2. Pump impeller
2. Coolant to the thermostat housing
3. Coolant flow past oil cooler
3. Coolant flow past injector
4. Coolant flow past cylinder head
4. Thermostat
5. Coolant to cylinder head.
5. Coolant bypass passage
6.Coolant flow to pump inlet
7. Bypass closed
8. Coolant flow back to radiator.
Flow Diagram, Air Intake System
Page D-14
83.9 and 85.9 Series Engines
Section D System Diagrams
-
Flow Diagram, Air Intake System
General information
2
Flow Diagram, Air Intake System
Page D-15
83.9 and 85.9 Series Engines
Section D System Diagrams
-
1. Intake air inlet to turbocharger
4. Intake manifold
2. Turbocharger air to charge air cooler
5. Intake valve.
3. Charge air cooler
Flow Diagram, Air Intake System
Page D-16
Turbocharged-Aftercooled (Water Jacket) Engine
83.9 and 85.9 Series Engines
Section D System Diagrams
-
Flow Diagram, Air Intake System
63.9 and 85.9 Series Engines
Section D System Diagrams
-
1. Intake air inlet to turbocharger
2. Air to intake manifold
3. Intake manifold
Page D-17
4. Intake valve.
Flow Diagram, Air Intake System
Page D-18
Naiurally Aspiraied Engine
83.9 and 85.9 Series Engines
Section D System Diagrams
-
Flow Diagram, Air Intake System
Page D-19
83.9 and 85.9 Series Engines
Section D System Diagrams
-
1. Intake air inlet
2. Intake manifold
3. Intake valve.
Flow Diagram, Exhaust System
Page D-20
Flow Diagram, Exhaust System
General information
Turbocharged with Wastegate
83.9 and 85.9 Series Engines
Section D System Diagrams
-
83.9 and 85.9 Series Engines
Section D System Diagrams
-
Flow Diagram, Exhaust System
Page D-21
1. Wastegate closed
5. Turbocharger exhaust inlet
2. Wastegate open
6. Turbocharger exhaust outlet.
3. Exhaust valve
4. Exhaust manifold
Flow Diagram, Exhaust System
Page D-22
Naturally Aspirated Engine
83.9 and 85.9 Series Engines
-
Section D System Diagrams
83.9 and 85.9 Series Engines
Section D - System Diagrams
1. Exhaust valve
2. Exhaust manifold.
Flow Diagram, Exhaust System
Page D.23
Flow Diagram, Exhaust System
Page D-24
Turbocharged Engine
83.9 and 85.9 Series Engines
Section D System Diagrams
-
83.9 and 85.9 Series Engines
Section D - System Diagrams
1. Exhaust valve
2. Exhaust manifold
3. Turbocharger exhaust inlet
Flow Diagram, Exhaust System
Page 0.25
4. Turbocharger exhaust outlet.
Flow Diagram, Compressed Air System
Page D-26
B3.9 and B5.9 Series Engines
Section D System Diagrams
-
Flow Diagram, Compressed Air System
General Information
12900074
,
Flow Diagram, Compressed Air System
Page D-27
83.9 and 85.9 Series Engines
Section D System Diagrams
-
1. Compressor
0. Economy valve line
2. Compressor intake
9. Air dryer
3. E-Type unloader
10. Check valve (built into dryer)
4. Reservoir line
11. Reservoir (wet tank)
5. Governor
12. Check valve
6. Discharge line
13. Secondary pressure line.
7. Splitter valve line
Flow Diagram, Compressed Air System
Page D-28
83.9 and 85.9 Series Engines
Section D System Diagrams
-
7
12W76
Flow Diagram, Compressed Air System
83.9 and 85.9 Series Engines
Sectlon D System Diagrams
-
Page D-29
.
1. Compressor
5. Governor
2. Compressor intake
6. Dlscharge line
3. Unloader line
7. Reservoir (wet tank).
4. Reservoir line
Flow Diagram, Compressed Air System
Page D-30
83.9 and 85.9 Series Engines
Section D System Diagrams
-
NOTES
83.9 and 85.9 Series Engines
-
Section L Service Literature
Page L-a
-
Section L Service Literature
Section Contents
1
Additional Service Literature,. ........_...........
....................................................................................................
L-1
Gefleral Information ................................
:.................................................................................................... L-1
Service Literature Ordering Location..........................................................
:..................................................... L-2
General Information ........ ....... ................:...............................................
.......................................... L-2
~
~
Page L-b
83.9 and 85.9 Series Engincs
-
Section L Service Literature
THIS PAGE LEFT INTENTIONALLY BLANK
Additional Service Literature
Page L-1
63.9 and B5.9 Series Engines
Section L Service Literature
-
Additional Service Literature
General Information
The following publications can be purchased by contacting a Cummins Distributor or by calling 1-800-DIESELS
(343-7357):
Bulletin No.
Title of Publication
3666087
6 Series Troubleshooting and Repair Manual
3666017
.~
B Series Engine Shop Manual.
3810234
B Series Alternate Repair Manual
3810326
48 Series Standard ,Repair Times
3810305
6B Series Standard Repair Times
3666025
Specifications Manual
.
. .
I
I
I
Service Llterature Orderlng Location
Page L-2
83.9 and 85.9 Series Engines
Section L Service Literature
-
Service Literature Ordering Location
General Information
Region
United States and Canada
U.K., Europe, Mid-East, Africa,
and Eastern European Countries
South and Central America
(excluding Brazil and Mexico)
Brazil and Mexico
Far East (excluding
Australia and New Zealand)
Ordering Location
Cumrnins Distributors
or
Contact 1-800-DIESELS
(i
40G&3-7357)
Cummins Ehgine Co., Ltd.
Roval Oak Wav South
DaGentry
Northants, NNll 5NU, England
Cummins Americas, Inc.
16086 N.W. 52nd Avenue
Hialeah, FL 33104
Cummins Engine Co., Inc.
international Parts Order Dept., MC 40931
Box 3005
Columbus, IN 47202-3005
Cummins Diesel Sales Corp.
Literature Center
8 Tanjong Penjuru
Jurong industrial Estate
Singapore
Service Literature Ordering Location
Page L-3
83.9 and 85.9 Series Engines
Section L Service Literature
-
Region
Australia and New Zealand
Ordering Location
Cummins Diesel Australia
Maroondah Highway, ROB. 139
Ringwood 3134
Victoria, Australia
Obtain current price information from your local Cummins Distributor.
83.9 and B5.9 Series Engines
Section M Component Manufacturers
Component Manufacturers’ Addresses
Page M-8
I_
NOTES
83.9 and B5.9 Series Engines
Section M Component Manufacturem
-
Deutsch
Industrial Products Dlviainn
37140 Industrial1Avenue
Hemet. CA 92343
Telephone: (714) 929-1200
~
~
Oil Heaters
Fleetguard, Inc.
1200 Flee!guerd R o d
Cookeviile. TN 38502
Telephone: (615) 5269551
Kim Hotstart Co.
PO. Box 11245
Spokane, WA 99211-0245
Telephone: (509) 534.6171
Prelubrication Systems
RPM Industries, Inc.
Suite 109
55 Hickory Street
Washington, PA 15301
Telephone. (412) 228-5130
Radiators
JB Radiator Specialties, Inc.
P.O. Box 292087
Sacramento. CA 95829-2087
Telephone: (916) 381-4791
The GBO Manufacturing Company
100 Gando Drive
P,O. ox 1204
Newtaveii
06505-1204
Telephone: (203) 562-5121
Young Radiator Company
2825 Four Mile Road
Racine, WI 53404
Telnphcnc: (9%) 271-2307
Land M Radiator, Inc.
1414 East 37th Street
Hibbing, MN 55746
Telephone: (218) 263-8993
Throttle Assemblies
Williams Controls, Inc.
14100 SW 72nd Avenue
Portland, OR 97224
Telephone: (503)684-8600
Torque Converters
Twin Disc international S.A.
Chaussee de Namur
Nivelles
Belgium
Telephone: 067-224941
Component Manufacturers' Addresses
Page M-7
Twin Disc Incorporated
1328 Racine Street
Racine. WI 534031758
Telephone: (414) 6b41981
Rockford Powertrain, Inc.
Off-Highway Systems
1200 Windsor Road
p.0. Box 2908
Rockford, IL 51132-2908
Telephone: (815) 633-7460
Modine Mfg. Co.
1500 DeKoven Avenue
Racine, WI 53401
Telephone: (414) 636.1640
Component Manufacturers' Addresqes
Page M-6
Kabi Electrical and Piastics
Cranborne Road
Patters Bar
Herts
EN6 3JP
England
Telephone: 01707-53444
Datcon Instruments
PO.Box 128
East Petersburg, PA 17520
Telephone: (717) 569-5713
Barber Colman Co.
1354 Clifford Avenue
Loves Park, iL 61132
Telephone: (815) 637-3000
United Technologies
Diesel Systems
IOOOJorie Blvd.
Suite 111
Oak Brook, IL 69521
Telephone: (312) 325-2020
Heat Sleeves
Rochester Gauges, Inc.
11616 Harry Hines Blvd.
PO. Box 29242
Dallas, TX 75229
Telephone: (214) 241-2161
Bentley Harris Manufacturing Co,
100 Bentley Harris Way
Gordonville, TN 38563
Telephone: (313) 348.5779
Governors
hydraulic and Power Steering Pumps
Woodward Governors Ltd.
P.O. Box 15
663/664 Aiax Avenue
Slouoh
BUCG
SLI 4DD
EngIand
Telephone: 01753-26835
Woodward Governor Co.
P.O. Box 1519
Fort Collins, CO 80522
Telephone: (303) 482-5811
(8001 5232831 -
Hobourn Automotive
Temple Farm Works
Priotv Road
Strodd
Rochester
Kent, England
ME2 2BD
Telephone: 0163471773
83.9 and 85.9 Series Engines
Section M Component.Manufacturek
-
Honeywell Control Systems Ltd.
Honeywell House
Charles Square
B,racknell
Berks RG12 1EB
Telephone: 01344-4245
Sundstrand Hydratec Ltd.
Cheney Manor Trading Estate
Swindon
Wiltshire
SN2 2PZ
England
Telephone: 01793-30101
.
Soerrv Vickers
P.O. Box 302
Troy, MI 48084
Telephone: (313) 280-3000
Z.F.
PO.Box 1340
Grafvonsoden Strasse
5.9 D7070
Schwaebisch Gmuend
Germany
Telephone: 7070-7171-31510
In-Line Connectors
.
Pioneer-Standard Electronics, Inc.
5440 Neiman Parkway
Solon, OH 44139
Telephone: (216) 349-1300
83.9 and 85.9 Series Engines
Section M * Cqmponent Manufacturers
Filters
Fleetguard International Corp
Cavalry Hi111Industrial Park
Weedon
Northampton NN7 4TD
England
Telephone: 0132741313
Fleetguard. InC.
17nn
Rbad
..Fleetauard
..
.
.
Cookeville,-fN 36502,
Telephone: 1-800,22-Filters
(1-800-223-4583)
Flexplates
Corrugated Packing and
Sheet Metal
Hamsterley
Newcastle Upon Tyne
England
Telephone: 01207;660-505
Allison Transmissiart
Division of General Motors .
Corporation
PO. Box 894
Indianal)olis, IN 46206.0894
Telephone: (317) 2a2-5000
Midwest Mfo. Co.
23500 SoutLfield Road, Suite 122
Southfield. MI 48076
Telephone: (313) 642.5355
Wohlen Corparation
708 East Grand Rwer Avenue
PO. Box 20217
Lansing, MI 48901
Telephone: (517) 485-3750
Fuel Coolers
Havden. Inc.
1551 Pdmona Road ’
Po. BOX 848
Corona. CA 91718-0840
Telephone: (909) 736-2665
Fuel Pumps
Robert Bosch Corp.
Automotive Group
2800 South 25th Ave.
Broadview, IL 60153
Fuel Warmers
Fleetguatd, Inc.
1200 Fleetguard Road
Cookeville. TN 38502
Telephone: (615) 526-9551
Component Manufacturers’ Addresses
Page M-5
Gauges
ASS.
Dyffon Industrial Estate
Ystrad Mynach
Hengoed
Mid Glamorgan
CF8 7XD
England
Telephone: 0:4;3-81275:
Grasslln U.K. Ltd.
Vale Rise
Tonbridge
Kent
TN9 1TB
EngIand
Telephone: 01732-359888
lcknield Instruments Ltd.
Jubilee Road
Letchworth
Herts
England
Telephone: 04626.5551
Superb Tool and Gauge Co.
21 Prinoip Street
Birmingham
84 61E
Enaland
Telephone: 021-359-4876
Component Manufacturers’ Addresses”
Page M-4
Electronic Switches
Cutler-Hammer Products
Eaton Corporation
4201 N. 27th Street
Milwaukee, WI 53216
Telephone: (414) 449-6600
Engine Protection Controls
Flight Systems Headquarters
Hempt Road
P.O. Box 25
Mechanicsburg, PA 17055
Telephone: (717) 697-0333
The Nason Company
.
2610 Blue Ridge Blvd.
West Union. SC 29696
Telephone: (803) 638-9521
Teddington Industrial
Equipment
Windmill Road
Sunburn on Thames
Middlesex
TW16 7HF
England
Telephone: 09327-85500
Fan Clutches
Kysor Cooling Systems N.A.
6040 West 62nd Street
Indianapolis, IN 46278
Telephone: (317) 328-3330
’
Holset Engineering Cv.Ltd.
P.0.Box A9
Turnbridae
HudderGeld, West Yorkshire
England HD6 7RD
Telephone: 01484-22244
Hortan Industries, Inc.
P.O. Box 9455
Minneapolis, MN 55440
Telephone: (612) 378-6410
Rockford Clutch Company ’
1200 Windsor Road
P.O. Box 2908
Rockford, IL 61132-2908
’ Telephone: (815) 633-7460
Fans
Tr-uflo Ltd.
Westwood Road
Birmingham
B6 7JF
England
Telephone: 021-557-4101
Hayes-Albion Corporation
Jackson Manufacturing Piant
1999 Wildwood Avenue
Jackson, MI 49202
Telephone. (517) 782-9421
83.9 and 85.9 Series Engines
Section M Component Manufacturers
-
Engineered Cooling Systems, Inc.
201 W. Carmel Drive
Carmel, IN 46032
Telephone: (317) 8463438
Brookside Corporation
EO.Box 30
McCordsville. IN 46055
Telephone: (317) 335-2014
TCF Aerovent Company
9100 Purdue Rd., Suite 101
Indianapolis, IN 462681180
Telephone: (317) 872-0030
Kvsor-Cadillac
li00 Wright Street
Cadillac, MI 49601
Telephone: (616) 775-4681
Schwitzer
6040 West 62nd Street
P.O. Box 80-6
Indianapolis, IN 46206
Telephone: (317) 328.3010
Fault Lamps
Cutler-Hammer Products
Eaton Corporation
4201 N. 27th Street
Milwaukee, WI 53216
Telephone: (414) 449-6600
83.9 and 85.9 Series Engines
Sectlon M Compohent lylanufacturers
-
Catalyti'cConveiters j
Donaldson Company, lnc.
1400 West 94th Street
p.0. BOX1299
Minneapolis, MN 55440
Telephone: (612) 887-3835
Nelson Division
Exhaust 'and Flitration Systems
1801 U.S. Highway 51 P.0. Box 428
Stoughton, Wl 53589'
Telephone: (808) 873-4200
.Walker Manufactuking
3901 Willis Road
PO. Box 157
Grass Lake, Mi 49240
Telephone: (517) 522-5500
Coolant Level Swttches
Robertshaw Contmls Company
P.0. Box 400
Knoxville, TN 37901
Telephone: (216) 885-1773
Clutches
Win Disc International S.A,
Chaussee de Namur
Niveiles
BeIguim
Telephone: 067-224941
Twin Disc Incorporated
1328 Racine Street
Racine, Wi 53403
Telephone: (414) 634-1981
Coolant Heaters
Fleetguard, Inc.
1200 Fleetguard Road
Ceokeville. TN 38502
Telephone; (615) 526-9551
Drive Plates
Detroit Diesel Alllson
Division of General Motors
Corporation
P.0.BOX 894
Indianapolis, IN 46206-0894
Telephone: (317) 242-5000
Electric 'Starting Motors
Butec Electrics
Cleveland Road
Leyland
PR5 IXB
England
Telephone: 01744-21663
Component Manufacturers' Addresses
Page M-3
C.A.V. Electrical Equipment
PO. BOX 36
Warple Way
London
w3 7ss
Englkind
Telephone: 01-743-3111
A.C. Delw components Group
34iC Ofhe3
Central Milton Keynes
MK9 3EL
England
Telephone: 0908-66001
Delco-Remy America
2401 Columbus Avenue
PO. Box 2439
Anderson, IN 46018
Telephoner (317) 646-3528
Leece-Neville Carp.
400 Main 6treet
Arcade, NY 14009.
Telephone: (716) 492-1700
Nippondenso Inc.
2477 Denso Drive
P.O. Box 5133
Southfield, MI 48086
Telephone: (313) 350.7500
~
~~~
Component Manufacturers' Addresses
Page M-2
StartMaster
Air Starting Systems
A Division of Sycon Corporation
9595 ChenevAvenue
P. 0. Box 49i
Marion, OH 43302
Telephone: (614)-382-5771
Alternators
Robert Bosch Ltd.
PO. Box 98
Broadwater Park
North Orbital Road
Denham
Uxbridae
Middlesex UD9 5HG
England
Telephone: 01895433633
Butec Electrics
Cleveland Road
. .
Leyland
PR5 1XB
England
Telephone: 01744.21 683
C.A.V. Electrical Equipment
P.O. Box36 .
.Warple Way
London
w 3 7ss
England
Telephone: 01-743-3111
A.C. Delco Comoonents Groua
Civic Offices
Central Milton Keynes
MK9 3EL
England
Telephone: 01908-66001
C. E. Niehoff & Co.
2021 Lee Street
Evanston, iL 60202
Telephone: (708) 866-6030
Delcc-Remy America
2401 Columbus Avenue
P.0.Box 2439
Anderson, IN 46018
Telephone: (317) 646-3528
Leece-Neville Corp.
400 Main Street
Arcade, NY 14009
Telephone: (716) 492-1700
Auxiliary Brakes
The Jacobs Manufacturing Company
Vehicle Equipment Division
22 East Dudley Town Road
Bloomfield, CT 06002
.i
Telephone: (203) 243.1441
83.9 and 85.9 Serles Engines
Section M Component Manufacturers
-
Belts
Dayco Rubber U.K.
Shellield Street
Stockport
Chesn're
SK4 IRV
England
Telephone. 061-432-5163
T.B.A. Belling Ltd.
PO.Box 77
Wigan
Lancashire
WN2 4XQ
England
Telephone: 01942-59221
Dayco Mfg.
Belt Technical Center
1955 Enterprize
Rochester Hills, MI 48309
Telephone: (810) 853-8300
Gates Rubber Company
s, B
~
~
&
Denver, CO 80217
Goodyear Tire and
Rubber Company
Industrial Products Div.
2601 Fortune Circle East
Indianapolis. IN 46241
Telephone: (317) 898-4170
~
~
-
Component Manufacturers’ Addresses
Page M-I
83.9 and 85.9 Series Engines
Section M Component Manufacturers
Component Manufacturers’ Addresses
General Information
NOTE The following list contains addresses and telephone numbers of suppliers of accessories used on Cummins
engines. Suppliers can’be contacted direatly for any specifications not covered in this manual.
Air Compressors
Air Cylinders
Kim Hotstart Co.
Bendix Heavy Vehicles Systems
Div. oi Allied Automotive
901 Cleveland Street
Elyria, OH 44036
Telephone: (216)329.90W
Holset Engineering Co., Inc.
1320 Kemper Meadow Drive
Suite
~. 500
..
Cipcinnati. OH 45240
Telephone: (513)825.9600
Midland-Grau
Heavy Duty Systems
Heavy Duly Group Headquarters
10930 N. Pamona Avenue
Kansas Clty, MO 64153
Telephone: (816)891-2470
Eendix Ltd.
Doualas Road
Kingiwwd
Brisfol
England
Telephone: 0117-671881
Catching Engineering
1733 North 25fh Avenue
Melmse Park, IL 60160
Telephone: (708)344-2334
TEC Wacken Inc.
8909 Rawles Avenue
Indianapolis, IN 48219
Telephone: (317)895-3870
Spokane, WA 992110245
Telephone: (509)534-6171
~
.
Air Heaters
Fleetguard, InC.
1200 Fleefauard Road
Cookeviiie,iN 38502
Telephone: (615)5269551
[email protected]
11245
Air Starting Motors
lngersoll Rand
Chorley New Road
Honvioh
Bolton
Lancashire
England
EL6 6JN
Telephone: 01204-65544
Ingersoll-Rand Engine
Starting Systems
888 Industrial Drive
Elmhurst, IL 60126
Telephone: (708)530-3875
83.9 and 85.9 Series Engines
Section M Component Manufactu.rers
-
Page M-b
Governors ....................................................................................................................................................
Heat Sleeves ................,:..........................................................................................................................
Hydraulic and Power Steering Pumps...........................................................................................................
In-Line Connectors ........................................................................................................................................
Oil Heaters.....................................................................................................................
:..............................
Prelubrication Systems ...................:
..................... ;.......: ..........................................................................
Radiators....................................
; . . . . . . I ..........................................................................................................
Throttle Assemblies ......................................
.:....
;...............................................
..........................................
,~
.
Torque Converters .......:......................................I
....................................................
:........:
~
~
~~
.....
~
~
...........................
Page
M-6
:... M-6
M-6
M-6
M-7
M-7
M-7
M-7
M-7
.
7n
-.r
=
5%
?r
: m
i3
:
u
:(I)
.. .._
._. .
._
.. ... .
..
.. .
... .,~
.
.. ...
.. ._.
_
. ..
.. ..
... ...
.. ..
... .~
._
.. ..,.
.. ..
..
..
._....
.. ..
.. ..
... ..._
_
. ..
_
.. .. .
. ._
-... .~
.~
.
.. ..
. ..
_
.~.
..
... ~.
. ...
.. ...
... ..._
.... ..._
.. ..
..
.... ....
... ...
... ....
..
.
.._
._ ....
__ __
__
__
.
r
I~
r
I
I
.
.
.
__
~~
I
~~
.
83.9 and 85.9 Series Engines
Section S Service Assistance
.
Page S-a
.
Section S Service Assistance
Section Contents
Page
..........................................................
Service Asststance .........................................................
Distributors and Branches -Australia ..........................
....................................................... :................5-22
Distributors and Branches .Canada............................................................................................................
5-19
Distributors and Branches .New Zealand ...............................
:........ .........................................................
: 5-25
Distributors and Branches .United States..................................
1.................................................................
5-4
Division and Regional Offices ........................................................................................................................
5-3
Emergency and Technical Service ....................................................................................
:..........................
5-1
Problem Solving ...............................................................
:.........................................................
................ 5-2
Routine Service and. Parts ............................................................................................................................
53-1
.
~
~
.
Page S-b
83.9 and 85.9 Series Engines
Section S Service Assistance
-
THIS PAGE LEFT INTENTIONALLY BLANK
83.9 and 85.9 Serles Engines
Section S Service Assistance
-
Service Assistance
Page S-1
Service Assistance
Routine Service and Parts
Personnel at Cummins Authorized Repair Locations can assist you with the correct operation and serviceof your engine.
Cummins has a worldwide service network of more than 5,000 Distributors and Dealers who have been trained to
provide sound advice, expert service, a'nd complete parts support. Check the telephone directory yellow pages or refer
to the directory in this section for the nearest Cummins Authorized Repair Location.
Emergency and Technical Service
The Cummins Customer Assistance Center provides a 24hour, toll free telephone number to aid in technical and
emergency service when a Cummins Authorized Repair
Location can.not be reached or is unable to resolve an
issue with a Cummins product.
If adaitional assistance is required, call Toll-Free:
1-800-DIESELS
(1-800-343-7357)
Includes ail 50 states, Bermuda, Puerto Rico, Virgin
Islands, and the Bahamas.
.
Outside of North America contact you; Regional
Office. Telephone numbers and addressesare listed
in the International Directory.
,
Service Assistance
Page S-2
83.9 and 85.9 Series Engines
Section S Service Assistance
-
Proble'm Solving
Normally, any problem that arises with the sale, service, or repair of your engine can be handled by a Cummirp
Autiiorized Repair Location in your area. Refer to the telephone dlrectory yellow pages for the one nearest you. If the
problem has not been handled satisfactorily, foll,ow the steps outlined below:
1. If the disagreement Is with a Dealer, talk to the Cummins Distributor with.whom he has his sewice agreement.
2. If the disagreement is with a Distrlbiltor, call'tRe nearest Cummins Division or Regional Office: however, mobt
probiems are soived below ihne Division of Regional oiilce revel. Telephone numbers and addresses are iisied in
thls section. Before calling, write down the following information:
a. Engine model and serial number
b. Type and make of equipment
c.' Total kilometers [milesl'or hours of operation
d. Warranty start date
e.' Nature of proble:m
f.
Summary of the current problem arranged in the order of occurrence
g. Name and location of the Cummins Distributor or Dealer
3. If a problemcan not be resolved'satisfactorilythrough your Cummins Authorized Repair Locationor Division Office,
write to:
Cummins Customer Assistance Center- 41403, Cummins Engine Company, Inc., Box 3005, Columbus, IN 47202-3005
83.9 and 85.9 Series Engines
Service Assistance
-
Section S Service Assistance
Page 5-3
Division and Regional Off ices
NOTE The following list contains offices in US., Canada, Australia, New Zealand, and Puerto Rico.
United States
Southern Division Office
Cummins Engine Company, Inc.
425 Franklin Road S.W.
Suite 500
Marietta, GA 30067
Telephone: (770) 423-1108
FAX: (770) 499-8240
Plains Regional Office
Cummins Engine Company, inc
1901 Central Drive
Suite 356
Bedford. TX 76021
Telephone: (817) 267-3172
FAX: N/A
Canada
Canadian Division Office
Cummins Diesel of Canada, Ltd.
5575 North Service Road
Burlington, Ontario L726M1
Telephone (905) 331-5944
FAX (905) 331-0276
Western Canada Regional Office
-
.
I
Cummins Diesel of Canada: Ltd.
18452.96th Avenue
Surrev. B.C. V3T 4W2
TelepKone: (604) ,882-5727
FAX (604) 882-9110
Eastern Canada Regional Office
Cummins Diesel of Canada Ltd.
7200 Trans Canada Hwy.
'
Pt. Cuaire, Quebec H9R 1CO
Telephone: (514) 695-2402
FAX: (514) 695-8917
Central Canada Regional Office
Cummins Diesel of Canada Ltd;
4887 - 35th Street SE
Calgary, Alberta T2B 3C6
FAX: (403) 569.9974
Australia Regional Office
Cummins EngineCompany Pty. Ltd.
2 Caribbean Drive
Scoresby,.Victoria 3179
Australia
Telephone: (61-3) 9765-3222
FAX: (61-3) 97634079
NOTE This office also serves New
Zealand.
Cummins Americas Regional
Office
Cummins Latin America
3088 N. Commence Parkway
MPC #14, Building A
Miramar, FL 33025
Telephone: (305) 621-1300
NOTE This office serves Puerto Rico
and South America excluding Brazil.
63.9 and 95.9 Series Engines
Section S Service Assistance
Service Assistance
Page 5-4
-
-
Distributors and Branches United States
,
.
Arkansas
Alabama
Alaska
Birmingham Distributor
Anchorage (Branch of Seattle)
Little Rock (Branch of Memphis)
Cummins Alabama. Inc.
2200 Plnson Highway
P.O. Box 1147
Srmir!ghsm, AL 3520%!
Telephone: (205) 841-0421
FAX: (205) 849-5926
Cummins Nqrlhwest, Inc.
2610 Commercial Drive
Anchorqge, AK 99501-3095
Te!ephone: (907)279-7594
FAX: (907) 276-6340
Cummins Mtd-South, Inc.
6600 interstate 30
Little Rock, AR 72209
Telephone:
Sales. p o i ) 5695600
Service: (501) 589-5656
P a m (501) 569-5613
FAX: (501) 585-2199 A
Mobile Branch
Cummlns Alabama, Inc.
1924 N. Beltline Hwy.
Mobile, AL 36601-1598
Telephone: (334) 45B2236
FAX: (334) 452-6419
Mobile OnanlMarine Branch
Cummins Alabama, Inc.
3422 Georgia Pacific Avenue
Mobile. AL 36617
Telephone: (334) 452-6426
FAX (334) 4756657
Montgomery Branch
Cummins Alabama, Inc.
2325 West Fairview Avenue
Montgomery, AL 36100
Telephone: (205) 283-2594
FAX: (205) 263-2594
8-18 (dom.dislrlbulorl
-
Arizona
Phoenix Distributor and Branch
Cummins Southwest, Inc.
2239 N: Black Canyon Hgwy
Phoenix. AZ 85009
Telephone: (602) 252-8021
FAX: (602) 253-5725
Tucson Branch
Cummins Southwest, Inc.
1012 West Prince Road
Tucson, AZ 85705
Telephone: (520) 887-7440
FAX: (520) 887-4173
-
California
, I
San Leandro Distributor
Cummins West, Inc.
14775 Wicks Blvd.
San Leandro, CA 94577-6779
Telephone: (510) 351-6191
FAX (510) 352-3925
Arcata Branch
Cummins West, Inc.
4801 West End Road
Arcala, CAO5521
Telephone (707) 822-7392
FAX (707) 822-7585
.
Service Assistance
Page S-5
63.9 and 85.9 Series Engines
Section S Seniice Assistance
-
Bakersfield Branch
West Sacramento Branch
San Diego Branch
Cummins West, Inc..
46x31 East Brundage Lane
Bakersfield, CA 93307
Telephone: (805) 325-9404
FAX (805) 861-8719
Cummins West, Inc.
2661 Evergreen Avenue
West Sacramento. CA 95691
Telephone: (916) 371-0630
FAX (916) 371-2849
Cummins %a1 Pacific Inc.
310 N. Johnson Avenue
Et Caion. CA 92020
Telephone: (619) ,593-3093
FAX (619) 593-0600
Fresno Branch
Los Angeles Distributor
Ventura Branch
Cummins West, Inc.
2740 Church Avenue,
Fresno, CA 93706
Telephone: (209) 495-4745
FAX: (209) 486-7402. ,
Cummins Cal Pacific Inc.
1939 Deere Avenue (Irvine)
Irvine, CA 92606
Telephone: (949) 253-6000
FAX. (949) 253-6080
Cummins Cal-Pacific Inc.
3958 Transoort St.
Ventura, Cl\ 93003
Telephone: (805) 644-7281
FAX: (805) 644-7284
Redding Branch
Montebello Branch
Colorado
Cummins West, Inc.
20247 Charlanne Drive
Redding, CA 96001
Telephone: (916) 222-4070
FAY: (916) 224-4075
Cummins Cal Pacific Inc.
1105 South Greenwood Avenue
Montebelio, CA 90640
Telephone: (323) 728-8111
FAX: (323) 889-7422
'
Stockton Branch
Bloomington Branch
Cummins West. Inc.
41 West Yokuts Avenue
Suite 131
Stockton, CA 95207
Telephone: (209) 472-0386
FAX: (209) 478-2454
Cummins Cal Pacific Inc.
3061 S. Riverside Avenue
Bloomington, CA 92377
Telephone: (909) 877-0433
FAX: (909) 877-3787
Denver Distributor Cummins Rocky Mountain, Inc.
5100 East 58th Avenue
Commerce Citv. CO 80022
Telephone: (30s)287-0201
FAX: (303) 288-7080
Denver Onanllndustrial Branch
Cummins Rocky Mountain, Inc.
5100 East 58th Ave.
Commerce City, CO 80022
Telephone: (303) 286-7697
FAX: (303) 287-4837
-
I
Service Assistance
Page S-6
Durango Branch
I
I
63.9 and 65.9 Series Engines
Section S Service Assistance
-
Ft. Myers Branch
Orlando Branch
Cummins Rocky Mountain, Inc.
13595 County Road 213
Durango, CO 81301
Telephone: (970) 259-7470
FAX: (970) 259-7482
Cummins Southeastern Power, Inc.
2671 Edison Avenue ,
Ft. Myers. FL 33902
Telephone: (941) 337-1211
FAX: (941) 337-5374
Grand Junction Branch
Jacksonville Branch
Cummins Southeastern Power. inc.
4020 North
Orange Blossom mal
Orlando, FL 32810
Telephone: (407) 298-2080
FAX: (407) 290-8727
Cummins Rocky Mountain, Inc
2880 0.S. Hignway 6 & 60
P.O. Box 339
Grand Junction, CO 81501
Telephone: (303) 242-5776
FAX: (303) 243-5495
Cummins Southeastem Power, Inc
755 Pickettville Rd.
Connecticut
CumminsSoutheistern Power, Inc.
9900 N.W. 77th Avenue
Hialeah Gardens, FL 33016
Velephone: (305) 821-4200
FAX (245) 557-2992
-
Rocky Hill (Branch of Bronx)
Cummins Metmpower, inc.
914 Cromwell Ave.
Rockv Hill. CT 06067
Teledhonel (860) 529-7474
FAX: (860) 529-7524
Florida
Tampa Distributor
Cummins Southeastern Power, Inc.
Corporate Office
5421 N. 59th Street
Tampa, FL 33610
Telephone: (813) 621-7202
FAX: (813) 621-8250
Hialeah (Miami) Branch
Ocala Branch
Cummlns Southeastern Power
321 Southwest 52nd Ave.
Gaia, FL 34474-1892
Telephone (352) 861-1122
FAX. (352) 861-1130
Tampa Branch
Cummins Southeastern Power, Inc.
5912 E. Hillsborough Avenue
Tampa, FL 33610
Telephone: (813) 626-1101
FAX: (813) 628-4183
Georgia
Atlanta Distributor
CumminsSouth, inc.
5125 Georgia highway 85
College Park, GA 30349
Telephone: (404) 763.0151
FAX: (404) 786-2132
Albany Branch
Cummins South, Inc
1915 W. Oakridge Drive
Albany, GA 31707-4938
Telephone: (912) 888-6210
FAX (912) 883-1670
Service Assistance
Page $7
63.9 and 65.9 Series Engines
Section S Service Assistance
-
Atlanta Branch
Cummins South, Inc.
100 Universlty Avenue, S.Y.
Atlanta, GA 30315-2202 . ,
Telephone: (404)527-7800
FAX: (404)527-7832
Augusta Branch
Cummins South, Inc.
1255 New Savannah Road
Augusta, GA 30901-3891
Telephone: (706)722-8825
FAX: (706)722-7553
Savannah Branch
Cummins South, Inc.
8 Interchange Court
Savannah, GA 31401-1627
Telephone: (912)232-5565
FAX: (912)232-5145
Hawaii
Kapolei Distributor
Cummins Hawaii Diesel Power, Inc.
91-230 Kalaeloa Blvd.
Kaoolei. HI 96707
Telkphone: (808) 682-8110
FAX: (808) 682-Ed77
Idaho
.
Onan Branch
.
Cummins Intermountain, Inc,
2851 Federal Wav Citv
Boise, iD 83705
Telephone: (208)3365000
FAX:
.~ (208)338-6436
I
Justin, IL 60458
Telephone: (708)563-7070
FAX: (708)563-7095
,
Harrisburg (Branch of St. Louis)
I
Pocatello-(Branchof Salt Lake City)
Cummins Intermountain. Inc.
14299 Highway 30 West
Pocatello, ID 83201
Telephone: (208)234-1661
FAX: (208)234-1662
-
Rock Island (Branch of Omaha)
Cummins GreatPlains Diesel, Inc.
7820.42nd Street West
Rock Island, IL 61204
Telephone: (309)787-4300
FAX: (309)7874397
illinois
Chicago Distributor
C h m i n s Northern Illinois, Inc.
7145 Santa Fe Drive
Hodgkins. IL 60525
Telephone: (708)579-9222
FAX: (708)352-7547
Bloomington-Normal
Indianapolis)
Onan Branch
- (Branch of
Cummins Mid-States Power, Inc.
(at U.S. 51 N and 1-55)
414 W. Northtown Road
Bloomington-Normal, IL 61761
Telephone: (309)4524454
FAX: (309)452-1642
Cummins Gateway, Inc.
Highway 45 North
Harrisburg, IL 62946
Telephone: (618)273-4138
FAX: (618)273-4531
Cummins Gateway, Inc.
#I Extra Mile Drive
Collinsville, IL 62234
Telephone: (618) 345-0123
FAX: (314)531-6604
.
,,
8
Service Assistance
Page S-8
Indiana
.
-
Indianapolis Branch
Indianapolis Distributor
Cummins Mid.States Power, Inc.
P.O. BOX 42917
3762 West Morris Street
Indianapolis, IN 46242.0917
Telephone: (317) 243.7979
FAX: (317) 240-1925
-
Evansville (Branch of Louisville)
Cumrnins Cumbedand, Inc.
7901 Highway 41 North
Evansville, IN 47711
Telephone: (812) 867-4400
FAX: (812) 421-3282
Ft. Wayne Branch
Cummins Mid-States Power, Inc.
F! 0. Box $2917
3621 b s t Morris Street
Indianapolis, IN 46242-0917
Telephone: (317) 244-7251
FAX: (317) 240-1215
Onsn Branch
Des Moines - (Branch of O!maha)
Midwestern Power Products
Division of Cupmins Great Plains Diesel, Inc.
5194 N.E. 17th Street
Des Moines, IA 50313
Telephone: (515) 264-1650
FAX: (515) 264-1651
Kansas
Mid-States Power. Inc.
4301W Morris Sweet
P.0.Box 42917
Indianapoiis, IN 46240-0917
Telephone: (317) 240-1967
FAX: (317) 240-1975
Colby (Branch of Kansas City, Missouri)
iowa
Colhy, KS 67701
Telephone: (785) 462-3945
FAX (785) 462-3070
Cedar Rapids,- (Branch of,Omaha)
Cummins Mid-States Power, Inc.
3415 Coliseum Blvd. West
(At Jct. 1-69 & 33/33)
Ft. Wayne, IN 46808
Telephone: (219) 482-3601
FAX: (219) 484-8930
Cummins Great Plains Diesel, Inc.
625 33rd Avenue SW
Cedar Rapids, IA 52406
Telephone: (819) 366-7537 (24 hours)
FAX (319) 366-7562
Gary (Branch of Chicago)
Des Moines (Branch of Omaha)
Cummins Northern Illinols, Inc.
1440 Texas Street
Garv. IN 46402
Teliphone: (219) 885-5591
FAX: (219) 883-4817
Cummins Great Plains Diesel, inc.
1680 N.E. 51st Avenue
-
63.9 and 65.9 Series Engines
Section S Service Assistance
~
-
PO.
BOX
B
s
0; Moines, IA 50313
Telephone: (515) 262-9591
Parts: 6151 262-9744
FAX- (h5)”262-0626
-
-
Garden City (Branch of Kansas
Citv. Missouri)
Cummins Mid-America, Inc.
7285 A~~~~~~
Garden Citv. KS 67846
Telephone:’(316) 275-2277
(316) 275-2533
83.9 and 85.9 Series Engines
Section S Service Assistance
Service Assistance
Page S-9
-
-
Wichita (Branch of Kansas City,
Missouri)
Louisiana
Maryland
-
Morgan City (Branch of Memphis)
Baltimore distributor
Kentucky
Cummins Mid-South, Inc.
Hwy. 90 East
PO. BOX 1229
Amelia, LA 70340
Telephone: (504) 631-0576
FAX: (504) 631-0081
Cummins Power Systems, Inc.
1907 Parkwood Drive
MD 21061
Telephone: (410) 590-8700
FAX: (410) 590-8723
Louisville Distributor
New Orleans - (Branch of Memphis)
Cummins Mid-America, Inc.
5101 North Broadway
Wichita, KS 67201
Telephone: (316) 838-0875
FAX: (316) 838-0704
Cummins Cumberland, Inc
(Corporate Office)
2301 Nelsonville Parkwav
Louisville., ..
KY 40223
Telephone: (502) 254-3363
FAX: (502) 254-9272
Hazard Branch
Cummins MidSouth, Inc.
110 E. Airline Highway
Kenner, LA 70062
Telephone: (504) 468-3535.
FAX (504) 465-3408
,
Maine
Bangor (Branch of Boston)
Cummins Cumberland. Inc
Highway 15 South
PO. BOX 510
Hazard, KY 41701
Telephone: (606) 436-5718
FAX: (606) 436-5038
Cummins Norlheast. Inc
221 Hammond Street
Bangor, ME 04401
Telephone: (207) 941-1061
FAX: (207) 945-3170
Louisville Branch
Scarborough (Branch of Boston)
Cummins Cumberland, Inc
9820 Bluegrass Parkway
Louisville, KY 40299
Telephone: (502) 491-4263
FAX (502) 499-0896
Cummins Northeast, Inc.
10 Gibson Road
Scarborough, ME 04074
Telephone: (207) 883-8155
FAX: (207) 883-5526
,
.
~
-
.
Massachusetts
Boston Distributor
Cummins Northeast. Inc.
100 Allied Drive
Dedham, MA 02026
Telephone: (7811 329-1750
FAX': (781) 329-'h28
Springfield Branch
Cummins Northeast, Inc.
177 Rocus Street
Springfield, MA 01104
Telephone: (413) 737-2659
FAX: (413) 731-1082
,
I
83.9 and 85.9 Series Engines
Section S Service Assistance
Service Assistance
Page S-10
Mexico
-
Tijuana (Branch of Los Angeles)
DistribuiUo~raCummins De Baja
Blvd. 3ra. Oeste No. 17523
Fracc. Industrial
Garita de Otay C.P. 22400
Tijuana, Baia California
Mexico
Telephone: 011-52-66-298433
FAX 011-52-66-238649
Dearborn Branch
Novi Branch
Cummins Michigan. Inc.
3760 Wyoming Avenue
Dearborn, MI 4d120
Telephone: (313) 8456200
FAX: (313) 843-6070
Cummins Michigan, Inc
25100 Novi Road
Novi, Mi 48375
Telephone: (248) 380-4300
FAX (248) 380.0910
Grand Rapids Branch
Power Products (Branch of Detrolt)
Michigan
Cummlns Michigan, Inc.
3715 Clay Avenue, S.W.
Grand Rapids, MI 49508
Telephone: (616) 538-2250
FAX: (616) 538-3830
Cummlns Michiqan, Inc.
41326 Vincenti Ct.
Novi, Mi 40375
Telephone: (248) 426-9300
FAX: (248) 473-8560
Detroit (Novi) Distributor
Grand Rauids Bmnch
Saalnaw Branch
Standby Power, Inc.
2580 Expressway Drive S.W.
Grand Raoids. MI 49548
Telephon;: (6i6) 281-2211
FAX: (616) 281-3177
Cumrnins Michigan, Inc.
722 N. Outer Drive
Saginaw, MI 48605
Telephone: (517)'752-5200
FAX: (517) 752-4194
Cummins Michigan, Inc.
41216 Vincenli Court
Novi, MI 48375
Telephone: (248) 478-9700
FAX: (248) 478-1570
~~~
-
-
Blissfield, Michigan
Iron Mountain -(Branch of De Pere) Standby Power (Branch of Detroit)
Diesel Fuel Systems, Inc.
Subsidiary of Cummins Michigan Inc.
211 N. Jipson Street
Blissfield, MI 49228
Telephone: (517) 486-4324
FAX: (517) 4863614
Cummins Great Lakes, Inc.
1901 Stevenson Avenue
Iron Mountain, MI 49801
Telephone: (906) 774.2424
(800) 236-2424
FAX (906) 774-1190
Cummins Michigan. Inc.
12130 Dixie
Redford. MI 48239
Telephone (313) 538-0200
FAX (313) 538-3986
. .. . . ~
........... .........
......
.. .
.
..-... .. ... .... .
.... . .
..
Service Assistance
Page S-11
83.9 and 65.9 Series Engines
Section S Service Assistance
-
0
Minnesota
Mississippi
St. Paul Distributor
Jackson (Branch of Memphls)
Cummins North Central, Inc.
3030 Centre POinte Drive
Suite 500
Rosevilie. MN 55113
Telephone: (651) 636:1000
FAX: (651) 63&2442
Duluth Branch
Cummins Diesel Sales, Inc.
3115 Truck Center Drive
Duiulh, MN 55806-1786
Telephone: (218) 628-3641
FAX: (218) 628-0488
St. Paul Branch
Cummins North Central, lnc
2690 Cleveland Ave. North
St. Paul. MN 55113
Telephone: (651) 636-1000
FAX: (651) 638-2497
Cummins Mid-South, inc.
325 New Highway 49 South
Jackson, MS 392884224
Telephone:
Admin.: (601) 932-7016
Parts: (601) $32-2720
Service: (601) 939-1800
FAX: (601) 932-7399
Missouri
Springfield Branch
Cummins Mid-America, Inc.
3637 East Kearney
Springfield, MO 65803
Telephone: (417) 862-0777
FAX: (417) 862-4429
St.’Louis Distributor
Cummins Gateway, Inc.
7210 Hall Street
St. Louis. MO 63147
Telephone: (314) 389-5400
FAX: (314) 389-9671
I
Kansas City Distributor and Branch Columbia Branch’
Cummins Mid-America, Inc.
8201 NE Parvin Road
Kansas City, MO 64161
Telephone: (816) 414-8200.
FAX: (816) 414-8299
Cummins Gateway, Inc.
5221 Highway 763 North
Columbia, MO 65202 ’ .
Telephone: (314) 449.3711
FAX: (314) 449-3712
Joplin Branch
Sikeston Branch
Cummins Mid-America, Inc.
3507 East 20th Street
Joplin, MO 64801
Telephone: (417) 623-1661
FAX: (417) 623-1817 .
Commins Gateway, Inc.
101 Keystone Drive
.. Sikeston, MO 63801
Telephone: (314) 472-0303
FAX: (314) 472-0306
~.
Service Assistance
Page S-12
Industrial Power Branch
Cummins Gatewav. Inc.
3256 E. Outer Rokd
Scott city, MO 63788
TeieDhone: 1573)335-9399
FAX; (573)335-jO62
Montana
"
3i!!ings = (8rsnch of Dcnva;)
Cummins Rocky Mountain, Inc.
5151 Midland Road
Billinas. MT 59101
Telepione: (406)245.4194
FAX: (406)245-7923
-
Great Falls (Branch of Denver)
Cummins Rocky Mountain, inc.
415 Vaughn Road
Great Fails, MT 59404
Telephone (406) 452-8561,
FAX: (406)452-9911
-
Missouia (Branch of Seattle)
Cummins Northwest, Inc.
4950 North Reserve Street
Missouia, MT 59802-1498
Telephone. (406)728-1300
FAX. (406)728-8523
63.9 and 65.9 Series Engines
Section S Service Assistance
-
Sparks (Branch of Salt Lake City)
Nebraska
Omaha Distributor and Branch
Cummins Great Plains Diesel, Inc.
.
5515 Center Street
P.0. Box 6068
Omaha. NE 68ld6
Telephone: (402)551-7678 (24Hoors)
FAX: (402)551-1952
Kearney Branch
Cummins Great Plains Diesel. Inc.
515 Central Avenue
Kearney, NE 68847
Telephone: (308)234-1994
FAX: (308)234-5776
~
~~
~~~~~~~~~~~
Nevada
Cummins Intermountain, Inc.
Elko (Branch of Salt Lake City)
..
5370 East Idaho Street
Elko, NV 89801
Telephone: (775)7386405
FAX: (775)736-1719
Las Vegas
City)
-
- (Branch of Salt Lake
Cummins intermountaini Inc.
2750 Losee Road
North Les Vegas, NV 89030
Telephone: (702)399-2339
FAX: (702)399-7457
Cimmins Intermountain, Inc.
150 Glendale Avenue
Sparb, NV 89431
Telephone: (775)331-4983
FAX: (775)331-7429
New Jersey ,
Nwwa;k - (Branch o: Bronx)
Cummins Metropower, inc.
41-85 Ooremus Ave.
Newark., NJ 07105
Telephone: (973)491-0100
FAX: (973)578-8873
~~
~
~~~
New
..-.. Mexico
... -...- -
-
Albuquerque (Branch of Phoenix)
Cummins Sobthwest. Inc.
1921 Broadway N.E.
Albuquerque, NM 87102
Telephone: (505) 247-2441
FAX (505)842-0436
Farmington -(Branch of Phoenix)
Cummins Southwest, Inc.
1101 North Troy King Road
Farmington, NM 87401
Telephone: (505) 327-7331
FAX: (505)326-2948
63.9 and 65.9 Series Engines
Section S Service Assistance
Service Assistance
Page S-13
-
New York
North Carolina
Bronx Distributor
Charlotte Distributor
Cummins Metropower, Inc.
890 Zerega Avenue
Bronx, NY 10473
Telephone: (718)892-2400
FAX: (718)892-0055
Curnmins Atlantic, Inc
l l l M Nations Ford Road (28273)
P.O. Box 240729
Charlotte, NC 28224-0729
Telephone: (704)588-1240
FAX: (704),%37-4870
Cummins North Central, Inc
3801 34th Ave. SWFarao, ND 58104
Telephone: (701)282-2466
FAX: (701)277-5399
,
Charlotte Branch
CumminsNorth Central, Inc.
4728 Gatewav Drive
-
Albany (Branch of Boston)
Cummins Norlheast, Inc.
101 Railroad Avenue
Albany, NY 12205
Telephone: (518)459-1710
FAX: (518)459-781 5
-
Buffalo (Bfanch of Boston)
Cummins Northeast, Inc.
480 Lawrence Bell Dr.
Willlamsville, NY 14221-7090
Telephone: (716)631-3211
FAX (716)626-0799
-
Syracuse (Branch of Boston)
Cummins Northeast. Inc.
29 Eastern Avenue
Curnmins Atlantic, Inc.
3700 North Interstate 85
Charlotte, NC 28206
Telephone: (704)596-7690
FAX: (704)596-3038
Greensboro Branch
Curnmins Atlantic, Inc.
513 Preddy Boulevard (27406)
PO. Box 22066
Greensboro, NC 27420.2066
Telephone: (336) 275-4531
FAX: (336) 275-8304
Wilson Branch
Cummins Atlantic. Inc.
1514Cargill Avenue (27893)
P.O. Box 1177
Wilson, NC 27894-1117
Telephone: (252)237-9111
FAX: (252)237-9132
North Dakota
-
Fargo
.
.(Branch of
Sl.Paul)
~
-
Grand Forks (Branch of St. Paul)
-
Minot (Branch of St. Paul)
Cummins North Central, Inc.
1501 - 20th Avenue. S.E.
' Minot, ND 58702
Telephone: (701) 852-3585
FAX (701)852-3588
Ohio
Columbus Distributor and Branch
Cummins Interstate Power, Inc.
4000 Lyman Drive
Hilliard (Columbus), OH 43026
Telephone: (614)771-1000
FAX: (614)771-0769
.
Service Assistance
Page S-14
63.9 and 65.9 Series Engines
Section S -Service Assistance
1,
Columbus Distributor ~'
Cummins Interstate Power, Inc.
2297 Southwest Bldv., Suite K
Grove Clty, .OH 43123
Telephone: (614) 771-1000
FAX (614) 527-2576
Cincinnati Branch
.
Oregon
Tol,e'doBranch
Cummins Interstate Power, Inc.
801 Illinois Avenue
Maumee
(Toledo). OH 43537
Telephone: (419) 893-8711
FAX: (419) 893-5362
8
8
~
Cummins Interstate Power, Inc.
10470 Evendale Drive
Cincinnati, OH 45241
Telephone: (513) 563.6870 '
FAX: (513) 563-0594
Cleveland Branch
Cummins interstate Power, inc.
7585 Northfield Road
Cleveland. OH 44146
Telephone: (440) 4396800
FAX (440) 439-7390
Strasburg Branch
Cummins Interstate Power, inc.
777 South Woosler Avenue
Strasburg, OH 44680
Telephone: (216) 878-5511
FAX: (216) 878-7666
Youngstown Branch
Cummins interstate Power, In;.
7145 Masury Road
Hubbard
(Youngstown), OH 44425
Telephone: (216) 534-1935
FAX 1216) 534-5606
Oklahoma
-
Oklavoma City (Branch of Arlingtan\
Cummins Southern Plains, Inc.
5800 West Reno
Oklahoma City, OK 73127
Telephone: (405) 946-4481 (24 hours)
FAX (405) 946-3336
-
Tulsa (Branch of Arlington)
Cummins Southern Plains, Inc.
16525 East Skelly Drive
Tulsa. OK 74116
TelephonG: (918) 234-3240
FAX: (918) 233-2342
-
Bend (Branch of Seattle)
Cummins Northwest, Inc.
3500 N. Hlghway 97 (07701.5729)
P.O. Box 309
Bend, OR 977094309
Telephone: (541) 289-1900
FAX: (541) 389-1909
Coburg/Eugene-(B,ranchof Seattle)
Curnniins Northwest, Inc.
91201 Industrial Parkway
Coburg, OR 97401
(Mailing Address]
PO. Box 10877
Eugene, OR 97440-2887
Telephone: (541) 687-0000
FAX: (541) 887-1977
-
Medford (Branch of Seattle)
Cumrnins Northwest.
.., Inc.
.
4045 Crater Lake Highway
Medford, OR 97504.9796
Telephone: (541) 779.0151
FAX: (541) 772-2395
Pendleton.- (Branch
of Seattle)
Cummins Northwest, Inc.
223 S.W. 23rd Street
Pendleton, OR 97801-1810
Telephone: (541) 276-2561
FAX. (541) 276-2564
Service Assistance
Page S-15
83.9 and 85.9 Series Engines
Section S Service Assistance
-
-
-
Portland (Branch of Seattle)
Harrisburg Branch
Columbia (Branch of Charlotte)
Cummins Northwest, Inc.
4711 "N. Basin Avenue
P. 0. Box 2710 (97208-2710)
Portland. OR 97217-3557
Telephone: (503) 2840900
FAX: (503) 286-5938
Cummins Power Systems, Inc.
4499 Lewis Road
Harrisburg, PA 17111-2541
Telephone: (717) 564-1344
FAX: (717) 558-8217
Cummins Atlantic. Inc.
1233 Bluff Road (29201)
P.O. Box 13543
Columbia, SC 29201-3543
Telephone: (803) 799-2410
FAX: (803) 779-3427
Pennsylvania
Philadelphia Distributor
Cummins Power Systems, Inc.
2727 Ford Road
Bristol, PA 19007
Telephone: (215) 785-6005 and
(609) 583-0005
FAX: (215) 785-4085
Bristol Branch
Puerto Rico
-
Puerto Nuevo (Branch of Tampa)
. ,
South Dakota
-
Sioux Falls (Branch of Omaha)
Cummins Great Plains Diesel, Inc.
701 East 54th Street North .
Sioux Falls, SD 57104
Telephorie: (605) 336-1715
FAX (605) 336-1746
South Carolina
Tennessee
-
Charleston (Branch of Charlotte)
Cummins Atlantic, Inc.
3028 West Montague Avenue
Charleston, SC 294185593
Telephone: (843) 554-5112
FAX: (843) 745-0745
Pittsburgh Branch
Charleston (Branch of Charlotte)
Cummins Power Systems. Inc.
3 Alpha Drive
Pittsburah. PA 15238-2901
Telephoiei (412) 820-8300
FAX (412) 820-8308
.
Cummins Diesel Power, Inc.
#31 Calle " C
El Matadero
Puerto Nuevo, Puerto Rico 00920
Telephone: t787) 793-0300
FAX: (787) 793-1072
Cummins Power Systems, Inc.
'2727 Ford Road
Bristol, PA 19007
Telephone: (215) 785-6005 and
(609) 563-0005
FAX: (215) 785-4728
-
Cummins Atlantic Inc.
231 Farmington Road
Charleston, SC 29483
Telephone: (843) 851-9819
FAX: (843) 875-4338
I
Memphis Distributor & Distribution
Center
Cummins Mid-South, Inc.
666 Riverside Drive
Memphis, TN 38703
Telephone: (901) 577-0666
FAX: (901) 522-8758
-
Chattanooga (Branch of Atlanta)
COmmins
.~South
.~
- ~..Inc.
1509 East 26th Street
Chattanooga, TN 37407-1095
Teleohone: 1615) 629-1447
FAX (615) 629-i494
~
~~
~
I
83.9 and 65.9 Series Engines
Section S Service Assistance
Service Assistance
Page S-16
-
-
Knoxville (Branch of Louisville)
Amarillo Branch
Houston Branch
Cummins Cumberland, Inc.
1211 Ault Road
Knoxville. TN 37914
Telephone: (423) 5230446
FAX: (423) 523-0343
Cummins Southern Plains, lnc.
5224 Interstate 40 Expressway East
p.a BOX31570
Amarillo, TX 79120-1570
Telephone: (806) 373-3793 (24 hours)
FAX: (806) 372-8547
Cummins Southern Plains, Inc.
4750 Homestead Road
P.0 Box 1367
Houston, TX 77251-1367
Telephone: (713) 875-7421 (24 hours)
FAX: (713) 675-1 515
Dallas Branch
Cummins Southern Plains, Inc.
2615 Bia Town Bivcl.
Mesquik TX 75150
Telephone: (214) 321-5555 (24 hours)
FAX: (214) 328-2732
Memphis Branch
'
Cummins MidSouth. Inc,
1784 E. Brooks Road
Memphis. TN 381i6
Telephone:
SaleslAdmln.: (901) 345-7424
Parts: (901) 345-1784
Service: (901) 345.6185
FAX (901) 346-4735
-
Nashville (Branch of Loulsville)
Cunimins Cumberland. Inc. # '
706 Spence Lane
.
Nashville, TN 37217
TeleDhone: (615) 3664341
FAX': (615) 366-5693
-
Texas
Arlington Distributor
Cummins Southern ,Plains, Inc.
600 N Watson Road
Arlinoton. TX 76004-3027
Teleihone: (817) 640-6801
FAX: (817) 640-6852
Cummins Southern Plains, Inc.
3707 Irving Boulevard
Dallas, TX 75247
Telephone: (214) 631-6400 (24 hours)
FAX: (214) 631-2322
-
El Paso (Branch of Phoenix)
Cummins Southwest, Inc.
14333,Gateway We61 .
El Paso, TX 79927
Telephone: (915) 852-4200
FAX: (915) 852-3295
,~
Mesquite Branch
Odessa Branch
Cummins Southern Plains, inc.
1210 South Grandview
p.0 Box 633
.Odessa, TX 79760-0633
Telephone: (915) 332-9121 (24 hours)
FAX (915) 333-4655
Fort Worth Branch
San Antonio Branch
Cummins Southern Plains.
~.Inc.
3250 Noflh Freeway
Fort Worth, TX 76111
.
Teleohone: (817) 624-2107 (24 hours)
FAX': (817) 624-3296
Cummins Southern Plains, Inc.
6226 Pan Am Expressway North
P.O. Box 18385
San Antonio, TX 78218-0385
Telephone: (512) 655-5420 (24 hours)
FAX: (512) 655-3865
~
~
~
~
~~~
Service Assistance
Page S-17
B3.9 and 65.9 Series Engines
Section S Service Assistance
-
-
-
Houston Onan Branch
Richmond (Branch of Charlotte)
Spokane Branch
Southern Plains Power
A Division of Cummins Southern Plains
1155 West LoOD North
Houston, TX 73055
Telephone: (713) 958-0020
FAX: (713) 956-0266
Cummins Atlantic, Inc.
3900 Deepwater Terminal Road
Richmond, VA 23234
Telephone: (804) 232-7891
FAX: (804)232-7428
Cummins Northwest, Inc,
11134 W. Westbdw Blvd.
Sookane.'WA 99204
Telephone: (509) 455-4411
FAX: (509) 624-4681
~~
~~~~~
~~~
~~
~
-
Tidewater (Branch of Charlotte)
Tacoma Branch
Cummins Intermountain, Inc
1030 South 300 West
Salt Lake City, UT 84101
Telephone: (801) 355-6500
FAX: (801) 524-1351
Cummins Atlantic. Inc.
Atlantic Power Generation
3729 Holland Blvd.
Chesapeake, VA 23323
Telephone: (757) 485-4848
FAX (757) 485-5085
Cummins Northwest, Inc.
3701 Pacific Highway East
Tacoma, WA 98424-1135
Telephone: (253) 922-2191
FAX: (253) 922-2379
Washington
Vernal Branch
Seattle Distributor
Cummins Intermountain, Inc
1435 East 335 South
Vernal. UT 84078
Telephone: (435) 7885732
FAX: (43s) 789-285a
Cummins Northwest, Inc.
811 S.W. Grady Way (980552944)
P.O. Box 9811
Renton, WA 98057-9811
Telephone: (425) 235-3400
FAX (425) 235-8202
Cummins Morthwest, Inc.
1905 East Central Avenue (98901-3609)
P.O. Box 9129
Yakima, WA 98909-0129
Telephone: (509) 248.9033
FAX: (509) 248-9035
Utah
Salt Lake City Distributor
Virginia
-
Cloverdale (Branch of Charlotte)
Cummins Atlantic, inc.
263 Simmons Drive
Cloverdale, VA 24077.
Telephone: (540) 966-3169
FAX (540) 966-3749
I
Chehalis Branch
Cummins Northwest, Inc.
926 N.W. Maryland
Chehalis. WA 985380339
Telephone: (360) 748-8841
FAX: (360)748-8843
Yakima Branch
West Virginia
-
Charleston (Branch of Louisvllle)
Cummins Cumberland. Inc.
3100 MacCorkle Ave. SW
PO.Box 8456
South Charleston, WV 25303
Telephone: (304) 744-6373
FAX: (304) 744-8605
83.9 and 65.9 Series Engines
Section S -Service Assistance
Service Assistance
Page S-18
-
Falrmont (Branch of Louisville)
DePere Branch
Cummins Cumberland, Inc.
Sorhh Fairmount Exit, 1-79
145 Middletown Road
Fairmont. WV 26554
Telephone: (304) 367-0196
FAX: (344) 367-1077
Cummins Great Lakes, Inc.
939 Lawrence Drive
P. 0. Box5070 '
DePere, WI 54115-5070
Telephone: (920) 336-9631
(800)236-1191
FAX: (920) 336-8954
Wisconsin
DePere Distributor
Cummins Great Lakes, Inc.
Coroorate Office
875 Lawrence Drive
PO. Box 5070
DePere. WI 54115-5070
Telephone: (920) 337-1991
FAX: (920) 337-9746
Chippewa Falls Branch
Cummins Great Lakes, Inc.
2030 St. Highway 53
Chippewa Falls, WI 54729
Telephone: (715) 720-0680
FAX: (715) 720-0685
Milwaukee Branch
Cummins Great Lakes, Inc.
9401 South 13th Street
P.O. Box 0
Oak Creek, WI 53154
Telephone: (414) 768-7400
(800)472-8283
FAX: (414) 7659441
Wausau Branoh
Cummins Great Lakes, Inc.
4703 Rib Mountain Drive
Wausau, WI 54401
Telephone: (715) 359-6886
(800) 236-3744
FAX: (715) 359-3744
Wyoming
-
Gilletfe (Branch of Denver)
Curnrnins Rocky Mountain, Inc.
2700 Hwy. 14 & 10 North
PO.Box 1207 (82717)
Glllette, WY 82718
Telephone: (307) 682-9611
FAX (307)682-8242
-
Rock Springs (Branch of Salt Laka
City)
Cummins Intermountain, Inc.
2000 Foothill Blvd.
P.O. Box 1634
Rock Springs, WY 82901
Telephone: (307) 362-5168
FAX: (307) 362-5171
83.9 and 85.9 Series Engines
Section S Service Assistance
Service Assistance
Page S-19
-
-
Distributors and Branches Canada
Alberta
Edmonton Distributor and Branch
Cummins Alberta
11751 - 181 Street
Edmonton. AB T5S 2K5
Telephone; (780) 455-2151
FAX: (780) 454-9512
Lethbridge Branch
Spamood Branch
Cummins Alberta
240. 24th streetNorth
Lethbridge, Alberta T I H 3T8, Canada
Telephone: (403) 329.6144 .
FAX: (403) 320-5383
Cummins British Columbia
731 Douglas Fir Road
Sparwood, B.C. VOB 260, Canada
Telephone: (250) 425-0522
FAX: (250) 425-0323
British Columbia .
Tumbler Ridge Branch
Calgary Branch
Vancouver Distributor
Cummins Alberta
4887. 35th Street S.E.
Calgary, Alberta T2B 3H6, Canada
Telephone: (403) 569-1122
FAX: (403) 569-0027
Cummins British Columbia
18452 96th Avenue
Surrey, B.C., Canada
V4N 3P8
Telephone: (604) 882.5000
FAX: (604) 882-5080
Grande Prairie
Cummins Alberla - Grande Praire
RR2, Site 9, Box 22
Sexsmith AB CN TOH 3CO
Telephone: (780) 568-3359
FAX: (780) 568-2263
Hinton Branch
Cummins Alberta
135 Veats Avenue
Hinton, Alberta T7V 1S8, Canada
'Telephone: (780) 865.5111
FAX: (780) 8655714
~
Kamloops Branch
Cummins British Columbia
,976' Lavai Crescent
Kamloops, B.C. Canada V2C 5P5
Telephone: (250) 828-2388
FAX: (250) 828.6713
Prince George Branch
Cummins British Columbia
102- 3851- 18th Avenue
Prince George, B.C. V2N 1B1
Telephone: (250) 564-9111
FAX (250) 564-5853
Cummins British Columbia
industrial Site, Box 226
Tumbler Ridge, B.C.
Canada VOC 2WO
Telephone: (250) 2424217
FAX: (250)242-4906
Manitoba
Winnipeg Distributor
'
Cummins Mid-Canada Ltd.
489 Oak Point Road
PO. Box 1860
Winnipeg, MB R3C 3R1; Canada
Telephone: (204) 632-5470
FAX: (204)'697-0267
83.9 and 85.9 Series Engines
Section S Service Assistance
-
Service Assistance
Page S-20
New Brunswick
Nova Scotia
Fredericton (Branch of Montreal)
Halifax. (Branch of Montreal)
Cummins Eastern Canada. Inc.
R.R.#I Doak Road
P.0. Box 1178, Station 'A'
Fredericton,
New Erunswkk E3B 4x2, Canada
Telephcnci (506) 45: .!9S
FAX: (506) 451-1921
Newfoundland
-
St. John's (Branch of Montreal)
Cummins Eastern Canada, h C .
122 Clyde Avenue
Donovans Industrial Park
Mount Pearl, Newfoundlend AIN 2C2
Canada
'
Telephone: (709) 747-0176
FAX: (709) 747-2283
-
Wabush (Branch of Montreal)
Cummins Eastern Canada, Inc.
Wabush Industrial Park
Wabush, Newfoundland AOR 160
Telephone: (709) 282-3626
FAX: (709) 282-3108 .
Cummins Eastern Canada, Inc.
50 Simmonds Drive
Dartmouth, Nova Scotia 838 1R3
Telephone: (902) 468-7938
FAX (902) 468-5177
Parts: ($02) 488-6560
Ontario
Toronto Distributor
Cummins Ontario, Inc.
7175 Pacific Circle
Mississauga, ON L5T 2A5
Telephone: (905) 795-0050
FAX: (905) 795-0021
-
Kenora (Branch of Winnipeg)
Cummins MidCanada Ltd.
Highway 17 East
P.O. Box 8
Kenora, Onbrio P9N 3x1
Telephone: (8W.548-1941
FAX: (807) 548-8302
Ottawa Branch
Cummins Ontario Inc.
3189 Swansea Crescent
Ottawa, Ontario K1G 3W5,
Telephone: (613) 736-1146.
FAX: (613) 736.1 202
Thunder Bay Branch
Cummins Ontario Inc.
1400 W:Walsh Street
Thunder Bay
Ontario P7E 4x4
Telephone: (807) 577-7561
FAX (807) 577-1727
Whitby Rr2nch
Cummins Ontario Inc.
1311 Hopkins Street
Whitby, Ontario L1N 2C2, Canada
Telephone: (905) 668-6886
FAX: (905) 668-1375
Quebec
Montreal Distributor
Cummins Eastern Canada. Inc.
7200 Trans Canada Highway
Pointe Claire, Quebec HBR 1C2,
Telephone: (514) 685.8410
FAX: (514) 695-8917
Montreal Branch
Cummins Eastern Canada, Inc.
7200 Trans Canada Highway
Pointe Claire, Quebec H9R 1C2,
Canada
Telephone: (514) 695-8410
Sales: (514) 695-4555
Parts: (514) 694-5880
FAX: (514) 695-8917
Service Assistance
Page S-21
63.9 and 65.9 Series Engines
Section S Service Assistance
-
-
Dorval Onan Branch
Regina (Branch of Winnipeg)
Cummins, Eastern Canada, Inc.
580 Lepihe
DONaI, Quebec H9H 1G2
Telephone: (514) 631-5000
FAX: [514) 631-0104
Cummins Mid-Canada Ltd.
110 Kress Street
P.0. BOX 98
Regina, SK S4P 225
Telephone: (306) 721-9710
FAX (306) 721-2962
Quebec City Branch
Cummins Diesel
Branch of Cummins Americas, Inc
2575 Dalton Street
Sle. Foy, Quebec GI P 3S7
Telephone: (418) 653-8411
FAX: (418) 653-5844
Val D’Or Branch
Curnmins, Eastern Canada, Inc.
1025 Rue Del
Val D’Or Quebec 59P 4P6
Telephone: (819) 825-0993
FAX: (819) 825-8488
Saskatchewan
Lloydminster- (Branch of Winnipeg)
Cumrnins Mid-Canada Ltd.
4.
W.5.52nd
.-.
Lloydminster, SK S9V OY9
Telephone:.(305) 825-2062
FAX: (305) 825-6702
-
Sasbtoon (Branch of Winnipeg)
-Curnmins Mid-Canada, Ltd.
3001 Faithful Avenue
P.O. Box 7679
Sashloon, SK S7K 4R4, Canada
Telephone: (306) 933-4022
FAX: (306) 242-1722
Service Assistance
Page St22
,
:
1,
Branches:
Gepps Cross
Cummins Engine Company, Ply. Ltd.
P.0.BOX 108
Blair Athol. 5084
South Australia, Australia
Location:
45.49 Cavan Road ,
Gepps Cross, 5094
Telephone: (61-8) 8262-5211
Dosra
Cummins Engine Company, Pty. Lld.
PO. Bo& 124
Darra, 4!376
Clueensland, Australia
Location:
33
Street
.. Kimberlev
~,
~. - - Darra. 4076,Australia
Telephone: (61-7)3375-3277
~~~~~~~
'
,I
B3.9 and B5.9 Series'Engines
iSection S -,Service Assistance
'
1
Distributors and Brandhes -'Australia
I
aunbury
Cummins Engine Company, Pty Ltd
PO.Box 1751
Bunbuw, WA 6230
Australie
locatton:
11 Dlyanda Coun
Picton. WA 6230
Telephone: (61-8)9725-6777
FAX! (61-8) 97256444
.
Cairns
Cummins Engine Company, Ply. Ltd.
P.0. Box 7189
Cairns Mail Centre, 4870
Queendand, Australia
Location:
Liberty Street
Cairns, 4870
Telephone: (61-7)9352999
Campbellfield
Cummills Engine Company, Ply. Ltd.
Private Bag 9
CamDbelifield. 3061
Victoria, Australia
Location:
1788-1800 Hume Highway
Campbellfield, 3061
Telephone: (613)9357-9200
Dandenong
,;,,
,
11
,
, ,
1
Cummins Engine Cornpans Pty. Ltd
Lot 7 Greens Road
Dandenong. 3175
Victoria, Australfa
Telephone: (613) 9708.8088
Darwin
Cummins Engine Company, Ply. Ltd.
PO. Box 37587
.
Winnellie, 0821
Northern Territory, Australia
Location:
Devonport
Cummins Engine Company, Ply. Ltd.
PO. Box 72E
Tasmania, Australia
Location:
2 Matthews Way
Devonport, 7310
Telephone: (61-3) 6424.8800
B3.9 and 85.9 Series Engines
Section S Service Assistance
Service Assistance
Page S-23
-
Emerald
Kalgoorlie
Leeton
Cummini Engine Company, Ply. Ltd.
PO. Box 668
Emerald. 4720
Queensland, Australia
Location:
Capricorn Highway
Emerald. 4720
Telephone: (61-7) 4982-4022
Cummins Engine Company, Pty. Ltd.
p.6. Box 706
Kalgoorlie, 6430
Western Australia, Australia
Location:
16 Atbara Street
Kalgoorlie, 6430
Telephone: (614) 9021-2588
Grafton
Karratha
Cummins Engine Company, Pty. Ltd.
RO. BOX 18
South Graflon, 2461
New South' Wales, Australia
Location:
18-20 lnduna Street
South Grafton, 2461
Telephone: (61-2) 66423655
Cummins Engine Company, Pty. Ltd.
P.O. Box 377
Karratha, WA 6714
Australia
Location:
1490 Lamberl Road
Karratha, WA 6714
Australia
Telephone: (61-8) 9144-4646
FAX: (61-8) 9143-1507
Cummins Engine Company, Ply. Ltd.
RO. BOX 775
Leeton, NSW 2705
Australia
Location:
'
29 Brady Way
Leeton, NSW 2705
Australia
Telephone: (61-2) 6953-3077
FAX: (61-2) 6953-3109
Hexham
Cummins Engine Company, Pty. Ltd.
21 Gaileghan Street
Hexham
New South Wales. Australia
Telephone: (61-2) 4964-8468
FAX: (61-2) 49644616
Laverton
Cummins Engine Company, Pty. Ltd.
Locked Bag 1
Laverton. Victoria 3028
Australia
. Location:
195 Boundary Road
Laverton North, Victoria 3028
Australia
Telephone: (61-3) 9360-0800
FAX: (613) 9350-0438
Mackay
Cummins Engine Company, Pty. Ltd.
P.O. Box 842
Mackay, 4740
Queensland, Australia
Location:
4 Presto Avenue
Mackay, 4746
Telephone: (61-7) 49551222
Mount Gambier
Cummins Engine Company, Ply Ltd.
P.O. Box 2219
Mount Gambier, 5290
South Australia, Australia ,
Location:
2 Avey Road
Mount Gambier, 5290
Telephone: (61-87) 25-6422
Service Assistance
Page 5-24
,
,
;
I
,
83.9 and 85.9 Series Engines
Section S Service Assistance
-
.
, , .
I1
Penrith
Swan Hill
Cummins Engine Company, Ply. Ltd.
P.0, Box 132
8
,
Cambridae Park. 2747
New SoGh Wales, Australia
Location:
7 Andrews Road
Penrith, 2750
Telephone: (W2)4729:!3!3
Cumnjins Engine Comipany, PyY. Lid
1
P.Q 6bx 1264
, ,
Swan Hill, 3585
Victoria, Australia
Location:
5 McAllister Road
Swan Hill. 3585
Te!ephone: (61.9) 5032-!5!!
Cummins Engine Company, Pv. Ltd.
P. 0.Box 52
Welshpool, 6986
Western Australia. Australia
Location:
50 Kwdale Road
Welshpaol, 6106
?e!aphone: (~1-e)94585911
Queanbevan
Tamworth
Wetherill Park
Cummins Engine Company, ~ t yLtd.
.
PO. Box 527.
Queanbeyan. 2620
New South Wales, Australia
Locatlon:
'
15.27 Bayldon Road .
Queanbeyan, 2620
Telephone: (61-2) 6297-3433
FAX: (61-2)6297-6709
Cummins Engine Compariy, Ply Ltd
P.O. Box 677
Tamworth, 2320
New South Wales, Australia
Location:
Lot 65 Gunnedah Road
'
Tamworth, 2340
Telephone: (61-2) 6765-5455
Cummins Engine Company, Ply. Ltd.
Private Bag 150
Wetherill Park, NSW 2164
Australia
Location:
492.494 Victoria Street
Wetherill Park, NSW 2164
Australia
Telephone: (61-2) 9616-5300
FAX: (61-2) 9616-5399
Regency Park
Cummins Engine Company, Ply. Ltd.
P.O. Box*2147
Regency Park, SA 5942
Australia
Location:
11 Manton Street
Hindmarsh, SA 5942
Australia
Telephone: (61-8) 83463832
FAX: (61-8) 8340-2045
~
'1
I
.
'
,
,
,
Townsviile
Cumrgins Engine Company, Ply. Ltd
P.O. Box 7339
Garbutt Business Centre, QLD4814
Australia
Location:
704-710 lngham Road
Townsville. QLD 4814
Telephone: (61-7) 4774-7733
FAX: (61-7)4774-7640
Welshpool
,
Wodonsa
Cummini Engine Company, Ply. Ltd.
PO. Box 174
Wodonoa. 3690
Victoria: Australia
Location:
9.11 McKoy Street
Wodonga, 3690
Telephone: (61-2)6024-3855
Service Assistance
Pages-25
B3.9 and 85.9 Series Engines
Section S Service Assistance
.
-
-
Distributors and Branches New Zealand
Auckland
Christchurch
Palmerston North
Cummins Diesel Sales &Service (NZ)
Lid.
Private Bag 92804
Penrose, Auckland, New Zealand
Location:
440 Church Street
Penrose
Telephone: (64-9) 579-0085
Cummins Diesel Engines
P.O. Box 16-149
Hornby, Christchurch, New Zealand
Location:
35 Parkhouse Road
Sockburn. Christchurch
Telephone: (64-3) 348-8170
Cummins Diesel Engines
P.O. Box 9024
Palmerston North, New Zealand
Lacation:
852-860 Tremaine Avenue
Teleohone:~164-6~
. , 356-2209
Branches:
Cummins Diesel Engines
..
P.O. Box 4005
Mi. Maunganui, New Zealand
Location:
101 Totara Street
Mi. Maunganui
Telephone: (64-7) 575-0545
Auckland
Cummins Diesel Engines
Private Bag 92804
Penrose, Auckland, New Zealand
Location:
440 Church Street . .'
Penrose
Telephone: (64.9) 579-0085
Mt. Maunaanui
j
83.9 and 85.9 Series Engines
Section S Service Assistance
-
NOTES
83.9 and B5.9 Series Engines
.
Page TS-a
Section TS Troubleshooting Symptoms
.
Section TS Troubleshooting Symptoms
Section Contents
Page
t5-1
Troubleshooting Procedures and Techniques ..............................................................................................
General Information ...................................................................................................................................
t5-1
Troubleshooting Symptoms Charts .......
.................................................
........................................ t5-2
Alternator Not Charging or Insufficient
ng ............................................
........................................
t5-3
. . . . .
. . . .
Coolant Contamination........................
..............................................................................................
t5-4
Coolant Lo
............................. :.................. .................... ., ............
...................................... t5-5
.....................
...................................... t5-7
Coolant Te
re Above Normal .......................................
Coolant Temperature is Below Normal........................
:................;..............
...................................... t5-6
Engine Difficult to Start or Will Not Start (Exhaust Smoke) .......................
:
.
.................................... t5-10
Engine Difficult to Start or Will Not Start (No Exhaust Smoke) ............
....................................
............................................... t5-12
Engine Noise Excessive ..........
....................................................
,._
t5-14
......................... t5-15
Engine Power Output Low ..................................................................
Engine Runs Rough at Idle, Warm Engine .........................................
:........;.............................................
t5-19
.
.
Engine Runs Rough or Misfires...........................................................................
:.....................................
t5-21
! :
Engine Speed Surges at Low or High Idle.,....................
...........................................................
:.......:...... t5-23
.
.
Engine Starts But Will Not Keep Running...................................
............................. t5-24
Engine Vibration Excessive .......................................................
............................ t5-25
Engine Will Not Crank or Cranks Slowly ....................................
............................. t5-26
Engine Will Not Reach Rated Speed (RPM) ...
t5-27
. 1.. ..............................................
.
Engine Will Not Shut Off ..............;.................
..................................................................
t5-29
. . .
Exhaust .Smoke Excessive'Under Load .............
...................................................
TS-30
.............................................. t5-32
. Fuel Knock........................................................
Fuel or Lubricating Oil Leaking From Exhaust
i..................................
t5-33
General information .....................................................................................
: :.....................................
t5-2
Lubricating Oil Contaminated ....................................................................
:...............................................
t5-34
Lubricating Oil Loss .................................................................
:
.......................................................... Ts-35
l?
~
..
.........
.......
........
.
83.9 and 85.9 Series Engines
Section TS .Troubleshooting Symptoms
Page TS-b
Page
Lubricating Oil Pressure High...........................................
........................................................................
Lubricating Oil Pressure Low.....................................................................................................................
Smoke. White Excessive .......................................................................................................................
-
t5-37
t5-38
'TS-40
Troubleshooting Procedures and Techniques
Page TS-1
83.9 and 85.9 Series Engines
Section TS Troubleshooting Symptoms
-
Troubleshooting Procedures and Techniques
General Information
This guide describes some typical engine operating problems, their causes, and some acceptable corrections to those
problems. Unless noted otherwise, the problems listed are those which an operator can diagnose and repair.
A
WARNING
A
Performing troubleshooting procedures NOT outlined in tiiis section can result in equipment damage or
personal injury or death. Troubleshooting must be performed by trained, experienced technicians. Consult a
Cummins Authorized Repair Location for diagnosis and repair beyond that which is outllned, and for symptoms
not listed in thissection. Before beginning any troubleshooting, refer to General Safety Instructions in Section
i of this manual.
Follow the suggestions below for troubleshooting:
Study the complaint thoroughly before acting
Refer to the engine system diagrams
Do the easiest and most logical things first
Find and correct the cause of the complaint
I
83.9 and 85.9 Series Engines
Section TS Troubleshooting Symptoms
Troubleshooting Symptoms Charts
Page TS-2
-
Troubleshooting Symptoms Charts
General Information
Use the following charts to aid in diagnosing specific engine symptoms. Read each row of blocks from top to bottom.
~
Follow the arrows through the chart to identify corrective action.
A
WARNING
A
Tmiib;eshooliny piasinis the tisic of equiprnen<aarnege, personai injury or deaih. iroubieshooring must be
performed by trained experienced technicians.
~
~
Troubleshooting Symptoms Charts
Page TS-3
83.9 and 85.9 Series Engines
Section TS Troubleshooting Symptoms
-
--
Alternator. Not Char&..ig or lnsuff icient Charging
..
-
Cause
i
Battery cables or connee
tions are Iwse, broken, or
(excessive
resistance)
1
Cause
Correctlon
1
I
OK
1
I
Alternator belt is loose or
missing
....
1 1
IM
'
Contact a Cummins
Authorized
Repair Facility
I
OK
I
,
I
I
Alternator drive pulley is
lwse on the water pump
shan
L
OK
t
OK
t
Check the alternator beit
tension. Check pulle 8 in
belt wrap, and repa& if
necessary. Replace belt or
belt tensioner. or both.
Referto Sexition A.
..
I
I
MaKe sure the drive pulley
. . ..
I
is ti~h#$~~$ji,fer
manual.
I
Correctlon
Test the alternator output.
Check the battery cables
and connections. Refer to
the OEM service manual.
.. . .
.
I
83.9 and 85.9 Series Engines
Section TS Troubleshooting Symptoms
Troubleshooting Symptoms Charts
Page TS-4
-
Coolant Contamination
Cause
Correction
Cause
I
I
s
Cwlant is rusty and has
debris
,.,
Drain and flusn the coo ng
stem Fill with COrreCt
mfxture'ol anliheeze and
water. Refer to Section 7.
-
I
OK
-Transmission oil cooler or
torq"e cO""ene( MOler 1s
leaking (Marine keelcooled.
engine only)
'
.'
Check the transmisslon oil
rooler and torque Omve*er
cooler for coolant leaks.
Refer lo the OEM seNice
manual.
OK
Lubricating oil cooler is
leaking
Check the lubricating oil
cooler for cwlant leaks and
cracks. Refer to Section A.
I
Cormellon
I
Check the cylinder head
gasket. Refer to the OEM
seNic8 manual.
Cylinder head gasket Is
lealcing
I
-
OK
I
I
I
I
I
TrouMeshpoting Symptoms Charts
Page TS-5
63.9 and 85.9 Series Engines
Section TS Troubleshooting Symptoms
-
Coolant Loss
'
b
Cause
Cause
Correction
.
I
Coolant is rusty and has
debris
...
I
Drain and flush the cooling
system. Fill with COrlBCt
mixture of antifreeze and
I water. Refer to Section 7.
Air compresrnr cylinder
head IS cracked or pornus,
or has a leak ng gasket
(nonmarine engines o n p )
I
-
,
Correction
t Ine alr compressor
manual.
OK
1' lnsaect
the anoine and its I
components-for seal.
gasket, tappet cover, 0'.
cooler, or drain cock eaks.
r
I
I
OK
Authorized
,
Combustion gases are
...
Check for combustion
gases in the cooling
system. Refer to the OEM
service manual.
OK
*
I
I
I ...
Transmission oil cooler or
tor ue converter cooler Is
leadng (Marine keel-cwled'
engine only)
OK
I
Check the transmission oil
cwler and torque converter
cwler for coolant leaks.
Refer to the OEM ssrvice
manual.
Check the lubricating oil
cooler for oil leaks. Refer to
Section A.
Lubricating oil cooler is
I
I
I
I
1
Troubleshooting Symptoms/!Charts
Page TS-6
i
i
!
83.9 and B5.9 Series Engines
Section TS - Troubleshooting Symptoms
!
Cause
Correction
Cause
open or opening early
Cneck tne ShJner operat on Repair or replace the
shuners 11necessary Refer
to the OEM S~NICB
manual.
Temperature gauge
malfunction
....
I
-
I
I
,
...
Check the fan dive and
oomrols. Refer to the OEM
service manual.
I
$
I 1
I
Thermostat is not correct
OK
OK
With the key sy8tem on,
short out the harness at the
temperature switch. If It
engages, tmubleshwt the
sensor or check for alr In
the wolant system.
Remove the senwr and
make sure at ambient
conditions the.sensor is
open: and at the correct
temperature, 91% [193'F],
make sure the sensor
closes. Replace If neces-
I
Check or replace the
lemperalure gauge. Refer
to tne OEM serice
manual
OK
*
OK
Fan drive or fan controls
are malfunctionlng
I;
Coolant Tempedaatureiis Below Normal
I
Check the thermostat for
the correCt part number
and for correct operation.
Refer lo the OEM service
manual.
I
-Troubleshooting Symptoms Charts
Page TS-7
83.9 and 65.9 Series Engines
Section TS Troubleshooting Symptoms
-
Coolant Temperature Above Normal
Correction
Cause
Coolant level is below
spBciflcatlon
,
...
..
1 cooling
lnsvect the enaine and I
system fcr external
coolant leaks. Repair If
necessarv. Add cwlant.
Refer io Section 7.
1
’
Correotlon
inspect the shroud and the
Fan shroud is damaged Or
recirculation baffles. Repair,
missing, or the air recircu.
replace, or install if neceslation baffles are damaged , . . ,
sary. Refer to the OEM
or missing
service manual. ”
U
’
OK
OK
IClean
lnsoect the radiator fins. I
and repair the fins as
Radiator fins are damaged
Cause
...
Check the fan drive belt.
Fan drive belt IS Iwse,
necessary. Refer to the
OEM service manual.
OK
t
OK
I
+
Cooling system hose is ’
the radiator hoses.
. . . Inspect
collapsed, restricted, or
Refer to Saction A.
leaking
I
I
I
I’ I
uu
..
Check the fan drive and
controls. Refer m the OEM
service manual.
Fan drive Or Ian
ControlS
, ,
are rnalfunctloning
OK
I
t
OK
I Check the
Lubricating oil level is
below specification
I
I
...
’
011 level.
I I
Verihr
Ran aior cap is not correct,
IS maltuncl oning. or has
iowpressxe ratlng
OK
t
(Continued)
OK
t
1
I
~
~
I
1 iubleshooting Symptoms Charts
I ge TS-8
I
I
83.9 and 85.9 Series Engines
Section TS Troubleshooting Symptoms
-
-i
i
,boye Normal (Continued$1I
Coolant Temperaturr 1
I
I
i ,
1
. ./ manufacturmi's instructions.
Check the shutterstat
I sellina. Refer to the OEM
s-ervice manual
I
OK
Temperature gauge
maltunctton
.I
I temperature
Check or reolace the
pge.,Refer
totheOE S B M C B
manual.
OK
Thermostat is not correct
or 1s malfunctioning
Test the fuel pump on a
Fuel pump is malfunction- . . . ., fuel pump test stand.
,
.
Replace
the fuel pump If
ing
4
necessary.
,
I
OK
Vehicle speed 1s too low fo
adequale cooling with high
cngneload
ROdJCe the eng.ne load.
increase the engine (Ian)
rpm by downshihng.
'
OK
*
I
I
1
I
Check the water pump for
correct operation. Replace
the water pump If neces
Water pump is malfunction
ing
Check the thermostat for
the carrect Dart number
and for oorrkt operation.
Refer to the. OEM service
manual.
. Correction
-1I
I
1
I
Radiator shutters are not
opening completely or the
shutterslat setting is wrong
il
Causu
saw.
I
OK
OK
t
I
OK
t
(Continued)
I
I
63.9 and 65.9 Series Engines
Section TS Troubleshooting Symptoms
-
.
Troubleshooting Symptoms Charts
Page TS.9
Coolant Temperature Above Normal (Continued)
-Cause
Correction
Clean the cooling system.
sludge
OK
Authorized
i
I
I
Troubleshooting Symptoms/Charts
Page TS-I0
I
i
83.9 and 85.9 Series Engines
Section TS Trbubleshooting Symptoms
~
-
I
~
Engin4 Difficult to Start or Will lkot Start (Exhaust Sdoke)
Cause
il
1
I
I1
Correcllon
!
Sta'ing
pmcdum 1% not
correct
,
. ..
'
1
1
i
-
Cause
Correction
1
Verity the C
a
.ystarting
procedure. Refer to Section
FJeI sdpply is not adequate
1, .I
.,
Check Ihs HOW through the
hner to locate the SOUICE of
the ieSlrlCllon Refer to u1e
OEM service manual.
1
I Check
thdenolne crankinu I
speed with ihandheld
tachometer or electronic
service twl. If the crankino
speed is slower than 150rpm. refer to the OEM
sewice manual.
*
1
.
OK
Check for correct operation
of cold starting aid. Refer to
Section 1.
OK
I
..
OK
Bleed the fuel system and
check for leaks. Refer to
Section 5.
I. .I
I
-Fuel drain backup
..
Verify the fuel return line IS
plumbed to the bottom of
tne fuel tank.
I
'OK.*
I
- '
Frel pLm werl om valve I
m a L l oning
-
I I
Check the over1 ow valve.
Replace 1necessary. Refer
to the OEM service
manual.
OK
f
,
Fuel transfer pump malfunctioning
....
L
'
OK
f
(Continued)
Inspect the fuel transfer
pump. Replace if neces.
saw. Refer to the OEM
service manual.
I
Troubleshooting Symptoms Charts
Page TS-11
83.9 and 85.9 Series Engines
Section TS Troubleshooting Symptoms
-
.Engine Difficult to Start or Will .Not Start (Exhaust Smoke) (Continued)
inspect the injecton.
Verify by operating the
a temporary tank.
t
I
I
Throttle linkage adjLstment
s not correct
OK
t
I
1
Cneck the l ~ epl m p
lhronle linkage ad',stment.
Reier 10 tho OEd sorv'ce
mama
I
iubleshooting Symptoms Charts
ge TS-12
Cause
I
83.9 and 85.9 Series Engines
Section TS Troubleshooting Symptoms
-
Engine Difficult to Start or Will Not Start (No Exhaust Smoke)
,
E
II
Starting pmcedure Is not
correct
Correction
I, :,
verity tne
. ., pmcedure
OK
'
*
. ./
~
Cause
~
II
!
starting
Refer lo Section
functioning
I
Inspect the fuel transfer
pump. Replace if necessary. Rder to Section A
...
plumbed to the bondm of
the fuel tank.
. . .F
OK
Fill thesu
I tank Refer
selvice
manual.
tothe!%!
.
OK
OK
, *
Fuel pump overflow valve i
Electrical or manual fuel
shutdown binds
'
1
*
I. .I
I
Air in the fuel System
I
I
OK
I
1
..
I
' Check the overflow valye.
Replaoe il necessary. Refer
to the OEM service
manual.
service manual.
OK
I
Correction
Bleed the fuel sptem and
check for leaks. Refer to
Section 5.
Throttle llnkage adjustment
is not correct
OK
I
*
(Continued)
Check throttle linkage
adjustment. Refer to the
OEM service manual.
83.9 and 85.9 Series Engines
Section TS Troubleshooting Symptoms
-
Troubleshootlng Symptoms Charts
Page TS-13
Engine Difficult to Start or Will Not Start (No Exhaust Smoke) (Continued)
Correction
Fuel injection pump is
malfunctioning
,
Fuel injection pump timing ,
is not correct
Authorized
Perform the fuel injection
pump test. Refer to the
OEM service manual.
Troubleshooting Symptoms/lCharts
Page TS-14
! j
1:
.
,
83.9 and 85.9 Series Engines
Section TSli-Troubleshooting Symptoms
:,
i
I
Engine Noise Excessive
I
Cause
Correclion
Correction
Inspect the vibration
damper. Refer lo SecBon 7.
t
.
." ...
..
OK
, .,
! inspect tho air intake and
i
. . . .,
Air intake or exhaus1 leaks
exhaust systems for air
leabs. Refer to me OEM
setvice manual.
i
u
u
OK
~
..
Valve laah excessive
I
/I.
I
-
OK
.
OK
I
Adjust vaives. Make sure
* the push rods are not bent
.
or mcker lavers not
severely worn. Refer lo
Section 6.
. I 1
Refer to the OEM service
1
i
,
c
~
. ..... , .~,
. ,.......
.
Contact a Cummins
Auth0:izsd
1
Troubleshooting Symptoms Charts
Page TS-15
83.9 and 85.9 Series Engines
Section TS Troubleshooting Symptoms
-
Engine Power Output Low
Correction
'Correction
Cause
i
Vehicle speed is too low for
engine load
I
I
Check the intake and
Reduce the engine load.
increase the en ine (fan)
rpm by downs%ifflng. .
restricted
intaLe air filter and replace
as necessary.
I
OK
*
Check the oil level. Add or
drain oil, if necessary
Refer to Section 1.
Lubricating oil level is
above or below specificatlon
I
I
OK
Throttle ilnbge adjbstment . . .
Is not correct
Check the fuel pump
throttle linkage ad ustment
Refer to the OEd service'
manual.
J
Air-fuel tubs leaking,
waslegate diaphragm
ruptured. or wastegate
plumbing damaged
Charge air cooler restricted
(if equipped)
OK
Check or replace shutoff
'
'
..
OK
-*
(Continued)
OK
I
Tighten the fittings. .repair
plumblng, replace wastegate dia hragm. Refer to
the OE&servlce manual.
insoect the air caoler for
iiteinai and external
restriction. Replace the
restricted cooler if necessary. Refer to the OEM
service manual.
1
1
;i
~
!
Symptom4
.
.Charts
,
!
i
I:
,,!
,.!
ill
;!
&US@
!!j
Air leak hetween the
! iurhocharger
and the inla
63.9 and 85.9 Series Engines
Section TS Troubleshooting Symptoms
2
;I
Engine Power OutputlLowi(Continued)
(i'
,,
:,
!i
1,.
Corrcctlon
I'
...
I
"
lj
ik
Operate Ine en me from a
lemporary tan! 01 NO. 2
a.ese1 ILeI. Relor 10 Sectin
V.
1
.
..,
OK
f
I
Exhaust leaks at the
manifold or tulbocharger
!
'I
I
1
-
I
...
manifold
'
Check'and wrreot any
leaks in the exhaust
j
manifo d or IJrbocnerger
gaskets. Check lor a
cracked exha.sl manifold.
Refer lo the OEM sew ce
manual.
I
1
I
Fuel supply is not adequate
Check the flow through the
filter to locate the souroe of
OK
Fuel return restriction
I
Inspect Ihe k e l rewin Inss
for reSlricl.ons. Refer to the
OEM sewice manual
OK
OK
f
Air in the fuel system
Fuel pump overiiw valve i
malfunctioning
Check the overflow valve.
Replace If necessary Refer
manual.
I
~
Section 5.
I
I
~
OK
OK
f
1
(Continued)
~
--
Troubleshooting Symptoms .Charts
Page TS-17
83.9 and 85.9 Series Engines
Section TS Troubleshooting Symptoms
-
Engine’Power Output Low (Continued)
Cause
Correction
Check the fuel lift pump for
correct operation. Check
Cause
Correction
Fuel injection pump timing
is not correct
Put the ensine at toD dead
center. CKeck and adjust
Ihe fuel timing. Refer to the
OEM service manual.
I
I
I
1
I
OK
t
1
*
intake manifold air tempera
ture is above specification
-
Exhaust systen) restrictlon
Is above specification
ChecK intake air temperature. Refer to Section A.
....
*
1
I
the fuel tanks. Turn off
or bypass the fuel heaters,
and check the fuel cooler.
Refer to the OEM service
manual.
1
OK
t
!
Perform the Oxidation
Catalyst Pressure Test.
Refer to the OEM service
manual.
Checa the waslegaie tor
Turbocharger wastegate is
corrccl opera1on. Refer 10
malfunctioning (if equipped , . . . tne OEM sewice rnanua,.
‘ Fill
Fuel temperature is
specification
.’
OK
OK
,...
OK
‘I
t
Chock for the specified
boost presswe. Ifispect the
iLrbocharger Roplace if
necessary. Refer to Section
A
I
OK
t
-
(Continued)
1 ubleshooting Symp
F ie TS-18
83.9 and 85.9 Series Engines
Section TS Troubleshooting Symptoms
:harts
-
Engine Power Output Low (Continued)
I
Cwae
Valve lash excesslye
Correction
A d J ~ sva
t yes. Make sure
Ihe push rods are not benl
or rocker levers not
severel worn Refer to
Jeectioi 6.
I
!
OK
Injector is malfunctioning
Inspect the Injectors.
Roplacc tne injecrors as
necessary Refer 10 Section
A
OK
Fuel in'ection pump is
malfunctioning
I
-
OK
Authorized
Remove Ihe IJe in.wclion
pLmp Cnock !he calibrai o n 01 the tue in eclion
pump. Refer to Se'ction A.
I
I
-I
I
I’
Troubleshooting Symptoms Charts
Page TS-19
63.9 and 65.9 Series Engines
,Section TS - Troubleshooting Symptoms
Engine Runs Rough at Idle, Warm Engine
Idle spe*
accessories
~
Cause
Correction
Cause
‘Ow
Checkand~thelow
idle screw. Refer to Section
. ...
Correction
I
I
Check and adjust the
Fuel injection pump timing
is incorrect
”
OK
I
I
I
OK
t
I
I
injector is maifunctionin’g
Section 5..
1
I
*
I
I
I
Inspect tne tuel lransfer
pump Replace I neces
sary Refer to Seclion A
FLOItransfer p m p ma1
lunct on ng
I
*
Engine mounts are worn,
damaged, or not correct
-
OK
OK
OK
t
I
Check the overflow valve.
Replace if necessary. Refer
to the OEM sewice
manual.
Fuel pum werflow valve I
maiunctionina-
I
.
OK
t
I
....
Inspect the injectors.
necessary,
Replace the
Refer
injectors
to Section
as
A.
”
OK
-
I
1
Bleed the fuel system and
I
I
(Continued)
Check the en ine mounts.
Troubleshooting Symptoms Charts
Page TS-20
I
83.9 and B5.9 Series Engines
Section TS Troubleshooting Symptoms
-
Engine Runs Rough at Idle, Warm Engine (Continued)
Cause
I
'
Correction
I
Remove the fuel injection
pump. Check \he calibration of the fuel injection
pump. Refer to Section A.
Fuel injection pump is
malfunctioning
I
I
OK
.I
I
Troubleshooting Symptoms Charts
Page TS-21
83.9 and 85.9 Series Engines
-
Section TS Troubleshooting Symptoms
Engine
Runs Rough
- or Misfires
I -
Fuel contaminated
. .
'I
.
Verify by operating the
engine with clean fuel from
a temporary tank.
Correction
Cause
Correction
Cause
I
Fuel lift pump is malfunc.
tinning
.,..
I
Check the fuel liit Oumo for
conect operation' Chick
tne pump outp~tpiessm
Rboiaco the fLel lift oumD 11
necessary. Refer to Section
'
A.
OK
Bleed the fuel system and
check for leaks. Refer lo
Section 5.
OK
Valve lash excessive
Fuel leak
OK
-
Injector is malfunctioning
Adjust valves. Make sure
the push rods are not bent
or rocker levers not
...,
I
I
*
..OK
Fuel pump overflow valve i
malfunctioning
OK
I
,
Checc tno o w l ow va uo.
Replace d necessaw. Refer
10 the OEM sewice manha
Replace
Inspectthe
theinjectors
injectors.as
. .. .
M
necessary, Refer to Section
A.
i
OK
t
(Continued)
I
83.9 and 85.9 Series Englnes
Section TS Troubleshooting Symptoms
Tmubleshootlng SymptomsICharts
Page TS-22
I
-
Engine Runs Rough or Misfires (Continued)
Cause
I /
Fuel In ection pump t m n g
s not correct
1
1
Cornoilon
PLt the engine at top deao
center Chsck and adjust
the luel tmln!l Refer to
-I I
Troubleshootifig Symptoms Charts
Page TS-23.
83.9 and 65.9 Series Engines
-
Section TS Troubleshooting Symptoms
Engine Speed Surges at Low or High Idle
Cause
OEL
u
w
OK
I
,
4,I
,
,,
AdJustthe idle speed.
to Section A.
I
I. .I
I
I
Air in the fuel sytem
OK
t
I
OK
t
Fuelmalfunctioning
injection pump is
I
I
..
Bleed the fuel system and
check for leaks Refer to
Section 5.
1 .I
I
OK
OK
f
Replace the mallunct oning
in,eclor Reler 10 Sect on A
I
I
Engine idle speed Is set
I
Fill the suppl tank. Refer
to the
service
manual.
..
Fuel level is low in the tank .:
f
Correction
Correction
Authorized
..
1
I
1
Remove the fuel pump.
Refer to Section A. Callbrate the fuel pump.
,
!
83!9 and 85.9 Series Engines
Section TS, -,Tr;oubleshootingSymptoms
Troubleshooting SymptomsCherts
Page TS-24
, '
8
1
,
! !
!I
8 ;
Engine Starts But Will Not Keep Running
cause
Comction
Correction
Replace the fuel filter.
Refer to Sectlon 5.
1
OK
*
t
Englne-driven units ere
engaged
Disengage enginedriven
units.
OK
1 1
1
1
Fuel suppl line or passag
restricri0n)betweenthe fuel.
pump and !he injectom
OK
..
Check the fuel suppl line
or passage for sharp k n d s
or restriction.
I
Verify by operating the
engine with clean fuel from
a temporary tank.
OK
OK
Air in the fuel system
OK
t
....
Bleed the Euel system and
check for leaks. Refer to
Check !he fuel pump
timing. Refer to Section A.
Fuel injection timing is not
I
OK
I
*
Contectacummins
Authorized
qepair Facility
I
83.9 and 85.9 Series Engines
Section TS Troubleshooting Symptoms
Troubleshooting Symptoms Charts
Page TS-25
-I. .
-
Engine Vibration Excessive
Correctlon
Engine not running
smoothly
.
Refer to the Engine Runs
Rough or Misfires symptom
tree.
inspect the engine mounts.
Replace as needed. Refer
.
to the OEM service
I,
manual.
OK
*
OK
Allernatar
damaged
bearing w r n or
Clean and replace the
alternator. Refer to the
OEM sirvice manual.
1
OK
Engine mounts.are wrn,
Vibration damper malfunc.
Correctlon
I
OK
Fan drive or fan controls'
are malfunctioning
Cause
'
.
Check the.fan drive and
controls. Refer lo the OEM
service manual.
I
Troubleshooting Symptoms Charts
Page TS-26
83.9'and 85.9 Serles Engines
Section TS? Trgubleshooting Symptoys
1 1! Engine Will Not Crank'or Cranks Slowly :
i
-
8
I
Comcllon
i
i
I
, ,
Cause
'
I
Engine-driven units are
engaged
OK
I
...
I
I
OK
I
Starter solenoid is not
rqelving voltage
'
II
.
Check tne b a n e r y y w l y to
the startel solenold. Refer ,
to the OEM seriice
manual.
I
I
--
1
*
Crankshah rotation is
impaired
1
Disengage engine-d!iven
...
OK
*
Check craokshafi :or ease
rotanon.
to Section
Check the starting circuit
components. Refer to the
OEM service manual.
Starting circuit component
is
OK
t
Eleotriccal system is "open"
or loose connections)
OK
Check the fuses, wires, and
connections. Refer to the
OEM serviua manual and
Manufacturer's wiring
diagram.
...
Starting motor operating
but not cranking the sngln
'
' '
'
J
I
I
OK
I
...
OK
'
R e m m the Starting motor
and h a ect for broken
teeth on t t e ring gear and
pinion.
,or a
starling motor spring.
. .
i
Check battery. If the battery
IS low. check the elternator
I-
I
t
Contact a Cummins
Authorized
'
I
1
.
83.9 and 85.9 Series Englnes
Section TS Troubleshooting Symptoms
-
-
Troubleshooting Symptoms Charts
Page TS-27
Engine Will Not Reach Rated Speed (RPM)
Correctlon
Vehicle speed is too low for
Air-fuel tube leaking,
wastegate diaphragm
Reduce the engine load.
OK
/I
I
t
Check throttle Ilnkage
Throme linkage adjustment
1s not correct
EM Service manual.
I
OK
plumblng damaged
OK
t
I
OK
I
I
Charge air cooler restricted . . . .
(if equipped)
I
Compare the tachometer
reading with a hanoheld
tachometer or an eiectronic
service tool reading.
Calibrate or replace the
tachometer as necessary.
Refer to the OEM service
I
manual.
I
Tighten the fittings, repair
plumbing, replace waste-
I
Inspect the air cooler for
internal and external
restriction. Replace the
restricted cooler if necessaw. Refer to Section A.
I
I
OK
t
I
I
Fuel s ~ p p
y is not aaequate
1, I
,,
I
II
I
I
ChecK the flow throJgh tne
f.lter 10locale the swrce 01
the reslrict on. Refer lo
Section 5.
II
OK
*
I
High-speed screw is not
adjusted correctly
,,,,
I
Loosen the locknut. and
adjust the high-speed
(topo) screw. Refer to
Section A.
vt
(Continued)
83.9 and 85.9 Series Engines
Section TS Troubleshooting Symptoms
Troubleshooting Symptoms Charts
Page TS-28
'I
-
- --
Evgine Will Not Reach F/ated Speed (RPM) (Continued)
i.
Cause
j,
.
i
i
Cometion
Cause
CormMlon
Fuel injection pump is
Remove the fuel pump.
I
Make sure fuel shutoff leier
is in the RUN posltion.
Replam if necessary. Refer
to the OEM service
I
manual.
:
I
I
-
Fuel shutoff lwer (mechani
engaged
mo
1
brate the fuel pump.
-b
CK
Measure and correct if
above specification.
OK
I
*
I. .I
I
Fuel transfer
functioning
pump malI
. '.
I
OK
*
i
I
I
Inspect the fuel transfer
pump. Replace if necessary Refer lo Section A.
I
OK
83.9 and 85.9 Series Engines
Section TS Troubleshootlng Symptoms
Troubleshooting Symptoms Charts
PageTS-29
-
I
Engine Will Not Shut Off
Cause
Correction
I
Cause
I
Fuel leak
I
OK
' ' '
I
1
repa rs as ncooeo. Refer
tolhe OEM serv'ce manual.
I
....
I I
-
OK
OK
Engine running on fumes
drawn into the air intake
1
b
Check for loose wires and
verifv that the fuel shutoff
valve'is functioning. Check
to be sure manual shutoff
lever is in the'run wosition.
Refer to the OEM'service
manual.
I
I
Correction
1
Check the fuelnei?l,
fuel
connections, and fuel filters
for leaks using the combus.
tibie gas detector service
tool. Refer to the OEM
sewicemanuai.
Troubleshooting Symptoms
Charts
,.
.
PageTS-30 ,
ij
I!
r
I1
8
8.
,
Cause
Engine is being lugged
down
,
I!
83.9 and 85.9 Series Engines
Section T S I Troubleshooting Symptoms
Exhaust Smoke xcessive Under Load I
,:
Cause
j
:i
:
Correction
_ ii .
systems for loose or
damaged piping connec-
,, , ,
,j
OK
intake or exhaust leak
*
A.
Air in the fuel system
system. Completely bleed
air born the fuel system. 1
Refer to the OEM sewice ,
OK
*
~
Check the air filter for
restrictions. Refer to
Section 4.
Only one is required. Refer
to Section A.
OK
Put the engine at top dead
center. Check and adjust
the fuel timing. Refer to the
OEM service manual.
*
OK
*
(Continued)
83.9 and 85.9 Series Engines
Section TS Troubleshooting Symptoms
Troubleshooting Symptoms Charts
Page TS-31
-
Exhaust Smoke Excessive Under Load (Continued)
,
Cause
Correction
Cause
Correction
Air-fuel (AFC control Is
Check the AFC for leaks.
Repair any leab found, if
necessary. Check and
clean AFC tubing and
tlltings for obstructions.
Refer to the OEM servlce
manual.
Monitor the turbocharger
boost pressure with an
Turbocharger is malfunotinning
or
. ., ,
OK
L
IAllow
the engine warm to I
operat,ng tkm rature.
I
OK
to
Engine is cold
'
..
II
the engine Jiilf%
reach
operating temperature. refer
to tne Coolant Temperatdre
Belou Normal symplom
tree.
OK
-Fuel injection pump Is
malfunctioning
OK
*
,Remove the fuel ump
Refer to Section Calibrate the fuel pump.
1
Authorized
83. ind 85.9 Series Engidees
Section TS :.1 Ableshooting Symptoms
Troubleshooting Symptoms Charts
Page TS-32
1
1
I
i
i
11
I
cause
FI I Knock
!
Correction
Cause
Correction
I
Put the engine at top dead
center. Check and adjust
the fuel timing. Refer to
Section A.
Fuel Injection pump timing
IS not correct
I
OK
I
OK
t
I
Fuel quality is poor
i
I
OK
t
I
Operate the en ine from a
temDoraw t a d of mod.
quaiity N6. 2 diese~fuel.
. . . .' Clean and flush vehicle's
fuel system. Fill fuel
with a good.quaiity%??
diesel fuel,
,
I
I. .I
I
I
OK
i
..
I
lnjeciom worn OT malfunc
tioning
..
Inspec1 Ihe injectors an0
replace any mailunct oning
lnleclom. Reter to Secnon
A
I
I
i
Air in the fuel system
~
. .
I
Bleed the fuel system and
check for leaks. Refer to
,
Section 5.
I
Authorized
Troubleshooting Symptoms Charts
Page TS-33
83.9 and 85.9 Series Engines
Section TS Troubleshooting Symptoms
-I'
-
Fuel or Lubricating Oil Leaking From Exhaust Manifold
~
Correction
Check the air intake system
Section 4.
*
I
Rrbocnarger dra n line s
resir cled
OK
Turbocharger oil seal is
leaklng
Check the turbocharger for
oil seals and for leaks
Refer to Section A.
I
1
Inspect the injectors.
Replace if necessary. Refer
to Section A.
injector needle
sticking
t
Correclion
uu
OK
OK
I
Cause
I.
,
Remove the turbocharger
dra n line and check lor
iestiict on. C ean or replace
the drain Ilne. '
83.9 and 85.9 Series Engines
Section TS Troubleshooting Symptops
-
i
I
~
cause
Coolant is leaklng into the
lubricating oil
Comction
,...
Check for cmiant in the oil.
Refer to the Lubricating Oil
Contaminated symptom
tree.
Correction
Cause
lnspmi the injectors.
Injector needle valve
slicking
OK
OK
*
I
Lubricating oii, sludge Is
excessive
1
....
I
OK
....
I
Refer to a Cummins
Authorized Repair Faclllly.
OK
I
1 Check the fuel lift DumD for
Fuel fin pump is malfune . . . .
tioning
A.
OK
I
OK
*
Lubricating oil 1s contaminated with cwlant or fuel
Fuel in'eciion pump is
malfunctioning
Refer to the OEM sewice
manual.
Authorized
I
I,
- -I...
B3.9 and 85.9 Series Engines
Section TS Troubleshooting Sympfoms,
-
Troubleshooting Symptoms Charts
Page TS-35
Lubricating Oil Loss
Cause
I
I
Correction
I
Lubricating oil leak (exter.
rial)
,...
Inspect the engine for
external oil leaks. Tighten
the capscrews, pipe plugs,
and fittings. Replace
gaskets, if necessary. Refei
to the OEM service
manual.
b
Lubricating oil level is
above speciflcatlon
....
Correction
Lubricating oil cooler is
leaking
Check the lubricating oil
cooler for woiant ieaks and
cracks. Refer to the OEM
service manual.
OK
f
OK
Check the oil level. Verify
the dipstick Cailbration and
oil pan capacity. Fiii the
system to the specified
level. Refer 10 Sectlon 3.
Cause
Air compressor is pumping
lubricating oil Into the air
system
_..
*
I
1 -
I
OK
f
....
Check the air llnes for
carbon buildup and
lubricating oil, Refer the
.OEM service manual.
Check for excessiva
blowby. Refer to the OEM
service manual.
I
Lubricating oil does not
meet specifications for
operating conditions
OK
..
t
(Continued)
.
Tmubleshootlng Symptoms!Charts
Page TS-36
I
8,
i
I
,
CaUM
I
Turbocharger oil seal is
leaking
CK
Authorized
,
I. .I
j
,
..
63.9 and 65.9 Series Engines
Section TS Troubleshooting Symptoms
-
Lubricating il Loss (Continued)
Correction
Check the turbocharger foi
oil seals and for leaks.
Refer to Section A.
Troubleshooting Symptoms Charts
Page TS-37
B3.9.and 85.9 Series Engines
Section TS Troubleshooting Symptoms
-
Lubricating Oil Pressure High
Cause
m
Lubricating oil pressure '
sensor or gauge; is mai- '
functioning or is not in the
correct location
I
I
I
Cause
Correction
Cneck the oil pressure
switch or gauge for correct
operation and localmon.
Refer 10 the OEM service
manuai.
I'
I
Lubricating oil ressure is
' above speci&lon
I
OK
Authorized
i
I
Lubricating oil does not
meel spec'tcat'ons lor
operating mndit ons
...
Cnange the 011 and tillers.
Use the oil type recorn.
mended in Section V oi Ine
engine operation and
maintenance manuai.
I
Correction
I
1
I
!
Troubleshooting Symptomsi,Charts
,
,
Page TS-38
i
1
Cause
-
I
B3:9 and 85.9 Series Engines
Section TS,- Froublesho'otingSymptoms
-/ I
Lubricating Oil P k s u r e Low
CorI(EEtlon
Check and replenish
lubricating oil. Refer to
Section 3.
I
I
OK
*
Correctlon
I
1
b
1
Lubricating oil level is low
I
1,
- 1
I
Lubricating
Oil is dliuled
with water
. .. .;
,
Check for a missing
dipstick, rain caps, or oil fill
caps. Change the oil. Refer
to the OEM service
manual.
I
OK
Chock Ihe 011pressure
switch or gauge for correct
Oneralion and localm.
Rifer to the OEM service
manual.
Lubricating oil does not
m*Qt speciflcalions for
operating wndilions
I
OK
*
Lubricatin oil is diluted
. . ..
wish fuel
I I
I
- i
I
Change the oil. Refer to
Section 4. If the oil becomes diluted again,
contact an Authorized
Cummins Repair Facility.
Change h e oil and filters.
Use the oil type r e w m
mended In Section V of the
engine operation and
maintenance manual..
.'
OK
Lubricating oil leak (external)
Inspect the engine for
external oil leaks. Tighten
the ca acre%%pipe plugs,
an8fittmgs: Replace
gaskets, ifnecessary. Refer
to the OEM service
manual.
1
83.9 and 85.9 Series Engines
Section TS Troubleshooting Symptoms
-
-
Troubleshooting Symptoms Charts
. PageTS-39
Lubricating Oil Pressure Low (Continued)
Cause
Correolion
I
I
I
I
Make eure the correct
correct
I
used. Refer to Section 5.
I
OK
t
Lubricatlna oil hiah-
.
I.
I
;
OK
*
Lubricating oil filler is
OK
Remove end inspm the
high-pressure relief valve.
Refer m the OEM Setvice
manual.
.
Aulhoiized
Chan e the oil and lllter.
Re?er to Section 4.
,
Troubleshooting Symptoms!:Charts
Page TS-40
11'
i
83.9 and 85.9 Serles Engines
Section TS, Troubleshooting Symptoms
-
"
~
!
.
1
i.
Cause'
Smoke, White - Exdessive
1
Correction
II
I
COrreMInn
Causs
Verify the correct starting
I : I
I
I
I
OK
OK
I
Refer to the OEM service
manual.
Coolant temperature is
below Specification
OK
Fuel pump return werllow
vaiveis malfunctioning
'
1
Inspect Ihe return ovef14w
vabe. Replace it necessary
Refer 10 the OEM SEW CE
I
manual.
I
OK
*
Refer to the OEM SeNice
-
With the k syatem an,
short out the%rneas at thi
temperature switch. If it
engages. troubleshoot the
8ensar or check for air In
the coolant system.
Remove the sensor and
OK
Fuel rate is lwli fuel
pressure is low, iniake
manifold pressure is low
...
Cheok the fuel pump
output pressure, pulsation
damper, and pressure
regulator. Replace the fuel
pump if necessary
conditions the eensar is
open; and at the correct
temperature,
make sure91%
the sensor
[le3°Fl
closes. Replace if necessary.
OK
I
OK
*
(Continued)
83.9 and 85.9 Series Engines
Section TS -Troubleshooting Symptoms
'
Troubleshooting Symptoms Charts
Page TS-41
Smoke, White - Excessive (Continued)
Cause
Correction
Correction
mKSB is malfunctioning
(Bosch VE
only,
I
Inspect the injectors.
Replace the injectors as
necessary. Refer to Section
A.
Refer to Section A.
OK
OK
t
1
I
1
I
t
I
.I
I
lniecmr
',2:&Yher .
I
I
OK
*
,
I
1, ,I
,,
Refer 10 Ine OEM serv:ce
manual.
I
I
OK
Cwlanl 1m lhrough the
rad;alor Is not correct
1
.
1
u
1
I
Remove injector and install
the proper sealin washer
Refer to s e c t i n A. '
I
Fuel in'ection pump is
malfunctioning
OK
1
Authorized
.:
Rernwe the fuel pump.
Refer m Section A. Calibrate the fuel pump.
83.9 and 85.9 Series Engines
Section TS Troubleshooting Symptoms
Troubleshooting Symptoms Charts
Page TS.42
-
NOTES
83.9 and B5.9 Series Engines
Section V .Maintenance Specifications
Page V-a
Section V .Maintenance Specifications
Section Contents
Page
Arctic Operation ..................................... :.................................................................................... 1.................V-27
Preparatory .....................................................................................................................................
;
.......... V-27
Capscrew Markings and Torque Values ........................................................................................................
'?
Capscrew Markings and Torque Values .Metric .........................................................................................
Capscrew Markings and Torque.
............................................
General Information .................
............................................
Coolant Recommendations and Specifications .............
Preparatory ...........................................
V-32
V-33
v-34
V-32
.............................................. V-28
............................................ V-28
Engine Component Torque Values ............
............................................................................... v-29
General Information ...............................
.................................................
... ........:..... v-29
Fuel Recommendations and Specifications ....................................
.......... ..................
..................v-20
Fuel Recommendations ................................................................................................
...................v-20
Lubricating Oil Recommendations and Specifications ................................................................................
V-25
New Engine Break-in Oils ................................................................................................
.......................... V-25
............................................................................................................................................... V-24
General Information ....................................................................................................................................
V-24
Specifications ..................................................................................................................................................
V-1
Air Intake System .................................................
...................................... :......................................... :..... V-10
Cooling System ...........................................................................................................................................
V-8
Electrical System .................................................................................... :..................................................
V-17
Exhaust System .......................................................
:..................................................................................
V-12
Fuel System ......................
,........................................................................................................................
V-14
~
i
:
Page V-b
83.9 and 85.9 Series Engines
Section V Maintenance Specifications
-
..
General Specifications .................................................................................................................................
Lubricating Oil System ...............1.................................................................................................................
Page
V-1
V-5
specifications
Page V-1
83.9 and 65.9 Series Engines
Section V Maintenance Specifications
-
Specifications
General Specifications
General 4 8 Engine Data (nonautomotive)
483.9
48T3.9
4BTA3.9
Bore
102 mm (4.02in]
102 mm (4.02in]
102 mm 14.02in]
Stroke
120 mm 14.72 in]
120 mm 14.72 in]
120 mm [4.72in]
Displacement
3.9 liters [238in3]
‘3.9liters [238in3]
3.9 liters 1238 in3]
308 kg (679Ib]
320 kg 1705 Ib]
329 kg [725Ib]
1 I 3,4,2
1, 3,4,2
1,3,4,2
0.25 mm [0.010in]
0.51 mm I0.020 in]
18.51
0.25mm [0.010 in]
0.51 mm-10.020in]
17.5:l
0.25 mrn’[0.010 in]
0.51 mm 10.020 in]
16.5:l
Clockwise
Clockwise
Clockwise
Engine Weight (dry) Less
Flywheel and Electric Components’
Firing Order
Valve Clearances:
- intake
- Exhaust
Compression Ratio
Rotation, Viewed from the
Front of the Engine
Aspiration:
- Naturally Aspirated
X
m
Specifications
Page v-2
- Turbocharged
- Aftercooled
83.9 and 85.9 Series Engines
Section V Maintenance Specifications
-
483.9
46T3.9
X
4BTA3.9
X
X
83.9 and 85.8 Series Engines
Section V Maintenance Specifications
-
,
Specifications
Page V-3
General 6B Englne Data (nonautomotive)
685.9
68T5.9
Bore
102 mm 14.02 in]
102 mm 14.02 in]
Stroke
120 mm (4.72 in]
120 mm 14.72 in]
120 m m 14.72 in]
5.88 liters 1359 in3]
5.88 liters [359 in3]
5.88 liters [359 in3]
388 kg 1855 Ibl
399 kg 1880 Ib]
411 kg 1906 Ib]
1, 5, 3, 6, 2, 4
1,5,3,6, 2,4
1,5,3, 6,2,4
4.25 mm [O.OlO in]
0.51 mm [0.020 in]
18.5:l
0.25 mm lO.010 in]
0.51 mm [0.020in]
,
17.5:l
0.25 mm [0.010in]
0.51 mm [0.020 in]
16.5:l
Clockwise
Clockwise
Clockwise
X
X
X
Displacement
Engine Weight (dry) Less
Flywheel and Electric Components
Firing Order
Valve Clearances:
Intake
a exhaust
Compression Ratio
Rotation, Viewed from the
Front of the Engine
Aspiration:
1
Naturally Aspirated
- Turbocharged
Aftercooled
'
-
.
6BTA5.9
'
102 mm [4.02 in]
X
Specifications
Page V-4
83.9 and 85.9 Series Engines
Section U Maintenance Specifications
-
General Engine Data (automotive)
Bore
Stroke
Displacement
Engine Weight (dry) Less
Flywhael and Etectril:
Components
Firing Order
Valve Clearances:
-Intake
-Exhaust
Compression Ratio
Rotation, Viewed from the
Front of the Engine
83.9
102 mm [4.02 in]
-120 mrn 14.72 in]
3.9 liters [238 in3]
308 to 329 kg [679 to 725 Ib]
85.9
102 mm [4.02 in]
120 mm (4.72 in]
5.9 liters 1360 in3]
388 to 411 kg [855 to 906 Ib]
1, 3,4, 2
1 , 5, 3,6, 2,4
0.25 mm [O.OlO in]
0.51 mm [0.020in]
(rotary pump) 17.6:l
Clockwise
0.25 mm [O,OlO in]
0.51 mm (0.020 in1
(in-line pumpj 17.9:l
Clockwise
X
X
X
X
Aspiration:
- Turbocharged
- Charge-Air Cooled
Specifications
Page V-5
83.9 and 85.9 Series Engines
Section V Maintenance Specifications
-
Lubricating Oil System
4 8 Lubrication System Data (nonautomotive)
4BT3.9
4BTA3.9
69 kPa [lo psi]
69 kPa [lo psi]
207 kPa [30psi]
207 kPa [30psi]
207 kPa [30psi]
Regulating Valve Opening
Pressure
449 kPa [65 psi]
449 kPa [65 psi]
449 kPa [65 psi]
Lubricating Oil Capacity:
Standard Pan Only
9.5 liters [loqt]
9.5 liters [ l oqt]
9.5 liters [I0 qt]
Total System
10.9liters 111.5 qt]
11 liters 111.6 qt]
11 liters I11.6qt]
Low to High
0.9 liter [l qt]
0.9 liter [l qt]
0.9 liter [I qt]
483.9
Lubricating Oil Pressure at Idle
(minimum allowable)
-
Lubricating Oil Pressure at Rated
(minimum allowable)
69 kPa [lo psi]
~
.
I
Specifications
Page V-6
83.9 and B5.9 Series Engines
Section V Maintenance specifications
-
68 Lubrication System Data (nonautomotive)
685.9
6BT5.9
6BTA5.9
Lubricating Oil Pressure at Idle (minimum allowable)
69 &Pa [ I 0 psi]
69 kPa [lo psi]
69 kPa [lo psi]
Lubricating Oil Pressure at Rated (minimum ailowablz)
207 kPa I30 psi]
207 kPa [30psi]
207 kPa 130 PSI]
Regulating Valve Opening
Pressure
449 kPa [65 psi]
449 kPa [65psi]
449 kPa [65 psi]
Lubricating Oil Capacity:
Standard Pan Only
14.2 liters [I5 qt]
14.2 liters [15 qt]
14.2 liters [ I 5 qt]
Total System
16,3 liters 117.2 qt]
16.4 liters [17.3 qt]
16.4 liters [17.3 qt]
Low to High
1.9 liters [2 qt]
1.9 liters [2 qt]
1.9 liters [2 qt]
I
I
83.9 and 85.9 Series Engines
Section V Maintenance Specifications
Specifications
. F’ageV-7
-
Lubrication System Data (automotive) -
Lubricating Oil Pressure at Idle (minimum allowable)
69 kPa [lo psi]
69 kPa [lo psi]
Lubricating Oil Pressure at Rated (minimum allowabie)
207 kPa 130 psi]
207 kPa [30 psi]
Regulating Valve Opening Pressure
449 kPa [65psi]
449 kPa [65psi]
Lubricating Oil Capacity:
Standard Pan Only
Total System Liters [U.S. qt]
Low to High
9.5 liters [loqt]
11 liters 111.6 qt]
0.9 liter [l qt]
14.2 liters [15qtl
16.4 liters p7.3 qt]
1.9liters [Zqt]
-
I
Specifications
Page V-8
83.9 and 85.9 Series Engines
Section V -!Maintenance Specifications
I
Cooling System
48 Cooling System Data (nonautomotive)
483.9
Coolant Capacity (engine only)
7 liters [7.4 qt]
Standard Modulating Thermo- Start 83'C [181°F]; Fully
stat Range
Open 95% [2.03"F!
Pressure Cap:
104OC [220°F] Systems
99OC [210°F] Systems
103 kPa f15 psi]
48 kPa [7 psi]
4BT3.9
7 liters [7.4 qt]
Start 83% [18l0F]; Fully
Open 9 Y C !203OF!
4BTA3.9
9.7 liters (10.2 qt]
Start 83°C [18l0F]; Fully
Open 95% { 2 W F ]
103 kPa [15 psi]
48 kPa [7psi]
103 kPa [15 psi]
48 kPa [7 psi]
6 8 Cooling System Data (nonautomotive)
Coolant Capacity (engine only)
Standard Modulating Thermostat
Range
Pressure Cap:
104OC [220°F] Systems
99OC [210°F] Systems
685.9
6BT5.9
6BTA5.9
10.5 liters 111.1 qt]
10.5 liters IH.1 qt]
14.5 liters 115.3 qt]
Start 83% [18l0F]: Fully Start 83OC [18l0F]; Fully Stan 83% [181°F]; Fully
Open 95OC [203OF]
Open 95% [Z03°F]
Open 95% [203OF]
103 kPa 115 psi]
48 kPa [7 psi]
103 kPa [15 psi]
48 kPa [7 psi]
103 kPa [15 psi]
48 kPa [7 psi]
83:9 and 85.9 Series Engines
Section V Maintenance Specifications
Specifications
Page V-9
-
Cooling System Data (automotbe)
Coolant Capacity (engine only)
Standard Modulating Thermostat Range
Pressure Cap:
1M0C [220°F] Systems
99% [210DF]Systems
83.9
7 liters (7.4 qt]
Start 83% [18l0F]
B5.9
10.5 liters [H.1 qt]
Fully Open 95°C [203OF]
103 kPa [15 psi]
48 kPa (7 psi]
103 kPa [I5 psi1
48 kPa [7 psi]
I-
Specifications
Page V-10
83.9 and B5.9 Series Engines
Section V Maintenance Specifications
-
Air Intake System
4 8 Air intake System (nonautomotive)
6B Air Intake System (nonautomotive)
Maximum Allowable Intake Restriction at Rated Speed and
Loaded with Dirty Air Filter Element
685.9
6BT5.9
6BTA5.9
508 mm H 0
120 in H,d]
635 mm H 0
[25in H,d]
635 mm H 0
[25 in H,6]
1
83.9 and 85.9 Series Engines
Section V Maintenance Specifications
.
Specifications
Page V-11
-
Air Iptake System Data (automotive)
Maximum Allowable Intake Restriction
at Rated Speed and Loaded with Dirty
Air Filter Element
83.9
85.9
635 mm H 0
125 in H,6]
635 mm H 0
125 in H,8]
83.9 and 85.9 Series Engines
Section V Maintenance Specifications
Specifications
Page V-12
-
Exhaust System
4 8 Exhaust System Data (nonautomotive)
Maximum Allowable Exhaust Restriction at Rated Speed and
Lo2ded
463.9
4BT3.9
4BTA3.9
76.2 mm Hg [3.0in Hg]
76.2 mm Hg [SO in Hg]
76.2 mm Hg [3.0in Hg]
6BT5.9
6BTA5.9
68 Exhaust System Data (nonautornaiive)
665.9
Maximum Allowable Exhaust Restriction at Rated Speed 2nd
76.2 mm Hg [3.0in Hg]
Loaded
76.2 mm Hg [3.0in Hg]
76.2 mm Hg [3.0in Hg]
Specifications
Page V-13
83.9 and 65.9 Series Engines
-
Section V Maintenance Specifications
Exhaust System Data (automotive)
Maximum Allowable Exhaust
Restriction at Rated Speed and
Loaded (I991 to 1993 EPA certified)
83.9
85.9
114.3 rnm Hg 14.5 in Hg]
114.3 m m Hg [4.5 in Hg]
..
Maximum Allowable Exhaust
Restriction at Rated Speed and
Loaded (1994,to 1998 EPA certified)
152.4 mm Hg [6in Hg] with oxidation 152.4 mm Hg [6in Hg] with oxidation
catalyst
,
catalyst
'
.
.
-
I
Specifications
Page V-14
-
83.9 and 65.9 Serles Englnes
Section V Maintenance Speciflcations
Fuel System
4 8 Fuel System Data (nonautomotive)
Distributor-qpe Fuel Injection
483.9
46T3.9
4BTA3.9
Pumps
Maximum Allowable Restriction
i00 mm Hg i4 !n Hgj
100 mm rig i
4 in rig]
iOO mm Hg (4 in ngj
to the Fuel Pansier Pump Must
N3t Exceed
Return Line
518 mm Hg I20.4 in Hg] 518 mm Hg [20.4 in'Hg] 518 mm Hg 120.4 in Hg]
Restriction
35 kPa [5 psi]
35 kPa [5 ,psi]
Maximum Allowable Pressure
35 kPa [5 psi]
Drop across Fuel Filter
Maximum Inlet Pressure to the
70 kPa [ l o psi]
70 kPa [I0 psi]
70 kPa 110 psi]
Injection Pump Must Not Exceed
IndLine-l!fpe Fuel Isnjection
Pumps
Maximum Inlet Restriction to the
100'mm Hg [4 in Hg]
100 mm Hg [4 irl Hg]
Fuel Transfer Pump Must Not
100 mm Hg [4 in Hg]
Exceed
172 kPa 125 psi] High
172 kPa [25 psi] High
Fuel Transfer Pump Minimum
172 kPa [25 psi] High
Flow and 90 kPa [I3 psi] Flow and 90 kPa 113 psi] Flow and 90 kPa [I3 psi]
Output Pressure
Low Flow @ Rated rpm
Low Flow @ Rated rpm
Low Flow @ Rated rpm
Fuel Filter Restriction (maximum
35 kPa [5 psi] .
35 kPa [5 psi]
35 kPa [5 psi]
pressure drop across filters)
' 140 kPa [20psi] @
* 140 kPa I20 psi] @
* 140 kPa 120 psi] @
Fuel Pump Gallery Pressure
Rated rpm
Rated rpm
Rated rpm
Fuel Return Maximum Restriction 518 mm Hg I20.4 in Hg] 518 mm Hg [20.4 in Hg] 518 mm Hg [20.4 in Hgl
' The low-flow fuel transfer pump will have 82.7 kPa 112 psi].
I
83.9 and 85.9 Series Engines
Section V Maintenance Specifications
-
Specifications
Page V-15
6 6 Fuel System Data (nonautomotive)
!
I
Distributor-Type Fuel Injection
685.9
6BT5.9
6BTA5.9
Pumps
Maximum Allowable Restriction
to the Fuel Transfer Pump Must
100 mm Hg [4 in Hg]
100 mm Hg [4 in Hg]
100 mm Hg [4in Hg]
Not Exceed
Maximum Allowable Return Line 518 mm Hg [20.4 in Hg]
518 mm Hg [20.4 in Hg] 518 mm Hg 120.4 in Hg]
Restriction
Maximum Allowable Pressure
35 kPa [5psi]
35 kPa [5psi]
35 kPa [5psi]
Droo across Fuel Filter
Maximum Inlet Pressure to the
70 kPa [ l o psi]
70 kPa [lo psi]
70 kPa I10 psi]
Injection Pump Must Not Exceed
In-Line-Type Fuel Injection
Pumps
Maximum.lnlet Restriction to the
Fuel Transfer Pump Must Not
100 mm Hg [4.in Hg] ,
100 mm Hg [4in Hg]
100 mm Hg [4in Hg]
Exceed
Fuel Transfer Pump Minimum
172 kPa [25 psi] High
172 kPa [25 psi High
172 kPa 125 psi] High
Output Pressure
Flow and 90 kPa [I3psi] Flow and 90 ,Pail3 psi] Flow and 90 kPa [13psi]
Low Flow @ Rated rpm
Low Flow @ Rated rpm
Low Flow @ Rated rpm
Fuel Filter Restriction (maximum
35 kPa [5psi]
35 kPa [5psi]
35 kPa [5 psi]
pressure drop across filters)
Fuel Pump Gallery Pressure
* 140 kPa [20psi] @
* 140 kPa [ZO psi] @
140 kPa [20PSI] @
Rated rpm
Rated rpm
Rated rpm
Fuel Return Maximum Restriction 518 mm Hg [20.4in H g l 518 mm Hg [20.4 in Hg] 518 mm Hg [20.4 in Hg]
* The low-flow fuel transfer pump will have 82.7 kPa [12psi].
83.9 and 85.9 Series Engines
Section V Maintenance Specifications
-
Specifications
Page V-16
Fuel System Data (automotive)
Distributor-Type Fuel Injection Pumps
Maximum Inlet Restriction to thE Fuel
. .Transfer Pump Must Not Exceed
Maxlmum Allowable Return' Line Restriction
Maximum Allowable Pressure Drop across
Fuel Fiiter
Maximum inlei Pressure to the Injection
Pump Must Not Exceed
In-Line-Type Fuel injection Pumps
Maximum Inlet Restriction to the Fuel Transfer
Pump Must Not Exceed
Fuel Transfer Pump Mihimum Output Pressure
Fuel Filter Restriction (maximum pressure drop
across filters)
Fuel Pressure Gallery Pressure
Fuel Return Maximum Restriction
83.9
85.9
100 mm Hg [4 in Hg]
100 mm Hg (4 in Hg]
518 mm Hg 120.4 in Hg]
35 kPe !5 psi]
518 mm Hg 120.4 in Hg]
70 kPa [lo psi]
70 kPa [lo psi]
35 kPa.!5 psi!
B3.9
85.9
100 mm Hg [4 in Hgl
100 mm Hg 14 in Hg]
175 kPa 125 psi] @J Rated rpm
35 kPa [5psi]
175 kPa [25 psi] @ Rated rpm
140 kPa 120 psi] @ Rated rpm
518 mm Hg 120.4 in Hg]
140 kPa 120 psi] @ Rated rpm
.
35 kPa [5 psi]
518 mm Hg 120.4in Hg]
83.9 and 85.9 Series Engines
Section V Maintenance Specifications
Specifications
Page V-17
-
Electrical System
48 Electrical System Data (nonautomotive)
483.9
48T3.9
48TA3.9
625CCA
4OOCCA
825CCA
4OOCCA
Minimum Recommended Battery
Capacity @I -18OC [OOF]
With Liaht Accessories*
12-VDC Starter
24-VDC Starter
625CCA
312CCA
With Heavy Accessories" *
12-VDC Starter
24-VDC Starter
BOOCCA
4OOCCA
BOOCCA
4OOCCA
BOOCCA
400CCA
Maximum Allowable Resistance
of Starting Circuit
With 12-VDC Starter - Ohms
With 24-VDC Starter Ohms
0.0012
0.0020
0.0012
0.0020
0.0012
0.0020
-
*
.
Typical light accessories include alternator, small steering pump, and disengaged clutch.
*' Ty&al heavy accessories include hydraulic pump and torque converter.
I
83.9 and 85.9 Series Engines
Section V Malntenance Specifications
Specifications
Page V-16
-
EB Electrical System Data (nonautomotire)
685.9
6BT5.9
6BTA5.9
Minimum Recommended Battery
Capacity @ -1S0C!Oo~]
With Light Accessories
12-VDC Starter
24-VDC Starter
BOOCCA
400CCA
8OOCCA
4OOCCA
BOOCCA
4OOCCA
With Heavy Accessories"
12-VDC Starter
24-VDC Starter
950CCA
475CCA
95OCCA
475CCA
95OCCA
475CCA
0.0012
0.0012
0.0020
0.0012
0.0020
Maximum Allowable Resistance
of Startlng Clrcuit
With 12-VDC Starter - Ohms
Wlth 24-YDC Starter Ohms
-
0.00m
Typical light accessories include alternator, small steering pump, and disengaged clutch.
* * Typical heavy accessories include hydraulic pump and torque converter.
83.9 and 85.9 Series Engines
Section V Maintenance Specifications
Specifications
Page V-19
-
Electrical System Data (automotive)
83.9
85.9
Minimum Recommended Battery Capacity
@ -18°C 10°Fl
With Light Accessories*
12-VDC Starter
24-VDC Starter
625CCA
4OOCCA
8OOCCA
4OOCCA
With Heavy Accessories’*
12-VDC Starter
24-VDC Starter
8bOCCA
4OOCCA
95OCCA
475CCA
Maximum Allowable Resistance of Starting
Circuit
With 12-VDC Starter Ohms
With 24-VDC Starter - Ohms
0.0012
0.0020
0.001 2
0.0020
- -
-
*Typical light accessories include alternator, small steering pump, and disengaged clutch.
“Typical heavy accessories include hydraulic pump and torque converter.
‘
83.9 and 65.9 Series Engines
Section V Maintenance Specifications
Fuel Recommendations and Specifications
Page V-20
-
Fuel Recommendations and Specifications
Fuel Recommendations
A
WARNING
A
Do not mix gasoline, alcohol, or gasohol with diesel fuel. This mixture can cause'explosion.
h
CAUTION
A
Because of precise tolerances of diesel injection systems, it is extremely important fhaf the fuel be kept cleen
and free of dirt or water. Dirt or water in the system can cause severe damage to both the injection pump and
the injection nozzles.
A
CAUTION
A
Do not use diesel fuel blended with lubricating oil in engines equipped with a catalytic couverter (including 1994
model year and beyond). Damage to legally required emission control can result.
UseASTM No.2Dfbel withaminimumcetanenumberof40. FTo.2dieselfuelgivesthebesteconomy~and~performance
under most operating conditions. Fuels with cetane numbers higher than 40 can be' required in higher altitudes or
extremely low ambient temperatures to prevent misfires and-excessive smoke.
At operating temperatures below 0% [32OF], use a blend of
No. 2 D.
Po. 1 D and No. 2 D fuels,-aiso known as "winterized"
NOTE No. 1 D fuel can be.used: however, fuel economy Will suffer.
Use low-qulfur content fuel having a cloud point that is at least 10 degrees below the lowest expected fuel temperature.
Cloud point is the temperature at which wax crystals begin to form in diesel fuel.
Theviscosityofthefuel must be keptabovel.3centistokesto provideadequatefueisyStemlubricationat4O0C[104OF].
For a more detailed description of fuel properties, refer to Fuel for Cummins Engines, Bulletin No. 3379001.
~~
~~
~~
~
Fuel Recommendations and Specifications
Page V-21
83.9 and B5.9 Series Engines
Section V Maintenance Specifications
-
The following chart lists acceptable alternate fuels for midrange engines.
A
CAUTION
A
'
Do not use diesel fuel blended with lubricating oil in engines equipped with a catalytic converter (including
model year 1994 and beyond). Damage to legally required emission control can result.
NOTE: Any adjustment to compensate for reduced performance with a fuel system using alternate fuel is not
warrantable.
NOTE: Wear on any midrange fuel pump component attributed to the lack of lubrication in the fuel is not a wqrrantable
reoair.
Fuel Recommendations and Specifications
Page V-22
83.9 and 65.9 Series Engines
Section V Malntenance Specifications
-
Fuel Type
Denso.EP-9
Stanadyne DB-4
No. 1-D diesel
No. 2-D diesel
OK
OK
OK
,
No.
1-K kerosene
No. 2-K kerosene
Jei-k
Jet A-1
JP-5
JP-8
Jet-B
JP-4
Cite
OK
OK
OK
GK
OK
OK
OK
Not OK
Not OK
Not OK
Lucas CAV
(DPA and DPS)
OK
OK
1
.
f
f
Not OK
Not OK
Not OK
Not OK
Not OK
Not OK
83.9 and B5.9 Series Engines
Section V Maintenance Specifications
Fuel Recommendations and Specifications
Page V-23
-
Fuel Filters
A = Standard filter used as secondary filter in dual-filter
applications
,.
B = Fuel-water separator primary filter for dual-filter applicatidns
. .
C = Fuel-water separator used in single-filter applications.
,
I,
.i
Sealants
Page V-24
63.9 and 85.9 Series Engines
Section V Maintenance Specifications
-
Sealants
General Information
Use the sealants listed below or sealants containing equivalent properties.
Description
pip
plup
cup plugs
O-rings
Rear camshaft expansion plug
Fuel pump studs
Turbocharger drain in block
Front seal in gear cover
Rear seal in gear cover
Oil pan at T-joint
Sealants
Sealing Method
Precoated Teflon" or pipe sealer
Loctite 277 of 11,264
No sealant required
Precoated or Loctite 59,241 liquid Teflon"
bctite 609
Loctite 277 or 11,264 "
Loctite 277 or 11,264
No sealant
Three-Bond'" 1207C (PIN 3823494)
83.9 and 85.9 Series Engines
Section V Maintenance Specifications
-
Lubricating Oil Recommendations and Specifications
Page V-25
Lubricating Oil Recommendations and Specifications
New Engine Break-in Oils
Do not use special "break-in" oils for new or rebuilt Cummins engines. Use the same type of oil during the break-in
as that used in normal operation.
Recommended Oil Change Intervals
Refer to the flowchart and table located in Section 2 for the recommended oil change interval based on engine
application.
Oil Performance Recommendations
The use of quality engine lubricating oils, combined with appropriate oil drain and filter change intervals, is a critical
factor in maintaining engine performance and durability.
Cummins Engine Company, Inc: recommends the use of a high-quality SAE 15W-40 heavy-duty engine oil (such as
Cummins Premium Blue@),which meets the American Petroleum Institute (API) performance classification CEISG.
NOTE CC/CD or CDlSF engine oils can be used in areas where CE oil is not yetavaiiable. but the oil change interval
must be reduced to one half the interval given in the maintenance schedule.
A sulfated ash limit of 1.D mass percent is suggestedfor optimum valve and piston deposit and oil consumption control.
The sulfated ash must not exceed 1.85 mass percent.
Oil Viscosity Recommendations
The use of multiviscasity lubricatingoil has been found to improve oil consumption control and improve engine cranking
in cold temperatures'whiie maintaining lubrication at high operating temperatures.
'While 15W-40oil is recommendedfor most climates, refer to the accompanyingtable for oil viscosity recommendations
for extreme climates.
83.9 and B5.9 Series Engines
Section V Maintenance Specifications
Lubricating Oil Recommendations and Specifications
Page V-26
-
NOTE Limited use of low-viscosity oils, such as 1OW30,
can be used for easier starting and providing sufficient 011
flow at ambient temperatures below -5 "C [ZPF]. However,
continuous use of low-viscosity oils can decrease engine
life due to wear. Refer to the accompanying chart.
Winter Conditions
A
CAUTION
A
I
.A six-cylinder oil filter can be used on a four-cylinder
engine. Do not use a four-cylinder oil filter on a sixcylinder engine. Use of a four-cylinder oil filter on a
six-cylinder engine will result in engine damage.
Oil Filters
'A =
LF 3345 Standard Four-Cylinder Applications
B = LF 3349 Standard Six-Cylinder Applications.
Arctic Operation
Page V-27
63.9 and 65.9 Series Engines
Section V
- Maintenance Specifications
Arctic Operation
Preparatory
,
A
CAUTION
A
The use of a synthetic-based oil does not justlfy extended oil change intervals. Extended 011 change intervals
can decrease engine life due to factors such as corrosion, deposits, and wear.
If an engine is operated in ambient temperatures consistently below - 2 3 T [-lO°F] and there are no provisions to keep
the engine warm when it is not in operation, use a synthetic CElSG engine oil with adequate low-temperature properties
such as 5W-30.
The oil supplier must be responsible for meeting the performance service specifications,
Additional information regarding lubricating oil availability throughout the world is available in the E.M.A. Lubricating
Oils Data Book for Heavy-Duty Automotive and Industrial Engines. The data book can be ordered from the Engine
Manufacturers Association, One Illinois Center, 111 East Wacker Drive, Chicago, IL, U.S.A. 60601. The telephone
nuqber is (312) 644-6610.
1
Coolant Recommendations and Specifications
Page V-28
Coolant Recommendations and Speci.ficatiohs
,
83.9 and 85.9 Series Engines
Section V Maintenance Specifications
,
,
8
,
8
'
Preparatory
Heavy-duty diesel engines require a balanced coolant mixture of water and antifreeze. Drain and replace the mixture
every 2 years, 320,000 km [200,000mi], or 6000 hours of operation, whichever comes first, to eliminate buildup of
harmful chemicals.
Antifreeze is essential in any climate. It broadens the operating temperature range by lowering the coolant
freezing pnint by reiskg its boi!ing,poin:. 90 no: use moie :han'5&percint aniiheze in the mixiqre unless
additional freeze protection is required. Never use 'more than 68-percent antifreeze under any condition.
Usesoftwater in thecoolant mixture. Contaminants in hard water neutralize thecorrosion inhibitor components.
Water must not exceed 300-ppm hardness or contain more than 100 ppm of either chloride or sulfate.
-
Specifications Use low-silicate antifreeze that m,eets ASTM4985 test (GM6038M spec.) criteria.
-
Concentration Antifreeze must be used in any climate for both freezing and boiling protection. Cummins recommends a 50-percent concentration level (4O.percent to 60-perceot range) of ethylene glycol or propylene glycol
In most climates. Anttfreeze at 6Epercent concentration provides the maxirnum.freazingprotection and must never
be exceeded under any condltion. Antifreeze protection decreases above 68 percent.
Antifreeze Protection
Ethylene Glycol
40% = -23% [-9"F]
50% = -37% F35OF]
60% = -54% [-65'F]
68Vo = - 7 1 T [-96OF]
-
Propylene Glycol
40% = -21°C [@F]
50% = -33OC [-27'F]
60% = -49'C [-56OF1
' 68% = -63% [-81"F]
Concentration Testing Antifreeze concentration must be checked using a refractometer (such as Fleetguard.
Part No. CC2800). "Floating ball" type of densitv testers or hydrometersare not accurateenouahfor use with heavv-dutv
diesel cooling systems.
Engine Component Torque Values
Page V-29
83.9 and 85.9 Series Engines
Section V Maintenance Specifications
-
Engine Component Torque Values
General Information
Component
Aftercooler Mounting
Aftercooler Water Hose Clamp
Alternator Link (Delco 10-15 SI)
Alternator Link (Delco 20-27 Sl)
Alternator Mtg. Bolt 10-15 SI
Alternator Mtg. 27 SI
Alternator Support (Upper)
Belt Tensioner Flat Bracket
Belt Tensioner Mounting
Crankshaft Damper and Pulley
.Crossover Clamp
,
T-Bolt Type Clamp
Exhaust Outlet Pipe, V-Band Clamp
Fan Bracket Mounting
Fan Pulley
Wrench Size
Torque Value
24
5
24
43
43
77
24
24
43
137
5
10 rnm
8. mm
13 mm
314 in
15 mm
’ 18mm
10 mm
Allen 5 mm
15 mm
15.mm
5/16 in
11 mm
7/16 in
10 mm
10 mm
.
18
44
18
32
32
57
18
18
32
101
44
71
71
8
8
24
24
18
18
Engine Component Torque Values
Page V-30
Component
Fan Pulley
83.9 and 85.9 Series Engines
Section V Maintenance Specifications
-
Wrench Size
13 mm
Torque Value
N*rn
ft-lb
43
32
in-lb
83.9 and 65.9 Serles Engines
Section V Maintenance Specjfications
Engine Component Torque Values
Page V-31
-
ft-lb
N*m
Fuel Filter
75 to 85 mm
Fuel Filter Adapter Nut
Lubricating Oil Filter
Lubricating Oil Cooler Assembly
24 mm
75 to 85 mm
10 mm
Lubricating Oil Pan Drain Plug (steel)
Lubricating Oil Pan Drain Plug (aluminum)
Lubricating 011 Pan Heater Plug
Lubricating Oil Pressure Regulator Plug
Starter Mounting
Thermostat Housing
Water Inlet Connection
Water Pump Mounting
Valve Cover
Water-in-Fuel Sensor
Top -'Load Filter Lid'
17 mm
17 mm
27 mm
19mm
Install as specified by filter
manufacturer
32
24
3/4 Turn after Contact
24
18
59
41
59
59
80
55
,
80
80
10 mm
43
10 mm
24
15 mm
43
24
12
Hand-Tighten
Hand-Tighten
13 mm
15 mm
19 mm
10 mm
.
in-lb
32
18
32
18
1
'
106
Capscrew Markings and Torque Values'
Page V-32
83.9 and 85.9 Series Engines
Section V Mpintenance Specifications
-
Capscrew Markings and Torque Values
General information
A
CAUTION
A
When replacing ca screws, always use a capscrew of the same measurement and strength as the capscrew
being replaced. Us ng the wrong capscrews can result in engine damage.
Metric.capscrews and ncts ere ideh!ified by the grade :umber stamped 0:::he head of the capsciei oi iifi the siirfsce
of the nuts..U.S. Customary capscrews are identified by radial lines stamped on the head of the capscrew.
P
The following examples indicate how capscrews are identified:
'
-
Metrle ME-1.25 X 25
U.S. Cuatornary (5fl6X 18 X 1-1/21
'
~siarrnrsrnaamswinmiiiirmm~
Dkmncn boh+mrn&*
I"mllllmbll-
Mqw mnsd dlamshlr In lncha
J-
Numb.io(rnmadsp.rlih
bngm ~nmllllmnrr
Lsngm I" Inches
.
3-
,
,
1
2
..a,.
.
NOTES:
1. Always use the torque values listed in the following tables when specific torque values are not available.
2. Do not use the torque values in place of those specified in other sections of this manual.
3. The torque values in the table are based on the use of lubricated threads.
4. When the ft-lb value is less than 10, convert the ft-ib value to in-lb to obtain a better torque with an in-lb
torque wrench. Example: 6 ft-lb equals 72 in-lb.
83.9 and B5.9 Series Engines
Section V Maintenance Specifications
Capscrew Markings and Torque Values
Page V-33
-
Capscrew Markings and Torque.Values - Metric
Commercial Steel Class
8.8
Cgpscmw Head Markings
Body
Size
Diameter
mm
6
7
8
10
12
14
16
18
20
10.9
Torque
Cast Iron
Aluminum
N*m
ft-lb
N*m ft-lb
. 9
5
7
4
14
9
7
11
23
17
18
14
45
33
30
25
80
60
55
40
125
65
90
90
195
100
140
140
280
135
200
180
400
290
-
-
Torque
Cast Iron
Aluminum
N'm
ft-lb
N*m ft-lb
13
10
7
4
18
14
11
7
33
25
18
14
65
50
30
25
115
85
55
40
180
133
90
65
280
200
140
100
390
285
180
135
550
400
-
12.9
Torque
Cast Iron
Aluminum
N*m ft-lb
N-m
ft-lb
14
9
7
4
23
18
11
7
40
29
18
14
70
50
30
25
125
95
55
40
195
145
90
65 '
290
210
140
100
400
290
180
135
-
-
-
-
Capscrew Markings and Torque Values
Page V-34
83.9 and B5.9 Series Engines
Section V Maintenance Specifications
-
-
Capscrew Markings and Torque Values U S . Customary
5
8
Cao8crew Toraua - QRds 5 CEDECW
C W M W Toroue - Glads 8 Caomrew
WE Grad8 Number
C a p l C W HeEd MarVlngs
These am all SAE Grade 5 (3 line)
Q@Q
Capscrw Bedy Siia
114. 20
114.28
5/18 18
5116.24
-
318-16
318 - 24
7/16 - 14
7/16. 2n
1/2 - 13
112 -20
9/16 12
9116 16
518. 11
5/B - 18
34.10
314 - 16
716 .9
7/8 - 14
1-8
1-14
-
Cast lion
N*m
R-lb
9
7
12
9
273
15
23
17
40
30'
40
30
60
45
65
50
95
70
1w
75
135
1W
150
110
160
135
210
155
325
240
385
270
490
360
'530
390
720
530
800
590
A Ium inum
N*m
ft4b
6
8
9
7
12
16
19
14
iy1
25
25
35
45
35
40
55
55
75
60
60
110.
60
115
85
110
150
160
120
255
190
265
210
280
380
420
310
420
570
650
480
@?F
Cast Iron
N m
ft4b
15
18
30
33
55
60
90
95
130
150
180
210
255
290
460
515
745
825
1100
1200
11
13
22
24
40
45
65
70
95
110
140
155
190
215
340
380
550
610
820
890
A IumInum
N*m
ft-lb
8
6
9
7
16
12
19
14
25
20
35
25
45
35
55
40
75
55
60
60
80
85
150
110
160
120
255
190
285
210
380
280
420
310
570
420
650
480
22
83.9 and 95.9 Series Engines
Section W Warranty
-
Page W-a
-
Section W Warranty
Section Contents
All Bus Categories Worldwide (Except USlCanada Diksel Powered School Buses) ..;...............................
B5.9 &.C8.3 Engines United States and Canada Recreational Vehicle........:..............................................
Page,
W-7
W-25
BllSB Englnes United States and Canada Automotive ..................................................................................
W-1
California Emission Control System Warranty, On-Highway .....................................
1.........................
:........ W-36
Moteurs tout terrain Etats-Unis et Canada .....................................
:..........................................................
W-19
Off-Highway Engines United States and Canada.............................................................................
:........... W-13
United States and Canada Diesel Engine School Bus........................
:
....................... .................................. W-30
I
.
Page W-b
83.9 and 85.9 Series Engines
Section VJ Warranty
-
THIS PAGE LEFT INTENTIONALLY BLANK
-
Cummins Warranty
Page W-1
83.9 and 85.9 Series Engines
Section W Warranty
BllSB Engines United States and Canada Automotive
Coverage
Products Warranted
This warranty applies to new B and iSB~seriesdiesel Engines sold by Cummins and delivered to the first user on or
afier October 1, 1996, that are used in automotive on-highway applications in the United States’ or Canada with three
exceptions. Cummins provides different warranty coverage for engines used in fire apparatus truck and crash truck,
bus and coach, and recreational vehicle. applications.
Base Engine Warranty
This warranty covers any failures of,the Engine which result, under normal use and service, from a defect in material
or factory workmanship (Warrantable Failure). This coverage begins with the sale of the engine by Cummins and ends
twoyears(2yearsor50,000miies/80,468kilometersfor4Bwhi~heveroccursfirst)from thedateof deliveryoftheEngine
to the first user.
Additional coverage is outlined in the Emission Warranty section.
. .
a
These warranties are made to all Owners in the chain of distribution, and Coverage continues to all subsequent
Owners until the end of the periods of Coverage.
Cummins Responsibilities
Cumminswill pay for ail parts and labor neededto repair the damage to the Engine resulting from a Warrantable Failure.
Cummins will pay for the lubricating oil, antifreeze, filter elements, belts, hoses and other maintenance items that are
not reusable due to the Warrantable Failure.
Cummins will pay for reasonable labor costs for Engine removal and reinstallation when necessary to repair a
Warrantable Failure.
I
Curnmins Warranty
Page W-2
B3.9 an'd 85.9 Series Engines
Section W Warranty
-
Cummins will pay reasonable costs for towing a vehicle disabled by a Warrantable Failure to the nearest authorized
repair station for the first year from the date of delivery of the Engine to the first user or the duration of the warranty,
whichever occurs first. In lieu of the towlng e x p e p Cummins will pay reasonable costs for mechanics to travel to and
from the locatlon of the vehicle, including mea s, mileage,
B3.9 and 65.9 Series Engines
Section W Warranty
-
Cummins Warranty
Page W-3
and lodging when the repair is performed at the site of the failure.
Owner Responsibilities
Owner is responsible for the operation and maintenance of the Engine as specified in the applicable Cummins
Operation and Maintenance Manual. Owner is also responsible for providing proof that all recommended maintenance
has been performed.
Before the expiration of the applicable warranti Owner must notifya Cummins distributor, authorized dealer or other
repair location approved by Cummins of any Warrantable Failure and make the Engine available for repair by such
facility. Except for Engines disabled by a warrantable Failure during the first year fromthe date of delivery of the Engine
to the first user or the duration of the warranty, whichever occurs first, Owner must also deliverthe Engine to the repair
facility. Locations in the United States and Canada are listed in the Cummins United States and Canada Sales and
Service Directory.
Owner is responsible for the Cost of lubricating oil, antifreeze, filter elements and other maintenance items provided
during warranty repairs unless such items are not reusable due to the Warrantable Failure.
Owner is responsible for communication expenses, meals, lodging and similar costs incurred as a result of a Warrantable Failure.
Owner is responsible for non-Engine repairs and for "downtime" expenses, cargo damage, fines, all applicable taxes,
all business costs and other losses resulting from a Warrantable Failure.
Limitations
!
'
Cummins is not responsible for failures or damage resulting from what Cummins determines to be abuse or neglect,,
including but not limited to: operation without adequate coolants or lubricants; overfueling; overspeeding: lack of
maintenance of lubricating, cooling or intake systems: improper storage, starting, warm-up, run-in or shutdown
practices: unauthorized modificationsof the Engine. Cummins is also not responsible for failures caused by incorrect
oil or fuel or by water, dirt or other contaminants in the fuel or oil.
Cummins Warranty
Page W-4
63.9 and 65.9 Serles Engines
Seotlon W -Warranty
This warranty does not apply to accffiso,ries suppiied by Cummins which bear thme name of another rompany. This
category includes, but is not limited to: alternators, starters, fans, air conditioning compressors, clutches, filters,
transmissions, tog,ue converters, vacuum pumps, engine erhaust brakes, power steering pumps, non.Cummins fan
drives, and air compressors.
Failures resu1ting.h excessive oil consumption-are covered for the duration of the coverage or 100,000 miles (160,935
kilometers) or MOO hours from the date of delivery of the Engine to the first user, whichever of the three occurs first.
Before a claim for excessive oil consumption'wlllbe considered, Owner must submit adequate documentationto show
that consumption exceeds Cummins published standards.
Failures of belts and hoses supplied by Cumrnins are covered during the iirstyear irom the date of delivery of the Engine
to the first user or the duration of the warrant$ wtikhever occurs first.
Parts used to repair a Warrantable Failure may be new Cummins parts, Cummins approved rebuilt parts, or repaired
parts. Cummins is not responsible for failures resulting from the use of parts not approved by Cummins.
A new Cummins or Cummins approved rebuilt part used to repair a Warrantable Failure assumes the identity of the
part it replaced and is entitled to the remaining coverage hereunder.
CUMMINS DOES NOT COVER WEAR OR WEAROUT OF COVERED PARTS.
CUMMINS IS NOT RESPONSIBLE FOR INCIDENTAL OR CONSEQUENTIAL DAMAGES.
THIS WARRANTY AND THE EMISSION WARRANTY SET FORTH HEREINAFTER ARE THE SOLE WARRANTIES
MADE BY CUMMINS IN REGARD TO THESE ENGINES. CUMMINS MAKES NO OTHER WARRANTIES, EXPRESS
O,R IMPLIED, OR OF MERCHANTABILITY OR FITNESS FOR A PARTICULAR PURPOSE.
This warranty gives you specific legal rights, and you may also have other rights which vary from state to state,
83.9 and 85.9 Series Engines
Section W -Warranty
Cummins Warranty
Page W-5
Emission Warranty
Products Warranted
. .
This emission warranty applies to new B and ISB series diesel Engines marketed by Cummins that are used in the
United States’ in vehicles designed for transporting persons or property on a street or highway. This warranty applies
to Engines delivered to the ultimate purchaser on or after October 1, 1996.
Coverage
Cummins warrants to the ultimate purchaser and each subsequent purchaser that ttie Engine is designed, built and
equipped so as to conform at the time of sale by Cummins with ail US. Federal emission regulations applicable at the
time of manufacture and that it is free from defects in material or factory workmanship which would cause it not to meet
these regulations within the longer of the following periods: (A) Five years or 100,000 miles (160,935 kilometers).of
operation, whichever occurs first, as measured from the date of deJivery of the Engine to the ultimate purchaser, or
(B) The Base Engine Warranty.
if the vehicle in which the Engine is installed is registered in the state of California, a separate California Emissibn
Warranty also applies.
Limitations
Failures, other than those resulting from defects.in material or factory workmanship,,are not covered by this warranty.
Cummins is not responsible for failures or damage resuiting from what Cummins determines to be abusenr neglect,
including, but not limited to: operation without adequate coolants or lubricants; overfueling; overspeeding; lack of
maintenance of lubricating, cooling or intake systems; improper storage, starting, warm-up, run-in or.shutdown
practices; unauthorized modifications of the Engine. Cummins is also not responsible for failures caused by incorrect
oil or fuel or by water, dirt or other contaminants in the fuel or oil.
Cummins is not responsible for non-Engine repairs, “downtime” expenses, cargo damage, fines, a11 applicable taxes,
all business costs or other losses resulting from a Warrantable Failure.
Cummins Warranty
Page W-6
83.9 and 85.9 Series Engines
Section W Warranty
-
CUMMINS IS NOT RESPONSIBLE FOR INCIDENTAL OR CONSEQUENTIAL DAMAGES.
* United States includes American Samoa, the Commonwealth of Northern Mariana Islands. Guam, Puerto Rico. and
the U.S. Virgin Islands.
83.9 and 85.9 Series Engines
Section W Warranty
-
Cummins Warranty
Page W-7
All Bus Categories Worldwide (Except U.S./Canada Diesel Powered School
Buses)
Coverage
Products Warranted
This warranty applies to new diesel, LPG, compressed or liquid natural gas fueled engines sold by Cummins and
.delivered to the first user on or after January 1,1999, that are used in all bus categoriesworldwide (except U.S.ICanada
diesel powered school buses).
Base Engine Warranty
The Base Engine Warranty covers any failures of the Engine which result, under normal use and service, from a defect
in material or factory workmanship (Warrantable Failure). This coverage begins with the sale of the engine by Cummins
and continues for two years from the date of delivery of the Engine to the first user.
Extended Major Components Warranty
The Extended Major Components Warranty applies to ail except B and ISB series Engines and covers Warrantable
Failures of the engine cylinder block, camshaft, crankshaft, connecting rods and Cummins fan clutch (Covered Parts).
Bushing and bearing failures are not covered.
This coverage begins with the expiration of the Base Engine Warranty and ends three years or 300,000 miles (482,805 .
kilometers) or 10,800 hours of operation, whichever occurs first, from the date of deiivery of the Engine to the first user.
Emission 'Warranty
.. Additional
coverage is outlined under the Emission Warranty.
Cumrnins Warranty
Page W-6
-
83.9 and 65.9 Series Engines
Section W Warranty
Consumer Products
'This warranty on Consumer Products in the United States is a LIMITED warranty. CUMMINS IS NOT RESPONSIBLE
FOR INCIDENTAL OR CONSEQUENTIAL DAMAGES. Any implied warranties applicable to Consumer Products in the
Unired States terminate concurrently w:th the expiration of the express warranties applicable to such proaucts. Some
states or countries do not allow the exclusion of incidental or consequential damages, or limitations on how long an
implied warranty lasts, so the imitations or exclusions herein may not apply to you.
';:ar:Gii:i.?s
are made :G a;; Grriiers in ihe chain of a'kiribuilon and Coverage conrinues I 0 ali SuiJsequent
Owners untll the end of the periods of Coverage.
T1'393
Cummins Responsibilities
During The Base Engine Warranty
CLmmins will pay for 81, parts and labor needed to repair the damage to the Engine resulting from a Warrantable Failure.
Cumrnins will pay for Ihe lubrcating oil, antifreeze, filter elements, bells, hoses and other maintenance items that are
not reusable due to the Warrantable Failure.
Cummins WIIIpay for reasonable labor costs for Engine removal and reinstallation when necessary to repair a
Warrantable Failure
Cummins will pay reasonable costs for towing a vehicle disabled by a Warrantable Failure to the nearest authorized
repair locat'on. In lieu of towing expenses, Cummins will pay reasmable costs for mechanics 10 travel to and from the
location of the vehicle, including meals, mileage, and lodging, when the repair is performed at the site of the failure.
During The Extended Major Components Warranty
Cummins will pay for the repair or, at its option, replacement of the defecl:ve Covered Part and any Covered Part
damaged by a Warrantable Failure of the defectde Covered Part
.
83.9 and 85.9 Serles Engines
Cummins Warranty
Page W-9
-
Sectlon W Warranty
Owner Responsibilities
During The Base Engine Warranty
Owner is responsible for the cost of lubricating oil, antifreeze, filter elements and other maintenance items replaced
during warranty repairs unless such items are not reusable due to the Warrantable Failure.
During The Extended Major Components Warranty
Owner is responsible for the cost of all labor needed to repair the Engine, including the labor to remove and reinstall
fhe engine. When Cummins elects to repair a part instead of replacing it, Owner is not responsible for the labor needed
to repair the part.
Owner is responsible for the cost of all k r t s required for the'repair except for the defective Covered Part and any
Covered Part damaged by a Warrantable Failure of the defective Covered Part.
Owner is responsible for the cost of lubricating oil, antifreeze, filter elements and other maiflenance items replaced
during
. . the repair.
During The Base Engine and Extended Major Components Warranties
Owner is responsible for the operation and maintenance of the Engine as specified in the applicable Cumminst
Operation and Maintenance Manuals.Owner is also responsiblefor providing proof that all recommendedmaintenance
has been performed.
Before the expiration of the applicable warranty, Owner must notify a Cummins distributor, authorized dealer or other
repair location approved by Cummins of any Wariantable Failure and make the Engine available for repair by such
facility. Except for Engines disabled by a Warrantable Failure during the Base Engine Warranty, the Owner must also
deliver the Engine to the repair facility. 'Locations in the United States and Canada are listed in the Cummins United
States and Canada Sales and Service Directory.
Owner is responsible for communication expenses, meals, lodging and similar costs incurred as a result of a War.
rantable Failure.
.
.
83.9 and B5.9 Series Engines
Seotion W Warranty
Cummins Warranty
Page W-10
-
Owner is responsibie for non-Engine repairs and for."dwvntimNe" expe)lsm, passenger delays, fines, cargo damage,
all applicable taxesi all business cost$ and other losses resulting from a Warrantable Fallure.
Limitations
I
,,
,
,,
,
Cummins is not res&ndIble for failures or damage resulting from what:Cummins determines to be abuse or wglect,
including, but not limited to:, operation without adequate,coolants of lubricants; overfueling; overspeeding; lack of
maintenance of lubricatlng, ,oooling or intake systems:',improper storage, starting, warm-up, run-in or shutdown
ixactices; unauthorized modificaticns cf the Engine. Summins is alsc nct responsible for fal!ures caused Sy incorrect
oil or fuel or by water, dirt or other contaminants in the fuel or oil.
This warranty does not apply to accessorieswhich bear the name of another company. Such non-warrantedaccessories
include, but are not limited to: alternators, starters, fans, air conditioning compressors, clutches, filters, transmissions,
torque converters, vacuum pumps, power.steering pumps and air compressors.
Excessive oil consumption for B series engines is covered for the duration of the coverage or l,M),OOO miles (160,935
kilometers) or 7000 hours from,the date of delivery of the Engine to the first user, whhhever of the three occurs first.
Before a claim for excessive oil'cqnsumptionWill be considered, Owner must submit adequate dooumentation to show
that consumption exceeds Cummins published standards.
Failures of belts and hoses supplied by Cummins are covered for the first year from the date of delivery of the Engine
to the first user.
Parts used to repair a Warrantable Failure may be new Cummins parts, Cummins approved rebuilt parts, or repaired
parts. Cummins is not responsible for failures resulting from the use of parts not approved by Cummins.
A new Cummins or Cummins approved rebuilt part used to repair a Warrantable Failure assumes the identity of the
part it replaced and is entitled to the remaining coverage hereunder.
CUMMINS DOES NOT COVER WEAR OR WEAROUT OF COVERED PARTS.
CUMMINS IS NOT RESPONSIBLE FOR INCIDENTAL OR CONSEQUENTIAL DAMAGES.
83.9 and 65.9 Series Engines
Section W Warranty
-
Cummlns Warranty
Page W-11
THESE WARRANTIES AND THE EMISSION WARRANTY SET FORTH HEREINAFTER ARE THE SOLE WARRANI TIES MADE BY CUMMINS IN REGARD TO THESE ENGINES. CUMMINS MAKES NO OTHER WARRANTIES,
EXPRESS OR IMPLIED, OR OF MERCHANTABILITY OR FITNESS FOR A PARTICULAR PURPOSE.
This warranty gives you specific legal rights, and you may also have other rights which vary from state to state or country
to country.
Emission Warranty
e
Products Warranted
This emission warranty applies to new diesel, LPG, compressed or liquid natural gas fueled engines marketed by
Cummins that are used in the United States' in vehicles designed for transporting persons or property on a street or
highway. This warranty applies to Engines delivered to the ultimate purchaser on or after January 1, 1999.
~
Coverage
'
Cummins warrants to the ultimate purchaser and each subsequent purchaser that the Engine is designed, built and
equipped so ag to conform at the time of sale by Cummins with ail US. Federal emission regulations applicable at the
time of manufacture and that it is free from defects in material or factory workmanship which would cause it not to meet
these regulations within the longer of the following periods: (A) Five years or 100,000 miles (160,935 kilometers) of
operation, whichever occurs first, as measured from the date of,delivery of 1he.Engine to the ultimate purchaser, or
(B) The Base Engine Warranty.
, .
If the vehicle in which the Engine is installed is registered in the state of California, a separate California Emission
Warranty also applies.
Limitations
Failures, other than those resulting from defects in material or factory workmanship, are not covered by this warranty.
Cummi'nsis not responsible for failures or damage resulting from what Cummins determines to be abuse or neglect,
including, but not limited to: operation without adequate coolants or lubricants; overfueling; overspeeding; lack of
.
.
Cummins Warranty
Page W-12
63.9 and 65.9 Series Engines
-
Section W Warranty
maintenance of lubricating, cooling or intake systems; improper storage, starting, warmup, run-in or shutdown
practices; unauthorized modifications of the Engine. Cummins is also not responsible for failures caused by incorrect
oil or!!fuelor by water, di8rtor other contaminants in the fu;el or oil.
Cummins is not responsible for non-Engine repairs, "downtime" expenses, cargo damage, fines, all applicable taxes,
all business costs, and other losses resulting from a Warrantable Failure.
CUMMINS IS NOT RESPONSIBLE FOR'INCIDENTAL OR CONSEQUENTIAL DAMAGES.
* iiniied States inciudaskmeilcan Samoa, iha Commoiiwealih 0: ::sithein Mariana islands, Guam, Puei;s Rics, and
the US. Virgin is!ands.
83.9 and 85.9 Series Engines
Section W Warranty
-
x
Cummins Warrant
Page W-1
Off-Highway Engines United States and Canada
Coverage
Products Warranted
This warranty applies to new Engines sold by Cummins and delivered to the first user on or after April 1, 1999, that
are used in industrial (off-highway) applications in the United States* and Canada, except for Engines used in marine,
generator drive and certain defense applications, for which different warranty coverage is provided.. .
Base Engine Warranty
This warranty covers any failures of the Engine, under normal use and service, which result from a defect in material
or factory workmanship (Warrantable Failures).
Coveragebegitiswith thesaleofthe Engine by Cummins. Coveragecontinuesfortwo years or2,000 hoursofoperation,
whichever occurs first, from the date of delivery of the Engine to the first,user, or from the date the unit is first leased,
rented or loaned, or when the Engine has been operated for 50 hours, whichever occurs first. Ifthe 2,000 hour limit
is exceeded during the first year, Coverage continues until the end of the first year.
Extende.d Major Components Warranty
The Extended .Major Components Warranty covers Warrantable Failures of the Engine cylinder block, camshaft,
crankshaft and connecting rods (Covered Parts).
Bushing and bearing failures are not covered.
Thiscoverage beginswith theexpirationofthe Base Enginewarrantyandendsthreeyearsor 10,000 hoursofoperation
from the date of delivery ofthe Engine to the first user, or from the date the unit Is first leased, rented or loaned, or
from when the Engine has been operated for 50 hou.rs, whichever occurs first.
n
3381321
83.9 and 85.9 Series Engines
Sectiov W -Warranty
Cummins Warranty
Page W-14
Consumer Products
The warranty on Consumer Produc
in
3
States is,a LIMITED warrai
. CUMMINS IS NOT RESPONSIBLE
,
FOR INCIDENTAL OR CONSEQUENTIAL DAMAGES. Any impliedwarranties appllcable to Consumer Productsih the
United States terminate concurrently with the expiration of the express warranties applicable to the product. In the
United States, some states do not allow the exclusion of incidental or consequential damages, or limitations on how
long an implied warranty lasts, so the limitations or exclusions herein may not apply to you.
These warranties are made to all Owners in the chain ofdistribu!ian, and Coverage cnn!inues!c
Owners until the end of the periods of Coverage. .
Cummins’ Responsibilities
I
! SL!bsefpe!!!
I
During The Base Engine Warranty
Cumminswill pay for a11 partsand laborneeded to repairthedamage tothe Engineresultingfrom awarrantable Failure.
Cummins will pay for the lubricating oii, antifreeze, filter elements, and other maintenance items, that are not reusable
due to :the Warrantable Failure.
,
,
Cummins will pay reasonable costs for mechanics to travel to and from the equipment site, including meats, mileage
and lodging, when the repair is performed at the site of the failure.
Cummins will pay reasonable labor costs for Engine removal and reinstallationwhen necessary to repair a Warrantable
Failure.
During The Extended Major Components Warranty
Cummins will pay for the repair or, at its option, replacement of the defective Covered.Part and any Covered Part
damaged by a Warrantable Failure of the defective Covered part.
1
Cummins Warranty
Page W-15
83.9 and 85.9 Series Engines
Section W -Warranty
Owner’s Responsibilities
During The Base Engine Warranty
I
Owner is responsible for the cost of lubricating oil, antifreeze, filter elements and other maintenance items provided
during warranty repairs unless such items are not reusable due to the Warrantable Failure.
Duiing The Extended Major Components Warranty
Ownel; is responsible for the cost of all labor needed to repair the Engine, including the labor’to remove and reinstall
the Engine. When Cummins elects to repair a part instead of replacing it, Owner is not responsible for the labor needed
to repair the part.
Owner is responsible fof the cost of all parts required for the repair except for the defective Covered Part and any
Covered Part damaged by a Warrantable Failure of the defective Covered Part.
Owner is responsible for the cost of lubricating oil, antifreeze, filter elements and other maintenance items replaced
during repair of a Warrantable Failure.
,
-D
’
During The Base Engine and Extended Major Components Warranties
Owner is responsible for the operation and maintenance of the Engine as specified in the applicable Cummins
Operation and Maintenance Manual. Owner is also responsible for providing proof that all recommended maintenance
has been performed.
Before the expiration of the applicable warranty, Owner must notify a Cummins distributor, authorized dealer or other
repair location approved by Cummins of.any Warrantable Failure and make the Engine available for repair by such
facility. Locations in the United States and Canada are listed in the Cummins Off Highway Authorized Dealer Directory.
,
Owner is responsible for communication expenses, meals, lodging and similar costs incurred as a resuit of a Warrantable Failure.
Owner is responsible for non-Engine repairs, “downtime’! expenses, cargo damage, fines, all applicable taxes, all
business costs and other-losses resulting from a Warrantable Failure.
I
II
Cummins Wafiranty
Page W-16
83.9 and 85.9 Series Engines
.Section
.
W Warranty
-
Limitations
Cummins is not respopsible for failure$ or#damageresulting from what,Cummins deprmin,es to be abuse or qeglect,
incliuding, but not limited to: operation without adequate coolants' or lubricants; overfueling: overspeedhg; lack of
maintenance of lubricating, cooling or intake systems: improper storage, starting, warm-up, run-in or shutdown
practices: unauthorized m:odificationsof the Enghe. Cummlns is a160 not responsible for failures caused by incorrect
oil or fuel, or by water, dirt or other contaminants in the fuel or 01.
For power units and fire,pumps (package units), this warranty applies to accessories, except for clutches znd,Wers,
supplied by Cummins which bear the name of another company.
Except for power units and fire pumps, this warranty does not apply to accessories which bear'the name of another
company. Such non-warrantedaccessories include, but are not limited to: alternators, starters, fafis**, air conditioning
compressors, clutches, filters, transmissions, torque converters, steering pumps, and nonCummins fan drives, engine
compression brakes and air compressors.
Cummins Compusave units are covered by ageparate warranty.
Before a claim for excessive oil.consumptim will;be consldered, Owner must submit adequate dooumentation to sh,ow
that consumption exceeds Cummins published standards.
Failures of be'ltsand hoses supplied by Cummins ale not covered beyond the first 500 hours or one year of operation,
whichever occurs first.
Parts used to repair a Warrantable Failure may be new Cummins parts, Cummins-approved rebuilt parts, or repaired
parts. Cummins is not responsible for failures resulting from the use of parts not approved by Cummins.
A new Cummins or Cummins-approved rebuilt part used to repair a Warrantable Failure assumes the identity of the
part it replaced and is entitled to the remaining coverage hereunder.
CUMMINS DOES NOT COVER WEAR OR WEAROUT OF COVERED PARTS.
CUMMINS IS NOT RESPONSIBLE FOR INCIDENTAL OR CONSEQUENTIAL DAMAGES.
B3.9 and 65.9 Series Engines
Section W -Warranty
Cummins Warranty
Page W-17
THESE WARRANTIES SET FORTH HEREIN ARE THE SOLE WARRANTIES MADE BY CUMMINS IN REGARD TO
THESE ENGINES. CUMMINS MAKES NO OTHER WARRANTIES. EXPRESS OR IMPLIED, OR OF MERCHANTABILITY OR FITNESS FOR A PARTICULAR PURPOSE.
This warranty gives you specific legal rights, and you may also have other rights which vary from state to state.
Emission Warranty
Products Warranted
This emission warranty applies to new Engines marketed by Cummins that are used in the United States' in vehicles
designed for Industrial off-highwayuse. This warranty applies to Engines delivered to the ultimate purchaser on or after
April 1, 1999 for engines up to 750 horsepower, on or aHer January 1, 2000 for engines 751 horsepower and over.
Coverage
Cummins warrants to the ultimate purchaser and each subsequent purchaser that the Engine is designed, built and
equipped so as to conform at the time of sale by Cummins with all US. Federal emission regulations applicable at the
time of manufacture and that it is free from defects in workmanship or material which would cause it not to meet these
regulations within the longer of the following periods: (A) F:ve years or 3,000 hours of operation. whichever occurs first,
as measured from the date of delivery of the Engine to the ultimate purcnaser, or (6) The Base Engine Warranty.
If the vehicle in which the Engine is installed is registered in the state of California, a separate California Emission
Warranty also applies.
Limitations
Failures, other than those resulting from defects in materials, or workmanshlp, are not covered by this warranty.
Cummins is not responsible for failures or damage resull'ng from what Cummins determines to be abuse or neglect,
including, but not limited to: operation without adequate coolant or lubricants; overfueling; overspeeding; lack of
maintenance of lubricating, cooling or intake systems; improper storage, starting, warm-up, run-in or shutdown
practices; unauthorized modifications of the Engine, Cummins is also not responsible for failures caused by incorrect
I
Cummins Warranty
Page W-18
83.9 and 85.9 Series Engines
Section W Warranty
-
fuel or by waier, diri of other contaminants in the fuel.
Cummins Is not responsible for non-Engine repairs, "downtime" ex
or other losses resulting from a Wayantable Failure.
3r;
vgo damage, fines, all bushess costs
CUMMINS IS NOT PESPONSIBLE FOR INCIDENTAL OR CONSEQUENTIAL DAMAGES.
* IncludesAmerican Samoa, the Commonwealth of Northern Mariana Islands, Guam, Puerto Rim, and the U.S. Virgin
Islands.
*'
Alternators, starters, and fans ARE covered for the duration of the base engine warranty on 83.3 engines.
83.9 and B5.9 Series Engines
Section W
- Warranty
Cummins Warranty
Page W-19
Moteurs tout terrain Etats-Unis et Canada
Garantie
Produits garantis
La presente garantie s’applique aux nouveaux moteurs vendus par Cummins et livres au premier utiiisateur a compter
du lei avril 1999 pour un usage dans des applications industrieiies (tout terrain) aux Etats-Unis” et all.Canada, B
i’exception des moteurs utilisbs dans des applications marines et d’entrainement de genbrateur, ainsi que dans
certaines applications militaires, pour iesqueiies une couverture de garantie differente est fournie.
Garantie de base du moteur
Lapresente garantie couvretoute panne du moteur, dans des conditions normales d’utiiisation etd’entretien, provenant
d’un defaut de matbriau ou de fabrication en usine (pannes couvertes).
a
h garantie prend effet dater de IaLente du moteur. Eiie s’etend sur une pbriode de deux ans ou 2 000 heures
d’utilisation, suivant lequel de ces termes intelvient en premier, a compter de la date de livraison du moteur au premier
utilisateur ou de la date B laquelle le moteur est mis en location de courte ou longue durbe du en pr&t pour la premiere
fois, ou encore lorsque le moteur a btb utiiise pendant 50 heures, suivant lequel de ces termes intervLent en premier.
En cas d’une utilisation depassant 2 000 heures durant la premiere annee, la periode de garantie s’etend jusqu’a la
fin de la premiere annee.
Garantie etendue des camposants principaux
La Garantie prolongbe des principaux eibments couvre les pannes justifiables du bloc-cylindre, de I’arbre a cames,
du vilebrequin, des bielles du moteur (pieces couvertes).
Les pannes de bagues et roulement de paliers ne sont pas garanties
Cette couverture prend effet a la date d’expiration de la garantie de base du moteur et se termine trois ans ou 10 000
heures d’utilisation apres ia date de livraison du moteur au premier utiiisateur ou a compter de la date B laquelie le
moteur est mis en location de courte ou longue duree ou en pr& pour ia premiere fois, ou encore lorsque ie moteur
33H321
83.9 and 85.9 Series Englnes
Section W Warranty
Cummins Warranty
Page W-20
-
a el6 utilise pendant 50’heures, suivant lequel de ces te~rm,esinterviqnt en premier.
Prod,uitsde consommation
~
La garantie sur ies produits de consommation aux EJats-Unis est LIMITEE. CUMMINS ”EST PAS RESPONSABLE
DES DOMMAGES INDIRECTS OU INDUITS Aux Etats-Unis, toute garantie implicite applicable aux produits de
consomrnationvientBBcheanceahxpiration desgaranties expregsesapplicablesauprodukcertains Etatsd‘Amerique
refutent i’excluslo,ndes deteriorations erovoquees par des domrnages ihdirects ou induits, o u b s limitations de duree
de garanties implicites.
Ces garanties s’appllquent B tcus les proprietaires du circuit dme distribution et la couverture s’applique itous
proprietaires ulterieurs jusqu’a la fin de la periode de couverture.
las
Responsabilites Cummins
Pendant,la garantie de base du moteur
Cummins regiera tous ies frais des pieces detachees et de la main d’oeuvre necessaires a la ,reparation
du produit
,
enapmmage en raison d‘wne.panne jiustifiable.
Cummins prend en charge I’huile, Ilantigel, les cartouches de filtre ainsi que d‘autres pieces ou fournitures d’entretien
non reutllisables en raison d’une panne sous garantie.
Cummins paie la majeure partie des frais de deplacement des mecaniciens ce qui comprend les frais de repas, les
frais kilometriqueset lesfraisd’hebergement, dans lecasoh une reparation doitetreeffectueesur leslieuxdelapanne.
Cummins prend en charge une partie des frais de main d’oeuvre lorsqu’il est necessalre de deposer et de remonter
le moteur lors d’une panne sous garantie.
Pendant la garantie etendue des principaux composants
Cummins reglera la reparation ou, s’il prefere, le remplacement de la pl&ce couverte defectueuse et de toute piece
couverte endommagee par une panne justifiable de la piece couverte defectueuse.
83.9 and 85.9 Series Enginis
-
Section W Warranty
Cummins Warranty
Page W-21
Resp.onsabilit6s du proprietaire
Pendant hgarantie de.base du moteur
Le proprietairedoit regler I'huiledegraissage, I'antigel, les Biementsfiltrantsetlesautresarticlesd'entretien remplaces
au cours des reparations effectuees dans le cadre de la garantie a moins que ces articles ne puissent plus &re utilises
en raison d'une panne justifiable.
Pendant la garantie etendue des principaux composants
Le proprietaire est resDonsable de tous ies frais de la main-d'oeuvre-necessairea la reoaration du moteur, y compris
lesfrais de main-d'oeuvre pour demonter et reinstailer le moteur. Lorsque Cummins chokit de reparer une piece pIut6t
que de la remplacer, le proprietaire n'est pas responsable de la main-d'oeuvre necessaire a ia reparation de la piece.
Le proprietaire supporte les frais occasionnes par le remplacement des pieces except6 pour la piece defectueuse sous
garantie et toute piece garantie dont la deterioration a Bte provocfuee par une panne sous garantie de la piece
defectueuse sous garantie.
Le proprietaire supporte les frais.de remplacement de I'huile, de I'antigel, des cartouches de filtre ainsi que des autres
pieces ou fournitures lors d'une reparation en raison d'une panne sous garantie.
PENDANT LA Pl!RIODE DE GARANTIE DE BASE DU MOTEUR ET DE GARANTIE ETENDUE
DES COMPOSANTS PRINCIPAUX
Le proprietaire est responsable de I'utilisation et de. I'entretien du moteur comme il est specific dans le manuel
d'utilisation et d'entretien Cummins. Le proprietaire doit Bgalement pouvoir prouver que tous les travaux d'entretien
recommandes ont Bt6 effectues.
Avant la date d'expiration de la garantie en vigueur, le proprietaire doit avertir un concessionnaire Cummins,,un
concessionnaire agree ou un autre site de reparation homologue, de toute panne sous garantie et pouvoir confier le
moteur afin qu'il puisse &re repare. Les sites de reparation aux Etats-Unis ainsi qu'au Canada sont enumeres dans
le repertoire des concessionnaires moteur tout terrain Cummins agree.
-
Cummins Warranty
Page W-22
83.9 and 85.9 Series Engines
-
Section W Warranty
Le’proprletairesupporte les frais de communicatidn, d,erepas, d’hebergement et d’autres frais simiiaires occasionnes
par une panne sous garantie.
Le pmprietaire est responsable des reparatiNons iautres que ceiles du motekr, des Uepenses de’temps mort, des
dommages au chargement, des amendes, de toutes les taxes en vigueur, de bus les coats commerciaux et .de toute
autre depense resultant d’une panne sous garantime.
Limites
Cummins deciine route responsabiiite en cas de pannes ou de deteriorations resuitanr de ce que Cummins considere
cornme un abus ou une negligence de la part du proprietaire, notamment at non limitativement: une utilisation sans
les lubrifiantsou Ies liquidesde refroidissementappmpries;surrempiissagede carburant; vitesse tmp eievee; negligence
d’entretien des systemes d’admission, de refroidissement ou de lubrification: mauvaises conditions d’entreposage,
pratiques inappropriees de dbmarrage, de chauffage, de rodage ou d’arrbt: modificationsnon homologuees du moteur.
Cummins n’est egalement pas responsable des pannes provoquees par I’utilisation d‘une huile, d’un carburant ou
d’une eau non appropries, ainsi que des pannes provoquees par la presence de d6p6ts dans le carburant ou dans
I’huile.
Pour les generateurs de courant et les pompes a hkendie (unites conditionnees), cette garantie s’apdlique aux
aocessoires. sauf pour 18s embrayages et filtres fournis par Cummins qui portent le nom d’une autre societe.
Mis a part les generateurs de courant et les pompes a incendie, Cummins ne garantlt pas ies,accessoiresportant 18
nom d’une autre societe. Ces accessoires comprennent: les aiternateurs, les demarreurs, les ventilateurs’*, les
compresseurs d’air conditionnes, les embrayages, les filtres,.les transmissions, les convertisseurs de couple, ies
pompes d’assistance de direction;, l,es entrahements ventilateurs d’une marque differentede celle de Cummins; les
freins de compression moteur et les compresseurs d’air.
Les unites Compusave Cummins sont mujetties.a une’garantie differente.
Avant qu’une reclamation concernant une consommation excessive en huile soit prise en compte, le proprietaire doit
fournir une documentation adequate afin de pouvoir prouver que la consommation depasse celle definie par Cummins.
Cummins Warranty
Page W-23
83.9 and 65.9 Series Engines
‘Section W Warranty
-
Les deteriorations des courroies et flexible? fournis par Cummins ne sont pas garanties au-dela des 500 premieres
heures ou apres un an d’utilishtion, suivant lequel de ces termes intervient en premier.
Les pieces utiliseespourlareparationd‘unepannesousgarantiepeuvent &tredespiecesCummins neuves, des pieces
reconditionnees homoioguees ou des pieces reparees. Cummins n’est pas responsable des pannes resultant de
I’utilisation de pieces non homologuees.
Une nouvelle piece Cummins ouwne piece reconditionnee homologuee utilisee pour la reparation d’une panne sous
garantie est alors identifiee comme la piece originale remplacee,en vertu,de cette garantie.
CUMMINS NE COUVRE PAS L’USURE DES PIECES COUVERTES.
CUMMINS N’EST PAS RESPONSABLE DES DOMMAGES INDIRECTS OU INDUITS
LES PRESENTESGARANTIES SONT L‘ESGARANTIESEXCLUSIVESDECUMMINSCONCERNANTCES MOTEURS.
. CUMMINS NE CONSENT AUCUNE AUTRE GARANTIE EXPRESSE OU IMPLICITE ET AUCUNE GARANTIE DE
BONNE QUALITE COMMERClALE OU D’ADAPTATION A UN USAGE SPECIFIQUE.
Cette garantie vous procure certains droits qui peuvent varier d’un h a t a I’autre.
Garantie concernant I’emission de polluants
I
Produits garantis
Cette garantie s’appiique aux nouveaux moteurs commercialises par Cummins et utilises aux Etats-Unis’ sur des
vehicules a usage industriel tout-terrain. Lapresentegaranties’applique aux moteurs livres i’acheteurfinal acompter
du l e r avrill999 pour les moteurs jusqu’a 750 chevaux ou a compter du l e r janvier 2000 pour lesmoteurs d’au moins
751 chevaux.
Gaiantie
. .
Cummins garantit au dernier acheteur et achaque futur acheteur que le moteur a Bte con$u, construit et equipe selon
les loisamericalnesenvigweurportantsurlapollution etqu‘il necomporteaucundefautdefabrication descomposants,
ce qui engendrerait une non-conformite du moteur pendant les periodes suivantes: (A) cinq ans ou 3 000 heures
Cummins Warranty
Page W-24
83.9 and 85.9 Series Engines
Section W - Warranty
d’utilisation, suivant lequel de ces termes intervient en premier, et a dater de la livkieon &I moteur A I’acquereur final
ou (B)la garantie de base des rnoteurs.
Si le vehlcule muni du mdeur Cuinrnins est enregistre dans I’Etat de Callfornle, une autre, garantie du systeme
antipollution s’applique egalement.
Limites
Lea pannes autres que celles resultant d’un defaut de rnateriaux ou de main d’oehre, ne sont pad garanties.
Cummins decline toute responsabiliteen cas de pannes ou de deteriorations resultant de ce que Cummins considere
comme un abus ou une negligence de la part dw proprietaire, notamment et non limitativement: une utiiisation sans
les lubrifiants ou les liquides de refroidissernentappropries; suriemptissagede carburant; vitesse trop elevee; negligence
d’entretien des systemes d’admission, de refroidissement ou de lubrification; mauvaises condltions d’entreposage,
pratiques inappmpriees de demarrage, de chauffage, de rodage ou d’arr&t;modifications non homologuees du moteur.
Cumminsdest egalement pas responsable des pannes provoquees par I’utillsation d’une huile, d’un carburant ou
d’une eau non approprihs, ainsi que des pannes provoquees par la presence de depbts dans le carburant ou dans
I’huile.
Cummins n’est pas responsable des reparations auires que celles du moteur, des depenses de temps mort, des
domrnages au chargement, des arnmdes, de toutes les taxes en vigueur, de tous les coclts commerciaux et de toute
autre depense resultant d‘une panne sous garantie.
CUMMINS ”EST PAS RESPONS/+BLE DES DOMMAGES INDIRECTS OU INDUITS
’Doivent &re pris en.compte I’archipel americain Samoa, le Conlmonwealth d e s k s Mariana du nord, Ies iles Guam,
Porto Rico et les lleH americaines Vierges.
* * Les alternateurs, les demarreurs et les ventilateurs SONT couverts pendant la duree de la garantie debase des
moteurs 83.3.
Cummins Warranty
Page W-25
83.9 and 65.9 Series Engines
Section W Warranty
-
85.9 & C8.3 Engines United States and Canada Recreational Vehicle
Coverage
,
..
Products Warranted
This warranty applies to new 85.9 and C8.3 series diesel Engines soid by Cummins Engine Company, Inc., hereafter
"Cummins", anddelivered tothefirst useron orafter March 15,1998, thatareused in recreationalvehicie' applications
in the United States."' or Canada.
-
Base Engine Warranty
The Base Engine Warranty covers any failures of the Engine whichresult, under normal use and service, from adefect
in material or factory workmanship (Warralltabie Failure). This coverage begins with fhe sale of the Engine by Cummins
and continues for seven years or 150,000 miles (241,400 kilometers), whichever occurs first, from the date of delivery
of the Engine to the first user.
Emission Warranty
Additional coverage is outlined in the Emission Warranty on the back page.
.
Consumer Products.
This warranty on Consumer Products in the United States is a LIMITED warranty. CUMMINS IS NOT RESPONSIBLE
FOR INCIDENTALOR CONSEQUENTIAL DAMAGES. Any impliedwarranties applicable to Consumer Products in the
United States terminate concurrently with the expiration of the express warranties applicable to such products. In the
United States, some states do not allow the exclusion of incidental or consequential damages, or limitations on how.
.long an implied warranty lasts, so the limitations or exclusions herein may not apply to you. . .
These warmties are made to all Owners in the chain of distribution, and Coverage continues to all subsequent
Owners until the end of the periods of Coverage.
3381327
Cummins Warranty
Page W-26
,
8,
B3b9add 65.9 Series Engihes
Section W Warranty
,.I
./!
-
, .. ,,
I
Cummins Responsibillties
During
Th'e Base Engine Warcanty
,. ,
,
,
Cumminswill payforall partsand laborneededio repairthedamage tothe Engine resultingfroma Warramtable Failure.
Cummins will pay for the lub,ricatingoil, antlfreeze, filter elements, blelts, hoses and ottyer maintenance items that are
,
.
not reusable due to the Warrantable Failure.
j,
Cummins will pay for reasonable labor costs for Engine removal and reinstallation when nncessaty to repair a
Warrantable Failure.
Cummins will pay reasonable costs for towing a vehicle disabled by a Warrantable Failure to the nearest authorized
repair location when necessary to make the repair for the first year from the dateof delivery of the Engine twthe first
user. In lieu of towing expenses, Cummins.wil1pay reasonable costs for mechanics to travel to and from the location
of the vehicle, including meals, mileage, and lodging, when the repair is performed at the site of the failure.
Owner Responsibilittes
,
,
Durin'g The Base Engine Warranty
Owner is .responsible for the cost of lubricating oil, antifreeze, filter elements and other maintenanee items provided
during warranty repairs unless such items are not reusable due to the Warrantable Failure.
Owner is responsible for the operation gnd maintenance of the Engine as specified in the appficable Cummins
Operation and Maintenance Manual. Owner is also rgsponsible for providing proof that ail recommended maintenance
has been performed.
Before the expiration of the applicable warranty, Owner must notify a Cummins distributor, authorized deal& or other
repair location approved by Cummins of any Warrantable Failure and make the Engine available for repair by such
facillty. Except for Engines disabled by a Warrantable Failure during the first year from the date of delivery of the Engine
to the first'user, Owner must also deliver the Engine to the repair facility. Locations in the United States and Canada
are listed in the Cummins United States and Canada Sales and Service Directory.
83.9 and B5.9 Series Engines
Section W Warranty
-
Cummins Warranty
Page W-27
Owner is responsible for communication expenses, meals, lodging and similar costs incurred as a result of a Warrantable Failure.
Owner is responsible for non-Engine repairs and for “downtime” expenses, passenger delays, fines, all applicable
taxes, all business costs and other losses resulting from a Warrantable Failure.
Limitations
Cummins is not responsible for failures or damage resuliing from what Cummins determines to be abuse or.neglect,
including but not limited to: operation without ade,quate coolants or lubricants: overfueling; overspeeding; lack of ,,
maintenance of lubricating, cooling or intake systems; improper storage, starting, warm-up, run-in or shutdown
practices; unauthorized modifications of the Engine. Cummins is also not responsible for failures caused by incorrect
oil~orfuel or by water, dirt or other contaminants in the fuel or oil.
This warranty does not apply to accessories which bear the name of another company. This category includes, but is
not limited to: alternators, starters, fans, air conditioning compressors, clutches, filters, transmissions, torque converters, vacuum pumps, power steering pumps and air compressors. Cummins branded alternators and starters are
coveredforthefirsttwoyearsfrom thedateofdeiiveryoftheEnginetothefirst user,ortheexpirationofthe BaseEnbine
Warranty, whichever occurs first.
Excessive pi1 consumption for B series Engines is covered for the duration of the coverage or 150,000 miles (241,400
km) or 10,000 hours from the date of delivery of the Engine to the first user, whichever of the three occurs first. Before
a claim for excessive oil consumption will be considered, Owner must submit adequate documentation to show that
consumption exceeds Cumrnins published standards.
Failures of beits and hoses supplied by Cummins are not covered beyond the first 12 months from the date of delivery
of the Engine to the first user or the expiration of the applicsble Base Warranty, whichever occurs first.
Parts used to repair a Warrantable Failure may be new Cummins parts; Cummins approved rebuilt parts, or repaired
parts. Cummins is not responsible for failures resulting from the use of parts not approved by Cummins.
A new Cummins OrCummins approved rebuilt part used to repair a Warrantable Failure assumes the identity of the
part it replaced and is entitled to the remaining coverage hereunder.
,
I
~
~
Cummins Warranty
Page W-28
83.9 and 65.9 Series Engines
Section W Warranty
-
CUMMINS DOES NOT COVER WEAR OR WEAROUT OF COVERED PARTS.
CUMMINS IS NOT RESPONSIBLE FOR INCIDENTAL OR CONSEQUENTIAL DAMAGES.
THESE WARRANTIES AND THE EMISSION WARRANTY SET FORTH HEREINAFTER ARE THE SOLE WARRAN.
TIES MADE BY CUMMINS IN REGARD TO THESE ENGINES. CUMMINS MAKES NO OTHER WARRANTIES,
EXPRESS OR IMPLIED, OR OF MERCHANTABILITY OR FITNESS FOR A PARTICULAR PURPOSE.
This warranty gives you specific legal rights, and you may also have other rights which vary from state to state,
Emission Warranty
Products Warranted
.
This emission warranty applies to new Engines marketed by Cummins that are used in the Unitedstates' in vehicles
designed foitransporting persons or property on a street or highway. This warranty applies to Engines delivered to the
ultimate purchaser on or after January I,1998.
Coverage
Cummins warrantsto the ultimate purchaser and each subsequent purchaser that the Engine is designed, buiit and
equipped so as to conform at the time of sale by Cummins with all US. Federal emission regulations applicable at the
time of manufacture and that it is free from defects in material or factory workmanship which would cause it not to meet
these regulations within the longer of the following periods: .(A) Five years or 100,000 miles (160,935 kilometers) of
operation, whichever occurs first, as measured from the date of delivery of the Engine to the ultimate purchaser, or
(8)The Base Engine Warranty.
If the vehicle in which the Engine is installed is registered in the state of California, a separate California Emission
Warranty also applies.
Limitations
Failures, other than those resulting from defects in material or factory workmanship, are not covered by this warranty.
83.9 and 85.9 Series EnginesSection W - Warranty
Cummins Warranty
Page W-29
Cummins is not responsible for failures or damage resulting from what Cummins determines to be abuse or neglect,
including, but not limited to: operation without adequate coolants or lubricants; overfueiing; overspeeding: lack of
maintenance of lubricating, cooling or intake systems; improper storage, startins’, warm-up, run-in or shutdown
practices; unauthorized modifications of the Engine. Cummins is also not responsible for failures caused by incorrect
oil or fuel or by water, dirt or other contaminants in the fuel or oil.
‘Cummins is not responsible for non-Enginerepairs, “downtime” expenses, cargo damage, fines, all applicable taxes,
all business costs or other losses resulting from a Warrantable Failure.
CUMMINS IS NOT RESPONSIBLE FOR INCIDENTAL OR CONSEQUENTIAL DAMAGES.
* A ’recreational vehicle’ for this warranty is defined as a Class A Motorhome which is a vehicular unit built on a
self-propelledmotor vehicle chassis, primarily designed or altered to provide temporary living quarters for recreational,
travel or camping use. The living unit has been entirely constructedon a bare, specially-designedmotor vehicle chassis.
’* IncludesAmerican Samoa, the Commonwealthof Northern Mariana Islands, Guam, Puerto Rico, and the US. Virgin
Islands.
Cummins Warranty
Page W-30
-
'83.9and 85.9 Series Engines
Section W Warranty
United States and Canada Diesel 'Edgine'SchoolBus
Coverage '
Products Warranted
This warranty applies to new'diesel Engines,sold by Cummins Engine Company, Inc., hereafter "Cummins", and
delivered to the first user on or after Septem:ber 15, 1996, that are used in school bus' applications in the United
States'* or Canada.
Base Engine Warrmty
The Base Engine Warranty covers any failures of the Engine which result, under normal use and service, from a defect
In material or factoryworkmanstlip (Warrantable Failure). This coverage begins with the sale of the Engine by Cummins
and continues for five years or 100,000 miles (160,935 kilometers), whichever occurs first, from the date of delivery of
the Engine to the first user.
Extended Major Components Warranty
The Extended Major Components Warranty applies to all except B and 1SB series Engines and covers Warrantable
Failures of the engine cylinder block, camshaft, crankshaft, connecting rods and Cumminsfan clutch (Covered Parts).
Bushing and bearing failures are not covered.
This coverage begins with the expiration of the Base Engine Warranty and ends three years or 300,000 miles (482,805
kilometers), whichever occurs first, from the date of delivery of the Engine to the first user.
Emission Warranty
Additional coverage is outlined in the Emission Warranty on the back page.
63.9 and B5.9 Series Engines
Section W Warranty
-
Cummins Warranty
Page W-31
Consumer Products
I
This warranty on Consumer Products in the United States is a LIMITED warranty. CUMMINS IS NOT RESPONSIBLE
FOR INCIDENTALOR CONSEQUENTIAL DAMAGES. Any impliedwarranties applicableto Consumer Products in the
United States terminate concurrently with the expiration of the express warranties applicable to such products. In the
United States, some states do not allow the exclusion of incidental ?r consequential damages, or'limitations on how
long an implied warranty lasts, so the limitations or exclusions herein may not apply to you. ;
THESE WARRANTIES ARE MADE TO ALL OWNERS IN THE CHAIN OF DISTRIBUTION, AND COVERAGE CONTINUES TO ALL SUBSEQUENT OWNERS UNTIL THE END OF THE PERIODS OF COVERAGE,
Cummins Responsibilities
During The Base Engine Warranty
Cummins will pay for all parts and labor needed to repair the damage to the Engine resultingfrom a Warrantable Failure.
Cummins will pay for the lubricating oil, antifreeze, filter elements, belts, hoses and other maintenance items that are
not reusable due to the Warrantable Failure.
Cummins will pay for reasonable labor costs for Engipe removal and reiustallation when necessary to repair a
Warrantable Failure.
Cummins will pay reasonable costs for towing a vehicle disabled by a Warrantable Failure to the nearest authorized
,repair location when necessary to make the repair for the first 2 years from the date of,delivery of the Engine to the
first user. In lieu of towing expenses, Cummins will pay reasonable costs for mechanics to travel to and from the location
of the vehicle, including meals, mileage, and lodging, when the repair is performed at the,site of the failure.
During The Extended Major Components Warranty
Cummins will pay for the repair or, at its option, replacement of the defective Covered Part and any Covered Part
damaged by a Warrantable Failure of the defective Covered Part.
83.9 and 85.9 Series Engines,
Section W Warranty
'Cummins Warranty
Page W-32
-
Owner Responsibilities
During The Base-Engine Warranty
Owner is responsiblefor the cost of lubricating oil, antifreeze, filter elements and other maintenance items provided
during warranty repairs unless such items are not reusable due to the Warrantable Failure.
During The Extended Major Components Warranty
I
.
Owner is responsible for the cost of all labor needed to repair the Engine, including the labor to remove and reinstall
the Engine. When Cummins elects to repair a part instead of replacing it, Owner is not responsible forthe labor needed
to repair the part.
.
.
Owner is responsible for the cost of all parts required for the repair except for the defective Covered Part and-any
-Covered Part damaged by a Warrantable Failure of the defective Covered Part.
Owner is responsible for the cost of lubricating oil, antifreeze, filter elements and other maintenance items replaced
during the repair.
During The Base Engine and Extended Major Components Warranties
Owner is responsible for the operation and maintenahce of the Engine as specified in the applicable Cummins
Operation and Maintenance Manual. Owner is also responsible for providing proof that all'recommended maintenance
has been' performed.
Before the expiration of the applicable warranty, Owner must notify a Cummins distributor, authorized dealer or other'
repair location approved by Cummins of any Warrantable.Failure and make the Engine avaiiaple for repair by such
facility. Except for Engines disabled by a Warrantable Failure during the first year from the date of delivery of the Engine
to the first user, Owner must also deliver the.Engine to the repair facility. Locations in the United States and Canada
are listed in the Cummins United States and Canada Sales and Service Directory.
Owner is responsible for communication expenses, meals, lodging and similar costs incurred as a result of a Warrantable Failure.
.
.
83.9 and 85.9 Series Engines
Section W Warranty
-
.
Owner is responsible for non-Engine repairs and for “downtime” expenses, passenger delays, fines, all applicable
taxes, all business costs and other losses resulting from a Warrantable Failure.
Limitations
. .
Cummins is not responsible for failures or damage resulting from what Cummins determines to be abuse or neglect,
including but n d limited to: operation without adequate coolants or lubricants; overfueling; overspeeding: lack of
maintenance of lubricating, cooling or intake systems: improper storage, starting, warm-up, run-in or shutdown
practices; unauthorized modifications of the Engine. Cummins is.also not responsible for failures caused by incorrect
oil or fuel or by water, dirt or other contaminants in the fuel or oil.
This warranty does not apply to accessories which bear the name of another company. This category includes, but is
not limited to:,alternators, starters, fans, air conditioning compressors, clutches, filters, transmissions, torque-converters, vacuum pumps, power steering pumps and air compressors. Cummins branded alternators and starters are .
covered forthe first two yearsfrom the dateof deliveryof the Enginetothefirst user, or theexpirationof the Base Engine
Warranty, whichever occurs first.
Excessive oil consumption for B series Engines is covered for the duration of the coverage or 100,000 miles (160,935
kilometers) or MOO hours from the date of delivery of the Engine to the first user, whichever of the three occurs first.
Before a claim for excessive oil consumptionwill be considered, Owner must submit adequate documentatiqn to show
that consumption exceeds Cummins published standards.
. .
Failures of belts and hoses supplied by Cummins are not covered beyond the first year from the date of delivery of the
Engine to the first user or the expiration of the applicable Base Warranty, whichever occurs first.
Parts used to repair~aWarrantable Faiiure’may be new Cummins parts, Cummins approved rebuilt parts, or repaired
parts. Cummins is’not responsible for failures resulting from the use of parts, not approved by Cummins.
A new Cummins or Cummins approved rebuilt part used to repair a Warrantable
Failure assumes the identity of the
’
part it replaced and is entitled to the remaining coverage hereunder.
CUMMINS DOES NOT COVER WEAR OR WEAROIJT OF COVERED PARTS.
Curnrnins Warranty
Page W-34
83.9 and 65.9 Series Engines
Section W Warranty
-
CUMMINS IS NOT RESPONSIBLE FOR INCIDENTAL OR CONSEQUENTIAL DAMAGES.
THESE WARRANTIES AND THE EMISSION WARRANTY SET FORTH HEREINAFTER ARE THE SOLE WARRANTIES MADE BY CUMMINS IN1 REGARD TO THESE ENGINES. CUMMINS MAKES NO OTHER WARRANTIES,
EXPRESS OR IMPLIED, OR OF MERCHANTABILITY OR FITNESS FOR A PARTICULAR PURPOSE.
This warranty gives you specific legal rights, and you may also have other rights which vary from state to state.
Emission Warranty
Products Warranted
This emission warranty applies to new Engines marketed by Cummins that are used in the United States* in vehicles
designed for transporting persons or property on a street or highway. This warranty applies to Engines delivered to the
ultimate purchaser on or after January 1, 1996.
Coverage
Cummjns warrants to the ultimate purchaser and each subsequent purchaser that the: Engine is designed, built and
dquipped so as to conform at;the time of sale by Cummins with all U S Federal emission regulations applioable at the
time of manufacture and that it is free from defects in material oi factory workmanship which would cause it not to meet
these regulations within the longer of the following periods: (A) Five years or 100,000 miles (160,935 kilometers) of
operation, whichever occurs first, as measured from the date of delive,ryof the Engine to the ultimate purchaser, or
@),The Base Engine Warranty:
If the vehicle in which the Engine is installed is registered in the state of California, a separate California Emission
Warranty also applies.
Limitations
Failures, other than those resulting from defer& in material or factory workmanship, are not covered by this warranty.
Cutnmins Is not responsible for failures or damage resulting from what Cummins determines to be abuseborneglect,
including, but not limited-to: operation without adequate coolants or lubricants; overfueling; overspeeding; lack of
B3.9 and 85.9 Series Englnes
Section W Warranty
-
Cummins Warranty
Page W-35
maintenance of lubricating, cooling or intake systems; improper storage, starting, warm-up, run-in or shutdown
practices; unauthorized modifications of the Engine. Cummins is also not responsible for failures caused by incorrect
oil or fuel of by water, dirt or other contaminants in the fuel or oil.
Cummins is not responsible for non-Engine repairs, "downtime" expenses, cargo damage, fines, ail applicable taxes,
all business costs or other losses resulting from a Warrantable Failure.
CUMMINS IS NOT RESPONSIBLE FOR INCIDENTAL OR CONSEQUENTIAL DAMAGES.
* A vehicle used to transport students to and from school and school-related events. Vehicle must have warnlng lights
and the words "SCHOOL BUS" written on the front and rear roof caps.
* * IncludesAmerican Samoa, the Commonwealth of Northern Mariana Islands, Guam, Puerto Rico, and the U.S. Virgin
Islands.
California Emission Control System Warranty, On-Highway
Page W-36
83.9 and 85.9 Serles Engines
California Emission Contro'l System Warranty, On-Highway
..
Products Warranted:
;'
-
Section p Warranty
d
l
~
,
This Emission ControlSystem Warranty applies to heavy duty diesel engines (hereafter, engines) certified with the
California Air Resources Board beginning with the year 1991, marketed by Cummins, and registered in California for
use in automotive on-highway applications.
Your Warranty Rights and Obligatisns
The California Aii R e s o u ~ e sBoaid and Cummins Engine Company, inc,, are pleased to explain the emission control
system warranty 00 your 1992 and subseque,nt model year heavy duty diesel engine. In Californla,,new motor vehicle
engines must be designed, built and equipped to meet the State's stdngent anti-smog standards. Cummins must
warrant the emission control system on your heavy duty diesel engine for the,periodsof time listed below providedthere
has been no abuse, neglect or improper maintenance of your heavy duty diesel engine.
Your emission control system may include parts such as the fuel injection system and engine electronic control module.
Also included may be hoses, connectors and other emission,.related assemblies..
If an emission-related part on your engine is found t6 have a defect in' material or factory workmanship (Warrantable
Condition), the part will be repaired or replaced by.Cummins. This is your emission control system defects warranty.
Manufacturer's Warranty Coverage
This warranty coverage is provided fdr five years or 160,935 km [lOO,OOO miles] or 3,000 hours of engine operation,
whichever first occurs from the date of delivery of the engine to the first user.
83.9 and 85.9 Series Engines
Section W Warranty
-
California Emission Control System Warranty, On-Highway
Page W-37
Owner’s Warranty Responsibilities
As the engine owner, you are responsible for the performance of the required maintenance listed in your Cummins
Operation and Maintenance Manual. Cummins recommendsthat you retain all receipts covering maintenance on your
endne, but Cummins cannot denv warrantv solelv for the lack of receiots or for vour failure to substantiate the
pei?ormance of all scheduled maiitenance. .
You are responsible for presentingyour engine to a Cummins dealer as soon as a problem exists. The warranty repairs
should be completed in a reasonable amount of time, not to exceed 30 days.
As the engine owner, you should also be aware that Cummins may deny you warranty coverage if your engine or a part
has failed due to abuse, neglect, improper maintenance or unapproved modifications.
If you have any questions regarding your warranty rights and responsibilities, you should contact Cummins Customer
Relatipn Department at 1-800-343-7357 or the California Air Resources Board at 9528 Telstar Avenue, El Monte, CA
91731.
A,warranted part which is scheduled for replacement as required maintenance is warranted up to the first scheduled
replacement point.
Prior to the expiration of the applicable warranty, Owner must give noiice of any warranted emission control failure to
a Cummins distributor, authorized dealer or other repair location approved by Cummins and deliver the engine to such
facility for repair. Repair locations are listed in Cummins United States and Canada Service Directoty.
Owner is responsible for incidental costs such as: communication expenses, meals, lodging incurred by Owner or
employees of Owner as a result of a Warrantable Conditidn.
.
Owner is responsible for “downtime” expenses, cargo damage, fines, all applicab!e taxes, all business costs, and other
losses resulting from a Warrantable Condition.
CUMMINS IS NOT RESPONSIBLE FOR OTHER INCIDENTAL OR CONSEQUENTIAL DAMAGES. INCIDENTAL OR
CONSEQUENTIAL DAMAGES INCLUDEBUT ARE NOT LIMITEDTO FINES, THEFT, VANDALISM OR COLLISIONS.
I
California Emission Control System Warranty, On-Highway
Page W-38
-
83.9 and 85.9 Series Engines
Section W Warranty
Replacement Parts
Cummins recompends that any service parts used for maintenance, repair or replaiement of emission control systems
be new, genuine Cummins or Cummlns approved rebuilt parts and assemblies, aria that the engine be serviced by a
Cummins distributor, authorized dealer or the repair location approved by Cummins. The owner may elect to have
maintenance, replacement or repair of the emission control parts performed by a facility other than a Cummins
distributor, an authorized dealer or a repair location approved by Cummins, and may elect to use parts other than new
genuine Cummins or Cummins approved rebuilt parts and assemblies for slich Maintenance, replacement or repair;
however, thecostof suchserviceor partsandsubskquentfailures resuitingfromsuchserviceorpartswiii not becovered
under this emissi;on controLsystem warranty, :exxqeptfor Emergency Repairs as desciibed below.
.Cummins Responsibilities
,
,
The warranty coverage begins when the engine is delivered'to the ultimate purchaser.
Repairs and service will be performed by any Cummins distributor, authorized dealer or other repair location approved
by Cummins using new, genuine Cummins or Cummins approved rebuilt parts and assemblies. Cummins will repair
any of the emfdsion cpntrol par@found by Cumminsto bse defectivewithoutcharge foipartsor labor (including diagnosis
which results in determination.that there has been a failure of a warranted emission control part).
Emergency Repairs
In the case of an emergency where a Cummins distributor, authorized dealer, or other repair location approved by
Cummins is not available, repairs may be performed by any available repair location or by any individual using any
replacement parts. A part not being available within 30 days or a repair not being complete within 30 days cqnstitutes
an emergency. Cumminswill reimburse the Owner for expenses (including diagnosis), not to exceed the manufacturer's
suggested retail price for all warranted parts replaced and labor charges based on the manufacturer's recommended
time allowance for the warranty repair and the geographically appropriate hourly labor rate. Replaced parts and paid
invoices must be presented at a Cummins authorized repair facility as a condition of reimbursement for emergency
repairs not performed by a Cummins distributor. authorized dealer. or other repair location approved by Cummins.
California Emisston Control System Warranty, On-Highway
Page W-30
B3.9 and 85.9 Series Engines
Section W Warranty
-
Warranty Limitations
Cummins is not responsible for failures o?damage resulting from what Cummins determines to be abuse or neglect,
including, but not limited to: operation without adequate coolants or lubricants: overfueling: overspeeding; lack of
maintenance of cooling, lubricating or intake systems: improper storage, starting, warm-up, run-in or shutdown
practices: unauthorized modifications to the engine. Cummins is also not responsible for failures caused by incorrect
.
.
oil or fuel or by water, dirt or other contaminants in the fuel or oil.
Cummini is not responsible for failures resulting' from improper repair or the use of parts which are not genuine
Cummins or Cummins approved parts.
1
Cummins is not responsible for the material and labor'costsof emission control parts and assemblies replaced during
Scheduled Maintenance of the engine as specified in Cummins Operation and Maintenance Manuals.
THIS WARRANTY. TOGETHER WITH THE EXPRESSCOMMERCIAL WARRANTIES ARETHE SOLE WARRANTIES
MADE BY CUMMINS. THERE ARE NO OTHER WARRANTIES, EXPRESS OR IMPLIED, OR OF MERCHANTABILITY
OR FITNESS FOR A PARTICULAR PURPOSE.
.California Emission Control System Warranty, On-Highway
Page W-40
.
NOTES
83.9 and 85.9 Series Engines
-
Section W Warranty
Index
Page 1
M o u t the Manual................................................................
:.... +2
General informatin .........:.......:..............................................
i-2
i-8
Acronyms and Abbreviations ...................................................
............................... ................................................... A-78
........................................................................... A-76
.................................................. .............................. A-76
.......................................... ...... .... 4-11
.............................................................. 4-11
7-9
............................................................................... 7-9
.................................................................... ..... A-75
.................................................................................. A-75
............................................................................... A-75
...........................................................
A-81
................................................................................... A-82
............................ .... A-83
....................
.................
.............. A-85
st ..................;.............................
A-85
Vent ..................................
...:..................... ... ..........
A-84
................ 4-7
Air Intake Piping.....................................................
Inspect for Reuse, ...................................................................
4-7
A-74
Air Intake System - Overview ...............................................
General Information .............................................................
A-74
Install
Preparatory
Remove
Alr Cleaner Restriction
; _.....
Maintenance Check
Air Compressor.......................................................................
inspect ...:
Air Crossover
Install
Remove
:.....
Air Intake ManHold
Clean
Install ..................................................
:
Preparatory
Pressure Test
;
s
a
All Bus Categories WorldMde (Except US./
Buses) .................................
Diesel
........... w.7
................................................
......,.. A-I12
................................................................................. A-113
....................... :............... ............................ :......... A-112
Install
Remove
G
Arctic Operation..........................................
Preparatory.......................................
...................W-25
...................&4
.......I...............................
A-5
Remo
.. A 4
BllSB E
.. w.1
California Emission Control System Warranty On-Highway .....
WJ6
Capscrew Markings and Torque Values ...............................
V-32
Capscrew Markngs and Torque Values . Metric.................. V-33
Capscrew Markng~and Torque Values . U.S. CLSlOmary .... V.34
General Information................................................
V-32
Charge-Air Cooler (CAC) ......................................................
4-8
Clean.....................................................................................
4-9
Inspect for Reuse...................................................................
4-8
Leak Test
A-80
Pressure Test
I
A-81
Cold Start Timing Advance System (KSB) Temperature
.
.............................................................................
........................................
..............................
..... ..................
~
.................................................................................
.................................................. ........................
...................................................
.................. .............
Shullers
Winterfronts
:
Cold Weather Stailing Aids
Ether Starting Aids ..............:
i
Grid Heater .......
With Mechanical
Component Manuiaoturers’ Addresses
Air Compressors
Air Cyiiiders
:......................................
Air Heaters..............................................................................
Air Slarting Motors .................................................................
..................
....................................................
...................................
1-9
1-9
1-10
M-1
M-1
M-1
....................... ........... A;L,
...........
........................ :L..... ,....",...........
Clulche8
:
Coolant Heaters
Cwlani Level Switches
i..~,,
.....
................'...................i...........dlhll.....
4.,1(../...
4'
.
.
,
.
,
.................................................... .......is.,.....<..
............................................
.......... ,dd...4 ....
...............;..................~.,
"~,
.......
...,.....i,.' ., ,
Fill
Install
Praparatoly
Remove..................
M-3
M-3
M-3
....................,..................
5
...................................
Clean .......................................
s.-
....,......i.......
A41
-.
&iz
7-2
................. .... ....;....
..
76i
8
$/../
..I/...
L
:...gi
...................,........,,....,.,,............
51
A-3
.
.
.
.
.
.
.
.
.
.
.
.
.
................
...>.....................%
............../.,.+ ................... A-3
............................................. A 3
I
..i.;..&...i...
tI
Oil Healers.............
,
~
General Information
Drive Bell, COOllW . F a
...........
'A-14
i.2
..............A 2 3
............................................................. A-31
install ..................................................................................
A.34
.
.
................................................................
........
Install ................... :
Remove..................................................................................
Flow Diagram, Air Inlake System ............,.... ;..............
General lnformati
Flow Diagram, Co
General Informati
Flow Diagram, Co
General Informati
Flow Diagram, Exha
General Information.......
~
Remove .................
A-6
A-5
014
General Information................................
:..............................
0-2
Flow Diagram, Lubricating Oil System
:
D.6
General Information
DE
Fuel Filter Adapter
:
: A-22
Preparatory ..........................................................................
A-22
Remove ...............................................................................
A-23
Fuel Filter (Spin-On Vpe).
........... .............
...............................................................
.................................. ............................
.,..............................................
Install
................ :...............................................
.......;.
Fuel Lift Pump
A-51
;............;.... A 4 3 .
Fuel Recommendatlons and Specifications.........................
Fuel Recommendatlons .......................................................
Fuel Shutoff Valve..
Clean................
V-20
Remove ................................................................................
Vent
i
Fuel System -Overview
General Information
:
i...
FueLWater Separator
Maintenance Check .....,:........................
i...............................
GeneraPSafety Instructions
:....................
Important Safety Notice
How to Use the Manual
General Information
lilustrations ..
General Info
..............................
Injector .......................
:.
;.....................................
.................
:......
Preparatoly
Remove
A.18
5-4
A- I7
A-17
......................................................................................
........................................................
............... .........................................
V.20 -
.............................................................. 3-2
32
......
................ i-3
...
................................
................ i-5
.....................................
...................................................
..........................................................................
................................................................................
A-37
A-37
A-36
A36
I
Overhead Set
...
.,.....
Clean.. .,
I...
Gsnerai information,_.._...
I..._l...._....,..l..l._.I,,,,,.,.. i...,...,...llll
V-24
.........,......,
.....I............^..^*1.
i
I,(.
3.3
3.3
Distributors and Branches .United States
.........
I.
,...,........................ 5.4
..................................
.'l.l
1.
s-2
Service Literature
Ordetina
L-2
.
" Location .....................................
General Information
~..,...............L-2
Spsclfloatlons
:
lb.l.l.l
V-1
Air intake System .......................................................
V-10 , E-19
~~
~
...........................................
............................
Maintenance Guideline
General informalion
,._,
l... 2-1
/.__i
....I..
Maintenance Record Form...............................
General Information
Maintenance Schedule...................................
........................
General Information ................................................................
2-10
2-3
2-3
....................................
.......... V-17 , E-23
Starting Motor ...............................................................
Install .................................................................................
A-110
All1
Index
Page 5
Remove...............................................................................
A-110
. S~ing.RrocedureAAerExtended.Shuulawn.or.~ll.~an~
1.13
General Information .............................................................
1.13
Symbols ...................................................................................
General Information .................................................................
S y t e m Diagrams O ~ r v l ..................................................
~w
General Information
-
1-4
1-4
0-1
0-1
..............................................................
.
.......................................................
General Information
2-2 A-1
Troubleshooting Procedures and Techniques......................
TS-l
General Information...........................................................
t5.1
Troubleshooting Symptoms Charts ................................
t5-2
Allernator Not Cnarg'ng or Insdlic'vnl Charging ....................
t5.3
Coolant Contsminallon.........................................
;
................ t5-4
....................................................
t5-5
&ant Temperature Above Normal......... .....................
t5-7
Coolant TemperatureJs Below Normal
t5-6
Engine Difficult to Start or Will Not Start (Exhaust Smoke) TS-10
Engine.Oifficult.!o
r l.Dlat.
S.E
m
a.l(e
T
2o.)S
l..
Engine Noise Excessive......................................................
TS-14
Engine Power Output Low...................................................
1.5-15
Enaine
t5-19
., Runs Ravah at Idle. Warm Enaine ..........................
Engine Runs Rough or Misfires
Engine Speed Surges at Low or H
Engine Starts But Will Not Keep R
Engine Vibration Excessive
Engine Will Not Crank or Cranks
Engine Will Not Reach Rated Sp
t5-29
Engine Will Not Shut OM.....................................................
Exhaust Smoke Excessive Under,Load...............................
t5-30
Fuel Knock .........................................................................
t5.32
Fuel or Lubricating Oil Leaking From Exhaust Manifold
t5-33
......
..................................
..
~
. . . ....
~~
~
~
~
~~-
....
..........
......
Lubricating Oil Contamin
Test .............................................................................
A-96
United States and Canada Dlesnl Englne School Bus ........ W-30
Vibration Damper ..................................................................
7-8
Inspect...................................................................................
7-53
Water Pump.............................................................................
A-7
Clean ................................
:
A-9
A-10
Install
A-7
Preparatory
Remove :
A-8
...................................................
....................................................................................
............................................................................
.................................................................................
UNITED STATES
BUSINESS REPLY MAIL
-POSTAGE W LL BE PAID BY ADDRESSEE-
CUMMINS ENGINE COMPANY, INC.
MAIL CODE 41302
BOX 3005
COLUMBUS, IN 47202-3005
11l11111111111111111llllllllllllllllllll,,,l,ll,,,ll
Do not use this form to order additional literature. Refer to
Section L Service Literature for literature information.
-
Literature Survey Form
We are alaays open to an suggestions or recommendationsthat will aid in improving oJr manuals. Use
In's postage paid SUN^ k r m to evaluate this manual. Please check the appropr:ate response and Lse
the space provided below to list any addit'onal comments:
No
Yes
Is the needed information easy to locate in the manual?
Is the information easy to read?
Is
R
a w to understand?
.the
. .information
. ..
._.,
.
DOCS !he information sufllciently cover the subject?
Are subjects in the Index specific enoLgh to locate in the man)
Are the 'mportant PO nts suliicienlly emphasized?
Arc :he 'Iiustra:ions oasl to JndEfStand?
Does the text support !he operaton being 'Il~strated?
Do you use the Table of Contents and Sect on Contents?
Do YOJ use the .noex?
~~
~
~~
Please provide comments on any response(s) marked "No" in this survey and on any suggestions you
feel could improve our manuals.
Diesel engine exhau
to the State of Califi
other reproductive h
Name:
Company:
Street Address:
City:
Country:
StatelProvince:
Zip/Postal Code:
Do not use this form to order additional literature. Refer to
Section L Service Literature for literature information.
-
Diesel engine exhaust and some of its constituents are known
to the State of California to cause cancer, birth defects, and
other reproductive harm.
Cummins Engine Company, Inc.
Box 3005
Columbus, Indiana. U.S.A., 47202
Registered Office
Cu.m-mi.n$..Engine Company, Ltd.
46-50 Coombe Road
New Malden,
Surrey KT3 4QL,
Cummins Customer Assistance Center
1-800-DIESELS (I -800-343-7357)
APPLICABLE ONLY IN U.S.A. AND CANADA
’
i
I
f
-Bulletin No. 3810205-14
Printed in U.S.A. 3/00
I
3
P86