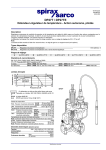
1
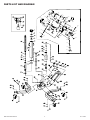
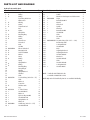
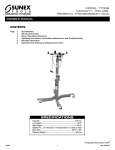
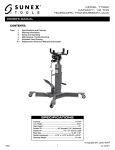
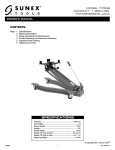
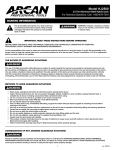
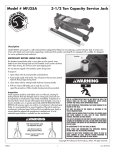
Model ARTJ1000
1,000 lb. Transmission Jack
For Technical Questions, Call: 1-800-879-7316
WARNING INFORMATION
This is the safety alert symbol. It is used to alert you
to potential personal injury hazards. Obey all safety
messages that follow this symbol to avoid possible
injury or death.
WARNING
WARNING: Indicates a hazardous situation
which, if not avoided, could result in death
or serious injury.
IMPORTANT: READ THESE INSTRUCTIONS BEFORE OPERATING
BEFORE USING THIS DEVICE, READ THIS MANUAL COMPLETELY AND THOROUGHLY, UNDERSTAND ITS OPERATING
PROCEDURES, SAFETY WARNINGS AND MAINTENANCE REQUIREMENTS.
It is the responsibility of the owner to make sure all personnel read this manual prior to using the device. It is also the responsibility of the
device owner to keep this manual intact and in a convenient location for all to see and read. Contact PowerStation, LLC for a replacement
label if your jack's label is not readable.
THE NATURE OF HAZARDOUS SITUATIONS
WARNING
The use of Portable Automotive Lifting Devices are subject to certain hazards that cannot be prevented by mechanical means, but only
by the exercise of intelligence, care, and common sense. It is essential to have personnel involved in the use and operation of the device
who are careful, competent, trained, and qualified in the safe operation of the device and its proper use when servicing motor vehicles
and their components. Examples of hazards are dropping, tipping or slipping of loads caused primarily by improperly securing loads,
overloading, off-centered loads, use on other than hard level surfaces, and using equipment for a purpose for which it was not intended.
METHODS TO AVOID HAZARDOUS SITUATIONS
WARNING
• Read, study, understand and follow all instructions before operating this device.
• Inspect the jack before each use. Do not use jack if damaged, altered, modified, in poor condition, leaking hydraulic fluid, or
unstable due to loose or missing components. Make corrections before using.
• Consult the vehicle manufacturer for the transmission's center of balance.
• Secure the transmission to the jack's saddle with the anchorage restraint system provided before raising or lowering the
transmission.
• Center load on saddle. Be sure setup is stable before working on vehicle.
• Support the engine with a stand before unbolting the transmission from the engine.
• Wear eye protection that meets ANSI Z87.1 and OSHA standards.
• Do not use jack beyond its rated capacity.
• Use only on a hard level surface.
• Adequately support the vehicle before starting repairs.
• Use of this product is limited to the removal, installation and transportation in the lowered position, of transmissions, transfer cases and transaxles.
• Do not use any adapters unless approved or supplied by Arcan.
• Always lower the jack slowly and carefully.
• This product contains one or more chemicals known to the State of California to cause cancer and birth defects or other
reproductive harm. Wash hands thoroughly after handling.
• Failure to heed these warnings may result in serious or fatal personal injury and/or property damage.
CONSEQUENCES OF NOT AVOIDING HAZARDOUS SITUATIONS
WARNING
Failure to read this manual completely and thoroughly, failure to understand its OPERATING INSTRUCTIONS, SAFETY WARNINGS,
MAINTENANCE INSTRUCTIONS and comply with them, and failure to comply with the METHODS TO AVOID HAZARDOUS SITUATIONS
could cause accidents resulting in serious or fatal personal injury and/or property damage.
ARCAN is a registered trademark of Powerstation LLC.
All rights reserved.
1
rev. 111413
INSPECTION AND SETUP
This is the safety alert symbol used for the INSPECTION AND SETUP section of this manual to alert you to potential personal injury hazards. Obey all instructions to avoid possible injury.
Visual inspection should be made before each use of the transmission jack, checking for leaking hydraulic fluid and damaged, loose or missing
parts. Any jack which appears to be damaged in any way, found to be badly worn or operating abnormally MUST BE REMOVED FROM SERVICE.
If the jack is accidentally subjected to an abnormal load or shock, it must be inspected by a manufacturer's authorized repair facility immediately.
It is recommended that an annual inspection of the jack be made by a manufacturer's authorized repair facility and that any defective parts,
decals, or warning labels be replaced with manufacturer's specified parts. A list of authorized repair facilities is available from the manufacturer.
Sometimes air gets trapped in the jack causing the jack ram to extend in sporadic increments instead of one smooth extension.
PURGING AIR FROM THE MANUAL PUMP SYSTEM
a.
b.
c.
d.
Open the release valve by turning the release valve knob in a counterclockwise direction two full turns from it's closed position.
Pump the foot pedal ten full strokes.
Close the release valve by turning the release valve knob in a clockwise direction until tight.
Pump the jack until the ram is extended to maximum height. If the condition remains, repeat steps "a" through "d" until air is purged
from system.
OPERATING INSTRUCTIONS
This is the safety alert symbol used for the OPERATING INSTRUCTIONS section of this manual to alert you to potential personal injury hazards. Obey all instructions to avoid possible injury or death.
1. Lift the vehicle to the desired work height and support the vehicle in accordance with the lift manufacturer's recommended support
procedure and all the instructions and warnings in this manual.
2. Use an under hoist stand rated greater than the weight of the engine to support the engine before unbolting the transmission from the
engine or bolting the transmission to the engine.
3. Position the transmission jack directly under the transmission. Depress the foot pedal up and down in order to raise the saddle to a height
very close to the center of balance point of the transmission oil pan but do not touch the transmission.
4. Adjust the fingers #S-4 on the saddle so that the bent up section of the fingers will fit in the mounting flange around the perimeter of
the transmission oil pan. Once the fingers are properly positioned, tighten the wing nuts that secure the fingers to the saddle. Slowly
and gently pump the jack so the connection is made, and then secure the transmission to the jack's saddle with the safety chain #S-1
provided. Sometimes it is necessary to turn the fore and aft and side to side tilt knobs so the saddle is in the proper alignment with the
transmission pan before securing the load to the saddle.
5. Make sure the safety chain #S-1 is very tight when securing the transmission to the saddle and before raising or lowering the transmission.
6. Remove the transmission from the engine according to instructions in the vehicle service manual.
7. Once the transmission has been disconnected from the engine, very slowly turn the release knob in a counterclockwise direction to make
sure the jack's saddle and transmission do not hang up on any under-car components, wiring, fuel lines, etc. Continue to lower the jack
all the way down.
8. When installing a transmission, follow the above instructions but in the applicable order and according to the vehicle
manufacturer's installation procedure.
PREVENTATIVE MAINTENANCE
This is the safety alert symbol used for the PREVENTATIVE MAINTENANCE section of this manual to alert you to
potential personal injury hazards. Obey all instructions to avoid possible injury or death.
1. Always store the transmission jack in a well protected area where it will not be exposed to inclement weather, corrosive vapors, abrasive
dust, or any other harmful elements. The jack must be cleaned of water, snow, sand or grit before using.
2. Lubricate moving parts, excluding the hydraulic components, monthly with a general purpose grease. Periodic lubrication should be
subject to a maintenance schedule based on frequency of use. A weekly lubrication inspection is suggested. Premature wearing of
components due to lack of or inadequate lubrication is not eligible for warranty consideration.
3. Inspect the jack before each use. Do not use the jack if any component is cracked, broken, bent, shows sign of damage or leaks
hydraulic fluid. Do not use the jack if it has loose or missing hardware or components or is modified in any way. Take corrective action
before using the jack again. Premature wearing or damage to components caused by loose or missing hardware is not eligible for
warranty consideration.
ARTJ1000 User Manual
2
rev. 111413
PREVENTATIVE MAINTENANCE (CONT)
4. It should not be necessary to refill or top off the reservoir with hydraulic fluid unless there is an external leak. An external leak requires
immediate repair which must be performed in a dirt-free environment by qualified hydraulic repair personnel who are familiar with this
equipment.
IMPORTANT: In order to prevent seal damage and jack failure, never use alcohol, hydraulic brake fluid or transmission oil in the jack.
Use Chevron Hydraulic Oil AW 150 32 or its equivalent Unocal Unax AW150. Any jack found to be defective as a result of foreign
contaminants in the hydraulic system is not eligible for warranty consideration.
5. Every jack owner is responsible for keeping the jack labels clean and readable. Use a mild soap solution to wash external
surfaces of the jack but not any moving hydraulic components. Contact an authorized service center for a replacement label if your
labels become unreadable.
6. Do not attempt to make any hydraulic repairs unless you are a qualified hydraulic repair person that is familiar with this
equipment. Repairs must be performed by an authorized service center.
TROUBLESHOOTING
PROBLEM
ACTION
1. Unit will not lift load.
Purge air from hydraulic system by following procedure
under "SETUP"
2. Unit will not sustain load or feels “spongy” under load.
Purge air from hydraulic system as above.
3. Unit will not lift to full height.
Purge air from hydraulic system as above.
4. Unit still does not operate.
Contact an authorized service center from enclosed list.
SPECIFICATIONS
Base dimensions: Jack Closed Height:
Jack Lift Distance: Jack Raised Height:
Weight:
Degree of Saddle Tilt:
36" x 42"
43-5/8"
28-3/8"
71"
134 lbs
23˚ Forward | 16˚ Backward
7˚ Left | 7˚ Right
LIMITED WARRANTY
POWERSTATION, LLC WARRANTS TO ITS CUSTOMERS THAT THE COMPANY’S POWERSTATION, LLC
BRANDED PRODUCTS ARE FREE FROM DEFECTS IN WORKMANSHIP AND MATERIALS.
PowerStation, LLC will repair or replace its PowerStation, LLC branded products which fail to give satisfactory service due to
defective workmanship or materials, based upon the terms and conditions of the following described warranty plans attributed to that
specific product. This product carries a ONE-YEAR warranty. During this warranty period, PowerStation, LLC will repair or replace at our
option any part or unit which proves to be defective in material or workmanship.
Other important warranty information:
This warranty does not cover damage to equipment or tools arising from alteration, abuse, misuse, damage and does not cover any repairs
or replacement made by anyone other than PowerStation, LLC.The foregoing obligation is PowerStation, LLCs’ sole liability under this or
any implied warranty and under no circumstances shall we be liable for any incidental or consequential damages.
Note: Some states do not allow the exclusion or limitation of incidental or consequential damages, so the above limitation or
exclusion may not apply to you. If you have any questions about warranty service, please contact PowerStation, LLC. This warranty gives
you specific legal rights and you may also have other rights which vary from state to state.
1-800-879-7316
Monday - Friday 8:30am to 5:30pm EST
P.O. Box 1203
Travelers Rest, South Carolina 29690.
ARTJ1000 User Manual
3
rev. 111413
PARTS LIST AND DIAGRAM
S-4
S-1
S-7
S-8
S-3
S-27
S-17
S-9
S-2
S-23
S-17
S-16
S-10
S-16
S-4
S-25
S-12
S-9
S-6
S-16
S-20
S-26
S-14
S-9
S-9
S-18
S-24
S-23
S-11
S-5
S-15
S-4
S-11
S-13
S-23
S-13
S-21
S-28
S-14
S-19
S-23
S-22
S-27
S-16
S-15
S-18
S-19
ARTJ1000 User Manual
4
rev. 111413
PARTS LIST AND DIAGRAM
Hydraulic Assembly Unit
Index Part No.
Description
1
Cap
2
O-Ring 3
O-Ring
4
Positioning Guide Nut
5
Oil Reservior
6
Oil Plug
7
Gasket
8
Trapeziform Seal
9
Base
10
Gasket
11
Oil Cylinder
12
Retaining Ring
13
O-Ring
14
Gasket
15
Piston Sleeve
16
Piston Rod
17
Knob
18
Hex Nut
19 RS6645RRA
Release Valve Rod
20
Retangular Seal
21
Steel Ball 6.0000
22
Washer
23
Pump
24
O-Ring
25
Spring
26
Spring Washer
27
O-Ring
28
Retaining Ring
29
Pump Plunger
30
Nut M8
31
Spring Washer 8
32
Link Rod
33
Shaft
34 RS6645FPA
Foot Pedal Assy. (Incl. #30 — 37) 35
Shaft
36
Washer 8
37
Cotton Pin
38
Anti-dust tube
39
Leg
40 RSSC301A
3" Swivel Caster
41 +
Hex Bolt M8x25
42 +
Washer 8
43 +
Nylon Locking Nut M8
44 +
Hex Bolt M12x20 45 +
Spring Washer 12
46 +
Washer 12
47 RS6644WA
Saddle Assy. (Incl. #S1— S27)
48 +
Hex Bolt M10x20
*
*
*
*
*
*
*
*
*
*
*
*
*
*
*
*
ARTJ1000 User Manual
Q’ty Index Part No.
1
1
1
1
1
1
1
1
1
1
1
1
1
1
1
1
1
1
1
1
2
1
1
1
1
1
1
1
1
2
2
1
1
1
4
4
4
1
2
4
16
16
16
4
4
4
1
1
Description
Q’ty
S-1 + RS7700CH Chain
1
S-2
Saddle 1
S-3 +
Mushroom head square neck bolt M12x254
S-4RS664406WFinger
4
S-5 +
Butterfly Nut M12
4
S-6+
Washer
4
S-7 +
Chain hook
1
S-8+
Spindle
1
S-9 +
Washer 8
4
S-10 +
Butterfly Nut M8
1
S-11 +
Hex Nut M8
2
S-12
Shaft
1
S-13
Pin 4x28
4
S-14
Shaft
2
S-15 RS6644WASCR Screw Rod Assy. (incl. # S15 — S19)
2
S-16
Ball Bearing 8100
4
S-17
Locking Nut M10
2
S-18
Hex Nut M14
2
S-19
Knob
2
S-20
Adjusting Bracket A
1
S-21
Adjusting Bracket B
1
S-22
Hex Bolt M10x20
1
S-23
Washer 12
4
S-24
Hex Bolt M12x95
1
S-25
Shaft
1
S-26
Hex Bolt M12x90
1
S-27
Locking Nut M12
2
S-28 +
Hex Bolt M8x25
1
NOTE: * Available in RS779502 Bolt Kit
+ Available in RS6645SK Seal Kit
NOTE: Only Index #’s identified by Part No. are available individually.
5
rev. 111413