1
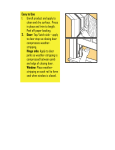
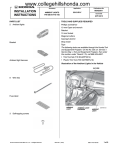
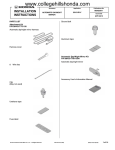
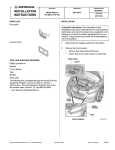
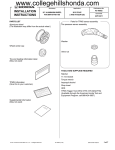
INSTALLATION
INSTRUCTIONS
PARTS LIST
Accessory
Application
DOOR VISORS
P/N 08R04-T7S-100
2016 HR-V
Publications No.
VERSION 1
Issue Date
APR 2015
8
Clips
Left front door visor
TOOLS AND SUPPLIES REQUIRED
Right front door visor
Left rear door visor
Right rear door visor
4 Brackets A
(Identification mark: T7AA)
Isopropyl alcohol
Shop towel
Masking tape
Ruler
Soft towel
INSTALLATION
Customer Information: The information in this
installation instruction is intended for use only by skilled
technicians who have the proper tools, equipment, and
training to correctly and safely add equipment to your
vehicle. These procedures should not be attempted by
“do-it-yourselfers.”
NOTE:
• Visors may not be legal in all states. Please check the
laws of your state.
• These instructions show the left door visors being
installed. The same procedure applies to installing the
right door visors.
• Be careful not to damage the paint finish and glass run
channels when installing the door visors.
• Handle the door visors with care. They are not
designed to absorb shock or impact.
• This kit should be installed only if the ambient air
temperature is 15°C (60°F) or above.
• To allow the adhesive to cure, do not wash the vehicle
for 24 hours. Please advise your customer.
4 Brackets B
(Identification mark: T7AB)
© 2015 American Honda Motor Co., Inc. – All Rights Reserved.
AII01797-20 (1504)
08R04-T7S-1000-90
1 of 7
Installing the Front Door Visors
1.
4.
Fully open the left front door glass.
GLASS RUN
CHANNEL
(Peel.)
Using isopropyl alcohol on a shop towel, thoroughly
clean the area where the left front door visor will
attach.
BRACKET A
SECTION
VIEW
DOOR SASH
Clean with
isopropyl alcohol.
BRACKET A
GLASS RUN
CHANNEL
BRACKET B
BRACKET B
SECTION
VIEW
DOOR
SASH
GLASS RUN
CHANNEL
GLASS RUN
CHANNEL
(Peel.)
LEFT FRONT DOOR
LEFT
FRONT
DOOR
5.
QC72503AK
Peel back the adhesive backings from each
adhesive tape, and tape the ends to the front surface
of the left front door visor with masking tape.
LEFT FRONT
DOOR VISOR
120 mm
(4.72 in.)
2 ADHESIVE BACKINGS
(Peel back and tape them
to the front surface of the
left front door visor.)
80 mm
(3.15 in.)
BRACKET B
BRACKET A
EDGE OF
DOOR SASH
EDGE OF
DOOR MIRROR BASE
2.
3.
QC72502BK
MASKING
TAPE
QC72504AK
Peel back the glass run channel in the areas shown.
Install the brackets A and B between the door sash
and the glass run channel at the measurements
shown. Seat the glass run channel properly around
the brackets.
2 of 7
AII01797-20 (1504)
© 2015 American Honda Motor Co., Inc. – All Rights Reserved.
6.
Align the clip holes in the left front door visor with the
bracket holes, and install the clip while pushing up
on each bracket. There should be no gap between
the bracket and the door sash.
NOTE: Be extremely careful when installing the
clips, they cannot be reinstalled after installation.
7.
Align the left front door visor to the position shown.
Align the door
visor with the
door sash.
DOOR SASH
2 mm
(0.08 in.)
LEFT FRONT
DOOR VISOR
(inside)
GLASS RUN
CHANNEL
SECTION BRACKET B
VIEW
BRACKET A
LEFT FRONT
DOOR VISOR
(inside)
REAR VIEW
SECTION
VIEW
Push
up.
BRACKET A
Push
up.
GLASS
RUN
CHANNEL
EDGE OF
DOOR
SASH
PROJECTION
LEFT FRONT
DOOR VISOR
PROJECTION
LEFT FRONT DOOR
2 CLIPS
LEFT FRONT DOOR
© 2015 American Honda Motor Co., Inc. – All Rights Reserved.
QD51515AK
QC72505AK
AII01797-20 (1504)
3 of 7
8.
While applying light pressure against the left front
door visor, carefully remove the adhesive backings
in the order shown. Use your finger to push up each
bracket so there is no gap between the bracket and
the door sash.
Installing the Rear Door Visors
10. Fully open the left rear door glass.
DOOR SASH
SECTION
VIEW
BRACKET A
GLASS RUN
CHANNEL
SECTION
VIEW
BRACKET B
GLASS RUN
CHANNEL
(Peel.)
2 ADHESIVE
BACKINGS
(Remove.)
BRACKET A
SECTION
VIEW
Push
up.
BRACKET B
BRACKET A
DOOR SASH
2
GLASS RUN
CHANNEL
1
Push
up.
SECTION
VIEW
GLASS
RUN
CHANNEL
LEFT
REAR
DOOR
BRACKET B
GLASS RUN
CHANNEL
LEFT FRONT DOOR
9.
QC72507AK
Using a soft towel, press and hold the left front door
visor against the door sash for 30 seconds.
120 mm
(4.72 in.)
80 mm
(3.15 in.)
BRACKET B
EDGE OF
DOOR SASH
BRACKET A
QC72508BK
EDGE OF
DOOR SASH
11. Peel back the glass run channel in the areas shown.
12. Install the brackets A and B between the door sash
and the glass run channel at the measurements
shown. Seat the glass run channel properly around
the brackets.
4 of 7
AII01797-20 (1504)
© 2015 American Honda Motor Co., Inc. – All Rights Reserved.
13. Using isopropyl alcohol on a shop towel, thoroughly
clean the area where the left rear door visor will
attach.
Clean with
isopropyl alcohol.
15. Align the clip holes in the left rear door visor with the
bracket holes, and install the clip while pushing up
on each bracket. There should be no gap between
the bracket and the door sash.
NOTE: Be extremely careful when installing the
clips, they cannot be reinstalled after installation.
BRACKET A
GLASS RUN
CHANNEL
LEFT REAR
DOOR VISOR
(inside)
SECTION
VIEW
BRACKET A
BRACKET B
LEFT REAR
DOOR VISOR
(inside)
SECTION
VIEW
LEFT REAR DOOR
Push
up.
LEFT REAR
DOOR VISOR
QC72509AK
14. Peel back the adhesive backings from each
adhesive tape, and tape the ends to the front surface
of the left rear door visor with masking tape.
PROJECTION
Push
up.
GLASS
RUN
CHANNEL
PROJECTION
BRACKET
B
LEFT REAR
DOOR VISOR
2 ADHESIVE
BACKINGS
(Peel back and tape them
to the front surface of the
left rear door visor.)
MASKING
TAPE
© 2015 American Honda Motor Co., Inc. – All Rights Reserved.
2 CLIPS
LEFT REAR DOOR
QC72511AK
QC72510AK
AII01797-20 (1504)
5 of 7
16. Align the left rear door visor to the position shown.
DOOR
SASH
EDGE OF
DOOR SASH
Align the door visor
with the door sash.
17. While applying light pressure against the left rear
door visor, carefully remove the adhesive backings
in the order shown. Use your finger to push up each
bracket so there is no gap between the bracket and
the door sash.
2 mm
(0.08 in.)
BRACKET B
GLASS RUN
CHANNEL
GLASS RUN
CHANNEL
SECTION
VIEW
SECTION
VIEW
BRACKET A
FRONT VIEW
Push
up.
Push
up.
2
1
LEFT REAR DOOR
QD51516AK
2 ADHESIVE
BACKINGS
(Remove.)
LEFT REAR DOOR
QC72513AK
18. Using a soft towel, press and hold the left rear door
visor against the door sash for 30 seconds.
19. Repeat steps 1 through 18 to install the door visors
on the right side of the vehicle.
6 of 7
AII01797-20 (1504)
© 2015 American Honda Motor Co., Inc. – All Rights Reserved.
CONFIRMATION AFTER INSTALLATION
Restoration and Learning Operations
1.
2.
Start the engine.
Using the power window switch, repeat opening and
close the window from half-open to fully closed 10
times to allow the glass run channel to wear in. (The
window should not bind.)
3. If necessary refer to the Service Manual to reset the
power window. (If the automatic closing/opening
does not function after the reset, reset again.)
4. If necessary refer to the Service Manual to carry out
“learning” of the power window. (If the automatic
closing/opening does not function after the learning,
carry out “learning” again.)
NOTE: The operations in the steps 3 and 4 should be
done to all power windows having the automatic closing/
opening function to allow for proper functioning of the
auto-reverse function after installing the door visors.
USE AND CARE
Clean the door visors with mild detergent and water. Do
not use organic solvents (thinners, benzine, alcohol, etc.)
or cleaners containing any abrasive material.
© 2015 American Honda Motor Co., Inc. – All Rights Reserved.
AII01797-20 (1504)
7 of 7