1
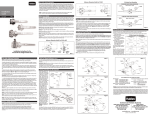
Reference Dimension Details for PR HCV
PR & PR Plus General Information
The Haldex Precision Response (PR & PR Plus) Height Control Valves (HCV) automatically add and
exhaust air from any air suspension to maintain a constant static design ride height. The PR line of
HCV’s are perfect for light to heavy duty applications and can be installed on rear air suspension, cab
air suspension and front air suspension applications. The PR and PR Plus line of HCV’s offer an array
of fittings, manifolds and integrated dump valve options. The PR and PR Plus HCV can be used in left
or right hand installations with short or long control arm configurations. The Haldex line of PR height
control valves have an industry leading deadzone, can operate in hot and cold environments and
decrease air consumption
Installation
Guide
L31231
PR Control Arm Orientation
NOTE: The Haldex PR & PR Plus HCV(s) can be interchanged with other brands of height control
valves. Be sure to read instructions carefully for proper replacement and installation.
1-08
Figure 2
Before You Get Started
IMPORTANT: The HCV and linkage are designed to maintain the vehicle ride height as loads increase
and decrease. Proper setup of the PR and PR Plus HCV(s) is critical to system performance. Prior to any
assembly or disassembly, please read all instructions. Should you feel unable to properly perform the
installation or adjustments of a Haldex PR or PR Plus HCV contact Haldex Technical Services or have a
certified mechanic install or adjust the valve.
CAUTION: Incorrect installation of any HCV and associated components can impair suspension and
vehicle performance. It is extremely important that the original equipment manufacturer’s specifications
of a one or two HCV system be followed when installing an air control system. Refer to vehicle and
suspension manufacturer’s instructions for recommended valve location and ride height.
DO NOT install a single height control valve of any type if the suspension or vehicle manufacturer specifies a two height control valve installation.
Prepare Vehicle For Installation
NOTE: Prior to installation, rotate control arm 3-5 times 360 degrees in both the intake and exhaust
directions to remove any adverse effects from storage.
1. Be sure that the suspension is centered between the frame rails before beginning installation. The
vehicle should be in an unloaded condition before starting installation procedures. Be certain all
dump switches are off. Park the vehicle making sure all vehicle wheels are on a hard, level surface.
Raise and properly support all auxiliary axles. DO NOT set the parking brakes. Instead use safety
wheel chocks to secure the vehicle.
DO NOT use a time delay valve with a PR or PR Plus HCV on the same vehicle.
Verify System Operation
DO NOT use antifreeze or other solvents in an air supply line. Use of solvents or antifreeze can damage
seals and void the valve warranty.
Installing the PR and PR Plus HCV
6. Confirm the control arm is properly installed by raising the control arm approximately 20° above
horizontal. Air pressure should inflate the air springs. If the air springs do not inflate:
NOTE: Conducting routine air system maintenance can help prevent any damage to air system components. Never introduce foreign chemicals into any air system. Drain all moisture from air reservoirs at
regular intervals.
ALWAYS use a Pressure Protection Valve (PPV) and filter such as the Haldex Part Number 90554107.
Attach PPV directly to the air reservoir for supply to the PR & PR Plus HCV.
2. Determine the desired control arm position and valve orientation on the vehicle.
Fasten the control arm to the interface cap and shaft making sure the alignment identifier dimple on the
interface cap is in the proper position for your valve orientation. Refer to Fig. 3 & 4 for proper alignment
identifier orientation. Use the provided nylok nut and tighten to 25-30 in- lbs. DO NOT over torque this
nylok nut; it could result in a damaged or broken shaft.
NOTE: If adjustable control arm is used, assemble with provided hardware. Torque the adjustment bolt
to 25-30in lbs.
Reference Dimension Details for PR Plus HCV
NOTE: Apply permanent thread locking compound on threaded shaft before tightening down the nylok nut.
3. If necessary, install fittings in HCV before mounting to the vehicle. Haldex recommends fittings with
pre-applied seal compound. If recommended fittings are not available use a drop of oil or thread-locker.
Use small amounts of sealant on threads only. DO NOT use Teflon tape or pipe sealing compound.
4. Mount the PR & PR Plus HCV on the frame rail or a bracket and torque mounting nuts to 35-45 in-lbs.
Hexagonal head fasteners can be used to mount the PR HCV. Integrated fasteners are already installed
in the PR Plus HCV. For proper mounting bolt spacing see Fig. 1 & 2. The PR & PR Plus valves should be
mounted as level as possible. A small torpedo level or mason’s line level can help in this positioning.
5. a) Connect the air line from the air springs to the delivery (DEL) port(s) on the valve.
b) Connect the air line from the air supply tank to the supply (SUP) port on the valve.
c) Charge the air supply system.
Installation Instructions for the
PR and PR Plus Height Control Valve
Ride Height Adjustment Instructions
NOTE: The following procedures require the vehicle to be parked over an inspection pit or level surface
and may require two people working simultaneously when using a two HCV system.
7. Bring the suspension to the vehicle manufacturer’s recommended ride height. Ride height is measured
from the bottom of the frame rail to the center of the axle. Refer to the vehicle or suspension manufacturers manual for proper ride height measurement.
8. With the suspension at ride height and the HCV control arm at center position, determine the location of the lower linkage tab. A typical PR HCV and linkage assembly are shown in Fig. 5. Note the
recommended angles between the HCV and linkage connection before installing the bottom linkage
tab.
9. Damage to the valve, linkage and other suspension components may result if the recommended
angles are not followed. Measure the distance from the control arm linkage mounting hole to the axle
tab bracket mounting hole (Dim. “A” - Fig. 5). This is the required linkage length.
10. Connect the linkage to the control arm and axle tab bracket. For correct linkage assembly consult
the suspension service manual.
IMPORTANT: Adjustments to the suspension ride height requires system air pressure. Adequate system air pressure must be maintained throughout adjustment procedures.
11. CHECK FOR PROPER RIDE HEIGHT. Disconnect the lower linkage end from the axle tab. Lower the
control arm and linkage about 1” and hold for 15 seconds to lower the suspension. Reconnect the
lower linkage end, the suspension should return to ride height. Measure the ride height on both sides
of the vehicle to verify that the suspension is within the manufacturer’s specified tolerance.
12. FINE ADJUST RIDE HEIGHT IF NECESSARY. Carefully adjust the linkage assembly or control arm to
bring suspension to ride height. Your PR or PR Plus HCV may have an adjustable control arm which
provides approximately 1” of ride height adjustment. After each adjustment of the linkage or control
arm repeat previous step. This may require several attempts, repeat until proper ride height is obtained
twice in a row.
NOTE:When using the adjustable control arm to make fine adjustments, torque bolt to 25-30 in lbs.
FINAL CHECK. Soap spray test all air line connections for air leaks and verify that all fasteners are tight.
NOTE: Ride heights may vary slightly from the loaded to the unloaded condition.
NOTE: The vehicle should maintain air spring volume and remain near ride height during short periods
out of service. An air suspension system can deflate during extended periods out of service.
NOTE: A small amount of air may escape from the exhaust located under the interface cap; this is normal and should not cause alarm or require replacement of the valve.
NOTE: If two valves are used on a chassis, then the valves must be located in the same position and
location on each side of the vehicle. Proper installation of a 2 HCV system is required to ensure the air
suspension system operates correctly.
Check For Linkage Interference
NOTE: The following procedures require the vehicle to be parked over an inspection pit or level surface
and may require two people working simultaneously when using a two HCV system.
13. CHECK LINKAGE(S) FOR CLEARANCE. Disconnect the lower linkage connection and
move the HCV control arm down to fully exhaust the suspension. Reconnect the lower
linkage to verify linkage does not interfere with frame rail, electrical wiring or air lines.
If there is linkage or control arm interference, the valve position and/or linkage axle tab need to
be moved.
Figure 3
WARNING: Failure to support auxiliary axles could allow axle to drop or the vehicle to roll resulting in
death or serious personal injury.
Figure 1
Check For Linkage Interference
continued
NOTE: Supply port for PR HCV is the port closest to the mounting holes on the valve.
a.) Verify the air supply pressure is sufficient enough to open the pressure protection valve (usually
greater than 85 psi).
PR Plus Control Arm Orientation
b.) Recheck the air lines for proper port connection.
c.) Make sure that any suspension dump/exhausting feature
is not activated.
d.) Determine if the control arm
and alignment identifier dimple on the interface cap are
in the proper orientation.
Refer to Fig. 3 & 4.
If air system still fails to inflate air
springs contact Haldex Technical
Service.
If the PR or PR Plus HCV properly
inflates the air springs, rotate the
control arm down approximately
20° below horizontal. During normal operation the air is exhaustFigure 4
ed from under the interface cap
as shown in Fig. 6. Verify air is flowing from under the interface cap and the air springs are deflating.
Figure 7
Figure 10
14. CHECK LINKAGE OPERATION WITH SUSPENSION AT FULL EXTENSION.
Disconnect lower linkage from axle tab and move the HCV control arm up to raise suspension to full
extension.
IMPORTANT: DO NOT continue to inflate air springs after full extension is reached. Damage to shock
absorbers and/or air springs could result.
Immediately reconnect lower linkage to axle tab. Verify the control arm/linkage connection rotates
smoothly and is free of tension. If the linkage is in tension or the rubber link end is being pulled along
the rod at full extension, the valve position and/or linkage axle tab will need to be moved.
Lowering/Exhausting Your Air Suspension
Certain applications may
require that a vehicles air
suspension has the ability
to fully lower or exhaust
the air springs from ride
height. The PR Plus HCV
has the option of an integrated Normally Open or
Normally Closed dump
valve. The Normally Open
dump valve is typically
operated in conjunction
with a manual switch or
electric solenoid valve as
shown in Fig. 9. The
Normally Open dump
valve allows air to be
exhausted from the air
springs when a pilot pressure is applied. The
Normally Closed valve is
typically operated from
the gladhand or emergency brake line as shown
in Fig. 10. The Normally
Closed dump valve allows
air to be exhausted from
the air springs when the
pilot pressure is removed.
It should be noted that
the optional dump valve
for the PR Plus HCV is
NOT sold separately and
CANNOT be replaced in
the field.
Figure 8
These Additional Parts Are Available From Haldex
Adjustable Linkages:
48100374 -48100375 -48100367 -48100224 --
Upgrade Pressure Protection Valve to include an inline filter:
Looped Linkage Max. Length 16”
Looped Linkage Max. Length 22”
Strap Linkage Max. Length 14”
Fixed Rod Linkage Max. Length 15 7/8”
Upgrade your Pressure Protection Valve to include an inline filter:
90554107 -- PPV With Inline Filter
90554107 -- PPV With Inline Filter
Add a suspension dump feature to your truck or trailer:
90554088 -- For Switch to Pilot Manual Dump
Valves
90554615 -- For Remote Mounted “Auto” or
Manual Dump Applications
Warning: The products described within this literature, including without limitation, product features, specifications, designs,
availability and pricing are subject to change by Haldex and its subsidiaries at any time without notice.
Figure 5
This document and other information from Haldex, its subsidiaries and authorized distributors provide product and/or system
options for further investigation by users having technical expertise. It is important that you analyze all aspects of your application and review the information concerning the product or system, in the current literature or catalog. Due to the variety of
operating conditions and applications for these products or systems, the user, through their own analysis and testing, is solely responsible for making the final selection of the products and systems and assuring that all performance, safety and warning requirements are met.
Figure 9
Figure 6
The Haldex Pilot Valve, part number 90554615, can be used in conjunction with the PR HCV to
provide air suspension exhausting. The Haldex Pilot Valve provides the capability to exhaust air
from any air suspension in a Normally Open or Normally Closed operation.
Commercial Vehicle Systems
Haldex Brake Products Corporation
10707 NW Airworld Drive
Kansas City, MO 64153-1215
Phone: 816-891-2470
Fax: 816-801-4198
Haldex Limited
525 Southgate Drive, Unit 1
Guelph, Ontario Canada N1G 3W6
Phone: 519-826-7723
Fax: 519-826-9497
www.haldex.com · www.hbsna.com
L31231 US 1/08 ART ONLY


![Web Only [L31123W] Nov-2001](http://vs1.manualzilla.com/store/data/006261811_1-4af033c8ff7f86bb4ac91ee243d7e1f2-150x150.png)