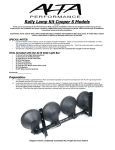
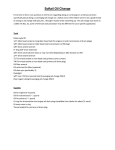
1
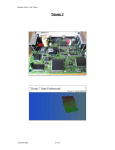
Rotated Garrett GT Turbo Kit
040107
Thank you for purchasing the PERRIN performance rotated turbo kit. Installation of this turbo should only be performed by persons
experienced in the installation and proper operation of turbochargers and related systems. This kit is designed around using Garrett GT2860R,
GT3071R, GT3076R, and GT3582R. All of which utilize Garrett T31 turbine housing.
WARRNING: AN ACURATE BOOST GAUGE AND PROGRAMABLE ENGINE MANAGEMENT, IS REQUIRED FOR PROPER INSTALLATION AND
ADJUSTMENT OF THIS PRODUCT. IMPROPER INSTALLATION AND USE OF THIS PRODUCT WILL DAMAGE THE ENGINE AND MAY RESULT IN
INJURY OR DEATH! PERRIN PERFORMANCE IS IN NO WAY RESPONSIBLE FOR ANY DAMAGES AS A RESULT OF THE INSTALLATION OF THIS
PRODUCT!
WARNING: This part is designed, manufactured, and sold solely for use on off-road and racing vehicles not controlled by federal and or local
emissions laws. It is not intended for use on vehicles that operate on public streets and highways. Use of this part on emissions controlled
vehicles may be in violation of federal or local law! PERRIN performance is not responsible for any damages as a result of misuse of this part.
Check your local laws prior to installing.
SPECAIL NOTES:
•
•
•
•
The use of a factory service manual is highly recommended. http://techinfo.subaru.com, and http://subaru.spx.com is a place to buy OEM tools.
It is critical that all bolts and nuts are tightened; improper tightening can cause serious injury or death.
The use of penetrating oil will greatly reduce the chances of galling threads on bolts as they are removed.
We highly recommend the use of anti-seize on treads of all bolts, when reassembling.
Parts Included with the PERRIN GT ROTATED TURBO KIT:
•
•
•
•
•
•
•
•
•
•
•
•
•
•
•
•
•
•
•
•
(1) Rotated Turbo Uppipe
(1) Rotated Turbo Downpipe
(1) STI oil line with female fitting (WRX oil line with banjo fitting is ordered separately)
(1) Gasket set (T3 inlet, Turbo outlet, GT oil drain, 3” gasket, (2) restrictors)
(2) Banjo Coolant Sets (M14 banjo bolt, M14 banjo fitting, (2) M14 washers)
(1) GT oil drain flange
(1) 3/8NPT- 1/2” barb 45 degree fitting
(4) 10mm x 1.25mm Studs
(2) M8 x 20 Socket cap screws
(4) M8 x 25 Socket cap screws
(2) 1/2”-3/8” reducers
(2) 1/2”-5/8” reducers
(1) 3/8” reducer
(2) #3 hose clamps
(1) T-bolt 175 size
(5’) –8 PERRIN PYROshield
(1’) 1/2” Fuel hose
(3’) –6 Pushlock coolant hose
(7’) 5/32” vacuum hose
(20) Zip ties
Checked By_________________
Installation
1)
2)
3)
4)
5)
6)
Remove the factory turbocharger per factory service manual. Take care in removing OEM oil line from turbo. Remove this line from engine to
insure it doesn’t become stressed from over bending.
Remove factory uppipe and Uppipe brackets from car.
Remove OEM inlet hose from engine. This can be done by removing the manifold, or by destroying OEM part.
Install supplied oil line onto OEM oil line fitting. Make sure to tighten down or oil leak can occur. Some bending of OEM oil line will be necessary
to clear turbo. Extra care must be taken to ensure the hard line doesn’t break.
Prepare for Turbo kit mock up. This is done to help align the wastegate to uppipe and downpipe.
•
Install 4 studs into uppipe, and install gasket to flange.
•
Install turbo onto uppipe and install OEM 14mm nuts, but leave 1/2 turn loose.
•
Install downpipe to turbo (using gasket between connection), and leave bolts 1/2 turn loose.
•
Install Wastegate to uppipe making sure to install valve seat between wastegate and uppipe. Leave v-band clamp loose enough to
allow rotation of wastegate.
•
Slide wastegate dump tube (on downpipe) up to wastegate outlet. Install and fully tighten v-band clamp.
•
Snug down bolts on downpipe, and then fully tighten bolts on uppipe. This will align wastegate to uppipe and downpipe. Fully tighten
remaining wastegate flange to uppipe.
•
Remove (4) bolts on downpipe and slide downpipe off of wastegate dump tube and from turbo.
Prepare turbo for installation.
•
Install Oil drain fitting into oil drain flange, making sure to use anti-seize on threads. Line up fitting to one of the holes in flange.
•
Install oil drain fitting onto turbo making sure to install gasket between turbo and flange using supplied bolts.
•
•
•
•
•
Re-clocking (rotating the housings to line up) is required to align compressor/center housing, and turbine housing. Loosen bolts on
outside turbo (6 bolts on the compressor, and 6 on the turbine). Rotate center section until brass drain fitting hits the uppipe flange.
Rotate drain fitting roughly .25” away from flange. If rotated too far away, oil will pool in turbo and cause oil consumption. (SEE
PICTURE)
Tighten turbine-housing bolts to secure rotation.
Rotate compressor housing until compressor outlet is facing toward the throttle body, and tighten back down. Some rotation may be
needed later in the install, but getting it close is necessary for installation.
Install coolant line banjo fittings making sure to put gaskets between the banjo, and the banjo bolt. Install coolant fittings so they face
upwards in the car, and are clear of the turbine housing.
Preinstall turbo/uppipe assembly to manifold to determine oil drain tube length. Simply use a couple OEM bolts to hold it to the
manifold. Using supplied 1/2” hose, attach to brass fitting on turbo drain and install supplied clamp. Install included reducer into OEM
oil drain tube, and cut 1/2” hose to length. Install 1/2” hose to reducer fitting, and install clamp. It is critical to not cause a kink in the
line as it will cause pooling of oil in turbo.
Turbocharger’s are taken apart for illustration purposes only!
7)
8)
9)
10)
11)
12)
13)
14)
15)
16)
Install PERRIN uppipe to exhaust manifold making sure to use new gasket, and use OEM bolts. Do to the precise nature of the OEM exhaust
manifold, you can line up the flanges of the PERRIN uppipe to and torque bolts down. If installing with other aftermarket manifold, leave slightly
loose until all other parts are installed.
Install oil supply line to turbo oil inlet making sure to install oil line restrictor (SEE PICTURE). Special Note: Included with kit are 2 oil line
restrictors. The use of the second restrictor may be necessary on cars with high oil pressure, or excessive oil flow to the turbo. The second
restrictor should be installed after kit is installed on car, and oil burning continues to be an issue. If second restrictor needs to be installed,
simply install in line a head of brass fitting on turbo.
Install downpipe onto turbo and wategate dump tube. Snap into transmission hanger and install bolt loosely. Then install and tighten 4 bolts onto
turbo exhaust housing.
Under car, tighten downpipe to tranny mount and to rear catback exhaust. This Downpipe requires that the installed catback has a flex joint in
the pipe. If catback uses a doughnut type gasket, we recommend flipping it 180 degrees, the installing the catback.
Install push-loc coolant hose to push-loc banjo fittings on turbo. Run one hose to passenger side coolant hose (located on passenger side of
engine) and the other to the coolant fill tank on top of manifold. Install supplied reducers into OEM lines, and cut push-loc hose to fit. Add more
coolant as necessary.
Before pushlock coolant hose is fully secured to OEM coolant hose, install and cut Pyroshield to length.
Remove Power steering line from power steering pump. Using supplied Pyroshield hose protector, slide over power steering line all the way
down to steering rack. This is used to protect the power steering line from the extreme temperatures seen by the uppipe. Not using this can
cause a fire, you must use. Reinstall power steering line back to power steering pump.
Remove aluminum power steering return line (S bent line) from rubber hose at power steering reservoir. Install supplied 3/8” connector into hose
and secure with OEM clamp. (Power Steering oil will come out of the hoses, have rag ready to catch oil). New imprezas will need to cut
aluminum line to shorten it. Take care not to get metal shavings into hose and lines.
Install PERRIN rotated turbo intake kit and boost tube connection. (see rotated intake instructions)
Install boost control system to Tial 44mm wastegate according to instructions provided with boost controller. If no instructions were provided,
located lower port on wastegate, and connect to boost source. This will provide 14psi of boost.
17) Start car and check for oil leaks at turbo, at the oil drain tube connection, and coolant line connections. If any leaks are found stop engine and
fix. Start engine, and let it warm to normal operating temperature. Once again make sure there are no leaks.
18) Once no leaks are found, using supplied zipties, tie coolant hoses out of way of turbo, and Pyroshield material to oil line, and power steering line.
Extra Pyroshield is included for covering misc wires and harnesses.
PERRIN Recommends These Complimentary Parts:
•
•
•
•
•
•
PERRIN Rotated intake system.
PERRIN Dual Tube Catback Exhaust.
PERRIN Front Mounted Intercooler
PERRIN High Flow Fuel Rails
PERRIN Modified 816cc Fuel Injectors
Walbro 255LPH fuel pump
WARNING!!
These turbos are capable of more power than the stock engine is designed for. Catastrophic failure can occur
when stock horsepower levels are exceeded. We highly recommend a properly built engine that I capable of
handling the extra power and a proper tune. PERRIN performance is not responsible for any and all damage
caused by this turbo.
For questions & comments please contact
503-693-1702
[email protected]
AIM contacts SALESALTA, ALTAPERRIN