1
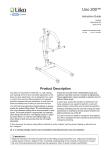
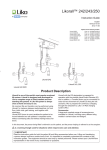
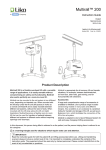
English
Instruction Guide
7SV215101-1
2006-05-10
Nordic Capella 201
Prod. No. 5021001
Capella sit-to-stand lift is especially designed for
people who have difficulty in standing up on their
own.
When standing in Capella, a patient can be transferred, for example, to the wheelchair or toilet.
Capella is intended to be used by patients that
are able to carry weight on their legs and actively
participate in the standing exercise.
Capella can be used for standing training.
To a limited extent, Capella may also be used to
transfer passive patients who are unable to actively participate.
“Caution!” triangles are used to warn of situations that demand extra care and attention.
In this document, the person being lifted is referred to as the “patient” and the person helping them is referred to
as the “caregiver”.
Table of Contents
Safety Instructions ...................................................................................................................... 2
Product Description ................................................................................................................... 3
Assembly Instructions .............................................................................................................4-5
Charging the Batteries ............................................................................................................... 5
User´s Guide ............................................................................................................................. 6
Slings and Accessories..........................................................................................................7-10
Simple Troubleshooting .............................................................................................................11
Care and Maintenance ............................................................................................................ 12
Safety Instructions
Before using the lift, make certain that:
•
•
•
•
•
the lift is assembled according to the instructions
you have read and understood the instruction guides for the lift and lifting accessories
personnel using the equipment have received appropriate instructions and training
the lifting accessories are not damaged
you have selected the correct type, size, material, and design of slings and accessories to safely meet
the patient’s needs
• the lifting accessory is correctly and securely applied to the patient, so that no personal injury can occur.
Never leave a patient unattented in Capella!
Nordic Capella 201 has been tested by an accredited testing institute and complies with the requirements of the
directive for Class 1 medical-technical products (MDD 93/42/EEC).
Nordic Capella 201 complies with the requirements of IEC 60601-1, IEC 60601-1-2 and EN ISO 10535: 1998.
Maximum load: 160 kg (350 lbs.) for active lifting, see page 9.
Maximum load: 120 kg (264 lbs.) for passive lifting, see page 10.
!
Important!
Inspect the sling regularly, especially after laundering. Check
carefully for wear and damage to seams, fabric, straps and
strap loops.
Lifting and transferring a patient always involves a degree
of risk. Study the instruction guide for both lift systems and
accessories carefully. A complete understanding of the
contents of instructions is essential. Only trained personnel
should use the equipment.
Never use damaged accessories!
When in doubt, contact the manufacturer or supplier.
Make certain that the lift accessories are appropriate for the
lift you are using and for the lifting situation. Exercise caution and care when using lift equipment and accessories.
Nordic Rehab has an agreement with Liko AB, which means
that many lift accessories from Liko can be used together with
Nordic Rehab’s lifts. Contact your distributor for more information.
As a caregiver, you are responsible for the patient’s safety.
You must be well informed of the patient’s condition and
ability to manage the lifting situation.
Instruction Guide Nordic Capella 201 • 7EN215101-1
2
Nordic Rehab • w w w . nordicrehab.com
Product Description
6
1. Lift mast
2. Lift arm
3. Base
4. Control unit with battery, emergency
stop and electrical emergency lowering
5. Handcontrol with cable
6. Safety latches
7. Slingbar
8. Lever for base width adjustment
9. Motor for lift arm
10. Rear wheel with brake
11. Front wheel
12. Adjustable lower-leg support
14
13. Footrest - removable
14. Charger (separate)
15. Locking handles
7
2
4
1
5
12
8
9
15
13
10
3
11
Lifting speed:
2.0 cm/s without load.
Emergency lowering:
Electrical.
Batteries:
2 pcs. 12 V 2.9 Ah valve-regulated
lead-acid gel-type batteries. New
batteries available from supplier.
External charger, 100-230 V, 50-60 Hz,
max. 220 mA
Lower-leg support:
Height and depth adjustable.
Removable.
Int. Op. 10/90, active operation
max 2 min. Out of a time of 100,
active must be less than 10,
though not more than 2 min.
IP X4
Battery charger:
Motor (mast):
24 V, permanent magnetic motor with
mechanical safety mechanism and
safety nut.
Material:
Powder-coated steel.
Footrest:
Removable.
Intermittent operation:
IP class:
Built for indoor operation.
Type B, according to the degree of protection against
electric shock.
E1
H
E
A
L
F
G G1
Capella 201
B1
D
C
B
Max.
load*
L**
A** B
B1
C
D
E
E1
F
G G1 H
Max Min
(max)
172 87 117 106 86
69-112
53-96
21-30
65
30-40
11 5 35
A:
160
167 82 112
162 77 107
67.7 34.3 46.1 41.7 33.9 27.2-44.1 20.9-37.8 8.3-11.8 25.6 11.8-15.7 4.3 2 13.8
B:
350
65.7 32.3 44.1
63.8 30.3 42.1
A: Maximum load and weight in kg. Measurement in cm.
B: Maximum load and weight in lbs. Measurement in inch.
* For passive lifting the maximum load is 120 kg (264 lbs.).
** These measures depend on in which hole the mast is levelled and secured. See assembly instruction on page 4.
Instruction Guide Nordic Capella 201 • 7EN215101-1
3
Weight
total part
Turning
diameter
118
88.2 37.5
46.5
40
17
Nordic Rehab • w w w . nordicrehab.com
Assembly Instructions
Before assembly, make sure you have the following:
•
•
•
•
• Lift mast with lift arm, motor for lift arm, slingbar
with safety latches, and 2 pcs (M6 x 12) screws
• Base with locking handles
• Lever for base width adjustment
• Handcontrol with cable
Control unit with rail
Footrest and frame for footrest
Lower-leg support
Bag containing instruction guide, battery charger,
Allen wrench (4 mm) and the decal ”Using the lift”.
Individual adjustment of lifting height
Patient’s height
< 170 cm (<67 inch.)
160-190 cm (63-75 inch.)
> 180 cm (>71 inch.)
Pos.
1
2
3
See page 11 for more information.
1. Remove the locking handles from the base and place
the lift mast in the socket on the base, as illustrated
above.
3. Remove the screws (2 pcs.) placed
on the mast (see illustration). Place
the control unit with the premounted
rail on the mast, as shown in the
illustration.
2. Lifting height can be set at three different levels. Choose
one of the three holes, as in the illustration above. Holes
are placed at 5 cm (2 inch) intervals. Using the accompanying locking handles, secure the lift mast in the desired position in the base. Adjust the handles so that
they point downward.
4. Affix the control unit on the lift mast
with the screws that were removed
in step 3. Use the accompanying
Allen wrench.
5. Connect cables as follows:
- Cable handcontrol to outlet 1
- Cable motor for lift arm to outlet 2.
B
A
6. A) Place the frame for the
footrest into the bracket
on the lift mast, making
sure the frame is secure.
7. A) Insert the brace of the
lower-leg support into the
lift mast’s mount for the
lower-leg support.
B) Press the footrest onto
the frame.
Instruction Guide Nordic Capella 201 • 7EN215101-1
4
B) Adjust the height of the
lower-leg support by using
the knob B. Use knob A to
adjust the depth.
Nordic Rehab • w w w . nordicrehab.com
Using the lift
! Read instruction
guide!
Operation
The lift is operated up/down
by using the pushbuttons on
the handcontrol.
The base width is adjusted
manually with lever/pedal.
Emergency Lowering
- Electrical
When necessary, press
a narrow, not too sharp
object, in the hole marked
“down” on the electrical
power unit.
Emergency Stop
Push the red Emergency
Stop button on the control
box. To reset: Turn the
button in the direction of
the arrows.
7EN190101-01 • © 2003 Nordic Rehab
Charging the batteries
Charge every night after
use. Before charging,
ensure that the red
Emergency Stop button
is not pushed in. Do not
charge in a wet area!
Locking the wheels
The rear wheels can
be locked by stepping
on the pedal above
the wheel.
www.nordicrehab.com
9. Mount the lever for base width adjustment:
• Press in the catch on the base with one finger.
• Slide the lever into place.
• Turn the lever until it clicks securely in place on the
base.
8. Stick the decal "Using the lift" (included in bag containing instructions) on one side of the lift mast.
After assembly, check to ensure that:
• wheel brakes work properly
• the indicator lamp on the front of the control unit
lights during charging.
• lift mast motions correspond with the buttons on
the handcontrol
• emergency lowering works properly
• the safety latches on the slingbar work properly
Charging the Batteries
A B C
D
A display on the control unit indicates battery capacity. When the
handcontrol is activated, a diode/lamp lights, indicating battery
capacity.
A Green: min. 50%
B Yellow: 25-50%
C Yellow: 0-25%
Lamp lights for 10 seconds after activating.
D Another lamp indicates that charging is in progress.
For maximum service life, it is important that batteries be
charged regularly. We recommend charging after use or
each night.
Maximum charge is reached after about 10 hours. When
the batteries are fully charged, the charger disconnects
automatically. NOTE! An indicator lamp on the control
unit lights constantly during charging. When the
batteries are fully charged, the lamp shuts off. If the
lamp continues to light after 12 hours, the batteries
probably need to be replaced. Discontinue charging
and replace batteries.
Never charge batteries in a wet area.
If the lift is not in daily use, we recommend that the
emergency stop be pressed in after the lift has been
used. This breaks the current and conserves battery
power.
Charging procedure
With external charger:
1. Connect charger cable to outlet for charger,
under the control unit.
2. Connect charger to power supply (100-230 V~).
1
2
The lift must not be used when the charger cable
is plugged into a wall socket.
Old batteries are to be given to authorized Nordic Rehab personnel or left at the nearest recycling station.
Instruction Guide Nordic Capella 201 • 7EN215101-1
5
Nordic Rehab • w w w . nordicrehab.com
User’s Guide
Operation
Capella is operated by pressing the buttons on the handcontrol.
For raising and lowering the lift arm:
press
and
, respectively.
Directional arrows show the direction of movement (up/down).
Lifting motion stops as soon as the push-button is released.
If the battery needs charging a beep tone will sound and a lamp
on the handcontrol (A) will light. If the lamp is lightend the battery
must be re-charged as soon as possible. There is however enough
power left in the battery for a few more lifts.
Base-width adjustment
The base width of Capella is manually adjusted by a lever. The
lever can be placed in several different positions. Move the lever
backwards to unlock it, and then move it sideways to adjust the
width. The lever locks automatically when released.
Emergency stop
For emergency stop: Press the red Emergency stop button.
To release/reset: Turn the button in the direction of the arrows.
Electrical emergency lowering
The lift arm is lowered electrically by pressing “down” (
control unit.
) on the
Locking the wheels
The rear wheels can be locked for rotation and lateral movement.
To lock the wheels, press the brake lever above the wheel down
with your foot.
Release the wheels by pressing the top side of the lever.
During lifting, wheels should remain unlocked so that the lift may
shift to the patient's center of gravity.
Locked wheels during lifting increases the risk of the
lift tilting over.
Never pull the lift by the actuator! This may result in
damage to the lift and possible injury.
Instruction Guide Nordic Capella 201 • 7EN215101-1
6
Nordic Rehab • w w w . nordicrehab.com
Slings and Accessories
For sit-to-stand lifts with Capella we recommend the use of Nordic Capella Vest. Capella may also, to a ceratin
extent, be used in so called ”passive lifting”, i.e. when lifting and transferring a patient in a sling. For passive
lifting we recommend the use of Nordic Hygiene Sling, but only if an individual assessment shows that the sling
fits the patient.
An individual assessment, of slings and other accessories, is necessary for optimal function and security when
using the lift. As an alternative to the Nordic Slings, several slings from Liko can be used with Capella.
As an accessory to Capella, there is a Cable reel that enables assembly of external charger and charger cable
on the lift;
Cable reel EU
Cable reel UK
Cable reel AU/NZ
Prod. No. 5107104
Prod. No. 5107105
Prod. No. 5107106
Contact your Nordic Rehab representative or visit www.nordicrehab.com or www.liko.com for advice and
information.
Nordic Slings
Material: Polyester
Laundry instructions:
60-80 C
Always read the laundry instructions on the sling’s label before washing!
Nordic’s slings are approved for 160 kg (350 lbs.) maximum load, see product label.
The size of the sling can be found on the label. The colour of the central back strap is also indicating the size of
the sling, for example: yellow = medium, blue = large.
Remember!
• Determine, in each case, whether more than one caregiver is required to safely execute the lift.
• Plan the lift/transfer before starting, so that it can be executed as safely and efficiently as possible.
• Although Capella’s slingbar is equipped with safety latches to prevent straps from accidentally unhooking,
particular attention is necessary: after tension has been applied to the straps, but before the patient has been
lifted, it is important to check that the straps are hooked correctly on the slingbar!
• Never lift a patient higher than necessary. Consider the patient’s individual needs and condition.
• Never leave a patient unattended during a lift/transfer.
• Ensure that wheels on wheelchairs, beds, gurneys, etc. are appropriately locked during the lift/transfer.
The handles on the sling are intended to steer with, not to lift with. Excessive force on the handles
can cause the sling to tear. Do not lift with the handles!
Class 1 medical-technical product
Nordic Capella Vest and Nordic Hygiene Sling comply with all requirements for MDD Class 1 products and the
harmonized EN ISO 10535 standard.
Instruction Guide Nordic Capella 201 • 7EN215101-1
7
Nordic Rehab • w w w . nordicrehab.com
Nordic Capella Vest
Nordic Hygiene Sling
Prod. No.
Size
Body weight*
5037505
5037506
M Medium
L Large
50-90 kg (110-198 lbs.)
5037305
80-120 kg (176-264 lbs.) 5037306
Prod. No.
Size
Body weight*
M Medium
L Large
40-90 kg (88-198 lbs.)
80-120 kg (176-264 lbs.)
*NOTE! Indicated patient weights are just guidelines.
Deviations may occur.
*NOTE! Indicated patient weights are just guidelines.
Deviations may occur.
If the patient has poor muscle tone and sinks down in Hygiene
Sling, try a smaller size.
3
1. Upper strap loop
2
1
2. Serial number
3 2
3. Label
7
4. Handle
10 11
4
5. Leg support
6. Leg support loop
8
8
9
5
7. Back support
8. Waist belt
9
9. Plastic buckle
6
10. Outer vest strap
11. Inner vest strap
Nordic Capella Vest
A
Size
Vest width (cm / inch.)
Medium (yellow) A: 82 / 32.3 B: 135 / 53.1
Large (blue)
A: 95 / 37.4 B: 150 / 59.1
B
Vest straps
The vest is equipped with two vest straps: outer and inner strap, for maximum flexibility during use. Generally, it
is recommended that you use the inner strap, so as to achieve a maximum upright position, and also to make it
possible for the patient to reach the slingbar, in order to be able to participate in the raising.
The outer strap is used when the patient’s girth so requires it, or if the patient is short in relation to the height of
the Slingbar hooks on Capella.
Waist belt function
The waist belt is intended to hold the vest in place around the patient initially during raising to an upright position.
During raising, the upper body always tends to become somewhat narrower, causing the waist belt to slacken
and hang loose around the upper body. This is a natural tendency and does not affect raising in any way.
Instruction Guide Nordic Capella 201 • 7EN215101-1
8
Nordic Rehab • w w w . nordicrehab.com
Sit-to-stand lifting with Capella, with the
active participation of the patient
Sling: Nordic Capella Vest.
1. Place Capella in front of the patient and adjust the width
of the base so that the feet can be placed centrally on the
footrest with the shins parallel to the lower-leg support.
Adjust lower-leg support height and depth against the
shins so as to achieve a comfortable resistance just under
the kneecap.
2. Slide the Capella Vest down behind the patient to waist
level, with the vest’s label facing out.
The patient’s arms must always be kept outside the
vest.
Adjust the waist belt gently to the girth of the patient’s
upper body and fasten the waist belt’s plastic buckle.
Hook the straps, that are most appropriate for the lifting
situation, to the lift, see page 8.
3. Raise the slingbar about 10-20 cm (4-8 inch.)
The patient grasps the slingbar and the lifting procedure
can continue. If the patient leans backwards during the lift,
this facilitates lifting and prevents the vest from sliding up.
The height to which the patient is to be lifted must be
decided and tested in each individual case.
When the straps are fully extended, but before the
patient is clear of the seat, make sure the vest’s loops
are correctly fastened to the slingbar.
4. To achieve a more upright position, continue the lifting
motion to the uppermost position. The lifting procedure
may seem unpleasant for those who are unaccustomed
to it.
For maximum comfort, the lift mast must be locked into
the base in the best possible of the three alternative
holes. See page 4 and 11.
Instruction Guide Nordic Capella 201 • 7EN215101-1
9
Nordic Rehab • w w w . nordicrehab.com
Passive lifting from a sitting position with Capella
Sling: Nordic Hygiene Sling.
The patient’s arms must always be kept outside the vest!
To provide maximum space for the patient when lifting from a sitting position with Capella, the lift should be set in position 3,
see page 4.
A
1. Disassemble lower-leg support: loosen screw A.
Pull the lower-leg support out.
Remove footrest: Grasp front edge, bend up and lift
footrest away from base.
2. Slide the Hygiene Sling down behind the patient with
the sling’s label facing out. The upper edge of the sling
should be placed just below the patient’s armpits.
The patient’s arms must always be kept outside
the sling!
Position the leg supports under the patient’s thighs
and cross the leg support straps.
3. Move lift forward. Hook sling loops to slingbar hooks.
Hook the upper strap loop first and then the leg support
loop.
When the straps are fully extended, but before
the patient is clear of the seat, make sure the sling’s
loops are correctly fastened to the slingbar.
4. Raise slingbar to the minimum height necessary to
achieve the transfer.
If the lift movement is too high, the patient may
come too close to the lift mast!
NOTE!
This method of lifting sitting patients with Capella cannot replace regular routine lifting from the sitting position using
conventional mobile lifts.
Instead, it is intended as an occasional solution when the patient cannot actively manage a sit-to-stand lift. If the need
for passive lifting from sitting persists, we recommend the use of mobile lift Nordic Caroli.
Instruction Guide Nordic Capella 201 • 7EN215101-1
10
Nordic Rehab • w w w . nordicrehab.com
Simple Troubleshooting
The lift does not work up/down
1. Check that the emergency stop button
is not pushed in (p. 6).
2. Check that the cables on the control
unit are connected correctly (p. 4).
3. Check that the charging cable is not
connected to the wall socket.
4. Check that the battery is charged (p. 5).
5. If the lift still does not work satisfactorily,
contact your Nordic Rehab distributor.
Battery charging does not
work
1. Check that the emergency stop button
is not pushed in (p. 6).
2. If the lift still does not work satisfactorily,
contact your Nordic Rehab distributor.
The lift stops in the elevated
position
1. Check that the emergency stop button
is not pushed in (p. 6).
2. Use the electrical emergency lowering
device to safely lower the patient (p. 6).
3. Check that the battery is charged (p. 5).
4. If the lift still does not work satisfactorily,
contact your Nordic Rehab distributor.
If you hear unusual sounds
Contact your Nordic Rehab distributor.
The patient is unable to rise to a sufficiently upright position. What can be done?
Sometimes this is due to the patient’s physical status; weak musculature, poor tone and/or contractures in hips
and knees. To use Capella in the best possible way, follow these steps:
1. Hook the vest to the hook in the shorter loop (B).
2. Raise the lift mast in Capella’s base.
See Adjustment of lifting height, page 4.
3. Try a smaller sized vest. A smaller size means shorter distance to the hooks,
which results in a more upright standing position.
Instruction Guide Nordic Capella 201 • 7EN215101-1
11
Nordic Rehab • w w w . nordicrehab.com
Care and Maintenance
For safe and trouble-free operation, a few routine procedures should be performed every day the lift is used:
•
•
•
•
•
Visually inspect the patient lift and check for external damage or wear.
Check that all screws and lock nuts on the lift arm are tight.
Check that the safety latches on the slingbar work properly.
Check the handcontrol and the lift movements.
Charge the battery every day the lift is used, and check charger function.
When necessary, clean the lift with common surface cleaners or disinfectants. NOTE! Avoid regular use of
cleaning agents that contain phenol or chlorine, since these can damage polyamide material.
Inspection
Capella must be inspected at least once per year. Pay particular attention to parts that are subject to wear.
Inspection must be performed according to the Nordic Rehab service manual and by authorized personnel.
IMPORTANT!
Repairs and maintenance may only be carried out by authorized Nordic Rehab service personnel using
original spare parts.
During transportation, or when the patient lift is not to be used for some time, the emergency stop button should
be pushed in. The environment where the patient lift is transported and stored should have a temperature between
10˚C and 40˚C and a humidity between 30 and 75%. The air pressure should be between 700 and 1060 hPa.
Nodic Rehab's products are constantly being updated and refined. Nordic Rehab reserves the right to change
aspects of the products without prior notice. Contact your local representative for updated information and advice.
Manufacturer:
Nordic Rehab AB
Nedre vägen 100
SE-975 92 Luleå, Sweden
Tel: +46 (0)920 24 75 90
Fax: +46 (0)920 24 75 91
[email protected]
Distributor:
© Copyright Liko AB 2006-05
Transportation and storage