1
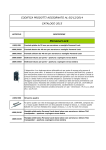
56755MX
Revised
1.8.15
Rear Installation
NOTE: Be careful that you do not hang
the caliper from the brake lines, it will cause
damage to the brake lines!
1. Block the front tires and raise the rear of the
vehicle. Support the frame with jack stands
forward of the rear springs.
7. Unbolt the track bar from the rear axle mount
and secure up and out of the work area. Save
Unbolt the brake line brackets from the frame.
the hardware for reinstallation.
Save the hardware for reinstallation.
8. Carefully lower the rear axle enough to remove
Remove the shocks on both sides of the vehithe coil springs from the rear spring pockets.
cle. It may be necessary that you slightly raise
Save the factory isolators for reinstallation.
the axle to unload the shocks for removal.
NOTE: Be sure to support the rear axle
Save the hardware for reinstallation.
while the springs and shocks are removed.
NOTE: Use the supplied wrench (965545) to remove the upper shock hardware.
9. Loosen the upper and lower control arm to
NOTE: You may need to remove the
axle brackets bolts, but DO NOT remove. Un8MM bolt on the splash shield to access the
bolt and remove the upper and lower control
top bolt on the drivers side.
arm to frame bracket bolts. Save the hardware
for reinstallation.
Disconnect the sway bar end links and remove
NOTE: Be sure to support the axle while
them from the vehicle. The end links will not
the
control arms are removed.
be reused.
10. Install the control arm drop bracket (91-5462
Remove the disc brake calipers and secure
drvr and 91-5468 pass) into control arm frame
them clear of the work area. Save the hardmounting pockets using the previously reware for reinstallation.
2. Remove the wheels and tires.
3.
4.
5.
6.
OE
Bolts
Frame
1/2” X 1
1/2” Bolt
Control Arm Drop
Bracket (91-5462
drvr and 91-5468
pass)
1/2” X 1
1/2” Bolt
90-5472
Nut
Plate
Illustration 18
Control Arm Drop Bracket
19