1
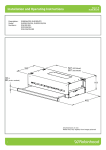
HYDRAULIC LANDING GEAR HLG
OPERATION AND SERVICE MANUAL
TABLE
OF
CONTENTS
SYSTEM……………………………………………........….…..
Warning…………………………………........……....
Prior to Operation…………………….......………
System Description………………………………..
Preventative Maintenance……….......………..
4
4
4
5
6
COMPONENTS…………………………………........…………… 7
Warning......................................................... 7
Mechanical Components….............…………. 7
Electrical Components....…….............……... 7
Auxiliary Operation....…………............………. 9
Component Layout....................................... 10
SERVICE…………………………..………………........………12
Filling Procedures........................................ 12
Troubleshooting…………………….........……… 13
Chart.................................................. 14
Pump Unit......................................... 14
Wiring Diagram…………………….….......……… 15
Ordering Parts.............................................. 16
3
SYSTEM
WARNING
FAILURE TO ACT IN ACCORDANCE WITH THE FOLLOWING MAY
RESULT IN SERIOUS PERSONAL INJURY OR DEATH.
THE USE OF THE LIPPERT HYDRAULIC LANDING GEAR TO SUPPORT THE
COACH FOR ANY REASON OTHER THAN WHICH IT IS INTENDED IS
PROHIBITED BY LIPPERT’S LIMITED WARRANTY. THE LIPPERT LEVELING
SYSTEM IS DESIGNED AS A “LEVELING” SYSTEM ONLY AND SHOULD NOT
BE USED TO PROVIDE SERVICE FOR ANY REASON UNDER THE COACH
SUCH AS CHANGING TIRES OR SERVICING THE LEVELING SYSTEM.
LIPPERT COMPONENTS, INC. RECOMMENDS THAT A TRAINED
PROFESSIONAL BE EMPLOYED TO CHANGE THE TIRE ON THE COACH.
ANY ATTEMPTS TO CHANGE TIRES OR PERFORM OTHER SERVICE WHILE
COACH IS SUPPORTED BY THE LIPPERT HYDRAULIC LANDING GEAR
COULD RESULT IN DAMAGE TO THE COACH AND/OR CAUSE SERIOUS
PERSONAL INJURY OR DEATH.
WARNING! – BE SURE TO PARK THE COACH ON SOLID, LEVEL
GROUND.
WARNING! – CLEAR ALL JACK LANDING LOCATIONS OF DEBRIS
AND OBSTRUCTIONS. LOCATIONS SHOULD ALSO BE
FREE OF DEPRESSIONS.
WARNING! – WHEN PARKING THE COACH ON EXTREMELY SOFT
SURFACES, UTILIZE LOAD DISTRIBUTION PADS
UNDER EACH JACK.
WARNING! - PEOPLE AND PETS SHOULD BE CLEAR OF COACH
WHILE OPERATING LEVELING SYSTEM.
WARNING! – BE SURE TO KEEP HANDS AND OTHER BODY PARTS
CLEAR OF FLUID LEAKS. OIL LEAKS IN THE LIPPERT
HYDRAULIC LANDING GEAR MAY BE UNDER HIGH
PRESSURE AND CAN CAUSE SERIOUS SKIN
PENETRATING INJURIES.
WARNING! - NEVER LIFT THE COACH COMPLETELY OFF THE
GROUND. LIFTING THE COACH SO THE WHEELS ARE
NOT TOUCHING GROUND WILL CREATE AN UNSTABLE
AND UNSAFE CONDITION.
4
PRIOR TO OPERATION
The leveling system shall only be operated under the following conditions:
1. The unit is parked on a reasonably level surface.
2. The towing vehicle is disengaged from the unit.
3. Be sure all person, pets and property are clear of the coach while
Lippert Leveling System is in operation.
SYSTEM DESCRIPTION
Please read and study the operating manual before you operate the leveling
system.
The Lippert Hydraulic Landing Gear is an electric/hydraulic system. A 12V DC
electric motor drives a hydraulic pump that moves fluid through a system of
hoses, fittings and jacks to level and stabilize the coach.
There are no serviceable parts within the electric motor. If the motor fails, it must
be replaced.
Disassembly of the motor voids the warranty.
Mechanical portions of the Lippert Hydraulic Landing Gear are replaceable.
Contact Lippert Components, Inc. to obtain replacement parts.
COMPONENT DESCRIPTION The Lippert Hydraulic Landing Gear consists of the
following major components:
Lippert Landing Gear are rated at a lifting capacity appropriate for your coach.
Each Landing Gear is powered from a central 12VDC motor/pump assembly, which
also includes the hydraulic oil reservoir tank, control valve manifold, and solenoid
valves.
The Lippert Hydraulic Landing Gear is controlled electronically from the switch
near the pump.
5
PREVENTATIVE MAINTENANCE PROCEDURES
The Lippert Hydraulic Landing Gear has been designed to require very little
maintenance. To ensure the long life of your slideout system, read and follow
these few simple procedures.
1. Change fluid every 36 months.
a) Check fluid only when jacks are fully retracted.
b) Always fill the reservoir with the jacks in the fully retracted position. Filling
reservoir when jacks are extended will cause reservoir to overflow into its
compartment when jacks are retracted.
c) When checking fluid level, fluid should be within ¼” of fill spout lip.
2. Check the fluid level every month.
3. Inspect and clean all Pump Unit electrical connections every 12
months.
4. Remove dirt and road debris from Landing Gear as needed.
WARNING:
YOUR COACH SHOULD BE SUPPORTED AT BOTH FRONT AND REAR
AXLES WITH JACK STANDS BEFORE WORKING UNDERNEATH.
FAILURE TO DO SO MAY RESULT IN PERSONAL INJURY OR DEATH.
5. If jacks are down for extended periods, it is recommended to spray
exposed Landing Gear rod with a silicone lubricant every seven days for
protection. If your coach is located in a salty environment, it is recommended to
spray the rods every 2 to 3 days.
IF YOU HAVE ANY PROBLEMS OR QUESTIONS CONSULT YOUR LOCAL
AUTHORIZED DEALER OR CALL LIPPERT AT:
(866) 524-7821.
6
COMPONENTS
WARNING!
DO NOT WORK ON YOUR SLIDEOUT SYSTEM UNLESS
THE BATTERY IS DISCONNECTED.
FAILURE TO ACT IN ACCORDANCE WITH THE FOLLOWING MAY
RESULT IN SERIOUS PERSONAL INJURY OR DEATH.
The Lippert Hydraulic Landing Gear has been static tested to over 6,000
continuous cycles without any noticeable wear to rotating or sliding parts. It is
recommended that when operating in harsh environments and conditions (road
salt, ice build-up, etc.) the moving parts be kept clean and can be washed with
mild soap and water. No grease or lubrication is necessary and in some
situations may be detrimental to the environment and long-term dependability of
the system.
MECHANICAL
Although the system is designed to be almost maintenance-free, actuate the
Landing Gear once or twice a week to keep the seals and internal moving parts
lubricated.
Check for any visible signs of “leaking” before and after movement of the system
and the coach.
When the Landing Gear is down, visually inspect the Inner and Outer
Assemblies. Refer to Fig. 3, pg. 10-11, for location of inner assemblies. Check
for excess build-up of dirt or other foreign material; remove any debris that may
be present.
If the system squeaks or makes any noises it is permissible to apply a coat of
lightweight oil or silicone lubricant spray to the hydraulic rod but remove any
excess oil so dirt and debris do not build-up. DO NOT USE GREASE.
ELECTRICAL
For optimum performance, the slideout system requires full battery current and
voltage. The battery must be maintained at full capacity. Other than good
battery maintenance, check the terminals and other connections at the battery,
the control switch and the pump motor for corrosion and loose or damaged
terminals. Check motor leads under the coach chassis. Since these
connections are subject to damage from road debris, be sure they are in good
condition.
7
Note: The Lippert Hydraulic Landing Gear is designed to operate as a negative
ground system. A negative ground system utilizes the chassis frame as the
ground source. An independent ground wire back to the battery is not needed. It
is important the electrical components have good wire to chassis contact. Over
90% of unit electrical problems can be attributed to bad ground connections.
Note: For long-term storage: It is recommended that the room be closed
(retracted) and if your unit is equipped with the IRC room control, it is
recommended all of the control knobs be kept in the closed position.
IF YOU HAVE ANY PROBLEMS OR QUESTIONS CONSULT YOUR LOCAL
AUTHORIZED DEALER OR CALL LIPPERT AT:
(866) 524-7821.
8
AUXILIARY OPERATION
The Lippert Hydraulic Landing Gear can be run with auxiliary power devices like
electric drills, ratchet wrenches or cordless screwdrivers. In the event of
electrical or system failure, this manual method of extending and retracting the
jacks can be used. A standard handheld drill is all
that is required. See the instructions below.
Fig. 1
1. Remove protective label. (See Fig 1).
2. Using a standard hex bit, insert into auxiliary drive device, i.e.
cordless drill or screwdriver or ratchet wrench.
Fig. 2
3. Insert hex bit into coupler found under protective label, Fig. 2
4. Run drill forward or clockwise to extend slideout room and in
reverse or counterclockwise to retract slideout room.
9
Fig. 3
Top View
Manual Triple Room Control Assembly
(also available in 2 & 4 room models)
Front View
Pump Assembly – Base
12V Motor, Pump, Reservoir
Fittings – “T” – “90o” – Straight – “45o”
Valve Assembly
Switch Harness
Trombetta
Valve Blocks
Restricted Flow
Unrestricted Flow
PART #
1
2
3
4
DESCRIPTION
CYLINDER
OUTER ASSY
INNER ASSY
FOOT ASSY
QTY
1
1
1
1
SERVICE
FLUID FILLING PROCEDURE
Fill Cap
The Lippert Hydraulic Landing Gear uses automatic transmission fluid (ATF).
Any ATF can be used. A full synthetic or synthetic blend works best such as
Dexron III or Mercon 5. For best operation, fill system within ½” of the top when
all slideouts are completely retracted. The see through reservoir makes it easy
to check oil level. It is recommended that the oil level be checked prior to
operating the system. Make sure the breather cap is free of contamination
before removing, replacing or installing.In colder temperatures (less than 10° F)
the jacks may extend and retract slowly due to the fluid’s molecular nature. For
cold weather operation, fluid speciallyformulated for low temperatures may be
desirable.
Please consult factory before using any other fluids.
FILLING DIRECTIONS
Remove Breather/Fill Cap
Pour ATF into Breather/Fill opening.
Note: Do not allow any contamination into reservoir during fill process.
Note: Standard reservoir holds approximately 2 quarts (1.89 liters) of
ATF.
Fill to within ½” of top.
Replace Breather/Fill cap when finished.
Note: System is self-purging. By simply cycling the system 2-3 times,
any air in the system will be forced back to the reservoir and out of
the Breather/Fill cap.
12
TROUBLESHOOTING
The Lippert Hydraulic Landing Gear is a feature that allows the owner more
options and flexibility for quickly and effectively leveling the unit. It is a totally
integrated system with your unit’s chassis and electronics.
Every unit has it’s own personality and what may work to fix one unit may not
work on another even if the symptoms appear to be the same.
When something restricts mechanized travel, system performances will be
unpredictable. It is very important that Landing Gear be free of contamination
and allowed to travel freely the full distance. Dirt, sand, mud and other
contaminants build-up during travel and can be potentially damaging to the
performance of the system.
When beginning to troubleshoot the system, make sure the battery is fully
charged, there are no visible signs of external damage to the Landing Gear,
motor or hoses and that the motor is wired properly and all connections are
secure.
IF YOU HAVE ANY PROBLEMS OR QUESTIONS CONSULT YOUR LOCAL
AUTHORIZED DEALER OR CALL LIPPERT AT:
(866) 524-7821.
13
TROUBLESHOOTING - CHART
JACKS WILL NOT EXTEND TO GROUND, PUMP IS RUNNING
PROBABLE CAUSE
CORRECTIVE ACTION
Little or no fluid in reservoir
Leg valve is inoperative
Electronic signal is lost between switch
and leg valves
Fill reservoir with DEXRON III ATF, See pg. 6
Clean, repair or replace
Trace wires for voltage drop or loss of signal
Repair or replace necessary wires or replace
switch.
ANY ONE OR TWO JACKS WILL NOT RETRACT
PROBABLE CAUSE
Hose damaged or unconnected
Return valve inoperative
Electronic signal is lost between switch
and solenoid
CORRECTIVE ACTION
Replace with new hose or reconnect hose
Replace inoperative return valve
Attempt to retract jacks in MANUAL mode.
If successful, replace control pad; if not, test
for voltage drop between switch and leg valve
Repair bad wiring or replace defective board or
valve.
TROUBLESHOOTING – POWER UNIT
Before attempting to troubleshoot the Power Unit, make sure an adequate power
source is available. The unit batteries should be fully charged or the unit should
be plugged into to A/C service with batteries installed. Do not attempt to
troubleshoot the Power Unit without assuring a full 12V DC charge.
The following tests require only a DC voltmeter (or DC test light) and a jumper
lead.
Step 1 - Attach voltmeter (or test light) leads to the negative and positive
terminals on motor solenoid (See Fig. 7). Does the meter indicate 12V DC?
If YES, see Step 2; if NO see Step 3.
Step 2 - If YES, at the motor, check the incoming leads to 12V DC (if necessary,
disconnect leads at wire splices). Does meter indicate 12V DC? If YES, Power
Unit needs to be replaced. The motor is not field serviceable. DO NOT
ATTEMPT TO REPAIR. If NO, Inspect all wires and connections between the
wall switch and the motor. Repair connections as necessary. Recheck as in
Step 1.
Step 3 - If NO, Inspect all connections between battery and solenoid. Inspect
30A Auto-reset Circuit Breaker (See Fig. 7 for location).
Recheck as above in Step 1.
Since there are no field serviceable parts in the motor of the Power Unit,
electrical troubleshooting and service is limited to replacing only those
components as previously outlined.
Thorough inspection of wiring and connections is the only other electrical service
that can be performed.
14
BUSS BAR OR
6 GA. WIRE MIN.
WIRING DIAGRAM
Fig. 9
15