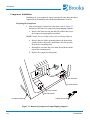
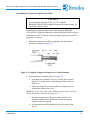
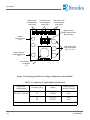
1
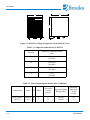
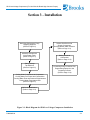
8510 Low Voltage Compressor,
(For Use with On-Board® High-Vacuum
Pumps)
Installation, Operation and Service
Instructions
8040232 Revision AA
8510 Low Voltage Compressor
Installation, Operation and Service Manual
Information provided within this document is subject to change without notice, and although believed to be
accurate, Brooks Automation assumes no responsibility for any errors, omissions, or inaccuracies.
AcuLigner™, Align™, AquaTran™, AutoTeach™, ATR™, AXM™, Basic Blue™, BiSymmetrik™,
CenterSmart™, Cool Solutions™, Crate to Operate™, e-RMA™, e-Spares™, e-Volution™, FastRegen™,
FIXLOAD™, FrogLeg™, InLigner™, InCooler™, Interface™, Jet Engine™, LowProfile™, M2 Nano™,
Mini-Ion™, PASIV™, PowerPak™, PerformanceBlue™, PowerPak™, PowerTools™, QuadraFly™, Radius™,
Radient™, Radient Express™, Reliance™, Reliance ATR™, RetroEase™, SCARA™, SmartPM™,
SPOTLevel™, Synetics™, The New Pathway to Productivity™, Time Optimized Trajectory™, Time Optimal
Trajectory™, Time Optimized Path™, TopCooler™, TopLigner™, Ultimate Blue™, VAC-407™, VacuTran™,
Vacuum Quality Monitor™, VQM™, Vacuum Quality Index™, VQI™, and the Brooks logo are trademarks of
Brooks Automation, Inc.
AcuTran®, AquaTrap®, Conductron®, Convectron®, the Cool Solutions logo, Cryodyne®, Cryotiger®,
Cryo-Torr®, Fusion®, GOLDLink®, Granville-Phillips®, Guardian®, GUTS®, Helix®, Jet®, Leapfrog®,
MagnaTran®, MapTrak®, Marathon®, Marathon 2®, Marathon Express®, Micro-Ion®, MiniConvectron®,
On-Board®, Polycold®, Razor®, Simplicity Solutions®, the Simplicity Solutions logo, Stabil-Ion®, TrueBlue®,
TurboPlus®, Vision®, Zaris®, and the Brooks Automation logo are registered U.S. trademarks of Brooks
Automation, Inc.
All other trademarks are properties of their respective owners.
© 2013 Brooks Automation, Inc. All Rights Reserved. The information included in this manual is Proprietary
Information of Brooks Automation and is provided for the use of Brooks Automation customers only and cannot
be used for distribution, reproduction, or sale without the express written permission of Brooks Automation.
This information may be incorporated into the user’s documentation, however any changes made by the user
to this information is the responsibility of the user.
For Technical Support:
Location
GUTS® Contact Number
North America
+1-800-FOR-GUTS (1-800-367-4887)
+1-978-262-2900
Europe
+49-1804-CALL-GUTS (+49-1804-2255-4887)
Japan
+81-45-477-5980
China
+86-21-5131-7066
Taiwan
+886-3-5525225
Korea
+82-31-288-2500
Singapore
+65-6464-1481
Visit us online: www.brooks.com
January 11, 2013
Part Number 8040232
Revision AA
This technology is subject to United States export Administration Regulations and authorized to the destination
only; diversion contrary to U.S. law is prohibited.
Printed in the U.S.A.
Brooks Automation
8040232 Revision AA
8510 Low-Voltage Compressor (For Use With On-Board High-Vacuum Pumps)
Table of Contents
Section 1 - Introduction
General . . . . . . . . . . . . . . . . . . . . . . . . . . . . . . . . . . . . . . . . . . . . . . . . . . . . . . . . . . . 1-1
Installation, Operation and Service Instructions . . . . . . . . . . . . . . . . . . . . . . . . 1-1
Section 2 - Inspection
Packaging of the System . . . . . . . . . . . . . . . . . . . . . . . . . . . . . . . . . . . . . . . . . . . . . 2-1
The Compressor . . . . . . . . . . . . . . . . . . . . . . . . . . . . . . . . . . . . . . . . . . . . . . . . . . . 2-1
Section 3 - Installation
Compressor Installation . . . . . . . . . . . . . . . . . . . . . . . . . . . . . . . . . . . . . . . . . . . . . . 3-2
Preparing the Compressor . . . . . . . . . . . . . . . . . . . . . . . . . . . . . . . . . . . . . . . . . 3-2
Assembling the Compressor Input-Power Cable . . . . . . . . . . . . . . . . . . . . . . . 3-3
Electrical Preparation Of Compressor Control Module . . . . . . . . . . . . . . . . . . 3-5
Cooling Water: Preparation . . . . . . . . . . . . . . . . . . . . . . . . . . . . . . . . . . . . . . . 3-5
Cooling Water: General Considerations . . . . . . . . . . . . . . . . . . . . . . . . . . . . . . 3-6
Cooling Water: Flow and Pressure Requirements . . . . . . . . . . . . . . . . . . . . . . 3-7
Cooling Water: Temperature Rise . . . . . . . . . . . . . . . . . . . . . . . . . . . . . . . . . 3-10
Oil Circuit Stabilization . . . . . . . . . . . . . . . . . . . . . . . . . . . . . . . . . . . . . . . . . 3-11
Connecting the Compressor to the Cryopump . . . . . . . . . . . . . . . . . . . . . . . . . . . . 3-11
Electrical Connection of Compressor . . . . . . . . . . . . . . . . . . . . . . . . . . . . . . . . . . 3-12
8510 Low-Voltage Compressor Electrical Phase Check and
Automatic ON/OFF Control . . . . . . . . . . . . . . . . . . . . . . . . . . . . . . . . . . . . . . . . . 3-13
System Phase Input Checkout Procedure . . . . . . . . . . . . . . . . . . . . . . . . . . . . 3-13
Automatic ON/OFF Control of the 8510 Low-Voltage Compressor
Using the On-Board Setpoint Relays . . . . . . . . . . . . . . . . . . . . . . . . . . . . . . . . 3-14
Multipump Installation . . . . . . . . . . . . . . . . . . . . . . . . . . . . . . . . . . . . . . . . . . . . . 3-14
Section 4 - Maintenance Procedures
Scheduled Maintenance . . . . . . . . . . . . . . . . . . . . . . . . . . . . . . . . . . . . . . . . . . . . . .
Removing the Compressor Adsorber . . . . . . . . . . . . . . . . . . . . . . . . . . . . . . . . .
Unscheduled Maintenance . . . . . . . . . . . . . . . . . . . . . . . . . . . . . . . . . . . . . . . . . . . .
Suggested Unscheduled Maintenance Equipment . . . . . . . . . . . . . . . . . . . . . . .
Adding Helium Gas . . . . . . . . . . . . . . . . . . . . . . . . . . . . . . . . . . . . . . . . . . .
Helium Circuit Decontamination . . . . . . . . . . . . . . . . . . . . . . . . . . . . . . . . .
Cryopump Decontamination Procedures . . . . . . . . . . . . . . . . . . . . . . . . . . .
Compressor Decontamination Procedures . . . . . . . . . . . . . . . . . . . . . . . . . .
Priming the Compressor Oil System . . . . . . . . . . . . . . . . . . . . . . . . . . . . . .
P/N 8040232
4-1
4-2
4-4
4-4
4-4
4-6
4-6
4-8
4-9
i
8510 Low-Voltage Compressor (For Use With On-Board High-Vacuum Pumps)
Table of Contents (continued)
Appendix A - Customer Support Information
Appendix B - Troubleshooting Procedures
Appendix C - Electrical Schematic for 8510 Low-Voltage Compressor
Appendix D - Electrical Control Module Components of the 8510
Low-Voltage Compressor
Appendix E - 8510 Low-Voltage Compressor Flow Diagram
Appendix F - Multiple Cryopump Installation with Single 8510 Low-Voltage
Compressor
Figures
Figure 1-1: 8510 Low-Voltage Compressor: Front and Side Views . . . . . . . . . 1-2
Figure 1-2: 8510 Low-Voltage Compressor . . . . . . . . . . . . . . . . . . . . . . . . . . . 1-4
Figure 3-1: Block Diagram for 8510 Low-Voltage Compressor Installation . . 3-1
Figure 3-2: Removing Compressor Pump Shipping Supports . . . . . . . . . . . . . . 3-2
Figure 3-3: Stripping Compressor Input-Power Cable Insulation . . . . . . . . . . . 3-3
Figure 3-4: Input Power Cable Receptacle Plug . . . . . . . . . . . . . . . . . . . . . . . . 3-4
Figure 3-5:. Wiring Diagram For Standard And Grounded Delta
Configurations . . . . . . . . . . . . . . . . . . . . . . . . . . . . . . . . . . . . . . . . 3-5
Figure 3-6: Preparing the 8510 Low-Voltage Compressor Control Module . . . 3-8
Figure 3-7: 8510 Compressor Cooling Water Flow And Pressure
Requirements . . . . . . . . . . . . . . . . . . . . . . . . . . . . . . . . . . . . . . . . . . 3-9
Figure 3-8: 8510 Compressor Water Discharge Temperature Increase ° F . . . 3-10
Figure 3-9: 8510 Low-Voltage Compressor Installation . . . . . . . . . . . . . . . . . 3-13
Figure 4-1: Disconnecting/Connecting the Adsorber Self-Sealing Couplings . 4-2
Figure C-1: Electrical Schematic for 8510 Low-Voltage Compressor Drawing No.
8031350 Rev. F . . . . . . . . . . . . . . . . . . . . . . . . . . . . . . . . . . . . . . . . C-2
ii
P/N 8040232
8510 Low-Voltage Compressor (For Use With On-Board High-Vacuum Pumps)
Table of Contents (continued)
Figure D-1: Electrical Control Module Components of 8510 Low-Voltage
Compressor . . . . . . . . . . . . . . . . . . . . . . . . . . . . . . . . . . . . . . . . . . . D-3
Figure E-1: Flow Diagram of 8510 Low-Voltage Compressor . . . . . . . . . . . . . E-1
Figure F-1: Typical Multiple Cryopump Installation with Single 8510
Low-Voltage Compressor . . . . . . . . . . . . . . . . . . . . . . . . . . . . . . . . F-1
Tables
Table 1-1: Compressor Dimensions P/N 8031315 . . . . . . . . . . . . . . . . . . . . . . 1-2
Table 1-2: Power Requirements (Steady-State Conditions) . . . . . . . . . . . . . . . 1-2
Table 1-3: General Specification . . . . . . . . . . . . . . . . . . . . . . . . . . . . . . . . . . . . 1-3
Table 2-1: 8510 Shipping Carton Contents . . . . . . . . . . . . . . . . . . . . . . . . . . . . 2-1
Table 3-1: Compressor Control Module Specifications . . . . . . . . . . . . . . . . . . 3-8
Table 3-2: Electrical Leads . . . . . . . . . . . . . . . . . . . . . . . . . . . . . . . . . . . . . . . 3-14
Table B-1: Compressor Troubleshooting Procedures . . . . . . . . . . . . . . . . . . . . B-2
Table C-1: 8510 Fuses . . . . . . . . . . . . . . . . . . . . . . . . . . . . . . . . . . . . . . . . . . . . C-1
Table C-2: Legend for Figure C-1 . . . . . . . . . . . . . . . . . . . . . . . . . . . . . . . . . . . C-3
Table D-1: Legend for Figure D-1 . . . . . . . . . . . . . . . . . . . . . . . . . . . . . . . . . . . D-2
P/N 8040232
iii
8510 Low-Voltage Compressor (For Use With On-Board High-Vacuum Pumps)
This Page Intentionally Left Blank
iv
P/N 8040232
8510 Low-Voltage Compressor (For Use With On-Board High-Vacuum Pumps)
Section 1 - Introduction
General
The manual provides instructions for installing, operating and servicing the
8510 Low-Voltage Compressor, P/N 8031315. If you are installing or
operating an On-Board High-Vacuum System you should also have
available the On-Board High-Vacuum Pump Manual that applies to your
particular system:
•
8040215 On-Board 8 and 8F High-Vacuum Pumps
•
8040233 On-Board 10 and 400 High-Vacuum Pumps
The manuals for a system cover two basic components: the high-vacuum
pump and the compressor. Each manual outlines the details necessary for
installation, operation and service of that component. A manual is shipped
with each system component (high-vacuum pump and compressor). When
you purchase a system, you will receive the two manuals necessary for
system installation, plus a loose-leaf binder with index tab separators,
allowing you to compile a complete indexed system notebook.
Installation, Operation and Service Instructions
Installation, Operation and Service Instructions for your 8510 LowVoltage Compressor provide easily accessible information. All personnel
with installation, operation, and service responsibilities should become
familiar with the contents of these instructions to ensure high quality, safe,
reliable performance.
Unit must be wired by an authorized electrician in accordance with the
national electric code, ANSI/NFPA 70-1987, as well as the local codes.
P/N 8040232
1-1
Introduction
B
A
C
D
Figure 1-1: 8510 Low-Voltage Compressor: Front and Side Views
Table 1-1: Compressor Dimensions P/N 8031315
Compressor Dimension Inches
(mm)
Location
A
19.40 max.
(493 mm)
B
21.25 max.
(540 mm)
C
24.12 max.
(613 mm)
D
2.30
(58 mm)
Table 1-2: Power Requirements (Steady-State Conditions)
Compressor
8510, Part No.
8031315
1-2
Volts
Hz
208/230 60
200
50
Phase
Full Load
Current
(Amps)
Operating Voltage
Range (Volts)
Maximum
Phase Run
Current
(Amps)
3
3
17
15
198-250
190-230
24
23
P/N 8040232
8510 Low-Voltage Compressor (For Use With On-Board High-Vacuum Pumps)
Table 1-3: General Specification
Specification
Description
Weight
340 lbs (154 kg) approximate
Weight
(shipping)
445 lbs (202 kg) approximate
Power
consumption
5 kw, nominal operating power, 6.75 kw maximum
Compressor input-power
cable
(customer-supplied)
Recommended type SO-4 conductor, 600V, neoprene jacket and
10-gauge wire.
Install per Figure B.1, electrical schematic diagram, ensuring
compliance with all national, state and local standards.
Helium pressure
Static: 195-205 psig (1345-1415 kPa) at 70 to 80°F (21 to 27°C)
Return: Normal operation: 75-85 psig (517-590 kPa) at operating
temperature.
Ambient operating
temperature range
Interface
50 to 100°F (10 to 38°C)
Cold head power receptacles (3): Mates with plugs on cold head
power cables.
Compressor input-power receptacle: Mates with Hubbel twist lock
plug No. 27723
Gas-supply connector: 1/2-inch self-sealing coupling
Gas-return connector: 1/2-inch self-sealing coupling
Remote control receptacle: 24 VAC 150ma: Mates with P4 connector
P/N MS3106A-2, supplied by BROOKS-CRYOGENICS.
Adsorber service schedule
Cooling water requirements
Replace every three years.
70°F water supply, 2.5 gpm, 14 psid (pressure drop: water inlet to
water outlet).
The pressure value does not consider discharge back-pressure conditions.
Maximum/minimum water requirements
Maximum outlet temperature 100°F (38°C)
Minimum inlet temperature 40°F (4°C)
Maximum inlet pressure 100 psig
This compressor has been designed to operate with water having a pH
value of 6.0 to 8.0 and a calcium carbonate concentration of less than 75
parts per million (typical municipal drinking water quality). For
applications of lower pH or greater hardness, water conditioning may be
necessary.
P/N 8040232
1-3
Introduction
1
8
2
10 11 12
9
13
7
6
5
4
14
3
1. Compressor power ON/OFF switch (with ON lamp).
2. On-Board System power ON/OFF switch (with ON
lamp).
3. Oil sight glass.
4. Cooling water output.
5. Cooling water input.
6. Helium gas-return connector self-sealing coupling.
7. Helium gas-supply connector self-sealing coupling.
8. Compressor motor starter reset.
9. Voltage selector switch (S3).
18
10.
11.
12.
13.
14.
15.
16.
17.
18.
17
16
15
Heater power circuit breakers (CB4 and CB5).
On-Board power circuit breakers (CB6 and CB7).
Cold head power circuit breakers (CB2 and CB3).
Cold head power cable receptacles (J10, J11, and J12).
Input power cable receptacle (J1).
Helium gas charge fitting and valve.
Helium return pressure gauge.
System power ON/OFF switch circuit breaker (CB1).
System remote control receptacle (J4).
Figure 1-2: 8510 Low-Voltage Compressor
1-4
P/N 8040232
8510 Low-Voltage Compressor (For Use With On-Board High-Vacuum Pumps)
Section 2 - Inspection
Packaging of the System
The On-Board High-Vacuum Pump System is packaged in three separate
cartons. Listed below are the contents of each carton, as they relate to these
two system applications. Note that an Installation, Operation, and
Servicing Manual is included in cartons for the high-vacuum pump and
compressor. Each manual covers the component packaged in that carton.
When installing an On-Board High-Vacuum Pump System,
BROOKS-CRYOGENICS recommends that as you unpack a component;
you perform an inspection and the necessary tasks for system installation
for the component according to the manual included with the component.
Final system installation and operation will be performed following
procedures in the On-Board 8/8F or 10 and 400 Cryopump Manual (No.
8040215 or 8040233 respectively).
Table 2-1: 8510 Shipping Carton Contents
Carton Label
On-Board 8/8F, 10 And 400 High-Vacuum
Pump System Carton Contents
Manual
Included
On-Board
On-Board 8/8F Cryopumps
8040215
On-Board
On-Board 10 and 400 Cryopumps
8040233
Compressor
8510 Low-Voltage Compressor
8040232
Accessories
Installation and Scheduled Maintenance
Tool Kit and Accessories,
P/N 8032040G014
—
The Compressor
On receipt, remove the 8510 Low-Voltage Compressor from its shipping
carton and inspect the compressor for evidence of damage as described in
this Section.
1. Unpackage and remove the compressor from its shipping
carton.
P/N 8040232
2-1
Introduction
2. Check the carton contents. It should contain:
a. 8510 Low-Voltage Compressor.
b. Two barbed fittings for compressor cooling water connections.
c. Compressor remote start connector.
d. Input power connector.
e. Oil prime manifold, P/N 8018129.
f. 8510 Low-Voltage Compressor Manual, P/N 8040232.
g. Spare fuses.
2-2
P/N 8040232
8510 Low-Voltage Compressor (For Use With On-Board High-Vacuum Pumps)
Section 3 - Installation
Removing Compressor Pump
Shipping Supports
(Refer to Page 3-2)
Assemble Compressor
Input-Power Cable
(Refer to Page 3-3)
Setting Voltage
Tap Switches
(Refer to Page 3-5)
Helium Gas Return and
Supply Connections
Verifying Helium Static Pressure
(Refer to Page 3-11)
Making Electrical
Connections
(Refer to Page 3-12)
Connecting Relay Connector Pins
Programming Relay #1 to the
Cryopump Function
(Refer to Page 3-14)
Cooling Water Connections to Compressor
Cooling Water PH Factors and Conservation
Cooling Water Flow and Pressure Requirements
Cooling Water Temperature Rise
(Refer to Page 3-5)
Oil Circuit Stabilization
(Refer to Page 3-11)
Figure 3-1: Block Diagram for 8510 Low-Voltage Compressor Installation
P/N 8040232
3-1
Introduction
Compressor Installation
Installation of your compressor requires no special tools other than those
supplied in the Installation and Scheduled Maintenance Tool Kit.
Preparing the Compressor
1. After removing the compressor front panel, refer to Figure 3-1:
and remove the front two compressor pump shipping supports.
a. Remove the front two nuts and red flat washers that secure
the compressor pump tightly in position.
NOTE: Retain the two red flat washers for use during shipment.
b. Remove the two rubber grommets that are in the package
attached to the compressor: install them, flat side up, onto
the front two mounting posts.
c. Reinstall the two nuts and screw them down flush with the
tops of the mounting posts.
d. Replace the compressor front panel.
Hex Head Nut
Red Flat Washer
Hex Head Nut
Red Flat Washer
Compressor Base
Rubber Grommets
Figure 3-2: Removing Compressor Pump Shipping Supports
3-2
P/N 8040232
8510 Low-Voltage Compressor (For Use With On-Board High-Vacuum Pumps)
Assembling the Compressor Input-Power Cable
CAUTION
Use round cable (diameter 0.595” to 1.50”) with the
BROOKS-CRYOGENICS supplied compressor receptacle plug. Do
not tin the conductor leads.
Assemble the compressor input-power cable using the BROOKSCRYOGENICS supplied compressor receptacle plug and a 600-volt power
cable that has a SO-4 conductor, 600-volt rating neoprene jacket and 10gauge wire as follows.
1. Prepare the input power cable by stripping wires and jacket of
the cables as shown in Figure 3-2:
Figure 3-3: Stripping Compressor Input-Power Cable Insulation
2. Disassemble the receptacle plug. See Figure 3-4:
a. Loosen the two assembly screws (1) securing the receptacle
plug face (2) to the cover (3) until plug face can be removed
from cover.
b. Open cord clamp (5) by loosening the two clamp screws (4)
securing the clamp to the cover.
NOTE: If you are using cable with a diameter greater than 0.895 inch,
remove the auxiliary insert (6) from the cover.
c. Insert the stripped end of the power cable into the cover
opening by starting from clamp end (6) until the stripped
conductor ends are exposed.
d. Loosen and back off all terminal screws on receptacle plug
face (2).
P/N 8040232
3-3
Introduction
Figure 3-4: Input Power Cable Receptacle Plug
e. Insert all conductors into their proper wire entrance holes on
receptacle plug face. See Figure 3-5:. Check that there are
no bare conductors exposed. Tighten terminal screws to 912 in.-lbs. torque. Users with 3-phase power, where one
phase is at or near ground potential, must connect to the
compressor as shown in Figure 3-5:
WARNING
For installation where one of the 3-phase legs is at or near ground
potential, connect that leg to terminal X on the compressor, as shown in
Figure 3-5:
3-4
P/N 8040232
8510 Low-Voltage Compressor (For Use With On-Board High-Vacuum Pumps)
PHASE A
X
PHASE B
Y
PHASE C
Z
GROUND
G
COMPRESSOR-RECEPTACLE PLUG
SUPPLIED BY BROOKS-CRYOGENICS
STANDARD CONFIGURATION
Figure 3-5:. Wiring Diagram For Standard And Grounded Delta Configurations
3. Assemble the receptacle plug by sliding the cover over the wire
assembly noting key (7). Align the key on the cover to the keyway
on the plug face and tighten the two assembly screws (1) to secure
the cover and plug face. Alternately tighten the clamp screws (4) to
8-10 in.-lbs. torque.
WARNING
Insure that the ground wire is returned to the equipment grounding conductor of the circuit supplying the receptacle.
4. Refer to 8510 Low-Voltage Compressor Electrical Phase Check
and Automatic ON/OFF Control, for correct phasing checkout
procedure.
Do not connect the compressor to the power source at this time. All of the
preparation must be completed and all the panels reinstalled before
electrically connecting the compressor.
Electrical Preparation Of Compressor Control Module
1. Refer to Table 1-2: for electrical power requirements. Then,
using a voltmeter, measure the phase-to-phase voltage from the
power source.
2. Prepare the compressor voltage selector switch S3 as required in
accordance with Figure 3-6:
Cooling Water: Preparation
If flexible water hose connections are used, install the barbed fittings
supplied with the compressor on the input and output connections:
1. Apply a light coating of standard plumbing thread sealant on
the barbed fitting threads.
P/N 8040232
3-5
Introduction
2. Tighten fittings on 1/2-inch FPT input and output connections. DO
NOT OVERTIGHTEN.
3. Connect flexible hoses to the fittings and secure with hose clamps.
If hard piping is desired, install the water lines directly onto the compressor
1/2-inch FPT input and output connections. DO NOT OVERTIGHTEN.
CAUTION
Check water connections for leaks.
Cooling Water: General Considerations
NOTE: Adjust your water flow to maintain an optimum discharge water
temperature of 80° F with a minimum input pressure of 7 psi. For detailed
water requirements, see below.
1. Cooling water must meet flow and pressure requirements as
indicated in the following subsections.
2. Cooling water should have a pH value of 6.0 to 8.0 and a calciumcarbonate concentration of less than 77ppm. The quality of typical
municipal drinking water is generally acceptable. If the cooling
water has a pH value lower than 6.0 or a calcium-carbonate concentration higher than 77 ppm, water conditioning may be required.
3. To conserve water, the cooling water should be shut off when the
compressor is not running.
CAUTION
If cooling water below 45° F (7° C) is allowed to run through the
compressor while the compressor is not operating, the compressor oil
will change viscosity and thicken, causing the compressor to overheat
and shut off at startup. In this event, repeatedly restart the compressor
and allow it to run until it has shut off several times. The oil
temperature will rise and thereby allow continuous compressor
operation.
4. Drain and purge water from the compressor before shipping it back
to the factory or subjecting it to freezing conditions. Purge water
from the compressor by blowing compressed air, regulated to 30 to
40 psig (200 to 275 kPa) into the compressor output connection and
allowing water to exit from the water input connection.
3-6
P/N 8040232
8510 Low-Voltage Compressor (For Use With On-Board High-Vacuum Pumps)
Cooling Water: Flow and Pressure Requirements
CAUTION
If your water supply pressure falls below 7psig due to back pressure,
the compressor will overheat and shut down.
Use the two graphs in Figure 3-7: to determine the minimum acceptable
cooling water supply pressure at different flow rates and temperatures.
Find the minimum pressure:
P/N 8040232
3-7
Introduction
Heater Power
Circuit Breakers
(CB4, CB5)
On-Board Power
Circuit Breakers
(CB6, CB7)
Cold Head Power
Circuit Breakers
(CB2, CB3)
System Power
ON/OFF Switch Circuit
Breaker (CB1)
Voltage
Selector Switch
(S3)
Cold Head Power
Cable Receptacles
(J10, J11, J12)
System Remote
Control Receptacle
(J4)
Input Power Cable
Receptacle
(J1)
Figure 3-6: Preparing the 8510 Low-Voltage Compressor Control Module
Table 3-1: Compressor Control Module Specifications
Compressor
Configuration
Frequency (Hz)
Voltage
Voltage Selector
Switch S3 Setting
P/N 8031315 220/
230 VAC, 50/60 Hz
50
50
190-210*
210-230
Low
Med
60
60
198-230*
230-250
Low
Med
*Factory setting
3-8
P/N 8040232
8510 Low-Voltage Compressor (For Use With On-Board High-Vacuum Pumps)
NOTE: Without
consideration of back
pressure.
Figure 3-7: 8510 Compressor Cooling Water Flow And Pressure Requirements
1. Determine the temperature of the cooling water. Allow a ±10° F
to the present water temperature if a variation cannot be
ascertained. Plot the high and low temperatures on the vertical
axis of the lower graph.
The example describes cooling water that varies between 45° F and 67° F.
2. Determine the optimum water flow rate by drawing a horizontal
line from the upper temperature variation figure on the lower graph
to the upper curve of the allowable operating range indicated by
cross-hatching. Draw a line from this intersecting point straight
down to the horizontal axis to find the optimal flow rate.
The example shows a solid arrow extending from 67° F and intersecting
the allowable operating range. Dashed arrows pointing downward indicate
a water flow rate of 2.5 gallons per minute.
3. Determine the cooling water supply pressure drop by drawing a
straight line up from the flow rate in the lower graph to the upper
graph. At the point at which this line intersects the upper graph,
draw a line leftward to the vertical axis and find the water supply
pressure drop.
P/N 8040232
3-9
Introduction
The example shows dashed arrows extending from the lower to the upper
graph. On the upper graph the dashed arrows intersect the graph curve at
approximately 15 psig.
4. Determine the total cooling water supply pressure drop by adding
the pressure drop determined from the graph to the water back pressure at the installation site.
Cooling Water: Temperature Rise
CAUTION
The temperature of the cooling water as it leaves the compressor should
not exceed 100° F.
Use the graph in Figure 3-8: to determine the rise in cooling water
temperature as it passes through the compressor. The recommended
discharge temperature for the compressor is 80° F. This information is used
by plant engineering personnel to determine cooling water requirements.
NOTE: Used for
clarification of example
presented in text.
Figure 3-8: 8510 Compressor Water Discharge Temperature Increase ° F
Find the temperature rise:
1. Draw a vertical line upward from the horizontal axis of the
graph at the water flow rate determined from the previous
section, until it hits the graph curve.
3-10
P/N 8040232
8510 Low-Voltage Compressor (For Use With On-Board High-Vacuum Pumps)
The example shows dashed arrows pointing upward to the graph curve
from 2.5 gpm on the water flow rate axis.
2. At the point which the dashed arrows intersect the graph curve,
draw a straight line to the left to obtain the increase in output water
temperature.
The example shows a temperature increase of 14° F.
Oil Circuit Stabilization
1. Check to insure that the cover and all panels are properly
installed on the compressor.
2. With the system power ON/OFF switch in the OFF position, connect the input-power cable to the power source. If necessary, refer
to Table 1-1: for electrical requirements.
3. Place the system power switch to the ON position and allow the
compressor to run 15 minutes to stabilize the oil circuit. If the compressor shuts down, oil system priming may be necessary. Refer to
Section 4 - Maintenance Procedures for compressor oil priming
procedures.
Connecting the Compressor to the Cryopump
NOTE: If your application requires the use of multiple compressors on a
single gas manifold, you must install an external check valve on each
compressor. Order BROOKS-CRYOGENICS’ Kit No. 8080275K004 and
contact the Product Service Department for installation guidance on
manifolding compressors.
Make the connections between the cryopump and compressor. See Figure
3-9:
1. Remove all dust plugs and caps from the supply fittings and
return lines, compressor, and cryopump cold head. Check all
fittings.
2. Connect the helium-gas return line from the gas return connector on
the rear of the compressor to the gas-return connector on the
cryopump cold head.
3. Connect the helium-gas supply line from the gas-supply connector
on the rear of the compressor to the gas-supply connector on the
cryopump cold head.
4. Attach the supply and return line identification decals
(BROOKS-CRYOGENICS supplied) to their respective connecting
piping ends.
P/N 8040232
3-11
Introduction
Verify proper helium supply static pressure by confirming that the helium
pressure gauge reads 195-205 psig (1345-1415 kPa), in an ambient
temperature range of 50 to 100° F (10 to 38° C).
If the indicated pressure is higher than 205 psig (1415 kPa), reduce the
pressure as follows:
1. Remove the flare cap from the gas charge fitting located on the
rear of the compressor.
2. Open the gas charge valve very slowly. Allow a slight amount of
helium gas to escape until the helium pressure gauge reads 200 psig
(1380 kPa).
3. Close the gas charge valve and reinstall the flare cap.
If the indicated pressure is lower than 195 psig (1345 kPa), add helium gas
as described in Section 4 -Maintenance Procedures.
Electrical Connection of Compressor
WARNING
The system power switch on the rear of the compressor must be in the
OFF position before making any and all electrical connections.
1. Connect the power cable to the rear panel of the compressor and
the other end to the electrical power connector on the
cryopump.
2. Plug the compressor input power cable into the power source.
3. Turn the system power switch on the rear of the compressor to the
ON position.
3-12
P/N 8040232
8510 Low-Voltage Compressor (For Use With On-Board High-Vacuum Pumps)
User’s
Vacuum
Chamber
On-Board
Cryopump
Helium Supply Line
Helium Return Line
On-Board Power Cable
Roughing Pump
Air Pressure (60-80 psi)
Nitrogen (40-80 psi)
Figure 3-9: 8510 Low-Voltage Compressor Installation
8510 Low-Voltage Compressor Electrical Phase Check and
Automatic ON/OFF Control
System Phase Input Checkout Procedure
To check that the correct phasing is being supplied to the On-Board
cryopump, proceed as follows:
1. Press CONTROL key on the On-Board keypad.
2. Press 1 to turn the cryopump on.
3. If the cryopump turns on, keypad displays CRYO ON the system
phasing is correct.
4. Press 0 to turn cryopump off.
5. If the cryopump does not turn on when 1 is pressed, keypad display
reads NO CRYO POWER 2 . This means that incorrect phasing is
being supplied to the 8510 Compressor from its power source.
6. To correct the phasing, interchange any two of the three phase
wires at the compressor receptacle plug. See Figure 3-5:
P/N 8040232
3-13
Introduction
Automatic ON/OFF Control of the 8510 Low-Voltage Compressor
Using the On-Board Setpoint Relays
The 8510 Low-Voltage Compressor remote start feature can be used with
one of the On-Board setpoint relays to automatically turn the compressor
on when the cryopump is turned on and turn it off when the cryopump is
turned off. Disconnect the jumper on the “jumper” connector supplied and
installed on the compressor REMOTE connector J4. Connect the electrical
leads from the On-Board relay using 18 awg or larger wire (2.7A inductive
load) to the remote connector as follows:
Table 3-2: Electrical Leads
On-Board Relay
Connector
8510 Remote
Connector (J5)
Pin #8
A
Pin #6
B
Now program Relay 1 to the cryopump function as described below.
1. Press the RELAY function key.
2. Select Relay 1 by pressing 1.
3. Press the Next key until the display reads CRYOPUMP.
4. Press Enter and the display should read FNC = CRYOPUMP
(function is cryopump operation).
5. Press the CONTROL function key. Programming is complete.
NOTE: Be sure that the compressor switch is off before connecting or
disconnecting the remote connector.
Multipump Installation
Your 8510 Low-Voltage Compressor can be connected to more than one
high-vacuum pump at a time. For example, three On-Board 8 vacuum
pumps can be connected to a single 8510 Low-Voltage Compressor.
CAUTION
For detailed instructions on multiple Cryopump installation, refer to
Appendix F.
3-14
P/N 8040232
8510 Low-Voltage Compressor (For Use With On-Board High-Vacuum Pumps)
Section 4 - Maintenance Procedures
WARNING
Always disconnect the compressor from all sources of electrical power
before performing any maintenance procedures.
Unit must be wired by an authorized electrician in accordance with the
national Electrical Code, ANSI/NFPA 70-1987, as well as the local
codes. This shall include installation of a readily accessible disconnect
device into the fixed wiring supplying power.
An insulated safety grounding conductor that is identical in size, insulation material and thickness to the circuit supply conductors, except that
it is green with or without one or more yellow stripes is to be installed as
part of the branch circuit which supplies the unit or system. The grounding conductor described is to be connected to equipment grounding conductor of the supply circuit.
Scheduled Maintenance
The only scheduled maintenance required on the 8510 Low-Voltage
Compressor is replacement of the compressor adsorber (P/N
8080275K001) every three years.
P/N 8040232
4-1
Introduction
Compressor
Rear
Panel
This 1 1/8 in. wrench This 1 3/16 in. wrench is used
holds the coupling in to loosen the self sealing
a stationary position. coupling connector. Note the
direction of the large arrow.
This 1 1/8 in. wrench This 1 3/16 in. wrench is used
holds the coupling in to tighten the self sealing
a stationary position. coupling connector. Note the
direction of the large arrow.
To Disconnect The Coupling
To Connect The Coupling
Figure 4-1: Disconnecting/Connecting the Adsorber Self-Sealing Couplings
Removing the Compressor Adsorber
To remove the compressor adsorber see Figure 4-1: and proceed as
follows:
1. Shut down the compressor.
2. Disconnect the compressor input power cable from its electrical
power source and disconnect the water lines.
3. Disconnect the flex lines from the gas-return and gas-supply connectors at the rear of the compressor.
NOTE: Use the two wrenches supplied in the Installation and Scheduled
Maintenance Tool Kit to avoid loosening the body of the coupling from its
adapter. Hold one wrench fast on the coupling half attached to the rear side
of the compressor. Use the other wrench to loosen the coupling on the
helium supply or return line.
4. Loosen the four screws that hold the compressor rear panel and
remove the panel.
5. Disconnect the adsorber-inlet self-sealing coupling. See Figure 4-1:
6. Remove the bolts, nuts, and washers that secure the adsorber to the
base of the compressor. Save all hardware.
4-2
P/N 8040232
8510 Low-Voltage Compressor (For Use With On-Board High-Vacuum Pumps)
7. Carefully slide the adsorber outward until it clear the compressor
and remove the adsorber.
WARNING
Depressurize the adsorber before disposing of it. Attach the depressurization fitting (included in the Installation and Scheduled Maintenance
Tool Kit) to the coupling half at either end of the adsorber and tighten it
slowly. Installing the Compressor Adsorber
1. Install the replacement adsorber as follows:
a. Remove the dust caps from the self-sealing coupling halves
at each end of the replacement adsorber.
b. Install the replacement adsorber following the steps for
compressor adsorber removal in reverse order. Use the hardware saved from adsorber removal.
2. Connect the adsorber to the compressor internal piping as follows:
a. Check the self-sealing connector flat rubber gasket to make
sure that it is clean and properly positioned.
b. Make the first turns by hand and then firmly seal the connection using the two wrenches until the fittings “bottom”.
CAUTION
Make sure to hold fast on the left coupling nut while tightening the
right coupling nut, as shown in Figure 4-1:
c. Using the two wrenches supplied in the Installation and
Scheduled Maintenance Tool Kit, make the connection
quickly to minimize minor gas leakage. See Figure 4-1:
3. Replace the panel and secure it by tightening the four screws.
4. Ensure that the pressure gauge reads 195-205 psig (1345-1415
kPa). If additional gas pressure is required, follow the instructions
under, Adding Helium Gas. Record the date that the adsorber was
replaced, and also make a note that the next adsorber replacement is
in three years.
5. Connect the flex lines to the gas-return and gas-supply connectors
at the rear of the compressor.
P/N 8040232
4-3
Introduction
6. Connect the water lines to the compressor fittings and secure with
hose clamps. If hard piping is used, apply a light coating of plumbing thread sealant on threads and install water lines onto the compressor. DO NOT OVERTIGHTEN.
CAUTION
Check water connections for leaks.
7. Connect the cold head power cables to the compressor connectors.
8. Plug the compressor input power cable into the power source.
Unscheduled Maintenance
Suggested Unscheduled Maintenance Equipment
It is advisable to keep on hand the unscheduled maintenance equipment
and disposable supplies listed below.
1. Helium, 99.999% pure.
2. Pressure regulator (0-3000/0-400 psig).
3. Maintenance manifold, P/N 8080250K003*.
4. Helium charging line terminating in a 1/4-inch female flare fitting,
P/N 7021002P001.
5. Installation and Scheduled Maintenance Tool Kit, P/N
8032040G014.
*Available from stock; consult the factory or your sales representative.
Adding Helium Gas
Use only 99.999% pure helium gas.
CAUTION
If the compressor helium pressure gauge reads 0, decontamination is
required. Refer to Helium Circuit Decontamination within this
section or contact the Product Service Department.
1. A user-supplied helium charging line terminating in a 1/4-inch
female flare fitting, and a two-stage pressure regulator rated at
0-3000/0-400 psig is required for this operation.
4-4
P/N 8040232
8510 Low-Voltage Compressor (For Use With On-Board High-Vacuum Pumps)
2. If you need to add helium more than once every several months,
check for leaks caused by improperly connected self-sealing connections or any mechanical joint within the compressor.
There are two conditions that require the addition of helium gas:
1. Compressor not operating; helium pressure gauge reads 195
psig (1345 kPa), or below.
2. Compressor operating; helium pressure reads 75 psig (517 kPa), or
below.
To add helium gas:
1. Attach a two-stage regulator (0-3000/0-400 psig) and charging
line to a helium gas (99.999% pure). DO NOT OPEN THE
BOTTLE AT THIS TIME. Purge the regulator and charging
lines as instructed in steps a through e below. Do not use helium
gas that is less than 99.999% pure.
a. Open the regulator a small amount by turning the adjusting
knob clockwise until it contacts the diaphragm, then turn
approximately 1/8 to 1/4 turn more, so that the regulator is
barely open.
b. Slowly open the bottle valve, and purge the regulator for 10
to 15 seconds. Turn the regulator knob counterclockwise
until the helium stops flowing.
c. Connect the charge line to the helium pressure regulator.
d. Remove the flare cap of the gas charge fitting on the rear of
the compressor. Loosely connect the charge line to the
charge fitting.
e. Set the helium pressure regulator to 10 to 25 psig (70-125
kPa). Allow helium gas to flow through the charging line
and around the loosened flare fitting for 30 seconds to purge
the charging line of air. Then tighten the flare nut at the end
of the charge line.
(This procedure is required to ensure that both the regulator and the
charging line will be purged of air and that the air trapped in the regulator
will not diffuse back into the helium bottle. For best results, BROOKS
suggests a dedicated helium bottle, regulator, and line, which are never
separated, for adding helium.)
2. Set the helium pressure regulator to 300 psig (2070 kPa). Depending on the compressor operating state, add helium gas:
a. If the compressor is running (approximately 2 hours operat-
P/N 8040232
4-5
Introduction
ing time) under normal operating conditions, slowly open
the helium charge valve on the rear of the compressor.
When the helium pressure gauge rises to 75-85 psig (517590 kPa) tightly close the charge valve.
b. If the compressor is not running, slowly open the helium
charge valve. When the helium pressure gauge rises to 195205 psig (1345-1415 kPa), tightly close the charge valve.
CAUTION
Add helium gas slowly to prevent relief valve blow-off.
3. Ensure that the helium charge valve on the compressor is tightly
closed. Shut off the helium pressure regulator on the helium bottle
and remove the charging line from the male flare fitting. Shut off
the helium gas bottle valve. Reinstall the flare cap.
Helium Circuit Decontamination
Contamination of the helium-gas circuit is indicated by sluggish or
intermittent operation (ratchetting) of the cold head drive mechanism. With
severe contamination the cold head drive may seize and fail to operate. One
of the major sources of contamination is using helium gas of less than the
required purity. When performing the decontamination process, use only
99.999% pure-helium gas, and the regulator and charging line must be
properly connected and purged. This contamination procedure will remove
contaminants from the cold head and/or compressor, thereby restoring
system performance. The cold-trapping of contaminants inside the cold
head during this procedure will also decontaminate the compressor if the
contamination of the system is not severe. Separate decontamination of the
compressor is required whenever the compressor has been opened to
atmosphere, or the pressure dropped to zero.
Cryopump Decontamination Procedures
1. Cool down the cryopump and operate it for one to three hours.
If the system will not cool down, proceed to step 2. Operating
the cryopump will isolate the contaminants by “freezing” them
in the cold head. The contaminants in the helium-gas circuit of
the cryopump tend to become frozen inside the cold head. The
longer the cryopump is operated beyond the one-hour period,
the greater is the amount of contamination that becomes
isolated inside the cold head.
2. Shut down the compressor as follows:
4-6
P/N 8040232
8510 Low-Voltage Compressor (For Use With On-Board High-Vacuum Pumps)
a. Close the Hi-Vac valve in your vacuum system.
b. Turn off the system power ON/OFF switch.
CAUTION
Exposing the cryopump to atmosphere during warm-up will cause
excessive water vapor adsorption by the charcoal of the 15K array.
3. Immediately disconnect the helium-gas supply and helium-gas
return lines from the gas-supply and gas-return connectors at the
rear of the compressor. Leave them attached to the cold head.
4. Attach the maintenance manifold (P/N 8080250K003) to the disconnected ends of the helium-gas return and helium-gas supply
lines.
5. Reduce the pressure in the cold head to a level of 45 psig by using
the maintenance manifold.
6. If you have the automatic REGEN ON-BOARD option, start a
regeneration and then discontinue it when the cryopump reaches
300K. If you only have the manual regeneration option, turn the
cryopump off and open the purge valve until the second stage
reaches room temperature.
7. Allow the second stage of the cold head to warm up to room temperature. Warm-up time can be reduced by purging the cryopump
with warm dry argon or nitrogen gas. Using the gas heater,
BROOKS P/N 8080250K020, will reduce warm-up time about 50
percent, and will maintain the gas temperature below the 150°F
(66°C) limit.
8. Once the cryopump has reached room temperature, attach a twostage regulator (0-3000/0-400 psig) and charging line to a helium
bottle (99.999% pure). DO NOT OPEN THE BOTTLE VALVE AT
THIS TIME. Purge the regulator and charging line as instructed in
steps a through e in Adding Helium Gas. Do not use helium gas
that is less than 99.999% pure.
9. Perform in sequence:
a. Backfill the cold head and helium-gas return and supply
lines with helium to a static charge pressure of 195-205 psig
(1345-1415 kPa) by adjusting the regulator to the required
pressure, and opening the valve on the manifold. Close the
valve when the pressure is correct.
b. Depressurize the cold head by slowly opening the ball valve
P/N 8040232
4-7
Introduction
and allowing the helium to bleed out slowly. Do not reduce
the pressure to less than 30 psig or the cold head may be
further contaminated.
c. Perform flushing steps a and b three more times.
d. Pressurize the cold head to the static charge pressure of 195205 psig (1345-1415 kPa) and run the cold head drive motor
for 10 to 30 seconds by actuating the controller ON/OFF
switch to on.
e. Perform steps b through d three more times for a total of 16
flushes and a total of 4 drive-motor runs.
10. Verify that the cold head is pressurized to the static charge pressure
of 195-205 psig (1345-1415 kPa).
11. Disconnect the maintenance manifold from the helium-gas return
and helium-gas supply lines.
12. Reconnect the helium-gas return and helium-gas supply lines to the
return and supply connectors at the rear of the compressor. The
cryopump is now ready for operation.
Compressor Decontamination Procedures
The procedure to decontaminate a compressor is similar to the above
procedure with certain exceptions.
•
There is no need to operate the cryopump before decontaminating
the compressor.
•
The maintenance manifold and helium-gas supply and helium-gas
return lines will be connected to the supply and return fittings on
the compressor.
1. Open the ball valve slightly on the maintenance manifold and
allow the helium to bleed out and depressurize the compressor
(if pressurized) to 30 psig.
2. Charge the compressor slowly to approximately 200 psig (1380
kPa) by opening the 1/8-inch valve on the maintenance manifold.
3. Run the compressor for about 30 seconds.
4. Repeat steps 1 and 2, one time.
5. Disconnect the maintenance manifold from the helium-gas return
and helium-gas supply lines.
6. Reconnect the helium-gas return and helium-gas supply lines to the
return and supply connectors on the cold head. The compressor is
now ready for operation.
4-8
P/N 8040232
8510 Low-Voltage Compressor (For Use With On-Board High-Vacuum Pumps)
NOTE: After connecting the compressor to the cryopump, and operating
the system for a period of time, it may be necessary to decontaminate the
cryopump as some residual contamination from the compressor may
become trapped in the cold head. If the entire system was reduced to zero
psig (a broken flex line, for example), then the cryopump and compressor
would have to be decontaminated according to the cryopump
decontamination. Refer to Helium Circuit Decontamination within this
section.
Priming the Compressor Oil System
The oil-prime manifold (P/N 8018129) supplied with the 8510 LowVoltage Compressor is used to prime the compressor oil system when any
of the following conditions exist:
1. The compressor has been inoperative for a period of three
months or longer.
2. The compressor is not operating and the supply pressure gauge
reads 0 psig. If this condition exists contact the Product Service
Department for corrective action before priming the compressor.
3. The compressor has automatically shut off because of a loss of
helium supply pressure.
Priming procedures are:
1. Disconnect the helium return and supply lines from the rear of
the compressor.
2. Install the oil-prime manifold on the compressor supply and return
connectors.
3. Ensure that the pressure gauge reads 195-205 psig (1345-1415
kPa). If additional gas pressure is required, follow the instructions
under, Adding Helium Gas.
4. Turn the compressor switch to the ON position and allow the compressor to run between 15 and 30 minutes.
5. After completing the oil-system priming turn off the compressor
and remove the oil-prime manifold.
6. Reconnect the helium return and supply lines on the rear of the
compressor.
P/N 8040232
4-9
Introduction
This Page Intentionally Left Blank
4-10
P/N 8040232
Appendix A - Customer Support Information
Customer Support Center Locations
To locate a Customer Support Center near you, please visit our website
www.brooks.com on the world wide web and select CONTACT on the
home page.
Guaranteed Up-Time Support (GUTS®)
For 24-hour, 7-day per week Guaranteed Up-Time Support (GUTS) dial:
1 800-367-4887 - Inside the United States of America
+1 508-337-5599 - Outside the United States of America
Product Information
Please have the following information available when calling so that we
may assist you:
•
Product Part Number
•
Product Serial Number
•
Product Application
•
Specific Problem Area
•
Hours of Operation
•
Equipment Type
•
Vacuum System Brand/Model/Date of Manufacture
E-mail
For your convenience, you may also e-mail us at:
[email protected]
©2013 Brooks Automation Inc.
A-1
This Page Intentionally Left Blank
8510 Low-Voltage Compressor (For Use With On-Board High-Vacuum Pumps)
Appendix B - Troubleshooting Procedures
Troubleshooting the Compressor
The compressor troubleshooting procedures are summarized in Table B-1:
Technical Inquiries
Please refer to Appendix A of this manual for a complete list of the
BROOKS-CRYOGENICS’ world wide customer support centers.
WARNING
Disconnect the compressor before performing any troubleshooting
procedures.
The compressor pump is hot after operating. Wait for the pump to cool
down before working on the inside of the compressor
Do not change or modify any compressor internal wiring circuits, this
may cause failure of the compressor and cold head due to improper
phasing.
P/N 8040232
B-1
Introduction
Table B-1: Compressor Troubleshooting Procedures
Problem
1) System power ON/
OFF switch (CB1) and
compressor switch (S1)
remains in the ON position when switched on
but the compressor will
not run. Refer to Figure
C-1 for identification of
all electrical components.
Possible Cause
Corrective Action
1) No power coming from the
source.
1) Check source fuses, circuit
breakers, and wiring associated
with the power source, and repair
as needed.
2) Insufficient voltage at power
source.
2) Verify adequate phase to phase
input voltage. Refer to Table 1-2:
3) Control circuit fuses missing
or blown.
3) Check control fuses 1FU, 2FU,
and 3FU. If any of these fuses are
blown, contact the Product Service Department.
4) Improperly wired external
remote control circuit. This will
apply only if the remote control
feature is being utilized.
4) Verify correct installation of
remote control feature by referring to Table 3-2:
5) Check voltage setting of switch
S3, see Figure 3-6:
5) Incorrect control circuit voltage.
6) Excessive current drawn by
the compressor pump has
caused the overload relay in the
motor contactor (MI) to open.
2) System power ON/
OFF switch (CB1) will
not remain in the ON
position when switched
on. The switch circuit
breaker trips when
excessive current is
being drawn by the cold
head or 24-volt compressor control circuits.
B-2
6) a. Reset the overload relay in
the motor contactor. Refer to Figure C-1:, for its location.
b. Contact the Product Service Department.
1) Damaged On-Board power
cable, connectors or drive
motor.
1) Check for compressor operation with each cold head connection (P2, P3 or P4) disconnected
from compressor. Contact the
Product Service Department if the
compressor operates improperly.
2) Damaged component in the
compressor power or control
circuit.
2) Contact the Product Service
Department.
P/N 8040232
8510 Low-Voltage Compressor (For Use With On-Board High-Vacuum Pumps)
Table B-1: Compressor Troubleshooting Procedures
Problem
Possible Cause
3) System power ON/
OFF switch (CB1)
remains in the ON position, and the compressor
stops after several minutes of operation and
remains off.
1) Loss or degradation of power
coming from power source.
1) Ensure a constant supply of
power per Table 1-2:
2) Thermal protective switches
are open.
2) Check for inadequate water
cooling, see Table 1-3:
3) Very cold cooling water has
caused a restriction of oil flow
through the oil injection orifice
during startup.
3) Recheck for proper cooling
water temperature per Table 1-1:
Restart the compressor repeatedly until continuous operation is
achieved.
P/N 8040232
Corrective Action
B-3
Introduction
This Page Intentionally Left Blank
B-4
P/N 8040232
8510 Low-Voltage Compressor (For Use With On-Board High-Vacuum Pumps)
Appendix C - Electrical Schematic for 8510
Low-Voltage Compressor
Table C-1: 8510 Fuses
Fuse Designation
Amp Rating
Bussman* P/N
1FU
1
MDX1
2FU
1
MDX1
3FU
2
MDX2
4FU
3.2
MDL 3 2/10
5FU
3.2
MDL 3 2/10
6FU
3.2
MDL 3 2/10
7FU
0.5
MDL 1/2
8FU
0.5
MDL 1/2
9FU
0.125
MDL 1/8
*Replacement parts must be Bussman type only.
P/N 8040232
C-1
Introduction
Figure C-1: Electrical Schematic for 8510 Low-Voltage Compressor Drawing No. 8031350
Rev. F
C-2
P/N 8040232
8510 Low-Voltage Compressor (For Use With On-Board High-Vacuum Pumps)
Table C-2: Legend for Figure C-1
Component
Description
CB1
Circuit Breaker, 25 Amps, Main Power
CB2 &CB3
CB4 & CB5
CB6 & CB7
ETM
J1
J4
J10 Thru J12
K2
Circuit Breakers, 3 Amps, Cryopump Power
Circuit Breakers, 5 Amps, Heater Power
Circuit Breakers, 5 Amps, On-Board Power
Elapsed Time Meter
Input Power Connector
Remote ON/OFF Connector
On-Board Power Output Connectors
On-Board Power/Cryopump Heater Relay
K3
K4
K5
K6
M1
OL1
PM
PUMP
R1
S1
S2
S3
SOL1
SOL2
T1 & T2
T3
TD1
TS1
TS2
TS3
Voltage Select Relay
Remote ON/OFF Relay
Compressor Start Relay
Cryopump Phase Monitor Relay
Motor Starter
Motor Overload Protector
Phase Monitor
Compressor Pump
Resistor - 150 Ohms, 5 Watts
Compressor Power Switch (With Lamp LT1)
On-Board Power Switch (With Lamp LT3)
Voltage Select Switch
Solenoid Valve - Oil Flow
Solenoid Valve - Gas Flow
Cold Head Drive Transformer
Control Transformer, 24 VAC
Time Delay Relay
Thermal Protective Switch -Oil Flow/Gas Discharge Temperature
Thermal Protective Switch - Oil Flow/Motor Temperature
Thermal Protective Switch - Oil/Water Temperature
P/N 8040232
C-3
Introduction
This Page Intentionally Left Blank
C-4
P/N 8040232
8510 Low-Voltage Compressor (For Use With On-Board High-Vacuum Pumps)
Appendix D - Electrical Control Module
Components of the 8510
Low-Voltage Compressor
P/N 8040232
D-1
Introduction
Table D-1: Legend for Figure D-1
Item
Number
1
2
3
4
5
6
7
8
9
10
11
12
13
14
15
16
17
18
19
20
21
22
23
24
25
26
27
28
29
30
31
32
33
34
35
36
37
38
39
D-2
Description
Cryopump Phase Monitor Relay
Compressor Start Relay
Remote ON/OFF Relay
Voltage Select Relay
On-Board Power/Cryopump Heater Relay
Time Delay Relay
Control Transformer, 24 VAC
Cold Head Drive Transformer
On-Board Power Switch (with Lamp LT3)
Compressor Power Switch (with Lamp LT1)
Cold Head Drive Transformer
Fuse - 0.125A, Slow-Blow, Bussman, MDL 1/8
Fuse - 0.5A, Slow-Blow, Bussman, MDL 1/2
Fuse - 0.5A, Slow-Blow, Bussman, MDL 1/2
Fuse - 3.2A, Slow-Blow, Bussman, MDL 3 2/10
Fuse - 3.2A, Slow-Blow, Bussman, MDL 3 2/10
Fuse - 3.2A, Slow-Blow, Bussman, MDL 3 2/10
Fuse - 2.0A, Slow-Blow, Bussman, MDX 2
Fuse - 1.0A, Slow-Blow, Bussman, MDX 1
Fuse - 1.0A, Slow-Blow, Bussman, MDX 1
Fuse - 1.0A, Slow-Blow, Bussman, MDX 1
Resistor - 150 Ohms, 5 Watts
Motor Starter
Phase Monitor
Motor Overload Protector
Voltage Select Switch
Motor Starter Reset
Remote ON/OFF Connector
Input Power Connector
On-Board Power Output Connector
On-Board Power Output Connector
On-Board Power Output Connector
Circuit Breaker, 3A, Cryopump Power
Circuit Breaker, 3A, Cryopump Power
Circuit Breaker, 5A, On-Board Power
Circuit Breaker, 5A, On-Board Power
Circuit Breaker, 5A, Heater Power
Circuit Breaker, 5A, Heater Power
Circuit Breaker, 25A, Main Power
Symbol
Designation
K6
K5
K4
K3
K2
TD1
T3
T2
S2
S1
ETM
T1
9FU
8FU
7FU
6FU
5FU
4FU
3FU
2FU
1FU
R1
M1
PM
OL1
S3
M1 Reset
J4
J1
J12
J11
J10
CB3
CB2
CB7
CB6
CB5
CB4
CB1
P/N 8040232
8510 Low-Voltage Compressor (For Use With On-Board High-Vacuum Pumps)
Figure D-1:Electrical Control Module Components of 8510 Low-Voltage
P/N 8040232
D-3
Introduction
This Page Intentionally Left Blank
D-4
P/N 8040232
8510 Low-Voltage Compressor (For Use With On-Board High-Vacuum Pumps)
Appendix E - 8510 Low-Voltage
Compressor Flow Diagram
Figure E-1: Flow Diagram of 8510 Low-Voltage Compressor
P/N 8040232
E-1
Introduction
This Page Intentionally Left Blank
E-2
P/N 8040232
8510 Low-Voltage Compressor (For Use With On-Board High-Vacuum Pumps)
Appendix F - Multiple Cryopump Installation
with Single 8510 Low-Voltage Compressor
Your 8510 Compressor may be used to drive a number of multiple
On-Board cryopump combinations.
Figure F-1: depicts a typical multi-cryopump installation with an 8510
Low-Voltage Compressor. As shown in this figure, a power cable is
connected from the compressor to each cold head; also, the components are
helium connected in parallel (all supply fittings piped together).
8510 Compressor
On-Board
On-Board
On-Board
Cryopump
Cryopump
Cryopump
On-Board Power Cables
1
2
3
Helium Return Line
Helium Supply Line
Input Power
Figure F-1: Typical Multiple Cryopump Installation with Single 8510 Low-Voltage
Compressor
Shown in Figure F-1: is a typical multiple cryopump installation. If you are
considering a multiple cryopump installation please contact the
BROOKS-CRYOGENICS, U.S.A., Application Engineering Department
(1-800-447-5007) for technical assistance in the selection and sizing of the
manifolds and interconnecting lines for your particular installation.
P/N 8040232
F-1
Introduction
Preliminary System Requirements
Installation of the 8510 Low-Voltage Compressor for use with a single
cryopump is covered in Section 3 - Installation. Installation for multiple
cryopump usage is similar, but requires that system charge pressure be
established for a given high-vacuum pump system. Additionally, the
following parameters must be considered before the system can be
assembled.
•
All system components must be assembled and be operational for
system static charge pressure determination.
•
All system components must have static charge pressures of
195-205 psig at 70° F to 80° F (21° C to 27° C).
Determining System Charge Pressure
To establish the helium gas charge pressure of a multiple cryopump
installation proceed as follows:
1. Assemble your multiple cryopump system components.
2. Check the compressor pressure gauge to insure static pressure is in
the 195-205 psig (1345-1415 kPa) range.
3. If it is necessary to reduce helium gas pressure then perform the
following:
a. Disconnect the charging line from gas charge fitting on rear
of compressor.
b. Open the gas charge valve very slowly. Allow helium gas to
escape until pressure gauge reads 50-100 psig (345-690
kPa).
c. Close the gas charge valve and reinstall the charging line to
the gas charge fitting, refer to step 4 for procedure.
4. If the pressure is low, attach a helium bottle, regulator, and charging
line to the compressor and perform the following:
a. Remove the flare cap of the gas charge fitting on the rear of
the compressor.
b. Loosely attach a charging line from the helium pressure regulator on the helium bottle to the 1/4-inch male flare fitting
installed on the helium charge fitting of the compressor.
NOTE: Use only 99.999% pure helium.
c. Set the helium pressure regulator to 10 to 25 psig (70-125
kPa). Allow helium gas to flow through the charging line
F-2
P/N 8040232
8510 Low-Voltage Compressor (For Use With On-Board High-Vacuum Pumps)
and around the loosened flare fitting for 30 seconds to purge
the charging line of air. Then tighten the flare nut at the end
of the charge line.
d. Slowly add helium gas until compressor pressure gauge
reads 195-205 psig (1345-1415 kPa).
5. Turn on the system power ON/OFF switch.
6. Note helium pressure gauge reading immediately after startup. It
should read 50-100 psig (345-690 kPa). If necessary add additional
helium gas by slowly opening the helium charge valve on the rear
of the compressor until the helium pressure gauge rises to 50-100
psig (345-690 kPa).
7. Allow the cryopump to operate until a cooldown temperature of
20K or less is reached.
Adjust the helium pressure if necessary as described in step 6 until the
helium pressure gauge reads 80-100 psig (550-690 kPa) while the system is
operating.
8. Allow the system to reach steady state. Recheck the helium pressure.
9. When steady state is achieved, shut the system off and allow the
system time to reach steady state conditions at room temperature.
10. When the system reaches room temperature, the pressure reading
on the compressor gauge is the system charge pressure.
NOTE: Record the compressor static pressure in your operating log. This
is the static pressure for your particular installation and should be used for
checking compressor performance or when troubleshooting the
installation.
11. Ensure that the helium charge valve on the compressor is tightly
closed. Then shut off the helium pressure regulator or the helium
bottle. Remove the charging line from the male flare fitting and
reinstall the flare cap.
P/N 8040232
F-3
Introduction
This Page Intentionally Left Blank
F-4
P/N 8040232