1
WI-127 Print Formatter
Software
User’s Manual
10/10/01 127FORMT_U.P65 PN 29728-0018A e4 Printed in USA
2
WI-127 Print Formatter Software User’s Manual
Table of Contents
Table of Contents ..................................................................................... 3
Introduction ............................................................................................ 5
Installing the Software .............................................................................. 5
Program Screen Descriptions .................................................................. 6
Command Line .............................................................................. 6
Toolbar .......................................................................................... 6
Using the Formatting Window ....................................................... 7
The Basics .......................................................................... 7
Nesting Layouts ................................................................ 11
Downloading Files .................................................................................. 12
Uploading Files....................................................................................... 12
Factory Supplied Files ............................................................................ 13
Orion-1.127.................................................................................. 13
Orion-2.127.................................................................................. 14
Orion-3.127.................................................................................. 15
Orion-4.127.................................................................................. 16
Orion-5.127.................................................................................. 16
Rd125-1.127 ................................................................................ 17
TM295-1.127 ............................................................................... 17
WP250-1.127 .............................................................................. 18
Appendix A: File Information Print Output .............................................. 19
Pages are numbered consecutively beginning with the cover page.
WI-127 Print Formatter Software User’s Manual
3
4
WI-127 Print Formatter Software User’s Manual
Introduction
This WI-127 Print Formatter
software works with Rev. D of
the WI-127 software, Rev. C of
the GTN, and Rev. C of the InMotion software.
The WI-127 Print Formatter software allows you to quickly format output
styles which can be downloaded to the WI-127. This eliminates the necessity of keying in each alpha character’s ASCII code when configuring layouts
through the WI-127 front panel. However, you can still make layout changes
through the front panel if you wish.
Installing the Software
®
Windows is a registered
trademark of Microsoft.
Insert the floppy disk into your PC’s floppy drive. In Windows® 3.1 or Windows 95/98® run the setup.exe file. Follow the onscreen instructions for
loading the files. The default location for the program files is a directory
called “wt” which the installation creates automatically unless you direct the
files to another location.
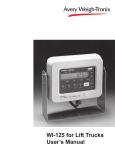
After installation, start the program by clicking the icon in the Weigh-Tronix
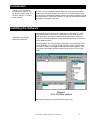
group (Windows 3.1) or clicking on Start, Program, Weigh-Tronix and WI127 Print Formatter. The program loads and an OK button appears. Click
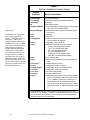
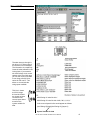
the button or press Enter and the program screen shown in Figure 1 appears.
Figure 1
Print Formatter window
Each part of the window is explained in the next section.
WI-127 Print Formatter Software User’s Manual
5
Program Screen Descriptions
The program screen consists of a command line, a toolbar and the editing
window which is split into five areas labeled
When Com1 or Com2 are
mentioned they are in reference to your PC, not the WI127.
• Current Layout Window
• System Variables List
• Ascii Strings List
• Groups Window
• Labels Window
The command line has five commands. They are File, Edit, Transfer, View,
and Help. Click on each command to see a drop down menu. Each menu is
explained below.
Command Line
See Appenix A: File Information Print Output to see an
example of what is printed
when you click on Print under
File or click on the Print button
in the program window.
It is important that the baud
rate of the WI-127 (under
Serial in the service menu)
and the baud rate you
choose under Transfer
match before you download
or upload. Also the baud rate
of the WI-127 and the printer
must match before printing.
With this menu you can pick a new indicator type (ie., standard
WI-127, GTN or In-motion) and start a new file for that indicator,
open an existing file, save a file you are working on, save a file
under a new name, print the format information, setup your
default printer for the PC, or exit the Formatter program. The
indicator file type must match the indicator software type.
Edit
With this menu you can undo a previous action, redo an action,
cut an object out and place it in the clipboard, copy an object to
the clipboard, paste an object from the clipboard to the cursor
location, delete a selected object, or select all text in the current
layout window.
Transfer
With this menu you can choose to upload format information
from the WI-127 through your computer Com1 or Com2,
download format information to the WI-127 through Com1 or
Com 2, and choose the baud rate. It is important that the baud
rate of the WI-127 (under Serial in the service menu) and the
baud rate you choose under Transfer match before you download or upload. Also the baud rate of the WI-127 and the printer
must match before printing.
View
With this menu you can toggle the toolbar on and off and also
toggle the popup hints on or off. When enabled, hints appear
when the cursor rests above a command, button or an area of
the window.
Help
Use this to access the About screen and the help files for this
program.
The toolbar consists of buttons which mirror functions available in the
command line. The buttons are shown below along with their functions.
Toolbar
Open
a file
Select a new
indicator type and
new file type
6
File
Paste
Cut
Save
the file
Copy
Delete
Undo
Print
Upload
Download
(See App.
thru
thru Com2
A)
Com2
Redo
Upload
Download
thru Com1
thru Com1
WI-127 Print Formatter Software User’s Manual
Using the Formatting
Window
You cannot nest a layout into
itself. You must use other
existing layouts.
A layout is made up of items, up to a maximum of 16 items per layout. An
item can be a space, a carriage return, a line feed, a label, a string of text,
or any of the other items listed in the system variable list which appears on
the right side of the formatting window. To make larger layouts possible you
may imbed an existing layout within another layout. This is called nesting.
You cannot nest a layout into itself.
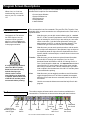
Table 1 shows the specifications for layouts in different models of WI-127.
Table 1
Layout specifications
The number of layouts available depends on the version of
WI-127 you pick in the Open
Settings item under File. See
Table 1.
The Basics
Example shown at right is a
WI-127 connected to a WP233/
234 printer.
We suggest using the default
file as a starting point to save
time by making use of the
default layouts that have
already been created and exist
in these files.
Layouts
Strings
Groups
Items/
Layout
Char./
String
Char./
Label
WI-127
16
16
9
16
32
16
GTN
32
16
9
16
32
16
In-Motion
16
16
9
16
32
16
To illustrate the basics of creating a layout for your model of WI-127, we’ll
create the following simple layout:
My Company
G 1000 lb
This layout consists of an Ascii
string, a carriage return and line
feed, the label for gross (G), a
space, the gross weight, a space,
the units name, and six line feeds to
advance the paper tape.
1. Select the model of indicator you are using from the list under File/New.
Select from WI-127, GTN or In-Motion versions. This will setup the
window with the information in Table 1. Open file DEFAULT.127 or
DEFAULT.gtn or DEFAULT.ims (depending on the software in your
indicator). See note at left.
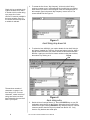
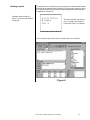
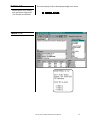
2. Select the first blank layout as the Current Layout number you want to
work on. See Figure 2. Use the scroll bar on the right side of the drop
down list to see the rest of the list. We’ll select #10 in this example.
Current
Layout
number
Figure 2
Choosing Current Layout
WI-127 Print Formatter Software User’s Manual
7
Single click on a variable in the
system variables list to select
it. Double click it to either bring
up a popup list of value
choices or insert the variable in
the layout window. Press F1
for context sensitive help while
a variable is selected.
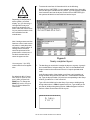
3. To create the line of text, “My Company”, click on the Ascii String
number you want to use. In this example click on #2. Now you need to
enter the text you want in Ascii String #2 in the Ascii String window. In
this example, type in the words “My Company” next to Ascii 2. The
screen should look like Figure 4.
Figure 3
Ascii String drop down list
4. To select the item ASCII-02, you need to double click on Ascii String in
the System Variable list. This item, like several others in the list, have a
popup screen from which you need to choose a value associated with
that item. Again you can scroll to unseen numbers using the scroll bar,
then select 2 by clicking on 2.
Popup
list
The maximum number of
characters or spaces in an
Ascii string is 32. For more
characters, create more Ascii
strings and select one Ascii
item followed by the next Ascii
item in your layout.
Figure 4
Ascii string entry
5. Double click on Carriage Return (1). Press the ENTER key on your PC
keyboard to wrap the text on the screen. Otherwise the text runs off the
screen to the right. Pressing ENTER will only wrap the text line, it will not
cause any action when the layout is printed from the WI-127. Only
items in curly brackets are acted upon.
8
WI-127 Print Formatter Software User’s Manual
6. To create the next lines of information click on the following:
Double click on LINE FEED (1) in the systems variable list to insert this
item into the layout. Double click on LAYOUT (4) in the systems variable
list to insert this item into the layout. Double click on LINE FEED (5) in
the systems variable list to insert this item into the layout.
Depending on the peripheral
device (printer, pc,remote
display, etc.) you are using, a
Carriage Return may also
produce an automatic Line
Feed. Check the control codes
for your particular device in the
documentation from the
manufacturer.
Note: Carriage returns and line
feeds are control codes sent to
the printer to make the printer
respond in a specific manor. A
carriage return command
sends the print head of the
printer back to column one. A
line feed command will advance the paper one line.
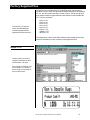
Figure 5
Nearly completed layout
You must put a Y (for YES)
under Inhibit for most applications.
By default the WI-127 transmits Group 2, layout 6, from
port 1 when you press the
PRINT key. To change the
PRINT key action, see your
WI-127 Service Manual for
instructions.
7. The last thing you need to do is assign the layout to a group. A group is
just a combination of a layout and a port. Port 1 is the standard serial
output located on the main board. Ports 2 & 3 require optional serial
cards.
In the Groups section of the window you will see a grid consisting of
Group numbers along the left side and Port 1-3 and Inhibit across the
top. Type the layout number (10) in the box corresponding to the Group
number (2) under Port 1. See note at left.
Type a Y in the Inhibit box for that Group if you want to inhibit printing
during scale motion. A YES will appear in the box. Type an N if you do
not want to inhibit printing during motion. A NO will appear in the box.
8. Perform a Save As and name this file mycom.
My Company
G 250 lb
WI-127 Print Formatter Software User’s Manual
9
Table 2
System Variables to build a layout
System
Variables
Gross Weight
Tare Weight
Net Weight
ID
Displayed Weight
Status byte
Selected Weight
Transmitted as a single character. The bits appear as
follows: 011LEBM, where L is
set to logic 1 when a Low
voltage condition exists; logic
0 otherwise. E is set to 1 when
an a-d Error condition exists; 0
otherwise. B is 1 when the
weight is Beyond displayable
range (over- or under-capacity); 0 otherwise. And M is set
to logic 1 when an in Motion
condition exists; set to logic 0
when the weight is stable. The
upper four bits are set to 0011
to cause the value to be printed
as a digit or symbol in row 3 of
the ASCII character set.
Hour
Date
Tare Register
Status
Label*
Units
Delay*
Ascii String*
Spaces*
Carriage Return*
Line Feed*
Form Feed
Character*
Layout*
What is transmitted
Current gross weight.
Current tare (general or numbered register).
Net weight.
Identification number.
Current displayed live weight (gross or net), depending on the current display mode.
Currently selected item from the select list (gross,
tare or net).
Current time.
Current date.
Current tare register number (a space is transmitted
for the general tare register).
Current status. See note at left.
Weight label. These choices are available:
• Gross - your assigned gross label
• Tare - your assigned tare label
• Net - your assigned net label
• ID- your assigned ID label
• Displayed- current display weight
• Selected- currently selected display
Unit of measure label.
Pauses serial port output by this many seconds (0255).
A configurable ASCII string.
A configurable number of spaces.
A configurable number of carriage returns.
A configurable number of line feeds.
A form feed is transmitted.
A character (ASCII value).
A predefined layout may be included within another
layout. For example, Layout 6 includes Layouts
1, 2, & 3. Note: A “layout error” will occur if a
layout uses its own layout within itself or if a
“loop” of layouts is used (for example, Layout 1
cannot use Layout 2 if Layout 2 includes Layout
1)
* denotes items that have a drop down list which requires entry of more
information. For example: if “LABEL” is inserted within a layout, you must
specify the label to be printed; if “SP” is inserted, you must specify the
number of spaces to be transmitted.
10
WI-127 Print Formatter Software User’s Manual
Nesting Layouts
Example shown at right is a
WI-127 connected to a WP233/
234 printer.
To assemble more complex layouts you may nest one layout within another.
Following is an example using Layout #10, which we just created, in Layout
#11. We will create the layout for this output following the same steps just
completed for Layout #10:
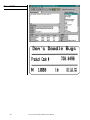
12-31-99 02:30 pm
My Company
G 250 lb
The date is printed, a space, the
time, a carriage return and line
feed, then Layout 10 is inserted.
Here is what the layout looks like if we send Group 2 out of Port #1:
Figure 6
WI-127 Print Formatter Software User’s Manual
11
Downloading Files
After you have finished creating the layouts you want in your WI-127, save
the file and connect your PC to the WI-127 serial port. Place the WI-127 in
transfer mode by following these steps:
You may also press the seal
switch to display About.
Be sure baud rates of your
computer and WI-127 match
before downloading.
1. Key in 127, press and hold the
ESCAPE key. . .
About is displayed.
2. Press the Left Arrow key. . .
SETup is displayed.
3. Press the ENTER key. . .
127 is displayed.
4. Press the ENTER key. .
AdJUSt is displayed.
5. Press the Left Arrow key. . .
trANSFEr is displayed.
6. Press the ENTER key. . .
PC---127 is displayed.
Double check your layout if you
have a problem.
The WI-127 is now ready to receive the file from your computer. Connect a
cable between the WI-127 serial port and your computer.
Your printer may require
specific control codes in the
print format. Check your printer
manual.
Click on the Download (1 or 2) button in the Formatter program to begin
downloading through COM1 or 2 of your PC. A progress window appears
and shows the file is downloading. When complete, a dialog box informs you
how many seconds the transfer lasted. Click OK. Return the WI-127 to
normal weigh mode by pressing SELECT twice.Your WI-127 should now be
ready to print according to your programming.
“Format mismatch error”
means your file type does not
match your indicator type.
If the download fails, check the baud rate, the cable connections between
your PC Com Port and Port #1 of the WI-127 and be sure the WI-127 is in
Transfer mode. Also, check that the PRINT key is configured correctly to
transmit the correct Group #. Try again. If the download is successful but
your data is not being transmitted, check your Group, Layout, and Serial
Port settings.
Uploading Files
Be sure baud rates of your
computer and WI-127 match
before uploading.
“Format mismatch error”
means your file type does not
match your indicator type.
12
The Formatter program can also upload the current layouts in a WI-127.
Place the WI-127 in Transfer mode just as you did in steps 1-6 above. Be
sure your WI-127 is connected to your PC. Click the Upload (1 or 2) button
to upload through COM1 or 2 of your PC.
The program is now visible on your formatter. You can edit it or add to it,
save the file under a new name and download it again or transfer the file to
another WI-127. If a port is not assigned in a group, NONE is shown by
default when uploaded to the Editor program.
WI-127 Print Formatter Software User’s Manual
Factory Supplied Files
Several files are included with the Format Editor when the program is
installed. Three of these files replicate the default settings for the standard
WI-127, the GTN version and the In-motion version. The other eight files
give sample formats for eight different printer setups for the standard WI127. They are as follows:
The Rd125-1.127 file also
works with RD4000/6000
models equipped with the
appropriate software version.
• Orion-1.127
• Orion-2.127
• Orion-3.127
• Orion-4.127
• Orion-5.127
• Rd125-1.127
• TM295-1.127
• WP250-1.127
The appearance of the Format Editor window and a sample printout (with
fictitious information) for each of these printers appears below.
Orion-1.127
Control Codes in an ASCII
string are entered as a hexadecimal (base 16) value.
For example, a line feed is an
ASCII number 10. Shown in
ASCII string 2 it is entered as
hex constant (x\0A).
WI-127 Print Formatter Software User’s Manual
13
Orion-2.127
14
WI-127 Print Formatter Software User’s Manual
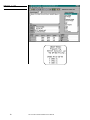
Orion-3.127
N
The data shown to the right is
the Orion-3.127 file as seen in
a text editor such as Notepad.
The information is compiled by
Create A Label software for the
Orion printer. If you examine
the ASCII strings in the screen
capture at the top of this page,
you can see some of this data
in use along with ASCII hex
values for CR and LF. This
allows us to maximize the
string space available.
This line is shown
as ASCII strings
#13 and #15 which
are shown as items
contained in the
current layout below
as well as the
system variable for
date.
Clear image buffer
Print Head Speed
Label orientation
ASCII String 13 looks like this: “
ASCII String 15 looks like this A142,138,0,1,1,2,N,”
In the current layout this line would appear as follows:
{Ascii String:15}{date}{Ascii String:13}{Layout:1}
System Variable for date
WI-127 Print Formatter Software User’s Manual
15
Orion-4.127
Orion-5.127
16
WI-127 Print Formatter Software User’s Manual
Rd125-1.127
Default layouts 4 or 5 will also
work with remote displays RD125, RD-4000 and RD-6000.
The remote display will show the displayed weight in this format:
G 5000.5 LB
TM295-1.127
WI-127 Print Formatter Software User’s Manual
17
WP250-1.127
18
WI-127 Print Formatter Software User’s Manual
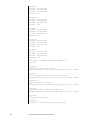
Appendix A: File Information Print Output
Following is an example of what is printed when you click the print button on
the program window or select Print under File. This example is for the
Default.127 file.
Weigh-Tronix Wl-127 Print Formatter Report
File Name: C:\SOURCE\WI127\DAT\DEFAULT.127
Indicator File: WI127.ind
Wl-127 Firmware Revision: 0019C
Current Time and Date: 2/10/99 10:08:43 AM
ASCII Strings:
ASCII 01
WEIGH-TRONIX WI-127
File Name: C:\SOURCE\WI127\DAT\DEFAULT.127
Labels:
Gross Label
G
Tare Label
T
Net Label
N
ID Label
ID
File Name; C:\SOURCE\WI127\DAT\DEFAULT.127
Groups:
Group# 1
Port#1: Layout# 5
Port#2: Layout# None
Port#3: Layout# None
Inhibit: Yes
Group# 2
Port#1: Layout# 6
Port#2: Layout# None
Port#3: Layout# None
Inhibit: Yes
Group# 3
Port#1: Layout# 7
Port#2: Layout# None
Port#3: Layout# None
Inhibit: Yes
Group# 4
Port#1: Layout# 8
Port#2: Layout# None
Port#3: Layout# None
Inhibit: Yes
WI-127 Print Formatter Software User’s Manual
19
Group# 5
Port#1: Layout# None
Port#2: Layout# None
Port#3: Layout# None
Inhibit: Yes
Group# 6
Port#1: Layout# None
Port#2: Layout# None
Port#3: Layout# None
Inhibit: Yes
Group# 7
Port#1: Layout# None
Port#2: Layout# None
Port#3: Layout# None
Inhibit: Yes
Group# 8
Port#1: Layout# None
Port#2: Layout# None
Port#3: Layout# None
Inhibit: Yes
Group# 9
Port#1: Layout# None
Port#2: Layout# None
Port#3: Layout# None
Inhibit: Yes
File Name: C:\SOURCE\WI127\DAT\DEFAULT.127
Layouts:
Layout# 1
{Spaces:2}{Label:Gross}{Gross
Weight}{Spaces:1}{Units}{Carriage Return:1}{Line Feed:1}
Layout# 2
{Tare Register}{Spaces:1}{Label: Tare}fTare
Weight}{Spaces:1}{Units}{Carriage Return:1}{Line Feed:1}
Layout# 3
{Spaces:2}{Label: Net}{Net
Weight}{Spaces:1}{Units}{Carriage Return:1}{Line Feed:1}
Layout# 4
{Spaces:1}{Label:Displayed}{Displayed
Weight}{Spaces:1}{Units}{Carriage Return:1}{Line Feed:1}
Layout# 5
{Layout:4}{Form Feed}
Layout# 6
{Layout:1}{Layout:2}{Layout:3}{Form Feed}
20
WI-127 Print Formatter Software User’s Manual
Layout# 7
{Layout:1}{Layout:3}{Form Feed}
Layout# 8
{Layout:3}{Layout:2}{Form Feed}
Layout# 9
{Label:Displayed}{Displayed
Weight}{Spaces:1}{Units}{Spaces:1}{Hour}{Spaces:1}{Date}{Carriage
Return:1}{Line Feed:1}
WI-127 Print Formatter Software User’s Manual
21
Weigh-Tronix
1000 Armstrong Dr.
Fairmont, MN 56031 USA
Telephone: 507-238-4461
Facsimile: 507-238-4195
e-mail: [email protected]
www.wtxweb.com
Weigh-Tronix Canada, ULC
217 Brunswick Blvd.
Pointe Claire, QC H9R 4R7 Canada
Telephone: 514-695-0380
Facsimile: 514-695-6820
Weigh Bar ® is a registered trademark of Weigh-Tronix Inc.
Weighing Products & Systems