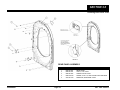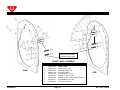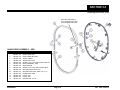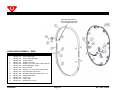
1
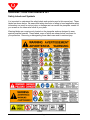
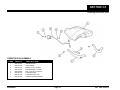
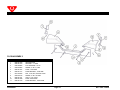
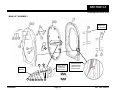
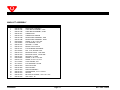
Pinspotter Manual Supplement
These Original Instructions were written in English
400-088-091
Revision B
ALL RIGHTS RESERVED
All rights to this manual including the diagrams, figures, and technical specifications are
the property of QubicaAMF Bowling Products, Inc. Reproduction or transmission of any of
the material contained in this manual without the prior written permission of QubicaAMF
Bowling Products, Inc. is strictly prohibited. All of the product information in this manual
was carefully prepared based on the latest information available and was believed to be
correct at the time of printing. While every effort has been made to ensure accuracy, this
publication may inadvertently contain typographical errors, inaccuracies, or errors of
omission. QubicaAMF Bowling Products, Inc. cannot be held responsible for any claims
resulting from these errors.
DOCUMENT UPDATES
QubicaAMF Bowling Products, Inc. reserves the right to revise and/or update this manual
at any time without obligation to notify any person or entity of such revision. The document
number, revision level, and date below indicate the edition of this manual.
TRADEMARK NOTICES
QubicaAMF and the QubicaAMF logo are the registered trademarks of QubicaAMF
Bowling Worldwide, Inc.
QubicaAMF TECHNICAL SUPPORT
Technical Support: (International) 804.730.4000 - (Domestic) 1-866-460-7263
QubicaAMF Bowling Products, Inc.
8100 AMF Drive
Mechanicsville, Va. 23111
Copyright © 2010, 2011, 2012 QubicaAMF Bowling Products, Inc.
Document #400-088-091 Rev. B
Issue Date: 03/7/2012
QubicaAMF
Edge Performance Lift Manual
400-088-091
Rev. B
SUMMARY OF CHANGES
Change No.
NEW
Rev.B
ECR No.
11-0289
12-0053
List of Effective Pages
Page
All
All
Change No.
Revision A
Revision B
Effective Date
09/14/2011
03/07/2012
Table of Contents
1.0
SAFETY ..........................................................................................................
1
General Safety Guidelines ...................................................................
Safety Labels and Symbols .................................................................
Guards and Safety Precautions ...........................................................
1
2
3
INTRODUCTION .............................................................................................. 1-1
1.1
2.0
How To Use This Manual ..................................................................... 1-1
OPERATION, MAINTENANCE & ADJUSTMENT ........................................... 2-1
2.1
LIFT OPERATION ................................................................................. 2-1
2.2
MAINTENANCE .................................................................................... 2-1
2.2.1 General Guidelines ............................................................................. 2-1
2.2.2 Periodic Maintenance ......................................................................... 2-2
2.3
ADJUSTMENTS .................................................................................... 2-4
2.3.1
2.3.2
2.3.3
3.0
Hardware ............................................................................................. 2-4
Drive Belt Tension .............................................................................. 2-4
Center Guard Adjustment .................................................................. 2-5
2.4
LIFT REMOVAL .................................................................................... 2-6
2.5
LIFT DISASSEMBLY & REASSEMBLY ............................................... 2-7
2.6
LIFT INSTALLATION ............................................................................ 2-9
2.7
DRIVE CLUTCH ..................................................................................... 2-10
DRAWINGS AND PARTS LISTS ..................................................................... 3-1
Main Assemblies .................................................................................. 3-2
Center Guard Assembly ...................................................................... 3-3
Orientor Pan Assembly ....................................................................... 3-4
Plow Assembly .................................................................................... 3-5
Main Lift Assembly .............................................................................. 3-6
Rear Panel Assembly .......................................................................... 3-8
Front Panel Assembly ......................................................................... 3-9
Chain Drive Assembly - ODD .............................................................. 3-10
Chain Drive Assembly - EVEN ............................................................ 3-11
Drive Assembly ..................................................................................... 3-12
XLi EDGE Distributor ........................................................................... 3-13
SAFETY
Safety
SAFETY
General Safety Guidelines
QubicaAMF believes strongly in its commitment to safety. Proper service and repair
are important to the safety of the mechanic as well as the safe, reliable operation of
the pinspotters. Please read, understand, and follow all of the recommended safety
procedures presented in this manual.
The procedures recommended and described in this technical manual are effective
methods of performing service and repair. Some of these procedures might require
the use of tools specially designed for this purpose.
•
Properly trained personnel should be present whenever maintenance is being
performed on a pinspotter.
•
No unauthorized personnel should be allowed in the pit area.
•
Keep in mind that the pinspotter performs a series of mechanical motions and
electrical actions during each cycle, and that bodily injury could result should
personnel enter the machine when power is on. When working on a pinspotter,
it is recommended that power also be turned off on adjacent machines.
•
Remember that safety must remain your first priority at all times.
•
Safety goggles, ear protection, and steel-toed shoes are recommended
whenever any work is being performed on a pinspotter.
•
When using cleaners and lubricants, always follow the precautions on the
product label.
•
Wearing loose clothing or jewelry is NOT RECOMMENDED when operating or
maintaining the machinery.
A series of short animations depicting the Edge Performance Lift removal,
disassembly, and reinstallation is also available and is provided on disk with your
XLi EDGE pinspotter.
400-088-091
Page 1
Rev. Date 03/2012
QubicaAMF - EDGE PERFORMANCE LIFT
Safety Labels and Symbols
It is important to understand the safety labels and symbols used in this manual set. These
labels are shown below. Be aware that taking shortcuts or failing to heed applicable safety
information can result in serious injury or damage and can render the pinspotter unsafe for
you as well as for others who follow in your place.
Warning labels are conspicuously located on the pinspotter and are designed to warn
against possible hazards. These labels, some of which are shown below, are there for
your protection. Removing or disregarding these labels can result in serious injury.
400-088-091
Page 2
Rev. Date 03/2012
SAFETY
Safety
–
Refer to the Service Manual before performing
maintenance or repair.
–
Caution! Severe pinching hazard - belts.
It is also important to understand that the use of these symbols and labels is not allinclusive because it is impossible to warn of all the possible hazards and consequences
that could result from failure to follow these instructions. Trained and competent bowling
center mechanics are able to recognize and avoid potentially hazardous situations.
Guards and Safety Precautions
All safety guards must be in place before operating the machine. When maintenance
is required, the following steps must be followed:
1.
Place the Sweep in the 1st Guard position.
2.
Disconnect power before working on the pinspotter.
3.
Remove guards only as required to perform the maintenance.
4.
Once maintenance is complete, replace all guards.
400-088-091
Page 3
Rev. Date 03/2012
QubicaAMF - EDGE PERFORMANCE LIFT
This Page Intentionally Left Blank
400-088-091
Page 4
Rev. Date 03/2012
SECTION 1.0
Introduction
1.0
INTRODUCTION
1.1
How To Use This Manual
This manual is provided for use by trained and authorized bowling center mechanics in
conjunction with the adjustment, operation, and maintenance of Edge Performance Lifts
installed in QubicaAMF XLi EDGE pinspotters. The purpose of this manual supplement is
to consolidate all of the applicable information into one easy-to-use document making
finding the information you need simpler and faster when compared to having the
information scattered throughout the pinspotter manual.
This manual does not cover initial installation of the pinspotter, but does cover removal and
reinstallation of the Edge Performance Lift for maintenance and adjustment. Refer to the
drawings at the back of this manual for detailed views of the Lift’s construction.
There are six parts to this manual supplement: Safety, Introduction, Operation,
Maintenance, Adjustment, and Drawings & Parts Lists.
•
The Safety Section provides information on precautions that should be taken when
working in and around the Lift, including examples of safety labels and symbols used
on the pinspotter to indicate potential hazards.
•
The Introduction Section outlines the manual.
•
The Operation and Maintenance Sections describe how the lift works including a
description of its components as well as information relating to the type and frequency
of maintenance required by of the unit. Maintaining the Lift in accordance with this
section can help attain maximum component life and trouble-free operation.
•
The Adjustment Section provides drawings and step-by-step instructions for making the
few adjustments required by the Edge Performance Lift. Additionally, there are
procedures for the unit’s removal, disassembly, and reassembly for repair or
maintenance.
•
The Drawings & Parts Lists Section is designed to be an invaluable tool for identifying
parts and part numbers for maintenance and repair of the unit.
This manual is intended to be a supplement to, and is included with, the QubicaAMF
XLi EDGE Pinspotter Manual Set.
Refer to the Safety Section of this manual before proceeding
with Lift maintenance.
400-088-091
Page 1-1
Rev. Date 03/2012
QubicaAMF - EDGE PERFORMANCE LIFT
This Page Intentionally Left Blank
400-088-091
Page 1-2
Rev. Date 03/2012
SECTION 2.0
Operation, Maintenance, and Adjustment
2.0
OPERATION, MAINTENANCE, & ADJUSTMENT
2.1
LIFT OPERATION
The Edge Performance Lift transfers pins from the Pin Conveyor Belt in the Pit to the
Distributor for delivery to the Bin Assembly. The unit is driven by the Back End Motor
using a belt and a pulley and sprocket assembly. Some of the Lift’s features include:
•
A sprocket driven chain to which the Pin Flight Cups and Tabs are attached.
•
A Roller Chain that travels within a replaceable track sandwiched between the Front
and Rear Panels.
•
The removable Plow Assembly attached to the Front Panel.
•
A fixed Orientor Pan (O-Pan) Assembly that is attached near the top of the Lift
during pinspotter installation, and that requires no adjustment.
•
A set of Carrier Rails that guide the pins to the exit opening and pivot outward to
prevent damage should a pin jam occur. Simply clear the jam and pop them back
into place. No adjustment needed.
When the pins are knocked down or swept onto the pit conveyer belt, they are deflected
by the plow assembly to the center of the lift where they are picked up by the chaindriven flight cups and carried to the top of the lift.
When a pin reaches the top of the Lift, it is deposited onto the O-Pan which orients it
bottom first onto the Distributor Belt. As the pin reaches the end of the Distributor, the
weight of the pin causes the Trip Lever to pivot downward depositing the pin in the Bin.
The Trip Lever also causes the Cam Gear to index the Distributor to the next Bin position.
2.2
MAINTENANCE
2.2.1 General Guidelines
•
DO NOT use solvent-based cleaners on the Lift’s components.
•
NEVER use a parts washer to clean the Chain Assembly.
•
DO NOT lubricate the chain while installed in the track. Remove the chain, apply
LPS #2, allow it to dry, and reinstall. NEVER use grease as a chain or sprocket
lubricant. Grease will lock up the chain rollers and cause excessive track wear.
•
DO NOT use excessive force to remove a bowling pin if it is jammed in the Lift’s exit
opening. Remove the Distributor Drive Shaft and then carefully reverse the drive by
pulling down on the Pit Conveyor Drive Belt. Failure to remove the Distributor
Drive Shaft could result in damage to the Distributor Clutch.
400-088-091
Page 2-1
Rev. Date 03/2012
QubicaAMF - EDGE PERFORMANCE LIFT
•
DO NOT install the Carrier Rails upside down. The pointed end always faces down.
•
DO NOT stand on the lower rim of the Rear Panel. It is not intended to be used as a
step.
•
DO NOT use excessive force when installing the Center Guard. Adjust in
accordance with the instructions in Section 2.3.
•
DO NOT run the pinspotter without the Carrier Rails installed. Pins repeatedly falling
back into the unit could damage the Chain Track.
•
DO NOT run the machine with the exit opening blocked. Pins repeatedly falling back
into the unit could damage the Chain Track.
•
NEVER place the machine in service without the guards in place.
2.2.2 Periodic Maintenance
Weekly:
1. Clean the Lift’s inner and outer shell, Plows, Flight Cups and Tabs (parts
attached to the chain), O-Pan, Carrier Rails (must be removed from the unit) and
the Distributor Funnels using a mild cleaner:
a. AP3 Cleaner (294-006-045) diluted 1 part AP3 to 20 parts water.
b. Use a damp rag and wipe all surfaces.
2. Inspect the Pin Ejector Springs – make sure both are in place.
3. Inspect the Carrier Rails for the correct installation direction - (pointed end down).
Monthly:
1. After cleaning, treat plastic surfaces with a vinyl protectant such as Armor All®
and buff dry.
2. Visually inspect the track and chain components for excessive wear and cracks.
Annually:
1. Check and tighten (don’t over torque – torque to a maximum of 50 in-lbs)
hardware holding the Plow Brackets to the Front Panel, Plow Brackets to the
Plows, Center Plow to the Front Panel, and Outer Plows to the Center Plow.
2. Check and tighten the unit’s mounting hardware. Replace missing hardware.
3. Check the Drive Belt for wear and cracking – replace as needed.
400-088-091
Page 2-2
Rev. Date 03/2012
SECTION 2.0
Operation, Maintenance, and Adjustment
Every 2 years or 200,000 Frames:
1) Remove the Lift in accordance with Section 2.4.
2) Disassemble the Lift in accordance with Section 2.5.
a. Inspect all components thoroughly for excessive wear and damage. Replace
components as needed.
b. Remove and clean the Chain with LPS #2 (this cleans, lubricates, and applies
a rust inhibitor to the chain). LPS #2 is available from QubicaAMF as follows:
20 oz trigger spray
1 gallon can
715-021-912
715-022-013
1. Spray LPS #2 on the chain and wipe between each roller with a cotton
rag. Repeat for both sides of the chain. Wipe, but do not remove all of the
LPS #2. Apply extra LPS #2 if any signs of rust are noticed around link
pins or rollers.
2. Wipe down the attachment links, Flight Cups and Flight Tabs.
3. Only use LPS #2 on the Chain Assembly.
c. Clean the interior of the Track (where the chain rollers ride).
1. Use AP3 Cleaner (294-006-045) diluted 1 part AP3 to 20 parts water and
reach inside the track and rub off dirt buildup.
2. Dry or allow the track to dry before assembly.
d.
Clean and inspect the Drive Assembly.
1. Check the Drive Sprocket teeth for excessive wear.
2. Check the drive Shaft for rust. If necessary, use steel wool to remove rust
and treat with LPS #2.
3. Check the drive bearings for radial and axial play. Replace worn
components if necessary.
3) Inspect metal brackets for cracks or rust. Repair or replace if necessary.
4) Replace bent, missing, or stripped hardware as needed.
5) Inspect the O-pan for bends, cracks, and excessive wear. Check the protective
rubber edging on the support bracket. Replace if necessary.
6) Assemble the Lift in accordance with Section 2.5.
7) Reinstall the unit in accordance with Section 2.6.
Note: NEVER use solvent-based cleaners or parts washers on the Lift or its
components including the Chain Assembly.
400-088-091
Page 2-3
Rev. Date 03/2012
QubicaAMF - EDGE PERFORMANCE LIFT
2.3
ADJUSTMENTS
The Edge Performance Lift is designed to require a minimum of adjustment. However,
the few adjustments that are necessary are very important.
2.3.1 Hardware
Unless specified differently elsewhere, tighten all fasteners to a maximum of 50 in-lbs.
2.3.2 Drive Belt Tension
The drive belt tension must be high enough to ensure that the unit can transfer a full load
of pins from the pit to the distributor and to ensure that the clutch (see section 2-7) slips
before the belt does. This is accomplished by keeping the drive belt tension adjusted
properly as follows:
To check/adjust belt tension:
•
Loosen the tension retaining bolt in the
adjustment slot (see Figure 2-1). This bolt MUST
be loosened to check or adjust belt tension.
a. If the washer on the Tension Adjustment Screw
is touching the spacer, turn the adjustment
screw in the counterclockwise direction until a
gap appears between the washer and spacer,
and then turn the screw clockwise until the
washer just touches the spacer.
b. If a gap forms between the spacer and the
washer on the Tension Adjustment Screw
after loosening the Tension Retaining Bolt,
turn the adjustment screw in the clockwise
direction until the washer just touches the
spacer.
•
Tension Retaining Bolt
Spacer
Tension Adjustment Screw
Figure 2-1, Drive Belt Tension Adjustment
Tighten the Tension Retaining Bolt.
Compressing the spring of the adjustment assembly so that the washer just
touches the spacer will result in the correct belt tension. The belt could stretch
slightly after the first month or two of operation. Check and adjust the belt
tension following the first 30 to 60 days of initial operation or belt replacement.
Very little belt stretching should occur after that.
Whenever the belt has been removed (such as when the lift assembly is removed
for pinspotter maintenance), following reinstallation and belt tensioning, run the
lift for approximately 30 seconds and then recheck and adjust belt tension.
400-088-091
Page 2-4
Rev. Date 03/2012
SECTION 2.0
Operation, Maintenance, and Adjustment
2.3.3 Center Guard Adjustment
The Lift’s Center Guard is held in place at three points: at the top center and at
approximately the 4:00 o’clock and 8:00 o’clock positions (see Figure 2-2). When
correctly adjusted, the guard should be held firmly in place without rattling and should
not be dislodged by vibrations from pin action or machine operation. On some
installations the guard contains a magnetic interlock assembly that will function to shut
down the pinspotter pair if the guard is removed. To prevent an unintentional shutdown
of the pinspotter, it is important that the guard be adjusted properly.
To loosen the guard:
Outer Lock Nut
•
Remove the guard from the unit.
•
Remove the plug from the outer surface of
the guard at the tight-fitting location.
•
With a wrench or socket on the outer hex
lock nut to keep it from turning, turn the
elevator bolt in the counterclockwise
direction a half turn.
Inner Lock Nut
•
Tighten the inner hex lock nut.
•
Reinstall the plug. Repeat these steps as
needed for the other elevator bolts.
Elevator Bolt
Figure 2-2, Center Guard Adjustment
To tighten the guard:
•
Remove the guard from the unit.
•
Remove the plug from the outer surface of the guard at the loose-fitting location.
•
With a wrench or socket on the inner hex lock nut to keep it from turning, turn the
elevator bolt in the clockwise direction a half turn.
•
Tighten the outer hex lock nut.
•
Reinstall the plug. Repeat these steps as needed for the other elevator bolts.
400-088-091
Page 2-5
Rev. Date 03/2012
QubicaAMF - EDGE PERFORMANCE LIFT
2.4
LIFT REMOVAL
Watch the animation for a quick lesson on removing the Lift from the pinspotter.
Removing the Lift is a two-person job.
Tools Needed
½-inch and 9/16-inch Wrenches or Sockets and Ratchet
Support Block
Some pinspotter installations include a safety guard enclosure system. It might be
necessary to remove some of the guard panels or ladder assemblies before removing
the Lift from the pinspotter. Refer to the documentation supplied with the safety guard
enclosure for more information.
Place the Sweep in the 1st Guard position and ensure the pinspotter pair has been
shut down and deenergized in accordance with your center’s lock-out and tag-out
procedures before beginning Lift removal.
1.
Remove the Center Guard and store out of the way.
2.
Remove the PBL Guard assembly.
3.
Loosen the belt’s Tension Retaining Bolt (see
Figure 2-1).
4.
Turn the Tension Adjusting Screw counterclockwise
to fully loosen the tensioning pulley.
5.
Remove the Drive Belt from the Sprocket Drive
Pulley.
6.
Remove the two bolts next to the Tensioning
Bracket (see Figure 2-3).
7.
Place a support block under the center bottom of
the Lift and remove the four bolts (two on each
side) that secure the unit to the pinspotter Kickback
Plates.
8.
Raise the unit several inches, tilt the top away from
the pinspotter, and remove the unit. Raising and
tilting are necessary to ensure the Plow clears
parts of the pinspotter that protrude inward behind
the Plow assembly.
400-088-091
Page 2-6
Remove
these bolts
Remove these two bolts
plus the corresponding
two on the other side.
Figure 2-3, Lift Removal
Rev. Date 03/2012
SECTION 2.0
Operation, Maintenance, and Adjustment
2.5
LIFT DISASSEMBLY AND REASSEMBLY
Disassembly is not required frequently and is designed to be accomplished with a
minimum of tools and training. In addition to these instructions, an animation is
available that shows how to disassemble the Lift shell including the plow. Things
that require disassembly and their recommended frequencies are listed below.
Your experience may dictate more or less frequent disassembly.
Maintenance/Repair
Frequency
•
Inspect Track for wear
2 years or 200,000 frames
•
Replace Track
As needed
•
Clean inside of Track
When disassembled for any other reason
•
Oil Chain (use LPS #2 only!)
2 years or 200,000 frames
The preferred orientation for disassembling and assembling the Lift is in the
horizontal position, but the unit can be disassembled in the vertical position as well.
Do not let the unit fall over during disassembly, and be careful not to let any
spacers (especially the six spacers along the top) fall into the interior of the
front panel of the unit.
Disassembly (refer to the drawings on pages 3-2 through 3-6.)
1.
Remove the Center Guard (if in place).
2.
Remove the Carrier Rail assembly.
3.
Remove the Orientor Pan by removing the four bolts and two braces from
under the pan.
4.
Remove the Plow Assembly.
a) Remove the four bolts and nuts (two on each side at the lower end of the
long mounting bracket) that attach the plow’s side brackets to the housing.
b) Remove the four long bolts and spacers located along the lower edge of
the plow. During disassembly, keep each group of spacers with their
associated components. The different groups of spacers are of
different lengths and are not interchangeable.
5.
Uncouple the two halves of the Lift assembly.
a) Remove the bolt from the center of the drive pulley and carefully remove
the drive pulley and clutch components from the drive sprocket assembly.
b) Remove the six bolts and spacers along the top of the Lift. Do NOT let the
spacers fall into the double-walled inside half of the Lift.
400-088-091
Page 2-7
Rev. Date 03/2012
QubicaAMF - EDGE PERFORMANCE LIFT
c)
Remove the four remaining bolts and nuts, the long and short mounting
brackets, and the two lower spacers from the Sprocket Drive side of the unit.
d) Carefully separate the Lift’s two halves. The spacers passing through the
Sprocket Drive Assembly and the two spacers on the opposite side of the
unit are tight-fitting and should remain with one half of the assembly.
e) Remove the Track and Chain Assembly. The Sprocket Drive housing is
attached to the Track and Chain Assembly and is held in place by the two
spacers that pass through the sprocket housing and lift panel.
6.
Remove the Chain Assembly from the Track:
a) Remove the Sprocket Drive Assembly. Four
screws attach it to the track.
b)
Rotate the chain in the track until the Connecting
Link (the link with cotter pins) is in the cutout
opening below the Sprocket Drive location. The
Connecting Link rollers are painted red to aide in
identification.
c)
Remove the hardware on the upper track that
attaches the two halves of the track together and
push the two halves together (Figure 2-4). This
will allow enough slack in the chain so that the
Connecting Link can be pulled out of the opening
below the sprocket location for link disassembly.
Remove
Connecting
Link Here
d) Remove the Connecting Link.
e)
Separate the Upper and Lower Chain Tracks and
carefully remove the Chain Assembly from the
tracks.
Figure 2-4, Track Disassembly
Reassembly (Refer to the drawings on pages 3-10 & 3-11 for part identification.)
1. Insert the Chain Assembly into the Upper and Lower Tracks positioning the two
ends as close to the opening at the track flap as possible.
a) For ODD numbered machines (lanes), the Flight Cups point away when the
Drive Assembly is on the left.
b) For EVEN numbered machines, the Flight Cups point away when the Drive
Assembly is on the right.
The Even and Odd Chain Assemblies are NOT interchangeable.
400-088-091
Page 2-8
Rev. Date 03/2012
SECTION 2.0
Operation, Maintenance, and Adjustment
2. With the urethane sleeves installed in the cutout at the Drive Sprocket location,
insert the Track Joiners into the upper track and bring the two track halves together.
3. Install the Connecting Link in the opening at the track flap.
4. Install the Sprocket Drive.
5. Pull the two halves of the track apart by hand (don’t pry them) to tighten the chain
and align the screw holes, and install the Key Plates and screws. If more or less
chain tension is required, the lower track is slotted where the connection screws
pass through to allow adjustment.
6. Install the Track and Chain Assembly in the Rear Panel. You should be able to
easily rotate the Chain Assembly.
7. Align and install the Front Panel making sure to use the spacers in their original
locations. Tighten hardware to 50 in-lbs. Refer to the drawings in the Parts
Section and to the animation provided.
8. Install the Plow Assembly.
9. Install the Orientor Pan and Support Braces.
10. Install the Pulley and Clutch Assembly on the Sprocket Drive Shaft as shown in
Figure 2-6. Tighten the screw to 250 in-lbs.
2.6
LIFT INSTALLATION
This procedure should be performed by at least two people.
1.
Raise the unit several inches, tilt the top away from the
pinspotter, and install the unit. Raising and tilting are
necessary to ensure the Plow clears parts of the
pinspotter that protrude inward from the Kickback Plates.
2.
Place a support block under the center bottom of the
unit and install the four bolts (two on each side) that
secure the Lift to the pinspotter Kickback Plates.
Install
these bolts
3.
Install the two bolts next to the Tensioning Bracket
(see Figure 2-5).
4.
Install the Drive Belt onto the Sprocket Drive Pulley.
5.
Engage and turn the Tension Adjusting Screw clockwise compressing the spring
until the washer just touches the spacer. Refer to Section 2.3.2 for details
concerning belt tension adjustment.
400-088-091
Page 2-9
Figure 2-5, Lift Installation
Rev. Date 03/2012
QubicaAMF - EDGE PERFORMANCE LIFT
6.
Tighten the belt’s Tension Retaining Bolt.
7.
Install the Center Guard.
8.
Install the PBL Guard Assembly.
9.
Run the pinspotter back end for approximately 30 seconds and then recheck the
drive belt tension in accordance with section 2.3.2.
2.7
DRIVE CLUTCH
The Drive Pulley & Sprocket Assembly contains an in-line clutch that is designed to slip
whenever the drive chain stalls, such as when a pin jam occurs. This helps prevent
damage to the O-Pan assembly that could be caused by a pin jam, and it keeps the
Drive Belt from slipping which could cause the belt to overheat shortening its life.
The Clutch Assembly consists of spacers, a shim [where necessary], a series of stacked
Belleville Washers (that maintain the necessary tension), a Clutch Plate, and a Friction
Disc. Normally, all clutch components rotate in unison with the Drive Sprocket, so little, if
any, wear is expected. If the Drive Chain stops for any reason while the Back End Motor
is running, the Friction Plate, which is keyed to the Sprocket Shaft, stops while the Drive
Pulley and Friction Disc continue to rotate. The amount of force it takes to cause the
clutch to slip is determined by the amount of tension provided by the Belleville Washers.
This varies slightly from clutch to clutch because of manufacturing tolerances, so shims
are used when necessary to fine-tune the breakaway torque (125 -150 in-lbs).
Whenever disassembling a Clutch Assembly (the Clutch Plate and Friction Disc should
be cleaned periodically) be sure to reassemble them in the same order and orientation
as originally found. Be sure the original shim (if present) is reused and fully tighten the
retaining screw. Changing components can result in too much or too little breakaway
torque. Do not lubricate clutch components.
shim (1 or none as
originally configured)
Friction Disc
Belleville (cupped)
Washers
Assemble the Belleville
Washers cupped side to
cupped side in pairs as
shown.
Friction Plate
spacers
Figure 2-6, Clutch Components
400-088-091
Page 2-10
Rev. Date 03/2012
SECTION 3.0
Drawings and Parts Lists
Drawings
and
Parts Lists
400-088-091
Page 3-1
Rev. Date 03/2012
SECTION 3.0
Drawings and Parts Lists
CENTER GUARD ASSEMBLY
LIFT ASSEMBLY
O-PAN ASSEMBLY
When assembling, ensure the flap
is inserted into the slots in the
front and rear panels.
CARRIER RAIL
PLOW ASSEMBLY
400-088-091
CLUTCH ASSEMBLY
Page 3-2
Rev. Date 03/2012
QubicaAMF – EDGE PERFORMANCE LIFT
CENTER GUARD ASSEMBLY
ITEM
PART #
DESCRIPTION
1
2
3
4
5
6
088-001-502
801-548-241
844-049-002
948-753-102
719-024-009
838-849-007
CENTER GUARD FRAME & MESH
ELEVATOR BOLT, ¼-20 X 1-1/ 2, BLACK
NUT, ¼-20, HEX, STOVER LOCK
FLAT WASHER, ¼, BLACK
PLUG, ¾, NYLON
NUT, ¼-20, HEX, LOCK, NYLON INSERT, THIN
400-088-091
Mesh removed for clarity
Page 3-3
Rev. Date 03/2012
SECTION 3.0
Drawings and Parts Lists
ORIENTOR PAN ASSEMBLY
ITEM PART #
1
2
3
4
5
6
7
8
088-001-504
088-001-576
809-849-145
948-753-102
839-549-002
088-001-513
088-001-519
088-001-557
400-088-091
DESCRIPTION
ORIENTOR PAN
O-PAN HOOP
SCREW, ¼-20 X 7/8 HEX
FLAT WASHER, ¼, BLACK
NUT, ¼-20, HEX, FLEXLOC
O-PAN SUPPORT
O-PAN SUPPORT CAP
GUARD HANGER BRACKET
Page 3-4
Rev. Date 03/2012
QubicaAMF – EDGE PERFORMANCE LIFT
PLOW ASSEMBLY
ITEM PART #
1
2
3
4
5
6
7
8
9
10
11
088-001-508
088-001-543
000-026-865
809-849-805
088-001-587
088-001-517
844-049-022
809-849-145
088-001-541
088-001-588
088-001-516
400-088-091
DESCRIPTION
CENTER PLOW
SPACER, 4.1” LONG
FLAT WASHER, ¼ X 7/8
SCREW, ¼-20 X 5, HEX
PLOW, 7-PIN SIDE
PLOW BRACKET, 7-PIN SIDE
NUT, ¼-20, HEX, STOVER LOCK
SCREW, ¼-20 X 7/8 HEX
U-NUT, ¼-20, LOCK
PLOW 10-PIN SIDE
PLOW BRACKET, 10-PIN SIDE
Page 3-5
Rev. Date 03/2012
SECTION 3.0
Drawings and Parts Lists
MAIN LIFT ASSEMBLY
Torque these
eight bolts to
80-120 in-lbs.
27
25
24
Arrange Belleville
Washers (item 26)
cupped-side-tocupped-side in
pairs as shown.
Torque to
250 in-lbs
18
400-088-091
19
20
21
22
23
When assembling,
ensure the flap is
inserted into the
slots in the front
and rear panels.
26
Page 3-6
Rev. Date 03/2012
QubicaAMF – EDGE PERFORMANCE LIFT
MAIN LIFT ASSEMBLY
ITEM PART #
1
2
3
4
5
6
7
8
9
10
11
12
13
14
15
16
17
18
19
20
21
22
23
24
25
26
27
088-001-585
088-001-565
088-001-566
088-001-507
088-001-518
088-001-589
088-001-586
809-849-605
000-026-865
088-001-542
088-001-515
088-001-527
844-049-002
088-001-579
088-001-580
088-001-544
809-849-885
809-857-125
951-156-002
947-356-617
088-001-829
088-001-828
088-001-820
088-001-815
088-001-819
088-001-818
088-001-528
400-088-091
DESCRIPTION
REAR PANEL ASSEMBLY
CHAIN DRIVE ASSEMBLY, ODD
CHAIN DRIVE ASSEMBLY, EVEN
CARRIER RAIL
CARRIER RAIL SPRING
FRONT PANEL ASSEMBLY, ODD
FRONT PANEL ASSEMBLY, EVEN
SCREW, ¼-20 X 3-3/4, HEX
FLAT WASHER, ¼ X 7/8
SPACER, 3.1” LONG
MOUNT FLITCH PLATE
FLITCH BRIDGE WELDMENT
NUT, ¼-20, STOVER LOCK
MOUNTING PLATE, 7-PIN SIDE
MOUNTING PLATE, 10-PIN SIDE
SPACER, 5.0” LONG
SCREW, ¼-20 X 5-1/2, HEX
SCREW, 5/16-18 x ¾, HEX
LOCK WASHER, 5/16
FLAT WASHER, 5/16 USS
FRICTION PLATE
FRICTION DISC
SHEAVE ASSEMBLY
SHIM WASHER, .76 X 1.13 X.010
SPACER
BELLEVILLE WASHER, .76 X 1.50 X .072
HEX V-BELT, 35”
Page 3-7
Rev. Date 03/2012
SECTION 3.0
Drawings and Parts Lists
REAR PANEL ASSEMBLY
ITEM PART #
1
2
3
4
5
400-088-091
Page 3-8
088-001-501
088-001-541
088-001-564
808-549-120
252-001-160
DESCRIPTION
REAR PANEL
U-NUT, ¼-20, LOCK
GUARD CATCH PLATE
SCREW, ¼-20 X ¾, HEX SOCKET BUTTON HEAD
DOMETAG, QUBICAAMF LOGO
Rev. Date 03/2012
QubicaAMF – EDGE PERFORMANCE LIFT
Insert flat washer (item 8)
between the ground end
and first coil of the spring.
FRONT PANEL ASSEMBLY
ITEM
EVEN
400-088-091
1
2
3
4
5
6
7
8
9
PART #
DESCRIPTION
088-001-503
088-001-541
088-001-563
088-001-518T
000-026-865
809-849-145
808-549-120
948-722-111
839-549-002
FRONT PANEL
U-NUT, ¼-20, LOCK
PIN REJECTOR PLATE
KICKOUT SPRING
FLAT WASHER, ¼ X 7/8
SCREW, ¼-20 X 7/8, HEX
SCREW, ¼-20 X ¾, HEX SOCKET BTN HD
FLAT WASHER, 5/16, SAE
NUT, ¼-20, FLEXLOC
Page 3-9
ODD
Rev. Date 03/2012
SECTION 3.0
Drawings and Parts Lists
If the chain side surface of
item 7 shows excessive wear,
it can be flipped end for end.
9A
CHAIN DRIVE ASSEMBLY - ODD
ITEM
PART #
1
2
3
4
5
6
7
8
9
9A
10
11
12
13
088-001-553
088-001-554
088-001-556
088-001-552
808-549-120
088-001-559
088-001-555
808-849-120
088-001-526
088-001-561
088-001-590
088-001-524
088-001-525
908-040-121
400-088-091
DESCRIPTION
CHAIN TRACK TOP
CHAIN TRACK BOTTOM
TRACK JOINER
TRACK KEY PLATE
SCREW, ¼-20 X 3/4, HEX SOCKET BTN HD
DRIVE ASSEMBLY, ODD
DRIVE SLEEVE
SCREW, ¼-20 X 3/4, HEX SOCKET HEAD
ROLLER CHAIN (CHAIN ONLY)
ROLLER CHAIN ASSY, ODD, (INCL 9 -13)
CONNECTING LINK
FLIGHT CUP
FLIGHT TAB
GROOVE PIN, ¼ X 3/4
Page 3-10
Rev. Date 03/2012
QubicaAMF – EDGE PERFORMANCE LIFT
If the chain side surface of
item 7 shows excessive wear,
it can be flipped end for end.
CHAIN DRIVE ASSEMBLY - EVEN
ITEM
PART #
1
2
3
4
5
6
7
8
9
9A
10
11
12
13
088-001-553
088-001-554
088-001-556
088-001-552
808-549-120
088-001-560
088-001-555
808-849-120
088-001-526
088-001-562
088-001-590
088-001-524
088-001-525
908-040-121
400-088-091
DESCRIPTION
CHAIN TRACK TOP
CHAIN TRACK BOTTOM
TRACK JOINER
TRACK KEY PLATE
SCREW, ¼-20 X 3/4, HEX SOCKET BTN HD
DRIVE ASSEMBLY, EVEN
DRIVE SLEEVE
SCREW, ¼-20 X 3/4, HEX SOCKET HEAD
ROLLER CHAIN (CHAIN ONLY)
ROLLER CHAIN ASSY, EVEN, (INCL 9 -13)
CONNECTING LINK
FLIGHT CUP
FLIGHT TAB
GROOVE PIN, ¼ X 3/4
Page 3-11
Rev. Date 03/2012
SECTION 3.0
Drawings and Parts Lists
Bearings are pressed onto shaft and into housings.
Tighten bolt to 60 in-lbs.
ODD
088-001-559
DRIVE ASSEMBLY
ITEM
1
2
3
4
5
6
7
8
9
PART #
DESCRIPTION
088-001-529
088-001-530
088-001-584
088-001-532
088-001-551
948-753-102
809-849-325
844-049-002
907-200-800
SPROCKET YOKE, LEFT HAND
SPROCKET YOKE, RIGHT HAND
SOLID SPROCKET
DRIVE SHAFT
RADIAL BEARING, DOUBLE SHIELDED
FLAT WASHER, ¼, BLACK
SCREW, ¼-20 X 2, HEX
NUT, ¼-20, HEX, STOVER LOCK
KEY, 3/16 SQUARE X .720
400-088-091
EVEN
088-001-560
Page 3-12
Rev. Date 03/2012
QubicaAMF – EDGE PERFORMANCE LIFT
XLi Edge Distributor
Distributor Funnels – Maintain in
accordance with Section 2.2.2.
Distributor shown for reference only
400-088-091
Page 3-13
Rev. Date 03/2012
SECTION 3.0
Drawings and Parts Lists
This Page Intentionally Left Blank
400-088-091
Page 3-14
Rev. Date 03/2012