1
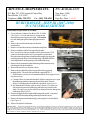
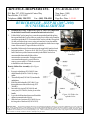
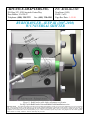
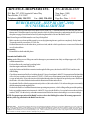
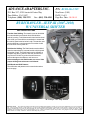
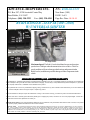
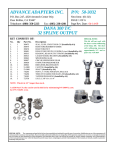
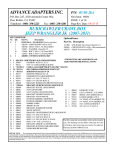
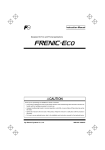
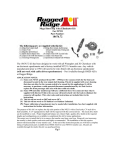
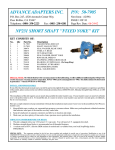
ADVANCE ADAPTERS INC.
P/N: RUBI-JK-UNIV
P.O. Box 247, 4320 Aerotech Center Way
Paso Robles, CA 93447
Telephone: (800) 350-2223
Fax: (805) 238-4201
New Item: (9/09)
PAGE 1 of 9
Page Rev. Date: 09-30-11
RUBICRAWLER - JEEP JK (2007-2010)
W/ UNIVERSAL SHIFTER
KIT CONSISTS OF:
No. Qty Part No.
1.
1
1
1
1
4
10
4
2.
1
1
1
1
1
1
1
1
1
1
2
2
1
2
1
2
2
3
4
1
22
1
1
1
Description
42R-JK - GEAR BOX
Kit also includes:
42R320 - BRACKET- FOOT MOUNT
42R350 - CHRYSLER RTV SEALANT
42R540 - BOLT- M10-1.5 X 30mm BHCS
720015 - WASHER- 10mm FLAT
720028 - BOLT- M10-1.5 X 35mm SHCS
720073 - BOLT- M10-1.5 X 25mm HHCS
42R-UNIV - UNIVERSAL SHIFTER KIT
Kit Includes:
303121 - NUT - 1/2-13 JAM
303305 - BARREL - CABLE - RUBICRAWLER
303341 - BOLT - 1/4-28 X 5/8 BHCS
340600 - ENCLOSURE- SHIFTER END
340601 - SHIFTER MOUNTING PLATE
340602 - SINGLE STICK BOOT RING
340605 - SINGLE STICK BOOT
340610 - BRACKET - BARREL RETAINER
340611 - CABLE SHIFTER HANDLE
340612 - BUSHING - SHIFT HANDLE
303313 - HEIM JOINT
340614 - CLEVIS PIN
340615 - BOLT - 1/4-20 X 5/8 BHCS
340616 - COTTER PIN
720040 - BOLT - M8-1.25 X 20mm SHCS
722523 - WASHER - 1/4" FLAT
722531 - BOLT - 1/4-20 X 1.25 HHCS
722542 - SCREW - #10 - SELF TAPPING
42R441 - BRACKET CABLE MT.
303311 - HEAT SHEILD
303309 - CABLE-48"LONG
42R607 - SHIFT KNOB - RUBICRAWLER
340617 - 1/4-28 X 1" S.H.C.S. (HEIM BOLT)
Optional Items:
Part No. Description
15-1000 - UNI-RAISE, Drivetrain Lifing Device
42R360 - CHRYSLER ATF+4 (Qty. 4 Recommemded)
42R370 - 42RLE Transmission Filter
Tool List:
1.
2.
3.
4.
5.
6.
7.
8.
FULL SET OF HAND TOOLS INCLUDING:
6 mm ALLEN WRENCH
16 mm DEEP SOCKET
8mm HEX BIT SOCKET
3/8" DRIVE RATCHET
15/16" WRENCH
5/32" ALLEN WRENCH
3/8" TORQUE WRENCH
(25 TO 40 FT.-LBS. REQUIRED)
GASKET SCRAPER
SMALL BRASS WIRE BRUSH
CLEANING SOLVENT
(PAINT THINNER, ACETONE, MEK ETC) DO
NOT USE DEGREASERS LIKE SIMPLE GREEN
STUBBY 9/16" WRENCH REQUIRED,
RATCHETING RECOMMENDED.
T20, T30, AND T45 TORX BIT SOCKETS.
SLIDE HAMMER.
INTRODUCTION: The RubiCrawler is a two speed crawl box for Jeep Wranglers, TJs and JKs, from 2003-2010 with the
factory automatic transmission (42RLE). This particular kit (RUBI-JK-UNIV) is for the 2007-2010 Jeep Wrangler JK
includes a universal RubiCrawler shifter that is intended to be used with an aftermarket transfer case such as the Atlas. As
such, some floorboard modifications will be required to install the new RubiCrawler shifter.
SPECIAL NOTE:
The components packaged in this kit have been assembled and machined for specific type of conversions. Modifications to any of the components will
void any possible warranty or return privileges. If you do not fully understand modifications or changes that will be required to complete your conversion, we strongly recommend
that you contact our sales department for more information. This instruction sheet is only to be used for the assembly of Advance Adapter components. We recommend that a
service manual pertaining to your vehicle be obtained for specific torque values, wiring diagrams and other related equipment. These manuals are normally available at automotive
dealerships and parts stores.
ADVANCE ADAPTERS INC.
P/N: RUBI-JK-UNIV
P.O. Box 247, 4320 Aerotech Center Way
Paso Robles, CA 93447
Telephone: (800) 350-2223
Fax: (805) 238-4201
New Item: (9/09)
PAGE 2 of 9
Page Rev. Date: 1-11-10
RUBICRAWLER - JEEP JK (2007-2010)
W/ UNIVERSAL SHIFTER
Disassembly/Preparation For Assembly:
1. Use an Advance Adapters Uni-Raise (PN: 15-1000)
(See Figure 1) or some other device to support the
transmission pan to support its weight. Take caution
to avoid denting the pan and damaging the transmission.
2. Remove the four M8 foot mount nuts from the
crossmember.
3. Remove crossmember and any aftermarket skid plates.
Figure 1: Uni-Raise
4. Remove both drive shafts. Disconnect the breather
hose, 4wd switch connector, and the vehicle speed sensor (VSS)
Tailhousing
connector from the transfer case if your transfer case has them.
Disconnect the wiring harness from the tailhousing by prying up the
retaining clip on the driver's side of tailhousing. Unbolt the fuel line
retaining bracket from the passenger side of the tailhousing.
5. Remove the foot mount from the tailhousing of the transmission by
Custom Puller
unbolting the four hex head bolts.
6. Remove the transfer case from the vehicle.
7. Remove the spud shaft by following one of the three suggested
Figure 2: Custom Puller Method
methods below. The end of the spud shaft is tapped M10-1.5.
i. Slide Hammer -(factory service manual method): Note: aggressive use
may be necessary.
ii. Custom Puller (recommended method)- Make a custom device to span
the tailhousing without contacting the end of the shaft. Thread a
M10x1.5 bolt through tool and into the spud shaft. (See Figure 2)
iii. Pry Method (fast but only works on some vehicles)- Use a piece of
sheet metal to protect the tailhousing and bolt a large washer to the
shaft. Use a pry bar to pry the shaft loose taking care not to damage the
tailhousing. (See Figure 3)
8. Prepare a drip pan. Removing the tailhousing will result in 2-4 quarts of
transmission fluid loss depending on the angle of the drivetrain.
Figure 3: Pry Method
9. Remove the transmission tailhousing by removing the 11 hex head bolts.
(See Figure 4)
10. Allow oil to drain for 10 minutes.
SPECIAL NOTE:
The components packaged in this kit have been assembled and machined for specific type of conversions. Modifications to any of the components
will void any possible warranty or return privileges. If you do not fully understand modifications or changes that will be required to complete your conversion, we
strongly recommend that you contact our sales department for more information. This instruction sheet is only to be used for the assembly of Advance Adapter
components. We recommend that a service manual pertaining to your vehicle be obtained for specific torque values, wiring diagrams and other related equipment.
These manuals are normally available at automotive dealerships and parts stores.
ADVANCE ADAPTERS INC.
P/N: RUBI-JK-UNIV
P.O. Box 247, 4320 Aerotech Center Way
Paso Robles, CA 93447
Telephone: (800) 350-2223
Fax: (805) 238-4201
New Item: (9/09)
PAGE 3 of 9
Page Rev. Date: 1-11-10
RUBICRAWLER - JEEP JK (2007-2010)
W/ UNIVERSAL SHIFTER
11.
Insert a CLEAN shop rag into
the back of the transmission as shown
in the picture below to prevent contaminates from entering your transmission. (See Figure 5)
12.
Thoroughly clean the rear face
of the transmission. Use solvent and a
brass wire brush to clean all of the RTV
off of the mating face and take caution
to avoid any debris from entering the
transmission or transmission bearing. (See
Figure 4: Transmission
Figure 6) It may be necessary to trim
Tailhousing
excess RTV that protrudes up from the
transmission pan onto the rear face of the transmission. Excess RTV
can prevent the Rubicrawler from fully mating to the transmission
face.
13. Remove the spud shaft retaining clip from the groove near the end of
the transmission output shaft.
RubiCrawler Installation:
1. Remove the red plug and O-ring, from the RubiCrawler as seen in
Figure 7 . Remove the rag from the transmission and discard the
red plug.
2.
3.
Figure 5: Rag Placement
Figure 6: Clean Transmission
RTV Pattern
The RubiCrawler should be test fit
into the vehicle by installing it
Red Plug
without RTV to make sure the
Figure 7: Red Plug
RubiCrawler flange face touches the
transmission face completely. This is to insure that the output shaft is
not too long. The product was designed for a standard output shaft
stick-out, but the stick-out could vary which would cause a major
O-Ring
problem. If you experience a problem, DO NOT proceed, call
Advance Adapters. Steps 3 and 4, are time sensitive and should be
completed in under 10 minutes.
Figure 8: RTV Pattern
Reclean the transmission face and the front face of the RubiCrawler
using solvent. Apply an 1/8" bead of the supplied Chrysler (ATF+4 compatible) RTV to the RubiCrawler
as shown in Figure 8.
SPECIAL NOTE:
The components packaged in this kit have been assembled and machined for specific type of conversions. Modifications to any of the components
will void any possible warranty or return privileges. If you do not fully understand modifications or changes that will be required to complete your conversion, we
strongly recommend that you contact our sales department for more information. This instruction sheet is only to be used for the assembly of Advance Adapter
components. We recommend that a service manual pertaining to your vehicle be obtained for specific torque values, wiring diagrams and other related equipment.
These manuals are normally available at automotive dealerships and parts stores.
ADVANCE ADAPTERS INC.
P/N: RUBI-JK-UNIV
P.O. Box 247, 4320 Aerotech Center Way
Paso Robles, CA 93447
Telephone: (800) 350-2223
Fax: (805) 238-4201
New Item: (9/09)
PAGE 4 of 9
Page Rev. Date: 1-11-10
RUBICRAWLER - JEEP JK (2007-2010)
W/ UNIVERSAL SHIFTER
4.
5.
6.
Reinstall the O-ring as shown in Figure 8. This is very important
for the RubiCrawler and Transmission lubrication circuits.
Lift the RubiCrawler into place, rotate the output shaft until the splines
line up and the RubiCrawler slides on, make sure it slides on by hand far
enough to squish the RTV. Fasten the RubiCrawler with the 10 supplied
10 mm socket head cap screws using an 8 mm hex bit socket and the
10 mm button head cap screw that bolts on under the shifter box using a
6 mm Allen wrench. Torque all bolts to 40 ft-Lbs.
Install the Rubicrawler foot mount using the supplied 10 mm hex head
bolts and washers. Torque to 40 ft.-lbs. (See Figure 9) Bolt the top
half of the factory rubber mount assembly to the RubiCrawler foot
mount and the bottom half of the rubber
mount to the crossmember. If using any other
crossmember than stock, you will have to
source your own M10-1.50 bolts to attach
to the Rubicrawler foot mount.
Bench -Shifter Box Assembly: (See Figure
10)
1. Press pivot bushings (P/N 340612) into
shifter handle (Part No. 340611) using a
mallet.
2. Thread ball joint (P/N 340613) into handle
and tighten.
3. Slide the shifter handle (P/N 340611) up
through bottom of the shifter body (P/N
340600).
4. Insert the clevis pin (P/N 340614) and
cotter pin (P/N 340616) for the pivot of the
handle.
5. Leave the shift knob and jam nut off until the
shifter is mounted in the vehicle.
6. Slide the barrel retainer (P/N 340610) over
the long side of the barrel (P/N 303305).
10mm Hex Bolts
And Washers
Figure 9: Heat Shield
Figure 9: Footmount
Installed
Figure 10: Shifter box
exploded view.
SPECIAL NOTE:
The components packaged in this kit have been assembled and machined for specific type of conversions. Modifications to any of the components
will void any possible warranty or return privileges. If you do not fully understand modifications or changes that will be required to complete your conversion, we
strongly recommend that you contact our sales department for more information. This instruction sheet is only to be used for the assembly of Advance Adapter
components. We recommend that a service manual pertaining to your vehicle be obtained for specific torque values, wiring diagrams and other related equipment.
These manuals are normally available at automotive dealerships and parts stores.
ADVANCE ADAPTERS INC.
P/N: RUBI-JK-UNIV
P.O. Box 247, 4320 Aerotech Center Way
Paso Robles, CA 93447
Telephone: (800) 350-2223
Fax: (805) 238-4201
New Item: (9/09)
PAGE 5 of 9
Page Rev. Date: 1-11-10
RUBICRAWLER - JEEP JK (2007-2010)
W/ UNIVERSAL SHIFTER
Low Range
High Range
Figure 11: RubiCrawler cable shifter adjustment verification.
See Step 2 of the RubiCrawler Universal Shifter Cable Installation section
SPECIAL NOTE:
The components packaged in this kit have been assembled and machined for specific type of conversions. Modifications to any of the components
will void any possible warranty or return privileges. If you do not fully understand modifications or changes that will be required to complete your conversion, we
strongly recommend that you contact our sales department for more information. This instruction sheet is only to be used for the assembly of Advance Adapter
components. We recommend that a service manual pertaining to your vehicle be obtained for specific torque values, wiring diagrams and other related equipment.
These manuals are normally available at automotive dealerships and parts stores.
ADVANCE ADAPTERS INC.
P/N: RUBI-JK-UNIV
P.O. Box 247, 4320 Aerotech Center Way
Paso Robles, CA 93447
Telephone: (800) 350-2223
Fax: (805) 238-4201
New Item: (9/09)
PAGE 6 of 9
Page Rev. Date: 1-11-10
RUBICRAWLER - JEEP JK (2007-2010)
W/ UNIVERSAL SHIFTER
7.
8.
9.
Remove the 2nd jam nut & washer from the shift cable housing and thread it into the barrel, about halfway.
Thread the 1/4"-28 jam nut completely onto the inner cable.
Insert the shift cable and barrel into the shifter body. Spin the shift cable to thread the inner cable into the
ball joint. When the cable bottoms out in the ball joint, use the jam nut to lock it in place.
10. Seat the barrel into the shifter body and install the barrel retainer with the supplied button head socket cap
screws (340615).
RubiCrawler Universal Shifter Installation:
1.
2.
3.
4.
5.
6.
Install the RubiCrawler shifter bracket to the flange of the RubiCrawler case using two 8 mm bolts and 1/
4" washers supplied with the kit. (See Figure 12)
Verify that the RubiCrawler cable travels an 1/8" past the mounting
hole on the RubiCrawler shift lever for both directions of travel.
Use a crescent wrench to shift the RubiCrawler while rotating the
output shaft. (See Figure 11)
Using a medium strength thread locking compound and the supplied 1/4-28x5/8" button head cap screw, bolt the heim joint of the
RubiCrawler shift cable to the RubiCrawler shift lever.
Mount the Shifter Box Assembly (that was bench assembled
Figure 12: Rubicrawler
previously) in to the vehicle. Pick a location that the cable can
shifter bracket installed
reach without kinking or binding. This shifter box was designed to
be mounted underneath the vehicle and only requires an approximately 5/8" diameter hole to be made in the floor. Use the shifter mounting plate as a template to drill the
three mounting holes in the floor. Insert the three 1/4"-20 x 1.25" bolts through the mounting plate and
floor and thread them into the shifter box.
Mount the rubber shift boot and boot ring over top of the shifter box.
Install the shift knob in the correct orientation onto the shifter handle.
Transfer Case Installation:
1.
Verify that the transfer case studs do not bottom out into the rear of RubiCrawler Case. Shorten as
needed. Note: If you shorten the studs while on the transfer case, make sure to protect the input shaft area
from debris while cutting.
SPECIAL NOTE:
The components packaged in this kit have been assembled and machined for specific type of conversions. Modifications to any of the components
will void any possible warranty or return privileges. If you do not fully understand modifications or changes that will be required to complete your conversion, we
strongly recommend that you contact our sales department for more information. This instruction sheet is only to be used for the assembly of Advance Adapter
components. We recommend that a service manual pertaining to your vehicle be obtained for specific torque values, wiring diagrams and other related equipment.
These manuals are normally available at automotive dealerships and parts stores.
ADVANCE ADAPTERS INC.
P/N: RUBI-JK-UNIV
P.O. Box 247, 4320 Aerotech Center Way
Paso Robles, CA 93447
Telephone: (800) 350-2223
Fax: (805) 238-4201
New Item: (9/09)
PAGE 7 of 9
Page Rev. Date: 1-11-10
RUBICRAWLER - JEEP JK (2007-2010)
W/ UNIVERSAL SHIFTER
2.
Lubricate the lip seal on the back of the RubiCrawler with ATF+4. Shift the transfer case into any gear other
than neutral. Install the transfer case back into the vehicle by lifting it into place and rotating the rear yoke until
the splines engage. Start all nuts before fully indexing the transfer case in to the RubiCrawler.
Note: Do not forget to refill the transfer case if any fluid spilled.
3. Make sure that you do not pull the transfer case on by tightening the nuts, push it on completely first by hand.
Torque the transfer case nuts to 25-30 ft-lbs.
4. Reinstall the transfer case breather hose, position switch, and the vehicle speed sensor connectors if it has them
as well as the shifters.
Reassembly:
1. Reinstall drive shafts and skid plates.
Transmission Fluid Re-Fill:
Caution: under filling or over filling can result in damage to your transmission. Only use Mopar approved, ATF+4 to
refill the transmission.
1. Park on a flat surface and apply parking brake.
2. Start the engine and let the vehicle idle.
3. Apply the brakes and shift the transmission through all of the gears, then back to NEUTRAL and leave the
vehicle idling.
4. Check the transmission fluid level with the dipstick. Using a clean funnel, add ATF+4 transmission fluid until the
oil level is between the two holes marked "COLD". (Check to see if the transmission fluid level on the dipstick
is even on both sides. If one side is noticeably higher than the other, the dipstick has picked up some fluid from
the fill tube. Allow the fluid to drain down the transmission fill tube and recheck.
5. Now that the fluid level has been approximately achieved, drive the vehicle 5-10 miles making sure to manually
shift the transmission through all gears.
6. Recheck the fluid level with the transmission at operating temperature, vehicle idling on flat ground, the parking
brake set, and the transmission in neutral. Add ATF+4 to raise the fluid level to a point between the two holes
marked "HOT". Do this slowly so that the transmission fill tube has time to drain and gives accurate readings.
NOTE: For proper operation of the RubiCrawler, refer to the Shifting Procedure/Warranty paperwork
and the yellow tag attached to the RubiCrawler case.
SPECIAL NOTE:
The components packaged in this kit have been assembled and machined for specific type of conversions. Modifications to any of the components
will void any possible warranty or return privileges. If you do not fully understand modifications or changes that will be required to complete your conversion, we
strongly recommend that you contact our sales department for more information. This instruction sheet is only to be used for the assembly of Advance Adapter
components. We recommend that a service manual pertaining to your vehicle be obtained for specific torque values, wiring diagrams and other related equipment.
These manuals are normally available at automotive dealerships and parts stores.
ADVANCE ADAPTERS INC.
P/N: RUBI-JK-UNIV
P.O. Box 247, 4320 Aerotech Center Way
Paso Robles, CA 93447
Telephone: (800) 350-2223
Fax: (805) 238-4201
New Item: (9/09)
PAGE 8 of 9
Page Rev. Date: 08-10-10
RUBICRAWLER - JEEP JK (2007-2010)
W/ UNIVERSAL SHIFTER
SHIFTING INSTRUCTIONS
Transfer Case
Shifter
Transfer Case Shifting: The transfer case can be shifted
from two wheel drive to 4 wheel drive HIGH while the
vehicle is moving. To shift the transfer case into four wheel
drive LOW, you must shift the transmission to neutral and
the vehicle speed must be below 2 mph. The transfer case
can be shifted at a complete stop but it is easier to shift
the unit when at a very slow roll.
RubiCrawler
Shifter
RubiCrawler Shifting: The RubiCrawler must be shifted
when the transmission is in neutral and the vehicle speed
is less than 2 mph. The RubiCrawler can be shifted at a
complete stop but it is easier to shift the unit when at a
very slow roll. Do NOT try to force the shift levers as
serious damage to the shifters or unit can occur.
Serious damage to the RubiCrawler can occur if the
proper shifting instructions are not followed.
JK Shift knobs
Shift Knobs and Shift Patterns
The shift knobs and patterns can be seen below and on
the next page.
Shift
Anytime
Shift
Under
2 MPH
JK Transfer Case Shift Pattern
SPECIAL NOTE:
The components packaged in this kit have been assembled and machined for specific type of conversions. Modifications to any of the components
will void any possible warranty or return privileges. If you do not fully understand modifications or changes that will be required to complete your conversion, we
strongly recommend that you contact our sales department for more information. This instruction sheet is only to be used for the assembly of Advance Adapter
components. We recommend that a service manual pertaining to your vehicle be obtained for specific torque values, wiring diagrams and other related equipment.
These manuals are normally available at automotive dealerships and parts stores.
ADVANCE ADAPTERS INC.
P/N: RUBI-JK-UNIV
P.O. Box 247, 4320 Aerotech Center Way
Paso Robles, CA 93447
Telephone: (800) 350-2223
Fax: (805) 238-4201
New Item: (9/09)
PAGE 9 of 9
Page Rev. Date: 08-10-10
RUBICRAWLER - JEEP JK (2007-2010)
W/ UNIVERSAL SHIFTER
RubiCrawler Shift Pattern
Shift
Under
2 MPH
Shift
Anytime
Shift Case
Transfer
Under
Shifter
2 MPH
RubiCrawler
Shifter
TJ Non-Rubicon Knob
Shift
Anytime
RrEDLINE
Shift
Under
2 MPH
TJ Rubicon Knob
TJ Shift Knobs
Maximum Speed: The Rubi-Crawler should not be operated at engine
speeds above 5000rpm when the transmission is in overdrive. This over
speed condition will cause damage to the bearings and geartrain in the
RubiCrawler, in addition to possible damage to other components in the
vehicle.
ADVANCE ADAPTERS, INC. LIMITED WARRANTY
The RubiCrawler is guaranteed against defects in workmanship and materials for one year. This warranty begins from the date the unit is shipped from
Advance Adapters. We log all units with a serial number at time of shipping. The wannanty is void (as determined by Advance Adapters, Inc.) by misuse,
abuse, improper mainenance or installation and or alterations to the product.
These guarantees do not cover any outside labor, shipping, towing, normal wear or any other unforseen events that that may occur due to failure of a
unit. Advance Adapters reserves the right to repair or replace any product.
Do not disassemble or attempt to repair the RubiCrawler as doing so will void the warranty, just return the product as furthet described below.
All returns must have a returned goods authoriztion (RGA#) prior to shipping the product, and returns are to be sent prepaid freight. Please call 1800-350-2223 and the sales department can assist you.
Warranty will be voided if the proper transmission fluid levels are not maintained, if any transmission fluid other than ATF+4 is used, or the product
has not been properly installed and instructions have not been followed.
SPECIAL NOTE:
The components packaged in this kit have been assembled and machined for specific type of conversions. Modifications to any of the components
will void any possible warranty or return privileges. If you do not fully understand modifications or changes that will be required to complete your conversion, we
strongly recommend that you contact our sales department for more information. This instruction sheet is only to be used for the assembly of Advance Adapter
components. We recommend that a service manual pertaining to your vehicle be obtained for specific torque values, wiring diagrams and other related equipment.
These manuals are normally available at automotive dealerships and parts stores.