1
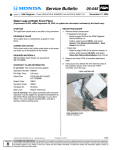
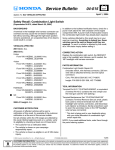
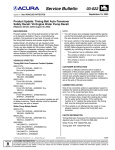
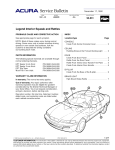
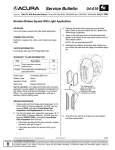
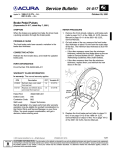
Service Bulletin Applies To: 2001 MDX – ALL 2002 MDX – From VIN 2HNYD1...2H500001 thru 2HNYD1...2H543293 02-028 October 28, 2002 Creaking or Ticking From the Dashboard or a Front Strut SYMPTOM DIAGNOSIS A creaking or ticking comes from the dashboard or front fender area. The noise occurs when driving over bumps, and sometimes when braking or turning. With the hood open and the vehicle parked, rock the vehicle from side to side, and listen for a creaking or ticking noise coming from the front damper area. If you are unable to duplicate the noise, test-drive the vehicle over small bumps to help confirm the noise. PROBABLE CAUSE • If a creaking or ticking noise comes from the dashboard or front damper area, go to the appropriate REPAIR PROCEDURE. Paint from the front damper mounting base is sticking to the body or burrs from a body spot weld are contacting the front damper mounting base. • If the noise is not a creaking or ticking from the dashboard or front damper area, continue troubleshooting. CORRECTIVE ACTION Remove the front damper/spring assembly, grind off the body spot weld burrs, and refinish the surface and/ or install shims to the damper mounting base. PARTS INFORMATION 2002 MDX: From VIN 2HNYD1...2H523466 thru 2HNYD1...2H532574 1. Remove the appropriate front damper/spring assembly. Refer to page 18-18 of the 2001–02 MDX Service Manual. Self-Adhesive Shim: P/N 75826-634-300, H/C 0701896 (Requires three shims per side) 2. While wearing eye protection, use an angle grinder with sandpaper to remove any spot weld burrs that are raised above the surface of the damper mounting area. Grind down the burrs flush with the surrounding area. Grinding off more material than necessary may create an uneven surface and could result in additional noise. WARRANTY CLAIM INFORMATION In warranty: The normal warranty applies. OP# DESCRIPTION FRT 414001 Grind off spot weld burrs and install shims to the damper mounting base (REPAIR PROCEDURE A) 2.2 414007 Install shims to the damper mounting base (REPAIR PROCEDURE B) 0.3 414092 Test-drive 0.3 Failed Part: REPAIR PROCEDURE A P/N 60750-S9V-A00ZZ H/C 7018351 Defect Code: 042 Contention Code: B07 Skill Level: Repair Technician Out of warranty: Any repair performed after warranty expiration may be eligible for goodwill consideration by the District Parts and Service Manager or your Zone Office. You must request consideration, and get a decision, before starting work. 2002 American Honda Motor Co., Inc. – All Rights Reserved BTB 24595 1 of 3 CUSTOMER INFORMATION: The information in this bulletin is intended for use only by skilled technicians who have the proper tools, equipment, and training to correctly and safely maintain your vehicle. These procedures should not be attempted by “do-it-yourselfers,” and you should not assume this bulletin applies to your vehicle, or that your vehicle has the condition described. To determine whether this information applies, contact an authorized Acura automobile dealer. NOTE: The exact location of spot weld burrs may vary. Be sure to check the damper mounting area completely. REPAIR PROCEDURE B 2001 MDX: All 2002 MDX: From VIN 2HNYD1...2H500001 thru 2HNYD1...2H523465 2002 MDX: From VIN 2HNYD1...2H532575 thru 2HNYD1...2H543293 1. Raise the vehicle on a hoist, and remove the front wheels. UNDERSIDE OF THE DAMPER MOUNTING AREA SPOT WELD BURR LOCATIONS 2. Remove the wheel sensor harness bracket from the damper. Do not disconnect the wheel sensor connector. STABILIZER LINK BRAKE HOSE BRACKET WHEEL SENSOR HARNESS BRACKET 3. Prepare and refinish the bare metal to prevent rust. Refer to the appropriate body repair manual. 4. Clean the surface of the damper mounting base with isopropyl alcohol. 5. Install three self-adhesive shims to the damper mounting base as shown. Position the shims so the edge of the shim is slightly rolled over the edge of the damper mounting base. SELF-ADHESIVE SHIMS 3. Remove the brake hose bracket from the damper. Do not disconnect the brake hose. 4. Disconnect the stabilizer link from the damper. 5. Position a floor jack under the front lower arm of the damper. Raise the floor jack to support the arm. 6. Reinstall the front damper/spring assembly. Refer to page 18-20 of the 2001-02 MDX Service Manual. 7. Check the front wheel alignment, and adjust as necessary. 8. Test-drive the vehicle over bumps to make sure the noise is gone. 2 of 3 02-028 6. Remove the service caps from the upper portion of the damper cover. SERVICE CAPS 9. Install three self-adhesive shims to the damper mounting base as shown. Position the shims so the edge of the shim is slightly rolled over the edge of the damper mounting base. DAMPER FLANGE NUTS SELF-ADHESIVE SHIMS Reach up into the wheelwell and install the shims to the top of the damper mounting base. Lower the damper assembly. 7. Remove the three flange nuts from the damper, and lower the damper assembly with the floor jack. 8. Clean the surface of the upper damper mounting base with isopropyl alcohol. 10. Reinstall the damper assembly. Torque the three flange mounting nuts to 59 N·m (43 lb-ft). 11. Reinstall the service caps to the upper portion of the damper cover. 12. Reconnect the stabilizer link to the damper, and torque the mounting nut to 78 N·m (58 lb-ft). 13. Reconnect the brake hose bracket to the damper, and torque the mounting bolt to 22 N·m (16 lb-ft). 14. Reconnect the wheel sensor harness bracket to the damper, and torque the mounting bolt to 9.5 N·m (7 lb-ft). 15. Reinstall the front wheels. 16. Test-drive the vehicle over bumps to make sure the noise is gone. 02-028 3 of 3