1
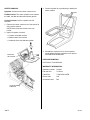
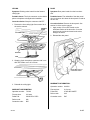
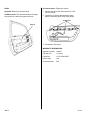
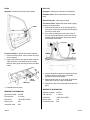
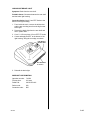
November 17, 1992 YEAR MODEL VIN APPLICATION 1991 – 92 LEGEND ALL BULLETIN NO. 92-031 Legend Interior Squeak and Rattles PROBABLE CAUSE AND CORRECTIVE ACTION INDEX See appropriate page for each symptom. Location/type NOTE: Most of these noises occur during normal driving. Some occur only at certain minimum driving speeds or over certain road surfaces. Ask the customer to describe the driving conditions surrounding each noise. CONSOLE Creak From Center Console Cover . . . . . . . . . . . 2 PARTS INFORMATION DOOR Creak From Door Panel . . . . . . . . . . . . . . . . . . . . . Rattle From the Door Panel . . . . . . . . . . . . . . . . . . Rattle From Interior Door Handle Trim Plate . . . Creak From Interior Door Handle . . . . . . . . . . . . . The following special materials are available through normal ordering channels. EPT Sealer 5 mm thick: EPT Sealer 3 mm thick: EPT Slip Tape: Wool Felt 1 mm thick: P/N 06991-SA5-000 P/N 06990-SA5-000 P/N 06994-SA5-000 P/N 06993-SA5-000 WARRANTY CLAIM INFORMATION Page CEILING Rubbing Noise at the Forward Ceiling Light . . . 3 3 4 5 6 B-PILLAR Creak From the Base of the B-pillar . . . . . . . . . . . 6 BRAKE LIGHT High Mount Brake Rattle . . . . . . . . . . . . . . . . . . . . 7 In warranty: The normal warranty applies. Out of warranty: Any repair performed after warranty expiration may be eligible for goodwill consideration by the District Technical Manager or your Zone Office. You must request consideration, and get a decision, before starting work. Operation number, flat rate time, failed part number, defect code, and contention code are listed under each related corrective action. 1992 American Honda Motor Co., Inc. – All Rights Reserved BTB 15509 (9211) 1 of 7 CUSTOMER INFORMATION: The information in this bulletin is intended for use only by skilled technicians who have the proper tools, equipment, and training to correctly and safely maintain your vehicle. These procedures should not be attempted by “do-it-yourselfers,” and you should not assume this bulletin applies to your vehicle, or that your vehicle has the condition described. To determine whether this information applies, contact an authorized Acura automobile dealer. CENTER CONSOLE Symptom: Creak from the center console cover. 3. Correct insulation by re-positioning or adding felt where needed. Apply felt. Probable Cause: The center console cover contacts the radio, the dash and the shift indicator garnish. Corrective Action: Add or re-position the felt insulation. 1. Remove the center console cover. See section 20 of the service manual. NOTE: Remove the two screws in the coin pocket. 2. Inspect for points of contact: • Console cover/dash surface • Radio/console cover surface • Underside of the shift indicator garnish Disconnect the connector. 4. Reinstall the console cover. If the coin pocket screw holes are broken, replace the coin pocket. See PARTS INFORMATION. PARTS INFORMATION: Coin Pocket: 77297-SP0-A00 WARRANTY INFORMATION: Operation number: 841290 Flat rate time: 0.3 hours Failed P/N: 77296-SP0-A10ZB Defect code: 042 Contention code: B07 Lift up the parking brake lever. 2 of 7 92-031 CEILING DOOR Symptom: Rubbing noise heard from the forward ceiling light. Symptom: Door panel creak from the inner door skin. Probable Cause: The 2-pin connector on the cellular phone microphone rubs against the headliner. Probable Cause: The underside of the door panel rubs on the door skin when the door panel is used as an arm rest. Corrective Action: Wrap the connector with EPT. 1. Remove the front ceiling light. See section 20 of the service manual. RUBBING NOISE 4-P CONNECTOR Corrective Action: Remove the door panel. See section 20 of the service manual. 1. Apply a strip of 5 mm EPT Sealer to the horizontal surface of the door skin. Cover the area from the lock knob forward to the mirror triangle, as shown. 2. Reinstall the door panel. HOUSING LENS 2. Wrap the 2-pin microphone connector with 3 mm thick EPT Sealer cut to 30 x 50 mm. Apply EPT sealer to horizontal surface. 3. Reinstall the ceiling light. WARRANTY INFORMATION: Operation number: 843300 WARRANTY INFORMATION: Flat rate time: 0.4 hours Operation number: 715220 Failed P/N: 67050-SP0-000ZZ Flat rate time: 0.2 hours Defect code: 043 Failed P/N: 34250-SP0-013ZC Contention code: B07 Defect code: 042 Contention code: B07 92-031 3 of 7 DOOR Corrective Action: Tighten the screws. Symptom: Rattle from the door panel. 1. Remove the door panel. See section 20 of the service manual. Probable Cause: The screws that attach the upper door panel to the lower door panel are loose. 2. Tighten the 10 screws that attach the upper portion of the door panel to the lower portion. SCREWS (10) RATTLE 3. Reinstall the door panel. WARRANTY INFORMATION: 4 of 7 Operation number: 843200 Flat rate time: 0.4 hours Failed P/N: 67151-SP0-300ZZ Defect code: 042 Contention code: B07 92-031 DOOR Symptom: Rattle from interior door handle trim plate. Probable Cause: The trim plate (cap) retaining clips are loose. 2. Cut 3 mm EPT Sealer into a strip 10 mm wide. Apply it to the back of the trim plate. The EPT will apply pressure to the retaining clips and eliminate the rattle. 3 mm EPT Affected Vehicles: 1991 Legend – All 1992 Legend – All Corrective Action: Insulate the area with 3 mm EPT Sealer. 1. Pry the trim plate out with a flat-tip screwdriver. Pry the trim plate out using a flat-tip screwdriver. 92-031 WARRANTY INFORMATION: Operation number: 818220 Flat rate time: 0.2 hours Failed P/N: 72160-SP0-023ZA Defect code: 043 Contention code: B07 5 of 7 DOOR B-PILLAR Symptom: Creak from the interior door handle. Symptom: Creaking from the base of the B-pillar. Probable Cause: Sheet metal friction near a spot weld. Affected Vehicles: 1991 Legend Coupe Corrective Action: Spread the sheet metal to apply pressure to the spot weld. CREAK 1. Raise and lower the car at the jack points with a floor jack to confirm that the base of the B-pillar is the source of the noise. 2. If the noise is coming from near the junction of the door sill and the B-pillar, remove the door sill molding and the quarter trim panel. See section 20 of the service manual. B-PILLAR Corrective Action: Lubricate the contact surfaces. CREAK CREAK 1. Remove the door panel, refer to section 20 of the service manual. 2. Inspect the bottom of the release cable holder for signs of contact. If the cable holder is touching the door panel, apply silicone grease to the cable holder. 3. Insert a flat-blade screwdriver between the layers of sheet metal next to the noisy spot welds. Spread the sheet metal slightly. CABLE HOLDER LUBRICATE 4. Raise and lower the car. If the creak is still heard, repeat step 3 until the creak is eliminated. 5. Reinstall the door sill molding and the quarter trim panel. 3. Reinstall the door panel. WARRANTY INFORMATION: WARRANTY INFORMATION: Operation number: 857310 Operation number: 819220 Flat rate time: 1.2 hours Flat rate time: 0.4 hours Failed P/N: 64620-SP1-300ZZ Failed P/N: 72160-SP0-023ZA Defect code: 042 Defect code: 042 Contention code: B07 Contention code: B07 6 of 7 92-031 HIGH MOUNT BRAKE LIGHT Symptom: Rattle from the rear shelf. Probable Cause: Clearance between the rear shelf and the brake light housing. Corrective Action: Apply 5 mm EPT Sealer to the bottom of the light housing. 1. From inside the trunk, remove the bulb socket and the two mounting nuts from the high mount brake light. 2. Remove the brake light from the rear shelf and turn it upside down. 3. Cut a 5 x 150 mm piece of 5 mm EPT 5T Sealer. 4. Center and apply the EPT to the bottom of the light housing, along the rear edge, as shown. HIGH MOUNT BRAKE LIGHT EPT SEALER 5T 5 x 150 mm 5. Reinstall the brake light. WARRANTY INFORMATION: Operation number: 714050 Flat rate time: 0.3 hours Failed P/N: 34270-SP0-A01 Defect code: 043 Contention code: B07 92-031 7 of 7