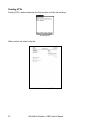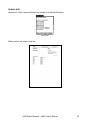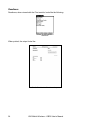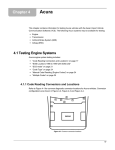
1
VAD Mobile Wireless
OBD-II User's Manual
Version 1.0
Table of Contents
What Is VAD Mobile Wireless?............................................................................... 1
What is the OBD-II Module?................................................................................... 1
Where to Get a VAD Mobile Wireless System........................................................ 1
Installing the OBD-II Module................................................................................... 1
Attaching VAD Mobile Wireless to the Vehicle........................................................ 2
Running the OBD-II Module ................................................................................... 2
Exiting the OBD-II Module...................................................................................... 2
The First Screen..................................................................................................... 3
Configuring OBD-II ................................................................................................. 3
Using PID Sets ....................................................................................................... 4
Connecting ............................................................................................................. 6
01 Current Data...................................................................................................... 7
02 Freeze Frame.................................................................................................. 10
03 DTCs ............................................................................................................... 10
04 Clear ECU ........................................................................................................11
05 O2S Tests........................................................................................................ 12
06 Monitor Tests ................................................................................................... 13
07 Pending DTCs ................................................................................................. 13
08 System Control................................................................................................ 14
09 Vehicle Info...................................................................................................... 15
Readiness ............................................................................................................ 16
Print Module Interaction ....................................................................................... 16
Print Module – Freeze Frame .......................................................................... 18
Print Module – DTCs........................................................................................ 19
O2S Tests......................................................................................................... 20
Monitor Tests.................................................................................................... 21
Pending DTCs.................................................................................................. 22
Vehicle Info ...................................................................................................... 23
Readiness ........................................................................................................ 24
Support for the OBD-II Module............................................................................. 25
VAD Mobile Wireless – OBDII User’s Manual
i
What Is VAD Mobile Wireless?
VAD Mobile Wireless is scan tool platform. It consists of a wireless adapter powered by
Bluetooth, which, when accompanied by a Bluetooth PDA or Smartphone, provides the user
with the latest in diagnostic technologies. The integrated CAN bus circuitry means VAD
Mobile Wireless can be used even with the newest cars. The touch screen is easy-to-use and
the compact size means it can be used both outside and inside the vehicle, at distances
exceeding 30’ away.
What is the OBD-II Module?
The OBD-II module implements the OBD-II diagnostic protocol as defined in ISO-15031-5 and
found in all post-1996 vehicles. With CAN bus support, the OBD-II module will work with the
newest vehicles that do not provide the old diagnostic buses.
The OBD-II module supports all nine Service IDs:
•
•
•
•
•
•
•
•
•
01 Current Data – Current Powertrain Data
02 Freeze Frame – Powertrain Freeze Frame Data
03 DTCs – Emissions-Related Diagnostic Trouble Codes
04 Clear ECU – Clear/Reset Emissions-Related Diagnostic Information
05 O2 Tests – Oxygen Sensor Monitoring Test Results
06 Monitor Tests – On-Board Monitoring Test Results for Specific Monitored Systems
07 Pending DTCs – Emissions-Related Diagnostic Trouble Codes Detected During
Current or Last Completed Driving Cycle
08 System Control – Control of On-Board System, Test or Component
09 Vehicle Info – Vehicle Information
The OBD-II module also contains an extensive list of fault codes as defined in ISO-15031-6.
Where to Get a VAD Mobile Wireless System
VAD Mobile Wireless is available from http://www.vadmobile.com/products.htm , or calling the
Versatile Automotive Diagnostics division at HPA Motorsports directly at 604.598.8520.
Installing the OBD-II Module
The OBD-II module comes as an option on the VAD Mobile Wireless system. There is a CDRom copy provided.
To install an update to the OBD-II module, use the Palm Desktop application found on the
CD-ROM that came with you Bluetooth PDA or Smartphone device. Use the HotSync
procedure to install the new obd2.prc application.
VAD Mobile Wireless – OBDII User’s Manual
1
Attaching VAD Mobile Wireless to the Vehicle
Attach the supplied OBD-II (J1962) adapter to the OBD-II diagnostics port in the vehicle.
After making both connections, turn the ignition switch to the ON or RUN position.
Running the OBD-II Module
The OBD-II module must be installed on the VAD Mobile Wireless PDA and can be found with
the other installed applications. To view the installed applications, tap on the silk-screened
House icon to the left of the graffiti area on the VAD Mobile Wireless PDA.
If you see some applications displayed, but not the OBD-II module, check the category
displayed in the upper right corner of the display. Only applications in the selected category
are displayed. The OBD-II module is found in the Utilities category and the All category. If
you are viewing a different category, tap on the category name and select All or Utilities from
the list.
Tapping on the House,
,icon when the application list is already displayed will also cycle
through the different categories.
Tap on the OBD-II icon,
, to launch the OBD-II module.
Exiting the OBD-II Module
There is no explicit Exit button. To quit the OBD-II module, tap on the silk-screened House
icon found at the bottom on the screen, to the left of the graffiti area.
2
VAD Mobile Wireless – OBDII User’s Manual
The First Screen
When you first run OBD-II, you will see the following screen:
Screen 1 :First screen
Tapping the Connect button will begin a diagnostic session with a vehicle. Tapping the
Configure button allows you to change some operating parameters and tapping the PIDs
button allows you to define PID sets when not connected to a vehicle. The Configure and
PIDs buttons will be discussed first.
Configuring OBD-II
After tapping the Configure button, you will see the following screen:
Screen 2: Configure
The first item allows you to select either Metric or English units. Vehicles report metric units. If
you choose English units, these will be calculated by converting the metric measurements.
The second item allows you to select either Normal PID label or labels specified in the ISO15031-5 standard. Typically the Normal labels are easier to comprehend, though some might
prefer the standardized labels.
After configuring the OBD-II module as desired, tap on the Done button.
VAD Mobile Wireless – OBDII User’s Manual
3
Using PID Sets
PID sets provide a method of defining groups of PIDs that are useful for particular diagnostic
tests. PID stands for Parameter Identification. Each PID reports one or more readings
showing operating conditions for the vehicle.
For example, 'Engine RPM,” “Ignition Timing Advance” and “Time Since Engine Start” are all
PIDs. ISO-15031-5.6 defines 87 PIDs, of which 85 can be viewed. ECUs do not support all
PIDs, with newer vehicles typically reporting more PIDs than older vehicles.
Normally, you are not interested in viewing all PIDs at once. If no PID sets are defined, the
OBD-II module will show almost all PIDs when viewing 01 Current Data. This can become
unwieldy. PID sets provide a method of defining groups of PIDs that you find useful for various
diagnostic tasks. For example, you might define a PID set that contains only oxygen sensor
readings. Another example might be engine speed, engine load and timing advance.
Creating PID sets also allows you to get date updates faster. The more PIDs you view, the
longer it takes to get the data from the vehicle and the longer it takes to display it. By creating
pared-down PID sets you don't waste time getting data you don't need.
Only those PIDs found in the PID set and also supported by the vehicle are used. PIDs found
in PID sets that are not supported by the vehicle are ignored.
PID sets can be created either before you connect to a vehicle by tapping on the PIDs button
or after you have connected by viewing 01 Current Data and tapping on the PID set name in
the upper right corner.
When you enter the PID set screen, you will see:
Screen 3: PID Set List
This shows a list of all currently defined PID sets. Initially, only the Default Set will be listed.
As you create PID sets, they will be shown on this screen. The currently selected PID set is
highlighted (Default Set in this case). To use a different PID set, just tap on the one you want
and then tap Done. The new set will be used the next time you view 01 Current Data.
The Add button allows you to define a new PID set. When you tap on it, you will see:
4
VAD Mobile Wireless – OBDII User’s Manual
Screen 4: Adding a PID
set
In this case, we are not connected. If we were connected, we would see an additional button
and by default, the PIDs supported by the vehicle would already be checked. This is shown
below:
Screen 5: Adding a PID
set while connected
To create a new PID set, check the boxes for the PIDs you want in your set. Then tap on the
dotted line after Name: and enter a name for the set. Then tap Save. This will create a new
set that you can use.
The other buttons do the following: Done exits the screen without saving, All checks all the
PIDs, None unchecks all the PIDs and Veh, if present, selects only the PIDs supported by the
vehicle.
VAD Mobile Wireless – OBDII User’s Manual
5
In this example, we will create a PID set containing the engine speed, ignition timing and bank
1 oxygen sensors. We will call this “Bank 1 sensors.”
Screen 6: Adding a PID
set for bank 1 sensors
After tapping Save, we will see:
Screen 7: Added a new
PID set
We can verify the contents of the new PID set by tapping Details.
Screen 8: PID set details
This shows the PID set name, “Bank 1 sensors”, and the PIDs included in this set. If we
wanted to modify this set, we would then tap the Edit button. The Details screen is also
where you delete PID sets. Do this by tapping the Delete button and then tapping the
Confirm Delete button which will appear.
Connecting
To begin a diagnostic session, tap on the Connect button. The OBD-II module will attempt to
connect to the vehicle using a variety of different physical interfaces.
6
VAD Mobile Wireless – OBDII User’s Manual
Depending on what the vehicle supports, this process might take a couple seconds. After you
have connected, you will see:
Screen 9: Connected
The OBD-II module automatically checks readiness after it connects. In this case, all the
readiness tests are complete.
Vehicles that use the CAN bus for diagnostics will show a slightly different screen after
connecting. CAN does not support the 05 O2S Tests service (06 Monitor Tests supersedes
it) and therefore it is not shown.
The following screen shows an example of a CAN vehicle that has not completed all of its
readiness tests.
Screen 10: Connected
(CAN)
To perform diagnostic tasks, just tap on the appropriate service. All nine services defined in
ISO-15031-5 are available as well as a Readiness check that retrieves PID 01 and displays
the readiness status in a simple format.
When you are done with your diagnostic session, tap the Disconnect button.
01 Current Data
Service 01, allows access to current (real-time) emission-related data values, including analog
inputs and outputs, digital inputs and outputs and system status information. Each PID
contains one or more readings reflecting these values. While accessing 01 Current Data, the
OBD-II module retrieves the PIDs in the current PID set and displays the values as quickly as
it can get and process the data. This speed will vary depending on the diagnostic protocol,
number of PIDs and PID type.
VAD Mobile Wireless – OBDII User’s Manual
7
The following screen shot shows the 01 Current Data function using the Bank 1 sensors PID
set we defined on page 6.
Screen 11: Current data
using PID set
Starting in the upper right, we see the current PID set name. Tap on the set name if you want
to change PID sets or define a new one. This is how you access PID sets when you are
connected.
Below the PID set name, we see a list of readings. The PID number is on the left of the line,
followed by the reading name and then the value. In this example, PIDs 0C, 0E and 15 each
contain a single reading while PID 14 contains two readings.
At the bottom of the screen, we see a series of buttons. Tap Done when you wish to exit. Tap
Log to record the readings to a Memo Pad file (more on this later).
The next three buttons control how the PID data is displayed. In the screen shot above, a flat
list view is selected. As many readings as possible are displayed on the screen. The icon to
the left selects a “big box” view. An example of this is shown below.
Screen 12: Current data big box view
We are viewing the same data, only now the lower part of the screen has been replaced by
two large boxes. This makes is easier to read two values. You select the reading you wish to
view by checking the appropriate box. A scroll bar has also appeared to allow access to all
readings if more than four are present.
The third viewing icon is for graphing. Tap on it to enter graph mode. The bottom part of the
screen is now used for graphing. Select the readings you want to graph by checking the
appropriate boxes.
8
VAD Mobile Wireless – OBDII User’s Manual
In the screen below, we are viewing engine speed and timing advance.
Screen 13: Graphing
current data
We also see that a new button has appeared. This is the pause button. It is a toggle button
and when it is selected the screen will not update (though data is still being recorded). Tap the
pause button a second time to allow the screen to update the new data.
You can read specific graph values by tapping anywhere in the graphing area. A vertical
marker bar will appear and the reading values for that marker appear below the graph.
The following screen shows how the marker can be used.
Screen 14: Reading
graph values
We can see that the engine speed was 2304 RPM while the timing advance was 37.6°.
The Log button is a toggle button. When highlighted, logging is enabled. When you are
logging, data is displayed on the screen and also written to one or more Memo Pad files.
When one Memo becomes full, another is automatically created. The data is stored in comma
separated value (CSV) format, using semicolons in place of commas. If you wish to import the
data into a spread sheet, simply HotSync the VAD Mobile Wireless system using the Palm
Desktop application. The Memo Pad data will automatically be transferred to your desktop
computer. Then connect the Memo Pad records and import them into your spread sheet.
You can also use the Print module to view data logs. Like the OBD-II module, the Print
module is sold separately for your VAD Mobile Wireless PDA/adapter. You can use the Print
module not only to view graphs on the VAD system, but to print them wirelessly on your
printer. The Print module is described separately in the Print User Manual.
VAD Mobile Wireless – OBDII User’s Manual
9
02 Freeze Frame
Freeze frame data is similar to current data in that the readings are from PIDs. However,
while current data shows the real-time status of the vehicle, freeze frame data shows readings
at the time a DTC occurred. PID sets are not used with 02 Freeze Frame. All PIDs in the
freeze frame are displayed. The following screen is an example of freeze frame data.
Screen 15: Freeze frame
Some vehicles can store more than one freeze frame. Tapping on the Next button will display
other stored freeze frames if they are available. If only one freeze frame is available, tapping
the Next button will either display a message saying there are no more frames, or will display
the data from freeze frame #1. The exact behavior is dependent on the vehicle.
At the top of the screen, the DTC causing the freeze frame is displayed. Following the DTC
description is a list of the associated PIDs.
The freeze frame data can be stored by tapping the Save button. The Save button will
disappear, telling you that the data has been saved, and the freeze frame information will be
available as a new Memo Pad record, and can be printed using the Print module.
03 DTCs
The 03 DTCs services allows you to obtain “confirmed” emission-related DTCs. The OBD-II
module will retrieve and display all DTCs from the ECU(s) in the vehicle.
An example is shown below.
Screen 16: DTCs
10
VAD Mobile Wireless – OBDII User’s Manual
In this case ECU #1 had six faults, of which we can see the first three. If the fault codes are
defined in ISO-15031-6, the OBD-II module will display the fault description in addition to the
fault code. Some DTCs are manufacturer specific and their description is not defined in any
standard. In these cases, only the DTC number will be displayed.
ISO-15031-6 also defines DTC codes that contain a sub-fault. These codes are in the form
P0000-00. They are only available when using the CAN diagnostic protocol and only some
vehicles support them. The OBD-II module checks for them and if present will display them.
An example is shown below.
Screen 17: DTCs with subfault bytes
DTCs can also be saved. Just tap on the Save button and a new Memo Pad record will be
created containing the DTC information. The DTC list can then be view or printed using the
Print module.
04 Clear ECU
04 Clear ECU allows you to clear all emission-related diagnostic information. This includes:
•
•
•
•
•
•
•
•
•
•
•
•
•
•
MIL and number of diagnostic trouble codes
Clear the I/M (Inspection/Maintenance) readiness bits
Confirmed diagnostic trouble codes
Pending diagnostic trouble codes
Diagnostic trouble code for freeze frame data
Freeze frame data
Oxygen sensor test data
Status of system monitoring tests
On-board monitoring test results
Distance traveled while MIL is activated
Number of warm-ups since DTCs cleared
Distance traveled since DTCs cleared
Time run by the engine while MIL is activated
Time since diagnostic trouble codes cleared
Other manufacturer specific “clearing/resetting” action may also occur.
VAD Mobile Wireless – OBDII User’s Manual
11
After the clearing service is performed, you will see:
Screen 18: ECU cleared
05 O2S Tests
05 O2S Tests allows access to on-board oxygen sensor monitoring test results. This is only
supported on non-CAN bus systems. The same information can be obtained from 06 Monitor
Tests.
There are two kinds of test results: constant readings and those that must be within a
minimum/maximum value range. The following screen shows fixed values.
Screen 19: Oxygen
sensor test results
(constant values)
The next screen shows an example of a test result (TID 09) that must fall between a minimum
and a maximum. In this case, the value is within the range and the test is passed.
Screen 20: Oxygen sensor
test results (ranged value)
12
VAD Mobile Wireless – OBDII User’s Manual
Tapping the Save button will store the test results in a Memo Pad file. These results can then
be viewed or printed using the Print module.
06 Monitor Tests
06 Monitor Tests is similar to the oxygen sensor test results, but is more flexible. It can report
test results from more than just the oxygen sensors. For example, service 06 can report test
results for catalyst monitoring and evaporative system monitoring. Vehicles using non-CAN
diagnostic buses report the test result data in a more limited form. They report a test result
value and either a maximum or minimum limit for the test. CAN based diagnostic systems
report a wider range of values and provide both minimum and maximum limits.
The following screen is an example of monitor test results from a non-CAN vehicle.
Screen 21: Monitor test
results, non-CAN
The test results from a CAN vehicle look like the following.
Screen 22: Monitor test
results, CAN
In this case, the ECU was not in a vehicle and that is why the voltages read zero. The
unknown TID 80 refers to an on-board test that is not defined in the ISO standard.
As with other services, tapping the Save button will create a new record in the Memo Pad
application.
07 Pending DTCs
Service 07 Pending DTCs reports emission-related diagnostic trouble codes detected during
the current or last completed driving cycle. These are referred to as pending DTCs to
distinguish them from the confirmed DTCs reported by service 03 DTCs.
VAD Mobile Wireless – OBDII User’s Manual
13
The following screen shows an example of pending DTCs.
Screen 23: Pending DTCs
In this particular case, one of the faults is a manufacturer defined trouble code and is not part
of the ISO/SAE standard. You must consult your service manual to determine the meaning of
trouble codes that are not part of the standard as they vary from manufacturer to
manufacturer.
Tapping the Save button will store the pending DTCs as a new record in the Memo Pad
application. You will then be able to view and print them using the Print module.
08 System Control
This service allows the VAD Mobile Wireless system to control the operation of an
on-board system, test or component. Possible uses of the 08 System Control service
include:
•
•
•
Turn on-board system/test/component ON
Turn on-board system/test/component OFF
Cycle on-board system/test/component for 'n' seconds.
Since the test parameters and test result data varies by test, the OBD-II module only supports
control of systems, tests and components that are defined in the ISO-15031-5 standard.
The list of controllable systems is shown in the table below.
System
Description
Enable EVAP system leak test
Enable the conditions required to conduct
an evaporative system leak test. The test
itself is not run, only the conditions
required to run the test are enabled.
Table 1: Supported controllable systems
14
VAD Mobile Wireless – OBDII User’s Manual
After tapping on 08 System Control, you will see a list of supported controllable systems, as
shown below.
Screen 24: System list
Select a system and tap Begin to initiate the action. Once the action has been performed
(enabling the evaporative system to be tested for leaks in this case), you will see this screen.
Screen 25: System test
completed
Tap Done when you are finished.
09 Vehicle Info
The 09 Vehicle Info service retrieves and displays vehicle specific information. For example,
VINs and Calibration IDs. Only those information types defined in the ISO-15031-5 standard
are displayed since the format of the data varies depending on type. When you tap on the 09
Vehicle Info button, the OBD-II module will retrieve all supported information types and
display them.
VAD Mobile Wireless – OBDII User’s Manual
15
The following screen is an example of an ECU displaying a VIN number, a calibration ID and
calibration verification number.
Screen 26: Vehicle
information
Depending on the diagnostic protocol, some ECUs might take up to 60 seconds to respond
with the vehicle information. The OBD-II module will display a wait message if the query takes
longer than 1 second.
Again, tapping on the Save button will store the vehicle information in a Memo Pad record
where is can later be viewed or printed using the Print module.
Readiness
The Readiness action is not a separate service. Rather it is the results of a query to PID 01
using the 01 Current Data service. The OBD-II module will display a list of supported system
and their readiness status.
In the example below, the ECU supports eight systems, of which three are ready.
Screen 27: Readiness
If the vehicle contains multiple powertrain ECUs, the readiness status for each will be
displayed. In the example above, only a single ECU is present.
Tapping the Save button will store the readiness status as a new Memo Pad record. The Print
module allows you to view or print this saved readiness status.
Print Module Interaction
The Print module can be used to view and print data you have saved from the OBD-II module.
The Print module is described in the Print User's Manual. Only the parts specific to OBD-II
saved data are described here.
16
VAD Mobile Wireless – OBDII User’s Manual
When the Print module is launched, you can select the type of data you wish to view. To view
saved OBD-II data, select the OBD-II option as shown below.
Screen 28: Print module –
select OBD-II data
In addition to viewing and printing data logs, which are covered in the Print User's Manual,
you can view and print the following from the OBD-II module:
•
•
•
•
•
•
•
Freeze Frames
DTCs
O2S Tests
Monitor Tests
Pending DTCs
Vehicle Info
Readiness
These items will look like the following when listed in the Print module.
Screen 29: Print module OBD-II item list
In this example, the first item has been annotated as “Carrie's car” the other items use their
default list appearance.
VAD Mobile Wireless – OBDII User’s Manual
17
Print Module – Freeze Frame
Freeze frame data looks like the following example when viewed on the VAD Mobile Wireless
system.
Screen 30: Print Module Freeze Frame
When printed it looks like the following (but at a higher resolution and the size of a full page).
Print 1: Print Module - Freeze Frame Output
18
VAD Mobile Wireless – OBDII User’s Manual
Print Module – DTCs
DTCs, when viewed with the Print module, look like the following:
Screen 31: Print Module DTCs
When printed, the output looks like:
Print 2: Print Module - DTCs Output
VAD Mobile Wireless – OBDII User’s Manual
19
O2S Tests
O2S Tests, when viewed with the Print module, look like the following:
Screen 32: Print Module O2s Tests
When printed, the output looks like:
Print 3: Print Module - O2S Tests Output
20
VAD Mobile Wireless – OBDII User’s Manual
Monitor Tests
Monitor Tests, when viewed with the Print module, look like the following:
Screen 33: Print Module Monitor Tests
When printed, the output looks like (only the first page is shown):
Print 4: Print Module - Monitor Tests Output
VAD Mobile Wireless – OBDII User’s Manual
21
Pending DTCs
Pending DTCs, when viewed with the Print module, look like the following:
Screen 34: Print Module Pending DTCs
When printed, the output looks like:
Print 5: Print Module - Pending DTCs Output
22
VAD Mobile Wireless – OBDII User’s Manual
Vehicle Info
Vehicle Info, when viewed with the Print module, look like the following:
Screen 35: Print Module Vehicle Info
When printed, the output looks like:
Print 6: Print Module - Vehicle Info Output
VAD Mobile Wireless – OBDII User’s Manual
23
Readiness
Readiness, when viewed with the Print module, looks like the following:
Screen 36: Print Module Readiness
When printed, the output looks like:
Print 7: Print Module - Readiness Output
24
VAD Mobile Wireless – OBDII User’s Manual
Support for the OBD-II Module
If you have questions or need assistance with the VAD Mobile Wireless system or the VAD
Mobile Wireless OBD-II module, please feel free to contact us at [email protected].
Check the VAD Mobile Wireless web site, http://www.vadmobile.com/, often for software
updates and other information.
Versatile Automotive Diagnostics can also be reached by phone at 604-598-8520.
VAD Mobile Wireless – OBDII User’s Manual
25