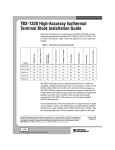
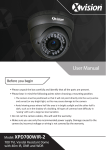
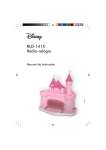
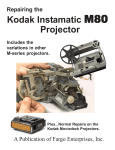
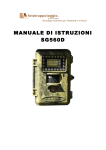
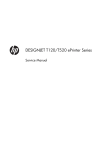
1
Troubleshooting 1 1 Introduction 1-2 Troubleshooting System Error Codes 1-2 Performing a Service Test on a Failed Assembly 1-2 Performing the Necessary Service Calibrations or Adjustments 1-3 Solving Print Quality Problems 1-3 The Printer does not Power ON 1-3 Cover Sensors are not Working 1-3 The File Sent is Not Processed Immediately 1-3 Paper Jams Occur Frequently 1-4 Print Speed is Very Slow 1-4 No Ink Message when there is Enough Ink 1-4 Abnormal Sound Coming from the Printer 1-4 Front Panel is Not Working 1-4 Solving Heater Problems 1-5 Heater Does NOT become Hot 1-5 Abnormal Temperature is Displayed 1-5 The Heater Temperature Becomes Extremely High 1-5 The Heater Heats Very Slowly 1-5 The Heater Temperature does not reach the Specified Range 1-5 Only the Front (or Rear) Heater is not Heated Normally 1-5 Special Power On Procedures 1-6 Both EEPROM and Main PCA are Replaced Together 1-7 HP Designjet 8000s Series Printer Service Manual 1-1 Troubleshooting Guide to Troubleshooting the Printer Introduction This chapter will guide you through the relevant steps to take when troubleshooting the Printer. Troubleshooting System Error Codes Chapter 2 - System Error Codes contains a list of system error codes and their respective descriptions and recommended corrective actions. Only try one recommended action at a time and check if the error code has disappeared. If you have an error code which is not documented in this Service Manual or you have an error which you cannot resolve, then report the error to the HP Response Center or the nearest HP Support Office. When reporting the error, have the following information ready: Model and Serial Number of the printer. Which firmware revision the printer is using. The complete error number. The System and History Prints. Which software application the customer is using (name, version, etc.). Whenever an Error Message is displayed, you should try to switch the Printer Off and then On again to see if the error disappears. If the error disappears, there is no need to troubleshoot the Printer any further. Performing a Service Test on a Failed Assembly If possible, always perform a Service Test on the component/assembly that you are about to replace, just to make sure that is the actual component/ assembly that has failed. If the test on that component/assembly passes, you should NOT replace it. For information on the Service Tests and how to use them see Chapter 4 Maintenance Mode. 1-2 HP Designjet 8000s Series Printer Service Manual Troubleshooting Performing the Necessary Service Calibrations or Adjustments Is the printer calibrated or adjusted correctly after replacing a component? For information on the Service Calibrations and Adjustments and how to use them, see Chapter 5 - Adjustments and Calibrations. Remember that certain Calibrations or Adjustments are required even if an Assembly has been disassembled to gain access to another Assembly or Component. Solving Print Quality Problems Whenever a Print Quality problem appears, it is advisable to print the Test Print to help diagnose the problem. The Test Print will help you differentiate between possible Printhead errors or mechanical problems. For information on solving Print Quality problems see Chapter 6 - Print Quality. The Printer does not Power ON 1 Check that the power cord is connected correctly to the Printer and to the Power Socket. 2 Check that the Power Switch on the BACK of the Printer is in the ON position. 3 Replace the Power Supply Unit ⇒ Page 8-32. Cover Sensors are not Working 1 Perform the Sensors Test ⇒ Page 4-29. 2 Check if the cable for the faulty sensor is not damaged and is connected correctly. 3 Replace the faulty Sensor. The File Sent is Not Processed Immediately 1 Check that the USB Cable is connected correctly to the Computer and the Printer and that it is NOT damaged. 2 Check that the Data LED on the Front Panel is flashing. If it is flashing and nothing is printed, then maybe the file sent is corrupted or too big. 3 Make sure that the Printer is in the Online state when the file is sent. The file will be rejected if the file is sent when the Printer is in the Offline state. HP Designjet 8000s Series Printer Service Manual 1-3 Troubleshooting Paper Jams Occur Frequently 1 Make sure that the paper type setting matches the type of paper loaded into the Printer. 2 Open the Window and check for any visible obstacles in the paper path. If there is a wrinkled mass of paper inside the paper path, lift the Pinchwheels (using the Media Lever) and clear the obstruction. 3 Make sure that the Vacuum Fans are working correctly. Print Speed is Very Slow 1 Make sure that the Printer is being used at temperatures of 20oC or higher. No Ink Message when there is Enough Ink 1 Make sure that the Ink Cartridge is installed correctly. 2 Check that the connector in the Ink Cartridge is NOT damaged. 3 Make sure that the Ink Cartridge Sensors are working correctly. Perform the Ink Sensor Test ⇒ Page 4-30. Abnormal Sound Coming from the Printer 1 One of the Motors in the Printer might be defective. Check that the Motors are working correctly ⇒ Page 4-35. 2 Check that there are no foreign or loose objects inside the Printer. Front Panel is Not Working 1 Make sure that the Front Panel Cable is connected correctly to the Front Panel and to the Main PCA. 2 Make sure that the Front Panel Cable is NOT damaged. 3 Replace the Front Panel ⇒ Page 8-21. 1-4 HP Designjet 8000s Series Printer Service Manual Troubleshooting Solving Heater Problems Heater Does NOT become Hot 1 Make sure that the Cable between the Heater Panel and the Heater Relay Board is connected correctly and NOT damaged. 2 Make sure that the Heaters are connected correctly to the power voltage alternation switch. 3 Replace the Heater Relay Board ⇒ Page 8-40. 4 Replace the Heater that is experiencing the problem. 5 Replace the Main PCA ⇒ Page 8-25. Abnormal Temperature is Displayed 1 Make sure that the Heater that is experiencing the abnormal temperature is installed correctly. Check that the Heater Cable is connected correctly. 2 Replace the Heater that is experiencing the abnormal temperature. The Heater Temperature Becomes Extremely High 1 Make sure that the Heater that is experiencing the high temperature is installed correctly. Check that the Heater Cable is connected correctly. 2 Replace the Heater Relay Board ⇒ Page 8-40. The Heater Heats Very Slowly 1 Check the ambient temperature and raise it if necessary. 2 Check the power voltage alternation switch to make sure that it is set to the correct voltage. The Heater Temperature does not reach the Specified Range 1 Check the power voltage alternation switch to make sure that it is set to the correct voltage. Only the Front (or Rear) Heater is not Heated Normally 1 Make sure that there is no cold air (e.g. from an air conditioning unit) blowing on the Heaters. 2 Check that the Temperature Sensor cables are correctly connected and not damaged. 3 Replace the Heater Relay Board ⇒ Page 8-40. 4 Replace the Main PCA ⇒ Page 8-25. HP Designjet 8000s Series Printer Service Manual 1-5 Troubleshooting Special Power On Procedures When turning On the Printer, the Printer will follow the internal initialization process, turning on the different systems and making the necessary system checks. In order to troubleshoot the Printer, the following Power On options are available: 1 Press the Shift key and Power On button - This will allow you to enter directly into the Language Setting Mode. 2 Press the OK key and Power On button - This will allow you to skip the Installation startup sequence, which occurs if none of the Printheads are installed in the Printer. 3 Press the Cancel key and Power On button - This will allow you to skip the system check of the Printer. 4 Press the Cancel and Shift keys and Power On button - This will allow you to skip the error recovery check of the Printer. You will be given the option to enter the Maintenance Mode in order to troubleshoot the Printer by entering a password: W, X, Shift and OK. This option is useful if you want to perform the following: – Reset the long-time storage error. – Initialize Parameters. – Perform certain diagnostics using the Maintenance Mode. – Perform Firmware Update. – Check the Firmware Version. 1-6 HP Designjet 8000s Series Printer Service Manual Troubleshooting Both EEPROM and Main PCA are Replaced Together When both the EEPROM and the Main PCA are replaced at the same time, mechanical correction value parameters, counters, calibrations, etc... are lost. Whenever possible, this most be prevented by just replacing either the EEPROM or the Main PCA. If for whatever reason, both the EEPROM and the Main PCA are replaced together, you need to perform the following: 1 Make sure that the EEPROM and the Main PCA have been installed correctly. 2 Press the Cancel key and Power On button in order to skip the system check. 3 Enter into the Maintenance Mode ⇒ Page 4-6. 4 Press the Shift key twice and then the T key to enter in to the Setup menu. 5 In the Setup submenu, scroll to "Init EEPROM" and press the OK key. # INIT EEPROM > 6 You will need to confirm that you want to initialize the EEPROM by pressing the OK key. # INIT EEPROM * OK? 7 In the Setup submenu, perform the following: System Date ⇒ Page 4-19. System Time ⇒ Page 4-20. HP Serial Number ⇒ Page 4-20. Ink Charge Done ⇒ Page 4-10. 8 Power Off the Printer, wait a few seconds and power On the Printer again. 9 You will need to check, and if necessary perform the following: Wiping Position Calibration ⇒ Page 5-16. Capping Position Calibration ⇒ Page 5-18. Vertical Capping Position Calibration ⇒ Page 5-15 Nozzle Position Correction ⇒ User’s Guide. Printhead Position Correction ⇒ User’s Guide. Bidirection Print Position Correction ⇒ User’s Guide. Media Advance Correction ⇒ User’s Guide. Side Margin Position Calibration ⇒ Page 5-20. Top Margin Position Calibration ⇒ Page 5-22. 10 Enter into the Maintenance Mode ⇒ Page 4-6. 11 Press the Shift key twice and then the T key to enter in to the Setup menu. HP Designjet 8000s Series Printer Service Manual 1-7 Troubleshooting 12 In the Setup submenu, scroll to "Save Calibs" and press the OK key. # SAVE CALIBS > 13 You will need to confirm that you want to save the EEPROM Calibrations by pressing the OK key. # SAVE CALIBS * OK? 14 In the Setup submenu, scroll to "Save EEPROM" and press the OK key. # SAVE EEPROM > 15 You will need to confirm that you want to save the EEPROM contents by pressing the OK key. # SAVE EEPROM * OK? 16 Power Off the Printer, wait a few seconds and power On the Printer again. Firmware Upgrade Instructions The Printer firmware is upgraded using a Compact Flash Card that contains the latest firmware version. Upgrading the Printer Firmware Version 1 Insert an empty Compact Flash Card into a Computer that has a CF Card Reader connected to it. 2 Create a directory path in the Compact Flash. If for instant the CF Card appears as disk K, then create the following directories: K:\CPL\ K:\CPL\SYS\ 3 Copy the "System.img" firmware file from the computer into the K:\CPL\SYS\ directory. 4 Switch the Printer Off. 5 Loosen two screws and remove the Firmware Access Cover. Firmware Access Cover 1-8 HP Designjet 8000s Series Printer Service Manual Troubleshooting 6 On the Main PCA (next to the CF Card slot), set bit1 of SW10 to ON (upper position) and bit2 to OFF (lower position). 7 Insert the CF Card (with latest Firmware version) in to the CF Card slot located on the Main PCA. CF Card Slot 8 Switch the Printer On (from the rear and the Front Panel). 9 The Printer will start the firmware upgrade sequence and the following messages will be displayed on the Front Panel: READING SYSTEM XXX/64 READING SYSTEM DONE UPGRADING SYSTEM ERASING XX/63 UPGRADING SYSTEM VERIFYING XX/63 UPGRADING SYSTEM WRITING XX/63 HP Designjet 8000s Series Printer Service Manual 1-9 Troubleshooting UPGRADING SYSTEM VERIFYING XX/63 UPGRADING BOOT ERASING XX/08 UPGRADING BOOT ERASING XX/08 UPGRADING BOOT VERIFYING XX/08 UPGRADING BOOT WRITING XX/08 UPGRADING BOOT VERIFYING XX/08 SYSTEM IS VALID POWER OFF/ON 10 Once the Front Panel display "System is Valid", switch the Printer Off (Push the Power Switch on the Front Panel for 5 seconds and then release it). 11 Remove the CF Card from the Main PCA. 12 On the Main PCA, set both bits (bit1 and bit2) to OFF (lower position). 13 Install the Firmware Access Cover. 14 Switch the Printer On and check the Firmware version once the Printer has initialized. If any type of Error appears on the Front Panel, this means that the Firmware Upgrade has failed. In this case, you should try again using a different CF Card. If the upgrade fails again, then replace the Main PCA. 1-10 HP Designjet 8000s Series Printer Service Manual System Error Codes 12 2 Introduction 2-2 System Error Codes 2-3 System Error 1010: ATG/RSM Loading Error 2-3 System Error 1011: PTC/PDD Loading Error 2-3 System Error 1100: Flash ROM Error 2-3 System Error 1101: ATG/RSM Error 2-3 System Error 1102: Trailing Cable Error 2-4 System Error 1103: Heater Relay Board Connection Error 2-4 System Error 1104: ISS PCA Connection Error 2-4 System Error 1105: PTC/PDD Error 2-4 System Error 1106: Power Error 2-5 System Error 1107: Carriage Interface Error 2-5 System Error 1108: USB Error 2-6 System Error 1109: EEPROM Error 2-6 System Error 110A: Band Memory Error 2-6 System Error 110B: Cap Horizontal Position Error 2-6 System Error 1110: Data Path Time-out Error 2-6 System Error 112x: Vacuum Fan Error 2-7 System Error 1130: DMA Controller Error. 2-7 System Error 1140: Flash ROM Write Error 2-7 System Error 1150: Home Position Sensor Error 2-7 System Error 1160: Wiping Error 2-8 System Error 1170: Temperature Sensor Error 2-8 System Error 1180: Pump/Wipe Motor Error 2-9 System Error 119x: Printhead Drive Voltage Error 2-9 System Error 11A0: EEPROM I/O Error 2-9 System Error 11D0: Printhead Cooling Fan Error 2-10 System Error 11E0: Long Term Storage Error 2-10 System Error 120x: Printhead Drive IC Error 2-10 System Error 1220: Line Sensor Error 2-11 System Error 126x: Trailing Cable Connection Error 2-11 System Error 1290: End of Life of Part Reached 2-11 System Error 1310: Cap Sensor Error 2-11 System Error 1320: Scan-Axis Motor Heating Error 2-12 System Error 1330: Scan-Axis Motor Temperature Sensor Error 2-12 System Error 140x: Heater Temperature Error 2-12 System Error 141x: Heater Error (High Temperature) 2-13 System Error 143x: Heater Error (Insufficient Heating) 2-13 System Error 144x: Heater Error (No Interrupt) 2-13 System Error 2000 to 6000: Firmware Logic Error 2-14 HP Designjet 8000s Series Printer Service Manual 2-1 System Error Codes System Error Codes Introduction The following pages contain a list of error codes and their respective descriptions and recommended corrective actions. Only try one recommended action at a time and check if the error code has disappeared. If you have an error code which is not documented in this Service Manual or you have an error which you cannot resolve, then report the error to the HP Response Center or the nearest HP Support Office. When reporting the error, have the following information ready: Model and Serial Number of the printer. Which firmware revision the printer is using. The complete error number. The Service Configuration Print. The Current configuration sheet. Which software application the customer is using (name, version, etc.). Whenever an Error Message is displayed, you should try to switch the Printer Off and then On again to see if the error disappears. If the error disappears, there is no need to troubleshoot the Printer any further. 2-2 HP Designjet 8000s Series Printer Service Manual System Error Codes System Error Codes A System Error Code appears on the Front Panel when a component of the Printer has failed during normal usage. Each System Error Code and it’s appropriate corrective actions are explained on the following pages. System Error: System Error 1010: ATG/RSM Loading Error Problem Description: The program load from the Flash ROM on the Main PCA to the ASIC on the Main PCA or sum-check was not performed correctly and an error occurred. Corrective Action: Try the following: Reinstall the Firmware. Replace the Main PCA ⇒ Page 8-25. System Error: System Error 1011: PTC/PDD Loading Error Problem Description: The program load from the Flash ROM on the Main PCA to the ASIC on the Carriage PCA or sum-check was not performed correctly and an error occurred. Corrective Action: Try the following: Reinstall the Firmware. Make sure that the Carriage Cable is NOT damaged and is correctly connected to the Carriage PCA and the Main PCA. Replace the Carriage PCA ⇒ Page 8-74. Replace the Main PCA ⇒ Page 8-25. If the error continues, replace the Trailing Cable ⇒ Page 8-101. System Error: System Error 1100: Flash ROM Error Problem Description: The program area in the Flash ROM is sum-checked, and it could not be read, causing an error. Corrective Action: Try the following: Reinstall the Firmware. Replace the Main PCA ⇒ Page 8-25. System Error: System Error 1101: ATG/RSM Error Problem Description: The read/write of the ATG/RSM registers and RSM Mask Memory Data on the Main PCA was diagnosed and an error was detected. Corrective Action: Try the following: Replace the Main PCA ⇒ Page 8-25. HP Designjet 8000s Series Printer Service Manual 2-3 System Error Codes System Error: System Error 1102: Trailing Cable Error Problem Description: The Trailing Cable between the Main PCA and the Carriage PCA is not connected. Corrective Action: Try the following: Reconnect the Trailing Cable to the Carriage PCA and the Main PCA. Make sure that the Trailing Cable is not damaged. Replace the Carriage PCA ⇒ Page 8-74. If the error continues, replace the Main PCA ⇒ Page 8-25. If the error continues after replacing the Main PCA and the Carriage PCA, replace the Trailing Cable ⇒ Page 8-101. System Error: System Error 1103: Heater Relay Board Connection Error Problem Description: The Cable between the Main PCA and the Heater Relay Board is not connected. Corrective Action: Try the following: Reconnect the Cable to the Heater Relay Board and the Main PCA. Make sure that the Cable is not damaged. Replace the Heater Relay Board ⇒ Page 8-40. If the error continues, replace the Main PCA ⇒ Page 8-25. System Error: System Error 1104: ISS PCA Connection Error Problem Description: The Cable between the Main PCA and the ISS PCA is not connected. Corrective Action: Try the following: Reconnect the Cable to the ISS PCA and the Main PCA. Make sure that the Cable is not damaged. Replace the ISS PCA ⇒ Page 8-139. If the error continues, replace the Main PCA ⇒ Page 8-25. System Error: System Error 1105: PTC/PDD Error Problem Description: The PTC/PDD registers cannot be read or written correctly. Corrective Action: Try the following: Make sure that the Carriage Cable is NOT damaged and is correctly connected to the Carriage PCA and the Main PCA. Replace the Carriage PCA ⇒ Page 8-74. Replace the Main PCA ⇒ Page 8-25. If the error continues, replace the Trailing Cable ⇒ Page 8-101. 2-4 HP Designjet 8000s Series Printer Service Manual System Error Codes System Error: System Error 1106: Power Error Problem Description: The power supplies of +36, +24 and +12 V were diagnosed and could not be detected. This error is checked when the Printer is booted up. Corrective Action: Try the following: Check the Window Sensors to make sure they are installed/connected correctly. Make sure that the Window lips (that activate the Window Sensors) are not bent and that the Window is closed correctly. Check that the sensor cables are correctly connected to connector CN4 on the Main PCA and connector CN3 on the Heater Relay Board. Check the lighting status of LED 35 (12V), LED 36 (36V), LED 37 (VDD2), and LED 38 (12V) on the Main PCA. If any LED is OFF, it mean the power is not generated properly. In that case, perform general troubleshooting according to the table below, and check whether there is a short-circuit in any of the parts or cables. Power Output (LED On) Possible faulty Part 12V 24V VDD2 36V No No No No Fuse 2, Cooling Fan, Carriage PCA Yes No No No Window Sensors, Fuse 1 Yes No - - Pump/Wipe Motor, Take-upreel Motor, Vacuum Fan, Motor Cooling Fan Yes - No - Carriage PCA Yes - - No Paper-Axis or Scan-Axis Motor If the error continues, replace the Main PCA ⇒ Page 8-25. System Error: System Error 1107: Carriage Interface Error Problem Description: The Carriage Interface is not connect correctly. Corrective Action: Try the following: Reconnect the Trailing Cable to the Carriage PCA and the Main PCA. Make sure that the Trailing Cable is not damaged. Replace the Carriage PCA ⇒ Page 8-74. If the error continues, replace the Main PCA ⇒ Page 8-25. If the error continues after replacing the Main PCA and the Carriage PCA, replace the Trailing Cable ⇒ Page 8-101. HP Designjet 8000s Series Printer Service Manual 2-5 System Error Codes System Error: System Error 1108: USB Error Problem Description: USB communication is not performed correctly. Corrective Action: Try the following: Replace the Main PCA ⇒ Page 8-25. System Error: System Error 1109: EEPROM Error Problem Description: The parameters saved in the EEPROM on the Main PCA cannot be read correctly. Corrective Action: Try the following: Replace the EEPROM ⇒ Page 8-29. Replace the Main PCA ⇒ Page 8-25. System Error: System Error 110A: Band Memory Error Problem Description: The read/write of the SDRAM (band memory) on the Main PCA was diagnosed and an error was detected. Corrective Action: Try the following: Replace the Main PCA ⇒ Page 8-25. System Error: System Error 110B: Cap Horizontal Position Error Problem Description: The Cap horizontal position is defined as 0.0 mm. Corrective Action: Try the following: Power On the Printer in the POC skip mode (Cancel key and Power On button together). Enter into the Maintenance Mode. Enter into the "Cap Position" option (inside the Adjust menu) and define a correction value other than 0.0 mm. System Error: System Error 1110: Data Path Time-out Error Problem Description: The data transfer via USB from the host does not finish even when a specified time period has passed. Corrective Action: Try the following: Replace the Main PCA ⇒ Page 8-25. 2-6 HP Designjet 8000s Series Printer Service Manual System Error Codes System Error: System Error 112x: Vacuum Fan Error Problem Description: x = 0: The Vacuum Fan 1 (extreme right of the printer) has failed. x = 1: The Vacuum Fan 2 (center right of the printer) has failed. x = 2: The Vacuum Fan 3 (center left of the printer) has failed. x = 3: The Vacuum Fan 4 (extreme left of the printer) has failed. Corrective Action: Try the following: Check that the failing Vacuum Fan is correctly connected. Replace the failing Vacuum Fan ⇒ Page 8-51. If the error continues, replace the Main PCA ⇒ Page 8-25. System Error: System Error 1130: DMA Controller Error. Problem Description: An error occurs when the DMA of the printing data cannot be completed. Corrective Action: Try the following: Replace the Main PCA ⇒ Page 8-25. System Error: System Error 1140: Flash ROM Write Error Problem Description: A time-out error occurs when the flash ROM contents are being saved and erasing does not end. Corrective Action: Try the following: Replace the Main PCA ⇒ Page 8-25. System Error: System Error 1150: Home Position Sensor Error Problem Description: The Carriage cannot be moved to it’s home position. Corrective Action: Try the following: Enter the Sensors Menu (in Maintenance Mode) and select "Printer Sensors". Then execute the "Home Position" option, which will display the state of the home position sensor. If the home position is detected, "1" will be displayed on the Front Panel. If the home position is not detected, manually move the Carriage and check the Front Panel to see if the "1" is displayed. Make sure the Home Position Sensor Cable is connected correctly and is not damaged. Replace the Home Position Sensor ⇒ Page 8-59. Replace the ISS PCA ⇒ Page 8-139. Replace the Main PCA ⇒ Page 8-25. HP Designjet 8000s Series Printer Service Manual 2-7 System Error Codes System Error: System Error 1160: Wiping Error Problem Description: When the Wiping Motor has been running for a while, the sensor fails to detect that the Motor has made one turn. Corrective Action: Check whether the Wiper Blade turns once and the Wiper Blade Position Sensor detects the turn when the Printer is initializing when it is powered On. If the Wiper does not turn once: – Check manually by turning the Wiper Gears to see if the Wiper Blade turns. If it does not turn then replace the Wiping Station ⇒ Page 8-134. – Check whether +24 V (LED 38) is supplied to the Main PCA by checking that LED 38 is lit on the Main PCA. If the Wiper Motor does not turn even though the +24 V is supplied, there is a possibility of a failure in the Wiper Motor. Replace the Wiping Station ⇒ Page 8-134. – Make sure the Wiper Blade Position Sensor Cable is connected correctly and is not damaged. – If the error continues, replace the Main PCA ⇒ Page 8-25. If the Wiper does turn once: – Check whether the Wiper Blade Position Sensor can be switched ON and OFF by manually rotating the Wiper Blade. Check whether the lever type switch is not loose. – Make sure the Wiper Blade Position Sensor is connected correctly and is not damaged. – Make sure that the Wiper Blade Position Sensor is clean. – Replace the ISS PCA ⇒ Page 8-139. – If the error continues, replace the Main PCA ⇒ Page 8-25. System Error: System Error 1170: Temperature Sensor Error Problem Description: The Temperature Sensor detects abnormal temperatures (-10oC or lower or 85oC or higher). Corrective Action: Try the following: Make sure that the Printer is in an environment where the temperature is between -10oC and 85oC. Make sure the Ambient Temperature Sensor Cable is connected correctly and is not damaged. Replace the ISS PCA ⇒ Page 8-139. Replace the Main PCA ⇒ Page 8-25. 2-8 HP Designjet 8000s Series Printer Service Manual System Error Codes System Error: System Error 1180: Pump/Wipe Motor Error Problem Description: Over current is detected in the pump/wipe motor drive circuit. Corrective Action: Try the following: When the ambient temperature is very low, the Pump Motor Tube becomes hard and the load on the Capping Motor is increased. Make sure that the Printer is in an environment where the temperature is not below -10oC or higher than +85oC. Enter the Motors Menu (in Maintenance Mode) and select "Forwards" to activate the Pump/Wipe Motor. Access the Pump Motor and check whether the Motor Drive Circuit and Motor work correctly. Make sure that the Capping Station cables are connected correctly and are not damaged If the Capping Motor cannot be rotated, replace the Capping Station Motor ⇒ Page 8-123. Make sure the Cap Sensor Cable is connected correctly and is not damaged. Replace the Main PCA ⇒ Page 8-25. System Error: System Error 119x: Printhead Drive Voltage Error Problem Description: The Printhead drive voltages generated on the Carriage PCA do not reach the expected values. Corrective Action: Try the following: Check whether VDD2 power is generated on the Main PCA. If not, then: – Make sure that the Window is closed. – Replace the Power Supply Unit ⇒ Page 8-32. If the power is supplied, it means that the voltage check circuit is defective. Replace the Main PCA ⇒ Page 8-25. Make sure the Trailing Cable is connected correctly and is not damaged. If the error continues, replace the Trailing Cable ⇒ Page 8-101. System Error: System Error 11A0: EEPROM I/O Error Problem Description: The read/write of the EEPROM on the Main PCA was diagnosed and an error was detected. Corrective Action: Try the following: Replace the Main PCA ⇒ Page 8-25. HP Designjet 8000s Series Printer Service Manual 2-9 System Error Codes System Error: System Error 11D0: Printhead Cooling Fan Error Problem Description: The Printhead temperature does not drop even after the printhead Cooling Fan rotates for more than a specified time. Corrective Action: Try the following: Make sure the Printhead Cooling Fan Cable is connected correctly and is not damaged Make sure that the Printhead Cooling Fan is working correctly. If the Printhead Cooling Fan is not working correctly, replace it ⇒ Page 8-95. Replace the Carriage PCA ⇒ Page 8-74. Replace the Trailing Cable ⇒ Page 8-101. If the error continues, replace the Main PCA ⇒ Page 8-25. System Error: System Error 11E0: Long Term Storage Error Problem Description: This error is displayed when the Printer has been left switched OFF for more than 31 days. Corrective Action: Try the following: This error can be avoided if the "Store Ink System" procedure is performed before turning the Printer OFF for long periods. To clear this error: – Turn the Printer ON in error skip mode by holding down the Cancel and Shift keys and pressing the ON button. – Enter the Password to clear the internal error flag: W, X, Shift and OK. – Switch the Printer OFF and then ON again. System Error: System Error 120x: Printhead Drive IC Error Problem Description: The Piezo Drive IC on a Printhead is either too hot (85oC or higher) or too low (-10oC or lower). Corrective Action: Try the following: Check whether the temperature of the Printhead voltage circuit on the Carriage PCA is extremely hot. If it is extremely high, check the short-circuit of the Printhead and the Printhead Cable using a tester. The Short-circuit may have been caused by the incorrect insertion of the Printhead Cable, internal failure of the Printhead or by a foreign object attached to the Carriage PCA. Replace the Carriage PCA ⇒ Page 8-74. 2-10 HP Designjet 8000s Series Printer Service Manual System Error Codes System Error: System Error 1220: Line Sensor Error Problem Description: The Printer has problems detecting the edge of the Media. Corrective Action: Try the following: Enter the Sensors Menu (in Maintenance Mode) and select "Printer Sensors". Then execute the "Line Sensor" option, and check if the Line Sensor is functioning correctly by inserting a white piece of paper underneath it. If the Line Sensor responds, then it is functioning correctly. If the Line Sensor does not respond to the white piece of paper, then replace the Line Sensor ⇒ Page 8-84. Replace the Carriage PCA ⇒ Page 8-74. Replace the Main PCA ⇒ Page 8-25. System Error: System Error 126x: Trailing Cable Connection Error Problem Description: The Trailing Cable connected to the one of the following connectors on the Carriage PCA is faulty. x = 0: Connector 9. x = 1: Connector 10. x = 2: Connector 11. x = 3: Connector 12. Corrective Action: Try the following: Reconnect the Trailing Cable to the Carriage PCA and the Main PCA. Make sure that the Trailing Cable is not damaged. Replace the Carriage PCA ⇒ Page 8-74. If the error continues, replace the Main PCA ⇒ Page 8-25. If the error continues after replacing the Main PCA and the Carriage PCA, replace the Trailing Cable ⇒ Page 8-101. System Error: System Error 1290: End of Life of Part Reached Problem Description: The end of life of the Prime Assembly has been reached since it has been working for more than 43 hours. Corrective Action: Try the following: Replace the Prime Assembly ⇒ Page 8-128. System Error: System Error 1310: Cap Sensor Error Problem Description: The cap home position cannot be found. Corrective Action: Try the following: Make sure that the Cap Home Position Sensor is correctly connected. Replace the ISS PCA ⇒ Page 8-139. Replace the Capping Station ⇒ Page 8-119. Replace the Main PCA ⇒ Page 8-25 HP Designjet 8000s Series Printer Service Manual 2-11 System Error Codes System Error: System Error 1320: Scan-Axis Motor Heating Error Problem Description: The Scan-Axis Motor Temperature Sensor has detected a temperature over 100oC. Corrective Action: Try the following: Make sure that the Scan-Axis Motor Cooling Fan, Scan-Axis Motor Temperature Sensor and the Scan-Axis Motor are connected correctly. Replace the Scan-Axis Motor Cooling Fan ⇒ Page 8-69. Replace the Scan-Axis Motor ⇒ Page 8-71. Replace the Main PCA ⇒ Page 8-25. System Error: System Error 1330: Scan-Axis Motor Temperature Sensor Error Problem Description: The Scan-Axis Motor Temperature Sensor has detected abnormal temperatures (-22.5oC or lower or 150oC or higher). Corrective Action: Try the following: Make sure that the Scan-Axis Motor Temperature Sensor is connected correctly and the cable is not damaged. Replace the Scan-Axis Motor Cooling Fan ⇒ Page 8-69. Replace the Main PCA ⇒ Page 8-25. System Error: System Error 140x: Heater Temperature Error Problem Description: Temperature read by the Heater Temperature Sensor is abnormal (lower than -20oC or higher than 200oC). x = 1: Front heater. x = 2: Center Platen. x = 3: Rear Heater. Corrective Action: Try the following: Make sure that the failing Heater is connected correctly to the Main PCA. Make sure that the cables are not damaged. Replace the failing Heater. Replace the Main PCA ⇒ Page 8-25. 2-12 HP Designjet 8000s Series Printer Service Manual System Error Codes System Error: System Error 141x: Heater Error (High Temperature) Problem Description: Temperature read by the Heater Temperature Sensor is above 65oC). x = 1: Front heater. x = 2: Center Platen. x = 3: Rear Heater. Corrective Action: Try the following: If the Printer is installed in a high temperature environment, move the Printer to an area where the operating temperature is much lower. Make sure that the failing Heater is connected correctly to the Main PCA. Make sure that the cables are not damaged. Replace the failing Heater. Replace the Main PCA ⇒ Page 8-25. System Error: System Error 143x: Heater Error (Insufficient Heating) Problem Description: The Heater is not heated to a specified temperature even after 30 minutes have passed. x = 1: Front heater. x = 2: Center Platen. x = 3: Rear Heater. Corrective Action: Try the following: If the Printer is installed in a low temperature environment, move the Printer to an area where the operating temperature is much higher. Check that the AC Voltage being used is the one selected on the Heater Voltage Setting Switch. Make sure that the failing Heater is connected correctly to the Main PCA. Make sure that the cables are not damaged. Replace the Heater Relay Board ⇒ Page 8-40. Replace the failing Heater. Replace the Main PCA ⇒ Page 8-25. System Error: System Error 144x: Heater Error (No Interrupt) Problem Description: No heater sequence interrupt. Corrective Action: Try the following: Make sure that all the cables are correctly connected to the Heater Relay Board. Make sure that the cables are not damaged. Replace the Heater Relay Board ⇒ Page 8-40. Replace the Main PCA ⇒ Page 8-25. HP Designjet 8000s Series Printer Service Manual 2-13 System Error Codes System Error: System Error 2000 to 6000: Firmware Logic Error Problem Description: A logic error has occurred in the Firmware program. Corrective Action: Try the following: Reinstall the Firmware or upgrade to the latest version (if available). Replace the Main PCA ⇒ Page 8-25. 2-14 HP Designjet 8000s Series Printer Service Manual