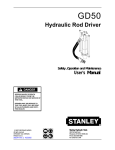
1
Operating and Service Manual Gas Hydraulic Power Unit (Reference Serial Number Plate) 910146-M 121115 Record of Changes Use this page to record changes, updates and corrections made to this manual. Rev. / Chg. / Bulletin No: Date Rev 1 121115 i Description of Changes Initial Release Initials MSO List of Figures & Tables Cover Page Record of Changes.......................................................................................................... i Table of Contents............................................................................................................ ii List of Figures & Tables................................................................................................... iv Section 1 General Information and Overview ................................................................................ 1-1 Purpose ............................................................................................................................................ 1-1 Cancellation ..................................................................................................................................... 1-1 Scope ............................................................................................................................................... 1-1 Definitions ........................................................................................................................................ 1-1 General Safety Precautions and Devices ........................................................................................ 1-2 Machine Description and Specifications .......................................................................................... 1-3 Machine Identification: ..................................................................................................................... 1-2 Service Manuals and Tools .............................................................................................................. 1-2 Warranty Terms and Conditions ...................................................................................................... 1-3 Section 2 Initial Set-up and Adjustment ......................................................................................... 2-1 Inspection and Warranty Registration .............................................................................................. 2-1 Initial Assembly and In-Service Maintenance .................................................................................. 2-1 Setup and Adjustments .................................................................................................................... 2-3 Preparation For Use ......................................................................................................................... 2-3 Hydraulic Connections ..................................................................................................................... 2-3 Section 3 Operating Procedures .................................................................................................... 3-1 Safety Precautions and Devices ...................................................................................................... 3-1 Transportation & Handling ............................................................................................................... 3-1 Operation Instructions ...................................................................................................................... 3-1 Emergency Procedures ................................................................................................................... 3-2 Section 4 Maintenance Procedures ............................................................................................... 4-1 Safety Precautions and Devices ...................................................................................................... 4-1 Testing and Trouble Shooting .......................................................................................................... 4-2 Section 5 Lists of Illustrations ........................................................................................................ 5-1 Parts Lists and Illustrations .............................................................................................................. 5-1 Section 6 Parts and Service Support ............................................................................................. 6-1 Non-Warranty Parts Sales ............................................................................................................... 6-1 Technical Support & Service ............................................................................................................ 6-1 Warranty Parts & Service ................................................................................................................. 6-2 Section 7 Appendices .................................................................................................................... 7-1 Sales Representatives ..................................................................................................................... 7-1 Gas Engine ...................................................................................................................................... 7-1 iii 910146-M 121115 List of Figures & Tables This list identifies where photos, tables and other figures are located within the text of this manual. All parts lists and drawings are provided in Section 5. Figures Figure 1-1 Gas Hydraulic Power Unit ................................................................................................. 1-3 Figure 1-2 Manufacturer’s Data Decal................................................................................................ 1-2 Figure 2-1 Hydraulic Connection ........................................................................................................ 2-4 Tables Table 4-1 Troubleshooting .................................................................................................................. 4-4 Table 4-2 Maintenance Schedule ....................................................................................................... 4-6 Table 5-1 List of Illustrations.............................................................................................................. 5-1 iv 910146-M 121115 Section 1 General Information and Overview Purpose This manual provides general instructions for operating and maintaining the Racine Railroad Products Gas Hydraulic Power Unit. Cancellation Not Applicable, Initial Release. Record subsequent changes made to this manual on page i. Scope This Bulletin applies to all Racine Railroad Products Gas Hydraulic Power Unit Reference Serial Number Plate. Definitions This manual uses the following standard terms for clarity: DANGER! An operating procedure, practice, or condition, etc., which WILL RESULT IN INJURY OR DEATH if not carefully observed or followed. WARNING! An operating procedure, practice, or condition, etc., which may result in injury or death if not carefully observed or followed. Caution! An operating procedure, practice, or condition, etc., which may result in damage to equipment if not carefully observed or followed. Note: An essential operating procedure, practice, or condition, etc. Figure 1-1 Label 1-1 910146-M 121115 General Safety Precautions and Devices WARNING! Failure to follow safety precautions when operating this equipment can result in serious injury or death to the operator or other persons in the area. Observe the following precautions whenever you are operating, working on or near this equipment. Always wear appropriate work clothing when operating this equipment. DO NOT WEAR loose clothing, jewelry, radio belts, etc., when you are operating, working on or near this equipment. Always wear appropriate personal protective clothing when operating this equipment: (e.g. Orange safety vest, hard hat, safety glasses with side shields, full-face shield, hearing protection, steel-toed safety boots, leather gloves, dust respirator, leggings, etc.). Keep your hands, arms, feet, head, clothing, etc., out of the operating area and away from all rotating or moving components when you are operating, working on or near this equipment. Ensure that all guards, covers, hoses and operating components are in good working order and that all controls are in the appropriate position before starting the engine. Ensure that installed safety equipment (e.g. fire extinguishers, first aid kits, locking and safety devices) are installed properly and are in good working order. DO NOT OPERATE the equipment until unsafe conditions have been corrected. Operate the POWER SOURCE ENGINE only in a well-ventilated area and ensure that the air filter(s), air filter cover(s), muffler are in good condition. DO NOT crank the engine with the spark plug removed. Keep the machine clean and free of debris. Operate the machine in a safe and responsible manner. Exercise caution when working on or near rotating or moving components, hot components and fuel systems. Be aware of potential fire hazards and prevent sparks, , etc., from starting fires on right-of way. Comply with all instructions provided on any decals or placards installed on the machine and with any relevant amplifying information provided in this manual or other general operating procedures. When you leave this equipment, even for a short time, shut off the hydraulic motor and disengage the hydraulic supply hoses. Shut off the power source engine, ensure that all controls are in a safe position and install all appropriate locking and safety devices before doing any of the following: Lubricating Adjusting Making Repairs Performing Service Comply with all Lock Out / Tag Out Procedures and other safety procedures established for your work environment. 1-2 910146-M 121115 Figure 1-2 Gas Hydraulic Power Unit Machine Description and Specifications The Racine Railroad Products Gas Hydraulic Power Unit is designed to provide hydraulic flow and pressure for operation of H.T.M.A. Type I and Type II hydraulic tools. The unit provides power for operation of Type I or Type II open center tools (5-10 gpm/ 19-38 lpm @ 2000 psi/ 140 bar). If equipped with the combined into one 10 gpm/ 38 lpm circuit for operation of H.T.M.A. Type III tools. Note: Not all power units can be equipped with the dual circuits or combiner kit. General: The power unit is equipped with a Gas engine ranging from 18 hp to 28 hp. See the parts section to determine which this unit has. The power units are all equipped with air-to-oil coolers operated by electric fan and temperature switch. The fuel and hydraulic systems are self-contained with the required reservoir, filtration and level indicators. Hydraulic System Description: The hydraulic system consists of a hydraulic system fluid reservoir, filter assembly, single pump and a wide variety of controls. The filter element is a 10 micron cellulose type element. The filter housing has a pressure bypass valve to divert fluid directly to the tank in the event of a restricted flow. Hydraulic pumps will vary depending upon the capabilities of the power unit. The hydraulic pump will be illustrated and called out in the parts section of this manual. Pressure hoses from the pump(s) are connected directly to a control module, which contains a relief valve(s), a control valve(s) and a pressure return port. Optional control modules may contain additional valves, controls and ports. 1-3 910146-M 121115 Viscosity (Fluid Thickness) U.S.A. METRIC ISO grade 100 40 C 46 Centistokes 100 C 10.0 Centistokes Pour Point -11 F/-24 C (Minimum for cold startup) Viscosity Index (ASTM D 2220) 110 Minimum Flash Point (ASTM D-92) 433 F/223 C Minimum The hydraulic fluid used should have a viscosity between 100 and 400 ssu/20 and 82 centistokes at the maximum and minimum expected operating temperatures. Petroleum base hydraulic fluids with antiwear properties and a viscosity index over 140 ssu/28 centistokes will meet the recommended requirements over a wide range of operating temperatures. The following fluids work well over a wide temperature range at startup, allow moisture to settle out and resist biological growth likely in cool operating hydraulic circuits. These fluids are recommended by Racine Railroad Products. Other fluids that meet or exceed the specifications of these fluids may also be used. Mobil NUT0100 Shell Tellus 100 Or Equal Fuel System Description: The fuel system consists of a fuel tank, fuel pump and filter. Fuel is pumped from the tank by an engine-mounted fuel pump. Fuel leaving the pump passes through an in line fuel filter. The output side of the filter housing is connected (through a hose). Fuel Requirements: Due to the variety of engines used, you must check the engine manual for recommended fuels. A manual is provided with each unit. Engine Description: An engine owner’s manual is provided with each power unit. This manual lists recommended service intervals. It should be followed to ensure proper power unit maintenance. Tool Hose Recommendations: The hoses are recommended for the hydraulic fluids specified in paragraph 3 at normal oil temperatures of 100° - 130° F/38° – 54° C (viscosity 100-400 SSU). Note: Avoid use of quick disconnects to attach multiple hose lengths, use full size steel pipe couplings. 1-4 910146-M 121115 Manufacturer: Racine Railroad Products, Inc. 1955 Norwood Court Mount Pleasant, WI 53403 Phone: (262) 637-9681 E-mail: [email protected] Website: http:\\www.racinerailroad.com Machine Identification: The Manufacturer’s data plate is located on the side of the assembly. Please provide the Racine Railroad Products Model and Serial Number, and any locally assigned identification number, to our customer service personnel when contacting the factory for parts, service or warranty support. Figure 1-1 Manufacturer’s Data Decal Service Manuals and Tools Operating and Service Manuals: One Operating and Service Manual is provided with each machine. Manuals are shipped with each machine. Operating and Service Manual Changes: The Operating and Service Manual may be updated to reflect product development and/or revised operating and maintenance procedures. If appropriate, Service Bulletins may be released to provide additional operational, maintenance and/or safety information. Record all changes made to this Manual in the Record of Changes on page i. Submit recommendations and requests for Operating and Service Manual Changes to: Racine Railroad Products, Inc. Attn: Technical Service Manager 1955 Norwood Court Mount Pleasant, WI 53403 Phone: (262) 637-9681 E-mail: [email protected] Website: http:\\www.racinerailroad.com 1-2 910146-M 121115 Warranty Terms and Conditions Warranty Period: Each new machine, and new parts of our manufacture, are warranted against defects in material and workmanship for one year from the date of shipment from our factory. When contacting the factory for parts, service or warranty support, please provide the Racine Railroad Products Model and Serial Number and any locally assigned identification number to our customer service personnel to help them identify your machine and better serve you. Vendor Parts Warranty Period: Other equipment and parts used, but not manufactured by Racine Railroad Products, Inc., are covered directly by the manufacturer's warranty for their products. Warranty Parts and Service: We will repair or replace, without charge, F.O.B. factory, Racine, Wisconsin, USA, any part of our manufacture which is proven to be defective during the warranty period. Material claimed defective must be returned, if requested, to the factory within 30 days from the date of the claim for replacement. Ordinary wear and tear, abuse, misuse and neglect are not covered by this warranty. Depending upon the circumstances, we may provide technical assistance and/or technical service support, without charge, to assist in the correction of warranty related problem. Non-Warranty Parts and Service: Material damaged through normal wear and tear, abuse, misuse and/or neglect are not covered by this warranty. Non-Warranty Parts and Technical Service policies and procedures are provided in Section 6 of this manual. 1-3 910146-M 121115 Section 2 Initial Set-up and Adjustment Inspection and Warranty Registration The Gas Hydraulic Power Unit is normally shipped via common carrier. The warranty period begins on the date of shipment from our factory. Upon delivery by the carrier, inspect the unit and shipping materials for damage. Ensure that all items indicated on the packing list have been received. Address items lost or damaged in shipment with the freight carrier. Removing Packing Materials / Delivery Inspection: Remove the packing materials and inventory the contents of the packing list. Ensure that Operating and Service Manuals, tool kits and any other materials sent with the machine are in good condition. Product Registration Card: Please fill out and return the Product Registration Card to help us better serve you. Your feedback on the Product Registration Card helps us improve our products and service. Note: Unless otherwise indicated, the address and contact name provided on the Product Registration Card will be the mailing address for future Service Bulletins and Customer Service Information. Note: Please contact our Service Department at the address provided in Section 6 of this manual if you have any problems with or questions about your new machine. Initial Assembly and In-Service Maintenance The Power Unit was tested after assembly at our factory. After assembly, the machine should receive a thorough In-Service inspection before initial operation. If you do not feel qualified to perform this In-Service work yourself, contact a competent mechanic or the Racine Railroad Products Service Department for technical support. Uncrating a new machine: Support the unit and cut the banding (if any) to release the machine from the shipping carton. Manually lift the unit, options and accessories separately and clear of the carton and place on a safe surface. Initial Assembly: After unpacking and inspecting the unit, options and accessories prepare the unit for service by doing the following: Hydraulic Systems: Use a calibrated flow meter and pressure gauge to check the hydraulic power source for 10 gpm/38 lpm at 2000 psi/400 bar. A relief valve setting between 2100-2250 psi/145-155 bar full bypass pressure is required for the operation. The hydraulic system’s back pressure should be less than 250 psi/17 bar, measured at the tool end of the operating hoses. All system’s checks should be made at minimum operating temperatures (maximum fluid viscosity of 400 ssu/82 centistokes. The hydraulic fluid cooling system should limit maximum fluid temperature to 160F/70 C at the maximum expected ambient temperature. The minimum cool capacity should be 5 hp/3.73kW at a 60 F/33 C difference between ambient temperature and fluid temperature. A minimum of 25 micron filtration is required for the hydraulic system. For cold weather startup and maximum dirt holding capacity a filter element sized for 25 gpm/12 l cpm is recommended. Hydraulic fluid requirements: See page 1-3 or front of unit. 2-1 910146-M 121115 Recommended hose size: .500 inch/12mm I.D. up to 50 ft./15m long Recommended hose size: .625 inch/16 mm I>D> up to 100 ft/30 m long The Racine Hydraulic power unit is recommended for hydraulic supply. This unit is equipped with one 10 gpm/40 lpm circuit. If the tool is used in cold weather, preheat the hydraulic fluid by running power source at low engine speed. Fluid temperature should be at or above 50 F/10 C (400 ssu/82 centistokes) before use, when using recommended fluids. Using too thick of fluid may result in tool damage. CHECK THE POWER SYSTEM TYPE: THE POWER UNIT MAY BE USED WITH OPEN OR CLOSED CENTER SYSTEMS. Check hydraulic hosed for cracks, leakage and damage. If the hoses or couplers show any of these wear characteristics, replace them before operating the tool. NEVER attempt to locate leaks with your hands, personal injury may occur from pressure system. Hose Connecting Wipe quick couplers with a clean lint free cloth before connecting them. Connect hoses from power source to the tool. It is recommended that you connect the return hoses first and disconnect last to minimize or avoid trapping pressure within the tool. When connecting the quick couplers, the flow should run from male coupler to female coupler. The female coupler on the tool is the inlet. Quick couplers are marked with an arrow to show flow direction. Turn on the hydraulic circuit at your power source. Note: When possible, connect the free ends of uncoupled hoses to prevent pressure build up in the hoses. The sun can also increase pressure in the hoses and make connecting difficult Be sure the pressure hose is connected to the pressure port and the return hose connected to the return port. Pressure port is at the position and return port is at the position. See parts view if uncertain. Do not attempt to reverse a tool by hooking the pressure hose to return port of the tool. Reversing the hoses can cause severe damage to equipment. 2-2 910146-M 121115 Setup and Adjustments The Gas Hydraulic Power Unit is a power tool that requires familiarization by the end user. It is highly recommended that this manual be referred to before attempting a testing exercise. Preparation For Use The following checks must be made prior to operating the power unit. 1. Engine Crankcase Oil Level: Check that the crankcase oil level is at the “Full” mark on the dipstick. 2. Hydraulic Oil: The hydraulic tank needs to be filled with clean, filtered hydraulic oil per section 1. For initial fill the filter and plastic filter barrel can be removed and fill can be done through the return filter housing. When topping off leave the filter and barrel in to insure the oil is filtered and dirt in the barrel sump does not migrate into the reservoir. Check the oil level in the tank using the dipstick. 3. Fuel Level: The power unit is shipped with only a small amount of fuel for safety purposes. The engine has been run at the factory to purge all air from entering the system, always fill the tank before starting the engine. 4. Battery: Check the electrolyte level in each battery cell. The level should never be below the top of the plates. If the level is low, add distilled water. The level is correct when filled to the bottom of the split ring in each cell. 5. Loose Items Shipped With New Units: Keep the engine reference manual in an area accessible to the operator and maintenance personnel. 6. Hydraulic Connections: Pressure and return hoses are connected to the ports at the control panel. The pressure return ports are marked per the label. When installing couplers, the pressure port receives the male coupler and the return port receives the female coupler. The hoses can then be connected directly to the couplers. Couplers are available through your Racine Railroad Products dealer. Hydraulic Connections Single Circuit Flows Up To 10 gpm: Plumb hose and tool as illustrated in Figure 2-1. Numbers are represented below. 1. H.T.M.A. 3/8-inch Female Quick Acting Coupler with ¾-16 O-ring thread. 2. H.T.M.A. 3/8-inch Male Quick Acting Coupler with 1/2-inch NPT thread. Note: At the tool, this may be H.T.M.A. 3/8-inch Female Quick Acting Coupler with 3/8inch NPT thread. 3. H.T.M.A. 3/8-inch Male Quick Acting Coupler with ¾-16 O-ring thread. 4. H.T.M.A. 3/8-inch Female Quick Acting Coupler with 1/2-inch NPT thread. 2-3 910146-M 121115 Note: At the tool, this may be 3/8-inch Male Quick Acting Coupler with 3/8-inch NPT thread. Figure 2-1 Hydraulic Connection 2-4 910146-M 121115 Section 3 Operating Procedures Safety Precautions and Devices Before operating the Gas Hydraulic Power Unit, perform a daily inspection of the tool as described in Section 4. Ensure that all general safety precautions are observed and that proper personal protective clothing is worn as described below. At a minimum, the following Personal Protective Equipment should be worn by the operator: Safety Glasses Hearing Protection Safety Helmet High Visibility Safety Vest Leather Work Gloves Steel Toed Safety Shoes Transportation & Handling The power unit is typically transported to the job site by truck. Upon arrival at the job site, the power unit lifted into position manually. Operation Instructions Before Start-Up: Perform the checks specified in Section 2 before operating the unit. Make certain the following conditions are met. A. Engine oil level is at the “full” mark on the dipstick. Add oil as required, refer to engine manual for fuel and oil requirements. B. Hydraulic tank must be full. C. Check that fuel level is adequate for estimated operating time. Use clean, fresh, lead-free gasoline with a minimum of 85 octane. Note: Purchase fuel in quantity that can be used within 30 days. DO NOT use gasoline which contains Methanol. DO NOT mix oil with gasoline. Start-up: A. Make sure the flow control circuit is set at 0 or OFF. B. Connect hydraulic hoses to the applicable couplers on the control panel. Male couplers are pressure ports, female couplers are return ports. C. Check that the hoses are properly connected to the tool and that the tool is in the OFF or deactivated mode. D. Lift the throttle knob up slightly, then turn the ignition key to start the engine. Note: Allow the engine to run at low speed until the engine and hydraulic circuits are warm. 3-1 910146-M 121115 Cold Weather Start Up: A. Move the choke control to the “CHOKE” position. Place throttle at 1/3 Full position. Note: If the engine does not start, remove air cleaner to check choke. Choke must be fully closed, if not, see adjustments. B. Turn the ignition key to start the engine. Repeat if necessary with the choke off and the throttle control in FAST position. Operate engine with choke off and throttle in slow to medium position. Note: Use short starting cycles, 15 seconds per minute, to prolong starter life. Extended cranking can damage the starter motor. Tool Operation: A. Start the engine as specified above. B. Turn the hydraulic circuit to the ON position or a flow setting to start the fluid flowing to the tool. WARNING!: Do not connect two tools when running in combine mode. Shutdown: A. Pull throttle lever to low speed. B. Return hydraulic circuit to the OFF position or 0 flow. C. Turn the ignition key to OFF. D. Disconnect the hydraulic hoses and store in a suitable area. Emergency Procedures In the event of any malfunction, IMMEDIATELY SHUT-OFF THE HYDRAULIC POWER SOURCE and correct the problem. WARNING! DO NOT PERFORM MAINTENANCE ON THE HYDRAULIC IMPACT WRENCH WHILE THE POWER SOURCE OR HYDRAULIC IMPACT WRENCH MOTOR ARE RUNNING. 3-2 910146-M 121115 Section 4 Maintenance Procedures Safety Precautions and Devices Normal maintenance of the Gas Hydraulic Power Unit can be performed without any special maintenance related safety devices. Before operating, perform a daily inspection of the power tool as described in Section 4. Ensure that all general safety precautions are observed and that proper personal protective clothing is worn as described in Sections 1 and 3. WARNING! DO NOT PERFORM MAINTENANCE ON THE POWER UNIT WHILE THE MOTOR IS RUNNING OR HOSES ARE CONNECTED AND ALLOW UNIT TO COOL. Hydraulic System Maintenance: A. Observe the following for maximum performance and service life from the hydraulic system. Use the correct hydraulic fluid at all times. Keep the hydraulic system and fluids clean at all times. Keep water out of the fluid, remove water from the fluid as specified in this section. Keep air out of the lines, air is indicated by the hydraulic system overheating and foam at the hydraulic tank breather. Tighten all suction line fittings and clamps. Hydraulic system wear is noted by increasing heat during tool operation, reduce tool performance and eventual system breakdown. B. Remove condensed moisture from hydraulic fluid. Condensation is a frequent problem with cool mobile hydraulic circuits. This condition occurs in moist or cold climates. When warm air in the reservoir tank draws moisture from the cooler outside air, water accumulates in the tanks. Approximately once each week (less often in hot dry weather) take a small sample from the bottom of the hydraulic tank by removing the 1/2-inch N.P.T. drain plug. If clear water appears, drain the tank until clean oil starts to show. If fluid is milky, allow unit to settle for about 48 hours before draining. 1% water in a 2000 psi/140 bar hydraulic can cause a 25% increase in wear rate. Note: Operate the unit with fluid temperature at 50°F to 140°F (10°C to 60°C) for improved seal and hose life, maximum efficiency and operator comfort. C. Check suction hose from the hydraulic tank to the pump inlet to see that it is not kinked and that the clamps are secure. This will reduce the risk of pump cavitations and sucking air into the system. All pump fittings must be tight. D. Check hydraulic unit for loose lines, fittings, leaks, etc., through the entire hydraulic circuit. WARNING! Do not attempt to locate pin hose leaks with your bare hands. “Pinhole” leaks can penetrate the skin. 4-1 910146-M 121115 E. Change hydraulic filter. If the operator consistently connects the hose ends together when detached from the tool and wipes off contaminants before connecting quick disconnects, the filter element should provide maximum performance. To replace the filter element, stop the engine and unscrew the cover from the filter housing. Carefully remove the element and filter barrel from the housing minimizing agitation. The filter barrel is equipped with a sump area at the bottom and needs to be thoroughly cleaned prior to reinstalling. Filter: Use a 10 micron filter with built in 25 psi bypass check. It is best to contact your dealer to insure you get the correct replacement element. F. Fill the hydraulic tank by removing the filter cap. The tank is full when oil reaches the notch in the dipstick. Refer to Section 1 for fluid specifications. Do not use engine oils or transmission fluids other than petroleum-based hydraulic fluids. The fluids listed in Section 1 are recommended. These fluids will flow easier when cold, will allow water to settle for draining and will prevent wear at high pressure and cold temperature during tool use. Engine Maintenance: See engine maintenance manual for requirements. Testing and Trouble Shooting The hydraulic system and engine should be tested periodically to insure that the power unit is operating at peak efficiency. Performing the recommended test will help to isolate problems that may exist in the engine and hydraulic system. Always perform the recommended maintenance procedures given in section above before making performance tests. Start the engine and listen for any unusual sounds. Check the engine fuel and cooling systems for leaks before performing any tests. Testing The Hydraulic Circuit: If the unit is equipped with two hydraulic circuits, they should be tested individually, using the circuit tester. Test each hydraulic circuit as follows. A. Set the hydraulic circuit to the OFF or 0 flow position. B. Connect the hydraulic hoses to the appropriate connectors on the control panel for the circuit you are testing. Connect a hydraulic tester to the opposite end of the hoses. Make sure flow direction is corrected. C. Start the engine and allow the hydraulic fluid to warm to about 100°F/38°C. D. Open the tester restrictor valve (fully open). This represents minimum load. E. Set the applicable hydraulic circuit to the PUMP ON position for the flow being tested. Push the throttle lever for maximum engine speed. F. Check the flow rate and pressure on the tester gauges. Record the flow and pressure. The flow should be slightly over the unit (or port’s) rated flow. The pressure gauge will indicate tool back pressure. 4-2 910146-M 121115 G. Position the engine throttle lever to produce 1/4 to 3/4 gpm (1-3 lpm) more than the rated flow. With the engine at this speed, slowly close the restrictor valve on the tester while observing the flow and pressure gauges. H. As the hydraulic system relief valve begins to crack (open) and bypass fluid through the valve, the flow rate will begin to drop. At this time, the pressure in the system should be between 2100 and 2200 psi/148 and 155 bar. I. If the pressure is not as specified the hydraulic circuit relief valve must be adjusted or replaced. There is a relief valve for each hydraulic circuit. Adjust or replace the relief valve for the ports at the circuit being tested. Turn the adjustment clockwise to increase the pressure setting. Always set the pressure by turning the screw in (upping the pressure). If you go past the setting back out the screw and reset. J. During the procedures given in steps “C” through “I”, the engine should hold nearly constant speed and a drop in flow by more than 1.2 gpm/4.5 lpm of that recorded in step “F” would indicate wear inside the hydraulic flow, this can be analyzed as follows: If the pressure stabilizes between 2100 and 2200 psi/148 and 155 bar, and the flow rate begins to drop, the relief valve is opening and the system is operating properly. If the flow rate gradually decreases while system pressure increases, the pump or control valves may be worn. K. Repeat steps “B” through “J” for the second circuit. Note: If internal circuit wear is present, the cause should be determined. Most circuit wear is caused by poor maintenance. Proper maintenance is essential for preventing problems. Keep hydraulic circuits clean at all times. I. Check the following and correct as required before performing any repairs. Proper hydraulic fluid Dirt or water in the hydraulic fluid Clogged return filter Air leaks in circuit Damaged pump-suction hose Testing The Engine: When performing the following test with both circuits operating, the hydraulic oil may overheat. Perform these tests as efficiently as possible to reduce overheating. At higher altitudes or during humid/hot weather conditions, the engine power may decrease below normal, causing smoke. This condition is normal because cold, dense air (for efficient combustion) is not being provided. If this occurs often, consult your Racine Railroad Products dealer for power unit modifications. A. When the engine and hydraulic fluid are warm, set the appropriate circuit to ON or the flow being tested. Close the tester restrictor valve for 0 flow on the tester flow gauge. At this time, the circuit relief valve should be open (by passing fluid). Record the pressure. B. Set the circuit to OFF or 0 flow and connect the hoses to the other circuit. Remove hoses from the first circuit. C. Open the tester restrictor valve and set the second circuit to ON. Leave the lever for the first circuit OFF. 4-3 910146-M 121115 D. Close the tester restrictor valve. Adjust the relief valve on circuit so the system pressure is below 2000 psi/140 bar by the same amount as the pressure recorded in step “D” was above 2000 psi/140 bar. E. Set the first circuit to OFF. F. Adjust the relief valve on the circuit to the pressure recorded for the first circuit in step “D” G. Shut down the engine and disconnect the hoses. Troubleshooting: If the symptoms of poor performance develop, the following charts can be used as a guide to isolate the problem. When diagnosing faults, review the recommended maintenance procedures given (see Maintenance Instructions). Perform the hydraulic and engine tests given in this section. Table 4-1 Troubleshooting 4-4 910146-M 121115 4-5 910146-M 121115 Table 4-2 Maintenance Schedule 4-6 910146-M 121115 Section 5 Lists of Illustrations Parts Lists and Illustrations The following reference drawings are provided for major assemblies and serviceable components. All Drawings are listed in ascending alphabetical order and filed in ascending numerical order on the table below and in the back of this book. Table 5-1 Part No. List of Illustrations Description Part No. Description 5-1 910146-M 121115 5-2 910146-M 121115 Section 6 Parts and Service Support Non-Warranty Parts Sales Material damaged through normal wear and tear, abuse, misuse and/or neglect are not covered by our warranty and should be ordered directly from our Customer Service Department. Parts for models that are no longer in production may not be available. Parts & Customer Service Address: Please contact us at the following address for parts and customer service support: Racine Railroad Products, Inc. Attn: Customer Service 1955 Norwood Court Mount Pleasant, WI 53403 Phone: E-mail: Website: 262-637-9681 Extension: 105 [email protected] http:\\www.racinerailroad.com Non-Warranty Parts Orders: When placing a parts order please provide the following information: Company Name and Billing Address Purchase Order Number and Issuing Authority Shipping Address Special Handling Instructions Contact Phone Number Machine Model and Serial Number Part Numbers and Quantities Being Ordered Note: Please use Racine Railroad Products part numbers when ordering parts. Racine Railroad Products part numbers are shown on the parts lists and drawings in Section 5 of this manual and have only six (6) numbers. Any part number with other than six numbers (e.g. contains alpha-numeric characters) is a Vendor Part Number and NOT a Racine Railroad Products part number. Technical Support & Service Telephone and web-based technical support is available for current production models through our Technical Service Department. Service Manuals and limited technical support may be available for models that are no longer in production. In the future, Technical Support features will be expanded on our home page on the world-wide-web. Telephone and E-mail Technical Support: Telephone and E-mail technical support is available on normal U.S. business days from 8:00 AM to 5:00 PM U.S. Central Time Zone (GMT +6 (+5 Daylight Savings Time)). Contact us at: Phone: E-mail: Website: (262) 637-9681 [email protected] http:\\www.racinerailroad.com Non-Warranty Technical or Field Service Support: Depending upon the circumstances and availability of technical service personnel, we may provide technical assistance and/or field 6-1 910146-M 121115 service support, at the customer's expense, to assist in the correction of non-warranty related problems. Contact our Technical Service Department to coordinate Non-Warranty Technical or Field Service Support. Warranty Technical or Field Service Support: Depending upon the circumstances and availability of technical service personnel, we may provide technical assistance and/or field service support, at no charge to the customer, to assist in the correction of warranty related problems. Contact our Technical Service Department to coordinate Warranty Technical or Field Service Support. Warranty Parts & Service Warranty parts and service are coordinated through our Technical Service Department. Our warranty terms and procedures are provided in Section 1 of this manual. Warranty Parts Claims: Material claimed to be defective must be returned to our factory for evaluation. Defective materials will be replaced, or your account will be credited if replacement materials have already been purchased. Please contact our Technical Service Department at the address provided below if you have any questions or problems. Warranty Service Support: Depending upon the circumstances and availability of technical service personnel, we may provide technical assistance and/or field service support, at no charge to the customer, to assist in the correction of warranty related problems. Contact our Technical Service Department at the address provided below to coordinate Warranty Technical or Field Service Support. Racine Railroad Products, Inc. Attn: Technical Service Manager 1955 Norwood Court Mount Pleasant, WI 53403 Phone: E-mail: Website: (262) 637-9681 [email protected] http:\\www.racinerailroad.com 6-2 910146-M 121115 Section 7 Appendices Sales Representatives For more information about this, or any of our other products, please contact the nearest representative shown on our sales representative list. Gas Engine The operator’s manual provided was current at the time of printing. For Service, contact the nearest engine distributor to locate the nearest dealer in your area. 7-1 910146-M 121115 7-2 910146-M 121115 Preparation Operating Instructions Maintenance IMPORTANT: READ OPERATING INSTRUCTIONS AND PREPARATION PROCEDURE THOROUGHLY BEFORE OPERATING THE HYDRAULIC UNIT!!! IT IS IMPORTANT TO THOROUGHLY READ THIS MANUAL BEFORE STARTING THE POWER UNIT!!! ASSEMBLY INSTRUCTIONS Power Unit is completely assembled and set up with a Manual Adjustable Flow Control Valve and an Adjustable Relief Valve. NOTE: System is capable of operating at 2000 P.S.I. It is extremely important that the pressure hoses used for power beyond the power unit are rated for 3000 P.S.I. or greater value. Step 1) Properly connect appropriate pressure hoses (Supplied by others). Connect Pressure Supply Port (Male Coupler) located on the Front Side of the Hydraulic Control Manifold. Connect the Return Hose from the Remote valve or device to the Return Line Coupler (Female Coupler) located on the left side of the Control Console Manifold. NOTE: Quick Couplers are FlatFace Style. NOTE: THE ADJUSTABLE FLOW CONTROL VALVE (BLACK ROUND HANDLE) SHOULD BE SET AT “OFF” Position Prior to Starting the Power Unit or Prior to Connecting or Dis-Connecting Pressure Hoses. NOTE: SHOULD THE ADJUSTABLE FLOW CONTROL VALVE BE POSITIONED IN THE “ON” POSITION IT WOULD PUT A TREMENDOUS LOAD ON THE ENGINE WHEN THE TRYING TO START THE ENGINE. THE LOAD MORE THAN LIKELY WOULD BE TOO GREAT TO START THE ENGINE. PREPARATION It is extremely important that the pump is not started until oil is in the system. Power Units are shipped without oil, operating a pump even for a time will result in damage. NOTE: It is IMPERATIVE that the hydraulic reservoir is filled with “Premium Quality” hydraulic oil, (Approximately, 9-Gallons). Reservoir must be filled before power unit is started. Be certain that the oil being used is filtered as it is being put into the reservoir. Oil should have anti-wear characteristics, excellent rust protection and contain additives to protect against foaming. NOTE: Manufacturer uses hydraulic oil supplied by U.S. Oil Corporation with the following characteristics. Viscosity Index 101 Grade 32 @ 100 F. it has a viscosity of 156 @210 F. it has a viscosity of 43.7 Cross-referencing to other manufacturers the following oils could be substituted. Common ISO Grades of Hydraulic Oil to be considered for use with this power unit can be Grades 46 & 68 and choice of the oil should be based on factors of typical Ambient temperature that the power unit is being during (i.e. climate and Season of the year) NOTE: There are many factors to consider when choosing the correct hydraulic oil, but the choice should always be “High Quality” and Extremely Important that the oil, even new oil from a container be filtered prior to installing into the reservoir. NOTE: Use 10-Micron Element Filter. The higher viscosity oil lends to reducing operating temperature, due to the fact that it helps increasing the volumetric efficiency of the pump. On the other hand if the viscosity is too high the pump will be subjected to poor mechanical efficiency. NOTE: System will operate with any High Quality, Petroleum Base Hydraulic Oil. Step 1) Remove oil breather cap and fill reservoir to the point that the oil level is approximately 1” from the top of the tank, (Approximately 9-Gallons). Refer to the Sight / Level /Temperature Gauge on the end of the reservoir to determine when the reservoir is full. Step 2) Replace oil breather cap when tank has been properly filled. Wipe up any oil that might have spilled. NOTE: Before proceeding to step 3) make sure that the engine has been properly serviced and fueled. (Refer to Honda Engine Manual). Step 3) Fill the Gasoline Fuel Tank. Note: Fuel tank holds approximately 6-1/2-Gallons Step 4) Serviced with the proper oil level in the reservoir the Honda Engine can be jogged, but not started. Repeat the jogging a few times and then stop. NOTE: Jogging the Engine without starting it will allow the pump to be primed before it is started. PREPARATION (Continued) Step 4) Start the engine (See engine manual for proper starting of the engine). NOTE: An adjustable throttle controls The Engine’s top speed has been FACTORY SET at 3300 R.P.M. (The engine’s speed is what determines the amount of flow from the pump. If the R.P.M.’s are set to low there will be less flow and possibly not enough torque to support the pump’s demand. If the engine is overloaded it will shut down. Throttle positions are to be maintained in the Factory Preset Range. NOTE: Maximum SPEED IS 3300 R.P.M’S which will produce 11 G.P.M. NOTE: Make sure that the hydraulic circuit is properly plumbed and adequate so that the reservoir does not run out of oil. Depending on what the power unit is plumbed to it could lower the reservoir level considerably. NOTE: For initial start-ups the power unit should be allowed to run a couple of minutes before it is allowed to build system pressure. NOTE: The power unit is equipped with an Adjustable Flow Control Valve to direct the circuit to power beyond. Proper plumbing connections must be provided prior to starting the engine and engaging the ADJUSTABLE FLOW CONTROL VALVE, otherwise the pressure will build immediately and dump over the relief valve setting causing excessive heat to be dumped into the system. THE POWER UNIT MUST BE PLUMBED TO AN OPEN CENTER VALVE. NOTE: Power Unit is equipped with a Fan-Cooled Heat Exchanger. The FAN COOLED HEAT EXCHANGER WILL HAVE POWER AS SOON AS THE ENGINE’S IGNITION SWITCH IS TURNED TO THE “ON” POSITION. A THERMOSTAT CONTROLS THE HEAT EXCHANGER’S MOTOR. THERMOSTAT WILL CAUSE THE HEAT EXCHANGER’S MOTOR TO START WHEN OIL ENTERING THE HEAT EXCHANGER REACHES 122 DEGREES F. OPERATING INSTRUCTIONS Once the proper oil has been put in the reservoir and the engine has been properly serviced the engine can be started. NOTE: AN ADJUSTABLE RELIEF VALVE LOCATED AT THE CONTROL MANIFOLD BLOCK. RELIEF VALVE HAS BEEN FACTORY SET @ 2000 P.S.I. NOTE: ADJUSTABLE FLOW CONTROL VALVE MUST BE IN THE IN “OFF” POSITION BEFORE STARTING THE POWER UNIT, (BLACK HANDLE ROTATED COMPLETELY CLOCKWISE) TO THE INDICATED “OFF” POSITION. OTHERWISE THERE WILL BE A CONSIDERABLE LOAD ON THE ENGINE WHEN TRYING TO START THE ENGINE. THE BATTERY MORE THAN LIKELY WILL NOT BE STRONG ENOUGH TO TURN THE ENGINE OVER FAST ENOUGH TO START. NOTE: WORK HOSES SHOULD BE PROPERLY CONNECTED TO THE APPROPRIATE QUICK COUPLERS. THE ENGINE SHOULD BE STARTED AND WARMED UP FOR A COUPLE OF MINUTES. THE ENGINE SPEED SHOULD BE INCREASED TO THE PRE-DETERMINED MAXIMUM SPEED OF 3300 R.P.M. NOTE: AFTER THE ENGINE IS SET AT THE CORRECT SPEED AND HOSES ARE CONNECTED, THE FLOW CONTROL VALVE CAN BE ROTATED COUNTER-CLOCKWISE TO THE REQUIRED OPERATING FLOW. (REFER TO THE DECAL) NOTE: THE SYSTEM’S RELIEF VALVE HAS BEEN FACTORY TESTED AND PRE-SET AT 2000 P.S.I. DO NOT EXCEED THE 2000 P.S.I. SETTING. CAUTION: ALWAYS RETURN THE OPERATING FLOW CONTROL VALVE HANDLE TO THE “OFF” POSITION BEFORE ATTEMPTING TO DISCONNECT A PRESSURE HOSE. IN THE OFF POSITION THERE WILL BE NO FLOW AT THE QUICK COULER. “OFF” IS MARKED ON THE DECAL POSITIONED ON THE MANIFOLD’S MOUNTING PLATE; THE HANDLE IS ROTATED COMPLETELY CLOCKWISE. OPERATING INSTRUCTIONS (CONTINUED) Adjusting pressure Step1) Loosen the hex jam nut at the base of the adjusting screw. Step 2) Change or adjust system pressure is done by rotating the adjusting screw. A) To DECREASE SYSTEM PRESSURE, turn the adjusting screw counter-clockwise to desired pressure setting and than lock in place by tightening the jam nut. B) To INCREASE SYSTEM PRESSURE, turn the adjusting screw clockwise to desired pressure setting and than lock in place by tightening the jam nut. NOTE: System’s Relief Valve has been Factory set and tested at 2000 P.S.I. NOTE: System is rated at 2000 P.S.I. Maximum Pressure. Never exceed the 2000 P.S.I. rated pressure. NOTE: NEVER EXCEED 2000 P.S.I. SYSTEM PRESSURE NOTE: FLOW CONTROL VALVE IS IN THE OFF POSITION WHEN TURN COMPLETELY CLOCKWISE. VALVE MUST BE IN THE OFF POSITION WHEN EITHER CONNECTING OR DISCONNECTING PRESSURE HOSES. MOVE COUNTER-CLOCKWISE (2) CLICKS TO SET AT 5 G.P.M. TURN COUNTER CLOCKWISE (3) CLICKS TO SET AT 8 G.P.M TURN COUNTER-CLOCKWISE (4) CLICKS TO SET AT 10 G.P.M. TURN CLOCKWISE TO LAST POSITION TO SET AT 11 G.P.M. MAINTENANCE Periodic inspection of all fasteners should be done as a routine precautionary procedure. The Honda Engine used should be serviced and maintained per the Maintenance scheduled as outlined in the Honda Engine Owner’s Manual. Periodic inspection of the condition of hydraulic hoses and fittings should be routine. A failure of hydraulic hose could be very hazardous, so frequent inspection for damage is good practice. Check hydraulic oil reservoir level periodically. Proper oil level should be approximately 1”-1 ½” from the top of the reservoir. (Refer to the Sight / Level / Temperature Gauge on the Reservoir. Hydraulic system includes a return line filter. Routine inspection is necessary to determine when to replace filter element. A clogged filter element should be replaced instead of trying to get extended life out of it. There are too numerous factors to consider in giving an element, projected life. The life of the element varies with the amount of contaminants or dirt introduced into the system. The amount of dirt introduced into the circuit varies from hour to hour and day to day. We therefore recommend frequent inspections. -CAUTIONEscaping fluid under pressure can have sufficient force to penetrate skin, causing serious personal injury. Before disconnecting lines, be sure to relieve all pressure. Before applying pressure to the system, be sure all connections are tight and that lines and hoses are not damaged. Fluid escaping from a very small hole can be almost invisible. Use a piece of cardboard or wood rather than hands to search for suspected leaks. If injured by escaping fluid, SEE A DOCTOR AT ONCE. Serious infection or reaction can develop if proper medical treatment is not administered immediately. COMPONENTS Engine Side 1) Sight/Level/Temperature Gauge 2) Complete Honda GX-690 Engine 3) Fuel Tank Hold Down Strap (2) Pieces 4) Fuel Tank, 7-Gallon, E.P.A. Approved 5) E.P.A. Approved Fuel Cap 6) Fan Cooled Heat Exchanger, Complete 7) Lenz Submerged Style Filter 8) ½” Pressure Hose, ½” N.P.T. Both Ends, 32-1/2” Long 9) Filler/Breather Cap Assembly, (Behind Side Plate) 10) Main Base Frame Assembly Figure 1 Pump Side 1) Pipe Plug, ¾” N.P.T. 2) Lenz Submerged Style Filter 3) Filter Element Only, (Not Shown) 4) 45° Fitting, #16 “O” Ring x ¾” Hose Barb 5) Protective Cage Assembly 6) Relay for Temperature Switch 7) Drive Coupling Guard 8) Pump Mounting Plate 9) L100 1-1/8” Bore w/ ¼” Key, Engine Coupling (Not Shown) 10) L100 ¾” Bore w/3/16” Key, Pump Coupling (Not Shown) Figure 2 Pump Side (Continued) 1) Temperature Switch Thermostat 2) 45° Fitting, #16 “O” Ring x ¾” Hose Barb 3) Muffler Kit Assembly 4) Protective Cage Assembly 5) 90° Deflector El with Muffler Clamp 6) Battery Box 7) Battery, U-154, 12-Volt (Not Shown) Figure 3 Hydraulic Pump 1) Straight Hose Barb, 1” N.P.T. Male x 1” Barb 2) Worm Gear Clamp, #16 Size (4) Pieces 3) Suction Hose, 8” Long 4) Worm Gear Clamp, #16 Size (4) Pieces 5) 90° O-Ring x 1” Hose Barb 6) Single Stage Gear Pump 7) 90° O-Ring x ½” N.P.T. Female 8) Drive Coupling Guard 9) Pump Mounting Plate Figure 4 Hydraulic Manifold 1) Lenz Submerged Style Filter 2) Quick Coupler, Female 3) Tee, ½” N.P.T. Male x ½” N.P.T. Male x ½” Female N.P.T. 4) 45° Fitting, ½” N.P.T. Male x ¾” Hose Barb 5) Worm Gear Clamp, #10, (2) Pieces 6) Return Hose, 13” Long 7) #4 Straight “O” Ring Plug 8) Bushing # 12 Straight “O” Ring x ½” N.P.T. Female 9) 90° #12 “O” Ring Straight x ½” N.P.T. Female Swivel 10) Manifold Assembly, Flow Control, Relief Valve, Complete Manifold 11) Adapter #12 Straight “O”-Ring x ½” N.P.T. Male 12) Quick Coupler, Male 13) Dust Cap, Male Quick Coupler 14) ½” Pressure Hose, ½” N.P.T. Both Ends, 32-1/2” Long 15) 90° O-Ring x 1” Hose Barb 16) Worm Gear Clamp, #16 Size (4) Pieces 17) Filler/Breather Cap Assembly 18) Return Hose, 13” Long x 1”Diameter 19) Dust Cap, Female Coupler 20) 90° Fitting, 1” N.P.T. Male x 1” Hose Barb Figure 5 Hydraulic Controls 1) Cartridge Relief Valve Assembly 2) Mounting Plate for Manifold Block 3) Instruction Decal, Flow & Relief Valve Instructions 4) Flow Control Valve Assembly Complete 5) Knob Only, For Flow Control Valve’ Figure 6