1
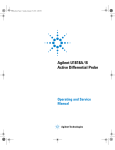
Keysight U1818A/B
Active Differential Probe
Operating
and Service
Manual
Mensa.book Page 1 Sunday, January 27, 2013 4:28 PM
Mensa.book Page 2 Sunday, January 27, 2013 4:28 PM
Notices
© Keysight Technologies 2013, 2014
Warranty
No part of this manual may be reproduced in
any form or by any means (including electronic storage and retrieval or translation
into a foreign language) without prior agreement and written consent from Keysight
Technologies as governed by United States
and international copyright laws.
The material contained in this document is provided “as is,” and is subject to being changed, without notice,
in future editions. Further, to the maximum extent permitted by applicable
law, Keysight disclaims all warranties,
either express or implied, with regard
to this manual and any information
contained herein, including but not
limited to the implied warranties of
merchantability and fitness for a particular purpose. Keysight shall not be
liable for errors or for incidental or
consequential damages in connec-tion
with the furnishing, use, or performance of this document or of any
information contained herein. Should
Keysight and the user have a separate
written agreement with warranty terms
covering the material in this document
that conflict with these terms, the
warranty terms in the sep-arate
agreement shall control.
Manual Part Number
U1818-90001
Edition
Edition 4, August 2014
Printed in Malaysia
Keysight Technologies
Phase 3 Bayan Lepas Free Industrial Zone
Bayan Lepas, Penang 11900 Malaysia
Certification
Keysight Technologies certified that this
product met its published specifications at
the time of shipment from the factory.
Keysight Technologies further certifies that
its calibration measurements are traceable
to the United States National Institute of
Stan-dards and Technology (NIST, formerly
NBS), to the extent allowed by the
Institute’s cali-bration facility, and to the
calibration facili-ties of other International
Standards Organization members.
Safety Notices
Technology Licenses
The hardware and/or software described in
this document are furnished under a license
and may be used or copied only in accordance with the terms of such license.
Restricted Rights Legend
U.S. Government Restricted Rights. Software and technical data rights granted to
the federal government include only those
rights customarily provided to end user
cus-tomers. Keysight provides this
customary commercial license in Software
and techni-cal data pursuant to FAR 12.211
(Technical Data) and 12.212 (Computer
Software) and, for the Department of
Defense, DFARS 252.227-7015 (Technical
Data - Commercial Items) and DFARS
227.7202-3 (Rights in Commercial
Computer Software or Com-puter Software
Documentation).
CAUTION
A CAUTION notice denotes a hazard. It calls attention to an operating procedure, practice, or the like
that, if not correctly performed or
adhered to, could result in damage
to the product or loss of important
data. Do not proceed beyond a
CAUTION notice until the indicated
conditions are fully understood and
met.
WA R N I N G
A WARNING notice denotes a
hazard. It calls attention to an
operating procedure, practice, or
the like that, if not correctly performed or adhered to, could result
in personal injury or death. Do not
proceed beyond a WARNING
notice until the indicated conditions are fully understood and
met.
Keysight U1818A/B Active Differential Probe
Mensa.book Page 3 Sunday, January 27, 2013 4:28 PM
WEEE Compliance
This product complies with the WEEE Directive
(2002/96/EC) marking requirements. The affixed label
indicates that you must not discard this electrical/electronic
product in domestic household waste.
Product Category: With reference to the equipment types in
the WEEE Directive Annex I, this product is classed as a
“Monitoring and Control Instrumentation” product.
Do not dispose in domestic household waste.
To return unwanted products, contact your local Keysight
office, or see www.keysight.com for more information.
Keysight U1818A/B Active Differential Probe
3
Mensa.book Page 4 Sunday, January 27, 2013 4:28 PM
Contacting Keysight
For more information, please contact your nearest Keysight
office.
Americas
Canada
Latin America
United States
(877) 894-4414
305 269 7500
(800) 829-4444
Asia Pacific
Australia
China
Hong Kong
India
Japan
Korea
Malaysia
Singapore
Taiwan
Thailand
1 800 629 485
800 810 0189
800 938 693
1 800 112 929
81 426 56 7832
080 769 0800
1 800 888 848
1 800 375 8100
0800 047 866
1 800 226 008
Europe
Austria
Belgium
Denmark
Finland
France
Germany
Ireland
Italy
Netherlands
Spain
Sweden
Switzerland (French)
Switzerland (German)
United Kingdom
Other European Countries:
0820 87 44 11
32 (0) 2 404 93 40
45 70 13 15 15
358 (0) 10 855 2100
0825 010 700
01805 24 6333
1890 924 204
39 02 92 60 8484
31 (0) 20 547 2111
34 (91) 631 3300
0200-88 22 55
41 (21) 8113811 (Opt 2)
0800 80 53 53 (Opt 1)
44 (0) 118 9276201
www.keysight.com/find/contactus
Or, go to www.keysight.com/find/assist for more information.
4
Keysight U1818A/B Active Differential Probe
Mensa.book Page 5 Sunday, January 27, 2013 4:28 PM
Contents
1
Introduction 7
Product Overview 8
2
Specification 13
Product Specifications 14
Physical Specifications 18
Environmental Specifications 19
3
Operating and Service 21
Operating Instructions 22
Other Available Accessories 27
Handling Guide 30
Maintenance 38
Service Instructions 38
Keysight U1818A/B Active Differential Probe
5
Mensa.book Page 6 Sunday, January 27, 2013 4:28 PM
6
Keysight U1818A/B Active Differential Probe
Mensa.book Page 7 Sunday, January 27, 2013 4:28 PM
Keysight U1818A/B Active Differential
Probe Operating and Service Manual
1
Introduction
Product Overview 8
“Key Features of Keysight U1818A/B Active Differential Probes" on page
8 “Options" on page 9
This chapter provides you the overview of Keysight U1818A/
B Active Differential Probe.
Mensa.book Page 8 Sunday, January 27, 2013 4:28 PM
Product Overview
The Keysight U1818A/B active differential probes provides
high differential input impedance from 100kHz to 7 or
12GHz. The new probes are designed to be directly
compatible with Keysight’s network, spectrum and signal
source analyzers. The U1818A/B probes provide
high- frequency probing solution for R&D and quality
assurance engineers performing RF/Microwave and
high- speed digital design and validation in the wireline,
wireless communications and aerospace/defence industries.
Figure 1-1 Keysight U1818A/B Active Differential Probe
Key Features of Keysight U1818A/B Active Differential Probes
• Broad bandwidth with flat frequency response, +/- 1.5dB,
which ensures excellent measurement accuracy and helps
users achieve the best product apecifications
• Low noise floor, less than - 130dBm/Hz at 10MHz to
12GHz, which allows measurements to be made at a low
signal amplitude
• Convenient biasing from Keysight’s RF and microwave
instruments probe power port or bench top power supply
for user flexibility
8
Keysight U1818A/B Active Differential Probe
Mensa.book Page 9 Sunday, January 27, 2013 4:28 PM
Options
There are two DC power supply cable options available
for Keysight U1818A/B.
• Option 001 - Power probe bias cable
• Option 002 - Banana plug cable
FLAT
1000 mm
Figure 1-2 Power probe bias cable
Black (-12.6V)
Green (ground)
Red (+15V)
1000 mm
Figure 1-3 Banana plug cable
There are five probe head options available for Keysight
U1818A/B. Probe head will not be included unless probe
head option is chosen.
Keysight U1818A/B Active Differential Probe
9
Mensa.book Page 10 Sunday, January 27, 2013 4:28 PM
E2695A differential SMA probe head for InfiniiMax probe
N5380A InfiniiMax II 12GHz differential SMA adapter
N5381A 12GHz InfiniiMax differential solder-in probe head and
accessories
10
Keysight U1818A/B Active Differential Probe
Mensa.book Page 11 Sunday, January 27, 2013 4:28 PM
N5382A InfiniiMax II 12GHz differential browser
N5425A 12GHz InfiniiMax ZIF solder-in probe head
N5426A 12GHz InfiniiMax ZIF Tip - kit of 10
Keysight U1818A/B Active Differential Probe
11
Mensa.book Page 12 Sunday, January 27, 2013 4:28 PM
12
Keysight U1818A/B Active Differential Probe
Mensa.book Page 13 Sunday, January 27, 2013 4:28 PM
Keysight U1818A/B Active Differential
Probe Operating and Service Manual
2
Specification
Product Specifications 14
Physical Specifications 18
Environmental Specifications 19
This chapter provides an overview specifications of
Keysight U1818A/B Active Differential Probe.
Mensa.book Page 14 Sunday, January 27, 2013 4:28 PM
Product Specifications
Specifications refer to the performance standards or limits
against which the active differential probe is tested.
Typical characteristics are included for additional
information only and they are not specifications. These
denoted as “typical”, “nominal” or “approximate” and are
printed in italic.
Bandwidth
Frequency Response
3dB BW*
U1818A/B with
N5381A
U1818A/B with
N5380A (Typical)
U1818A/B with
N5382A(Typical)
U1818A/B with
N5425A(Typical)
100kHz - 7 or 12GHz
100kHz - 7 or 12GHz
100kHz - 7 or 12GHz
100kHz - 7 or 12GHz
7 or 12GHz
7 or 12GHz
7 or 12GHz
7 or 12GHz
U1818A/B with
N5380A
U1818A/B with
N5382A
U1818A/B with
N5425A
14dBm
16dBm
16dBm
* Normalized 3dB BW to 100kHz
Supplementary/
Typical performance
U1818A/B with
N5381A
Maximum Input Power 16dBm
DC Biasing
Characteristic
+15V at 142mA and -12.6V at 12mA
Maximum Input DC
Voltage
+/-10V
Output Impedance
(Nominal)
50Ohm
Single Ended Mode
Input Impedance
@1MHz
25kOhm
N/A
25kOhm
25kOhm
Differential Mode
Input Impedance
@1MHz
50kOhm
N/A
50kOhm
50kOhm
Model Capacitance
between tips, Cm
0.09pF
N/A
0.09pF
0.13pF
14
Keysight U1818A/B Active Differential Probe
Mensa.book Page 15 Sunday, January 27, 2013 4:28 PM
Model Capacitance
between tip and
Ground, Cg
0.26pF
N/A
0.26pF
0.40pf
Differential Mode
Capacitance, Cdiff (Cm
+ Cg/2)
0.21pF
N/A
0.21pF
0.33pF
Single Ended Mode
Capacitance, Cse (Cm
+ Cg)
0.35pF
N/A
0.35pF
0.53pF
Nominal Probe
Attenuation
-10dB
-6.9dB
-10dB
-10dB
Output Return Loss
Common Mode
Rejection
100kHz - 7GHz: =< -13dB
7GHz - 12 GHz: =< -8dB
<2GHz: 35dB
2 - 12GHz: <30dB
<2GHz: 25dB
2 - 12GHz: <15dB
<2GHz: 35dB
2 - 12GHz: <30dB
Noise Spectral
Density*
100kHz - 10MHz: <-120dBm/Hz
10MHz - 1GHz: <-130dBm/Hz
1GHz - 12GHz: <-145dBm/Hz
Noise Figure†
100kHz - 10MHz: <54dB
10MHz - 1GHz: <44dB
1GHz - 12GHz: <29dB
Spurious‡
<2GHz: 35dB
2 - 12GHz: <30dB
<2MHz: -80dBm
Refers to Figure 2-1 for more details
Harmonic Distortion
(dBc)**
<-40dBc @ +10dBm
input power for
frequency <5GHz
<-35dBc @ +10dBm
input power for
frequency 2GHz
<-35dBc @ +4dBm
input power for
frequency 4GHz
<-35dBc @ +2dBm
input power for
frequency 5GHz
<-40dBc @ +10dBm
input power for
frequency <5GHz
<-40dBc @ +10dBm
input power for
frequency <5GHz
P1dB Compression
Input power >10dBm
@ frequency <7GHz
Refer to Figure 2-2 for
more details
Input power >10dBm
@ frequency <=2GHz
Refer to Figure 2-3 for
more details
Input power >10dBm
@ frequency <7GHz
Refer to Figure 2-2 for
more details
Input power >10dBm
@ frequency <7GHz
Refer to Figure 2-2 for
more details
Keysight U1818A/B Active Differential Probe
15
Mensa.book Page 16 Sunday, January 27, 2013 4:28 PM
Phase Noise @ +5dBm
input power**
Fc = 2GHz @ 1MHz offset <-140dBc/Hz
Phase Noise @
Fc = 100MHz @ 1MHz
+10dBm input power** offset <135dBc/Hz
Fc = 100MHz @ 1MHz
offset <-140dBc/Hz
Fc = 100MHz @ 1MHz
offset <135dBc/Hz
Fc = 100MHz @ 1MHz
offset <135dBc/Hz
Calculated Jitter: Fc =
2GHz @ +5dBm Input
Power††
5kHz - 20MHz: 31fs
5kHz - 20MHz: 25fs
5kHz - 20MHz: 31fs
5kHz - 20MHz: 31fs
Calculated Jitter: Fc =
100MHz @ +10dBm
Input Power††
5kHz - 20MHz: 1100fs
5kHz - 20MHz: 601fs
5kHz - 20MHz: 1100fs
5kHz - 20MHz: 1100fs
* Measured using “Noise Marker function” of Keysight PSA E4440A opt 110 with pre-amp on
† Noise Figure reading is derived from Noise Spectral Density
‡ No spurious signal detected >2MHz
**The signal source used is Keysight PSG
††The jitter value depends on the Keysight PSG and the U1818A/B probe. At close-in offset frequency, the residual noise of the
probe is better. The Keysight PSG calculated jitter is 23fs.
Spurious
-60
0
0.5
1
1.5
2
-70
-80
dBm
-90
-100
-110
-120
-130
-140
Frequency (MHz)
Spurious
Figure 2-1 Typical spurious plot
16
Keysight U1818A/B Active Differential Probe
Mensa.book Page 17 Sunday, January 27, 2013 4:28 PM
U1818A/B + N5381A/N5382A/N5425A P1dB (Typical)
5
1GHz
2GHz
4GHz
5GHz
7GHz
100MHz
0
-5
0
Output Power (dBm)
-10
5
10
15
12GHz
20
-5
`
-10
-15
-20
Input Power (dBm)
Figure 2-2 Typical P1dB plot with N5381A, N5382A and N5425A
U1818A/B + N5380A P1dB (Typical)
10
100MHz
2GHz
5
4GHz
1GHz
Output Power (dBm)
5GHz
0
-10
-5
0
5
7GHz
10
15
12GHz
-5
-10
-15
Input Power (dBm)
Figure 2-3 Typical P1dB plot with N5380A
Keysight U1818A/B Active Differential Probe
17
Mensa.book Page 18 Sunday, January 27, 2013 4:28 PM
Physical Specifications
U1818A/B
Mechanical Dimensions
Figure 2-4
Weight
0.170kg (0.375lb)
Shipping Weight
1.135kg (2.502lb)
Output Connector
N-type (male)
Figure 2-4 Mechanical Dimension of U1818A/B
Pin Depth Specification
U1818A/B
N-type (male) connector pin depth
18
-.207” to -.211”
Keysight U1818A/B Active Differential Probe
Mensa.book Page 19 Sunday, January 27, 2013 4:28 PM
Environmental Specifications
Keysight U1818A/B are designed to fully comply with
Keysight Technologies’s product operating environment
specifications. The following are the summarized
environmental specifications for these product.
Temperature
• Operating
0°C to +50°C
• Storage
-40°C to +70°C
• Cycling
-55°C to +85°C, 10 cycles
Relative Humidity
• Operation
50% to 95% RH at 40°C
• Storage
90% RH at 65°C
Shock
• End-use handling shock
Half-sine wave form, 2-3ms duration, 60 in/s (1.6ms) delta-V
• Transportation shock
Trapezoidal wave form, 18-22ms duration, 337 in/s (8.56ms) delta-V
Vibration
• Survival
Random: 5-500Hz, 2.09grms, 10min/axis
Altitude
• Operating
< 4,572 meters (15,000 feet)
• Storage
< 15,000 meters (50,000 feet)
ESD immunity:
• Air discharge
8 kV from 150pF, 330Ω HBM
CAUTION
This device is sensitive to electrostatic discharge. Do not subject the
device to direct contact by the probe head wires.
Keysight U1818A/B Active Differential Probe
19
Mensa.book Page 20 Sunday, January 27, 2013 4:28 PM
Regulatory Markings
The CE mark shows that the product complies with all the
relevant European Legal Directives.
ICES/NMB-001
ICES/NMB-001 indicates that this ISM device complies with
Canadian ICES-001.
Cet appareill ISM est conforme a la norme NMB-001 du Canada.
ISM GRP.1 CLASS A
This is the symbol of an Industrial Scientific and Medical Group
1 Class A product.
ff
N10149
20
The C-Tick mark is a registered trademark of the Spectrum
Management Agency of Australia. This signifies compliance
with the Australian EMC Framework Regulations under the
terms of the Radio communications Act of 1992.
Keysight U1818A/B Active Differential Probe
Mensa.book Page 21 Sunday, January 27, 2013 4:28 PM
Keysight U1818A/B Active Differential
Probe Operating and Service Manual
3
Operating and Service
Operating Instructions 22
Other Probe Heads 23
Other Available Accessories 27
Handling Guide 30
“Connecting/Disconnecting Probe Heads" on page 30
“Handling the Probe Cable" on page 32
“Handling the Probe Amplifier" on page 33
“Handling the Differential Browsers with Ergonomic Handle" on page 34
“Handling SMA Probe Heads" on page 35
“Temperature Rating" on page 36
“Securing Probe Heads and Amplifiers to Your DUTs" on page 37
Maintenance 38
Service Instructions 38
“Adjustment" on page 38
“Repair" on page 38
“Replacing the Wires on N5381A and N5382A Probe Heads" on page 38
“Procedures and Soldering Tips for Using N5425A InfiniiMax ZIF Probe
Heads" on page 43
This chapter provides you the operating instructions, service
information and handling guide.
Mensa.book Page 22 Sunday, January 27, 2013 4:28 PM
Operating Instructions
To power up the probe, user can either use power probe
cable or banana plug cable. When the probe is ON, you will
see the green LED will lights up to indicate the probe is
ready to be used.
Power probe cable
Connect the power probe bias cable to the probe power port
of Spectrum Analyzer, Signal Source Analyzer or Network
Analyzer.
Banana plug cable
Connect the banana plug cable to power supply with below
configuration:
• Red - > +15V
• Black - > - 12.6V
• Green - > Ground
22
Keysight U1818A/B Active Differential Probe
Mensa.book Page 23 Sunday, January 27, 2013 4:28 PM
Other Probe Heads
Besides stadard probe head options, below are some other
probe heads that can be used with U1818A/B (with
limitations).
N5451A Differential long wire ZIF tip
E2677A 12 GHz differential solder-in probe head
Keysight U1818A/B Active Differential Probe
23
Mensa.book Page 24 Sunday, January 27, 2013 4:28 PM
E2678A Single-ended/differential socketed probe head
E2675A Differential browser kit
24
Keysight U1818A/B Active Differential Probe
Mensa.book Page 25 Sunday, January 27, 2013 4:28 PM
E2679A Single-ended solder probe head
E2676A Single-ended browser probe head
Keysight U1818A/B Active Differential Probe
25
Mensa.book Page 26 Sunday, January 27, 2013 4:28 PM
E2669A Differential connectivity kit
E2668A Single-ended connectivity kit
26
Keysight U1818A/B Active Differential Probe
Mensa.book Page 27 Sunday, January 27, 2013 4:28 PM
Other Available Accessories
There are more accessories that you can get from Keysight
to work with U1818A/B.
N2880A In-line attenuator kit
N2881A DC blocking capacitor
11852B Minimum loss attenuator pad
Keysight U1818A/B Active Differential Probe
27
Mensa.book Page 28 Sunday, January 27, 2013 4:28 PM
N2784A 1-arm probe positioner
N2785A 2-arm probe positioner
28
Keysight U1818A/B Active Differential Probe
Mensa.book Page 29 Sunday, January 27, 2013 4:28 PM
N2787A 3D probe positioner
N5450A InfiniiMax extreme temperature cable extension
E3620A 50W Dual Output Power Supply, Two 25V, 1A
Keysight U1818A/B Active Differential Probe
29
Mensa.book Page 30 Sunday, January 27, 2013 4:28 PM
Handling Guide
This probe has been designed to withstand a moderate
amount of physical and electrical stress. However, with an
active probe, the technologies necessary to achieve high
performance, do not allow the probe to be unbreakable. You
should treat the probe with care. It can be damaged if
excessive force is applied to the probe tip. This damage is
considered to be abuse and will void the warranty when
verified by Keysight Technologies service professionals.
This section will assist you in properly handling your Active
Differential probes to maximize their lifetime of operation
and maintain their high performance.
Connecting/Disconnecting Probe Heads
When disconnecting a probe head from an amplifier, pull the
probe head connectors straight out of the socket as shown in
Figure 3- 1. When removing or disconnecting a probe head,
hold the amplifier by grasping the indentations located on
the sides of the amplifier (as shown in Figure 3- 1). There
are also indentations on many of the probe head sockets so
you have a convenient place to grasp there as well. When
connecting a probe head to an amplifier, push straight in
also.
Figure 3-1 Pull the probe head straight out to disconnect it from the amplifier.
30
Keysight U1818A/B Active Differential Probe
Mensa.book Page 31 Sunday, January 27, 2013 4:28 PM
Never bend the probe head in order to “pop” it loose from
the amplifier. Also, do not wiggle the probe head up and
down or twist it to remove the connectors from the sockets.
This can damage the pins in the amplifier or the probe head
itself. Figure 3- 2 is an example of an improper way to
disconnect the probe head.
Figure 3-2 An improper way to disconnect a probe head from an amplifier
To see if the pins in the probe amplifier are bent, visually
inspect them by looking in the sockets on the amplifier.
Notice in Figure 3- 3 that the pins are straight (as they
should be).
Figure 3-3 Straight pins in an amplifier
Keysight U1818A/B Active Differential Probe
31
Mensa.book Page 32 Sunday, January 27, 2013 4:28 PM
If you connect and disconnect probe heads using the
appropriate method, these pins should not bend. Always
remember to apply enough force to pull the probe head
straight out or push it straight in. Do not wiggle, twist, or
bend it in any way.
Handling the Probe Cable
In general, you need to be careful not to kink the cable,
twist it, or bend it too much.
For example, slamming a drawer or dropping a heavy item
on a cable can kink it and significantly degrade the probe’s
performance.
Also, when a probe is attached to instrument, you need to
be careful not to let a chair or other object crash into the
face of the instrument because it will hit the probe cable
where it exists the probe amplifier and bend it well beyond
its limit.
When storing the probe, it is best to coil the cable in a large
radius and avoid a net twist in the cable during the process.
This can be done in a similar manner to how garden hoses
or extension cords are typically coiled.
You can start by wrapping the cable around your thumb
(Figure 3- 4 - first picture). Then continue to circle your
thumb, but provide a slight twist with each rotation. This
will allow the cable rotations to lie flat against each other
and will eliminate the net twisting of the cable in the end.
Note that the radius of the coil must be fairly large so it
does not induce kinking or bending.
32
Keysight U1818A/B Active Differential Probe
Mensa.book Page 33 Sunday, January 27, 2013 4:28 PM
Figure 3-4 The recommended way to coil and store your probe
Handling the Probe Amplifier
The probe amplifier contains a delicate circuit board. You,
therefore, need to treat it carefully and take standard
precautions (for example, not dropping it repeatedly or from
large heights, not getting it wet, not smashing it with heavy
objects, etc.).
CAUTION
These probes are sensitive ESD devices so standard precautions need
to be used to not ruin the probe from the build-up of static charges.
Keysight U1818A/B Active Differential Probe
33
Mensa.book Page 34 Sunday, January 27, 2013 4:28 PM
Handling the Differential Browsers with Ergonomic Handle
Because of their small size, it can be difficult to hold the
differential browsers for extended periods of time. The
ergonomic handle can be used to more comfortably hold the
browser. Figure 3- 5 shows how to mount the browser in
the ergonomic handle and Figure 3- 6 shows how to
remove the browser from the ergonomic handle.
Figure 3-5 Steps to mount the browser in the ergonomic handle
34
Keysight U1818A/B Active Differential Probe
Mensa.book Page 35 Sunday, January 27, 2013 4:28 PM
Figure 3-6 Steps to remove the browser from the ergonomic handle
Handling SMA Probe Heads
The U1818A/B probe amplifier can become damaged when
used with the N5380A or E2695A SMA probe heads. Use the
Keysight N5380- 64701 SMA Head Support to prevent
damage. Make sure to plug the probe amplifier into the
SMA head before installing the SMA Head Support and do
not attempt to plug or unplug the SMA head from the
probe amplifier while it is in the SMA Head Support
housing. Figure 3- 7 shows how to attach the SMA Head
Support using two provided screws.
Keysight U1818A/B Active Differential Probe
35
Mensa.book Page 36 Sunday, January 27, 2013 4:28 PM
Figure 3-7 Attaching the SMA Head Support
Temperature Rating
U1818A/B probe amplifier have a specified operating
temperature range of 0°C to +50°C. However, the probe heads
can be operated over a much larger range of temperatures. If
you need to make measurements at temperatures outside the
range of the amplifier, the N5450A Extreme Temperatures
Cable Extension Kit is your solution.
These cables can used to physically separate the amplifier
from the probe head to allow you to operate the prode head
inside a temperature chamber while the probe amplifier
remains outside the chamber.
36
Keysight U1818A/B Active Differential Probe
Mensa.book Page 37 Sunday, January 27, 2013 4:28 PM
Securing Probe Heads and Amplifiers to Your DUTs
When soldering a probe to a circuit, you should first provide
some strain relief by using low temperature hot glue (use as
little as possible) or non- conductive double- sided tape. Do
not use super glue and do not get the low temperature hot
glue on the actual probe head tip as this can damage the
precision components of your probing system (only use the
low temperature hot glue on the probe head cables). The
provided velcro pads can be used to secure your probe
amplifier casing to the board.
Figure 3-8 Correct securing methods
Figure 3-9 Incorrect securing method because glue is placed on the
probe head tip
Keysight U1818A/B Active Differential Probe
37
Mensa.book Page 38 Sunday, January 27, 2013 4:28 PM
Maintenance
If the probe requires cleaning, disconnect it from the
instrument and clean it with a soft cloth dampened with a
mild soap and water solution. Make sure the probe is
completely dry before reconnecting it to the instrument.
Service Instructions
Adjustment
The probe amplifiers do not have internal adjustments and
should not be opened.
Repair
The U1818A/B contain no user serviceable parts (with the
exception of the probe head). If service or repair is required,
contact your nearest Keysight Technologies Service Center.
Refer to “Contacting Keysight" on page 4.
Replacing the Wires on N5381A and N5382A Probe Heads
When the wire leads of the N5381A and N5382A probe
heads become damaged or break off due to use, the wires
can be replaced. Use the appropriate wire for each probe
head as follows:
• The N5381A uses the 0.005 inch tin- plated nickel wire.
(01169- 21306) or 0.007 inch tin- plated nickel wire.
(01169- 81301)
• The N5382A uses the 0.005 inch tin- plated steel wire.
(01169- 21304)
38
Keysight U1818A/B Active Differential Probe
Mensa.book Page 39 Sunday, January 27, 2013 4:28 PM
Recommended Equipment
Below lists the equipment required to replace the wires.
Equipment other than the recommended can be used,
provided minimum specifications are satisfied.
• Vise or clamp for holding tip
• Metcal STTC- 022 (600°C) or STTC- 122 (700°C) tip
soldering iron or equivalent. The 600°C tip will help
limit burning of the FR4 tip PC board.
• 0.381mm (0.015in) diameter RMA flux standard tin/lead
solder wire
• Fine stainless steel tweezers
• Rosin flux pencil, RMA type (Kester #186 or
equivalent)
• Flush cutting wire cutters
• Magnifier or low power microscope
• Keysight supplied trim gauge (01169- 23801)
• Ruler
Recommended Procedure
1 Use the vise or clamp to position the tip an inch or so off
the work surface for easy access. If using a vise, grip the
tip on the sides with light force. If using a tweezers
clamp, grip the tip either on the sides or at the top and
bottom. See Figure 3- 10.
CAUTION
When tightening the vise, use light force to avoid damaging the
solder-in probe head.
Keysight U1818A/B Active Differential Probe
39
Mensa.book Page 40 Sunday, January 27, 2013 4:28 PM
Figure 3-10 Holding tip with vise
2 Make sure soldering iron tip is free of excess solder. Grab
each wire lead with tweezers and pull very gently up.
Touch the soldering iron to solder joint just long enough
for the wire to come free of the probe head tip. Do not
keep the soldering iron in contact with the tip any longer
than necessary in order to limit burning and damage to
the PC board. This solder joint has very low thermal mass
so it should not take very long for the joint to melt and
release.
3 Prepare the mounting hole(s) for new wire(s) by insuring
that the holes are filled with solder. If they are not, use
the soldering iron and solder to fill the holes. Again, do
not leave the iron in contact with the tip any longer than
necessary. When the hole(s) are filled with solder use the
flux pencil to coat the solder joint area with flux.
40
Keysight U1818A/B Active Differential Probe
Mensa.book Page 41 Sunday, January 27, 2013 4:28 PM
4 Cut two wires to a length of about 12.7mm (0.5inches).
5 Using tweezers, put 90 degree bend at the end of the
wire. Leave enough wire at the bend such that it will
protrude through the board when the wire is installed.
6 Holding the wire in one hand and the soldering iron in
the other hand, position the end of the wire lead over the
solder filled hole. Touch the soldering iron to the side of
the hole. When the solder in the hole melts, the wire lead
will fall into the hole. Remove soldering iron as soon as
lead falls into the hole. Again, the thermal mass of the
joint is very small, so extra dwell time is not needed with
the soldering iron to insure a good joint.
7 Cut the wires that protrude on the bottom side of the
probe head board even with the solder pad.
8 Place the wires through the hole in the trim gauge with
the probe head perpendicular to the trim gauge. Refer
to Figure 3- 11.
Figure 3-11 Use trim gauge to gauge the wire
Keysight U1818A/B Active Differential Probe
41
Mensa.book Page 42 Sunday, January 27, 2013 4:28 PM
9 Cut the wires even with the trim gauge on the side
opposite of the probe head.
Figure 3-12 Cut the wires even with the trim gauge
10 When replacing wires on the N5382A Browser, bend the
wires down at about 30 degree angle.
Figure 3-13 N5382A wire bend down at about 30 degree
42
Keysight U1818A/B Active Differential Probe
Mensa.book Page 43 Sunday, January 27, 2013 4:28 PM
Tips for Using Browser Probe Heads
• Spring steel wires will last longer if the span is set by
grabbing the lead near the PC board edge and twisting
instead of just pulling or pushing the wires apart or
together.
Tips for Using Solder-in Probe Heads
• When soldering in leads to DUT always use plenty of flux.
The flux will insure a good, strong solder joint without
having to use an excessive amount of solder.
• Strain relieves the micro coax leading away from the
solder- in tips using hook- and- loop fasteners or adhesive
tape to protect delicate connections.
• Note that for the differential solder- in probe head, the +
and - connection can be determined when the probe head
is plugged into the probe amplifier, therefore, it does not
matter which way the tip is soldered.
Procedures and Soldering Tips for Using N5425A InfiniiMax
ZIF Probe Heads
The InfiniiMax ZIF (Zero Insertion Force) Probe Heads
system is a way to use a less expensive connection accessory
(ZIF tip) that can be installed at many locations on a device
under test, to connect to a probe head (N5426A) that
transports the signal to the probe amplifier. The advantages
of this system are that the ZIF tip is very small and
connects to the probe head using a zero insertion force
feature allows connection without compressing the delicate
wires which cannot support this compression.
A close- up of the ZIF tip and the ZIF probe head before the
probe head is inserted into the ZIF tip is shown in
Figure 3- 14. Note that lever on the ZIF tip is shown in
the open position (pointed up) which allows the insertion
of the probe head contacts into the ZIF tip with zero
insertion force.
Keysight U1818A/B Active Differential Probe
43
Mensa.book Page 44 Sunday, January 27, 2013 4:28 PM
Figure 3-14 ZIF tip (open position) and ZIF probe head
Figure 3-15 ZIF tip (closed position) with ZIF probe head inserted
A close- up of the ZIF probe head inserted into the ZIF tip
is shown in Figure 3- 15. Note that now the lever on the
tip is in the closed position (down, rotated 90 degree to
the left) which closes the contacts of the ZIF connector.
44
Keysight U1818A/B Active Differential Probe
Mensa.book Page 45 Sunday, January 27, 2013 4:28 PM
Soldering the tip into a DUT is straighforward, but some of
the traditional soldering techniques that are typically used
on larger components will not work well here. Holding the
leads on the ZIF tip in place while applying the soldering
iron and adding solder requires the use of three hands.
The following is an overview of the recommended soldering
techniques:
1 Add some solder to the DUT connection points. There
should be enough solder to provide a good fillet around
the ZIF tip leads, but not so much as to create a big
solder ball. A fine MetCal (or equivalent) soldering tip
should be used along with some 11 or 15mil solder.
2 Using a rosin flux pen, coat the solder points with flux.
The flux core solder does not provide enough flux for this
small scale soldering. Also, put flux on the tips of the
leads of the ZIF tip.
3 Clean the soldering tip well, then add a little bit of solder
to the tip. It may take several tries to get just a little bit
of solder right at or near the tip of the soldering iron.
The solder on the tip keeps the soldering iron tip from
pulling solder on the DUT connection points.
4 Position a lead of the ZIF tip on top of one of the target
points, then briefly touch the soldering iron tip to the
joint. The thermal mass of this joint is very small, so you
don’t need to dwell on the joint for very long. The flux
that was added to the joint should produce a good, clean
solder joint. If you do not get a good, shinny, strong
solder joint, then there was either not enough flux or the
joint was heated too long and the flux boiled off.
5 Repeat step 4 for the other lead of the ZIF tip.
6 There is a possibility that if a lead of the ZIF tip is
inserted into a large ball of solder that is heated
excessively with a soldering iron, the solder joint holding
the lead onto the ZIF tip PC board could flow and the
lead would come off destroying the ZIF tip. Only the first
third of the lead or so needs to be soldered to the target
point.
Keysight U1818A/B Active Differential Probe
45
Mensa.book Page 46 Sunday, January 27, 2013 4:28 PM
Illustrated Procedure of Recommended Soldering Techniques
An illustrated example of the installation of a ZIF tip and
connection to a ZIF probe head is shown below. Figure 3- 16
shows a IC package which we will attach a ZIF tip to the
first two package leads. The target could also be via pads or
signal traces.
Figure 3-16 IC package for example ZIF tip installation
1 Add some solder to the target points in the DUT.
Figure 3- 17 shows extra solder added to the pads for
the first two pins on an IC package.
Figure 3-17 Solder added to target points
46
Keysight U1818A/B Active Differential Probe
Mensa.book Page 47 Sunday, January 27, 2013 4:28 PM
2 Use flux pen to add flux to the target points. Also, flux
the tip of the lead on the ZIF tip at this time.
Figure 3-18 Fluxing of the target points
3 Clean the soldering iron tip and add a small amount of
sold er to the very tip. This m ay take a few tries because
the solder may tend to ball up and move away from
the tip. Figure 3- 19 shows a small amount of solder on
the tip of the soldering iron.
Figure 3-19 Small amount of solder added to ZIF Tip of soldering iron
Keysight U1818A/B Active Differential Probe
47
Mensa.book Page 48 Sunday, January 27, 2013 4:28 PM
4 Installation of ZIF tip. Connect the ZIF tip to the ZIF
probe head as shown in Figure 3- 14 and Figure 3- 15.
This allows the probe to be used as a handle for the ZIF
tip to allow positioning in the DUT. Position the lead
wires on the target points and then briefly heat the solder
joints. There should be enough solder to form a good fillet
and enough flux to make the joint shinny. There should
not be so much solder that the big solder ball is formed
that could cause a solder bridge or overheat the leads on
the ZIF tip. This is shown in Figure 3- 20.
Figure 3-20 ZIF tip positioned and soldered in place
5 Remove ZIF probe head and leave ZIF tip behind for
future connection. It is best to use a non- conductive,
pointed object such as a tooth pick or plastic tool. Hold
on the heat- shrink part of the probe head to support the
ZIF tip while releasing the latch. Figure 3- 21 shows a
toothpick releasing the latch on the ZIF connector and
Figure 3- 22 shows the ZIF tip left behind in the DUT
with the latch open, ready for future connections.
48
Keysight U1818A/B Active Differential Probe
Mensa.book Page 49 Sunday, January 27, 2013 4:28 PM
Figure 3-21 Using non-conductive tool to open the ZIF connector
Figure 3-22 ZIF Tip left behind in DUT with ZIF latch open
Keysight U1818A/B Active Differential Probe
49
Mensa.book Page 50 Sunday, January 27, 2013 4:28 PM
6 Connect ZIF probe head to ZIF tip desired for
measurement. When you need to make a measurement at
a point where you’ve previously installed a ZIF tip, insure
the latch on the ZIF tip is open, insert the contacts on
the probe head into the ZIF socket, and then close the ZIF
latch with a non- conductive tool. Depending on the
positioning of the ZIF tip, you may need to support the
body of the ZIF tip while closing the latch. This can be
done by tweezers or other suitable tool by grabbing the
PC board at the tip while the latch is being closed. If the
circuit is live and there is concern about shorting
anything out, use plastic or non- conductive tweezers.
See Figure 3- 23.
Figure 3-23 Use non-conductive tool to close the latch
50
Keysight U1818A/B Active Differential Probe
This information is subject to change without notice.
© Keysight Technologies 2013, 2014
Edition 4, August 2014
*U1818-90001*
U1818-90001
www.keysight.com