1
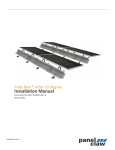
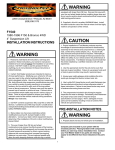
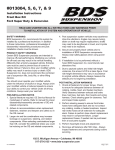
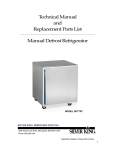
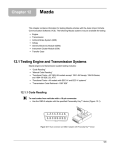
HOLE PREPARATION
2.
Drill hole to appropriate size for rivet nut installation. 1/2” Rivnuts require an 11/16” hole and 3/8” Rivnuts require a 17/32” drill. It is critical
that this hole is drilled to the correct size. Remove any burrs that could keep the rivet nut from seating flat against either side of the hole
surface.
If the correct drill size is not available, it is possible to drill the hole to an available smaller size and slowly grind it out
to until the rivet nut fits tight.
RIVET NUT INSTALLATION TOOL ASSEMBLY
3.
For a 3/8” rivet nut, place the provided 3/8” SAE flat washer on the 3/8” x 1-1/2” bolt, followed by 7/16” hex nut and then a 3/8” serrated
washer. (Fig. 1) Thread this tool assembly into the rivet nut.
4.
For a 1/2” rivet nut, place the provided 1/2” SAE washer on a 1/2” x 2” bolt followed by a 9/16” high nut and 1/2” serrated edge lock washer.
Thread this tool assembly into the rivet nut as shown. (Fig. 1)
FIGURE 1- 1/2” RIVET NUT SHOWN
.
RIVET NUT INSTALLATION
5.
Place the installation tool with the rivet nut threaded on the end into the appropriately sized hole.
6.
For a 3/8” rivet nut, hold the nut closest to the rivet nut still with an 5/8” wrench and tighten the 3/8” bolt with a 9/16 wrench to set the rivet
nut. Be sure to hold the rivet nut flush to the surface and square to the hole as it is tightened. (Fig. 2)
If available, an impact gun is recommended for tightening the bolt to ensure the rivet nut remains square to the hole
and to ease holding the nut from spinning.
7.
For a 1/2” rivet nut, hold the nut closest to the rivet nut still with an 7/8” wrench and tighten the 1/2” bolt with a 3/4” wrench to set the rivet
nut. Be sure to hold the rivet nut flush to the surface and square to the hole as it is tightened. (Fig. 2)
FIGURE 2 - 1/2” RIVET NUT SHOWN
30 | 021672