1
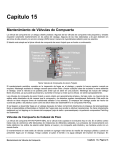
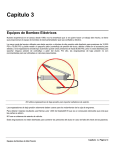
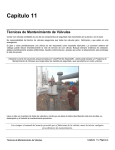
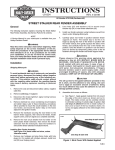
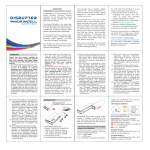
Chapter 12
Plug Valve Maintenance
Servicing Threaded Stem Lubricated Plug Valves
Introduction
Hard to turn valves are usually a result of:
•
A build-up of old dried sealant in sealant passages restricting plug travel
•
Lack of sealant
•
Improper adjustment
•
Rusted stem threads underneath the stop collar at the outboard end of the stem
•
Hard / dried out old stem packing
•
Any combination of the above
In order to determine which of these problems are the likely source of the difficulty, the following steps must
be taken.
Locate the sealant injection fitting on the top of the valve (see illustration). Inject Sealweld® Valve Cleaner
Plus using a high-pressure sealant injection pump in sufficient quantities to completely displace the old
sealant.
ALWAYS watch and read the injection pressure gauge to judge what is happening inside the valve.
In most cases, as the cleaner is injected, the pressure will increase until a rapid de-pressurization or blow will
occur as the old sealant is pushed out of the valve. The cleaner will then run in smoothly with very little
increase in pressure. The plug valve should be cleaned in the fully open or fully closed position in order to get
all the old sealant out from under and around the plug. Cycle the valve several times to ensure complete
coverage of the cleaner.
Once the cleaning is complete, inject Sealweld® Total-Lube # 911 plug valve lubricant / sealant in equal
quantities as the valve cleaner. The plug should be in the fully opened or fully closed position. As the sealant
is injected, the pressure gauge will increase and slowly decline as the sealant enters the sealant grooves.
When pumping stops, the gauge will begin to drop. The more slowly the gauge drops, the tighter the fit
between the plug and valve body. The tighter the fit, the better chance you have of achieving a seal. Too
tight a fit and the valve may be difficult to cycle.
Plug Valve Maintenance
Chapter 12 • Page 57
The plug can be adjusted in order to improve the valve sealing and turning ability. Look on the bottom of the
valve and you will notice a cap tack welded to the body of the valve. The plug position is set at the factory
and the cap is tack welded to prevent unnecessary tinkering. If the cap weld is intact then the setting should
be correct. If the weld has been broken some adjustment may be necessary. Consult the proper valve
manufacturer's service manual for proper setting adjustment advice.
Threaded Stem Plug Valve
If the valve is still stuck or very hard to turn after it has been cleaned and lubricated, assuming that the plug
setting is correct, you can suspect problems in the stem packing area.
Original Stem Packing
The original stem packing in a threaded stem plug valve consisted of short asbestos fibers in a graphite
bonding material. After many years the packing usually becomes hard and looses its lubricity, resulting in an
increase in torque required to turn the valve. Replacement of the stem packing and / or introduction of a
suitable thread lubricant will normally solve this problem.
Upper Stem Lubrication
Remove the stem indicator stop collar. It may be necessary to use two (2) wedges or a two-prong pulley
puller to pry off the collar. Examine the area on and around the stem for visible rusting. Spray with
penetrating oil and clean with a wire brush. Mark the stem position and cycle the valve open one complete
turn to expose the stem threads. Liberally spray the threads with penetrating oil and use a wire brush to clean
them. Cycle the valve to its original position and pour penetrating oil into the depression surrounding the
stem. If necessary make a dam of modeling clay or heavy sealant around the stem to contain the penetrating
oil. Cycle the valve and note if the movement is any easier.
It will probably be necessary to repeat this procedure several times. This is not an instant fix.
Page 58 • Chapter 12
Plug Valve Maintenance
Types of Threaded Stem Plug Valves
There are two types of threaded stem plug valves. One has a pipe (packing) plug on the neck of the valve
located 180° degrees opposite the stem packing injector fitting. The other type of valve does not have a pipe
(packing) plug.
Plug Valve Cross Section
Stem Packing Removal - Procedure # 1
Wait until the next scheduled shut-down when the line and valve can be de-pressurized. The valve
technician should only attempt the procedure on a pressurized valve if there is no alternative. Before
attempting to replace the stem packing on a valve under pressure we recommend the valve technician
practice with a valve (or two) on the workbench first. Get familiar with the procedures required to safely
change the stem packing before heading out to the field.
Equipment Requirements:
•
Set of buttonhead adapters for packing injectors (available from Sealweld®)
•
(1) each - High-Pressure Sealant Injection Guns
•
Allen key set
•
Open end / box end wrenches
•
Adjustable wrench - 6"
•
Stabbing Valve (Class 600) with schedule 80 nipple (see sketch)
•
Sealweld® Valve Cleaner Plus, Sealweld® Total-Lube # 911 and Sealweld® Slick Sticks Stem Packing
•
Penetrating oil
•
Varsol and rags
•
Foaming type leak detector (for use on valves in gas service)
The objective is to safely remove the old stem packing and replace it with Slick Sticks valve stem packing.
This packing is a special preparation for pipeline valves and includes special inhibited grease and a variety of
PTFE particles which bridge to form a durable, rebuildable seal. The stem seal can then be rebuilt by simply
injecting additional Slick Sticks or Super Stem Packing compounds through the packing injection fitting.
Types of Threaded Stem Plug Valves
Chapter 12 • Page 59
Replacement of Stem Packing on Hypreseal Plug Valves
This procedure should only be performed by trained and certified Valve Maintenance Technicians.
The valve being serviced should not be pressurized in order to avoid risk of personal injury. Always assume
the stem packing gland contains trapped line pressure and that extreme caution should be exercised. Work
cautiously and use liberal amounts of foaming type leak detector before completely unscrewing any threaded
fitting to check for trapped gases.
Read this handbook and the corresponding valve manufacturer's manuals completely before starting
any maintenance routine.
Mandatory Safety Equipment
•
Hard Hat
•
Safety Glasses
•
Steel-Toed Boots
•
Nomex® (or equivalent) fire retardant coveralls
•
Hearing Protection
•
Emergency Breathing Apparatus (depending on product, location and climatic conditions)
•
A full port stabbing valve of the same thread and internal dimensions as the plug opposite the packing
injector. An XH Nipple (schedule 80) should be thread taped and tightened into the valve. The other end
of the nipple should also be thread taped. Keep the stabbing valve in the open position and within arms
reach in case of kick through the stem packing gland while the plug is removed. The stabbing valve must
be full port.
ALWAYS notify your supervisor or the control room before attempting this procedure.
In the worst case, if the valve is under pressure the following procedure could expose the Valve Maintenance
Technician to full line pressure escaping through the stem or packing injector or packing plug (once removed).
Depending on the product in the line, the location of the valve and wind direction, this can present serious
consequences. Additionally, when removing the packing plug opposite the packing injector - if pressure has
entered the stem packing area, the plug will blow out at great velocity once the last engaged thread is
unscrewed. Due to the excellent sealing ability of most packing compounds and valve sealants, the threads
may not leak until the last engaged thread is unscrewed. This is why a stabbing valve must be ready before
the procedure begins. The check valve devices installed in most sealant fittings and packing injectors are
unreliable and prone to leakage and / or failure.
Always use EXTREME CAUTION when working with valves under pressure.
Use liberal amounts of foaming type leak detector when unscrewing any fitting on pressurized gas valves. If
at any time line pressure is suspected to be entering the stem packing area, stop this procedure and proceed
only after you are sure all sources of pressure have been eliminated.
Have an evacuation plan discussed and ready for implementation in case of emergency.
Page 60 • Chapter 12
Types of Threaded Stem Plug Valves
Assuming the plug has been cleaned with valve cleaner as previously discussed, inject valve lubricant /
sealant such as Total-Lube # 911 through the sealant fitting on the top of the valve. Keep pressure on the
fitting in excess of line pressure. If the lower threads on the stem have failed it is possible to have a kick once
the plug is removed. By having the valve charged these threads should seal themselves with the sealant.
Also, by watching the pressure gauge you can better judge if the lower threads have failed by a
corresponding drop in gauge pressure as the plug is unscrewed.
Carefully back the Allen screw out of the packing injector body and replace it with the proper sized buttonhead
fitting from the stem servicing kit. It may be necessary to wrap the threads with thread tape. Always check
for leakage before completely unscrewing.
Carefully begin to unscrew the plug opposite the packing injector. Being a tapered thread you should be able
to unscrew it by hand after (1 - 2) one or two turns. If the plug still requires a wrench, it may be a sign that
line pressure is evident in the stem area. The packing will be in compression and will expand once the plug is
unscrewed. This can send confusing signals to the technician.
Quickly install the stabbing valve and tighten in place. Working through the open stabbing valve, remove as
much of the old packing as possible with a packing puller or screw driver. As the packing is normally in
compression, a certain amount of expansion is going to occur once the plug is removed. This is normal.
Watch the gauge on the sealant gun for signs of sealant entering the stem area. Should a leak or kick occur quickly remove the packing puller or screw driver from the stabbing valve and close the stabbing valve to
contain the leak.
Inject Sealweld® Valve Cleaner Plus through the buttonhead adapter on the packing injector fitting. As the
cleaner is injected, the old packing should begin to extrude through the open stabbing valve. At this point you
will be most vulnerable to a kick as most of the packing has been removed. Watch the gauge pressure on the
sealant gun for any sign of pressure drop. Should the packing begin to blow, simply close the stabbing valve
to contain the leakage.
Close the stabbing valve and pressure up the stem area with valve cleaner. This will force the cleaner into
the stem threads and moisten the old packing. By repeatedly pressuring up the stem area and quickly
opening the stabbing valve, the old packing can be carried out with the cleaner. If possible, cycle the valve
partially or fully to distribute the valve cleaner up and down the threaded stem.
You may now begin to replace the packing. Remove the buttonhead adapter in the packing injector and
insert Sealweld® Slick Sticks. The Slick Sticks are injected by screwing in with the original Allen screw.
When the Allen screw bottoms out, back it out and repeat the procedure. Leave the stabbing valve in the
open position while additional Slick Sticks are added. The Slick Sticks will push out the old packing and valve
cleaner as it enters the packing gland. When Slick Sticks are evident in the stabbing valve, the stabbing valve
can be removed and the plug replaced.
Cycle the valve several times to ensure it has returned to its normal condition and that it turns easily with the
original wrench provided. Inject additional Slick Sticks until the Allen screw becomes harder to turn. Check
the valves torque requirements to ensure the packing material is not over-compressed.
Return the valve to its original position (fully opened or fully closed).
Return to the valve site and inject additional Slick Sticks if necessary over a period of (2 – 3) two or three
days. For this period additional Slick Sticks may be required as the valve cleaner and lubricating oil in the
Slick Sticks is displaced. Be careful not to apply excessive force to the Allen screw as a great deal of
pressure can be generated with even a short wrench.
Additional Slick Sticks can be added if necessary as part of a maintenance routine on an annual or semiannual basis. If stem leakage is still a problem, a heavier grade of Super Stem Packing is also available.
Stem Packing Removal - Procedure # 2
This procedure is applied to those valves which do not have a plug on the neck of the valve, 180° degrees
opposite the stem packing injector. In this case it is not possible to force out the old stem packing. However,
Types of Threaded Stem Plug Valves
Chapter 12 • Page 61
it is beneficial to introduce a lubricant such as Sealweld® Valve Cleaner Plus into the stem area to reduce the
valve operating torque and moisten the old dried packing.
•
Remove the Allen screw from the packing injector, dig out as much of the old hard packing as possible.
Install the proper sized stem servicing buttonhead adapter.
•
Attach the sealant gun, filled with valve cleaner, to the buttonhead adapter on the packing injector.
•
Apply pressure by means of the sealant gun until the gauge reads 4000 PSI. Stop pumping and observe
whether there is a drop in the gauge reading. Maintain a 4,000 PSI pressure for (10) ten minutes. Check
the valve turning torque. Turning the valve, even a small amount, will help to distribute the valve cleaner
around the stem threads.
•
Repeat until the valve turns in a normal manner.
•
Remove the stem servicing adapter and insert Slick Sticks stem packing before re-installing the Allen
screw in the packing injector. Inject a sufficient quantity of Slick Sticks to sufficiently seal the stem and
still provide minimal torque requirements.
•
Return to the valve site and inject additional Slick Sticks if necessary. Be careful not to apply excessive
force to the Allen screw as a great deal of pressure can be generated with even a short wrench.
Additional Slick Sticks can be added as part of a maintenance routine if necessary. If stem leakage is still a
problem a heavier grade of Super Stem Packing is also available.
Summary
If these procedures are not successful at reducing torque and eliminating stem leakage, the valve has more
serious mechanical damage and should be repaired or replaced at your earliest opportunity.
This document has been prepared in order to provide valve maintenance personnel with a better
understanding of some of the procedures which can be utilized in order to make plug valves easier to turn or
seal. If you do not clearly understand the procedures being described, contact Sealweld® Services for an
explanation or on-site demonstration.
Threaded Stem Plug Valve
Page 62 • Chapter 12
Types of Threaded Stem Plug Valves