1
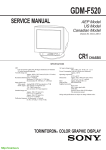
Order Number: MCUK000201C8
Handsfree Car Kit
EB-HFD30Z
EB-HFD70Z
EB-HFD90Z
Specification
Input voltage
13.8 V ± 1.0 V
Over voltage protection
20.2 V +0.8 V / -1.2 V
Current consumption
Operational:
Idle Mode:
Standby:
2.0A max. (normal sound)
150 mA max. (no sound)
1 mA max.(logic power off)
Ignition signal
H Level: ON
L Level: OFF
Speaker Output Power
1.5 W
Speaker impedance
8Ω
Antenna (H/F mode)
External
Operating temperature
-20 to +60 °C
Storage temperature
-40 to +80 °C
Charging temperature
-5 to +35 °C
WARNING
This service information is designed for experienced repair technicians only and is not designed for use by the general public. It does not
contain warnings or cautions to advise non-technical individuals of potential dangers in attempting to service a product.
Products powered by electricity should be serviced or repaired only by experienced professional technicians. Any attempt to service or
repair the product or products dealt with in this service manual by anyone else could result in serious injury or death.
© 2000 Matsushita Communication Industrial UK
Ltd. All rights reserved. Unauthorized copying and
distribution is a violation of law.
Issue 1
Revision 0
http://cxema.ru
Company Liability
This Service Manual is copyright and issued on the strict understanding that it is not be reproduced,copied,or disclosed to any
third party, either in whole or in part, without the prior written consent of Matsushita Communication Industrial UK Ltd.
Every care has been taken to ensure that the contents of this manual give an accurate representation of the equipment.
However, Matsushita Communication Industrial UK Ltd. accepts no responsibility for inaccuracies which may occur and
reserves the right to make changes to specification or design without prior notice.
The information contained in this manual and all rights in any designs disclosed therein, are and remain the exclusive property
of Matsushita Communication Industrial UK Ltd.
Other patents applying to material contained in this publication:
BULL CP8 PATENTS
Comments or correspondence concerning this manual should be addressed to:
Customer Support Department,
Matsushita Communication Industrial UK Ltd.,
Colthrop, Thatcham,
Berkshire, RG19 4ZD.
ENGLAND
© 2000 Matsushita Communication Industrial UK Ltd.
Issue 1
Revision 0
http://cxema.ru
- ii -
MCUK000201C8
Service Manual
WARNINGS AND CAUTIONS
WARNING
The equipment described in this manual contains polarized capacitors utilising liquid electrolyte. These devices are entirely safe provided
that neither a short-circuit nor a reverse polarity connection is made across the capacitor terminals.
FAILURE TO OBSERVE THIS WARNING COULD RESULT IN DAMAGE TO THE EQUIPMENT OR, AT WORST, POSSIBLE INJURY TO
PERSONNEL RESULTING FROM ELECTRIC SHOCK OR THE AFFECTED CAPACITOR EXPLODING. EXTREME CARE MUST BE
EXERCISED AT ALL TIMES WHEN HANDLING THESE DEVICES.
Caution
The equipment described in this manual contains electrostatic devices (ESDs). Damage can occur to these devices if the appropriate
handling procedure is not adhered to.
ESD Handling Precautions
A working area where ESDs may be safely handled without undue risk of damage from electrostatic discharge, must be
available. The area must be equipped as follows:
Working Surfaces: - All working surfaces must have a dissipative bench mat, SAFE for use with live equipment, connected via
a 1 MΩ resistor (usually built into the lead) to a common ground point.
Wrist Strap - A quick release skin contact device with a flexible cord, which has a built in safety resistor of approximately 1 MΩ
shall be used. The flexible cord must be attached to a dissapative earth point.
Containers - All containers and storage must be of the conductive type.
Batteries
This equipment may contain an internal battery in addition to the external battery packs. These batteries are recyclable and
should be disposed of inaccordance with local legislation. They must not be incinerated, or disposed of as ordinary rubbish.
MCUK000201C8
Service Manual
http://cxema.ru
– iii –
Issue 1
Revision 0
This page is left intentionally blank.
Issue 1
Revision 0
http://cxema.ru
– iv –
MCUK000201C8
Service Manual
INTRODUCTION
1 INTRODUCTION
1.1.
Purpose of this Manual
This Service Manual contains the information and procedures required for installing, operating and servicing the Panasonic
GSM Personal Cellular Mobile Telephone system operating on the GSM Digital Cellular Network.
The manual is structured to provide service engineering personnel with the following information and procedures:
1.
General and technical information - provides a basic understanding of the equipment, kits and options, together with
detailed information for each of the major component parts.
2.
Installation and operating information - provides instructions for unpacking, installing and operating the equipment.
3.
Servicing information - provides complete instructions for the testing, disassembly, repair and reassembly of each major
component part. Step-by-step troubleshooting information is given to enable the isolation and identification of a
malfunction, and thus determine what corrective action should be taken. The test information enables verification of the
integrity of the equipment after any remedial action has been carried out.
4.
Illustrated parts list - provided to enable the identification of all equipment components, for the ordering of spare /
replacement parts.
The procedures described in this manual must be performed by qualified service engineering personnel, at an authorised
service centre.
The service engineering personnel are responsible for fault diagnosis and repair of all equipment described in this manual.
1.2.
Handsfree Car Mount Kit
The Handsfree Car Mount Kit enables the handportable to be mounted in a vehicle, and to operate in handsfree mode.
Either the Cigar Lighter Cable or the Power Supply Cable can be used with the Handsfree unit. The Cigar Lighter Cable can
be used for easy and quick fitting, or the power supply cable can be used for a more permanent fitting.
The telephone can be operated in handheld mode by removing it from the Holder.
The handsfree unit also provides external power for the handheld internal charger.
Figure 1.1: Handsfree Car Mount Kit
ITEM
http://cxema.ru
PART No.
GD30 / GD50
GD70
GD90
Holder with RF Cable
EB-KAD31
EB-KAD71
EB-KAD91
2
Handsfree Unit
EB-HFD30
EB-HFD70
EB-HFD90
3
Handsfree Microphone
4
Adjustable Angle Brackets, set of 2
5
Power Supply Cable
6
Cigar Lighter Cable (Optional)
1
MCUK000201C8
Service Manual
DESCRIPTION
EBM1177
EBN0001
WP76001A
WC70135
Section 1
–1–
Issue 1
Revision 0
INTRODUCTION
1.3.
Second Handset
A second handset may be used with the Handsfree Car Mount Kit.
ITEM
Issue 1
Revision 0
http://cxema.ru
DESCRIPTION
PART No.
1
Handset
TBA
2
Cradle
TBA
Section 1
–2–
MCUK000201C8
Service Manual
OPERATING INSTRUCTIONS
2 OPERATING INSTRUCTIONS
2.1.
Controls and Connectors
Figure 2.1: Controls and Connectors
2.2.
Handsfree Operation
When the telephone is inserted into the Holder, the antenna connection is made to the vehicle installed antenna. Connecting
the Handsfree connector into the telephone will divert the internal microphone and loudspeaker connections to the handsfree
loudspeaker and microphone units. Control of the loudspeaker volume will be maintained from the Handsfree unit.
The Handsfree unit will be activated when the vehicle ignition is ON.
The telephone can be used without having to remove it from the Holder, by speaking into the microphone and listening to the
speaker. If the mute option is connected, the car radio will be automatically muted during a call.
2.3.
Telephone Operation
Operation of the telephone when installed in the Car Mount Kit is very similar to normal handheld operation but with the
following differences:
• Operation of the internal speaker and microphone of the telephone will be overridden by those of the Car Mount Kit.
• The Keep Alive timer will delay the switching off of the telephone when the vehicle ignition is turned off. Any calls in progress
when the ignition is switched off will be allowed to continue. The timer will not start until after the call is finished.
• When the Automatic Answer function is switched on, the call will be connected without pressing any keys.
• The ring volume cannot be turned off.
Adjusting the Speaker volume
Adjust the speaker volume by using the volume adjust the thumbwheel on the side of the Handsfree Unit.
2.4.
Charging
Make sure that the vehicle ignition is switched on, the Battery Pack is attached to the telephone and that the Handsfree cable
is connected. Charging will commence immediately.
MCUK000201C8
Service Manual
http://cxema.ru
Section 2
–3–
Issue 1
Revision 0
TECHNICAL DESCRIPTION
3 TECHNICAL DESCRIPTION
3.1.
Introduction
The handsfree unit provides a handsfree function for car use and provides charging power for the phone and consists of the
following:
5.
Microphone pre-amplifier.
6.
Loudspeaker pre-amplifier.
7.
lnternal Loudspeaker.
8.
Data adaptor socket for a Data Adaptor (PCMCIA) card, SMS Cable, RS232C Direct Cable or Second Handset.
9.
Facility to connect an optional audio only second handset to provide an ‘Off Hook’ function. (This is necessary as the phone
RF and the interface connectors do not allow the use of a coiled cable for ‘Off Hook’ operation.)
10. Designed for vehicles with 12 V nominal, negative ground supplies only.
11. Volume control.
12. Option of two plug-in power cables. One with Ignition sense and Radio mute for permanent installation and one with a Cigar
Lighter Plug for consumer installation.
Connection to the external (vehicle) antenna is provided within the Holder
The unit does not have an echo cancellation or acoustic path cancellation features, as these are incorporated within the
telehone.
Microphone pre-amplifier
Audio switches
MICROPHONE
Mic in
TX_AUDIO
GND
Volume
Control
Audio Power Loudspeaker
Amp
RX_AUDIO
AGND
Optional
Second Handset
AUDIO
nHF_SENSE
TX_AUDIO2
AGND2
nHF_ON
B
A
PHONE CONNECTOR,HANDHELD I/F
GND
RX_AUDIO2
nON_HOOK2
Audio
Control
nHF_SENSE2
GND2
nON_HOOK
Hook
Switch
SERIAL_IN2
SERIAL_OUT2
SERIAL_OUT
VBAT2
VBAT
nADP_SENSE
nADP_SENSE2
GND
EXT_PWR
Charger
Power
Supply
nLOGIC_PWR
DATA ADAPTORM& SECOND
HANDSET CONNECTOR
GND2
SERIAL_IN
nLOGIC_PWR2
POWER CONTROL
IGNITION
POWER CONNECTOR
nRADIO_MUTE
nradio_mute
Switch
Ignition
Battery +
GND
Switch
Power to
Audio Circuits
10173-1
Figure 3.1: Handsfree Block Diagram
MCUK000201C8
Service Manual
http://cxema.ru
Section 3
–5–
Issue 1
Revision 0
TECHNICAL DESCRIPTION
3.2.
Tx Audio
The external microphone connects to SKT2. The voice signal from the microphone is filtered through FL118 to eliminate TDMA
noise. R100 and R102 are for biasing Vcc, which is 5 V. C106 eliminates any noise produced from the power supply. U101
is an inverting amplifier with a gain of approximately 20.
U100 is a two pole switch that provides an On path during a call and Off when there is no call, therefore effectively muting the
microphone. U102 is for amplification bias, before the signal is passed through a differential amplifier (U103), which rejects any
noise created between the handset ground and the handsfree unit ground.
The TX_AUDIO signal is then passed to the telephone, which performs echo and noise cancellation functions.
3.3.
Rx Audio
The signal is received on A8 and PL1, after having already been processed in the handset. U115 is a differential amplifier. U114
and U116 are two pole switches enabling the path to be either On or Off. If U116 is on then U117 drives the optional second
handset.
If U114 is on, then the handsfree unit is on. R136 is a variable resistor which controls the volume, via a thumbwheel on the side
of the handsfree case. Further amplification is provided by U112, before the output is fed to the loudspeaker.
3.4.
Audio Control
Audio control is a basic logic section, which is used to control the switches U100, U104, U114 and U116. This ensures that the
second handset is activated if being used. It also de-activates the echo-cancellation process if the 2nd handset is used, as this
is no longer required.
3.5.
Power Control and Supply
U201 is the main control element for the charging and main power supplies. U200 and TR200 provide current limitation control.
U202 is a voltage regulator that provides a 5 V supply (VCC) for the handsfree unit. D205 provides protection for the supply by
switching the power off to the unit should the battery voltage rise above 18 V.
The IGNITION signal from the power connector swithes on the charging and is controlled by U201. Two external LEDs are
visible on the case of the handsfree unit, which are powered on as the ignition line becomes active. Their function is to provide
On/Off indication for the handsfree unit.
Issue 1
Revision 0
http://cxema.ru
Section 3
–6–
MCUK000201C8
Service Manual
INTERFACES AND TEST POINTS
4 INTERFACES AND TEST POINTS
4.1.
Interfaces
The handsfree unit provides a handsfree function for car use and provides charging power for the phone and consists of the
following:
4.1.1.
Power Connector
No.
4.1.2.
Signal Name
<==
Function
Battery +
2
Ignition
<==
Car ignition switch position sense
3
NC
-
Not connected
4
GND
<==
Negative car battery connection
5
NC
-
Not connected
6
nRadio Mute
==>
Handsfree output to mute Car radio
Positive car battery connection
Phone Connector, Handheld I/F
No.
A1
4.1.3.
H/F <=> Car
1
Signal Names
GND
Telephone <=> H/F
Function
-
Power supply and digital ground
Not connected
A2
PA_ON
-
A3
n.LOGIC_PWR
==>
Handheld accessory power control
A4
IGNITION
<==
Handheld car ignition state sense
A5
VBAT
==>
Handheld battery output for accessories
A6
nHF_SENSE
<==
Handheld sense input to detect Handsfree
A7
nRADIO_MUTE
==>
Handheld radio mute output
A8
RX_AUDIO
==>
Handsfree audio input
A9
-
-
Spare
B1
EXT_PWR
<==
Handheld charge input
B2
nON_HOOK
<==
Handsfree 'On Hook' output
B3
SERIAL_OUT
==>
Handheld serial data output
B4
SERIAL_IN
<==
Handheld serial data input
B5
nADP_SENSE
<==
Handheld accessory sense
B6
nHF_ON
==>
Handsfree audio control input
B7
AGND
-
Handsfree audio input and output ground
B8
TX_AUDIO
<==
Handsfree audio output
B9
GND
-
Power supply and digital ground
Microphone Connector
Signal Name
Function
Mic In
<==
Microphone bias and Handsfree audio input
Screen
GND
-
Ground
MCUK000201C8
Service Manual
http://cxema.ru
Telephone<=>H/F
Tip
Section 4
–7–
Issue 1
Revision 0
INTERFACES AND TEST POINTS
4.1.4.
Data Adaptor
Signal Name
4.2.
Telephone<=>H/F
Function
1
GND2
-
Power supply and digital ground
2
PA_ON2
-
Not used
3
nLOGIC_PWR2
==>
Handheld accessory power control
4
IGNITION2
-
Not used
5
VBAT2
==>
Handheld power supply output for accessories
6
nHF_SENSE2
<==
Second Handset connected detect
7
nRADIO_MUTE2
-
Not used
8
RX_AUDIO2
==>
Second Handset Audio
9
-
-
Spare
10
EXT_PWR2
-
Not used
11
nON_HOOK2
<==
Second handset 'On Hook' output
12
SERIAL_OUT2
==>
Handheld serial data output
13
SERIAL_IN2
<==
Handheld serial data input
14
nADP_SENSE2
<==
Handheld accessory sense
15
nHF_ON2
-
Not used
16
AGND2
-
Audio Ground
17
TX_AUDIO2
<==
Second Handset Audio
18
GND2
-
Power supply and digital ground
Test Points
TP No.
Description
AUDIO CONTROL
TR102 Pin 3
TP2
BATTERY+
SK1 Pin 1
TP3
nLOGIC_PWR
FL206, R221
TP4
Vcc
U202 Pin 1
TP5
EXT_PWR
C203, FL200
TP6
GROUND
TP7
MICROPHONE AUDIO
FL100, C109
TP8
MICROPHONE INPUT
SKT2 Pin 5
TP9
Tx AUDIO2 (FILTER)
FL103, FL119
TP10
nHF_ON
FL105, R122
TP11
Rx AUDIO
FL111, R138
TP12
AGND
FL112, R144
TP13
Tx AUDIO
R109, FL101
TP14
LOUDSPEAKER
PL2 Pin 2
TP15
GROUND
PL2 Pin 1
TP16
Rx_AUDIO2
PL3 Pin 8
TP17
Issue 1
Revision 0
http://cxema.ru
Location
TP1
U107 Pin 10
Section 4
–8–
MCUK000201C8
Service Manual
INSTALLATION GUIDE
5 INSTALLATION GUIDE
5.1.
General
This section describes the procedure used to install the GSM handportable unit into a negative-grounded vehicle.
Caution
Do not attempt to install this equipment into a positive-grounded vehicle.
Do not attempt to supply power to the equipment from a positive-grounded vehicle.
5.2.
Handsfree Car Mount Kit
10179-1
Figure 5.1: Handsfree Car Mount Kit
5.2.1.
Preparation
The following points should be considered when choosing a location for the handsfree unit:
1.
Ensure that the location does not obstruct normal operation/functioning of the vehicle.
2.
Ensure that the location does not affect passenger accommodation, or is subject to excessive shocks.
3.
Ensure that the location will allow easy operation of the unit.
4.
Ensure that the location provides a secure fixing for the unit.
5.
Avoid direct exposure to the sun’s rays, or to rain.
6.
Ensure that the location takes due consideration of cable routing requirements.
7.
Considering the points listed above, the recommended locations for mounting the handsfree unit are the Dashboard,
Armrest storage compartment or the Centre Console.
MCUK000201C8
Service Manual
http://cxema.ru
Section 5
–9–
Issue 1
Revision 0
INSTALLATION GUIDE
10175-1
Figure 5.2: Handsfree Cradle Unit Locations
5.2.2.
Mounting the Holder and Handsfree Unit
The Holder and Handsfree Unit can be mounted together using one Adjustable Angle Bracket as shown below:
Note that one half of the Bracket must be secured to the base of the Handsfree Unit and the other half to the mounting location
before the bracket is assembled.
1
2
2
10181-1
Figure 5.3: Mounting the Holder and Handsfree Unit
Issue 1
Revision 0
http://cxema.ru
Section 5
– 10 –
MCUK000201C8
Service Manual
INSTALLATION GUIDE
Note that the second Adjustable Angle Bracket may be used to mount the Holder at an alternative location to the Handsfree
Unit, if required:
10180-1
Figure 5.4: Mounting the Holder Unit
5.2.3.
Installing the Handsfree Microphone
The following points should be considered when installing the handsfree microphone:
1.
That it does not obstruct the operation of the vehicle.
2.
That it does not affect the normal passenger accommodation.
3.
That the microphone should face the driver’s mouth, at a distance of approximately 30cm.
> 50cm
» 30cm
10182-1
Figure 5.5: Microphone Installation
MCUK000201C8
Service Manual
http://cxema.ru
Section 5
– 11 –
Issue 1
Revision 0
INSTALLATION GUIDE
Mounting the Microphone to the Sun Visor
1.
Insert the projection on the microphone clip into the hole of the microphone base.
2.
Mount the microphone on to the sun visor as shown in the diagram.
3.
Connect the microphone lead to the connector on the Handsfree Unit.
Mounting the Microphone to the Dashboard
1.
Attach the adhesive pad to the dashboard clip.
2.
Drill a 1 mm hole at the mounting location and mount the clip using a M2.5 self-tapping screw.
3.
Insert the projection of the clip into the microphone base, ensuring that it points towards the driver’s mouth.
4.
Connect the handsfree microphone to the Handsfree Unit.
5.2.4.
Antenna
For best reception, mount the antenna on the vehicle roof.
10183-1
Figure 5.6: Vehicle Antenna Connection
5.2.5.
Wiring
Caution
Do not shorten or remove any item from the DC Power Cable. Removal of fuse holders or any part of the cable could result
in damage to the vehicle’s electrical systems and invalidate any warranty provided by the manufacturer.
Any excess cable should be wound neatly and secured by tie-wraps.
Caution
The Music Mute lead has an open-collector connection. This lead MUST be connected to the standard Mute connector of
ICE equipment only. It is not suitable for powering car radios directly..
Use the supplied Power Supply Cable to permanently connect the Car Mount Kit into the vehicle wiring as shown in the diagram
below.
Issue 1
Revision 0
http://cxema.ru
Section 5
– 12 –
MCUK000201C8
Service Manual
INSTALLATION GUIDE
Wiring Guide
Colour
Connection
Fuse
Black
Ground
-
Blue
Ignition
3A
Red
Battery (+)
3A
Yellow
Radio Mute
-
10184-1
Figure 5.7: Power Cable Connections
Alternatively, connect the EasyFit Cable between the Holder and the vehicle cigarette lighter socket. Note that this cable does
not cater for Radio Mute and will draw power whenever there is power to the cigarette lighter. It is recommended that the
EasyFit cable is removed from the cigarette lighter when the vehicle is not running.
MCUK000201C8
Service Manual
http://cxema.ru
Section 5
– 13 –
Issue 1
Revision 0
INSTALLATION GUIDE
10191-1
Figure 5.8: Cigarette Lighter Cable Connector
Issue 1
Revision 0
http://cxema.ru
Section 5
– 14 –
MCUK000201C8
Service Manual
DISASSEMBLY / REASSEMBLY INSTRUCTIONS
6 DISASSEMBLY / REASSEMBLY INSTRUCTIONS
6.1.
General
This section provides disassembly and reassembly procedures for the Handsfree Car Kit.
WARNING
The equipment described in this manual contains polarised capacitors utilising liquid electrolyte. These devices are entirely
safe provided that neither a short-circuit nor a reverse polarity connection is made across the capacitor terminals. FAILURE
TO OBSERVE THIS WARNING COULD RESULT IN DAMAGE TO THE EQUIPMENT OR, AT WORST, POSSIBLE
INJURY TO PERSONNEL RESULTING FROM ELECTRIC SHOCK OR THE AFFECTED CAPACITOR EXPLODING.
EXTREME CARE MUST BE EXERCISED AT ALL TIMES WHEN HANDLING THESE DEVICES.
Caution
The equipment described in this manual contains electrostatic sensitive devices (ESDs). Damage can occur to these
devices if the appropriate handling procedure is not adhered to.
ESD Handling Precautions
A working area where ESDs may be safely handled without undue risk of damage from electrostatic discharge, must be
available. The area must be equipped as follows:
Working Surfaces: - All working surfaces must have a dissipative bench mat, SAFE for use with live equipment, connected via
a 1 Mτ resistor (usually built into the lead) to a common ground point.
Wrist Strap - A quick release skin contact device with a flexible cord, which has a built in safety resistor of approximately 1 Mτ
shall be used. The flexible cord must be attached to a dissapative earth point.
Containers - All containers and storage must be of the conductive type.
6.2.
Disassembly
1. Remove the holder from the unit (2 screws).
10177-1
Figure 6.1: Holder Removal
MCUK000201C8
Service Manual
http://cxema.ru
Section 6
– 15 –
Issue A
Revision 0
DISASSEMBLY / REASSEMBLY INSTRUCTIONS
2. Remove the back cover from the unit by removing the cover securing screw.
10185-1
Figure 6.2: Removal of Cover
3. Pull back the PCB retaining clip and lift out the PCB. Disconnect the phone interface cable and speaker cable from the
PCB.
10186-1
Figure 6.3: PCB Removal
Issue A
Revision 0
http://cxema.ru
Section 6
– 16 –
MCUK000201C8
Service Manual
DISASSEMBLY / REASSEMBLY INSTRUCTIONS
6.3.
Reassembly
1. Position the cables into the case moulding, ensuring that the interface cable grommet is seated securely in the case
moulding and the microphone socket is also located in the case moulding.
10187-1
Figure 6.4: Reassembly: Cable Positioning
2. Replace the back cover of the unit and tighten the cover securing screw.
10190-1
Figure 6.5: Replacement of Cover
MCUK000201C8
Service Manual
http://cxema.ru
Section 6
– 17 –
Issue A
Revision 0
REPLACEMENT PARTS LIST
7 REPLACEMENT PARTS LIST
7.1.
7.1.1.
Sub-Assemblies
Handsfree Unit
M202
M0215-M0216
M0212
M0219
A
M0211
M0230-M0231
M0213
A
PCB
W0202
M0206-M0207
M0209
B
M0203-M0204
W0502
LS0501
M0210
IN
DC 12V
MIC
M0201
L
VO
B
MIC
10188-1
Figure 6.1: Handsfree Unit
Ref
Part Number
Description
Ref
Part Number
Description
M0201
1NA510A
GD70 HANDSFREE COVER
M0215
XTB2.6+12GFXK
SCREW M2.6 x 12mm
M0202
1PA516A
CASE
M0216
XTB2.6+12GFXK
SCREW M2.6 x 12mm
M0203
2QA538A
HANDSFREE LED LENS
M0219
XTB2.6+6GFXK
SCREW M2.6 x 6mm
M0204
2QA538A
HANDSFREE LED LENS
M0230
XTB2.6+10GFX
SCREW M2.6 x 10mm
M0231
XTB2.6+10GFX
SCREW M2.6 x 10mm
PCB
HFGD70AS02
HANDSFREE PCB COMPLETE
LS0501
VS45U0208
SPEAKER 8R 1.5W
M0206
XTB2.6+6GFXK
SCREW M2.6 x 6mm
M0207
XTB2.6+6GFXK
SCREW M2.6 x 6mm
M0209
1B70106A
SPEAKER BRACKET
W0502
WC70152A
SPEAKER CABLE (75mm)
M0210
6V10031A
SPEAKER NET
W0202
WC76016A
INTERFACE CABLE
M0211
5FJ5129AB
VOLUME KNOB
M0212
4EA525A
BRACKET
M0213
4JA534A
SHIELD CASE
MCUK000201C8
Service Manual
http://cxema.ru
Section 7
– 19 –
Issue 1
Revision 0
REPLACEMENT PARTS LIST
7.1.2.
Holder Unit
M530-534
M102
M103
M106
M101
W520
M104
10189-1
Figure 6.2: Holder Unit
Ref
GD30 / GD50r
GD70
GD90
Description
M101
1PA533A
1PA517A
1PA527A
CAR HOLDER MOULDING
M102
4HA530A
4HA520A
4HA525A
HOOK SPRING
M103
2RA518A
2RA540A
2RA518A
HOOK
M104
5U70049B
5U70049B
5U70049B
CUSHION FOR HOLDER G4 HANDSFREE
M106
4EA516A
4EA516A
4EA516A
G520 CABLE BRACKET
M107
6RA516A
6RA516A
6RA516A
CAP (GD70 CAR HOLDER)
M530
M531
M532
M533
M534
XTB2.6+6GFXK
“
“
“
“
XTB2.6+6GFXK
“
“
“
“
XTB2.6+6GFXK
“
“
“
“
W520
WC76017A
WC76017A
WC76017A
Issue 1
Revision 0
http://cxema.ru
Section 7
– 20 –
SCREW M2.6 x 6mm
RF CABLE
MCUK000201C8
Service Manual
MCUK000201C8
Service Manual
http://cxema.ru
7.2.
7.2.1.
7.2.3.
Handsfree Car Kits Complete
EB-HFD30Z (GD30 / GD50)
Model EB-HFD30Z
Name: GD30 / GD50 Handsfree Car Kit
Ref
Description
Part Number
Notes
EB-HFD90Z (GD90)
Model EB-HFD90Z
Name: GD90 Handsfree Car Kit
Ref
Part Number
Description
BRKT1
EB-N0002C
ADJUSTABLE ANGLE BRACKET 2
BRKT2
EB-N0002C
ADJUSTABLE ANGLE BRACKET 2
BRKT1
EB-N0002C
ADJUSTABLE ANGLE BRACKET 2
CABLE1
WC70187B
G600 BASIC HANDSFREE POWER SUP
BRKT2
EB-N0002C
ADJUSTABLE ANGLE BRACKET 2
CABLE2
WC76013A
G520 H/F POWER SUPPLY CABLE
CABLE1
WC70187B
G600 BASIC HANDSFREE POWER SUP
H/FUNIT
EB-HFD70
GD70 HANDSFREE UNIT
CABLE2
WC76013A
G520 H/F POWER SUPPLY CABLE
HOLDR
EB-KAD31
HOLDER WITH RF CABLE GD31
MIC
EB-M76600N
CAR MICROPHONE KIT GD70
OI001
7LA834D
GD30 / GD50 HANDSFREE OPERATING INSTR.
HOLDR
EB-KAD91
HOLDER WITH RF CABLE GD91
MIC
EB-M76600N
CAR MICROPHONE KIT GD70
7.3.
Section
– 21 –
7.2.2.
Notes
Microphone Kit
EB-HFD70Z (GD70)
Model EB-HFD70Z
Name: GD70 Handsfree Car Kit
Ref
Description
Part Number
BRKT1
EB-N0002C
ADJUSTABLE ANGLE BRACKET 2
BRKT2
EB-N0002C
ADJUSTABLE ANGLE BRACKET 2
CABLE1
WC70187B
G600 BASIC HANDSFREE POWER SUP
CABLE2
WC76013A
G520 H/F POWER SUPPLY CABLE
H/FUNIT
EB-HFD70
GD70 HANDSFREE UNIT
EB-KAD71
HOLDER WITH RF CABLE GD31
MIC
EB-M76600N
CAR MICROPHONE KIT GD70
OI001
7LA834B
GD70 HANDSFREE OPERATING INSTRUCTIONS
Name: Handsfree Unit
Ref
Part Number
Description
M0101
4G31674B
MICROPHONE HOLDER
M0102
4G32105
MICROPHONE HOLDER
M0103
4R13358
MICROPHONE CUSHION
M0107
XTB2510AFN
SCREW (XTB2.5+10AFN)
MK0101
HM76600N
MICROPHONE FOR CAR KIT C/W 1nF
Notes
Issue 1
Revision 0
REPLACEMENT PARTS LIST
HOLDR
Notes
Model EB-HFDxx
Handsfree PCB Assembly
Model: HFGD70AS02
Name: Handsfree PCB Assembly
Ref
Description
Part Number
Grid
Model: HFGD70AS02
Name: Handsfree PCB Assembly
Ref
Part Number
Description
Grid
C129
F1H1C104A043
CAP CER 100nF 10% 16V X5R SMD
F1
C130
F1H1H101A230
CAP CER 100pF 5% 50V NP0 SMD 1
F1
C131
F1H1H220A230
CAP CER 22pF 5% 50V NP0 SMD 16
F1
C100
F1H1C104A043
CAP CER 100nF 10% 16V X5R SMD
A4
C132
F1H1H101A230
CAP CER 100pF 5% 50V NP0 SMD 1
C4
C101
F1H1C104A043
CAP CER 100nF 10% 16V X5R SMD
F1
C133
F1H1H101A230
CAP CER 100pF 5% 50V NP0 SMD 1
C4
C102
F1H1C104A043
CAP CER 100nF 10% 16V X5R SMD
F1
C103
F1H1C104A043
CAP CER 100nF 10% 16V X5R SMD
F2
C134
F1H1H101A230
CAP CER 100pF 5% 50V NP0 SMD 1
F1
C104
F1H1C104A043
CAP CER 100nF 10% 16V X5R SMD
D1
C135
ECEV1EA221P
CAP ALUM 220uF 20% 25V SMD 10.
E4
C136
F1H1C104A043
CAP CER 100nF 10% 16V X5R SMD
E4
C105
F1H1H220A230
CAP CER 22pF 5% 50V NP0 SMD 16
A4
C137
ECEV1CA221P
CAP ALUM 220uF 20% 16V SMD 10.
D3
C106
F3G0J3360001
CAP TANT 33uF 20% 6.3V SMD CAS
A3
C138
F1H1H220A230
CAP CER 22pF 5% 50V NP0 SMD 16
B2
C107
F1H1H220A230
CAP CER 22pF 5% 50V NP0 SMD 16
F1
C108
F1H1H220A230
CAP CER 22pF 5% 50V NP0 SMD 16
F2
C139
F1H1H220A230
CAP CER 22pF 5% 50V NP0 SMD 16
B2
A4
C140
F1H1H101A230
CAP CER 100pF 5% 50V NP0 SMD 1
E1
C142
F1H1H101A230
CAP CER 100pF 5% 50V NP0 SMD 1
E4
A4
C143
ECJ1VB1H472K
CAP CER 4.7nF 10% 50V X7R SMD
C4
C144
F1H1H220A230
CAP CER 22pF 5% 50V NP0 SMD 16
E1
C109
C110
F0F1H2240001
F1H1H220A230
CAP FILM 220nF 20% 50V SMD 505
CAP CER 22pF 5% 50V NP0 SMD 16
Section
– 22 –
C111
F1H1C104A043
CAP CER 100nF 10% 16V X5R SMD
A4
C112
F1H1C104A043
CAP CER 100nF 10% 16V X5R SMD
A4
C113
F1H1H101A230
CAP CER 100pF 5% 50V NP0 SMD 1
A3
C145
F1J1H104A425
CAP CER 100nF -20+80% 50V Y5V
E4
F2
C146
ECEV0JS220WR
CAP ALUM 22uF 20% 6.3V SMD 5.4
E4
C147
F1H1H220A230
CAP CER 22pF 5% 50V NP0 SMD 16
C3
F1H1H103A219
CAP CER 10nF 10% 50V X7R SMD 1
E1
C114
F1H1H220A230
CAP CER 22pF 5% 50V NP0 SMD 16
C115
F1J1C474A045
CAP CER 470nF 10% 16V X7R SMD
F2
C148
C116
F1H1H220A230
CAP CER 22pF 5% 50V NP0 SMD 16
F2
C149
F1H1H220A230
CAP CER 22pF 5% 50V NP0 SMD 16
E1
C117
F1J1C474A045
CAP CER 470nF 10% 16V X7R SMD
E2
C118
F1H1H220A230
CAP CER 22pF 5% 50V NP0 SMD 16
C4
C150
F1H1C104A043
CAP CER 100nF 10% 16V X5R SMD
E1
F2
C151
F1H1H103A219
CAP CER 10nF 10% 50V X7R SMD 1
D1
C152
F1H1C104A043
CAP CER 100nF 10% 16V X5R SMD
C3
C153
F1H1H220A230
CAP CER 22pF 5% 50V NP0 SMD 16
D1
C154
F1H1H101A230
CAP CER 100pF 5% 50V NP0 SMD 1
C4
C119
F1H1H220A230
CAP CER 22pF 5% 50V NP0 SMD 16
MCUK000201C8
Service Manual
C120
F1H1H101A230
CAP CER 100pF 5% 50V NP0 SMD 1
C4
C121
F1H1H220A230
CAP CER 22pF 5% 50V NP0 SMD 16
F2
C122
F3G0J3360001
CAP TANT 33uF 20% 6.3V SMD CAS
A4
C123
F1H1H220A230
CAP CER 22pF 5% 50V NP0 SMD 16
F2
C155
F1H1H101A230
CAP CER 100pF 5% 50V NP0 SMD 1
C4
C124
F1H1H220A230
CAP CER 22pF 5% 50V NP0 SMD 16
F1
C156
F1H1C104A043
CAP CER 100nF 10% 16V X5R SMD
C3
C125
F3G0J3360001
CAP TANT 33uF 20% 6.3V SMD CAS
A3
C157
ECEV0JS220WR
CAP ALUM 22uF 20% 6.3V SMD 5.4
C3
C158
F1H1H220A230
CAP CER 22pF 5% 50V NP0 SMD 16
C3
C159
ECEV0JS220WR
CAP ALUM 22uF 20% 6.3V SMD 5.4
C3
C160
F1H1H220A230
CAP CER 22pF 5% 50V NP0 SMD 16
C3
C126
F1J1C474A045
CAP CER 470nF 10% 16V X7R SMD
F2
C127
F0F1H2240001
CAP FILM 220nF 20% 50V SMD 505
B3
C128
F1H1H220A230
CAP CER 22pF 5% 50V NP0 SMD 16
F1
REPLACEMENT PARTS LIST
Issue 1
Revision 0
http://cxema.ru
7.4.
MCUK000201C8
Service Manual
http://cxema.ru
Model: HFGD70AS02
Name: Handsfree PCB Assembly
Model: HFGD70AS02
Name: Handsfree PCB Assembly
Ref
Part Number
Description
Grid
Ref
Part Number
Description
Grid
C161
F1H1H220A230
CAP CER 22pF 5% 50V NP0 SMD 16
C4
C217
F1H1H101A230
CAP CER 100pF 5% 50V NP0 SMD 1
D3
C162
F1H1H220A230
CAP CER 22pF 5% 50V NP0 SMD 16
E1
C163
F1H1H220A230
CAP CER 22pF 5% 50V NP0 SMD 16
D3
C218
ECEV1EA221P
CAP ALUM 220uF 20% 25V SMD 10.
D4
C164
F1H1H220A230
CAP CER 22pF 5% 50V NP0 SMD 16
E4
C219
F1J1H104A425
CAP CER 100nF -20+80% 50V Y5V
C3
C165
F1H1H101A230
CAP CER 100pF 5% 50V NP0 SMD 1
E4
C220
F1H1C104A043
CAP CER 100nF 10% 16V X5R SMD
C3
C221
F1H1H101A230
CAP CER 100pF 5% 50V NP0 SMD 1
C4
C222
F1H1H101A230
CAP CER 100pF 5% 50V NP0 SMD 1
C4
C166
F1H1H220A230
CAP CER 22pF 5% 50V NP0 SMD 16
F2
C167
F1H1H101A230
CAP CER 100pF 5% 50V NP0 SMD 1
A4
C168
F1H1H101A230
CAP CER 100pF 5% 50V NP0 SMD 1
A3
C223
F1H1H103A219
CAP CER 10nF 10% 50V X7R SMD 1
F1
C169
F1H1H101A230
CAP CER 100pF 5% 50V NP0 SMD 1
A3
C224
F1J1H104A425
CAP CER 100nF -20+80% 50V Y5V
B1
C170
F1H1H101A230
CAP CER 100pF 5% 50V NP0 SMD 1
F1
C225
F1J1H104A425
CAP CER 100nF -20+80% 50V Y5V
D4
C226
F1H1H101A230
CAP CER 100pF 5% 50V NP0 SMD 1
E1
C227
F1H1H101A230
CAP CER 100pF 5% 50V NP0 SMD 1
D4
E1
Section
– 23 –
C171
F1H1H101A230
CAP CER 100pF 5% 50V NP0 SMD 1
E1
C172
F1H1H101A230
CAP CER 100pF 5% 50V NP0 SMD 1
F1
C173
F1J1H104A425
CAP CER 100nF -20+80% 50V Y5V
E4
C228
F1H1H220A230
CAP CER 22pF 5% 50V NP0 SMD 16
C174
F1H1H103A219
CAP CER 10nF 10% 50V X7R SMD 1
C4
C229
F1H1H220A230
CAP CER 22pF 5% 50V NP0 SMD 16
E1
C200
F1H1H103A219
CAP CER 10nF 10% 50V X7R SMD 1
A1
C230
F1H1H101A230
CAP CER 100pF 5% 50V NP0 SMD 1
E1
C231
F1H1H101A230
CAP CER 100pF 5% 50V NP0 SMD 1
E1
C201
F1H1C104A043
CAP CER 100nF 10% 16V X5R SMD
B1
C232
F1H1H102A219
CAP CER 1nF 10% 50V X7R SMD 16
C4
C202
ECEV0JS220WR
CAP ALUM 22uF 20% 6.3V SMD 5.4
E3
C203
F1H1H101A230
CAP CER 100pF 5% 50V NP0 SMD 1
C4
C233
F1H1H103A219
CAP CER 10nF 10% 50V X7R SMD 1
C4
C204
EEVFC1A151P
CAP ALUM 150uF 20% 10V SMD 6.2
E4
C205
F1H1C104A043
CAP CER 100nF 10% 16V X5R SMD
B1
D100
MAZ812000L
DIODE
E2
D101
MAZ812000L
DIODE
E2
F1H1C104A043
CAP CER 100nF 10% 16V X5R SMD
C4
D102
MAZ812000L
DIODE
E1
C207
EEVFC1A151P
CAP ALUM 150uF 20% 10V SMD 6.2
F4
D103
MAZ812000L
DIODE
E1
C208
F1H1H102A219
CAP CER 1nF 10% 50V X7R SMD 16
B1
D104
MAZ812000L
DIODE
E1
C209
F1H1H220A230
CAP CER 22pF 5% 50V NP0 SMD 16
B1
C210
F1H1H220A230
CAP CER 22pF 5% 50V NP0 SMD 16
C4
D105
MAZ812000L
DIODE
E1
D106
MAZ812000L
DIODE
D1
Issue 1
Revision 0
C211
F1H1H101A230
CAP CER 100pF 5% 50V NP0 SMD 1
C4
D200
B0JCMC000003
DIODE 40V 1.5A
E3
C212
F1H1H101A230
CAP CER 100pF 5% 50V NP0 SMD 1
C4
D202
B0JCMC000003
DIODE 40V 1.5A
F3
C213
EEVFC1H220P
CAP ALUM 22uF 20% 50V SMD 6.2x
E3
D203
B0ECMM000001
DIODE S3D 200V 3A SMD DO214AB
C4
C214
EEVFC1H470P
CAP ALUM 47uF 20% 50V SMD 10.2
E3
C215
EEVFC1H470P
CAP ALUM 47uF 20% 50V SMD 10.2
F3
C216
F1H1H101A230
CAP CER 100pF 5% 50V NP0 SMD 1
D4
D204
MAZ824000L
DIODE PLANAR S MINI MOLD 2 PIN
E2
D205
MA8160TX
DIODE 16V
E2
D206
MA3S132E0L
DIODE 100MA 80V
C4
REPLACEMENT PARTS LIST
C206
Name: Handsfree PCB Assembly
Model: HFGD70AS02
Name: Handsfree PCB Assembly
Ref
Part Number
Description
Grid
Ref
Part Number
Description
Grid
D207
MAZ80560LL
DIODE ZENER L RANK 5.3-5.58V S
C4
FL206
ACB1608M040T
FILTER
D2
D208
B3ABB0000049
DIODE LED GREEN 10-56mcd 20mA
C3
FL207
ACB1608M040T
FILTER
C4
D209
B3ABB0000049
DIODE LED GREEN 10-56mcd 20mA
C4
FL208
ACB1608M040T
FILTER
D3
FS201
K5D402AZ0001
FILTER 4 A
D4
PL002
K1KA02A00079
DF13C-2P-1.25V21 CONNECTOR
B4
A3
FL100
ACB1608M040T
FILTER
A3
FL101
ACB1608M040T
FILTER
D1
FL102
ACB1608M040T
FILTER
A4
FL103
ACB1608M040T
FILTER
E1
R100
ERJ3GEYJ392V
CHIP RESISTOR 3K9 OHM +/-5% 1/
FL104
ACB1608M040T
FILTER
E1
R101
ERJ3GEYJ104V
CHIP RESISTOR 100K OHM +/-5% 1
A4
R102
ERJ3GEYJ821V
CHIP RESISTOR 820 OHM +/-5% 1/
A3
FL105
ACB1608M040T
FILTER
D2
R103
ERJ3GEYJ224V
CHIP RESISTOR 220K OHM +/-5% 1
F1
FL106
ACB1608M040T
FILTER
D2
R104
ERJ3GEYJ472V
CHIP RESISTOR 4K7 OHM +/-5% 1/
A4
FL107
ACB1608M040T
FILTER
F1
FL108
ACB1608M040T
FILTER
E1
R105
ERA6YED104V
100k OHM 100mW RESISTOR
F2
FL109
ACB1608M040T
FILTER
E4
R106
ERJ3GEYJ223V
CHIP RESISTOR 22K OHM +/-5% 1/
F2
R107
ERA6YED473V
47k OHM 100mW RESISTOR
F2
Section
– 24 –
FL110
J0JGC0000007
SUPPRESSOR EMI FERRITE 10 OHM
E4
R108
ERJ3GEYJ471V
CHIP RESISTOR 470 OHM +/-5% 1/
E2
FL111
ACB1608M040T
FILTER
D2
R109
ERJ3GEYJ101V
CHIP RESISTOR 100 OHM +/-5% 1/
E2
FL112
ACB1608M040T
FILTER
D2
FL113
ACB1608M040T
FILTER
E4
R110
ERJ3GEYJ105V
CHIP RESISTOR 1M OHM +/-5% 1/1
F2
FL115
ACB1608M040T
FILTER
A3
R111
ERJ3GEYJ105V
CHIP RESISTOR 1M OHM +/-5% 1/1
A4
R112
ERJ3GEYJ103V
CHIP RESISTOR 10K OHM +/- 5% 1
F2
FL116
ACB1608M040T
FILTER
A4
R113
ERA6YED473V
47k OHM 100mW RESISTOR
F2
FL117
ACB1608M040T
FILTER
A4
R114
ERJ3GEYJ224V
CHIP RESISTOR 220K OHM +/-5% 1
F2
FL118
J0LB00000028
INDUCTOR FERRITE CHIP 1000OHM
A3
FL119
ACB1608M040T
FILTER
F1
R115
ERJ3GEYJ103V
CHIP RESISTOR 10K OHM +/- 5% 1
F2
FL120
ACB1608M040T
FILTER
F1
R116
ERJ3GEYJ392V
CHIP RESISTOR 3K9 OHM +/-5% 1/
F1
R117
ERA6YED104V
100k OHM 100mW RESISTOR
F2
FL121
ACB1608M040T
FILTER
F1
R118
ERJ3GEYJ104V
CHIP RESISTOR 100K OHM +/-5% 1
F1
FL122
J0LB00000028
INDUCTOR FERRITE CHIP 1000OHM
A3
R119
ERJ3GEYJ821V
CHIP RESISTOR 820 OHM +/-5% 1/
F1
MCUK000201C8
Service Manual
FL200
J0JGC0000007
SUPPRESSOR EMI FERRITE 10 OHM
D2
FL201
ACB1608M040T
FILTER
D2
R120
ERJ3GEYJ472V
CHIP RESISTOR 4K7 OHM +/-5% 1/
F1
FL202
ACB1608M040T
FILTER
D2
R121
ERJ3GEYJ105V
CHIP RESISTOR 1M OHM +/-5% 1/1
F1
R122
ERJ3GEYJ102V
CHIP RESISTOR 1K OHM +/-5% 1/1
E2
FL203
ACB1608M040T
FILTER
D2
R123
ERJ3GEYJ223V
CHIP RESISTOR 22K OHM +/-5% 1/
E2
FL204
ACB1608M040T
FILTER
D2
R124
ERJ3GEYJ221V
CHIP RESISTOR 220 OHM +/-5% 1/
E2
FL205
J0JHC0000003
SUPPRESSOR EMI FERRITE 150 OHM
D4
REPLACEMENT PARTS LIST
Issue 1
Revision 0
http://cxema.ru
Model: HFGD70AS02
MCUK000201C8
Service Manual
http://cxema.ru
Section
– 25 –
Model: HFGD70AS02
Name: Handsfree PCB Assembly
Model: HFGD70AS02
Name: Handsfree PCB Assembly
Ref
Part Number
Description
Grid
Ref
Part Number
Description
Grid
R125
ERJ3GEYJ223V
CHIP RESISTOR 22K OHM +/-5% 1/
E1
R203
ERA6YED473V
47k OHM 100mW RESISTOR
A1
R126
ERJ3GEYJ102V
CHIP RESISTOR 1K OHM +/-5% 1/1
E1
R204
ERA6YED133V
RESISTOR 13K 1/10W SM 2012
B1
R127
ERJ3GEYJ102V
CHIP RESISTOR 1K OHM +/-5% 1/1
E1
R205
ERA6YED103V
10k OHM 100mW RESISTOR
A2
R128
ERJ3GEYJ223V
CHIP RESISTOR 22K OHM +/-5% 1/
E1
R206
ERJ3GEYJ472V
CHIP RESISTOR 4K7 OHM +/-5% 1/
A2
R129
ERJ3GEYJ102V
CHIP RESISTOR 1K OHM +/-5% 1/1
E1
R207
ERJ3GEYJ101V
CHIP RESISTOR 100 OHM +/-5% 1/
A1
R130
ERJ3GEYJ102V
CHIP RESISTOR 1K OHM +/-5% 1/1
E1
R209
ERJ12NF1000U
RESISTOR 100 OHM 1% 1/2W SMD 4
A1
R131
ERJ3GEYJ104V
CHIP RESISTOR 100K OHM +/-5% 1
E4
R210
ERA6YED153V
15k OHM 100mW RESISTOR
B1
R132
ERJ3GEYJ223V
CHIP RESISTOR 22K OHM +/-5% 1/
E1
R211
ERA6YED103V
10k OHM 100mW RESISTOR
A1
R133
ERJ6GEYJ100V
CHIP RESISTOR 10 OHM +/-5% 1/1
E4
R212
ERA6YED183V
RESISTOR 18K 1/10W SM 2012
A1
R134
ERJ3GEYJ273V
CHIP RESISTOR 27K OHM +/-5% 1/
E4
R213
ERA6YED272V
2k7 OHM 100mW RESISTOR
A1
R135
ERA6YED104V
100k OHM 100mW RESISTOR
E1
R214
ERJ3GEYJ102V
CHIP RESISTOR 1K OHM +/-5% 1/1
B1
R137
ERJ6GEYJ471V
CHIP RESISTOR 470 OHM +/-5% 1/
E4
R215
ERJ3GEYJ153V
CHIP RESISTOR 15K OHM +/-5% 1/
B4
R138
ERJ3GEYJ101V
CHIP RESISTOR 100 OHM +/-5% 1/
E2
R216
ERJ3GEYJ221V
CHIP RESISTOR 220 OHM +/-5% 1/
A1
R139
ERA6YED104V
100k OHM 100mW RESISTOR
E1
R217
ERJ3GEYJ103V
CHIP RESISTOR 10K OHM +/- 5% 1
E2
R140
ERJ3GEYJ105V
CHIP RESISTOR 1M OHM +/-5% 1/1
C3
R218
ERJ3GEYJ221V
CHIP RESISTOR 220 OHM +/-5% 1/
D4
R141
ERJ6GEYJ100V
CHIP RESISTOR 10 OHM +/-5% 1/1
E4
R219
ERJ3GEYJ473V
CHIP RESISTOR 47K OHM +/-5% 1/
E2
R142
ERJ3GEYJ563V
CHIP RESISTOR 56K OHM +/-5% 1/
C3
R220
ERJ3GEYJ103V
CHIP RESISTOR 10K OHM +/- 5% 1
C4
R143
ERJ3GEYJ682V
CHIP RESISTOR 6K8 OHM +/-5% 1/
D3
R221
ERJ3GEYJ222V
CHIP RESISTOR 2K2 OHM +/-5% 1/
E2
R144
ERJ3GEYJ101V
CHIP RESISTOR 100 OHM +/-5% 1/
E2
R222
ERJ3GEYJ103V
CHIP RESISTOR 10K OHM +/- 5% 1
C4
R145
ERA6YED104V
100k OHM 100mW RESISTOR
D1
R223
ERJ3GEYJ104V
CHIP RESISTOR 100K OHM +/-5% 1
C4
ERJ3GEYJ473V
CHIP RESISTOR 47K OHM +/-5% 1/
C3
R224
ERJ6GEYJ332V
RESISTOR 3.3K OHM 5% 1/10W SMD
D2
R147
ERA6YED104V
100k OHM 100mW RESISTOR
D1
R225
ERJ3GEYJ103V
CHIP RESISTOR 10K OHM +/- 5% 1
B2
R148
ERJ3GEYJ105V
CHIP RESISTOR 1M OHM +/-5% 1/1
C3
R226
ERJ3GEYJ103V
CHIP RESISTOR 10K OHM +/- 5% 1
B2
R149
ERJ14NF27R0U
RESISTOR 27 OHM 1% 1/4W SMD 32
C3
R227
ERJ3GEYJ471V
CHIP RESISTOR 470 OHM +/-5% 1/
C4
R150
ERJ3GEYJ103V
CHIP RESISTOR 10K OHM +/- 5% 1
C3
R228
ERJ3GEYJ102V
CHIP RESISTOR 1K OHM +/-5% 1/1
E2
Issue 1
Revision 0
R151
ERJ3GEYJ273V
CHIP RESISTOR 27K OHM +/-5% 1/
C3
TR100
B1GDCFNN0007
TRANSISTOR DTA144EUA PNP WITH
E2
R152
ERJ3GEYJ103V
CHIP RESISTOR 10K OHM +/- 5% 1
C3
TR101
B1GBCFNN0009
TRANSISTOR DTC144EUA NPN WITH
E2
R153
ERJ3GEYJ105V
CHIP RESISTOR 1M OHM +/-5% 1/1
C3
TR102
B1GDCFNN0007
TRANSISTOR DTA144EUA PNP WITH
E2
R200
ERJ3GEYJ334V
CHIP RESISTOR 330K OHM +/-5% 1
A1
TR200
2SD601AQSTX
TRANSISTOR 150MHZ 25V 200MW
A1
R201
ERA6YED153V
15k OHM 100mW RESISTOR
B1
TR203
B1GDCFNN0007
TRANSISTOR DTA144EUA PNP WITH
E2
R202
ERJ3GEYJ473V
CHIP RESISTOR 47K OHM +/-5% 1/
B1
TR204
B1GDCFEM0002
TRANSISTOR DTA123JKA PNP WITH
E2
REPLACEMENT PARTS LIST
R146
Section
– 26 –
Name: Handsfree PCB Assembly
Ref
Part Number
Description
TR205
2SD17550PL
TRANSISTOR 50MHZ 60V
D3
TR206
B1GDCFEM0002
TRANSISTOR DTA123JKA PNP WITH
D2
TR207
DTC114EUAT06
TRANSISTOR DTC114EUA NPN WITH
D2
TR208
DTC114EUAT06
TRANSISTOR DTC114EUA NPN WITH
D2
U100
C0JBAS000061
IC C2MOS BILATERAL SWITCH 200m
A4
U101
C0ABAB000015
IC NJM2107F SINGLE OP AMP SMD
A4
U102
C0ABAB000015
IC NJM2107F SINGLE OP AMP SMD
F2
U103
C0ABAB000015
IC NJM2107F SINGLE OP AMP SMD
F1
U104
C0JBAS000061
IC C2MOS BILATERAL SWITCH 200m
E1
U105
C0ABAB000015
IC NJM2107F SINGLE OP AMP SMD
F1
U106
C0JBAD000091
IC TC74HC27AFN T 3I/P NOR GATE
E1
U107
C0JBAD000092
IC TC74HC02AFN Q 2I/P NOR GATE
E2
U114
C0JBAS000061
IC C2MOS BILATERAL SWITCH 200m
C3
U115
C0ABAB000015
IC NJM2107F SINGLE OP AMP SMD
D1
U116
C0JBAS000061
IC C2MOS BILATERAL SWITCH 200m
C3
U117
C0ABBA000054
IC NJM3414AM DUAL OP AMP SMD D
C3
U118
C0JBAC000109
IC TC7S00FU NAND GATE SMD SSOP
E1
U200
C0ABBA000027
INTEGRATED CIRCUIT DUAL CPE AM
B2
U201
C1CB00000531
5V 300KHz IC
A1
U202
C0CBADC00011
REGULATOR 3 TERMINAL TYPE
C3
Grid
REPLACEMENT PARTS LIST
Issue 1
Revision 0
http://cxema.ru
Model: HFGD70AS02
MCUK000201C8
Service Manual
http://cxema.ru
CIRCUIT DIAGRAMS
8
CIRCUIT DIAGRAMS
8.1 Audio Circuits
MCUK000201C8
Service Manual
Section 8
– 27 –
Issue 1
Revision 0
http://cxema.ru
CIRCUIT DIAGRAMS
8.2 Power Supply and Charging Circuits
Issue 1
Revision 0
Section 7
– 28 –
MCUK000201C8
Service Manual
http://cxema.ru
/$<287',$*5$06
/$<287',$*5$06
A
B
C
D
E
F
1
2
3
4
0&8.&
6HUYLFH0DQXDO
6HFWLRQ
±±
,VVXH
5HYLVLRQ