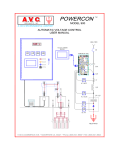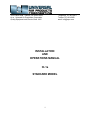
1
1135 Lance Road • Norfolk, VA 23502-2429
a.k.a. Universal Air Precipitator Corporation
Quality Equipment and Service Since 1962
Telephone: 757-461-0077
Telefax: 757-461-0808
email: [email protected]
INSTALLATION
AND
OPERATIONS MANUAL
CI-1a
STANDARD MODEL
1
1135 Lance Road • Norfolk, VA 23502-2429
a.k.a. Universal Air Precipitator Corporation
Quality Equipment and Service Since 1962
Telephone: 757-461-0077
Telefax: 757-461-0808
email: [email protected]
TABLE OF CONTENTS
SECTION I
Operating Principle
3
SECTION II
General Description
3
SECTION III
Steps for Installation
3
A.
B.
C.
D.
E.
F.
G.
Unpack
Remove Power Pack
Remove Cabinet Access Panel
Remove Ionizing - Collecting Cell(s)
Determine Location of Precipitator
Connect Duct Work
Connect Drain
SECTION IV
A.
B.
C.
D.
E.
Reassemble Unit
4
Install After-Filters
Install Ionizing - Collecting Cell(s)
Install Access Panel
Install Power Pack
Connect Electricity
SECTION V
3
3
3
3
3
4
4
Final Check
4
4
4
4
4
4
A. Electrical
4
SECTION VI
Instructing the Owner
5
SECTION VII
Power Pack Wiring Diagram
6
2
1135 Lance Road • Norfolk, VA 23502-2429
a.k.a. Universal Air Precipitator Corporation
Quality Equipment and Service Since 1962
Telephone: 757-461-0077
Telefax: 757-461-0808
email: [email protected]
3
CI-1 Standard model I & O
I.
OPERATING PRINCIPLE
The Universal Air precipitator is installed in the return air duct of a heating and/or air-conditioning
system. It is positioned in the main return air trunk so that all return air passes through it. The
airborne particles (as small as 1 / 2,500,000 of an inch) that enter the precipitator acquire a
positive electrical charge. The charged particles continue into the collecting plates section, where
they are repelled by another electrical field onto the collector plates. Periodically, an integral
washing system flushes the collected dirt to an approved sewer system (optional).
A power pack converts 115 volts alternating current to 7,500 volts direct current to supply the
necessary voltage for the ionizing-collecting cell(s).
II.
GENERAL DESCRIPTION
The Universal Air precipitator Standard Model is designed for horizontal airflow from left to right
or right to left. It is comprised of three distinct functional components, as follows:
1. Power pack with access cover and safety switch for supplying high voltage direct current
to the ionizing-collecting cell(s).
2. Ionizing-collecting cell(s) consisting of fine tungsten wires suspended between flat
electrodes, which are mounted in the air entering side of a series of parallel aluminum
plates.
3. An after-filter to provide backpressure to assure uniform air distribution through the
ionizing-collecting cell(s)
III.
STEPS FOR INSTALLATION
A. Unpack
1. Carefully remove precipitator from carton.
2. Remove all shipping retainers.
B. Remove Power Pack
1. Remove access cover. It is retained with the long safety screw located at the top
front center.
2. Detach high voltage lead from through-panel insulator.
3. Lift power pack up and out.
4. Set aside power pack and cover until installation of cabinet is complete.
C. Remove Cabinet Access Panel
1. Turn latch and pull.
D. Remove Ionizing-Collecting Cell(s)
1. Remove all temporary shipping retainers.
2. Pull cell(s) from cabinet. Care must be taken not to injure the collector plates.
3. Remove after-filters.
E. Determine Location of Precipitator
1. The precipitator must be positioned in the main return air trunk so that all return air
passes through it.
2. Provide sufficient space (at least 36 inches) in front of access panel for cell removal
and service.
3. Avoid sharp turns or narrow transitions in the air entering or leaving side of the
precipitator to assure uniform distribution of air over the face of the ionizing-collecting
cell(s).
4. When the precipitator is used for a commercial or industrial application and is to be
installed near a fresh-air intake, it is advisable to precede it with preheat coils to
minimize condensation forming on the ionizing-collecting cell(s). In addition, rain
louvers should be installed ahead of the intake area to reduce the entry of rain or
snow into the plenum chamber.
4
CI-1 Standard model I & O
5. It is good practice to install a 10 or 12-mesh insect screen over the intake area to
prevent large foreign particles or insects from reaching and shorting out the ionizingcollecting cell(s).
F. Connect Duct Work
The ductwork necessary to install a precipitator will vary with each installation.
1. Install all ducts inside the precipitator collars.
2. For horizontal flow units, the duct runs on both the air entering and leaving sides
should be sloped toward the cabinet and sealed so that any wash water splash will run
into the drain pan.
3. The duct in the air leaving side should be attached inside far enough to cover the
unused manifold holes (optional). The area around the manifold should also be
sealed.
4. The ductwork should be air tight between the precipitator and system blower to
prevent drawing dirt-laden air in with the air already cleaned.
G. Connect Drain
1. The pipe size should not be reduced from the precipitator drain. A trap must be
provided in the solid drain to prevent sewer gases and odors from being drawn into
the system. The trap must be lower than the drain pan.
IV.
REASSEMBLE UNIT
A. Install After-Filters
1. Place after-filter(s) in the air leaving collar of the precipitator cabinet.
B. Install Ionizing-Collecting Cell(s)
1. Install the ionizing-collecting cell(s) with the airflow arrow pointing in the same
direction as the air flows through the unit. On double-cell units, the spring connector
must be in the center of both cells.
2. Push ionizing-collecting cell(s) all the way back until it stops. When properly installed,
the ionizing wires (fine wires) will be on the side of the cabinet through which the air
enters.
C. Install Access Panel
D. Install Power Pack
1. Place power pack on cabinet brackets.
2. Attach high voltage lead to panel through-insulator.
3. Install power pack access cover and secure safety screw to activate the safety switch.
This will be indicated by a clicking sound.
E. Connect Electricity
1. Install a 115-volt, 60 cycles, AC receptacle within reach of the precipitator power pack
primary electrical cord set.
2. Wire receptacle to furnace or air-conditioning fan motor so that the precipitator
operates only when the system fan is “on”.
3. Plug the power pack electrical cord set into the receptacle.
The precipitator is dependent upon the action of the system fan to deliver the dirt-laden
air to it for removal. Therefore, the best results are achieved by maintaining continuous
fan action.
5
1135 Lance Road • Norfolk, VA 23502-2429
a.k.a. Universal Air Precipitator Corporation
Quality Equipment and Service Since 1962
Telephone: 757-461-0077
Telefax: 757-461-0808
email: [email protected]
6
CI-1 Standard model I & O
V.
FINAL CHECK
A. Electrical
1. Turn the system fan “on”.
2. Turn the power switch “on”. If a malfunction prevails, it will be indicated by the red
light not operating, green light not operating or the green light flashing.
(1) Red Light Not Operating
(a) Primary power is not being supplied to the power pack.
(2) Green Light Not Operating
(a) Safety switch is not depressed.
(3) Green Light Flashing
(a) Bent or warped collector plate
(b) Foreign metallic object between collector plates, such as a pan nail or
metal sliver.
(c) On multi-cell units, the inter-spring contact is against the unit housing,
rather than in between the cells.
(d) High voltage lead is not attached to the panel through insulator.
VI.
INSTRUCTING THE OWNER
Suggested points to cover are as follows;
1. Operating principle.
2. Keep air return grills open.
3. Recommend the use of continuous fan action. The precipitator can only remove the dirt
that is delivered to it.
4. An occasional crackling noise will be heard whenever unusually large particles enter the
collecting cell, or if the circuit breaker switch is turned on before the cell is thoroughly dry
after washing.
5. Quarterly inspection of the ionizing-collecting cell(s) is recommended to be sure there is
no accumulated dirt that has not been washed off; also, to examine the after-filter.
6. This equipment should be inspected frequently and collected dirt washed off regularly. A
cleaning schedule of at least once every week should be established and maintained.
Failure to do so may result in a fire hazard.
7
1135 Lance Road • Norfolk, VA 23502-2429
a.k.a. Universal Air Precipitator Corporation
Quality Equipment and Service Since 1962
Telephone: 757-461-0077
Telefax: 757-461-0808
email: [email protected]
INSTALLATION
AND
OPERATIONS MANUAL
CI-1a
DELUXE MODEL
(with optional wash system)
1
CI-1 Deluxe model I & O
TABLE OF CONTENTS
SECTION I
Operating Principle
3
SECTION II
General Description
3
SECTION III
Steps for Installation
3
A.
B.
C.
D.
E.
F.
G.
H.
I.
Unpack
Remove Power Pack
Remove Cabinet Access Panel
Remove Ionizing - Collecting Cell(s)
Determine Location of Precipitator
Position Water Wash Manifold
Connect Duct Work
Connect Water Wash
Connect Drain
SECTION IV
A.
B.
C.
D.
E.
Reassemble Unit
4
Install After-Filters
Install Ionizing - Collecting Cell(s)
Install Access Panel
Install Power Pack
Connect Electricity
SECTION V
3
3
3
3
3
4
4
4
4
Final Check
4
4
4
4
4
5
A. Electrical
B. Water Wash Systems
5
5
SECTION VI
Instructing the Owner
5
SECTION VII
Power Pack Wiring Diagram
6
2
CI-1 Deluxe model I & O
I.
OPERATING PRINCIPLE
The Universal Air precipitator is installed in the return air duct of a heating and/or air-conditioning
system or the air stream duct. It is positioned in the main return air trunk so that all return air
passes through it.
The airborne particles (as small as 1 / 2,500,000 of an inch) that enter the precipitator acquire a
positive electrical charge. The charged particles continue into the collecting plates section, where
they are repelled by another electrical field onto the collector plates. Periodically, an integral
washing system flushes the collected dirt to a sewer.
A power pack converts 230/115 volts alternating current to 7,500 volts direct current to supply the
necessary voltage for the ionizing-collecting cell(s).
II.
GENERAL DESCRIPTION1
The Universal Air precipitator Deluxe Model is designed for horizontal airflow from left to right or
right to left. It is comprised of five distinct functional components, as follows:
1. Power pack with access cover and safety screw for supplying high voltage direct current
to the ionizing-collecting cell(s).
2. Ionizing-collecting cell(s) consisting of fine tungsten wires suspended between flat
electrodes, which are mounted in the air entering side of a series of parallel aluminum
plates.
3. Water-spray system to wash away the collected dirt from the ionizing-collecting cell(s).
4. An after-filter to provide backpressure to assure uniform air distribution through the
Ionizing-collecting cell(s) and to prevent wash water from splashing into the downstream
duct.
5. A drain to carry the contaminated wash water to a sewer.
III.
STEPS FOR INSTALLATION
A. Unpack
1. Carefully remove precipitator from carton.
2. Remove all shipping retainers.
B. Remove Power Pack
1. Remove access cover. It is retained with the long safety screw located at the top
front center.
2. Detach high voltage lead from through-panel insulator.
3. Lift power pack up and out.
4. Set aside power pack and cover until installation of cabinet is complete.
C. Remove Cabinet Access Panel
1. Turn latch and pull.
D. Remove Ionizing-Collecting Cell(s)
1. Remove all temporary shipping retainers.
2. Pull cell(s) from cabinet. Care must be taken not to injure the collector plates.
3. Remove after-filters.
E. Determine Location of Precipitator
1. The precipitator must be positioned in the main return air trunk so that all return air
passes through it.
2. Provide sufficient space in front of access panel for cell removal and service.
3. Avoid sharp turns or narrow transitions in the air entering or leaving side of the
precipitator to assure uniform distribution of air over the face of the ionizing-collecting
cell(s).
3
4. When the precipitator is used for a commercial or industrial application and is to be
installed near a fresh-air intake, it is advisable to precede it with preheat coils to
minimize condensation forming on the ionizing-collecting cell(s). In addition, rain
louvers should be installed ahead of the intake area to reduce the entry of rain or
snow into the plenum chamber.
5. It is good practice to install a 10 or 12-mesh insect screen over the intake area to
prevent large foreign particles or insects from reaching and shorting out the ionizingcollecting cell(s).
F. Position Water Wash Manifold
Assemble water wash manifold in the up-stream side of the precipitator, with the spray
nozzles pointing toward the inside of the unit cabinet.
G. Connect Duct Work
The ductwork necessary to install a precipitator will vary with each installation.
1. Remove water manifold from precipitator.
2. Install all ducts inside the precipitator collars.
3. For horizontal flow units, the duct runs on both the air entering and leaving sides
should be sloped toward the cabinet drain and caulked so that any wash water
splash will run into the drain pan.
4. The duct in the air leaving side should be attached inside far enough to cover the
unused manifold holes. The area around the manifold should also be caulked.
5. The ductwork should be air tight between the precipitator and system blower to
prevent drawing dirt-laden air in with the air already cleaned.
H. Connect Water Wash
1. Run a hot water line, equipped with readily accessible hand service valve, to the
o
precipitator water wash manifold. The wash water should be approximately 125 to
o
140 F. If the water is too hot at the source, it may be necessary to include a mixing
valve to reduce the water temperature. Extremely hot water will increase the humidity
in the occupied area and may cause condensation.
I. Connect Drain
1. The pipe size should not be reduced from the precipitator drain. A trap must be
provided in the solid drain to prevent sewer gases and odors from being drawn into
the system. The trap must be lower than the drain pan.
IV.
REASSEMBLE UNIT
A. Install After-Filters
1. Place after-filter(s) in the air leaving collar of the precipitator cabinet.
B. Install Ionizing-Collecting Cell(s)
1. Install the ionizing-collecting cell(s) with the airflow arrow pointing in the same
direction as the air flows through the unit. On double-cell units, the spring connector
must be in the center of both cells.
2. Push ionizing-collecting cell(s) all the way back until it stops. When properly installed,
the ionizing wires (fine wires) will be on the side of the cabinet through which the air
enters.
C. Install Access Panel
D. Install Power Pack
1. Place power pack on cabinet brackets.
2. Attach high voltage lead to panel through-insulator.
3. Install power pack access cover and secure safety screw to activate the safety switch.
This will be indicated by a clicking sound.
E. Connect Electricity
1. Install a 115-volt or 220-volt, 50/60 cycles (check power supply voltage prior to
installation), AC receptacle within reach of the precipitator power pack primary
electrical cord set.
4
2. Wire receptacle to furnace or air-conditioning fan motor so that the precipitator
operates only when the system fan is “on”.
3. Plug the power pack electrical cord set into the receptacle. The precipitator is
dependent upon the action of the system fan to deliver the dirt-laden air to it for
removal. Therefore, the best results are achieved by maintaining continuous fan
action.
V.
FINAL CHECK
A. Electrical
1. Turn the system fan “on”.
2. Turn the power switch “on”. If a malfunction prevails, it will be indicated by the red
light not operating, green light not operating or the green light flashing.
(1) Red Light Not Operating
(a) Primary power is not being supplied to the power pack.
(2) Green Light Not Operating
(a) Safety switch is not depressed.
(3) Green Light Flashing
(a) Water valve leaking causing water to flow into the manifold and on to
the ionizing-collecting cell(s).
(b) Bent or warped collector plate
(c) Foreign metallic object between collector plates, such as a pan nail or
metal sliver.
(d) On multi-cell units, the inter-spring contact is against the unit housing,
rather than in between the cells.
(e) High voltage lead is not attached to the panel through insulator.
B. Water Wash System
Final inspection of the Universal Air precipitator should include the washing of the unit
to check the duct-to-collar connections.
VI.
INSTRUCTING THE OWNER
Suggested points to cover are as follows;
1.
2.
3.
4.
Operating principle.
How and when to operate water wash system.
Keep air return grills open.
Recommend the use of continuous fan action. The precipitator can only remove the dirt
that is delivered to it.
5. An occasional crackling noise will be heard whenever unusually large particles enter the
collecting cell, or if the circuit breaker switch is turned on before the cell is thoroughly dry
after washing.
6. Annual inspection of the ionizing-collecting cell(s) is recommended to be sure there is no
accumulated dirt that has not been washed off; also, to examine the after-filter and water
wash spray nozzles.
7. This equipment should be inspected frequently and collected dirt washed off regularly. A
cleaning schedule of at least once every week should be established and maintained.
Failure to do so may result in a fire hazard.
5
1135 Lance Road • Norfolk, VA 23502-2429
a.k.a. Universal Air Precipitator Corporation
ity Equipment and Service Since 1962
Telephone: 757-461-0077
Telefax: 757-461-0808 Qualemail: [email protected]
SM-C-Ia
SERVICE MANUAL
COMMERCIAL AND
INDUSTRIAL MODELS
TABLE OF CONTENTS
Page
1.
OPERATING PRINCIPLE
3
2.
ELECTRICAL CIRCUIT
3
3.
TROUBLE SHOOTING
4
A. Power Pack Difficulty
4
B. Collecting Cell Difficulty
4
C. Insulator Difficulty
4
4.
AIR NOT BEING CLEANED
5
5.
CONSTANT OR INTERMITTENT ARCING
5
6.
WIRING DIAGRAM
6
2
1. OPERATING PRINCIPLE
The Universal Air precipitator is composed of three basic components: the ionizing section, the collecting section, and the power pack. The first two of these combine to form
the collecting cell.
The collecting cell, within the air cleaner housing, is located in the return air duct ahead
of the air moving unit in the heating or cooling system. The dirt particles, carried by the
air, pass first through the ionizing section where a high-voltage direct current charge is
applied. All dirt particles, as they pass through the ion field, acquire a positive charge.
These positively charged particles then pass into the collecting plate section where an
additional electrical field then repels the charged particles to alternately spaced ground
collector plates.
Periodically, an integral washing system flushes the collected dirt to a sewer.
The power pack converts 115/230 volts AC to direct current.
2.
ELECTRICAL CIRCUIT
In the primary circuit, 115/230-V, 50/60-cycle, single phase, AC enters the power pack
through a safety switch that is mechanically operated by the screw retaining the power
pack cover, then through a toggle switch which is used as an “on” and “off” switch.
When the power pack cover is removed, it opens the safety switch to prevent shock
from contact with the circuit.
The primary power enters a power supply, which produces the necessary voltage for the
operation of the precipitator.
!! CAUTION !!
(i) The power pack must be grounded when being bench tested.
(ii) Discharge the secondary circuit with an insulated handle screwdriver before
touching any of the components.
3
3.
TROUBLE SHOOTING
A malfunction is indicated by the green light flashing. The difficulty can be isolated to
either the power pack or the collecting cell, as follows:
(i)
Remove power pack cover.
(ii)
Disconnect the high-voltage lead by removing the nut at the thru-panel
insulator.
(iii)
Pull the high-voltage lead away from any point of contact.
(iv)
Turn “on” switch.
(v)
Depress the safety switch button and hold for a couple of minutes.
If the green light is flashing or is off, the difficulty is in the power pack. If it stays lit, the
difficulty is in the collecting cells or the access panel insulator.
A.
Power Pack Difficulty - To check this possibility see above malfunction
and if the problem is in the power pack the problem lies with the power
supply. Consult factory for new power supply.
B.
Collecting Cell Difficulty -- Trouble in the collecting cell may be the result
of one or more of the following:
(1) Collecting cell still wet after washing.
(2) Water wash system leaking.
(3) Broken or loose ionizing wire(s).
(4) Foreign objects between collector plates.
(5) Extremely dirty collecting cell.
(6) Bent or warped collector or end plates.
(7) Cracked or porous insulators in either the ionizing or collecting plate
section. This condition would develop after washing and probably in
the collecting plate section. An OHM meter in some instances may
provide a reading.
(8) On multi-cell units, the jumper must be between the cells.
(9) When handling the collecting cell, it is possible for the high-voltage
plate supports (stamped with airflow directional arrow) to drop out of
their recess. A slight shift in either direction will put them in place.
Proper positioning can be determined by observing the centering of
the four (4) tie rods of the high -voltage plate support in the holes of
the larger end plates.
C.
Insulator Difficulty -- A cracked or porous insulator may cause a ticking
sound, cause the meter needle to flick or to read high. The defective insulator can be isolated by energizing the unit for several minutes and
then touching the insulators. The defective insulator will become warm.
4
(1) A defective stand-off insulator in the power pack or ionizing section of
the collecting cell can be determined by removing the screw from the
ground side. The screw will be corroded.
(2) A defective collecting cell plate support insulator will cause rust to
form around the hole in the plate support.
(3) A defective thru-panel bushing (two-piece) will become corroded inside.
4.
AIR NOT BEING CLEANED
(1) Leaks in blower box or ductwork downstream from the precipitator.
(2) Return air grills blocked with draperies or furniture, preventing infiltrated dirty
air from reaching the nearest returns.
(3) Unit is not operating properly
5.
CONSTANT OR INTERMITTENT ARCING
(1)
(2)
(3)
(4)
(5)
(6)
(7)
Water wash valve leaking
Loose or defective ionizing wire
Excessively dirty collecting cells
Bent or warped collecting plate
Cracked or porous insulator
Coated ionizing wires
On multi-cell units the jumper is not making firm contact
5