1
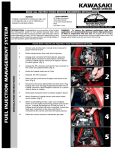
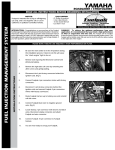
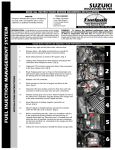
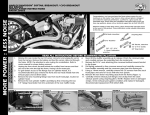
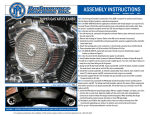
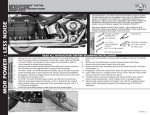
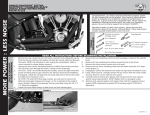
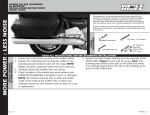
YAMAHA
ROAD STAR WARRIOR
READ ALL INSTRUCTIONS BEFORE BEGINNING INSTALLATION
TOOLS NEEDED
- #2 Phillips Screwdriver
- 2mm Allen Wrench
- 10 & 12mm Socket Wrench
- Pliers
- Less than 1 hour
INTRODUCTION: Congratulations on your purchase of the Fuelpak
Fuel Management System for fuel injected Yamaha Road Star Warrior
motorcycle. Please take the time to read the entire instruction manual
before attempting to install. DO NOT adjust the Fuelpak until you have
thoroughly read the instruction manual and the unit is fully installed. If
you have questions, please call (562) 921-0071.
Yamaha Road Star Warrior
Fuel Injected Models
INSTALLATION INSTRUCTIONS FOR P/N 65005
SUMMARY: To achieve the optimum performance from your
application, it is recommended that you install a high performance
air filter in conjunction with this unit. The Fuelpak will be installed
in-line the factory injector wiring harness and the throttle position sensor. The
Fuelpak will be tucked under the seat next to the tool tray.
PLEASE NOTE: FUELPAK USE REQUIRES A HIGH PERFORMANCE AIR FILTER.
INSTALLATION INSTRUCTIONS
FUEL INJECTION MANAGEMENT SYSTEM
NOTICE:
Fuelpak is intended for racing or off-highway
use only, and is not legal for sale or use in
California on pollution-controlled vehicles.
1.
Remove seat and fuel tank.
2.
Remove airbox and left airbox cover. We highly
recommend you consult the factory service manual for
proper removal of airbox.
3.
Route wiring harness under frame bracket towards
airbox. (Fig 1)
4.
Unplug stock black connector for fuel injectors. (Fig 2)
5.
Plug Fuelpak 4-pin connectors in-line with the
connectors from step 4.
6.
Unplug the TPS connector and attach T-tap connector to
the center wire (yellow). (Fig 3)
7.
Route the Fuelpak violet wire to T-tap. (Fig 4)
8.
Reattach the TPS connector.
9.
Route black wire to the front of engine and down to the
horn. (Fig 5)
10.
Disconnect the factory black/white wire from horn. Plug
Fuelpak into horn and plug Fuelpak black/white wire to
Fuelpak connector.
11.
Route black and green wires to battery negative.
12.
Attach Fuelpak to Fuelpak harness and mount under
seat as shown. (Fig 6)
13.
Before reassembling the bike, make sure handlebar
switch is in the engine-not-running position and turn the
key on. Fuelpak should light up. Sound the horn. If
Fuelpak turns off when the horn is sounded, recheck the
black wire connection on the horn and that it is
connected to the correct wire from the factory harness.
14.
Follow the service manual to reinstall the airbox and gas
tank.
6
3
4
5
HOW IT WORKS
ENTERING VALUES
Remove Fuelpak clear case cover by removing all four screws, save hardware.
2. Turn on main power with key, but do not start engine. Fuelpak display should light up, if not, turn power
off and verify the connectors are fully seated.
3. Refer to Fuelpak Setting Reference to locate the Setting Values specific to your bike and exhaust system. If
you do not find your setting, visit fuelpakfi.com or call tech support at (562) 921-0071.
4. Starting with mode 1 selected, press the value (+) or the value (-) buttons to input the correct value as
indicated in your Setting Value. After entering your first value, press the mode select button to move to mode
2 and enter the value. Continue until you have entered the value for each of the first 18 mode positions.
Each time the value (+) is pressed, the value increases by one number. Each time the value (-) is pressed, the
value decreases by one number. (Please refer to the “How It Works” section directly above if you have
questions about this step.
5. 6. As the next procedure, after you have entered in your values for the first 18 modes, press the
mode select button to move to mode 19. Fully twist open the throttle and return to idle
position to calibrate the Fuelpak to your bike.
7. Enter any other mode values as required for your application.
8. Turn off power.
9. Reinstall clear cover, tuck Fuelpak under seat area and reinstall seat.
10. You are now ready to ride.
By pressing the mode select button twice, move to mode 21 and verify that it reads “0” with the throttle
closed, “50” at approximately half-throttle and “99” when fully opened; if not, repeat step 5. Do not proceed
to step 7 until mode 21 is verified.
IN THE EVENT OF A MALFUNCTION, PLEASE CHECK THE FOLLOWING
TECH
SUPPORT
FUEL INJECTION MANAGEMENT SYSTEM
1. 1. 2. 3. Turn off main switch then verify all connectors are
fully seated.
Be sure setting values are correct for your application.
Verify throttle calibration, step 5 in Entering Values.
4. 5. 6. Check harness for cuts, scrapes or abrasions.
Make sure the battery is fully charged and the
charging system is operating correctly.
Calltechnical support at (562) 921-0071
WARRANTY INFORMATION
WARRANTY: Your Fuelpak unit is warranted against defects
in materials and workmanship for the period of 90 days from
the original retail purchase. In the event of an alleged defect
in material or workmanship, Fuelpak’s responsibility is strictly
limited to repair or replace the defective product. Fuelpak
shall not be responsible for (a) labor, transportation, or other
incidental charges; (b) consequential or other damages
incurred by use of any product. Fuelpak offers no other
warranty beyond this limited warranty. This limited warranty
does not apply to products which have been (a) modified
or altered in any way; (b) subjected to adverse conditions,
such as misuse, neglect, accident, improper installation
or adjustment, contaminants, corrosion, or faulty repair;
or (c) used in applications other than those recommended by
Fuelpak. To initiate a warranty process, the consumer must first
call technical support to receive a return authorization number.
The product must be returned to Fuelpak complete with a dated
receipt and a return authorization number.
Fuelpak
Attn: Warranty Claims
13861 Rosecrans Avenue
Santa Fe Springs, CA 90670
(562) 921-0071
P/N 51759 021408