1
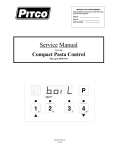
•
IMPORTANT FOR FUTURE REFERENCE
Please complete this information and retain this manual
for the life of the equipment:
Model #: __________________________
Serial #: __________________________
Date Purchased: ___________________
Service Manual
Covering
Pitco Compact Controller
Pitco p/n 60143801, 02, and 03
L20-268 Rev 0 (5/04)
Table on Contents
1. Keypad and DisplayFunctions: ................................................................................. 3
2. Normal Operations: (for the operator) ...................................................................... 3
2.1
To turn control ON: ...................................................................................................... 3
2.2.
To turn control OFF: .................................................................................................... 3
2.3.
To Start a Cook Timer:................................................................................................. 3
2.4.
To select T5-T8 Cook Timers:...................................................................................... 3
2.5.
To Cancel a Cook Timer: ............................................................................................. 3
2.6.
To Perform a Boil Out:................................................................................................. 3
2.7.
To Display Vat Temperature and Set Temperature: ................................................. 3
3. To Enter Programming: (for the store manager)..................................................... 4
3.1
To set timers T1-T8:...................................................................................................... 4
3.2.
To Change Cook Temperature: ................................................................................... 4
3.3.
To Change Melt Cycle type: ......................................................................................... 4
3.4.
To Change Pass Word Requirement:.......................................................................... 4
3.5.
To Change °F or °C Display:........................................................................................ 4
3.6.
To exit Level 1 Programming: ..................................................................................... 5
4. To Enter Level 2 programming from “TECH” Display: (for technicians and
factory use)........................................................................................................................ 5
4.1.
Standing Pilot: ............................................................................................................... 5
4.2.
Number of Basket Lifts:................................................................................................ 5
4.3
Vat Temperature Display:............................................................................................ 5
4.4.
Appliance Type:............................................................................................................. 6
4.5.
Control Point Offset:..................................................................................................... 6
4.6.
Display Value Offset: .................................................................................................... 6
4.7.
Exit Programming:........................................................................................................ 6
5. Other Displays:- ......................................................................................................... 7
5.1.
Low Vat Temperature: ................................................................................................. 7
5.2.
Drain Valve Open:......................................................................................................... 7
5.3.
Equipment Fault Displays ............................................................................................ 7
5.4.
To Change Port Address............................................................................................... 7
5.5.
To View Software Revision........................................................................................... 7
L20-268 Rev 0 (5/04)
Page 2 of 7
Programming Pitco p/n 60143801, 60143802 and 60143803
Compact Digital Controller
1.
Keypad and Display Functions:
Used for selection
of timer T5-T8,
and programming
changes.
2.
Normal Operations: (for the operator)
2.1. To turn control ON:
Press the [I/O] key. Display will momentarily show the current Appliance Type “APLx” for 2 seconds
and then to one of the normal displays shown here.
2.2. To turn control OFF:
Press and hold the [I/O]key for 3 seconds. Display will show [oFF].
2.3. To Start a Cook Timer:
Press a Basket Key T1-T4 to start a cook timer in this group.
2.4. To select T5-T8 Cook Timers:
Press the Shift key. The T5/T8 indicator
illuminates when timers in this group may be
selected. Press desired basket key.
2.5. To Cancel a Cook Timer:
Press the Basket key until light above the key is off.
2.6. To Perform a Boil Out:
Press the [P] key and the Down arrow key simultaneously. To exit
boil mode, turn controller off.
2.7. To Display Vat Temperature and Set Temperature:
Press the [I/O] key and Program [P] key simultaneously. Display will show
actual VAT temperature (348°F/176°C in this example).
Press the
key. Display now shows the SET temperature.
Press the
key. Display again displays actual vat temperature. To
exit, make no key presses for 3
seconds and display will return
to normal display.
Page 3 of 7
L20-268
Rev 0 (5/04)
Programming Pitco p/n 60143801, 60143802 and 60143803
Compact Digital Controller
3.
To Enter Programming: (for the store manager)
Press the [I/O] key and Program [P] key simultaneously for 2 seconds. Vat temperature will display
momentarily, then display will show one of two possible displays; [butt] for button or [Loc] for
Locked.
If locked, press the UP arrow TWO times, then the
down arrow TWO times to
unlock. Display shows:
3.1. To set timers T1-T8:
Select a timer key to change. The light above key illuminates (T1 in this
example). Display will show current timer setting in MM:SS format.
Press the UP arrow key or DOWN arrow key to adjust timer value. The value will
change in steps of 5second each.
When set, press the [P] key to save setting and continue.
Note that the T5-T8 indicator is now illuminated.
Changes to upper timer may now be made (T5 in this example).
Press the UP arrow key or DOWN arrow key to adjust timer value.
When set, press the [P] key to save time value.
Display returns to [butt] and the T5-T8 indicator is off.
Repeat section 3.1 for other timer keys.
3.2. To Change Cook Temperature:
While display is showing [butt], momentarily press the [P] key.
Display will show xxx°F or xxx°C, the current temperature setting.
The default setting is 350°F (177°C)
Press and hold the UP arrow key or DOWN arrow key to scroll temperature setting.
A single key press will increment or decrement the setting by one degree.
When set, press the key to save setting and continue.
3.3. To Change Melt Cycle type:
Display will show the current melt cycle setting.
Press the UP arrow key or DOWN arrow key to adjust melt cycle type.
When set, press the
key to save setting and continue.
3.4. To Change Pass Word Requirement:
Display will show the current lock status.
Press the UP arrow key or DOWN arrow key to change lock setting for future entry into
programming menus.
When set, press the
key to save setting and continue.
3.5. To Change °F or °C Display:
L20-268
Rev 0 (5/04)
Page 4 of 7
Programming Pitco p/n 60143801, 60143802 and 60143803
Compact Digital Controller
Display will show the current temperature scale setting.
Press the UP arrow key or DOWN arrow key to change scale setting.
When set, press the
key to save setting and continue.
3.6. To exit Level 1 Programming:
Display is showing
Press the [P] key to exit here. The display returns to normal.
4.
To Enter Level 2 programming from “TECH” Display: (for technicians and factory use).
With display showing
Press the UP arrow key
from step 3.6:
AND the Down arrow key
simultaneously for 3 seconds.
4.1. Standing Pilot: Display shows
current setting for the Standing
Pilot option. 1=ON, 0= OFF.
To change press the Up or Down
arrow key, then Press the key to save choice and continue.
Note: Standing Pilot has no effect if ApplianceType 2(electric) is selected in sect. 4.4.
4.2. Number of Basket Lifts:
Display shows current
basket lift settings. Where
LiF0 is no basket lift
outputs, LiF1 is left basket
lift, and, LiF2 is both left and right outputs are active.
To change, use the UP and Down arrow keys to scroll through choices. Press [P] key
to save and continue.
4.3. Vat Temperature Display:
Vat temperature may be displayed
rather than the normal displays.
To change, use the Up and Down
arrow keys to scroll through choices. Press [P] keys to save and continue.
Tech Tip: This display mode is intended as an aid to troubleshooting fryer
performance. This setting should always be returned to a“t-0” setting after use.
Page 5 of 7
L20-268
Rev 0 (5/04)
Programming Pitco p/n 60143801, 60143802 and 60143803
Compact Digital Controller
4.4. Appliance Type:
Setting for fryer type Gas, Electric, or general use Thermostat.
To change, use the Up and Down arrow keys to scroll through choices.
Press the
key to save and continue.
4.5. Control Point Offset:
This adjustment allows the control point to be adjusted to account for
differences between probe tip temperature and vat center oil
temperature. The adjustment range is plus or minus 0-15°F. Negative
values are preceded with a minus “-“ sign in display.
Notes for Control Point Offset:
1. If controller is set for degrees C display, this offset value remains in units of °F.
2. Positive values will offset the vat control point temperature higher.
3. Negative values will offset the vat control point temperature lower.
4. Default values: APL1(gas) =-2°F; APL2(electric)=-3°F; APL3 (general use
thermostat)= 0°F.
5. Warning: Proper equipment and expertise is required to properly adjust this value.
Even small changes may negatively effect cooking performance.
To change, use the Up and Down arrow keys to change value.
Press the
key to save and continue.
4.6. Display Value Offset:
This adjustment allows the Displayed Value for temperature to be
adjusted to account for differences between probe tip temperature
and set point temperature. The adjustment range is plus or minus 015°F. Negative values are preceded with a minus “-“ sign in display.
Notes for Display Value Offset:
1. If controller is set for degrees C display, this offset value remains in units of °F.
2. Positive values will offset the Displayed value higher.
3. Negative values will offset the Displayed value lower.
4. Default values: APL1(gas) =-2°F; APL2(electric)=-3°F; APL3 (general use
thermostat)= 0°F.
To change, use the Up and Down arrow keys to change value.
Press the
key to save and continue.
4.7. Exit Programming:
Press the
L20-268 Rev 0 (5/04)
key to return to normal display.
Page 6 of 7
Programming Pitco p/n 60143801, 60143802 and 60143803
Compact Digital Controller
5.
Other Displays:5.1. Low Vat Temperature:
When tank temperature is below 150°F (65°C), the
display will show as blanks. This is normal for cold
start-ups. Heat Demand indicator is located between
the first and second digits of display.
5.2. Drain Valve Open:
When drain valve is detected open,
normal operations are suspended. The
display will show Drain-Turn-Off
message until reset. To reset, CLOSE
the drain valve, turn the control OFF, then ON. Note: some fryer applications do not use the
drain valve input.
5.3. Equipment Fault Displays
This control will detect faulty probe conditions. If
temperature probe faults are detected, display will show one of
two possible conditions. All other functions are disabled. To
reset, turn control Off then On.
5.4. To Change Port Address
While display is showing [butt] (level 1 programming; sect. 3), press and hold the down arrrow key
and the program key simultaniously for 2 secs. Display will show the current port address (default is
30).
All cook key indicators will be off. Use the up or down arrow keys to change address. Press the [P]
program key to save selection and return to [butt] display. This address has no effect on operations
of the controller, and is only meaningful when control is networked for data collection with other
equipment.
5.5. To View Software Revision
While display is showing one of the normal displays, press and hold [I/O] key and the [T3/7]
simultaneously for 2 seconds. Display will show a rotating display, 4 digits each, for 2 seconds
each.
“FLSt” ----“1039”----“1 “----“ECL-“----“X”
“SoFt” ----“2039”----“1 “----“ECL-“----“X”
“dnLd”----“3039”----“1 “----“ECL-“----“X”
Displayed values may vary from those shown in this expample.
Page 7 of 7
L20-268
Rev 0 (5/04)