1
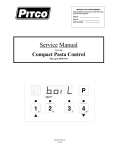
IMPORTANT FOR FUTURE REFERENCE Please complete this information and retain this manual for the life of the equipment: Model #: ___________________________ Serial #: ___________________________ Date Purchased: ___________________ Service Manual Covering Pitco Solstice Digital Controller Pitco p/n 60126601 L22-320 Rev 1 (06/11) Pitco Solstice Digital Controller 1 KEYPAD AND DISPLAY FUNCTIONS: ................................................................ 3 2 NORMAL OPERATIONS: (FOR THE OPERATOR):............................................. 3 2.1 2.2 2.3 2.4 2.5 3 3.1 3.2 3.3 3.4 3.5 3.6 3.7 To turn control ON:................................................................................................................................. 3 To turn control OFF:............................................................................................................................... 3 To Start a Cook Timer: ........................................................................................................................... 3 To Cancel a Cook Timer: ........................................................................................................................ 3 To Display Vat Temperature and Set Temperature:............................................................................ 3 TO ENTER PROGRAMMING: (FOR THE STORE MANAGER) ........................... 4 To set timer T1:........................................................................................................................................ 4 To set timer T2:........................................................................................................................................ 4 To Change Cook Temperature:.............................................................................................................. 4 To Change Melt Cycle type:.................................................................................................................... 4 To Change Pass Word Requirement:..................................................................................................... 4 To Change °F or °C Display: .................................................................................................................. 5 To exit Level 1 Programming: ................................................................................................................ 5 4 TO ENTER LEVEL 2 PROGRAMMING FROM “TECH” DISPLAY: (FOR TECHNICIANS AND FACTORY USE)......................................................................... 5 Standing Pilot? ......................................................................................................................................................... 5 4.2 Number of Basket Lifts: .......................................................................................................................... 5 4.3 Display Options Display:......................................................................................................................... 6 4.4 Appliance Type: ....................................................................................................................................... 6 4.5 Control Point Offset: ............................................................................................................................... 6 4.6 Display Value Offset:............................................................................................................................... 6 4.7 Exit Programming: .................................................................................................................................. 7 5 5.1 5.2 5.3 5.4 5.5 OTHER DISPLAYS ................................................................................................ 7 Low Vat Temperature:............................................................................................................................ 7 Drain Valve Open: ................................................................................................................................... 7 Equipment Fault Displays....................................................................................................................... 7 Fill Display................................................................................................................................................ 7 Heat Failure.............................................................................................................................................. 8 6 MECHANICAL DIMENSIONS:............................................................................... 9 7 ELECTRICAL CONNECTIONS AT J1:................................................................ 10 8 PROBE RESISTANCE CHART: .......................................................................... 11 L22-320 Rev 1 (06/11) Page 2 of 12 Pitco Solstice Digital Controller 1 Keypad and Display Functions: 2 2.1 Normal Operations: (for the operator): To turn control ON: Press . Display will momentarily show the current Appliance Type “APLx” for 2 seconds and then to one of the normal displays shown here. 2.2 To turn control OFF: Press 2.3 and hold for 3 seconds. Display will show . To Start a Cook Timer: When display shows [droP], press a basket key to start a cook timer. Both timers may run together. Only the timer with the least time remaining will be displayed. 2.4 To Cancel a Cook Timer: Press the Basket key until light above the key is off. 2.5 To Display Vat Temperature and Set Temperature: Press the key once. Display will show current VAT temperature (348°F/176°C in this example). Press the key again. Display now shows the SET temperature. Press the key, or, make no key presses for 5 seconds and display will return to one of the normal displays. L22-320 Rev 1 (06/11) Page 3 of 12 Pitco Solstice Digital Controller 3 To Enter Programming: (for the store manager) Press 3.1 key. If the display shows , press to unlock, and continue. To set timer T1: The indicator light above timer key 1 will illuminate. Display will show current timer setting in MM:SS format for this key. Press the UP arrow key or DOWN arrow key to adjust timer value. The value will change in steps of 5second each. When set, press 3.2 key to save setting and continue. To set timer T2: The indicator light above timer key 2 will illuminate. Display will show current timer setting in MM:SS format for this key. Press the UP arrow key or DOWN arrow key to adjust timer value. The value will change in steps of 5second each. When set, press 3.3 To Change Cook Temperature: Display will show [xxx°F] or [xxx°C], the current temperature setting. The default setting is 350°F (177°C). Press and hold the UP arrow key or DOWN arrow key to scroll temperature setting. A single key press will increment or decrement the setting by one degree. When set, press 3.4 key to save setting and continue. key to save setting and continue. To Change Melt Cycle type: Display now shows the current melt cycle setting. Press the UP arrow key or DOWN arrow key to adjust melt cycle type. When set, press 3.5 key to save setting and continue. To Change Pass Word Requirement: Display will show the current lock status Press the UP arrow key or DOWN arrow key to change lock setting for future entry into programming menus. When set, press key to save setting and continue. L22-320 Rev 1 (06/11) Page 4 of 12 . Pitco Solstice Digital Controller 3.6 To Change °F or °C Display: Display will show the current temperature scale setting, eiter Farenheit or Celcius. . Press the UP arrow key or DOWN arrow key to change lock setting for future entry into programming menus. When set, press 3.7 key to save setting and continue. To exit Level 1 Programming: Display is showing . Press key to exit here. The display will return to one of the normal operating displays: 4 To Enter Level 2 programming from “TECH” Display: (for technicians and factory use) Follow the instructions beginning at section 3. Use the display showing key to advance to the [Tech] display. With from step 3.7 above, press the key AND the key simultaneously for 3 seconds and continue. 4.1 Standing Pilot? The display now shows current setting for the Standing Pilot option . Where 0 =OFF, and 1= ON. Press the UP arrow key or DOWN arrow key to change this setting. When set, press key to save setting and continue. Note: Standing Pilot has no effect if ApplianceType 2(electric) is selected in sect. 4.4. 4.2 Number of Basket Lifts: Display shows current basket lift setting Where LiF0 is no basket lift outputs, LiF1 is left basket lift, and, LiF2 is both left and right outputs are active. Press the UP arrow key or DOWN arrow key to change setting. When set, press key to save setting and continue. L22-320 Rev 1 (06/11) Page 5 of 12 . Pitco Solstice Digital Controller 4.3 Display Options Display: Vat temperature may be displayed rather than the normal displays. Display . Press the UP arrow key or DOWN arrow shows key to change setting. When set, press key to save setting and continue. . Tech Tip: This display mode is intended as an aid to troubleshooting fryer performance. This setting should always be returned to the “t-0” setting after use. 4.4 Appliance Type: This setting is for fryer type Gas(1), Electric(2), or general use Thermostat(3) Press the UP arrow key or DOWN arrow key to change setting. When set, press key to save setting and continue. 4.5 Control Point Offset: This adjustment allows the control point to be adjusted to account for differences between probe tip temperature and vat center oil temperature. The adjustment range is plus or minus 0-15°F. Negative values are preceded with a minus “-“ sign in display. Press the UP arrow key or DOWN arrow key to change setting. When set, press key to save setting and continue. Notes for Control Point Offset: 1. If controller is set for degrees C display, this offset value remains in units of °F. 2. Positive values will offset the vat control point temperature higher. 3. Negative values will offset the vat control point temperature lower. 4. Default values: APL1(gas) =-2°F; APL2(electric)=-3°F; APL3 (general use thermostat)= 0°F. 5. Warning: Proper equipment and expertise is required to properly adjust this value. Even small changes may negatively effect cooking performance. 4.6 Display Value Offset: This adjustment allows the Displayed Value for temperature to be adjusted to account for differences between probe tip temperature and set point temperature. The adjustment range is plus or minus 0-15°F. Negative values are preceded with a minus “-“ sign in display. Press the UP arrow key or DOWN arrow key to change setting. When set, press key to save setting and continue. Notes for Display Value Offset: 1. If controller is set for degrees C display, this offset value remains in units of °F. 2. Positive values will offset the Displayed value higher. 3. Negative values will offset the Displayed value lower. L22-320 Rev 1 (06/11) Page 6 of 12 Pitco Solstice Digital Controller 4. Default values: APL1(gas) =-2°F; APL2(electric)=-3°F; APL3 (general use thermostat)= 0°F. 4.7 Exit Programming: Press the key to return to normal displays: . 5 Other Displays 5.1 Low Vat Temperature: When tank temperature is below 150°F (66°C), the display will show as blanks. This is normal for cold start-ups. Heat Demand indicator is located between the first and second digits of display. 5.2 Drain Valve Open: When drain valve is detected open, normal operations are suspended. The display will show Drain-Turn-Off message until reset. To reset, CLOSE the drain valve, turn the control OFF. Some applications do not use the drain valve input. 5.3 Equipment Fault Displays This control will detect faulty probe conditions. If temperature probe faults are detected, display will show one of two possible conditions. All other functions are disabled. To reset, turn control Off then On. 5.4 Fill Display If this appliance is equiped with a liquid level option, the control will display [FiLL] when the water level gets to low. Heat is suspended while the tank is filling or toping off. Some appliances don’t have the liquid level option. L22-320 Rev 1 (06/11) Page 7 of 12 Pitco Solstice Digital Controller 5.5 Heat Failure This message indicates that the heating system failed to respond to the controls demand for heat. Typically, the high temperature limit switch has tripped and is need of resetting. In the case of gas fired appliances, this message will display if the pilot fails to light or is detected marginal by the ignition module. L22-320 Rev 1 (06/11) Page 8 of 12 Pitco Solstice Digital Controller 6 Mechanical Dimensions: L22-320 Rev 1 (06/11) Page 9 of 12 Pitco Solstice Digital Controller 7 Electrical Connections at J1: J1 1 2 3 4 5 6 7 8 9 10 11 12 Inputs ACH ACN PROBE+ PROBEDVI HFB 24VDC COM HD SO/xFER RBL LBL Spare Type PWR PWR Thermistor Proble IN IN IN OUT OUT OUT OUT Non Con Nominal Notes: 24VAC 24VAC +20% -15% 50/60Hz. 24VACN 24VAC Return. Resistance varies with vat temperature. 942 Ohms @ 350°F 24VAC 24VAC 24VDC 24VDC 24VDC 24VDC 24VDC ? Drain Valve Interlock Heat Feed Back DC Returm Heat Demand Side ON or XFER Right Basket Lift Left Basket Lift Spare terminal not connected. 12 9 6 3 11 8 5 2 10 7 4 1 L22-320 Rev 1 (06/11) Page 10 of 12 Pitco Solstice Digital Controller Probe Resistance in 5°F Increments. Probe Temp (°F) 10 15 20 25 30 35 40 45 50 55 60 65 70 75 80 85 90 95 100 105 110 115 120 125 130 135 140 145 150 155 160 165 170 Probe Temp (°C) -12.2 -9.4 -6.7 -3.9 -1.1 1.7 4.4 7.2 10.0 12.8 15.6 18.3 21.1 23.9 26.7 29.4 32.2 35.0 37.8 40.6 43.3 46.1 48.9 51.7 54.4 57.2 60.0 62.8 65.6 68.3 71.1 73.9 76.7 Resistance (Ohms) 562734 483875 417167 360589 312474 271446 236370 206311 180491 158252 139055 122489 108051 95539 84644 75136 66823 59540 53146 47523 42569 38195 34328 30902 27862 25161 22755 20610 18695 16981 15446 14069 12823 Probe Temp (°F) 175 180 185 190 195 200 205 210 215 220 225 230 235 240 245 250 255 260 265 270 275 280 285 290 295 300 305 310 315 320 325 330 335 Probe Temp (°C) 79.4 82.2 85.0 87.8 90.6 93.3 96.1 98.9 101.7 104.4 107.2 110.0 112.8 115.6 118.3 121.1 123.9 126.7 129.4 132.2 135.0 137.8 140.6 143.3 146.1 148.9 151.7 154.4 157.2 160.0 162.8 165.6 168.3 Resistance (Ohms) 11719 10716 9812 8995 8255 7586 6979 6427 5926 5470 5055 4675 4329 4013 3723 3458 3214 2991 2785 2597 2422 2262 2113.9 1977.3 1851.0 1734.3 1626.1 1525.9 1433.0 1346.7 1266.6 1192.1 1122.8 Probe Temp (°F) 340 345 350 355 360 365 370 375 380 385 390 395 400 405 410 415 420 425 430 435 440 445 450 455 460 465 470 475 480 485 490 495 500 Probe Temp (°C) 171.1 173.9 176.7 179.4 182.2 185.0 187.8 190.6 193.3 196.1 198.9 201.7 204.4 207.2 210.0 212.8 215.6 218.3 221.1 223.9 226.7 229.4 232.2 235.0 237.8 240.6 243.3 246.1 248.9 251.7 254.4 257.2 260.0 Resistance (Ohms) 1058.23 998.09 942.00 889.67 840.78 795.10 752.38 712.41 674.95 639.87 606.96 576.09 547.09 519.86 494.24 470.16 447.49 426.13 406.02 387.04 369.14 352.24 336.29 321.21 306.94 293.46 280.69 268.61 257.15 246.30 236.00 226.24 216.96 8 Probe Resistance Chart: Notes: Resistance, of either probe lead, to the frame of the appliance should read as “open’ on the meter. Typically this is 1Meg ohms or more. L22-320 Rev 1 (06/11) Page 11 of 12 In the event of problems with or questions about your order, please contact the Pitco Frialator factory at (603) 225-6684 World Wide www.pitco.com In the event of problems with or questions about your equipment, please contact the Pitco Frialator Authorized Service and Parts representative (ASAP) covering your area, or contact Pitco at the numbers listed to the left. MAILING ADDRESS – P.O. BOX 501, CONCORD, NH 03302-0501 SHIPPING ADDRESS – 10 FERRY ST., CONCORD, NH 03301 L22-320 Rev 1 (06/11) Page 12 of 12