1
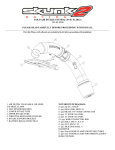
For assistance, please call 949-295-1668 or visit heeltoeauto.com
Support Documentation for HT-Spec
Version 2.0 Type-I and Type-II Damper Kits
HTSpec was launched in 2010 as a way for Heeltoe to convey a product’s viability to prospective customers. Items
which have been proven to be the most reliable, most popular, and most effective will become HTSpec parts. Only
items that are able to meet customer demands of improvement impact with minimal compromise are selected to
represent this moniker.
History:
The HTSpec damper kit was released in late 2010 as a combined effort with Function/Form Autolife suspension. The
main goals of most all Acura TSX and TL owners when it comes to upgrading suspension involve a uniform set of
principles. Handling improvement to enhance driving confidence, vast height adjustment ability from a reasonable
lowered height all the way to the ground, a ride that is not that of a track car and is suitable for a daily commute and
affordability are all main targets that the HTSpec damper kit is designed to hit.
After a hugely successful launch, the damper kits were re-evaluated and there were found to be some considerable
improvements to the dampening that were needed in order to become more perfect. In June 2011, the HTSpec
Version 2.0 damper kits were released. These dampers, while they looked the same on the outside, offering a more
favorable front and rear valving balance. The ride has improved significantly, as has the handling sharpness.
Another update came in the last quarter of 2011 when we elongated the lower brackets to allow for more height range
adjustment. HTSpec coilovers of this latest release can achieve a stock height setting. In addition, the 03-07 Accord
kits were added to the lineup.
To this day, we have not seen any suspension kit come close to hitting all the main speaking points that the HTSpec
V2 Damper kits do.
Which Kit To Choose:
There are two different types of HTSpec damper kits from which to choose.
•
•
Type-I has adjustable height with a fixed ride setting
Type-II has adjustable height and adjustable ride firmness
Both kits offer the following features
•
•
•
Rubber upper mounts pre-installed
Front/Rear spring rates: 12/6 kgf
Adjustable lower bracket for increased
height flexibility
•
•
•
1 year warranty against defect
Zinc plated bodies/collars for corrosion protection
Full installation phone support from Heeltoe
Installation:
Because of the important role the suspension plays in the driving of your car, we recommend installation be done by a
qualified individual. Your safety should be the first thing to think about before tackling any installation or repair job. If
you are not completely confident that you can perform a trouble-free install, seek help or call us for advice.
Adding HT-Spec Decal:
HT-Spec damper kits come from the Function/Form factory preassembled and pre-packaged. When you get your HTSpec dampers you will want to add HT-Spec decals to distinguish them from standard Function/Form kits.
Adjustment Of Preload and Lower Bracket Height:
We have found that installation of this system does not prompt nearly as many questions as adjusting it does, so we
have provided a more detailed section on adjusting in this document. The first and most important thing to realize
about this kit is that the kit comes assembled but it is still a good idea to affirm measurements and snug hardware
before installing. Here we will outline the different points of interest for you to review.
There are 2 main measurements you need to take into account when adjusting coilvoers. Those are PRELOAD and the
LOWER BRACKET HEIGHT.
Preload:
Preload is the length of the spring as mounted between the upper mount and the spring seat collars (note, this is not
the same as spring free-length, which is the length of the un-installed spring). Since parts such as rubber bushings
and spacers can distort over time we recommend measuring preload from the hard mounting points at the top and
bottom of spring mount locations. On the HT-Spec dampers this is the bottom of the top mount, and the top of the
lower spring seat.
Preload is an adjustment that is used for adjusting the effective firmness of the spring. If you feel that the car’s
springs are a little too soft but you don’t have the ability to change springs out for firmer ones, you can adjust the
preload to make the spring act like a firmer one by compressing it with the seat collars. The drawback to adding
preload is that you take away travel from the spring with can affect how the damper works with it. Also, the dampers
are designed to work with a specific spring rate so dialing in preload can upset the tuning of the system. Adding too
much preload can result in a suspension that is very non-compliant and potentially unsafe or damaging to the shock.
However contrary to standard documentation provided with all Function/Form kits, altering the preload in prescribed
increments will NOT void the warranty on your HTSpec damper set.
When the preload length gets smaller, it is called adding preload. This is done by spinning the lower spring seat collars
toward the top of the shock. When the lower collars are adjusted such that the spring if firmly mounted but it is not
compressed at all, it is called ZERO PRELOAD. We generally recommend starting tuning from this point
Adding
•
•
•
Adding
•
•
•
Preload Pros:
Can make the spring feel firmer when needed to resist bottoming or float
Gives more flexibility of suspension tuning
Can be used to raise the car’s height a bit
Preload Cons:
Can increase ride firmness if not desired
Too much can be damaging to the shocks
Will change the car’s height (if you like your height now…you will need to make more adjustments to get back
to it)
Lower Bracket Height:
The lower bracket height is in reference to the location of the lower mounting bracket as threaded onto the bottom of
the shock, which is fully threaded on its full length. Unlike other systems that do not have this adjustment, HTSpec
coilvers will have more flexibility of height adjustment independent of spring preload. Sometimes systems with a
lower bracket height adjustment are called “full length” adjustable or said to have “independent height adjustment.”
Since this setting is made AFTER preload is determined, it is usually easiest to call out this setting as the distance of
threads showing between the lower spring seat collar and the lower bracket locking collar.
The two biggest components of spring tuning functions are getting the rates set and setting the vehicle height. The
correct spring rates will help balance the car and aid stability when pushing hard. The vehicle height is mostly
responsible for affecting the balance of the car and the center of gravity. A process known as corner weighting is used
to tell tuners how much weight is being supported at each corner of the car. Lower corners of the car will have a
greater weight bias, and higher corners will have a lower weight bias. Since setting preload can change the height of
the car at a given corner, having the ability to set the height back to an ideal corner-weight is necessary. Hence, the
benefit of full length adjustment dampers; they allow setting of preload for the best spring tuning, while also allowing
corner-weighting to give the best balance.
This setup has been adopted by street tuners because they will allow setting the height of the car without messing
with preload and negatively impacting the ride. Street tuners want lower cars without ride compromise and this setup
allows this. HT-Spec damper kits are able to lower cars so low they will be practically un-drivable. However the added
benefit of adjustment in HT-Spec damper kits enable a nearly stock height as well, as many drivers prefer not to lower
too much to make commuting difficult. Making Lower Bracket Height smaller will lower the car while making it larger
raises it.
Lower
•
•
•
Lower
•
•
•
Bracket Height Adjustment Pros:
Allows independent setting of preload and corner-weight for best performance
Allows large range in vehicle height settings
Manufacturing costs can be reduced allowing lower cost kits for street tuners.
Bracket Height Adjustment Cons:
Makes setting height a little more difficult since it is less conventional that “normal” coilovers
Allows people to lower cars to an unsafe ride height
Not all systems like this are created equally but people tend to lump them all into one category (these are
performance settings, but not all kits are made for performance as some are quite cheaply made)
Recommended Height Settings for HT-Spec Dampers:
Front
Rear
Preload
Lower
Bracket
Height
Resulting
Vehicle
Height*
Preload
Lower
Bracket
Height
Resulting
Vehicle
Height*
7-1/2"
3-3/4”
13-3/4"
8-3/4"
4-1/2"
14"
7.5"
3-7/8"
14-1/4"
8-3/4"
4-5/8"
14-1/4"
TDB
TDB
TDB
TDB
TDB
TDB
04-08 TSX
04-08 TL
03-07 Accord
*For vehicle height measurement standard, please visit this site:
http://www.heeltoeauto.com/tech-articles/suspension/how-to-measure-your-cars-height.html
Note that the above figures are for reference only and your car may require additional adjustment to
achieve ideal settings.
Use the following form to help you in determining
How to use form:
1) Fill in Before Height and Desired Height. Leave Blue Fields Alone.
2) Perform Work On Car
3) Fill In After Height To Determine If Goal For Height Change Is Met.
Height of car
Front
Left
Before
Desired
Height
Adjustment
Needed
After
Actual
Change
Rear
Right
Left
Right
Setting the max high:
Sometimes customers will want to set the coilovers as high as they can go. There is a minimum amount of threads
from the shock that need to be spun into the lower bracket, about ½”. This is how you would accomplish this.
1. Spin the lower bracket completely off.
2. Move the lower bracket locking ring down so ½” of threads are showing, as below:
3. Reinstall lower bracket and tighten locking collar.
a.
Note, max high will not necessarily set front and rear levels even.
Adjusting the ride firmness (Type-II only):
The Type-II Kit offers the ability to change the damper firmness for improved ride and handling customization
•
•
Improve the ride comfort buy softening dampers
o To make the car fell less like it is “crashing” over bumps, soften the front
o To make the overall ride more comfortable, soften the rear
Enhance the performance and handling of the car
o For sharper, more direct steering feel and car control, firm up the front
o For better handling in tighter, slower corners, firm up the rear
The damper kit will come with 4 adjustment knobs that need to be installed on the tops of the shocks. Simply screw
them on and gently snug them with pliers. DO NOT MAKE THEM TIGHT OR OVERTIGHTEN THEM.
Tightening locking collars:
Spanner wrenches are included in each kit for tightening the spring seats/locking collars. While these tools are good
for grabbing and turning the collars, they may not provide enough torque to adequately lock them in place.
For adequate tightening to lock collars in place, we suggest using a hammer and punch/screwdriver to tighten locking
rings. You can also use a hammer on the spanner wrenches. The space requirements in the area of the car you are
working in will dictate the best technique to use.
Torque settings for hardware (top hat nuts, suspension assembly nuts and bolts):
All nuts and bolts used for mounting and assembly should be adjusted to the same torque as OEM hardware. Consult
the OEM service manual for these torque values.
Failure to ensure proper tightness of hardware could result in movement of the suspension components and impact
the long-term settings of the suspension. Noises can also occur while driving. Avoidance of problems is a main reason
why a qualified person should be doing installation on critical suspension parts.
Corrosion protection and long term care:
To protect from corrosion, it is best to apply a protective layer to outside of the coilover threads and adjustment
points. We’ve seen people wrap the threads with tape or other covering but we do not recommend this as water can
get in and be held in place increasing problems.
It is best to simply spray the components down with a light coating of penetrating lubricant or WD-40. This petroleum
based layer will repel water and prevent dirt from attacking the material. Periodic cleaning and reapplication should
keep your coilovers corrosion free.
Troubleshooting:
Problem
Variables and Causes
Corrective Action
Noise Occurrence
Squeaking sounds
Cause by rubbing issues. Check
mounting of the spring in the seats.
Ensure there are no parts contacting
each other that can rub together. Also
check the condition and tightness of
sway bar bushings. Lube if necessary
Some faint noises heard over bumps
are not indicative of installation issues
in most cases and can be considered
normal. Double-checking installation
and emptying out contents of the car
can help determine if the noise is
related to the suspension.
Most likely there is an issue with the
installation. Sway bar links are most
commonly left loose and must be
tightened properly, or possibly replaced
if proper tightening is not achievable.
If the noise moves with the suspension,
consult
Heeltoe for advice.
If the noise stays on the original side
after swapping, inspect other areas of
the suspenion or car for issues as the
noise is not related to the damper
assembly.
If the noise goes away, you had an
installation issue that is now resolved.
If the car is too low, the upper control
arms will contact the inner wheel
houses. This problem is especially
worse if Ingalls or SPC camber ball
joints are installed. If installed, swap
parts for Skunk2 camber arms. Raise
car as necessary.
Add preload. If your preload setting is
8” from the upper mount to the base of
the spring, move it to 7.5”
Faint clunking over minor
bumps
Medium volume clunking or
tapping
Persistent prominent
clunking noises from one
side of the car
Swap suspension from left to
right
Loud Banging from the
front over bumps
Car is too low (usually 3" or
more, tucking tires)
Not enough preload is dialed
in, especially in the front.
Uncomfortable ride
With Type-II Suspension
Adjusting knob click issues
Spins only, no clicking
Spins forever without stopping
Ensure the preload is set to zero or is
per the adjustment outlined by Heeltoe,
and set dampening softer in the rear.
The knob is broken. Contact us for a
replacement
The knob is broken. Contact us for a
replacement
Warranty Information
HTSpec Damper Kits are produced by Function/Form Autolife and they have established a warranty . This is 1 year
from the date of purchase against general manufacturer defects. For complete warranty coverage details, please visit:
http://www.f2autolife.com/warranty-policy
A warranty card is included with the HTSpec damper kits which should be mailed in to Function/Form in order to
register the product and establish the date when warranty coverage begins. It is important to note on the
warranty card your suspension is “HTSpec” suspension! Note: resetting preload WILL NOT void the
warranty. Warranty claims must be pursued by the customer through Function/Form via the link/warranty card
information above. Heeltoe is not incurring warranty expenses. However, in an effort to ensure the best possible
customer experience, Heeltoe encourages all problems and concerns be communicated to
[email protected] so we may assist in any general service issues you have!