1
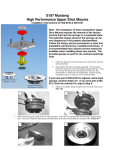
COLD AIR INTAKE SYSTEM, CIVIC Si, 2012+
343-05-0200
PLEASE READ CAREFULLY BEFORE PROCEEDING WITH INSTALL
Parts list (Please verify all parts are included in the kit before proceeding with installation)
1. AIR FILTER, CLEANABLE, OIL-FREE
with HOSE CLAMP
2. MAF SENSOR HOUSING
3. LOWER INTAKE TUBE
4. UPPER INTAKE TUBE
5. THROTTLE BODY HOSE COUPLER
6. INTAKE SUPPORT BRACKET
7. BATTERY RELOCATION TRAY
NOT SHOWN IN DIAGRAM:
(2 qty) Zip Tie, 4 INCH
(1 qty) ISOLATOR, M8X1.25
(1 qty) BRASS 5/16” HOSE CONNECTOR
(5 qty) 12” STRIP 16G WIRE
(2 qty) 18” STRIP 16G WIRE
(14 qty) WIRE CONNECTOR, RED
(1 qty) BOLT, M6 X 1.0 X 10
(1 qty) NUT, M8 X 1.25
(1 qty) SILICONE HOSE, ½”
DIAMETER
(3 qty) Size 64 HOSE CLAMP FOR INTAKE TUBES
(1 qty) Size 48 HOSE CLAMP FOR THROTTLE BODY
HOSE COUPLER
INSTALLATION - Please refer to factory service manual if available.
It is recommended that this product be installed by an experienced automotive mechanic / technician
Removal:
Refer to factory service manual for removal of the following:
1. Remove battery.
2. Remove front half of the inner fender.
3. Remove the OEM air intake air box system.
4. Remove battery tray.
Installation of kit:
1.
Secure the transmission with a jack and remove the three bolts securing the transmission mount to the frame
rail. (17MM Bolt Head)
2.
Install the battery relocation bracket onto the engine mount and reinstall the three factory transmission
mount bolts and torque to factory specs.
3.
Relocate the negative (-) terminal with 10MM bolt to its new location on the brake master cylinder
bracket on the driver side shock tower.
(MAKE SURE TO USE THE BOLT THAT WAS ORIGINALY ON FACTORY GROUNDING
LOCATION SO THAT YOU WILL HAVE A GOOD GROUND CONTACT TO FRAME)
4.
Install the battery in the newly mounted battery relocation bracket and secure it with the factory tie
down. Secure the negative (-) battery terminal to the battery.
5.
Extend the two wires from car harness to the negative (-) battery terminal. Use the four supplied wire
connecters and the two supplied 18” long strips of wire. Use electrical tape to wrap connections after
you are finished. Route up around fuse box to battery.
6.
Separate the single wire connecter from the charge harness and route positive (+) battery terminal to battery and fuse
box. (DO NOT CONNECT POSITIVE (+) TERMINAL AT THIS TIME)
7.
Remove factory breather tube that connects the valve cover to the intake tube. There are two coolant lines connected
to the tube. Use the supplied brass 5/16” connecter to connect the two hoses together.
8.
Install coupler on to throttle body with two clamps, install upper intake pipe, install MAF Coupler with two clamps,
install lower intake pipe, and secure air filter using clamp.
9.
Install Support Bracket. Install supplied isolator into frame, install bracket onto isolator and secure bracket to
isolator with the supplied nut. Install supplied 10MM bolt into lower intake tube.
10.
Extend the wires for the MAF sensor. Take the ten wire connecters and five 12” strips of wire and extend the five
wires for the MAF sensor. Use electrical tape to cover wires after you are finished. Connect to MAF sensor.
11. Use the supplied ½” hose to connect the valve cover breather to the intake tube. Secure hose with the two supplied
zip ties.
12. Reconnect the battery. Secure front bumper, fender liner, and anything that was removed during installation.
Congratulations!
You have just finished installing your Skunk2 Cold Air Intake
If you need further assistance or have additional questions, please call Skunk2 Racing at (951) 808-9888 or email
us at [email protected].
Product Disclaimer
•
The entire risk of quality, performance, and defect is with the purchaser and not the manufacturer, distributor, or retailer. Should
any product(s) prove to be defective for any reason under any circumstance, the purchaser and not the manufacturer, distributor, or retailer
will assume financial responsibility for any consequential damages, repairs/service, and any other liability.
•
A vehicle modified by the use of competition product(s) for use on public roadways may not meet local, state, or federal regulations.
Installation and use of this competition product(s) may also affect vehicle insurance coverage. It is the purchaser’s responsibility to meet and
comply with regulations and policies before operating vehicle on public roadways.
•
Return of product(s) will be accepted ONLY if product(s) is in resalable condition. All accepted returns will be subjected to a 20%
restocking fee. ABSOLUTELY NO RETURNS ON USED PRODUCTS. For more information on return policy, please call 951-808-9888.
Warranty Policy
Group A Autosports Inc. warranties all products to be free of defects in materials and workmanship for normal use and service for a
period of 1 year from the date of retail purchase. Products returned must be inspected and determined to be defective by Group A
Autosports Inc. before any warranty credit and/or replacement is issued. Group A Autosports Inc.’s obligation under warranty shall be
limited to repairing or replacing, at its discretion, any product found to be defective. The consumer will be responsible for transportation
charges. Final determination of the suitability of the product(s) for the intended use is the sole responsibility of the consumer. Group A
Autosports Inc. shall not be liable for any special, direct, indirect, incidental or consequential damages that may be claimed as a result of
the failure of any product, including claims for delay, loss of profits or labor. Group A Autosports Inc. shall not be liable for any damage
and/or injury to person(s) and/or property resulting from improper installation and/or misuse of any product subject to this warranty.
There are no other warranties expressed and/or implied extending beyond those set forth above.