1
INSTRUCTION MANUAL
P
A
100 Series Dialyzer Reprocessing System
MODEL RS8310
MODEL RS8320
100 SERIES
S/N‘S 1,000 - UP
Equipment
RENALIN® and RENATRON® are registered
trademarks of Minntech Corporation.
Printed and assembled in the United States.
All Rights Reserved.
Instruction Manual
Instruction Manual
-2-
Section
Topic
Contents
1.
Indications
4
2.
Contraindications
4
3.
Warnings and Precautions
4
4.
Description
5
5.
Specifications
8
6.
Description of Controls
10
7.
Renatron® PA 100 Series Installation Instructions
12
8.
Daily Machine Sanitize Procedure
14
9.
Operating Procedures
14
10.
Storage and Handling for Reprocessed Dialyzers
18
11.
Calibration and Adjustment
18
12.
Renatron® PA 100 Series Calibration Procedure
18
13.
Maintenance
20
14.
Service
22
15.
Warranties/Limitations
23
16.
Explanation for Symbols
24
17.
Technical Service Centers
24
18.
Part Number Listings
25
-3-
Instruction Manual
Read this Manual and the Renalin® 100 Cold Sterilant Instructions for Use
prior to using the Renatron® PA 100 Series Dialyzer Reprocessing System.
Failure to follow the instructions for use may result in injury.
Retain this manual for future reference.
CAUTION – ONLY HOLLOW FIBER DIALYZERS SHOULD BE PROCESSED AS SPECIFIED IN
THIS MANUAL.
CAUTION – U.S.A. FEDERAL LAW RESTRICTS THIS DEVICE TO SALE BY OR ON ORDER OF
A PHYSICIAN.
WARNING
THE RENATRON® PA 100 SERIES SYSTEM IS INTENDED EXCLUSIVELY
FOR IN VITRO CLEANING, TESTING, AND DELIVERY OF
PROPORTIONED RENALIN® 100 SOLUTION TO THE DIALYZER. ANY
SUBSEQUENT CLINICAL APPLICATION OR USE OF A HOLLOW FIBER
DIALYZER THAT HAS BEEN PROCESSED BY THE MACHINE IS THE
SOLE RESPONSIBILITY OF THE ATTENDING PHYSICIAN.
WARNING
A HOLLOW FIBER DIALYZER THAT IS PROCESSED ON THIS MACHINE
IS FILLED WITH A PROPORTIONED RENALIN® 100 COLD STERILANT
SOLUTION. THE PROPORTIONED RENALIN® 100 COLD STERILANT
SOLUTION MUST BE ADEQUATELY AND THOROUGHLY RINSED OUT
OF THE DIALYZER PRIOR TO CLINICAL USE.
Indications
The Renatron® PA 100 Series Dialyzer Reprocessing System is indicated for the in vitro rinsing,
cleaning, testing, and delivery of proportioned Renalin® 100 Cold Sterilant solution to hollow fiber
dialyzers. The Renatron® PA 100 Series system is indicated for use only with Renalin® 100 Cold
Sterilant solution.
Contraindications
This device is not designed, sold, or intended for use except as indicated.
Warnings and
Precautions
ADDITIONAL WARNINGS AND PRECAUTIONS THAT APPLY TO SPECIFIC PROCEDURES
ARE FOUND IN APPROPRIATE PLACES THROUGHOUT THIS MANUAL.
DANGER — EXPLOSION HAZARD - DO NOT USE IN THE PRESENCE OF FLAMMABLE
ANESTHETICS.
CAUTION – DISCONNECT POWER SUPPLY CORD BEFORE SERVICING.
WARNING
GROUNDING RELIABILITY CAN ONLY BE ACHIEVED WHEN THIS
DEVICE IS CONNECTED TO A RECEPTACLE MARKED HOSPITAL
GRADE“ OR EQUIVALENT.
CAUTION – IF THE DEVICE IS USED IN A MANNER NOT SPECIFIED BY THE
MANUFACTURER, THE PROTECTION PROVIDED BY THE DEVICE MAY BE IMPAIRED.
CAUTION – DO NOT USE CHEMICALS OTHER THAN RENALIN® 100 COLD STERILANT
WITH THIS MACHINE.
Instruction Manual
-4-
CAUTION – WATER SUPPLIED TO THIS SYSTEM MUST MEET THE REQUIREMENTS
LISTED IN SPECIFICATIONS SECTION. THE RS-8310 100 SERIES OR 8320 100 SERIES DOES
NOT PERFORM WATER TREATMENT.
CAUTION – DO NOT OPERATE THE RENATRON® PA 100 SERIES MACHINE WITH THE
COVER OFF UNLESS SPECIFICALLY INDICATED IN THIS MANUAL.
CAUTION – ALL PERSONNEL USING THIS DEVICE SHOULD BE FAMILIAR WITH THE
INFORMATION CONTAINED IN THIS MANUAL.
CAUTION – IT IS THE RESPONSIBILITY OF THE PRESCRIBING PHYSICIAN TO ENSURE
THAT THE OPERATORS OF THIS DEVICE ARE PROPERLY TRAINED AND TECHNICALLY
COMPETENT.
CAUTION – DO NOT REMOVE ANY WARNINGS, CAUTIONS, OR DESCRIPTIVE LABELING
FROM THIS MACHINE OR THE POWER CORD SUPPLIED WITH THIS MACHINE.
CAUTION – ALL PLUMBING (HOSES AND LINES) ARE CUT TO LENGTH AND CALIBRATED
AT THE FACTORY AND SHOULD NOT BE MODIFIED FROM THE ORIGINAL LENGTHS OR
SIZES. ONLY FACTORY AUTHORIZED SERVICE PERSONNEL SHOULD REPAIR OR
REPLACE THESE ITEMS.
WARNING
RENALIN® 100 COLD STERILANT IS USED IN CONJUCTION WITH THIS
DEVICE. RENALIN® 100 COLD STERILANT IS CORROSIVE AND CAN
CAUSE EYE DAMAGE AND SKIN IRRITATION. WEAR EYE
PROTECTION, RUBBER GLOVES AND PROTECTIVE CLOTHING WHEN
HANDLING THIS SOLUTION AND DURING THE OPERATION OF THE
RENATRON® PA 100 SERIES MACHINE.
CAUTION – THE OPERATOR SHOULD BE FAMILIAR WITH THE SAFE HANDLING
TECHNIQUES FOR THE MACHINE AND THE RENALIN® 100 COLD STERILANT AND WITH
THE RECOMMENDED FIRST AID PROCEDURES IN CASE OF CONTACT WITH OR
EXPOSURE TO RENALIN® 100 COLD STERILANT.
WARNING
DO NOT ALLOW RENALIN® 100 COLD STERILANT TO MIX WITH
ALKALINE SUBSTANCES SUCH AS BLEACH (SODIUM HYPOCHLORITE)
A. Components: the Renatron® PA 100 Series System consists of:
Description
®
1. A Renatron PA 100 Series station:
a. The solid-state electronics control section
b. The hydraulic section
c. The dialysate inlet and outlet port connection and the arterial and venous port
connection lines
d. The Renalin® 100 uptake hose
e. The drain line hose
2. Materials for connection of the Renatron® PA 100 Series station to existing in-house
water supplies consisting of:
a. Water pressure gauge block for attachment between one or two Renatron® PA 100
Series stations and the water outlet from the dialysis center. Mounts on the drip tray.
b. 1-1.85 m water hose with a female Hansen type connector for attachment to the water
gauge block and a female garden hose connector for attachment to the dialysis center
water outlet.
c. 1-1.85 m drain hose for each Renatron® PA 100 Series.
-5-
Instruction Manual
3. One volumetric calibration cell for periodic checking of the Renatron® PA's 100 Series
operation.
4. Drip Tray - single or dual Renatron® PA 100 Series compatibility (optional).
B. Terminology: For the purpose of clarity, the following terminology will be used throughout
this manual.
1. "Water" or "AAMI quality water" is water that meets or exceeds the following
requirements:
a. AAMI/ANSI Standard for Hemodialysis Systems and AAMI Recommended Practice
for the Reuse of Hemodialyzers.
b. Containing no particles larger than 1 micron.
2. "Renalin® 100 Cold Sterilant" or "Renalin® 100" is a concentrated solution for use with the
Renatron® PA 100 Series System. It is supplied as 10 liters of Renalin® 100 Cold Sterilant
in a 10 liter container for use by the Renatron® PA 100 Series machine and for use in
making a 1% Renalin® 100 mixture.
3. "Proportioned Renalin® 100 Solution" is the final diluted solution, which has been further
proportioned by the Renatron® PA 100 Series machine. This is the solution actually used
for cleaning and sterilizing the dialyzer and the Renatron® PA 100 Series.
4. "1% Renalin® 100 Solution" - 1 part Renalin® 100 Cold Sterilant to 99 parts AAMI quality
water.
5. The terms equipment, machine, device, station or Renatron® PA 100 Series are
synonymous with each Renatron® PA 100 Series Dialyzer Reprocessing unit of the overall
Renatron® PA 100 Series system and may be used interchangeably throughout this manual.
NOTE – ALL TIMES AND FLOW RATES SPECIFIED IN THIS MANUAL ARE APPROXIMATE.
C. General System Operation: The Renatron® PA 100 Series is an automated system for rinsing,
cleaning, and testing of hollow fiber dialyzers and for delivery of Proportioned Renalin® 100
Cold Sterilant solution to the dialyzers.
After rinsing and cleaning the dialyzers, the Renatron® PA 100 Series compares the blood
compartment filling volume (priming volume) against the predetermined volume set into the
machine.
The machine also conducts pressure leak tests on the blood and dialysate compartments of
the dialyzer. If either the blood compartment volume test or the pressure leak test is
unsatisfactory, the machine will automatically stop functioning and activate audible and
visual alarms.
The Renatron® PA 100 Series stations use Renalin® 100 Cold Sterilant as the only chemical
needed to reprocess dialyzers. THE QUALITY OF WATER USED TO SUPPLY RENATRON®
PA 100 SERIES STATIONS MUST EQUAL OR EXCEED REQUIREMENTS LISTED IN THE
SPECIFICATIONS SECTION. The Renalin® 100 Cold Sterilant used by the Renatron® PA 100
Series can cause a pressure build up within the machine and/or the dialyzer under certain
conditions. To prevent this possible pressure build up, the Renatron® PA 100 Series will
automatically perform a venting operation every 10 seconds after filling the dialyzer with
Proportioned Renalin® 100 Solution.
CAUTION – IN THE EVENT A DIALYZER HAS BEEN LEFT ON THE MACHINE AND DOUBT
EXISTS WHETHER VENT ACTION HAS OCCURRED, (I.E. POWER FAILURE TO RENATRON®
PA 100 SERIES) THE DIALYZER MUST BE REMOVED CAREFULLY. REMOVE THE DIALYZER
AFTER WRAPPING ALL CONNECTIONS WITH DISPOSABLE ABSORBENT MATERIAL.
PRESSURE BUILD UP MAY CAUSE FLUIDS TO SPRAY.
Instruction Manual
-6-
The Renatron® PA 100 Series station(s) sit on a single or dual unit drip tray that will catch
fluid drippage from the machine(s). A water pressure gauge block, with one or two outlets as
appropriate, is attached to the drip tray. The pressure gauge displays the pressure of the
water supplied to the Renatron® PA 100 Series station(s). The steps of the reprocessing
process are given below:
1. Performed by Operator
a. Operator connects the dialysate outlet port on the dialyzer to the connector mounted
on the front panel marked "DIALYSATE OUTLET SANITIZE INTERLOCK." This
connection acts as the dialyzer holding fixture.
b. Operator connects the system’s "ARTERIAL INLET," "VENOUS OUTLET," and
DIALYSATE INLET" lines to the dialyzer.
c. The operator sets the blood compartment reference volume by touching the "HOLD
TO SET" switch and turning the "SET" knob until the desired value is displayed in the
"VOLUME" display. The value for the blood compartment reference volume must be
determined by the attending physician for the type and size of the dialyzer to be
reprocessed.* The operator also selects the appropriate reprocessing program mode
by pressing the "MUTE" and "RESET" switches.
* NOTE – It is recommended that the operator set the reference volume of the dialyzer to be
reprocessed to 80% of the new dialyzer priming volume. New dialyzer measured priming
volume may differ from advertised volume by as much as 20%. It is recommended that the
operator measure new dialyzer volume with a known calibrated Renatron® PA 100 Series to
determine actual new dialyzer priming volume.
2. Automatic Reprocessing Steps
a. After the "START PROCESS" switch is pressed to initiate the reprocessing cycle, the
Renatron® PA 100 Series will reprocess the dialyzer according to the steps outlined in
the appropriate Operation Format and Program Outline document as follows:
Document Code Program
Kuf
50098-000 (OO) Low Flux Dialyzer
0-8
Time
8 min
50098-001 (CH)
Mid-Range/High Efficiency and
8-15
Hemophan Type Dialyzers
8 min
50098-002 (HF)
High-Range/High Flux
dialyzers and Hemofilters
10 min
15+
* NOTE – The Renatron® PA 100 Series machine should be sanitized a minimum of ONCE PER DAY.
3. The machine can automatically sanitize itself when the "Volume" display indicates "SEL"
and program mode "00," "CH," or "HF" are displayed in the "PROGRAM STEP" display.
The operator touches the "START SANITIZE" switch to start the sanitize cycle. The steps
of the sanitize cycle are given below:
a. Operator first visually verifies that the "RENALIN® 100 SOLUTION SUPPLY TANK"
has at least one inch of unexpired Renalin® 100 Solution remaining in the tank.
NOTE – If an insufficient amount of solution exists to complete one full "SANITIZE" cycle, the
machine will automatically alarm. The message "ADD CHEMICAL" will appear on the front
panel and remain visible until the alarm situation has been corrected and the "START
SANITIZE“ switch has been pressed.
b. Operator connects the system’s "ARTERIAL INLET" and "VENOUS OUTLET" lines to
the calibration cell or their respective "SANITIZE/ARTERIAL" and "SANITIZE/
VENOUS" connectors and connects the "DIALYSATE INLET" line to the "DIALYSATE
OUTLET - SANITIZE INTERLOCK" connector using the male/male fitting attached to
the front of the machine.
-7-
Instruction Manual
c. Operator touches the "ON" switch, selects a program by pressing the "MUTE" and "RESET"
switches then touches the "START SANITIZE" switch which activates the sanitize cycle.
The machine will automatically fill and flush all internal blood contact surfaces and the
dialysate circuit with Proportioned Renalin® 100 Solution. The machine then enters
"PROGRAM STEP" 83, at which time the "SANITIZE" message will be displayed and a 3
second continuous tone will sound.
d. Operator presses "OFF" switch, and allows machine to sit for a minimum of six hours
before using to reprocess dialyzers.
NOTE – A sanitize holding period of six hours or more will expose the machine’s fluid pathways
to Proportioned Renalin® 100 Solution for a time consistent with the disinfection time indicated in
the Renalin® 100 Cold Sterilant labeling. If the "START PROCESS“ switch is pressed after entering
"PROGRAM STEP“ 83, total sanitize cycle time will be approximately seventeen (17) minutes
which includes a 10 minute hold time. This will sanitize the machine fluid pathways. This cycle
will also allow the purging of the Renatron® PA 100 Series hydraulic pathways for shipping
purposes. Use the methods described in c - d above for a routine sanatization procedure.
e. Operator wipes clean the external machine surfaces with a lint free disposable towel
saturated with fresh 1% Renalin® 100 solution or undiluted Actril® solution.
f.
Specifications
The Renatron® PA 100 Series is now ready for reprocessing of dialyzers.
A. Materials of Construction: Acrylic, PVC, ABS, Polypropylene, Delrin, Ethylene Propylene, Viton
Rubber, Stainless Steel.
B. Electrical Leakage Current (risk current): Each Renatron® PA 100 Series, 100 micro amps, RMS
MAX at 115 VAC per CSA Standard C22-2, No. 125 Section 6.3 with revisions to 1984.
C. Electrical Requirements:
1. Renatron® PA 100 Series station:
Voltage:
Selectable 100, 120, 230, 240 VAC
50/60 Hz single phase
Fuses:
100-120 VAC, one 4A 3AG (1.25 inches x 0.25
inches)
220-240 VAC, two T2A (5mm x 20mm)
Equipment Classification:
Class 1, Type B
Electrical Leakage Current From cabinet to ground: <100uA
(risk current):
From ground wire to outlet: <100uA
Power Consumption:
460 VA maximum
Mode of operation
Continuous operation
D. Physical Properties and Dimensions:
1. Renatron® PA 100 Series station
Instruction Manual
Width
14.5 inches
41 cm
Depth
12.3 inches
31 cm
Height
16 inches
33 cm
Weight
50 lbs
23 kg
-8-
2. Drip Tray:
Version 1
(single)
Version 2
(dual)
Width
15.25 inches
39 cm
33.25 inches
85 cm
Depth
28 inches
71 cm
28 inches
71 cm
Height
3.5 inches
9 cm
3.5 inches
9 cm
Weight
3 lbs.
1.36 kg
6 lbs.
2.73 kg
E. Environmental Limits:
The Renatron® PA 100 Series is designed to be safe for indoor use at temperatures from 5˚C
(41˚F) to 40˚C (104˚F), maximum relative humidity of 80% at 31˚C (87.8˚F) decreasing
linearly to 50% relative humidity at 40˚C (104˚F) and altitudes up to 6500 ft (2000 meters).
The supply line voltage fluctuations may not exceed ±10% of the nominal voltage.
F. Water Requirements:
1. Flow
a. Feed line flow 0.46 gallons per minute (1.75 liters/minute) average pressure at 20-55
psig (137.9 - 379 K Pa, 1.38 - 3.79 Bars) per Renatron® PA 100 Series station.
b. Peak flow rate is approximately 1.6 gallons per minute (6 liters/minute) per
Renatron® PA 100 Series station. This peak flow is 15-35 seconds in duration and
occurs at approximate three (3) minute intervals.
2. Water must meet quality requirements listed in the current versions of the ANSI/AAMI
Standard for Hemodialysis Systems and ANSI/AAMI Recommended Practice for Reuse of
Hemodialyzers. It must meet both endotoxin and bacterial specifications listed in the
current version of the ANSI/AAMI Recommended Practice for Reuse of Hemodialyzers.
3. Inlet water must be filtered to particle size not larger than 1 micron.
4. Temperature must be in a range of 59˚F - 75˚F (15˚C - 24˚C).
5. Static (no flow) pressure should not be in excess of 55 psig (379K Pa - 3.79 Bars). For
optimal performance adjust the pressure to 40 psig (276K Pa - 2.76 Bars) dynamic output
pressure while all Renatron® PA 100 Series are operating in step 04 and all the other
equipment on the same water system are in operation.
G. Drain:
The drain must be capable of accepting a minimum water flow of 1.6 gal/min. (approx.
6 liters/minute) per Renatron® PA 100 Series station. Optimal placement is at counter top level,
and the drain should be placed no higher than the top of the machine. Sanitary drain
connections must be used in accordance with state and local plumbing codes. Drain must be
vented to atmosphere. Drain piping should be made from PVC, CPVC or other corrosion resistant
materials.
H. Dialyzer Testing:
The Renatron® PA 100 Series station performs a blood compartment (priming) volume
measurement, and a pressure leak test on each dialyzer.
1. Blood Compartment (Priming) Volume Measurement - The Renatron® PA 100 Series
measures, displays and holds each reprocessed dialyzer’s blood compartment volume
with a repeatability of ±5%, typically within 5.0 ml of true volume. If this volume is less
than the blood compartment reference volume (selected by prescribing physician) the
dialyzer fails the volume test.
2. Pressure Drop Test - The dialysate compartment of each dialyzer is subjected to
250 mmHg negative pressure while the blood compartment remains at atmospheric
pressure. A dialyzer that loses pressure at a rate equal to or greater than 0.83 mmHg
±10% per second fails the pressure leak test (low flux -00 and mid-range CH programs).
A dialyzer that loses pressure at a rate equal to or greater than 1.25 mmHg ±10% per
second fails the test for the high flux (HF) program.
-9-
Instruction Manual
I. Chemicals Required:
This Renatron® PA 100 Series station is designed to function with Renalin® 100 Cold
Sterilant solutions. These solutions are described in the Renalin® 100 Cold Sterilant
Instructions for Use (P/N 50090-720).
Description
of Controls
A. Renatron® PA 100 Series Station Controls
1. "OFF" switch de-energizes electronic circuitry in the Renatron® PA 100 Series . POWER
WILL STILL BE TRANSMITTED TO THE MACHINE UNLESS THE MACHINE IS
DISCONNECTED FROM THE ELECTRICAL POWER SUPPLY.
2. "ON“ switch energizes electronic circuitry. Sets Renatron® PA 100 Series station in
standby mode (i.e., "volume" display reads ["SEL"] and "PROGRAM" step display
indicates [—]).
3. "START PROCESS" switch initiates dialyzer reprocessing only when a priming volume
has been set and a dialyzer reprocessing program selected i.e., "00", "CH", "HF",.
Note: "START PROCESS" also allows user to repeat most program steps after an alarm
situation in a process cycle. Restart machine, in "PROGRAM STEP" 83, to purge fluid
from hydraulic pathway for shipping purposes only.
4. "START SANITIZE" switch initiates a machine cleaning cycle and repeats most program
steps after an alarm situation in sanitize cycle.
NOTE – Sanitize can only be initiated if reprocessing program "00", "CH", or "HF", is being
displayed in the "step display,“ not from the standby (—) mode.
5. "MUTE" switch mutes audio alarm.
6. "RESET" switch returns machine to last program mode used and "VOLUME" display to
"SEL".
7. "DISPLAY" switch allows operator to blank the display from viewing the actual program
steps.
8. "HOLD TO SET" switch when touched, activates "VOLUME" display. Allows operator to
view displayed value of minimum acceptable blood compartment reference volume
"SET" into the machine.
9. "SET" knob allows the operator to set the minimum acceptable blood compartment
reference volume prescribed by the attending physician in the manual mode of operation.
B. Renatron® PA 100 Series Station Indicators and Error Messages:
1. "VOLUME DISPLAY" indicates:
a. Blood compartment volume test measurement; or
b. Blood compartment reference volume
2. "PROGRAM STEP" is a display that allows the operator to view the actual program step
number and programmed mode of operation. Display is deactivated/activated by
sequentially touching "DISPLAY" switch.
3. "TANK VOLUME" error message appears when the internal mixing/measuring tank
should be empty but is not or when an improper action has occurred within the tank.
4. "CLEAN" message appears during the dialyzer cleaning steps.
5. "ADD CHEMICAL" error message appears when machine detects that an insufficient
amount of Renalin® 100 solution has been drawn into the mixing/measuring tank.
6. "TEST" message appears during the dialyzer testing steps.
7. "VOLUME FAIL" error message appears when measured dialyzer blood compartment
(priming) volume is less than the blood compartment reference volume.
8. "PRESSURE FAIL" error message appears when a fiber leak has been detected by the
machine.
Instruction Manual
-10-
®
Renatron
® II 100 Series Upgrade
Renatron
PA 100 Series Upgrade
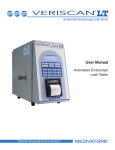
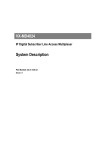
WARNING
Use of germicide(s) other than RENALIN®
100 COLD STERILANT CONCENTRATE
may result in:
•
•
•
•
Improper dilution of the germicide
A safety hazard
Adverse performance
Decreased component life and machine
reliability
67197-891/B
Figure 1
-11-
Instruction Manual
9. "DISINFECT" message appears during the dialyzer disinfection steps.
10. "ALARM" error message flashes continuously until alarm condition is corrected.
11. "PROCESS COMPLETE" message appears when dialyzer reprocessing cycle is complete.
12. "INTERLOCK" error message appears when the "START SANITIZE" switch has been
pressed and the sanitize interlock is not engaged.
13. "SANITIZE" message appears when the machine sanitization cycle is complete.
Renatron® PA
100 Series
Installation
Instructions
IMPORTANT – TO ISOLATE THE STATION FROM THE ELECTRICAL SUPPLY YOU MUST
DISCONNECT THE CORD FROM THE POWER ENTRY MODULE LOCATED IN THE LOWER
RIGHT (WHEN VIEWED FROM THE FRONT) SIDE OF THE UNIT BACKSIDE. THE UNIT
SHOULD BE SITUATED TO ALLOW AS MUCH ROOM ON THE RIGHT SIDE AS POSSIBLE,
ALLOWING EASY ACCESS.
CAUTION – TOTAL SYSTEM CHASSIS RISK CURRENT SHOULD NOT EXCEED 100 MICRO
AMPS.
NOTE – Report any damage promptly to the shipping company and make claim for
compensation. Damage incurred during shipment is not covered by the machine warranty.
Please save the shipping container for use in returning machine if repairs are necessary.
NOTE – All plumbing (hoses and lines) are cut to length and calibrated at the factory and must
not be modified from the original lengths or sizes. Only factory authorized service personnel
should repair or replace these items.
CAUTION –PRIOR TO CONNECTING, ALL WIRING MUST BE CHECKED TO ENSURE
PROPER POLARITY AND ALL GROUNDS MUST BE CHECKED TO ENSURE CONTINUITY.
CAUTION – WHEN THE WATER SUPPLY FEED LINE IS CONNECTED TO THE RENATRON® PA
100 SERIES, IT MUST BE EQUIPPED WITH AN "ON-OFF“ VALVE THAT WILL PERMIT SHUTTING
OFF THE FLOW OF WATER TO THE RENATRON® PA 100 SERIES WHEN NOT IN USE.
CAUTION – PROPER WATER SYSTEM OPERATION MUST BE VERIFIED. SEE
SPECIFICATIONS SECTION V FOR WATER REQUIREMENTS.
NOTE – ALWAYS USE THE RENALIN® 100 COLD STERILANT CONTAINER AS A SUPPLY
TANK FOR THE RENATRON® PA 100 SERIES DO NOT USE ANY OTHER TYPE TANK OR
CONTAINER.
CAUTION – ALWAYS STORE THE RENALIN® 100 COLD STERILANT CONTAINER UPRIGHT
AND OUT OF DIRECT SUNLIGHT. EXPOSURE TO SUNLIGHT DAMAGES THE CLEANING
AND DISINFECTING QUALITIES OF THE RENALIN® 100 COLD STERILANT.
NOTE - RENALIN® 100 COLD STERILANT CAN BE KEPT OUT OF SUNLIGHT BY KEEPING
THE RENALIN® 100 COLD STERILANT CONTAINER IN THE ORIGINAL SHIPPING
CARTON.
A. Verify suitable service connection
1. Water pressure should be 20 PSI minimum -137.9 K Pa - 1.38 Bars at 1.75 liter/minute
average flow rate.
Instruction Manual
-12-
2. Water quality must meet or exceed water requirements listed in Specifications Section.
3. If static (no flow) water pressure exceeds 55 psig (379K Pa - 3.79 Bars) make sure the
static pressure is reduced to below 55 psig. Dynamic pressure displayed must be 20 psig
(138K Pa - 1.38 Bars) or greater in step 04. Optimal dynamic water pressure is between
35-40 psig (241-276 K Pa - 2.41-2.76 Bars).
B. Remove the machine from shipping carton and inspect for possible damage incurred during
shipment. Lift the machine by placing fingers under the rear corners of the station, pulling
the station close to the body, and lifting while keeping the back straight. Keep the station
close to the body while carrying to the new location.
C. Remove Instruction Manual and Calibrated Volume Cell. Save carton for future use in
service or evaluation return.
D. Remove optional drip tray(s) from shipping carton(s) and place in desired location on
sturdy, level bench. Place the machines in appropriate mounts on the drip tray. The
Renatron® PA 100 Series must be level. Machines that are not level may have a 0-8 ml error
in the initial volume that is displayed when measuring Calibrated Volume Cell.
E. Place the siphon tube marked with the word Renalin® 100 in a container of Renalin® 100
Solution.
F. Connect the quick disconnect coupling, which is located at the end of the Renalin® 100
uptake hose, to the siphon (uptake) tube.
G. Make service connections to power, water and drain in accordance with Specifications
Section. Make sure that the water pressure gauge block is connected between the water inlet
source and the Renatron® PA 100 Series. Secure the water pressure gauge block to the back of
the drip tray using the screws provided. Be absolutely certain that no water leaks exist and
all connections are secure.
H. Insert the Calibrated Volume Cell between the arterial and venous lines. Record volume
value etched on cell here: _______________________.
I. Connect the dialysate line quick disconnects together using the plastic male to male
connector (interlock connector).
J. Open the water supply valve completely.
K. Push the switch labeled "ON." "SEL" will be displayed in the "VOLUME“ display and "—"
will appear in the "PROGRAM STEP" display window.
L. Push the "MUTE" switch and the "RESET" switch at same time. "00" will be displayed in the
"PROGRAM STEP" display window.
M. Touch and hold the "HOLD TO SET" switch and adjust the "SET" knob until the "VOLUME"
window displays (003). Release the "HOLD TO SET“ switch.
N. Press the "START PROCESS" switch. The machine will finish the process cycle and then
the "PROCESS COMPLETE" message and tone will be activated.
O. The calibration cell volume recorded in Step H above should be within ±3 cc. of the volume
value displayed on the Renatron® PA 100 Series. If the value is not within this range, refer to
the Calibration and Adjustment Section of this manual.
P. Press the "RESET" switch. The "VOLUME" display will read "SEL" and the "PROGRAM
STEP" display will indicate "00" or the last program mode used.
Q. Press the "START SANITIZE" switch. A red light will appear in corner of switch. Ensure
that the machine completes all sanitize steps and stops at step 83. After the "START
PROCESS" switch is pressed, the machine should complete the cycle after approximately
seventeen (17) minutes. Steps higher than 83 are used only when a complete hydraulic purge
is needed (e.g. preparation for shipment).
R. Installation is complete. Repeat for each Renatron® PA 100 Series station.
-13-
Instruction Manual
CAUTION – RENATRON® PA 100 SERIES STATIONS ARE NOT SANITIZED AT THE
FACTORY. SANITIZE PROCEDURE MUST BE PERFORMED PRIOR TO REPROCESSING
DIALYZERS INTENDED FOR PATIENT USE.
Daily
Machine
Sanitize
Procedure
A. The Renatron® PA 100 Series station must be sanitized once each day. Perform the
following procedure at end of reprocessing day:
1. Ensure that the Renalin® 100 storage tank contains at least 1" (2.5 cm) of Renalin® 100
solution.
2. Connect the "ARTERIAL INLET" and "VENOUS OUTLET" lines to the calibration cell.
3. Attach the "DIALYSATE INLET" line to the "DIALYSATE OUTLET/SANITIZE
INTERLOCK" connector using the male/male fitting attached to the front of the machine.
4. Wipe clean all external surfaces on the Renatron® PA 100 Series with fresh 1% Renalin®
100 Solution or full strength Actril® solution.
5. Check that the "VOLUME" display indicates "SEL" and program mode "00," "CH," or "HF"
are displayed in the "PROGRAM STEP" display.
6. Push the "START SANITIZE" switch to start the cycle. The machine will automatically
sanitize itself.
7. Press machine "OFF" switch when the machine cycles to "PROGRAM STEP" 83. A
"SANITIZE“ message will be displayed.
NOTE – A sanitize holding period of six hours or more will expose the machine’s fluid
pathways to Proportioned Renalin® 100 Solution for a time consistent with the disinfection
time indicated in the Renalin® 100 Cold Sterilant labeling. If the "START PROCESS" switch is
pressed after entering "PROGRAM STEP" 83, total sanitize cycle time will be approximately
seventeen (17) minutes which includes a 10 minute hold time. This will sanitize the machine
fluid pathways. This cycle will also allow the purging of the Renatron® PA 100 Series
hydraulic pathways for shipping purposes.
8. Turn off water supply to the Renatron® PA 100 Series station.
9. If the Renatron® PA 100 Series station is not used within 7 days time after sanitize is
complete, it should be sanitized again and allowed to sit for at least 6 hours prior to use.
Operating
Procedures
A. General Considerations and Cautions
CAUTION – MINNTECH RENAL SYSTEMS STRONGLY RECOMMENDS THAT ANY
HOLLOW FIBER DIALYZER REPROCESSED BY THIS MACHINE ACCORDING TO THE
INSTRUCTIONS IN THIS MANUAL, BE USED ONLY BY THE PATIENT WHO ORIGINALLY
USED THE DIALYZER.
1. When the Renatron® PA 100 Series station is not in use, the "ARTERIAL INLET" and
"VENOUS OUTLET" lines should be connected to the Calibrated Volume Cell. The
"DIALYSATE INLET" line should remain attached to the male/male fitting on the
"DIALYSATE OUTLET/SANITIZE INTERLOCK" connector.
2. At the end of each day the operator should sanitize each Renatron® PA 100 Series station.
The "SANITIZE" cycle sanitizes the machine and prepares it for overnight storage.
3. Renalin® 100 Cold Sterilant and its diluted versions are light sensitive. The Renalin® 100
Cold Sterilant storage carton can be used to hold the Renalin® 100 containers and reduce
the light exposure of Renalin® 100. Before using the Renatron® PA 100 Series each day,
ensure that the Renalin® 100 has not passed the expiration date marked on the Renalin
100 container.
NOTE: The supply tank will hold sufficient Renalin® 100 to clean approximately 250 280
dialyzers (low flux and mid-range programs), or 180-200 dialyzers (high flux program).
4. Prior to the removal of the dialyzer from the blood circuit, the operator must ascertain
that all identification and information on the dialyzer is legible and current (See Dialyzer
Identification and Documentation Procedure on page 17).
Instruction Manual
-14-
5. After storage and prior to preparation for use, a sample of fluid should be removed from
the dialyzer and tested for the presence of Renalin® 100 using the Renalin® 100 presence
test procedure and Perassay 500® Peracetic Acid Indicator Test Strips (Part #78378) or
Renalin® Indicator Test Strips (Part #78199). The Renalin® 100 presence test procedure is
described in the Renalin® 100 Cold Sterilant Instructions for Use, Part #50090-720.
WARNING – THE PROPORTIONED RENALIN® 100 SOLUTION
CONTAINED IN THE REPROCESSED DIALYZER MUST BE ADEQUATELY
AND THOROUGHLY RINSED OUT OF THE DIALYZER PRIOR TO ITS
CLINICAL USE. THIS SHOULD BE DONE IN ACCORDANCE WITH THE
INSTRUCTIONS SET FORTH IN THE RENALIN® 100 COLD STERILANT
INSTRUCTIONS FOR USE (PART #50090-720).
B. Start Up
1. Prior to the first use of day, wipe off the front panel of the Renatron® PA 100 Series
station with a disposable wipe saturated with fresh 1% Renalin® 100 Solution or full
strength Actril® solution. Discard the used wipe.
2. Verify that the Calibration Cell is attached to the Renatron® PA 100 Series Station.
3. Turn on the water supply and check static water pressure reading (should be between
20-55 psi [138-379K Pa - 1.38-3.79 Bars]).
4. Verify that there is sufficient Renalin® 100 in the container to reprocess the
dialyzer that will be installed on the Renatron® PA 100 Series station in step D below
and that the Renalin® 100 is not expired. Approximately 1" (2.5 cm) of Renalin® 100 is
required. Verify that the uptake hose is connected to the container.
5. Touch the "ON" switch and select program mode "00".
a. To change the program mode , simultaneously press "MUTE/ALARM" and "RESET".
b. "START PROCESS" will not initiate if "SEL" is displayed in the upper window. To
clear, press "HOLD TO SET" and turn "SET" knob to 255.
6. Check dynamic water pressure. In step 4, the dynamic pressure should optimally be
between 30-35 psi (2.07-2.41K Pa - 2.07-2.41 Bars).
7. Verify that the Calibration Cell volume displayed is within ± 3 ml of the recorded
reference volume.
8. Mute the audible alarm.
9. Remove the Calibration Cell.
10. Press "RESET“.
C. Remove the Dialyzer from the Extracorporeal Blood Circuit using standard facility
protocols.
Note – Prior to removing the dialyzer from the extracorporeal circuit, the operator must ensure
that all identification and information on the dialyzer is legible and current before proceeding.
WARNING – THE OPERATOR SHOULD WEAR PROTECTIVE EYEWEAR,
RUBBER GLOVES, AND OTHER PROTECTIVE CLOTHING. FOLLOW UNIVERSAL SAFETY PRECAUTIONS FOR DEALING WITH BLOOD
CONTAMINATED DEVICES.
.
CAUTION – THE TIME INTERVAL BETWEEN REMOVING AND REPROCESSING THE
DIALYZER SHOULD BE KEPT WITHIN THE LIMITS PRESCRIBED BY THE PHYSICIAN. THE
SUGGESTED MAXIMUM TIME INTERVAL IS TWO (2) HOURS.
D. Installation of the Dialyzer on the Renatron® PA 100 Series station.
1. Remove the blood port cap from the venous blood port of the dialyzer.
2. Wipe the venous blood port with a wipe saturated with 1% Renalin® 100 Solution.
3. Attach the Renatron® PA 100 Series venous outlet line to the venous port of the dialyzer.
4. Connect the dialyzer dialysate inlet to the Renatron® PA 100 Series dialysate inlet.
5. Connect the dialyzer dialysate outlet to the Renatron® PA 100 Series dialysate outlet/
sanitize interlock.
-15-
Instruction Manual
6. Remove the blood port cap from the arterial blood port.
7. Wipe the arterial blood port with a wipe saturated in 1% Renalin® 100 Solution.
8. Attach the Renatron® PA 100 Series arterial inlet line to the arterial blood port of the
dialyzer. Dialyzer placement should be vertical to the Renatron® PA 100 Series.
CAUTION – IT IS THE SOLE RESPONSIBILITY OF THE PRESCRIBING PHYSICIAN TO
DETERMINE THE BLOOD COMPARTMENT REFERENCE VOLUME AND PROGRAM MODE
ACCEPTABLE FOR A PARTICULAR TYPE AND SIZE HOLLOW FIBER DIALYZER. THIS
REFERENCE VOLUME AND PROGRAM MODE MUST BE SET FROM THE FRONT PANEL
MANUALLY OR INITIALLY ENTERED INTO THE DATABASE TO ALLOW THE COMPUTER
TO AUTOMATICALLY SET THESE VALUES BEFORE REPROCESSING A DIALYZER. IT IS
STRONGLY RECOMMENDED THAT THE MINIMUM ACCEPTABLE REFERENCE VOLUME BE
GREATER THAN 80% OF THE NEW VOLUME.
CAUTION – IT IS IMPORTANT FOR THE OPERATOR TO VERIFY THAT THE BLOOD
COMPARTMENT REFERENCE VOLUME SET ON THE MACHINE MANUALLY OR
AUTOMATICALLY IS CORRECT FOR EACH DIALYZER TO BE REPROCESSED.
E. Reprocessing the Dialyzer on the Renatron® PA 100 Series station
1. Push the switch labeled "ON." "SEL" will be displayed in the "VOLUME" display window
and "_ _" will appear in the "PROGRAM STEP" display window.
2. Push the "RESET" switch and the "MUTE" switch at same time to display the proper
program mode in the "PROGRAM STEP“ display window for the dialyzer to be reprocessed,
i.e. "00," "CH," "HF." Sequentially press the "RESET" and "MUTE" switches at the same time
to advance the Renatron® PA 100 Series station to the desired program mode.
3. Touch and hold the "HOLD TO SET" switch.
4. Adjust the "SET" knob until the "VOLUME" display indicates the physician’s prescribed
blood compartment reference volume for the dialyzer to be reprocessed.
5. Touch the "START PROCESS" switch. The Renatron® PA 100 Series station will now
reprocess the dialyzer in the manner described in Section 6.C of this manual.
6. When the "PROCESS COMPLETE" message appears the reprocessed dialyzer is ready to
be removed from the Renatron® PA 100 Series station.
7. If a "VOLUME FAIL" or "PRESSURE FAIL" message appears press the "START
PROCESS" switch to repeat the test which was failed. The dialyzer may pass the test
when retested by the Renatron® PA 100 Series.
Note –Pushing "START PROCESS" after a "VOLUME FAIL" alarm will cause the machine
to attempt to draw additional fluid from the blood compartment for measurement. If
additional fluid is obtained the total volume drawn may now be enough to allow a dialyzer
that was only a few ml below the minimum acceptable volume to pass the volume test.
Multiple attempts to draw additional fluid from the dialyzer have not proved to be effective at
improving the likelihood of passing the volume test.
8. If the dialyzer fails either the pressure test or the volume test, discontinue use of the
dialyzer.
F. Removal of the dialyzer from the Renatron® PA 100 Series station.
CAUTION –CAREFUL ASEPTIC TECHNIQUE MUST BE FOLLOWED WHILE REMOVING THE
REPROCESSED DIALYZER FROM THE RENATRON® PA 100 SERIES TO PREVENT
CONTAMINATION OF THE DIALYZER BLOOD PATHWAY.
CAUTION – DIALYZERS REPROCESSED WITH PROPORTIONED RENALIN® 100 SOLUTION
MAY UNDERGO AN INTERNAL PRESSURE BUILDUP DURING STORAGE. THEREFORE, USE
MINNTECH RENAL SYSTEMS DIALYSATE PORT CAPS ONLY.
1. Assure a supply of disinfected port caps. Disinfection of the dialysate port and blood
port caps from the dialyzer can be achieved by one of the following ways:
a. Place the caps to be disinfected into fresh 1% Renalin® 100 Solution for a minimum of
30 minutes.
b. Place the caps to be disinfected in full strength Actril® solution a minimum of
30 minutes.
Instruction Manual
-16-
CAUTION – MINNTECH RENAL SYSTEMS’ DIALYSATE PORT CAPS AND DIALYZER
BLOOD PORT CAPS ARE NOT AUTOCLAVABLE.
2. Wear protective clothing as indicated in the Renalin® 100 Cold Sterilant Directions for
Use (Part # 50090-720) and the Material Safety Data Sheet (MSDS) for Renalin® 100 Cold
Sterilant.
Note –Remove the dialyzer from the Renatron ® PA 100 Series ONLY when the "PROCESS
COMPLETE" message is displayed or when the dialyzer has failed the volume or pressure test.
If the dialyzer has failed the volume or pressure test, it must be either retested (press "START
PROCESS" switch), recleaned (touch "RESET" and then "START PROCESS" switch) or
removed and discarded. When the "PROCESS COMPLETE" message is displayed, automatic
venting of any pressure buildup in the dialyzer or machine will occur. Press "RESET" before
removal of the dialyzer.
3. Disconnect the "ARTERIAL INLET" line from the dialyzer. Wipe end of line with gauze
saturated with 1% Renalin® 100 Solution or full strength Actril® solution. Reconnect the
end of this line to its "SANITIZE/ARTERIAL" connector located on the machine front
panel.
4. Wipe the external surfaces of the dialyzer arterial blood port using gauze soaked in fresh
1% Renalin® 100 Solution or full strength Actril® solution.
5. Place a disinfected blood port cap (See page 16, F.1.a-b) on the dialyzer arterial blood
port.
6. Disconnect the "VENOUS OUTLET" line from the dialyzer. Wipe end of line with gauze
saturated with 1% Renalin® 100 Solution or full strength Actril® solution.
7. Wipe the external surfaces of the dialyzer venous blood port with gauze soaked in fresh
1% Renalin® 100 Solution or full strength Actril® solution.
8. Place a disinfected blood port cap (See page 16, F.1.a-b) on the dialyzer venous blood
port.
9. Disconnect the dialysate outlet of the dialyzer from the "DIALYSATE OUTLET/
SANITIZE INTERLOCK" connector on the Renatron® PA 100 Series.
10. Wipe the external surfaces of the dialysate outlet port with gauze soaked in fresh 1%
Renalin® 100 Solution or full strength Actril® solution. Install a disinfected dialysate
port cap (See page 15, F.1.a-b) on the dialysate outlet port of the dialyzer.
11. Disconnect the "DIALYSATE INLET" line from the dialysate inlet port and temporarily
install it on the holding bracket mounted on the side of the "DIALYSATE OUTLET/
SANITIZE INTERLOCK" post on the Renatron® PA 100 Series station.
12. Wipe the external surfaces of the dialysate inlet port with gauze soaked in fresh 1%
Renalin® 100 Solution or full strength Actril® solution. Install a disinfected dialysate port
cap on the dialysate inlet port of the dialyzer.
G. Suggested Cleaning of the Dialyzer Case
1. Wipe the entire capped, reprocessed dialyzer with a disposable wipe soaked in fresh 1%
Renalin® 100 Solution or full strength Actril® solution.
2. Discard the disposable wipe.
3. Rinse off the solution from the dialyzer case with cold flowing pure water and dry.
H. Suggested Dialyzer Identification and Documentation Procedures.
IMPORTANT NOTE – IT IS THE RESPONSIBILITY OF THE PRESCRIBING PHYSICIAN TO
DETERMINE WHAT INFORMATION IS RECORDED AND THE MANNER IN WHICH THE
RECORDS ARE MAINTAINED.
1. The use of indelible, waterproof, or permanent ink or other indelible marking systems to
label the dialyzer is recommended.
2. It is recommended that the following information be recorded legibly on each dialyzer.
a. Patient’s Identification (required).
b. Dialyzer use number (required).
c. Date the dialyzer was last reprocessed (required).
-17-
Instruction Manual
d. Pressure leak test results (optional).
e. Measured volume of blood compartment test (optional).
f.
The initials of the operator who reprocessed the dialyzer (optional).
g. Any other information required by the prescribing physician.
3. It is recommended that a label with the above information be used on every reprocessed
dialyzer.
Storage and
Handling for
Reprocessed
Dialyzers
A. The storage area should be a well-ventilated, cool area that is out of direct sunlight.
B. Reprocessed dialyzers or dialyzers awaiting reprocessing should not be exposed to freezing
temperature or sources of heat. The recommended temperature range is 59˚F (15˚C) to 75˚F
(24˚C).
WARNING – MINIMUM STORAGE TIME FOR REPROCESSED DIALYZERS
IS 11 HOURS
CAUTION – AFTER STORAGE AND BEFORE THE REPROCESSED DIALYZER IS RINSED AND
CLINICALLY USED, A SAMPLE OF FLUID SHOULD BE REMOVED FROM THE DIALYZER
AND TESTED FOR THE PRESENCE OF RENALIN® 100 USING PERASSAY® 500 PERACETIC
ACID INDICATOR STRIPS (PART #78378) OR RENALIN® INDICATOR TEST STRIPS (PART
#78199). REFER TO THE RENALIN® 100 PRESENCE TEST PROCEDURE OUTLINED IN THE
RENALIN® 100 COLD STERILANT INSTRUCTIONS FOR USE (PART #50090-720) AND THE
TEST STRIP LABELING.
WARNING – A HOLLOW FIBER DIALYZER THAT IS REPROCESSED AND
DISINFECTED BY THIS MACHINE IS FILLED WITH PROPORTIONED
RENALIN® 100 SOLUTION. THE PROPORTIONED RENALIN® 100 SOLUTION MUST BE ADEQUATELY AND THOROUGHLY RINSED OUT OF THE
DIALYZER PRIOR TO CLINICAL USE. USE THE RENALIN® RESIDUAL
TEST KIT (PART #78198) TO VERIFY RESIDUAL RINSE OUT AS
OUTLINED IN THE RENALIN® 100 COLD STERILANT INSTRUCTIONS
FOR USE (PART #50090-720)
Calibration
and
Adjustment
CAUTION – EXPOSING DIALYZERS TO CYCLIC TEMPERATURE DIFFERENCES DURING
ANY PART OF THE REUSE PROCEDURE MAY RESULT IN INCREASING OR INITIATING
PRESSURE BUILDUP IN THE DIALYZER DURING STORAGE. IN THESE CONDITIONS, A
VENTABLE DIALYZER DIALYSATEPORT CAP SHOULD BE USED. A VENTABLE DIALYZER
DIALYSATE PORT CAP IS AVAILABLE FROM MINNTECH RENAL SYSTEMS (PART #78208).
READ THE PORT CAPS LABELING BEFORE USE.
Each day, before reprocessing dialyzers, ensure that the Calibrated Volume Cell is installed
between the arterial and venous lines. Before checking calibration, make sure machine is level
and if machine is not level, retest measurement of Volume Cell after leveling machine. Push
"ON" switch, select Program mode "00“ then push and hold "SET" and put in 255. Push "START
PROCESS" and operate until volume is displayed in Step 35. Compare this value to value
etched on Volume Cell. These values should agree within 3 ml. If these values do not agree
within 3 ml, check the Renatron® PA 100 Series calibration as outlined below.
Note –If the Renatron ® PA 100 Series continues to fail the calibration verification day after
day, contact your Minntech Renal Systems Distributor.
Renatron® PA
100 Series
Calibration
Procedure
WARNING –SHOCK HAZARD. WHEN ADJUSTING TRIM CONTROLS
[VGC1] BE CAREFUL NOT TO TOUCH ELECTRONIC CONNECTIONS.
Note – Before removing the top cover, MAKE ABSOLUTELY CERTAIN there are no loose
water connections or potential for fluid leakage. ANY FLUID DAMAGE to internal electronics
is NOT COVERED by machine warranty.
1. Insert Calibrated Volume Cell between arterial and venous lines.
2. Remove the two screws from each side of the cover and lift off the cover. Place the cover
where it will not be damaged.
3. Press "ON" switch ("SEL“ and "- -" will be displayed).
4. Press the "MUTE“ AND "RESET" switches together until program "(00)" is displayed.
5. Press the "HOLD TO SET" switch while adjusting the "SET" knob to display "255" in the
"VOLUME" window.
Instruction Manual
-18-
6. Press the "START PROCESS" switch. A light will appear in corner of the "START
PROCESS" switch.
7. Press the "OFF" switch immediately after "PROGRAM STEP 05" has been completed.
There will be approximately 5 seconds in which to press "OFF“.
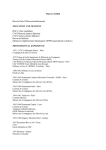
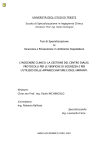
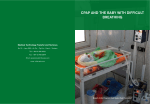
8. On the hydraulic side, view the lower tank scribe line (zero line located about
3 mm above bottom gray gasket Figure 2). Water level should be even with the lower tank
scribe line. If it is, proceed to step 9 in this procedure. If not, adjust P1 (Figure 3) and
repeat steps 3 - 8 until water level is even with the lower tank scribe line.
Note – Adjust P1 (Figure 3) clockwise to raise level in tank (counterclockwise to lower level)
for zero line adjustment. Adjust one turn to change the level approximately 3 mm.
9. Press "ON" switch ("SEL“ and "—" will be displayed).
10. Press the "MUTE" and "RESET" switches together until program "(00)" is displayed.
11. Press the "HOLD TO SET" switch while adjusting the "SET" knob to display "255" in the
"VOLUME" window.
12. Press the "START PROCESS" switch. A light will appear in corner of the "START
PROCESS" switch.
13. Immediately, at the end of "PROGRAM STEP 12", press the "OFF" switch.
14. On the hydraulic side, view the upper tank scribe line (507 mark located approximately
in the middle of the tank Figure 2). Water level should be even with the upper tank scribe
line (± 6.5 mm). If it is, proceed to step 15 in this procedure. If not, adjust P2 (Figure 3)
and repeat steps 9 - 14 until water level is even with the upper tank scribe line.
Note – Adjust P2 (Figure 3) counterclockwise to raise level in tank (clockwise to lower level).
Adjust one turn to change the level approximately 3 mm.
15. Press "ON" switch ("SEL" and "—" will be displayed).
16. Press the "MUTE" AND "RESET" switches together until program "(00)" is displayed.
17. Press the "HOLD TO SET" switch while adjusting the "SET" knob to display "255" in the
"VOLUME" window.
18. Press the "START PROCESS" switch. A light will appear in the corner of the "START
PROCESS" switch.
Figure 2
Figure 3
Tank Zero Level
Tank
Zero Level
Potentiometer
- P1
Potentiometer
- P1
Tank Gain Control
Tank -Gain
Control
Potentiometer
P2
Potentiometer - P2
“VOLUME”
Meter Gain
"VOLUME"
Meter Gain
Potentiometer
- P3
Potentiometer
- P3
Upper Tank
Scribe Line
(507 Mark)
Lower Tank
Scribe Line
(Zero Line)
-19 -
Instruction Manual
19. Allow the Renatron® PA 100 Series to continue operating until the "Volume Fail" alarm
has occurred in "PROGRAM STEP 35". Push the "MUTE" switch to silence the audio
alarm. DO NOT PRESS THE "RESET" SWITCH.
20. The displayed Renatron® PA 100 Series volume value must be within ±3 ml of the
Calibrated Volume Cell. If the Renatron® PA 100 Series volume is not within ±3 ml,
adjust P3. Turn P3 clockwise to decrease displayed volume value. Turn P3
counterclockwise to increase displayed volume value.
Example 1
Volume Cell value equals 60 (etched value). Volume displayed by machine equals 56.
Difference in milliliters equals 4 ml. Adjust P3 (Figure 3) 1.25 turns counterclockwise per ml
difference in volume value to eliminate the volume error. Therefore, a 4 ml difference will
require 5 turns counterclockwise.
Example 2
Volume Cell value equals 60 (etched value). Volume displayed by machine equals 64.
Difference in milliliters equals 4 ml. Adjust P3 (Figure 3) 1.25 turns clockwise per ml
difference in volume value to eliminate the volume error. Therefore, a 4 ml difference will
require 5 turns clockwise.
Note – If P3 is adjusted while the volume is being displayed, no change will be shown in the
display. The change in volume value will be evident only after pressing the "RESET“ and
"START PROCESS“ switches to retest the volume.
21. Repeat steps 15 - 20 until displayed Renatron® PA 100 Series volume is within ±3 ml of
the Calibrate Volume Cell.
22. Replace the Renatron® PA 100 Series cover, securing it with the two screws on each side.
The screw should be thumb tightened.
CAUTION – THE COVER SHOULD ALWAYS BE ON THE RENATRON® PA 100 SERIES FOR
NORMAL OPERATION.
Note – If Renatron® PA 100 Series will not calibrate, please call your Minntech Renal Systems
Distributor for assistance.
Maintenance
The following procedures will help maintain peak performance of the Renatron® PA 100 Series
Dialyzer Reprocessing System. If at any time during this process you have a question or
concern, please contact your Minntech Renal Systems Distributor for additional information.
A. Exterior Inspection - the Renatron® PA 100 Series station should be inspected periodically
for any defects such as the following list:
1. Bent or broken switches
2. Cracks in cover
3. Corroded metal parts
4. Loose or missing hardware
5. Cut or frayed hoses or electrical cords
6. Cracks in the Front Mask
7. Excessive protein deposits in the tubing. If necessary, see the Formula 409® Service
Cleaning Procedure in this section.
CAUTION – USE OF A RENATRON® PA 100 SERIES ON WHICH ONE OR MORE OF THE
ABOVE CONDITIONS EXIST SHOULD BE DISCONTINUED UNTIL THE DEFECT IS
CORRECTED AND THE SYSTEM OPERATION IS VERIFIED.
CAUTION – CARE SHOULD BE TAKEN TO AVOID EXCESS MOISTURE WHICH COULD
FLOW INTO THE RENATRON® PA 100 SERIES CASE ASSEMBLY. BLOOD MAY BE
REMOVED FROM THE EXTERIOR OF THE RENATRON® PA 100 SERIES WITH FRESH 1%
RENALIN® 100 SOLUTION OR FULL STRENGTH ACTRIL® SOLUTION. DO NOT USE ANY
OTHER CLEANERS, AS THEY MAY BE INCOMPATIBLE WITH THE MATERIALS IN THE
MACHINE.
Instruction Manual
-20-
B. Cleaning. The exterior of the Renatron® PA 100 Series station should be cleaned as often as
operating conditions require.
CAUTION – ANY LIQUID SPILLED ON THE MACHINE EXTERNAL SURFACES SHOULD BE
WIPED OFF IMMEDIATELY TO REDUCE THE POSSIBILITY OF MOISTURE ENTERING THE
MAIN CASE ASSEMBLY. IF SUCH A CONDITION WERE TO EXIST, IT COULD CREATE AN
ELECTRICAL CONDUCTIVE PATH WHICH COULD RESULT IN INSTRUMENT FAILURE.
CAUTION – DO NOT USE CHEMICAL CLEANING AGENTS THAT COULD DAMAGE THE
PLASTICS USED IN THIS MACHINE. AVOID CHEMICALS WHICH CONTAIN ALCOHOL,
BENZENE, TOLUENE, XYLENE, ACETONE OR OTHER AROMATIC OR KETONE SOLVENTS.
DO NOT USE BLEACH.
C. Formula 409® Service Cleaning Procedure
The internal fluid pathways must be cleaned periodically (typically every 2 weeks) as outlined
below:
Renatron® PA 100 Series machines experience deposits which gradually build up inside the
blood lines with continued machine use. The amount of build up is proportional to the extent
of machine use, the number of dialyzers reprocessed, and such factors as heparin regime and
rinseback method. This build up is a waxy, denatured substance with a slight yellow tint. If the
build up is allowed to continue, the machine may give erroneous blood volume readings (low)
and may stop operating altogether. Before this substance becomes visually evident in the blood
lines, the procedure outlined below should be performed to remove the deposits.
CAUTION – THIS PROCEDURE CALLS FOR THE USE OF FORMULA 409® CLEANER/
DEGREASER. THIS LIQUID CHEMICAL IS AN EYE IRRITANT. AVOID CONTACT WITH EYES
OR SKIN. REFER TO LABEL INSTRUCTIONS FOR CAUTIONS AND REMEDY. DO NOT USE
SUBSTITUTE CHEMICAL SOLUTIONS IN THIS PROCEDURE.
Formula 409® Cleaner/Degreaser (Formula 409®) will not react with trace levels of Renalin® 100
Cold Sterilant. To ensure Formula 409® contact with Renalin® 100 is minimized and to ensure
Formula 409® is rinsed completely from the Renatron® PA 100 Series station, this procedure
should be performed, in the order listed below.
1. Remove the uptake tube from the Renalin® 100 container and make sure excess Renalin®
100 drains back into the container. Cover the open Renalin® 100 container.
2. Place the uptake tube into a container of purified water (one gallon or more).
3. Press the "ON" switch, and select program "00." Connect external hoses in sanitize
configuration.
4. Press the "START SANITIZE" and "DISPLAY" switches. Allow the machine to operate to
completion of "PROGRAM STEP" 75 and press the "OFF" switch. (No problems will
occur if machine operates past step 75 before turning off).
5. Press the "ON" switch and repeat procedure steps 3 and 4 above. This action clears
Renalin® 100 from the uptake hose and replaces it with pure water.
6. Remove the uptake tube from the pure water and allow excess water to drain out of the
uptake tube.
7. Place the uptake tube into container of Formula 409®. Do not use a substitute chemical as
it may damage the materials in the machine.
8. Press the "ON" switch and repeat procedure steps c and d above. This action clears the
water from the uptake hose and replaces it with Formula 409®.
9. Press "ON," select program, "(00)," press the "START SANITIZE" and "DISPLAY"
switches. Allow the machine to continue operating to the "SANITIZE COMPLETE"
message in "PROGRAM STEP" 83.
10. Press the "OFF" switch and turn the water supply to the machine off. Leave the
machine overnight. Wait at least 8 hours.
11. Remove the uptake tube from the container of Formula 409® and make sure any excess
Formula 409® drains from tube back into container. Place the uptake tube in a container
of pure water (one gallon or more). Turn the water supply on.
-21-
Instruction Manual
12. Press "ON," select program, "(00)," press the "START SANITIZE" and "DISPLAY"
switches. Allow the machine to operate to completion of "PROGRAM STEP" 75 and press
the "OFF" switch. (No problems will occur if machine operates past step 75 before
turning off.) This action clears the Formula 409® from the uptake hose and replaces it
with water.
13. Press "ON," select program, "(00)," press the "START SANITIZE" and "DISPLAY"
switches. Allow the machine to operate to "PROGRAM STEP" 83, and when machine
enters step 83, press the "START PROCESS" switch. The machine will then enter step 84
and, after a ten minute hold period in step 84, will proceed with flushing and
draining. The flushing and draining will continue until machine enters "PROGRAM
STEP" 97 and the "SANITIZE COMPLETE" message reappears.
14. Press the "OFF" switch when the "SANITIZE COMPLETE" message appears in
"PROGRAM STEP" 97.
15. Remove the uptake tube from the container of pure water and allow excess water to drain
from uptake tube.
16. Place the uptake tube in a container of unexpired Renalin® 100.
17. Press "ON," select program, "(00)," and press the "START SANITIZE" and "DISPLAY"
switches. Allow the machine to operate to completion of "PROGRAM STEP" 75 and press
"OFF" switch. This action clears the water from the uptake hose and replaces it with
Renalin® 100 Solution.
18. Press "ON," select program, "(00)," and press the "START SANITIZE" and "DISPLAY"
switches. Allow the machine to operate to "PROGRAM STEP" 83. When the machine
enters step 83, press the "START PROCESS" switch. The machine will then enter step 84
and after a ten minute hold time will proceed to "PROGRAM STEP" 97. The "SANITIZE
COMPLETE" message will reappear.
19. Your Renatron® PA 100 Series station is now ready for normal use.
Note – Formula 409® is a registered trademark of the Clorox Co., Oakland, CA. International
Distributors should contact your Minntech Renal Systems Distributor to obtain this product if
not available locally.
D. Storage When Not In Use
The Renatron® PA 100 Series station should be stored in a protected location. Avoid high-traffic
areas where the machine might get damaged and avoid high humidity.
The Renatron® PA 100 Series station is a high-quality, precision medical system and should be
treated as such. The system has been designed to withstand the rigors of normal use and, with
reasonable care and maintenance, should provide many hours of trouble-free operation.
Service
Minntech Renal Systems maintains a special repair and calibration facility to provide its
customers with expert service for its products. If your Renatron® PA 100 Series system requires
servicing, we recommend that you contact your Minntech Renal Systems Distributor.
Note – Pressing the "START PROCESS“ switch while Renatron® PA 100 Series is turned on
and is holding in Step 83 will result in a 10 minute hold in Step 84 with subsequent water
rinse and air purge of hydraulic pathway. This second series of sanitize steps (84-97) are
intended for use ONLY when removal of fluid in hydraulic pathway is necessary, i.e. prior to
shipment or transport of Renatron® PA 100 Series station or long term storage of the Renatron®
PA 100 Series unit.
CAUTION – ALL CHEMICALS SHOULD BE THOROUGHLY RINSED FROM UPTAKE LINES
BEFORE REPACKING RENATRON® PA 100 SERIES STATION.
CAUTION – PERFORM A COMPLETE SANITIZE CYCLE, AS DESCRIBED IN THE NOTE
ABOVE, BEFORE REPACKING RENATRON® PA 100 SERIES. THIS ACTION ENSURES NO
FLUID WILL REMAIN IN HYDRAULIC SECTION. IF FLUID REMAINS IN THIS SECTION, IT
MAY FREEZE AND CAUSE DAMAGE TO HYDRAULIC COMPONENTS.
A. Repacking
Before repacking, the Renatron® PA 100 Series station should be thoroughly cleaned and
emptied. It is recommended that each unit be repackaged in the original manner for
maximum protection. The original shipping carton can be saved and used for this purpose. If
the original packing is not available, contact your Minntech Renal Systems Distributor for
the appropriate packing and shipping instructions.
Instruction Manual
-22-
B. Documentation
Any system being returned for service should be accompanied by a letter stating:
1. The model number of the system device.
2. The serial number of the system device (if applicable).
3. The address to which the device is to be shipped after repair.
4. The address to which the repairs are to be billed if not covered by the warranty and a
purchase order for the repairs.
5. A description of the problem for which the device is being returned.
Important Note –Because Minntech Renal Systems has no knowledge or control over any third
party’s service work or the affect such work may have on the Renatron System's operation or
performance, Minntech Renal Systems disclaims any liability for any damages whatsoever
resulting from a change in the operation or performance of the Renatron System or any
personal injury directly or proximately resulting from any repairs made or attempted to be
made by any person other than a factory representative of Minntech Renal Systems. If
Minntech Renal Systems replaces non-Renal Systems parts the customer will be charged in full
for all replaced parts.
Minntech warrants to customer that Minntech possesses good and marketable title to the
product sold to the customer and that the product (i) shall be free from defects in material
and workmanship at the time of shipment and under normal use and service for a period of
one year from the date of shipment; and (ii) are in compliance with the specifications for the
product. The liability of Minntech under this limited warranty does not extend to any abuse
or misuse of the product or any repair or attempt to repair the product by the customer,
which shall void this warranty. If the product does not meet this limited warranty,
Minntech's sole obligation shall be to repair or replace the product (provided that the
product is returned to Minntech prepaid within one year of the date of shipment), and this
shall be the customer's exclusive remedy. Under no circumstances will Minntech be liable
for any direct or indirect, incidental or consequential loss, damage or expense of any kind
(including without limitation, loss of profits, economic loss) whether such claim is based on
warranty, contract, tort or otherwise. This limited warranty is in lieu of all other warranties,
whether express or implied (including, without limitation, any warranty for suitability,
fitness for a partcular purpose or absence of hidden defects).
Warranties/
Limitations
No person has any authority to bind Minntech Renal Systems to any other representation or
warranty with respect to these products, and the purchaser accepts the products subject to
all the terms hereof. Any product returned to Minntech Renal Systems for replacement
becomes the property of Minntech Renal Systems.
-23-
Instruction Manual
Explanation for
Symbols
Attention; consult accompanying documents
Off; power disconnected from the mains
On; power connected to the mains
Off; connected to mains but in a wait or standby mode
On; active state as opposed to standby
Dangerous voltages within equipment
IPX1
Drip-proof equipment
As Operator Accessible Fuse Location
Technical Service Centers
International Service Locations
U.S. Service Locations
Minntech B.V. Singapore Representative Office
59A Duxton Road
Sourethweg 11
Singapore 089523
6422PC Heerlen
Tel: (65)-227-9698
The Netherlands
Fax: (65)-225-6848
Tel: (31) 45 5471471
Fax: (31) 45 5429695
Minntech Corporation
14605 28th Avenue North
Minneapolis, MN 55447 U.S.A.
Tel: (763) 553-3300
Toll Free: (800) 328-3340
Fax: (763) 553-3387
Note: Parts, service and a service manual with drawings, parts lists, circuit diagrams
are available on request from Minntech's Customer Service department.
Instruction Manual
-24-
Item
Part Number
Renalin® 100 Cold Sterilant
Instructions for Use
50090-720
Perassay® 500 Directions for Use
50086-010
Renalin® Residual Test Strips
Directions for Use
50083-000
Renatron® PA Service Manual
50101-000
Renalin® 100 Cold Sterilant (with 5 test kits)
78397-970
Renalin® Residual Test Strips
78198-000
Renalin® Indicator Test Strips
78199-000
Perassay® 500 Peracetic Acid Test Strips
78378-000
Dialyzer Dialysate Port Caps
78196-010
Ventable Dialyzer Dialysate Port Caps
78208-000
Dialyzer Blood Port Caps
78197-010
ISO Fitting Dialyzer Blood Port Caps
78329-000
Formula 409® Cleaner/Degreaser
78273-001
-25-
Part Number
Listings
Instruction Manual
Notes
Instruction Manual
-26-
Instruction Manual
Minntech Corporation
14605 28th Avenue North
Minneapolis, MN 55447 U.S.A.
Phone:
(763) 553-3300
Toll Free:
(800) 328-3340
Fax:
(763) 553-3387
Minntech B.V.
Sourethweg 11
6422 PC Heerlen
The Netherlands
Tel: (31) 45 5471471
Fax: (31) 45 5429695
Minntech BV Singapore Representative Office
59A Duxton Road
Singapore 089523
Tel:
65-227-9698
Fax:
65-225-6848
50090-733/A
© 2001 Minntech
Instruction Manual
-28-