1
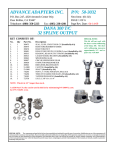
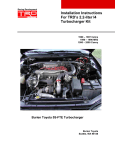
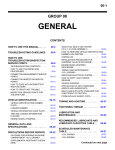
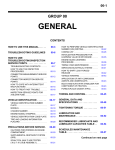
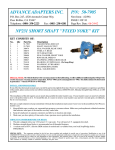
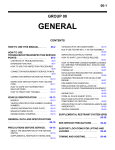
P/N: 300-0022
3841 Quest Court #13
Shingle Springs, CA 95682
ph: 530 677-8111 web: www.inchwormgear.com
Page: 1 of 6
Rev. Date: 07/10/12
3.4 V6 MANUAL/AUTO or any ‘05-’PRESENT 5-SPEED
TRANSMISSION to ‘79-’95 4cyl. 21 SPLINE GEAR DRIVEN T-CASE
KIT INCLUDES:
No.
Part No.
Qty.
1.
2.
3.
4.
5.
6.
7.
8.
9.
10.
11.
12.
13.
14.
15.
240-0020
120-0020
100-0001
100-0405
100-0408
100-0409
100-0411
100-0801
100-0802
100-0803
100-0804
160-0009
160-0004
160-0403
260-0022
1
1
8
2
2
4
6
4
4
6
6
1
1
1
1
Ck.
Box
Description
Adapter Plate - Tacoma Transmission Adapter
Hardware Kit - Tacoma Transmission Adapter
Set Screw - 8m x 1.25 x 8mm
Bolt - Socket - Flat - 10m x 1.25 x 30mm
Bolt - Socket - Cap - 8m x 1.25 x 30mm
Bolt - 14m Hex - 10m x 1.25 x 40mm
Bolt - Hex - 8m x 1.25 x 35mm
Washer - Flat - 10m
Washer - Lock - 10m
Washer - Flat - 8m
Washer - Lock - 8m
Seal Extension - Auto & 5-Speed
Oil Seal - 32 x 53 x 7
Coupler - 23 Spline x 21 Spline
Instruction Sheet - Tacoma Transmission Adapter - 3.4 V6 Manual/
Auto or any ‘05 + 5-Speed Trans. x 21 Spline Gear Driven Tcase
Notes:
Read through these instructions before assembly. Make sure you have the needed tools, supplies, and that you
are capable of building this. Tighten 8m bolts to 19 ft-lbs. Tighten 10m bolts to 29 ft-lbs. We recommend using Toyota FIPG or Permatex “the Right Stuff” for sealant.
Modification of shifters, crossmembers, mounts, drive shafts, and more may be required for applications that
use this adapter. Check with Inchworm Gear or your local dealer if you have any questions. We strongly recommend investing in a service manual for your vehicle and it’s components.
Clocking Options:
PLEASE READ: The components of this kit have been machined for specific applications. Double check you have the correct application
for this adapter kit. Any modifications to this kit or the parts in it will void any warranty or return privileges. These instructions are designed
to provide information about the use of this adapter. Information about torque specifications, vehicle stabilization, disassembly, fluid
recommendations and other related data is best found in repair manuals or factory service manuals available at auto parts stores or dealerships.
P/N: 300-0022
3841 Quest Court #13
Shingle Springs, CA 95682
ph: 530 677-8111 web: www.inchwormgear.com
Page: 2 of 6
Rev. Date: 07/10/12
3.4 V6 MANUAL/AUTO or any ‘05-’PRESENT 5-SPEED
TRANSMISSION to ‘79-’95 4cyl. 21 SPLINE GEAR DRIVEN T-CASE
This Adapter is used primarily in driver-side drop applications and clocking is explained in the next paragraph
from that perspective. In passenger-side drop applications the +/- sign should be reversed.
Four clocking options are available. Two between the Adapter and Transfer Case: -10 or 0 (stock) degrees.
Two between the Adapter and Transmission: 0 (stock) or 15 degrees. Combine the possibilities to get: -10, 0
(stock), 5, or 15 degrees total.
Clocked transfer cases may require custom fabrication of crossmember and shifter for installation and use.
Instuctions for Zero Degrees of Clocking:
Most applications will use 0 degrees of clocking. These instuctions
are made for 0 degrees of clocking.
Notice the six holes (right) for bolting the Adapter to the Transfer
Case have not been drilled all the way through. Using a 1/4” drill
bit bore a pilot hole the rest of the way through these six holes.
Repeat with a 7/16” drill bit.
WARNING: DO NOT CONFUSE THE ALIGNMENT PIN
HOLES WITH BOLT HOLES! DO NOT DRILL OUT THESE
HOLES! (left)
Notice that this Adapter works with two different styles of TailPLEASE READ: The components of this kit have been machined for specific applications. Double check you have the correct application
for this adapter kit. Any modifications to this kit or the parts in it will void any warranty or return privileges. These instructions are designed
to provide information about the use of this adapter. Information about torque specifications, vehicle stabilization, disassembly, fluid
recommendations and other related data is best found in repair manuals or factory service manuals available at auto parts stores or dealerships.
P/N: 300-0022
3841 Quest Court #13
Shingle Springs, CA 95682
ph: 530 677-8111 web: www.inchwormgear.com
Page: 3 of 6
Rev. Date: 07/10/12
3.4 V6 MANUAL/AUTO or any ‘05-’PRESENT 5-SPEED
TRANSMISSION to ‘79-’95 4cyl. 21 SPLINE GEAR DRIVEN T-CASE
housing, 1995-2004 or 2005-present. Mark the holes (left) for 1995-2004 applications or the holes shown
(right) for 2005 and newer applications.
1995-2004
2005-Present
Note: One of the bolt holes needed for 1995-2004 applications has not been dilled through. Use a 1/4” drill bit
to pilot the hole followed by a 3/8” drill bit to finish it (1995-2004 bolt pattern only).
Coat Set Screws (PN 100-0001) with sealant. Insert Set Screws to plug the threaded holes of the Adapter you
did not mark for use, make sure they do not stick out of the Adapter surface on either side. We recommend the
Set Screws be installed through the Transmission face of the Adapter (opposite face as the ones shown, above)
for easiest access if ever needed in the future. Using Scotch Bright lightly ruff Adapter gasket surface on both
sides.
PLEASE READ: The components of this kit have been machined for specific applications. Double check you have the correct application
for this adapter kit. Any modifications to this kit or the parts in it will void any warranty or return privileges. These instructions are designed
to provide information about the use of this adapter. Information about torque specifications, vehicle stabilization, disassembly, fluid
recommendations and other related data is best found in repair manuals or factory service manuals available at auto parts stores or dealerships.
P/N: 300-0022
3841 Quest Court #13
Shingle Springs, CA 95682
ph: 530 677-8111 web: www.inchwormgear.com
Page: 4 of 6
Rev. Date: 07/10/12
3.4 V6 MANUAL/AUTO or any ‘05-’PRESENT 5-SPEED
TRANSMISSION to ‘79-’95 4cyl. 21 SPLINE GEAR DRIVEN T-CASE
Adapter to Transfer Case Installation:
Chase threads and clean out the transfer case bolt holes. Remove bearing retainer tab from transfer case if applicable. Clean the Transfer Case gasket surface.
Coat the entire surface of the transfer case that will contact the
adapter, including around the bearings, with sealant to prevent oil
leaks. Not just the perimeter.
Align holes and set Adapter onto Transfer Case.
Install the two Socket Flat Head Bolts (PN 100-0405) into the
counter sunk holes in the bottom of the Adapter (right) with “Lock
Tight” thread locker. Make sure bolt heads do not sit above the
adapter surface to ensure a good seal.
Install the four Hex Head Bolts (PN 100-0409) along with the
supplied Flat Washers (PN 100-0801) and Lock Washers (PN
100-0802) through the four holes you have drilled out for this
purpose. Wait for sealant to set as needed.
Test Fit & Clearance:
Support the weight of the Transmission.
Make sure the two Alignment Pins are properly installed in the Transmission Tailhousing, they may have gotten stuck in the stock Transfer Case when it was removed.
Test fit Transfer Case w/ adapter to the Transmission securing it with at least four bolts. Mark floor where
clearance is needed, if any. Remove Transfer Case.
To clearance, gently massage floor with a hammer. Repeat as necessary until satisfied with fit and clearance.
PLEASE READ: The components of this kit have been machined for specific applications. Double check you have the correct application
for this adapter kit. Any modifications to this kit or the parts in it will void any warranty or return privileges. These instructions are designed
to provide information about the use of this adapter. Information about torque specifications, vehicle stabilization, disassembly, fluid
recommendations and other related data is best found in repair manuals or factory service manuals available at auto parts stores or dealerships.
P/N: 300-0022
3841 Quest Court #13
Shingle Springs, CA 95682
ph: 530 677-8111 web: www.inchwormgear.com
Page: 5 of 6
Rev. Date: 07/10/12
3.4 V6 MANUAL/AUTO or any ‘05-’PRESENT 5-SPEED
TRANSMISSION to ‘79-’95 4cyl. 21 SPLINE GEAR DRIVEN T-CASE
Prepare Transmission:
Manual Transmissions: Remove oil seal in tailhousing.
Automatic Transmissions: Remove tailhousing. Remove
bearing & oil seal. Reinstall tailhousing.
Using a 3/8” dill bit drill out the threads of the bottom passenger side bolt hole and open up the bottom driver side bolt hole
in the tail housing (right).
If the transmission mount holes (right) go into the tailhousing
the bolts will need sealant or the holes plugged to prevent leaks.
One suggestion to plug the holes is to lightly grease the end of
the mount bolt. Install it into the hole without the mount, tighten
it down all the way. From inside the tail housing pack hole with
a generous helping of “JB Weld.” Once cured remove the bolt
and the hole should be sealed.
Lightly grease 23 x 21 Spline Coupler (PN 160-0403)
splines and install onto Transmission output shaft.
Gently tap Oil Seal (PN 160-0004) into the Seal Extension (PN 160-0009) until flush using a piece of hardwood
or soft metal, DO NOT HIT THE OIL SEAL DIRECTLY.
Coat the entire rim of the Seal Extension that seats into
the Tailhousing with “Lock Tight” or sealant. Gently tap
the Seal Extension into the Transmission Tailhousing
using a piece of hardwood or soft metal, DO NOT HIT
THE OIL SEAL OR EXTENSION DIRECTLY.
Grease the lip of the Oil Seal.
PLEASE READ: The components of this kit have been machined for specific applications. Double check you have the correct application
for this adapter kit. Any modifications to this kit or the parts in it will void any warranty or return privileges. These instructions are designed
to provide information about the use of this adapter. Information about torque specifications, vehicle stabilization, disassembly, fluid
recommendations and other related data is best found in repair manuals or factory service manuals available at auto parts stores or dealerships.
P/N: 300-0022
3841 Quest Court #13
Shingle Springs, CA 95682
ph: 530 677-8111 web: www.inchwormgear.com
Page: 6 of 6
Rev. Date: 07/10/12
3.4 V6 MANUAL/AUTO or any ‘05-’PRESENT 5-SPEED
TRANSMISSION to ‘79-’95 4cyl. 21 SPLINE GEAR DRIVEN T-CASE
Transfer Case to Transmission:
Clean gasket surface of Transmission Tailhousing. Cover the Transmission gasket surface with sealant.
Install Transfer Case onto Transmission making sure the Alignment Pins are in the Transmission Tailhousing
and seated in the correct holes of the Adapter.
Lightly coat threads of the 8m Hex Head Bolts (PN 100-0411) with sealant and install with a Flat Washer (PN
100-0803) and a Lock Washer (PN 100-0804).
Install the Socket Cap Head Bolts (PN 100-0408) in the recessed top two holes.
Made In The USA
Inchworm Gear adapters are milled on our own CNC machines.
PLEASE READ: The components of this kit have been machined for specific applications. Double check you have the correct application
for this adapter kit. Any modifications to this kit or the parts in it will void any warranty or return privileges. These instructions are designed
to provide information about the use of this adapter. Information about torque specifications, vehicle stabilization, disassembly, fluid
recommendations and other related data is best found in repair manuals or factory service manuals available at auto parts stores or dealerships.