1
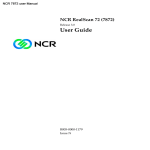
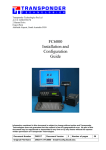
MDE-4866
Passport® Firewall Router
Start up and Service Manual
February 2010
Introduction
Purpose
This document provides instructions to configure a Linksys® RV042 10/100 4-port VPN
Router (Firewall Router) for use with the Passport® system.
IMPORTANT INFORMATION
The configuration and service procedures detailed in this document are notably different
from previous router installation instructions. These changes are necessary to support a
PA-DSS/PCI-DSS-compliant architecture. It is important to thoroughly read these prior
to performing any configuration (for example, changing router passwords), to prevent
site personnel from having to re-enter their secure passwords.
Intended Users
This manual is intended for Authorized Service Contractors (ASCs)/Customer Specified
Contractors (CSCs) who are Passport-certified and install Passport V8.02 systems.
Table of Contents
Topic
Page
Introduction
1
Configuring Your Laptop
3
Configuring the Firewall Router
6
Appendix A: Installing an Additional LAN Hub/Switch
19
Appendix B: Reprogramming a Linksys V3 Router for LAN Expansion
21
Appendix C: Firewall Router Advanced Routing and Secondary Router Programming for
WAN Traffic
26
Appendix D: Customer-specific Access Programming
29
Appendix E: Troubleshooting the Firewall Router
33
Required Tools
The following tools are required for configuration of the Firewall Router:
• Passport Server or Laptop
• CAT-5 Modular Cable (Q13482-XX or Q13850-XX)
MDE-4866 Passport® Firewall Router Start up and Service Manual · February 2010
Page 1
Introduction
Related Documents
IMPORTANT INFORMATION
Ensure that you review all related documentation before installation. Additionally, the
“Installation Instructions” section within the appropriate customer-specific network
addendum must be reviewed and be in your possession at the time of installation. If
present, this section will contain any additional requirements necessary to complete
Passport system configuration and installation.
Document Number Title
GOLD Library
MDE-3620
Point Of Sale Site Preparation Manual
Site Preparation
MDE-3816
Passport Hardware Start-up and Service Manual • Passport
• Service Manual
MDE-4743
Passport PA-DSS Implementation Guide
Passport
Abbreviations and Acronyms
Term
Description
ASC
Authorized Service Contractor
CSC
Customer Specified Contractor
FTP
File Transfer Protocol
IP
Internet Protocol
ISP
Internet Service Provider
LAN
Local Area Network
POS
Point Of Sale
WAN
Wide Area Network
Technical Support
If you need to contact the Gilbarco® Veeder-Root® Technical Support, call 1-800-743-7501.
Page 2
MDE-4866 Passport® Firewall Router Start up and Service Manual · February 2010
Configuring Your Laptop
Configuring Your Laptop
The procedures below must be used to program your laptop, to use a static Internet Protocol
(IP) address to communicate on the Firewall Router’s Local Area Network (LAN).
Note: The references and screenshots provided in the document may vary slightly based on the
hardware and version of Windows® that is used.
If the Passport Server is being used to configure the Firewall Router, proceed to the
“Configuring the Firewall Router” on page 6.
IMPORTANT INFORMATION
This procedure requires familiarity with your laptop’s hardware and software. To successfully
utilize these steps:
• Ensure that you have a functional Ethernet® Adapter.
• Disable any native or third-party Firewall applications.
Accessing the Control Panel
To access the Control Panel, proceed as follows:
1 Click Start > Run. The Run window appears.
2 Type Control in the “Open” field and press Enter. The Control Panel window appears.
Figure 1: Control Panel
MDE-4866 Passport® Firewall Router Start up and Service Manual · February 2010
Page 3
Configuring Your Laptop
Changing Network Connection Properties
To change the Network Connection Properties, proceed as follows:
1 Double-click the Network Connections icon. The Network Connections window appears.
Figure 2: Network Connections Window
2 Locate the LAN connection used by the laptop’s Ethernet Adapter.
Note: The name of the connection may vary based on the hardware configuration (refer to
Figure 2).
Page 4
MDE-4866 Passport® Firewall Router Start up and Service Manual · February 2010
Configuring Your Laptop
3 Right-click the appropriate LAN connection and select Properties. The Local Area
Connection Properties window appears.
Figure 3: Internet Protocol Option
4 Select Internet Protocol (TCP/IP) from the list.
5 Click Properties.
IMPORTANT INFORMATION
Make a note of the current IP address programming. You may need to refer to these
settings to change the Ethernet adapter settings for normal usage.
6 Select Use the following IP address.
MDE-4866 Passport® Firewall Router Start up and Service Manual · February 2010
Page 5
Configuring the Firewall Router
7 Enter the following values in the Internet Protocol (TCP/IP) Properties window.
• IP Address: 10.5.48.18
• Subnet Mask: 255.255.255.192
• Default Gateway: 10.5.48.1
IMPORTANT INFORMATION
10.5.48.18 must be used for your laptop to prevent potential address conflicts.
Improper IP address configuration may result in a site down condition when all devices
are connected to the router.
8 Click OK when programming is complete.
Configuring the Firewall Router
IMPORTANT INFORMATION
The Passport system’s architecture now incorporates the use of a Firewall Router to
manage traffic and adhere to compliance standards. The Firewall Router MUST be
used to ensure appropriate communication for LAN and Wide Area Network (WAN)
devices. Failure to install the Firewall Router as per Gilbarco requirements will impact
communication and compromise on site compliance.
Certain configurations, such as remote access through a WAN or use of dual routers,
may require additional installation precautions for compliance. Refer to MDE-4743
Passport PA-DSS Implementation Guide and Appendices A, B, C and D of this
document for additional installation recommendations.
Preconfigured routers from Gilbarco have been updated to ensure high-level security and
enforce a strong password for accessing the router. The default password of the previous router
will no longer allow access to the router configuration. The following procedure must be used
to initially access the router and configure it as required for a Passport system’s installation.
1 Connect the device (either Passport Server or laptop) that you will use, to configure the router
to Port 1 of the Firewall Router.
IMPORTANT INFORMATION
Due to enhanced security, the appropriate port MUST be used for either the Passport
Server, or a laptop. Failure to connect to this port will result in lack of TCP/IP
communication.
2 Open Internet Explorer on the Passport Server (or laptop).
3 Type 10.5.48.1 in the address bar and press Enter. An Enter Network Password dialog box
appears.
Page 6
MDE-4866 Passport® Firewall Router Start up and Service Manual · February 2010
Configuring the Firewall Router
4 Enter admin as the User Name and GVR09RV042 as the Password.
IMPORTANT INFORMATION
The password provided is configured by default by Gilbarco. When the router
configuration is complete, the merchant may choose to change the router password to
further adhere with PCI-DSS compliance standards.
If the merchant requires to change the Firewall Router password, refer to “Changing the
Firewall Router Password” on page 16. If the site chooses to change this password, it
must also be written on the Security Manager report and maintained only by the
appropriate site staff. Refer to MDE-4743 Passport PA-DSS Implementation Guide for
additional information regarding the Security Manager report.
The router System Summary window appears.
Figure 4: System Summary
MDE-4866 Passport® Firewall Router Start up and Service Manual · February 2010
Page 7
Configuring the Firewall Router
5 Click the Setup tab and configure the values for LAN settings as shown in Figure 5.
Figure 5: Setup Tab
Note: The WAN Connection Type settings are provided as an example only.
IMPORTANT INFORMATION
The Firewall Router will be preconfigured with the necessary LAN Setting
configuration, for use with the Passport Point Of Sale (POS) system. This configuration
includes multiple subnet configuration to allow communication to the Enhanced
Dispenser Hub. Default configuration for the LAN and DMZ must NOT be changed,
else this could result in a site down condition.
Page 8
MDE-4866 Passport® Firewall Router Start up and Service Manual · February 2010
Configuring the Firewall Router
6 If the Internet port is being used, settings for WAN Connection Type must be programmed as
per information from the customer-specific programming detailed in “Appendix D: Customerspecific Access Programming” on page 29, credit network, or third-party device provider.
a Make a note of the values provided for the following IP addresses. These entries will be
required later for router configuration:
A = WAN IP Address
B = Default Gateway Address
b Make the required changes to the WAN Connection Type configuration and select Save
Settings.
MDE-4866 Passport® Firewall Router Start up and Service Manual · February 2010
Page 9
Configuring the Firewall Router
7 Click the DHCP tab. DHCP will be disabled by default, and must be enabled if the site has
Passport Clients. If the site has at least one Passport Client, the start range must be configured
as 8. The end range must be limited to the number of Passport Clients configured on the
system (for example, for a site with one Server and two Clients, the DHCP range start value
would be 8 and the DHCP range end would be 9).
Figure 6: DHCP Window
Page 10
MDE-4866 Passport® Firewall Router Start up and Service Manual · February 2010
Configuring the Firewall Router
IMPORTANT INFORMATION
DHCP addresses are tied to Firewall Access Rules. Setting the Range Start and
Range End values outside of the range 8 - 14 may result in connection and processing
issues with Passport Clients outside that range, and could result in a site down
condition. The 10.5.48.8 - 10.5.48.14 range is reserved for Passport Clients.
Third-party devices must be configured for static IP addresses within the 10.5.60.X
subnet. A table listing IP assignments is provided in “IP Address Assignments” on
page 17.
8 Click the Save Settings tab when complete.
9 Click the Port Management tab. The Gilbarco default configuration will have only
LAN Port 1 and LAN Port 4 enabled. Required ports must be enabled by deselecting the
checkbox in the Disable column.
IMPORTANT INFORMATION
Additional ports must be activated ONLY as required by the site’s LAN requirements (for
example, if a Combo and two Clients are in use, then two additional open LAN ports will
be required). Only Passport Clients must be considered when enabling or disabling
ports.
If more than two additional LAN ports are required, it is necessary to install an additional
LAN hub/switch (Q13708-01A). Refer to “Appendix A: Installing an Additional LAN Hub/
Switch” on page 19.
For existing sites, it is also possible to reprogram the currently installed Linksys Router
(Q13708-05B) as an expansion device on the LAN. Refer to “Appendix B:
Reprogramming a Linksys V3 Router for LAN Expansion” on page 21.
All third-party devices (for example, Back Office Systems, IP-based security camera
systems, Loyalty Servers) must be connected to the DMZ. Refer to “Reprogramming a
Linksys V3 Router for Expansion on the Third-party DMZ (10.5.60.X)” on page 23.
Improper port configuration may result in a site down condition.
MDE-4866 Passport® Firewall Router Start up and Service Manual · February 2010
Page 11
Configuring the Firewall Router
Other than the Disable column, do not change the other settings on this window. Retain the
default settings.
Figure 7: Port Management
The Internet port must only be enabled if the site is using an IP-based payment network.
10 Click the Save Settings tab when complete.
11 If customer-specific access rules are required, proceed to step 12. Refer to “Appendix D:
Customer-specific Access Programming” on page 29 for additional details. If no
customer-specific access rules are required, skip to step 14.
12 Click the Firewall tab. Select Access Rules.
IMPORTANT INFORMATION
Default access rules are required for normal system operation and must not be modified
in any way by an ASC or customer.
13 Set the customer-specific access rules as specified in “Appendix D: Customer-specific Access
Programming” on page 29.
Page 12
MDE-4866 Passport® Firewall Router Start up and Service Manual · February 2010
Configuring the Firewall Router
14 Determine whether the site has any additional advanced routing requirements (for example, a
Loyalty Server that needs to go out over the internet). Programming must be made at this time,
as per the procedures in “Appendix C: Firewall Router Advanced Routing and Secondary
Router Programming for WAN Traffic” on page 26 and MDE-4743 Passport PA-DSS
Implementation Guide.
IMPORTANT INFORMATION
It is important to determine whether there are any additional advanced routing needs at
this time. If there are additional requirements that are determined after configuration has
been exported, this will require repetition of several steps within this procedure.
Advanced Routing and Secondary Router Programming for WAN traffic must be
performed as per the procedures in “Appendix C: Firewall Router Advanced Routing
and Secondary Router Programming for WAN Traffic” on page 26 and in compliance
with PA-DSS standards.
Exporting a Backup of Router Configuration
The Firewall Router supports the ability to export and import configuration files. This function
must be used to assist in system recovery, new installations, and router replacements.
IMPORTANT INFORMATION
Exporting router configuration must occur ONLY at this point of configuration. To adhere
with compliance requirements, the router configuration must NOT be exported after the
site has changed the administrator password.
MDE-4866 Passport® Firewall Router Start up and Service Manual · February 2010
Page 13
Configuring the Firewall Router
To export the configuration that has been programmed, proceed as follows:
1 Click the System Management tab and select Setting Backup.
Figure 8: System Management
2 Click Export. The File Download window with the message, “Do you want to save this file?”
appears.
Figure 9: File Download Window
Page 14
MDE-4866 Passport® Firewall Router Start up and Service Manual · February 2010
Configuring the Firewall Router
3 Click Save.
4 Select a location to save the router configuration file. This may be stored within a device at the
location, such as a folder on the D: drive on the Passport Server or an external media provided
by the merchant.
Figure 10: Save As Window
5 Click Save. The Download Complete window appears.
Figure 11: Download Complete Window
6 Click Close.
MDE-4866 Passport® Firewall Router Start up and Service Manual · February 2010
Page 15
Configuring the Firewall Router
Changing the Firewall Router Password
To change the Firewall Router password, proceed as follows:
IMPORTANT INFORMATION
The password provided is configured by default by Gilbarco. The merchant may choose
to change the router password to further adhere with PCI-DSS compliance standards. If
the site does not choose to change this password, proceed to step 5.
If the site chooses to change this password, it must also be written on the Security
Manager report and maintained only by the appropriate site staff. Refer to MDE-4743
Passport PA-DSS Implementation Guide for additional information regarding the
Security Manager report.
1 Click the Setup tab. Select Password.
Figure 12: Setup Window
2 Enter GVR09RV042 as the Old Password.
3 Allow the site personnel to enter the New Password. It is recommended that all new passwords
must be configured as strong according to PCI-DSS guidelines. This would indicate a
password to be at least seven characters, including a digit and a special character such as $.
Page 16
MDE-4866 Passport® Firewall Router Start up and Service Manual · February 2010
Configuring the Firewall Router
4 Allow the site personnel to confirm the New Password.
IMPORTANT INFORMATION
It is critical that only the approved site personnel enter and confirm the new router
password. This will prevent the administrator password from being known by anyone
other than approved site personnel. This User Name and Password must be written on
the Security Manager report and maintained only by the approved site personnel.
5 Click Save Settings.
The Firewall Router Passport password configuration is complete. The router is now
configured for use with a basic Passport installation. If additional configuration is required,
such as remote access through a WAN or use of dual routers, refer to MDE-4743 Passport
PA-DSS Implementation Guide and Appendices A, B, C and D of this document for additional
installation recommendations.
IP Address Assignments
Device
IP Address
Passport 10.5.48.X Subnet (255.255.255.192 Subnet Mask)
RV042 Router – LAN
10.5.48.1
Passport Server
10.5.48.2
Passport RAS
10.5.48.3 – 10.5.48.4
Secondary Router/Hub (if required)
10.5.48.7
DHCP Range
10.5.48.8 – 10.5.48.14
Passport Client 1
DHCP
Passport Client 2
DHCP
Passport Client 3
DHCP
Passport Client 4
DHCP
Passport Client 5
DHCP
(Reserved For Future Use)
DHCP
(Reserved For Future Use)
DHCP
Third-party 10.5.60.X Subnet (255.255.255.192 Subnet Mask)
Third-party DMZ Router
10.5.60.14
Back Office Server*/File Transfer Protocol
(FTP) User
10.5.60.15
Loyalty Server
10.5.60.16
Security Camera Server
10.5.60.17
Secure 10.5.50.X Subnet (255.255.255.252 Subnet Mask)
Passport Enhanced Dispenser Hub
10.5.50.2
RV042 Router – WAN
Provided by Payment Network or third-party Provider
*For additional details about configuring a Back Office System with Passport V8.02+, refer to
MDE-4880 Passport V8.02+ Third-party Partner Device Access Rules.
MDE-4866 Passport® Firewall Router Start up and Service Manual · February 2010
Page 17
Configuring the Firewall Router
IMPORTANT INFORMATION
Failure to configure Passport Clients and third-party devices according to the above
mentioned assignments may result in lack of communication and hence a site down
condition.
IMPORTANT INFORMATION
The following appendices will be required to complete the router installation and
configuration. To ensure proper TCP/IP communication, the procedures outlined within
each appendix must be applied to the appropriate situation. Review the networking
requirements with the site to determine the most appropriate configuration. Contact
Gilbarco Technical Support for additional questions or guidance in these areas.
Appendix
Purpose
Appendix A: Installing an Additional LAN Hub/Switch
May be used when installing more than 2 Clients on the Passport LAN.
Appendix B: Reprogramming a Linksys V3 Router for LAN
Expansion
May be used when installing more than 2 Clients on the Passport LAN
(10.5.48.X).
~OR~
May be used when installing more than 2 Clients on the third-party DMZ
(10.5.60.X) and one of the devices requires an Internet connection (for
example, Loyalty Server).
Appendix C: Firewall Router Advanced Routing and
Secondary Router Programming for WAN Traffic
May be used when traffic needs to be routed to a WAN location over the
Internet port of a secondary router (for example, Loyalty Server is installed at
the site).
Page 18
MDE-4866 Passport® Firewall Router Start up and Service Manual · February 2010
Appendix A: Installing an Additional LAN Hub/Switch
Appendix A: Installing an Additional LAN Hub/Switch
Installing an Additional Hub/Switch on the Passport LAN (10.5.48.X)
When more than two Clients require connection to the Passport LAN, it will be necessary to
accommodate additional LAN connections. This procedure must be used to install a
Linksys 10/100 8-port Workgroup switch (Q13708-01A) as a LAN expansion device with the
Firewall Router.
1
Ensure that both the Linksys switch and Firewall Router are powered on.
2 Connect a CAT-5 Modular Cable (Q13482-XX or Q13850-XX) between Port 1 of the
Linksys 10/100 8-port Workgroup Switch and Port 2 or 3 of the Firewall Router.
3 Connect additional Passport Clients to Ports 2 - 8 as required through a CAT-5 Modular Cable
(Q13482-XX or Q13850-XX).
Figure 13: Connecting the Firewall Router and LAN Hub/Switch (Passport LAN)
Firewall Router
Linksys 10/100 8-port Workgroup Switch
Installing an Additional Hub/Switch on the DMZ (10.5.60.X)
IMPORTANT INFORMATION
An expansion device will be required only if more than one third-party device needs to
communicate with the Passport POS system. If only one device requires connectivity to
the DMZ, this may be performed by connecting an Ethernet Cable directly between the
DMZ port on the router and the DMZ port on the Firewall Router.
The procedures below apply only if there is no requirement for the third-party device to
communicate over the Internet. If there is a need for Internet connectivity (for example,
Loyalty Servers that send data over the Internet for authorization) then the procedures
in “Appendix B: Reprogramming a Linksys V3 Router for LAN Expansion” on page 21
must be followed.
MDE-4866 Passport® Firewall Router Start up and Service Manual · February 2010
Page 19
Appendix A: Installing an Additional LAN Hub/Switch
When more than two third-party devices require connection to the DMZ, it will be necessary
to accommodate additional LAN connections. This procedure must be used to install a
Linksys 10/100 8-port Workgroup Switch (Q13708-01A) as an expansion device on the DMZ.
1 Ensure that both the Linksys switch and Firewall Router are powered on.
2 Connect a CAT-5 Modular Cable (Q13482-XX or Q13850-XX) between Port 1 of the
Linksys 10/100 8-port Workgroup Switch and the DMZ Port.
3 Connect third-party devices to Ports 2 - 8 as required, through a CAT-5 Modular Cable
(Q13482-XX or Q13850-XX).
Figure 14: Connecting the Firewall Router and LAN Hub/Switch (Third-party DMZ)
Firewall Router
Page 20
Linksys 10/100 8-port Workgroup Switch
MDE-4866 Passport® Firewall Router Start up and Service Manual · February 2010
Appendix B: Reprogramming a Linksys V3 Router for LAN Expansion
Appendix B: Reprogramming a Linksys V3 Router for LAN
Expansion
Reprogramming a Linksys V3 Router for Expansion on the Passport LAN
(10.5.48.X)
The 8-port Linksys Router may be used as an alternative solution towards accommodating
more than four LAN connections for Clients. This procedure must only be used when
reprogramming an existing Linksys V3 Router to install as a LAN expansion device with the
Firewall Router.
1 Ensure that the laptop is programmed to an IP address of 10.5.48.18.
2 Connect a CAT-5 Modular Cable (Q13482-XX or Q13850-XX) between Port 1 of the
secondary router and your laptop’s Ethernet port.
IMPORTANT INFORMATION
By default, all Linksys Routers ship with the same IP address. To prevent an IP
address conflict, the primary and secondary routers must not be connected
simultaneously. The only device that must be connected to a communication port on the
secondary router is a laptop.
3 Open Internet Explorer.
4 In the Internet Explorer address bar, type http://10.5.48.1 and press Enter. The Connect to
10.5.48.1 window appears.
Note: The password is case-sensitive and must be entered as specified.
Linksys Router
Password
User Name
Password
(blank)
admin
(blank)
GVR2Tech07
Note: The User Name and Password that must be used will depend on when the router was
installed. In some cases, both passwords may have to be attempted to determine the
appropriate one that must be used at a location.
IMPORTANT INFORMATION
Although the password for the secondary router is not subject to compliance
requirements, the merchant may choose to change the router password to strengthen
site security. If the site personnel require to change this password, refer to step
“Changing the Firewall Router Password” on page 16. Change the password only after
the router configuration is complete.
MDE-4866 Passport® Firewall Router Start up and Service Manual · February 2010
Page 21
Appendix B: Reprogramming a Linksys V3 Router for LAN Expansion
5 Enter the following information in the Network Setup tab in the Setup page of the Router
Configuration screen. These settings are required to allow the secondary router to
communicate over the Passport LAN.
Field
Value
Local IP Address
10.5.48.7
Subnet Mask
255.255.255.192
Local DHCP Server
Disable
Start IP Address
Not Applicable.
Note: This must be grayed out when Local DHCP Server is set to
Disable.
Client Lease Time
Not Applicable.
Note: This must be grayed out when Local DHCP Server is set to
Disable.
Static DNS 1, 2, 3
0.0.0.0
WINS
0.0.0.0
6 Verify if the programming performed in step 5 is correct. If any information is incorrect, it
must be corrected immediately. When complete, proceed to step 7.
7 Click Save Settings. If prompted to log on to the router with the new address, click OK.
IMPORTANT INFORMATION
Internet Explorer will not automatically return to router Setup page, as the IP address
was changed in step 5. Use 10.5.48.14 to access the secondary router’s Setup page.
8 If there are no advanced routing requirements, proceed to step 9. If the site has advanced
routing requirements, refer to “Appendix C: Firewall Router Advanced Routing and
Secondary Router Programming for WAN Traffic” on page 26 for the programming
procedure.
IMPORTANT INFORMATION
Verify if there are any additional advanced routing requirements. If there are additional
requirements after the secondary router password has been changed, then the
appropriate site personnel must obtain access to the router.
9 In the Internet Explorer address bar, type http://10.5.48.7 and press Enter. The Connect to
10.5.48.7 window appears. Re-enter the appropriate password (provided in step 4). The default
password must now be changed.
10 Click the Administration tab.
Page 22
MDE-4866 Passport® Firewall Router Start up and Service Manual · February 2010
Appendix B: Reprogramming a Linksys V3 Router for LAN Expansion
11 Allow the site personnel to enter and confirm the new password in the “Router Password”
field.
IMPORTANT INFORMATION
It is critical that only the approved site personnel enter and confirm the new router
password. This will prevent the administrator password from being known to anyone
other than the approved site personnel.
Figure 15: Connecting the Router and Passport LAN
Reprogramming a Linksys V3 Router for Expansion on the Third-party DMZ
(10.5.60.X)
The 8-port Linksys Router may be used as an alternative solution towards accommodating
more than one network connection for third-party devices. This procedure must only be
followed when reprogramming an existing Linksys V3 Router and install the router as an
expansion device on the DMZ.
IMPORTANT INFORMATION
If there is a need for Internet connectivity (for example, Loyalty Servers that send data
over the Internet for authorization) then the procedures below must be followed.
1 Ensure that the IP address of your laptop is programmed to 10.5.48.18.
2 Connect a CAT-5 Modular Cable (Q13482-XX or Q13850-XX) between Port 1 of the
secondary router and your laptop’s Ethernet port.
IMPORTANT INFORMATION
By default, all Linksys Routers ship with the same IP address. In order to prevent an IP
address conflict, the primary and secondary routers must not be connected
simultaneously. The only device that must be connected to a communication port on
the secondary router, is a laptop.
3 Open Internet Explorer.
MDE-4866 Passport® Firewall Router Start up and Service Manual · February 2010
Page 23
Appendix B: Reprogramming a Linksys V3 Router for LAN Expansion
4 In the Internet Explorer address bar, type http://10.5.48.1 and press Enter. The Connect to
10.5.48.1 window appears.
Note: The password is case-sensitive and must be entered as specified.
Linksys Router
Password
User Name
Password
(blank)
admin
(blank)
GVR2Tech07
Note: The User Name and Password used will depend on when the router was installed. In
some cases, both passwords may have to be attempted to determine the appropriate one
used at a location.
IMPORTANT INFORMATION
Although the password for the secondary router is not subject to compliance
requirements, the merchant may choose to change the router password to strengthen
site security. If the site personnel requires to change this password, refer to “Changing
the Firewall Router Password” on page 16 and must be performed after router
configuration is complete.
5 Enter the following information in the Network Setup tab of the Setup page in the Router
Configuration screen. These settings are required to allow the secondary router to
communicate over the Passport LAN.
Field
Value
Local IP Address
10.5.60.14
Subnet Mask
255.255.255.192
Local DHCP Server
Disable
Start IP Address
Not Applicable
Note: This must be grayed out when Local DHCP Server is set to
Disable.
Client Lease Time
Not Applicable
Note: This must be grayed out when Local DHCP Server is set to
Disable.
Static DNS 1, 2, 3
0.0.0.0
WINS
0.0.0.0
6 Verify if the programming performed in step 5 is correct. If any information is incorrect, it
must be corrected at this time. When complete, proceed to step 7.
7 Click Save Settings. If prompted to log on to the router with the new address, click OK.
IMPORTANT INFORMATION
Internet Explorer will not automatically return to router Setup page as the IP address
was changed in step 5. 10.5.60.14 must now be used to access the secondary router’s
Setup page.
Page 24
MDE-4866 Passport® Firewall Router Start up and Service Manual · February 2010
Appendix B: Reprogramming a Linksys V3 Router for LAN Expansion
8 If there are no advanced routing needs, proceed to step 9. If the site has advanced routing
needs, perform the programming as detailed in “Appendix C: Firewall Router Advanced
Routing and Secondary Router Programming for WAN Traffic” on page 26.
IMPORTANT INFORMATION
Verify if there are any additional advanced routing requirements. If there are additional
requirements after the secondary router password has been changed, then the
appropriate site personnel must obtain access to the router.
9 In the Internet Explorer address bar, type http://10.5.60.14 and press Enter. The Connect to
10.5.60.14 window appears.
10 Re-enter the appropriate password (provided in step 4).
11 Click the Administration tab.
12 Allow the site personnel to enter and confirm the new password in the “Router Password”
field.
IMPORTANT INFORMATION
It is critical that only the approved site personnel enter and confirm the new router
password. This will prevent the administrator password from being known by anyone
other than the approved site personnel.
MDE-4866 Passport® Firewall Router Start up and Service Manual · February 2010
Page 25
Appendix C: Firewall Router Advanced Routing and Secondary Router Programming for WAN Traffic
Appendix C: Firewall Router Advanced Routing and
Secondary Router Programming for WAN
Traffic
Programming Advanced Routing within the Firewall Router
IMPORTANT INFORMATION
If there is a need for Internet connectivity (for example, Loyalty Servers that send data
over the Internet for authorization) then the procedures below must be followed.
The Firewall Router manages communication to the various Passport devices (the Passport
Server, Clients, Enhanced Dispenser Hub, and so on). This router will be set to use the IP
address 10.5.48.1. This router requires a static route to the Internet/WAN interface on the
secondary router through its LAN ports.
IMPORTANT INFORMATION
Before beginning this procedure, connect the device that you will use to configure the
router as follows:
• If the Passport Server is used, connect it to Port 1 of the Firewall Router.
• If a laptop is being used, connect it to Port 1 on the Firewall Router. The IP address
of your laptop must be programmed as 10.5.48.18.
1 Open Internet Explorer.
2 In the Internet Explorer address bar, type http://10.5.48.1 and press Enter. The Connect to
10.5.48.1 window appears.
Note: The password is case-sensitive and must be entered as specified.
3 Enter the User Name and Password.
4 Select Setup > More > Advanced Routing from the Router Configuration screen.
5 Ensure that the following Advanced Routing settings are set.
Dynamic Routing
Page 26
Working Mode
Gateway
RIP
Enabled
Receive RIP
Versions
RIPv1
Transmit RIP
Versions
RIPv1
MDE-4866 Passport® Firewall Router Start up and Service Manual · February 2010
Appendix C: Firewall Router Advanced Routing and Secondary Router Programming for WAN Traffic
6 The Static Routing section has to be programmed. These settings are required to route traffic
appropriately to the required external WAN destination:
Field
Value
Destination IP Address
xxx.xxx.xxx.xxx
Note: This address must be provided by the third-party who will
receive the TCP/IP traffic.
Subnet Mask
yyy.yyy.yyy.yyy
Note: This subnet mask must be provided by the third-party
who will receive the TCP/IP traffic.
Gateway (Secondary Router IP)
10.5.60.14
Hop Count
1
Interface
WAN2/DMZ
7 Ensure that the programming performed in steps 5 and 6 is correct. When complete, proceed to
step 8.
8 Click Add to List.
9 Click Save Settings.
10 Click Logout.
11 Click Yes, if prompted to close the window.
The Advanced Programming of the primary router is complete.
Programming the Secondary Router
The secondary router may be connected to the Internet through a broadband or high-speed
provider.
IMPORTANT INFORMATION
Before beginning this procedure, ensure that a laptop is connected to Port 1 of the
secondary router. The IP address of your laptop must be programmed as 10.5.60.18.
1 Open Internet Explorer.
2 In the Internet Explorer address bar, type http://10.5.60.14 and press Enter.
3 Enter the User Name and Password for the secondary router.
4 In the Internet Setup – Internet Connection Type section of the Setup page, ensure that the
Internet Connection Type is configured with a static IP address as specified by the site’s
Internet Service Provider (ISP).
Note: As the requirements for each service may vary, contact the ISP directly to obtain the
required settings for communication to the Internet.
MDE-4866 Passport® Firewall Router Start up and Service Manual · February 2010
Page 27
Appendix C: Firewall Router Advanced Routing and Secondary Router Programming for WAN Traffic
5 Obtain the ISP-provided information regarding the appropriate cable connection
(Straight-through Cable vs. Crossover Cable) between the secondary router’s Internet Port and
the site’s Internet device (broadband modem, and so on). This connection information will be
required later.
6 Ensure that the programming performed in step 4 is correct. When complete, proceed to step 7.
7 Click Save Settings. The Internet Explorer will automatically return to the Router Setup.
8 Click Log out and close the Internet Explorer window. If a laptop is used for router
configuration, then disconnect the laptop.
9 Connect a CAT-5 Cable between Port 1 of the secondary router and the DMZ port on the
Firewall Router.
10 Access the Command Prompt from the Passport Manager Workstation.
11 In the Command Prompt window, ping 10.5.60.14. If the ping is successful, installation and
configuration is correct and you may proceed to step 12.
If you are unable to ping the secondary router, then repeat the steps provided in
“Reprogramming a Linksys V3 Router for Expansion on the Third-party DMZ (10.5.60.X)”
on page 23. Contact Gilbarco Technical Support for troubleshooting the communication
failure.
12 Connect an Ethernet Cable between the Internet port on the secondary router and the site’s
Internet device (broadband modem, switch, Ethernet jack, and so on) as specified by the ISP in
step 5.
13 In the Command Prompt window, ping the destination IP address.
Note: This is the IP address entered in the static route in step 5 of “Programming Advanced
Routing within the Firewall Router” on page 26.
14 If the ping is successful, installation and configuration is correct. If you are unable to ping the
destination IP address, then contact the site’s ISP to validate the internet connectivity. Contact
Gilbarco Technical Support for additional assistance.
Figure 16: Connecting the Router to Third-party DMZ
The configuration and installation of the dual-router environment is complete.
Page 28
MDE-4866 Passport® Firewall Router Start up and Service Manual · February 2010
Appendix D: Customer-specific Access Programming
Appendix D: Customer-specific Access Programming
When programming the RV042 Router, the following customer-specific changes must be
completed.
Access Rules
Customer access rules have been created based on specific customer requirements and must be
enabled only when required.
To modify customer access rules, select Firewall > Access Rules. A screen as in Figure 17
appears.
Figure 17: Access Rules
Proceed with the changes in the following table.
Applies To
Policy Name
Action Needed
3rdPtyLAN
Select Enable. Change will be saved automatically.
Third-party Rules
All customers with third-party
devices (for example, Back Office,
Loyalty, IP-based Security Camera
Interface)
All customers with a third-party
BOSFTP
Back Office System using a FTP on
the DMZ
Select Enable. Change will be saved automatically.
All customers with a third-party
Back Office System using a
Windows File Share over the DMZ
BOSShare
Select Enable. Change will be saved automatically.
All customers connecting to
Passport through FTP over a WAN
interface
WANFTP
Select Enable. Change will be saved automatically.
MDE-4866 Passport® Firewall Router Start up and Service Manual · February 2010
Page 29
Appendix D: Customer-specific Access Programming
Applies To
Policy Name
Action Needed
WAN2EDH
1 Click Edit beside the rule.
TCP/IP Credit/Debit Network Rules
All customers using a TCP/IP
network for credit/debit processing
2 Ensure that Source IP to is set to Single.
3 Set the Source IP Address to the Default
Gateway Address. (This takes the value B as in
step 6 in “Configuring the Firewall Router” on
page 6).
4 Save the settings.
All customers using a TCP/IP
network for credit/debit processing
EDH2WAN
1 Click Edit beside the rule.
2 Ensure that Destination IP to is set to Single.
3 Set the Destination IP Address to the Default
Gateway Address. (This takes the value B as in
step 6 in “Configuring the Firewall Router” on
page 6).
4 Save the settings.
Software Download Rules
Chevron®
CVXMCast1
CVXMCast2
CVXMCast3
Select Enable (for all rules). Change will be saved
automatically.
ExxonMobil®
EOMMCast1
EOMMCast2
Select Enable (for both rules). Change will be saved
automatically.
Network Ping Rules
BP®, Chevron, and ExxonMobil
Disable Block WAN 1 Navigate to the Firewall > General
Request
2 Set Block WAN Request to Disable.
3 Save the settings.
Chevron
ChevPING
1 Select Enable.
2 Click Edit beside the rule.
3 Ensure WAN IP Address to is set to Single.
4 Set the WAN IP Address to the Default Gateway
Address. (This takes the value B as in step 6 in
“Configuring the Firewall Router” on page 6).
5 Save the settings.
Network Specific Rules
BP
BPV900
Select Enable. Change will be saved automatically.
NetOpUDP2
Select Enable. Change will be saved automatically.
NetOpTCP2
Select Enable. Change will be saved automatically.
ExxonMobil
WAN2FTP
Select Enable. Change will be saved automatically.
Sunoco®*
SunPrysm
Select Enable. Change will be saved automatically.
*Applies only to Sunoco locations that have a Prysm system connected to the WAN port on the router.
Page 30
MDE-4866 Passport® Firewall Router Start up and Service Manual · February 2010
Appendix D: Customer-specific Access Programming
Applies To
Policy Name
Action Needed
WAN Support
IMPORTANT INFORMATION
Remote Support access rules are required only for customers where Gilbarco is
performing remote support through WAN. For dial-in supported sites these access
rules must not be enabled.
Applies only to non-BP locations
where Gilbarco is performing
remote support through WAN.
NetOpUDP
Select Enable. Change will be saved automatically.
NetOpTCP
Select Enable. Change will be saved automatically.
WANSiteCo
Select Enable. Change will be saved automatically.
RDP2EDH2
Select Enable. Change will be saved automatically.
UPnP Forwarding Rule - BP Only
The following change must be made at BP sites only:
From the Setup tab, select UPnP and proceed as follows:
a Select the BPV900 rule.
b Select the Enable box.
c Ensure that the “Name or IP Address” field shows 10.5.50.2. If the value is not 10.5.50.2,
update this field.
MDE-4866 Passport® Firewall Router Start up and Service Manual · February 2010
Page 31
Appendix D: Customer-specific Access Programming
d Click Save Settings.
Figure 18: Setup Tab for UPnP Forwarding Rule - BP Only
Page 32
MDE-4866 Passport® Firewall Router Start up and Service Manual · February 2010
Appendix E: Troubleshooting the Firewall Router
Appendix E: Troubleshooting the Firewall Router
Symptom
Potential Cause
Recommended Troubleshooting
Unable to communicate on the LAN. • Disabled Port
• Attempt to ping the router from the impacted
device.
• Lack of DHCP
reservation
• From another device (for example, laptop)
access the router setup screen.
• Connectivity issue
• Error in firewall access • From the System Summary screen, verify if
rule configuration
the port that the impacted device is
connected to, is shown as green.
a Red indicates that the port is disabled. It
may be enabled through the Port
Management tab.
b Black indicates that the port is enabled
but there is no connectivity between the
Ethernet adapter and the LAN Port.
• Check the cable connections and hardware.
• If the impacted device is a Passport Client,
access the DHCP tab.
a Verify that DHCP is enabled.
b Verify that the start and end addresses
in the DHCP range include enough
space for all the Clients.
• Contact Gilbarco Technical Support to
further investigate potential errors in
programming and firewall rule configuration.
Unable to communicate with
Enhanced Dispenser Hub/Forecourt
devices.
• Disabled Port
• From the Server, access the router setup
screen.
• Connectivity issue
• Error in firewall access • From the System Summary screen, verify
rule configuration
that Port 4 is shown as green.
a Red indicates that the port is disabled. It
may be enabled through the Port
Management tab.
b Black indicates that the port is enabled
but there is no connectivity between the
Ethernet adapter and the LAN Port.
• Check the cable connections and hardware.
• Contact Gilbarco Technical Support to
further investigate potential errors in
programming and firewall rule configuration.
A spare keyboard and monitor may be
required to perform troubleshooting locally
on the Enhanced Dispenser Hub.
MDE-4866 Passport® Firewall Router Start up and Service Manual · February 2010
Page 33
Appendix E: Troubleshooting the Firewall Router
Symptom
Potential Cause
Recommended Troubleshooting
Unable to communicate on the WAN • Disabled Port
• Attempt to ping the satellite device from the
Passport Server.
• Error in IP address
programming
a If unsuccessful, access the router
System Summary screen and ensure
• Connectivity issue
that the WAN Port is shown as green.
• Error in firewall access
rule configuration
- Red indicates that the port is
disabled. It may be enabled through
the Port Management tab.
- Black indicates that the port is
enabled but there is no connectivity
between the Ethernet adapter and
the LAN Port. IP address
programming, cabling, and
hardware must be further
investigated.
b If successful, verify that the TCP/IP
Credit/Debit Network Rules are
programmed properly.
• Contact Gilbarco Technical Support to
further investigate potential errors in
programming and firewall rule configuration.
Unable to communicate between
POS and third-party device (Back
Office, Loyalty Server, IP-based
security camera).
Page 34
• Disabled Port
• Attempt to ping the Back Office device from
the Passport Server.
• Error in IP address
programming
a If unsuccessful, access the router
System Summary screen and verify that
• Connectivity issue
the DMZ Port is shown as green.
• Error in firewall access
rule configuration
- Red indicates that the port is
disabled. It may be enabled through
the Port Management tab.
- Black indicates that the port is
enabled but there is no connectivity
between the Ethernet adapter and
the LAN Port. IP address
programming, cabling, and
hardware must be further
investigated.
b If successful, ensure that the third-party
rules are programmed properly.
• Contact Gilbarco Technical Support to
further investigate potential errors in
programming and firewall rule configuration.
MDE-4866 Passport® Firewall Router Start up and Service Manual · February 2010
Appendix E: Troubleshooting the Firewall Router
Symptom
Potential Cause
Recommended Troubleshooting
Unable to access router for
configuration
• Connectivity issue
• Corruption in router
memory
• Hardware issue
• By default, only Port 1 and Port 4 will be
active. Ensure that the device used to
program the router is connected to Port 1.
• Verify the IP address programming on the
device used to program the router. (If using a
laptop, verify settings as shown in
“Configuring Your Laptop” on page 3).
• Replace the Ethernet Cable between the
device and the router.
• If device programming is correct, reset the
router by holding in the circular button on the
rear of the Firewall Router for approximately
20 seconds*.
a Obtain a backup router configuration file
from the site or a current factory
configuration file from Gilbarco Technical
Support.
b Program your laptop as follows:
- IP address: 192.168.1.2
- Subnet Mask: 255.255.255.192
- Default Gateway: 192.168.1.1
• Open Windows Explorer on your laptop and
access 192.168.1.1. (Use admin as the
User Name and Password.)
• Navigate to System Management > Setting
Backup.
• Import the site’s backup router configuration
file or Gilbarco’s current factory configuration
file.
• Use the Password and User Name as
provided on page 7 of this document to
restore the configuration file.
• If you are unable to access the router after
performing a reset, this may indicate a
hardware issue. Contact Gilbarco Technical
Support for further troubleshooting.
*This process will reset the router to Linksys default value. It must only be performed at the direction of Gilbarco
Technical Support.
MDE-4866 Passport® Firewall Router Start up and Service Manual · February 2010
Page 35
BP® is registered trademark of BP Amoco P.L.C. Chevron® is a registered trademark of Chevron Corporation. Ethernet® is a registered trademark of Xerox
Corporation. ExxonMobil® is a registered trademark of Exxon Mobil Corporation. Gilbarco® and Passport® are registered trademarks of Gilbarco Inc.
Linksys® is a registered trademark of Cisco-Linksys LLC. Sunoco® is a registered trademark of Sunoco Inc. Veeder-Root® is a registered trademark of
Danaher Corporation. Windows® is a registered trademark of Microsoft Corporation.
© 2010 Gilbarco Inc.
7300 West Friendly Avenue · Post Office Box 22087
Greensboro, North Carolina 27420
Phone (336) 547-5000 · http://www.gilbarco.com · Printed in the U.S.A.
MDE-4866 Passport® Firewall Router Start up and Service Manual · February 2010