1
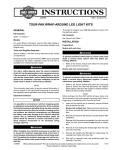
-J05933
REV. 2014-05-05
ENGINE GUARD MOUNTED LED BULLET FOG LAMP KITS
ELECTRICAL OVERLOAD
GENERAL
Kit Numbers
68000090, 68000092
Models
For model fitment information, see the P&A retail catalog or
the Parts and Accessories section of www.harley-davidson.com
(English only).
This kit is designed for use only with 1-1/4 in (31.8 mm) diameter engine guards that are vertical when viewed from the
front with the motorcycle upright.
Harley-Davidson recommends inboard mounting of engine
guard fog lamps
It is possible to overload your vehicle's charging system
by adding too many electrical accessories. If the combined
electrical accessories operating at any one time consume
more electrical current than the vehicle's charging system
can produce, the electrical consumption can discharge
the battery and cause damage to the vehicle's electrical
system. See an authorized Harley-Davidson dealer for
advice about the amount of current consumed by additional electrical accessories or for necessary wiring
changes. (00211c)
This kit is not compatible with soft fairing lowers.
NOTE
May not conform to local lighting regulations. Check local laws.
Installation Requirements
Separate purchase of an LED Bullet Fog Lamp Mounting
Bracket Kit and a Fog Lamp Wire Harness Kit are required for
proper installation of this kit.
Electrical Contact Lube (H-D Part No. 99861-02) or equivalent
is required after battery cable disconnection.
These items are available from a Harley-Davidson dealer.
When installing any electrical accessory, be certain not
to exceed the maximum amperage rating of the fuse or
circuit breaker protecting the affected circuit being modified. Exceeding the maximum amperage can lead to electrical failures, which could result in death or serious injury.
(00310a)
This kit requires up to 700 mA--> more current from the electrical system.
Kit Contents
See Figure 1 and Table 1.
PREPARATION
The rider's safety depends upon the correct installation
of this kit. Use the appropriate service manual procedures.
If the procedure is not within your capabilities or you do
not have the correct tools, have a Harley-Davidson dealer
perform the installation. Improper installation of this kit
could result in death or serious injury. (00333a)
To prevent accidental vehicle start-up, which could cause
death or serious injury, remove main fuse before proceeding. (00251b)
NOTE
NOTE
•
For 2007- later vehicles WITH security siren: With
security fob present, turn ignition switch ON. See the service manual. After system is disarmed, turn ignition switch
OFF. IMMEDIATELY remove the main fuse.
•
For 2006- earlier vehicles WITH security siren: Disarm
the siren with the key fob or security code. See the service
manual to remove the main fuse.
•
For vehicles WITHOUT security siren: See the service
manual. Remove the main fuse.
This instruction sheet refers to service manual information. A
service manual for this year/model motorcycle is required for
this installation. One is available from a Harley-Davidson dealer.
-J05933
Many Harley-Davidson® Parts & Accessories are made of plastics and metals which can be recycled.
Please dispose of materials responsibly.
1 of 2
INSTALLATION
1.
2.
SERVICE PARTS
Install the fog lamps to the vehicle per the instructions in
the LED Bullet Fog Lamp Mounting Kit.
is08358
3
Complete the fog lamp installation per the instructions in
the Fog Lamp Wire Harness Kit.
COMPLETION
NOTE
4
To prevent possible damage to the sound system, verify that
the ignition is OFF before installing the main fuse or attaching
the negative battery cable.
1.
2
1
Models with main fuse: See the service manual. Install
the main fuse.
Models with main circuit breaker:
a.
b.
ALL models except XL: See the service manual.
Attach the negative battery cable. Apply a light coat
of petroleum jelly or corrosion retardant material to
battery terminals.
Figure 1. Service Parts, Engine Guard Mounted LED Bullet
Fog Lamp Kits
XL models only: See the service manual. Connect
the negative battery cable at the engine crankcase.
Table 1. Service Parts
Item
Description (Quantity)
Part Number
For Kit 68000090 (Chrome):
After installing seat, pull upward on seat to be sure it is
locked in position. While riding, a loose seat can shift
causing loss of control, which could result in death or
serious injury. (00070b)
2.
1
Fog lamp, right, chrome
(includes Item 2)
68000089
2
•
72906-11
3
Fog lamp, left, chrome
(includes Item 4)
68000156
4
•
72906-11
ALL models: See the service manual. Install seat.
Socket housing, two-way
Socket housing, two-way
For Kit 68000092 (Black):
-J05933
1
Fog lamp, right, black
(includes Item 2)
68000091
2
•
72906-11
3
Fog lamp, left, black
(includes Item 4)
68000157
4
•
72906-11
Socket housing, two-way
Socket housing, two-way
2 of 2