1
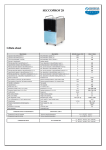
TECHNICAL FEATURES
Power Supply
Input Power (27 C - 65% U.R.)
Max Input Power (32 C - 80% U.R.)
Dehumidification Capacity 27 C - 65% U.R. (liters)
Dehumidification Capacity 32 C - 80% U.R. (liters)
Fan Speeds
Refrigerant type
Refrigerant quantity
Air Flow
Tank Capacity (liters)
Dimensions (HxWxD) mm
Weight
Noise level (sound pressure)
Noise level (sound power)
Water Proof Level
OPERATING WORKING LIMITS
Max working conditions in dehumidification mode: DB / WB
Min working conditions in dehumidification mode: DB / WB
Secco Prof
230V - 50Hz
520 W – 2,2A
620 W – 2,7A
18 /24 h
28 /24 h
1
R 134A
0,230 kg
3
380 m /h
10
720 x 310 x 450
27 kg
53 dB(A)
62 dB(A)
IPX1
35°C/31°C
2°C/1°C
INTRODUCTION
The dehumidifier is fitted with an electronic logic system which controls operation and optimises consumption
and performance. The keys and information on the control panel have the following meanings
1) Start / Stand-by key
2) Desired humidity / temperature increment key
3) Desired humidity / temperature decrement key
4) Humidity indication key
5) Detected ambient humidity(blinking) / Selected humidity
6) Condensate collection tank full or tank shortage (LED ON),
Continuous discharge function enabled (LED BLINKING with frequency 1.25Hz).
Tank empty/present with continuous discharge disabled (LED OFF).
7) Operating mode selection key
8) DRYING MODE indications (LED ON).
9) DEHUMIDIFICATION MODE indications (LED ON).
SELECTING FUNCTIONS
Stand-by. Key (1)
This key activates the dehumidifier or puts it in Stand-by mode.
Humidity set point
The set point can be adjusted from 30% to 90% Rh in steps of 5%; pressing the UP (Key 2) or DOWN (Key
3) keys increases or decreases the set point value by 5%.
Mode. Key (7)
Pressing this button the following operating modes can be set:
• DEHUMIDIFICATION, indicated by the "drop" symbol led ON. During first 5 seconds the display will show
the detected humidity, flashing numbers.
• DRYING, indicated by the “HI” symbol light on the display and corresponding “HI” led ON, this indicates
that the dehumidifier is running continuously at maximum power.
FUNCTION DETAILS
• DEHUMIDIFICATION indicated by the "drop" symbol light on the control panel.
Compressor and fan are switched on if the minimum OFF time (Cf) has elapsed and if the relative humidity
value is higher than the set point + 3; compressor and fan remain ON as long as the relative humidity value
is above the set point – 3; when below the set point – 3, compressor and fan switch off (the fan switch-off is
delayed by 30 seconds with respect to the compressor) and remain off for a minimum time equal to Cf
(measured as from switch-off of the compressor), at the end of which compressor and fan are switched back
on again if the relative humidity value is greater than the set point +3.
Compressor and fan switch off only in the following cases:
cut in of the tank full switch,
operation in defrosting mode,
alarms (the switching off of fan always delays for 30 seconds compared with compressor.
• DRYING MODE
Compressor and fan are switched on if the minimum OFF time (Cf) has elapsed.
Compressor and fan switch off only in the following cases:
cut in of the tank full switch,
operation in defrosting mode,
alarms (the switching off of fan always delays for 30 seconds compared with compressor.
DEFROSTING MODE
If there is a frost condition (evaporator temperature < Ft and compressor ON) the compressor remains on for
a maximum time equal to Co minutes, at the expiry of which air defrosting takes place (fan on and
compressor off) which terminates when the pre-set temperature is reached (evaporator temperature > St),
compatibly with the minimum compressor OFF duration of 5 minutes.
If the formation of frost is detected and the compressor is stopped due to reaching of the set point before the
expiry of Co the fan remains on until the end of defrosting temperature is reached.
OPERATION WITH CONTINUOUS DISCHARGE
To operate the dehumidifier with continuous discharge, carry out the following operations:
• Take the tank out of the appliance.
• Connect the rubber pipe provided in the outfit to the condensate collection tank (at the top of the tank
compartment).
• Secure the pipe with the metal clamp provided.
• Simultaneously press the increment (key 2) and decrement (key 3) for three seconds, with the machine in
function
The activation of this function is indicated by the flashing "tank" symbol (6).
The continuous discharge function is cancelled if the empty tank is refitted.
ALARM CODES
Display
Indication
"Hr" flashing
Likely Cause
Suggested Solution
Relative humidity drops below very low values (<22%).
Activate the dehumidifier with
higher ambient
humidity conditions.
Change humidity sensor or
whole PCB (according to the
model).
Change ambient temperature
sensor or whole PCB
(according to the model).
Activate the dehumidifier with
higher ambient humidity
conditions.
Humidity sensor broken.
"tE" flashing
The ambient evaporator temperature sensor
is damaged.
"Lo" flashing
The ambient temperature is too low. It means that after
30 minutes of operation in defrosting mode (compressor
stopped and fan working) the defrosting temperature
does not exceed St. Alarm reset automatically after
room temp rise up St.
Mnemonic
Co
Cf
Ft
St
Range scheduled
20 min
50 min
3 min
15 min
-9°C
+9°C
0°C
+9°C
Parameters set
30
3
-1
3
Description
Compressor in defrosting ON time
Compressor minimum OFF time
Frost accumulation temperature
End of defrosting temperature
AUTOTEST MODE
By pressing the keys 3+7 for 3 seconds in sequence with the unit in Stand-by, the following
sequence is started (each phase has a duration of 3 seconds):
- switch-on of all symbols of the displays
- display of the software release
- activation of the fan and compressor, displaying the code At.
The compressor remains ON continuously, independently of the set point and the tank level switch; the
pause between stop and subsequent start and the defrosting function are also excluded.
The tank level symbol is active if the tank is absent (switch open), off if the tank is present (input closed).
Pressing the key 3 the software refresh the standard display as evaporator temperature.
Pressing the key 7 the software refresh the standard display as relative humidity value.
Press the stand-by key or disconnect the power supply to quit the auto test mode.
SECCO PROF WIRING DIAGRAM
A1 = Electronic card (power);
A2 = Electronic card (control);
B1 = Humidity feeler;
B2 = Evaporator sensor;
F1 = Compressor thermal cut-out;
K1 = Compressor relay;
K2 = Fan control;
M1 = Motor-driven compressor;
M2 = Fan;
S1 = Tank presence micro-switch;
S2 = Tank full micro-switch;
T1 = Transformer;
X1 = Power supply terminal board;
X2 = 6-pole connector;
X3 = 5-pole connector;
X4 = 2-pole connector;