1
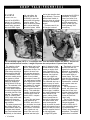
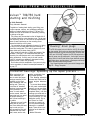
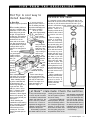
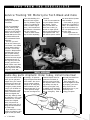
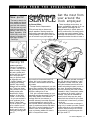
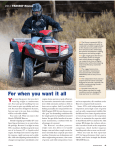
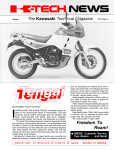
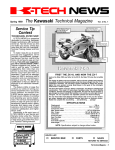
Fall 1992
The Kawasaki
Technical Magazine
Vol. 5 No. 3
by Patrick Kelly
Instructional Designer,
Instructor
Where do we start when
describing Kawasaki’s latest off-road wonder? This
new machine is so innovative it’s hard to pick one
item that is more important than another. From its
all new engine to its stateof-the-art perimeter frame
to its sophisticated suspension, the new KLX650-A1
has it all. And let’s not forget about its equally sophisticated street legal
brother, the KLX650-C1.
Since it has the same
100mm bore and the
same 83mm stroke for a
displacement of 651cc,
some people may pre-conceive the new KLX engine
as simply an updated KLR
650 engine. However,
nothing could be further
from the truth since many
new design features put
this engine in a different
class. This new engine is
more compact in all dimensions, being 13mm narrower side to side and
30mm shorter front to
back. And, while the torque
CONTINUED ON PAGE 2
ROUTE LIST: o SERVICE
P L E A S E
R E T U R NT O
o PARTS
S E R V I C E
o SALES
L I B R A R Y
Inside!
n Service tips & more!
KLX650
CONTINUED FROM PAGE 1
output of the KLX650-A
engine is up 13 percent,
its weight is down over 20
percent when compared
with the KLR650 engine.
with outer shims, the
same as used on the
KL650-A/B, to open the
valves while dual springs
close the valves. The
cams are driven by Kawasaki’s unique dual-stage
cam-drive system, similar
der but also transfers heat
more efficiently. The more
efficient heat transfer allows the piston to cylinder
clearance to be tightened
as well.
The bottom end of the
KLX engine is also all
completes the KLX650-Al
powerplant. It incorporates a rev limiter to cut
the ignition intermittently
at 8500 rpm and completely at 9000 rpm, preventing damage from
overrevving.
The new KLX650 engine (LEFT) is “‘in a different class” from the familiar KLR650 unit (RIGHT). Over an inch
shorter and half-an-inch narrower, it weighs 20 percent less and produces 13 percent more torque!
The massive cylinder
breathes through two
large 38mm intake valves.
These valves are fed by a
40mm semi-flat slide Keihin CV carburetor, which
features a coasting enrichener system to prevent
backfiring during engine
braking by supplying a
rich fuel mixture to the engine. The carburetor is fed
by an extra large airbox
for crisp throttle response.
Air enters this large airbox
from under the front of the
fuel tank. This system, the
Fresh Air Intake System
(FAIS), helps reduce maintenance and keeps performance up in dusty and
wet conditions.
The exhaust gasses exit
the cylinder through two
33mm exhaust valves into
a stainless steel exhaust
pipe. Dual overhead cams
act directly on the buckets
2
l
K-Tech News
to the system used on the
VN750. Dual-stage cam
drive allows the top of the
engine to be more compact, and also allows the
camshafts to be closer together for an included
valve angle of a mere 20°.
This extra-narrow included
valve angle allows the use
of a pentroof type combustion chamber for excellent
surface-to-volume ratio
and exceptional thermal efficiency. This combustion
chamber combines with a
concave piston crown to
provide a 9.5:1 compression ratio.
One of the most exceptional features of the
KLX650-A, and a first for
any production four-stroke
Kawasaki, is its electrofusion cylinder. The electrofusion cylinder not only
saves 2 Ibs. over a conventional wet-lined cylin-
new. It features a single
counter-balancer to help
cancel out engine vibrations. Compared to the
KL650A/B’s dual counterbalancer, the single balancer has a lighter moment of inertia for quicker
revving and acceleration.
The crankshaft also has a
lighter moment of inertia
because the flywheels are
the half-circle type as compared to the KL650A/B’s
full-circle type. In addition,
the crankpin diameter has
been reduced to limit
power- robbing friction.
Dual oil pumps also do
their part to reduce parasitic power losses. One
pump scavenges the
sump to prevent the crankshaft and magneto from rotating in a bath of oil while
the other supplies fresh oil
to vital engine parts.
A digital CD ignition
The chassis on the new
KLX650 has been designed to the same high
standards as Kawasaki’s
KX line. Topping the list is
a box-section steel perimeter frame. This frame
gives the KLX excellent rigidity for superior handling
characteristics combined
with superior mass centralization.
The front forks are inverted, with 43mm inner
tubes and 16-way compression damping adjustment. They provide 11.8
inches of plush frontwheel travel.
The Uni-Trak rear suspension utilizes a nitrogencharged piggyback
reservoir shock with 16way compression-damping adjustment and
16-way rebound-damping
adjustment. This sophisticated shock is combined
with an aluminum swingarm to provide 11 in. of
rising-rate rear-wheel
travel.
Braking chores are handled by front and rear disc
brakes. A floating front
disc, the same as used on
the KX125/250/500, is
combined with a twin-piston caliper in the front
while a rear disc with single-piston caliper takes
care of the back.
Twenty-one-inch front
and 18 in. rear aluminum
wheels with straight-pull
spokes complete this allnew off-road powerhouse.
Dual-purpose enthusiasts will be pleased to
know there is a streetlegal version of the bike
described above: the KLX650-C1. It’s made to the
same exact standards, but
with some changes to
make it more street compatible.
The KLX650-C engine
has slightly less intake
cam duration for more lowend and mid-range torque.
This combines with more
flywheel mass to smooth
out the power delivery and
provide a stable idle.
The electrofusion cylinder is replaced with a conventional wet-lined
cylinder. This, along with a
larger capacity silencer,
helps to lower the noise
level to street-legal levels.
The KLX650-A’s aluminum kick starter is replaced with a electric
starter to make starting an
effortless task while a
thermostat and electric
cooling fan are added to
the cooling system to
keep the engine’s operating temperature stable at
all times.
To better suit the wider
range of speeds deman-
ded of the KLX650-C, the
transmission gear and final
drive ratios are changed.
Although the frames are
very similar except for
brackets and gussets, the
wheelbase of the KLX650C is extended 22mm, and
the rake is changed from
27° to 28.5° for improved
straight-line stability.
Because the suspension will not be stressed
as much and to help keep
things simple, the front
and rear suspensions do
not have adjustable damping force. Front wheel
travel is 11.2 in. and rear
wheel travel is 10.2 in.,
helping to lower seat
height 2.6 in. from the “A”
model.
The front brake disc is
increased in size by
40mm to 290mm to increase stopping power
and heat capacity of the
front brake. The rear
brake is unchanged.
Other changes to make
the KLX650-C more compatible with street use are
a locking fuel tank cap,
tool kit mounted next to
the rear shock, maintenance-free 8 AH battery,
speedometer and tachometer, temperature warning light, O-ring drive
chain and handlebarmounted end weights to
dampen vibration.
With the introduction of
the KLX650-A1 and
KLX650-C1, Kawasaki
has raised the stakes in
the big bore off-road and
dual-purpose classes. And
the competition is about to
find out that we’re not bluffing! o
(LEFT) Front forks
on the KLX650-A
are inverted, feature 16-way compression damping
adjustment and
provide nearly 12”
of front-wheel
travel.
(BELOW) 650-C
engine has more
low-end and midrange torque and
a conventional
wet-lined cylinder.
Larger side cover
houses the electric starter.
(RIGHT) Modern instrument cluster on the
new KLX650-C is a
real eye-catcher.
The Technical Magazine 3
l
Fall 1992
Vol. 5 No. 3
©1992 Kawasaki Motors
Corp., U.S.A. (KMC).
All rights reserved.
K-Tech News Staff
Publisher
Kawasaki Tech Services
Challenge your service IQ
—and win new tools too!
by Fred DeHart
Technical Services Instructor
Kawasaki will begin a
Publications Manager
Don Church
Executive Editor
Gary Herzog
Editor-in-Chief
Gregg Thompson
Communications Editor
Patrick Kelly
Regional Editors
North and East
Fred DeHart
Central and South
Walter Rainwater
Contributors
Dave Behlings, Jerry Heil,
Keith Pestotnik, John
Porno, David Pyle, Steve
Rice, Ray St. John,
Sharon Willeke
Graphics/Production
Graphic Art
Gregg Thompson
Copy Editor
Pat Shibata
Production
Nickless Communications
Published by Kawasaki.
All suggestions become
the property of KMC.
Sending a service suggestion gives Kawasaki permission to publish and/or
use it without further consideration.
Specifications subject to
change without notice.
4
l
K-Tech News
new Service Contest with
the next edition of K-Tech
News!
Three tests will arrive at
your dealership via the
next three issues. Each
test will consist of 100 multiple choice questions.
Don’t know the answer?
Look it up in your service
Micro-
materials-this is an open
book test! Scoring an 85
or better on any of the
three tests will get you a
prize. A grand prize will be
awarded to the highest
overall scoring contestant
that completes all three
tests.
This contest is open to
all full-line dealership service personnel. It’s a
chance to test your service knowledge, learn while
you search for answers,
and win some extra tools
for your own tool box!
No matter what you
score, you come out the
winner by increasing your
knowledge as you take
the test.
So accept the challenge: Enter the Kawasaki
Service Contest. Look for
contest rules and the first
test in the next issue of
K-Tech News. o
: ABCs, VlNs and RFCs
by David Pyle
Parts Publications Specialist
L ately I have received
many calls regarding
painted parts and decals.
There’s no question that
looking up part numbers
for painted parts can be
confusing. To make matters worse, many times
your customers remember
the year they purchased
the vehicle not the actual
model year.
Ordering the wrong part
causes many problems.
There’s the extra time
spent re-ordering the part,
filling out the RFC and restocking, and there are additional charges. And
meanwhile your customer
is waiting for the correct
parts.
The best way to eliminate these headaches is
to verify the VIN numbers
on the customer’s machine. The VIN number information can be found on
every microfiche on Grid
A-l, and also on the
Model ID Grids on the
A-row on every fiche card.
After verifying the model
year with the VIN number,
pay close attention to the
reference number specifications code and year and
model column. Taking a
few extra minutes before
(and while) ordering will
save you more time in the
long run—and you’ll have
a happier customer, too. o
Vulcan™ 700/750 hard
starting and misfiring
by Keith Pestotnik
Rocky Mountain Kawasaki
Complaints of random hard starting, poor idling, poor
throttle response, misfires, and sometimes carburetor
backfire or exhaust afterfire on Vulcan™ 700 and 750
models can often be eliminated or reduced by reducing
the pickup coil air gap.
The pickup coils are mounted on the left hand side of
the engine behind the outer alternator cover. The air gap
from the factory is set at 1.0mm and is not adjustable because of small cast bumps on the mounting screw
bosses that hold the coils in place.
You can make this gap adjustable, however, by taking
the coils off the mounting plate and then knocking off
these little locating tabs. Put a dab of grease on a small
sharp chisel and just shear them right off.
Now, install the coils with a 0.5mm gap instead of the
standard 1.0mm gap. This modification has been approved by the manufacturer and is not considered tampering (emissions). It’s fairly easy to do and is worth
trying for just about any starting or low-speed running
problem on the Vulcan 700/750 series.
Don’t bother with this modification if you are not trying
to solve a problem; it doesn’t increase performance in
any way. o
TECHNICALITIES
“Dualing” drain plugs
The ZR1100 engine looks a lot like the old KZ1100 engines
on the outside, but there's one important difference you
should know before you do a service on one: As in the 900,
1000, and 1100 Ninja® engines, the ZR1100 engine has a
dual oil pump, two oil sumps and ... that's right, two drain
plugs! One is in the RH side of the oil pan below the primary
gear facing down, and the other is in the deeper main sump
below the transmission facing forward.
Don't forget this when you do your next oil change on the
Big ZR. - Gregg Thompson
Crankshaft bearings: Speeding up the repair process ...
When replacing a fourstroke crankshaft, you
have to select the proper
bearings according to the
markings on the crankshaft, crankcase, and connecting rods. There are
three sizes of “standard”
bearings to accommodate
close production tolerances. In each model’s
service manual, there are
charts that help you select
the proper bearing for
each journal according to
the marks.
Because you can’t order
these parts by size, you
won’t know what size bearings to order until you
have opened the box and
examined the new crankshaft, cases, and/or rods,
adding considerable time
to the repair process.
The bearing selection
process also holds true for
some engine balancer
shafts.
To prevent these delays
in the parts order/repair
process, you can now order
all bearing sizes (three
complete sets), use the
bearings you need and return the unopened and unused bearings to the
distribution center. Put on
the “Return for Credit”
form that you need to return the unused bearings
ordered for a crankshaft
repair. There will be no restocking fee in these situations.
- Walter Rainwater
The Technical Magazine 5
l
750 ignition tests
by Fred DeHart
Technical Services Instructor
Have a 750 JET SKI®
with no spark? Here are a
few quick checks to help
you find the problem
quickly and easily. You
can use your multimeter
and, if you have one, the
old Kawasaki CDI tester.
Test I: Output from the
pick-up coil
1. Disconnect the 4-pin
connector coming from
the magneto.
2. Connect the multimeter
or tester leads to the
green and the blue wires.
3. Set the multimeter to
the 10 AC volt scale or the
tester to low 15.
4. Crank the engine over
with the spark plugs removed.
5. Voltage output should
be about 0.5 VAC.
Test II: Output from the
exciter coil
1. Disconnect the 4-pin
connector coming from
the magneto.
2. Connect the multimeter
or tester leads to the purple and the red wires.
6
l
K-Tech News
3. Set the meter to the
250 AC volt scale or the
tester to high 30.
4. Crank the engine with
the spark plugs removed.
5. Voltage output should
be about 75 VAC.
Test Ill: Output from the
CDI unit to the ignition
coil (Note: For this test,
you must use the Kawasaki CDI tester)
1. Disconnect the orange
and the black/white wires
from the ignition coil and
connect the tester leads to
them, paying attention to
polarity. Connect the load
coil (that comes with the
tester) to the leads also.
Leave the magneto wires
connected.
2. Set the tester on high
60.
3. Crank the engine with
the spark plugs removed.
Be sure to disconnect
the stop switch wires and
check for spark before beginning the tests. If these
tests do not indicate the
source of the problem
then additional troubleshooting of the ignition
coil and wiring will be required. o
Impellers: Do they need ...
E very now and then, the Hot Line will receive a call from a
dealer who is baffled by the fact that a 650 JET SKI® pump
impeller has come right off the threads of the pump shaft and
chewed itself up along with the housing. The most common
question is, “Doesn’t it tighten itself onto the shaft while it’s
running?”
Technically it does, but on the 550-B and -C, 650, and 750
models, the torque that is applied to the threads by running it
in the water is very, very slight.
On the older style pumps (including all 440s and 300s) all
the torque it takes to turn the impeller in the water (and that’s
a lot!) is transferred to the impeller through the threads because the impeller is threaded right onto the driveshaft. The
driveshaft turns, the impeller resists, the threads get tight.
On the 550-A models, the impeller is threaded onto the
pump shaft instead of the driveshaft, but the driveshaft turns
the pump shaft which turns the impeller (LH thread), the
impeller resists ... and, yes, the threads get tight.
®
JET SKI 750SX watercraft: Don’t overrev ’em!
by Gregg Thompson
Sr. Product Support Specialist
We have had many calls
on the Hot Line about the
new JET SKI® 750SX
where the flywheel bolt
has come loose or the oil
pump shaft has broken inside the pump body. Believe it or not, we think
both these failures can be
caused by one thing: overrevving the engine. The
way the oil pump shaft is
shearing inside the pump
body indicates it is simply
being subjected to too
much torque. That torque
is also applied in the direction that would unscrew
the flywheel bolt. But the
torque needed to shear
the oil pump shaft or
loosen the flywheel bolt
can only be created at
revs well above the normal operating range of
this engine.
The ignition system has
a rev limiter to prevent
...
overrevving, but it is not
operational for about the
first minute after start-up.
It is during this first minute
that we believe the damage is occurring. Many
people (especially people
involved with motocross)
are used to starting a twostroke engine, holding the
throttle wide open for a
few seconds and then
“blipping” the throttle at
high rpm for a short while
to “clear out the engine.”
This procedure doesn’t
normally cause any damage to a single cylinder
two-stroke engine since
they won’t free-rev fast
enough to hurt the internal
engine parts. But spinning
a positive displacement oil
pump at 9000 rpm is another story!
Kawasaki has made a
new flywheel bolt available (P/N 92150-3813)
which can be torqued to
94 ft/lb instead of 72 ft/lb
(the torque value for the
original bolt). Installing this
new bolt at the higher
torque spec. should prevent the bolt loosening,
but it cannot prevent overstressing the oil pump
shaft when the engine is
overrewed. So educate
your customers not to rev
the engine very high when
the boat is out of the
water-and not to ride the
vehicle at wide open throttle for the first minute after
each startup!
(Actually, the engine
will not overrev as long as
the pump is in the water,
but if the customer takes
off at WOT (or WFO, depending upon what sport
you come from!) and 100
yards out jumps a goodsize wake without letting
off, he/she could easily
spin the engine beyond its
safe rpm range.)
Bad habits are hard to
break-start telling your
customers today. o
to be torqued?
On the pumps used in the 550-B and -C, 650, and
750 models, the impeller is threaded onto the pump
shaft like the 550A. But in these pumps, the driveshaft
drives the impeller directly through splines inside the
impeller. The pump shaft just kind of goes along for
the ride. The only torque applied to the threads is what
it takes for the impeller to drive that little pump shaft.
All the torque it takes to drive the boat is carried by
the splines.
You will notice in the service manuals for the
various 550, 650 and 750 models that the torque
value given for the impeller is 72 ft/lb. Whenever you
are installing an impeller on one of these watercraft,
make sure you use a torque wrench. It’s pretty tough
to apply 72 ft/lb with your handy adjustable crescent.
You will also need an impeller wrench to do this
job—P/N 57001-1228 or you can make one: Just cut
the splined end off of an old 650 driveshaft and braze
a half-inch-drive socket to it. - Gregg Thompson
The Technical Magazine
l
7
Watercraft test tank ...
ready-made
by Gregg Thompson
Sr. Product Support Specialist
Several times in the past
we have published information to help you build
your own watercraft test
tank. However, we realize
that building your own test
tank can be both time-consuming and expensive,
and in most cases the final product is a permanent fixture: Where you
build it is where it stays.
Recently, I had an opportunity to take a look at a
ready-made test tank
manufactured by a small,
Southern California-based
company called Bresee
Manufacturing. This very
compact all steel tank has
a water surface large
enough (5 ft. x 11.5 ft.) to
accommodate personal
watercraft as large as our
650 “SC” Sport Cruiser. It
is designed so that the outside dimensions are not
much larger than the
useable water surface.
The tank comes with a
davit for loading and unloading, and a thrust
gauge as standard equipment. An electric hoist is
optional as is a pump and
8
l
K-Tech News
filtration system. Test tank
water gets very murky
very quickly, so this filtration system is a welcome
addition.
I had a chance to observe this tank in use at a
local dealer and, in my
opinion, it works exceptionally well. It handles the
pump wash so effectively
that virtually no water
splashes out of the tank
during use. And clean,
smooth water is always
delivered to the pump
from the front so “cavitation” from air in the water
is not a problem.
We at Kawasaki have al
ways strongly recommended the installation
and use of personal watercraft test tanks by our
dealers, but this is the first
time we have been able to
recommend a finished
product that you can purchase ready-to-use.
For more technical infor
mation plus prices and
availability, contact the
manufacturer directly:
Bresee Manufacturing
14302 Plantana Dr.
La Mirada, CA 90638
(310) 944-7339
TECHNICALITIES
As JS300 model JET SKl®
watercraft begin to age, we
get more calls concerning
what seems to be slipping
starter motors. The starter
motor runs, but the crankshaft and driveshaft are
turning intermittently or not
at all.
Look for the solution to
this problem inside the gear
case on the rear of the engine. The first area of concern is the one-way clutch
which is pressed onto the
crankshaft taper by the drive
shaft coupler. Remove the
clutch and inspect both
races and the rollers in the
sprague assembly for wear.
Any visible wear on the
races or rollers can cause it
to slip, and the worn parts
must be replaced.
Next, inspect the tapers
on the crankshaft axle and
inside the large clutch piece
(called the “race” in our
technical publications). If
there are signs of slippage,
the two tapers must be
lapped together to ensure a
proper fit. Lap them until
both tapers are making
good contact their full length
all the way around. To confirm the fit, clean the parts
and then tap the race onto
the crank with your hand.
The tapers should grip and
be very difficult to separate
by hand.
Next, inspect the reduction gear. On 1986 and 1987
models, this appears to be
a one piece assembly. It is
actually two separate gears
pressed onto the shaft. Test
it by clamping one gear in
the soft jaws of a vise, and
trying to turn the other gear
with large slot-jaw pliers.
(Be careful not to damage a
good gear.) Any movement
in either direction between
the gears means its time for
a new one.
On 1988 and later models, the reduction gear incorporates a torque limiter
to increase durability. This
part does not directly interchange with the earlier part.
It works well, but can also be
overworked from hard starting engines and modified
compression ratios.
Don’t forget to torque the
driveshaft coupler to 72 ftIbs. during reassembly. If
you don’t, the one-way
clutch will slip on the taper
again.
- Keith Pestotnik
Hot Tip: A cool way to
install bearings
by Steve Rice
Product Support Specialist
When installing ball bearings into a vertically split
crankcase or onto a crankshaft, things can get a little tight. It’s supposed to
be that way: The bearings
are designed to have an
interference fit in the
cases and on the crank
axle. But just pounding on
the parts harder to get the
bearings all the way installed is not real good for
them.
So, how do
you get the parts
together without
beating on them?
Well, you
could
make the
outside
part bigger and
the inside part
smaller!
That’s a simple solution
and, luckily, the procedure
itself is almost as simple.
When installing a bearing in the crankcase half,
put the bearing in the
freezer long enough for it
to get real cold. Then,
heat the cases to about
200° F. (If there’s a seal
there, be careful not to
overheat it.) When aligned
with the bore properly, the
frozen bearing should just
drop right in.
When installing the
crankshaft into the bearing
in the case half), the bearing has to be heated because this time it’s the
outside part. The crankshaft is the inside part, so
freeze it.
If you use a torch to
heat your parts, here’s a
trick for heating the bearing without damaging the
seal: Warm a bearing
driver (or some
other appropriately
sized piece of
iron or steel)
with your torch,
and just before
taking the crankshaft out of the
freezer set your
very hot slug of
steel on the
bearing. The
heat will
transfer
to the
bearing,
expanding it
nicely, and the
crankshaft will drop
right in.
Do the same thing to
the LH main bearing before dropping the LH case
half onto the crank axle.
Presto! The engine is together and there is no
hammer in sight. o
KE100-B fork seals
I f a customer comes in with a leaking fork seal on his
KE100-B, do you know how to change it? After you get
the bike on your lift and the fork tube off and in your
hands in record time, the big question comes up: What
holds this thing together? There is no
damping rod bolt at the
bottom to take out and
no tension rod at the
top.
What is holding it together is a bushing,
seal, and snap ring.
That’s all. Remove the
top cap and spring, and
drain the oil. Slide the
dust boot off the stanchion tube and remove
the snap ring and
washer that are on top
of the seal. Now, clamp
the slider in your vise
[with soft jaws) at the
axle boss and slidehammer it apart. Pull
the stanchion tube up
hard against the bushing several times until it
knocks the bushing
and seal out the top of
the slider.
Before installing the
bushing and new seal,
check the snap ring
groove for burrs. If
needed, de-burr it with
a three corner file.
- John Pomo
TIP
Jet Mate™ stale mate: Check the switches
E very now and then we get
a call on the Hot Line about
a Jet Mate™ watercraft that
starts and idles fine, but
won’t take any throttle.
When the customer
squeezes the trigger to accelerate, it shuts off as if the
kill button was pushed.
Unfortunately, by the time
the dealer calls us, he has
usually gone through the
fuel and ignition systems
and found nothing.
If you have a Jet Mate with
these symptoms, the problem is most likely water in
one of the three ignition stop
switches. To check for this,
disconnect the white wire
from the igniter going to the
stop switches. Each of the
stop switches grounds that
wire to shut the engine off,
and if you disconnect this,
they can’t do that. If the engine runs fine with the white
wire disconnected, then try
the white wire at each switch
individually and see which
switch(es) has the problem.
- Dave Behlings
The Technical Magazine
l
9
Service Training ’93: Motorcycle Tech Week and more
by Jerry Heil
Training Development
Coordinator
A ll of us in Kawasaki’s
Service Training Dept.
have been busy getting
ready for the new training
season. And in January,
several new service training classes will be available to Kawasaki Dealer
technicians.
For sure, you won’t
want to miss “Motorcycle
Tech Week”- four related
courses back-to-back in
one week. The first day
(“Precision Measurement
and Diagnostic Tool Usage”) is spent learning
about the tools used for
quick and accurate engine
troubleshooting and repair. Day two (“Tune and
Service”) goes over the
most common work taken
in by the Service Department. Days three and four
(“Engines”) cover tear-
down and rebuilding of inline and V-twin engines.
Day five (“Modern Engine
Theory”) is a half day devoted to modern engine
theory, with formulas and
miscellaneous information
from your instructor.
Each of these courses
may be taken separately,
if desired.
Look for new model Motorcycle Update Classes
this season. There’s
plenty to talk about; we
even sent a training instructor to Japan specifically to get information for
this important class. You
will receive special notifica-
tion soon with the Update
class schedule.
Come ready to get your
hands dirty in our MULE™
class. All models-including the new products for
’93—are presented in this
two-day class.
Don’t forget about the
CONTINUED NEXT PAGE
A student diagnoses alternator problems at the West Training Center.
Same day parts shipment: Order today, install tomorrow!
D id you know that in most
cases you can get parts
shipped from your master
warehouse the same day
you order them? It’s true:
Emergency orders placed
through your K-Share terminal before 2 p.m. (your
master warehouse time)
should be shipped that
same day! Although same
day shipment is not a guaranteed service, our warehouses have shipped
nearly 100 percent of
these orders since first offering this service almost
six months ago.
If you want first- or second-day air shipping, don’t
forget to code your order
10
l
K-Tech News
accordingly. All premium
freight charges will be billed
to the dealer. Also, there
is an 8 percent handling
charge on all emergency
orders whether they are
shipped same day or not.
Most premium freight
requests are shipped via
Federal Express since its
prices are the lowest at
this time. And, since Federal Express offers a morning delivery next day air
service (at a higher cost)
in addition to its regular afternoon delivery, it is possible to emergency order a
part today and install it tomorrow. Amazing!
Don’t forget that in order to be eligible for same
day shipping, your emergency order must be
made before 2 p.m. your
warehouse time.
- Gregg Thompson
Get the most from
your around the
clock employee!
PARTS
New parts!
The band or clamp for the
stop switch on almost
every KX/KDX has been a
sore spot with customers.
This part was only available with the switch assembly—until now! The
Band Assembly (P/N
39183-1059) is now available and is included on the
latest parts microfiche.
- David Pyle
by Sharon Willeke
Customer Service Representative
ployee capable of working twenty-four
hours a day, seven days each week, including holidays? And, did you know that
you do not have to pay this employee
These recordings can be clever, humorous, professional, and best of all, customer oriented. Recordings can be
changed frequently to include some aspect of current events, like racing results
or exciting new product releases. Many
recordings offer extensions to various departments and allow the caller to leave a
any extra for all those extra hours? Of
course, this is not a human employee,
but rather a communication device used
by humans.
The hard-working employee is your telephone. When everyone else has locked up
and gone home to relax, your telephone is
still there, waiting to be of use.
Well, get a recorded message on your
telephone and take advantage of this situation. Many dealers have excellent recordings which let the customer (or
potential customer) know what days and
hours the dealership is open for busiless. Several dealers’ recordings list the
types of products and service the dealership offers. It can be frustrating for your
callers to listen to several telephone
rings, not knowing whether the store is
open or if anyone there cares.
message. Customer oriented recordings
may give the caller information on service specials or model close-outs, while
letting the customer know his call is important and making him want to come to
your store. My personal favorites are
often the humorous ones. Bob Thomas
Kawasaki in Irwin, Pennsylvania, makes
very good use of the humor in their recordings. They have an animated announcer with a folksy tone who really
makes their store sound like a fun place
to do business. Let me know if you have
a good one.
You do not know when a customer is
going to try to contact your store. Doesn’t
it make sense to put your recorded employee to work so that you do not miss
the opportunity to reach everyone who
calls your store? o
D id you know that you have an em-
Training ’93
CONTINUED FROM PAGE 10
“Electrical Troubleshooting” class. This class is all
hands-on testing of Kawasaki parts, systems and
vehicles with lots of short
cuts to help save time
when you perform electrical diagnostic work.
“Ignition Systems” and
“Charging and Starting
Systems” video training
packages will be available
soon. These new homestudy courses will join the
already popular parts
salesperson’s training
package, “At the Parts
Counter, You’re the Key.”
As you can see there’s
lots of excitement in the
Service Training Dept.
You can be part of it: Sign
up for a class at your regional training center or
send for one (or all) of the
home-study training packages. o
The Technical Magazine
l
11
R E G I O N A L
N E W S
Training
Schedule
East Region
North Region
Central Region
South Region
West Region
T he ’92/’93 training season starts soon. Watch for
the schedule; it looks different this year. Also, look for
the new model motorcycle
update class announcements.
Be sure to attend—
there’s lots to talk about!
WEST
It’s time to
learn!
by Patrick Kelly
9950 Jeronimo Road
Irvine, CA 92718
(714) 770-0400
I t is that time of year
when all the kids are back
in school to learn. And it is
also that time of year for
you to start learning! Well,
hopefully you never stop
trying to learn, but now is
the time of year when it is
even more important to
learn something new. It’s
that time when all the new
models are introduced,
and time to get up to speed
on any new technology or
servicing procedures.
Where, you ask, do I
learn about all this new
stuff? Well, there are
many sources that you
can take advantage of.
One of them you are reading right now: K-Tech
News. Another great
source is the product
sales guide: It’s not just
for salespeople, it also
contains technical stuff,
too! And keep your eyes
peeled for the service
12 K-Tech News
l
manuals for the new models. Take some time to sit
down and review them
when they arrive. You will
be surprised how much
you can learn!
Of course there is another great place to go
learn, and that is your regional training center. This
is the month when we
start training classes
again, so review the
schedule and make some
plans to attend! o
the training center you desire to attend anytime. I
will be glad to explain the
content of the classes to
help you decide which are
most helpful to you. Most
have been revised to include material on the 1993
models. Enroll early, as
the classes fill quickly.
It is always a pleasure
to meet the people in person that I talk with on the
phone throughout the
year. Hope to see you in
my classroom soon! o
SOUTH & CENTRAL
Now I'm getting ready ...
by Walter Rainwater
6110 Boat Rock Blvd. S.W.
Atlanta, GA 30378
(404) 349-2000
NORTH & EAST
Would you
like to win?
by Fred DeHart
201 Circle Drive N., #107
Piscataway, NJ 08854
(201) 469-1221
For most of the summer I
worked on the Hot Line,
helping dealers with technical problems. Now, I am
getting ready for the new
training season.
We mail training schedules every month with two
months’ schedule on it. If
you miss it, check out the
back page of K-Tech
News. You can enroll in
your choice of classes and
K awasaki Technical Training classes will resume
shortly, so make sure your
service manager shows
you the new training
schedule when it arrives
at your dealership.
Would you like to win
some tools? Then enter
the service contest which
will begin in the next issue
of K-Tech News. If you
can score 85 percent you
are guaranteed a prize.
Finish all three tests at 85
percent or better and you
have a shot at the grand
prize!
I would encourage all of
our dealership service personnel to participate; I
never met a mechanic
who had enough tools!
A lot of readers have
either misplaced or never
seen some back issues of
K-Tech News. Well, in
case you haven’t heard,
all previous issues have
been copied on microfiche
and should be in your dealership’s microfiche deck at
this time. If you need information from a past edition
... go fiche!
You can get more copies of the K-Tech News microfiche by ordering P/N
99961-5007-01.
Look forward to talking
with you this fall ! o