1
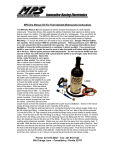
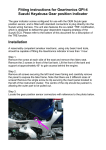
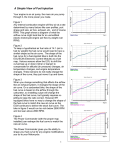
Innovative Racing Electronics
MPS Spyder Nitrous Spray System
The MPS Spyder Nitrous Spray System was
designed to evenly distribute nitrous to each cylinder
when using a dry nitrous system. The Spyder
Nitrous Spray System uses individual jets for each
cylinder delivering the precise nitrous charge you
need for your specific application. The Spyder
Nitrous Spray System you ordered comes with one
set of jets. The table below will give you a general
idea of the jets needed to attain specific horsepower
levels.
Nitrous Jets Horsepower
.012
23 HP
.013
27 HP
.014
30 HP
.015
34 HP
.016
40 HP
.017
44 HP
.018
50 HP
.019
54 HP
.020
60 HP
.021
68 HP
.022
75 HP
.023
81 HP
.024
90 HP
.026
105 HP
.028
120 HP
Phone: 321.972.8282 – Fax: 321.972.5123
380 Orange Lane – Casselberry, Florida 32707
Innovative Racing Electronics
We do not recommend more than 40 - 60 HP for bikes with stock pistons. We recommend the
following engine modifications for a long lasting nitrous installation: a good quality forged piston,
heavy duty cylinder studs, stainless steel valves, heavy duty valve springs, and heavy duty
connecting rods. With these modifications 100 plus nitrous shots can be used. A larger nitrous
solenoid must be used with jets bigger than .028. You must increase fuel to match the extra
oxygen your engine is getting from the nitrous. You can do this with a variety of products. We
like the Power Commander with a hub unit to change maps on the fly. Stock fuel injectors can be
a limitation to the amount of fuel you can deliver. Most stock injectors will have no problem
delivering enough fuel for 40 – 60 horsepower. Duty cycles above 95% are dangerous and not
recommended. To gain more power you will need larger injectors. We recommend our 62 lb
injectors for up to 400 total horsepower. Factory ignition timing is ok with 93 octane pump gas for
30-40 horsepower. For more horsepower you will need to retard the ignition timing or use a fuel
with more octane or both. We recommend using either a MSD SB-6 ignition or a Schnitz timing
retard module to retard the ignition timing. For large horsepower systems we also would
recommend using a progressive controller to control the power of a big nitrous system. We
recommend either the Schnitz 2 dial controller, the NOS mini progressive, or the Daytona
Sensors NC-2. All are quality units with different features. Call us for recommendations on your
specific nitrous system combinations. The MPS Spyder Nitrous Spray System is for use in closed
course competition events only and are not for use on any public street or highway.
Mounting – The MPS Spyder Nitrous Spray System mounts inside the top of the air box with the
¼ - 28 bolts provided. You will need to locate the Spyder Nitrous
Spray System so the stainless steel tubes align with each throttle body venturi. Mark the hole
location and drill a ¼” hole for the ¼ - 28 bolt in the top of the air box and mount the Spyder.
Make sure that the jets are tightened securely. Jets inside your motor are not good! Install the
straight fitting on the line to the –4 fitting on the Spyder distribution block. Find a good spot for
the bulkhead fitting to come through the air box where the line won’t be kinked and drill a 7/16”
hole in the airbox. Put the bulkhead fitting through the air box and secure it with the bulhead nut.
Install the line from the distribution block to the bulkhead fitting and tighten all lines and fittings.
Do not use any sealing agents on AN fittings. Sealing agents should only be used on pipe
thread.
Bottle Mounting – To mount the bottle you will need to find a suitable spot. Danger: Nitrous
bottles can explode. Never exceed 1000 lbs of bottle pressure. Nitrous pressures over
1000 lbs or so can prevent the nitrous solenoid from opening. Do not expose the bottle to
direct sunlight or leave the bottle enclosed in a container in direct sunlight. If you mount
your bottle in your trunk or under the seat be sure to take the bottle out before letting the
bike sit in the sun. Nitrous gains pressure with temperature. Do not mount the bottle near
Phone: 321.972.8282 – Fax: 321.972.5123
380 Orange Lane – Casselberry, Florida 32707
Innovative Racing Electronics
any source of heat. You will need to find a place that the bottle is out of sight, away from
heat, secure, and accessible. Above the motor, under the tank is not a good spot in other
words! The nitrous bottle has no siphon tube installed in the bottle. When the bottle is mounted
the valve should be the lowest part of the bottle. The better job you can do positioning your bottle
the better the system will function. The system needs to pick up liquid nitrous. The optimum
position is the bottle valve toward the ground. Siphon tubes can be installed if you wish to mount
the bottle upright.
Plumbing – The Nitrous solenoid inlet port is connected directly to the nitrous supply bottle via a
#4 AN swivel type fitting. Locate the male –4 fitting on the outlet side of the nitrous solenoid.
Route the –4 line to the bulkhead fitting on the outside of the airbox. Tighten all lines and fittings.
Wire The Horn/Shifter – Starter/Nitrous Control Box
Note: The Black, White, and Blue will not be used if you don’t have an air shifter or
your bike has a horn that switches power. The switch swapper will only work for air
shifters on bikes that switch ground with the horn button.
•
•
•
•
•
•
•
•
Locate the harness coming out of your left handlebar switch pod.
Carefully slice back the protective covering around the harness in a convenient spot.
Locate the horn switch wire. Hayabusa will be the solid black wire. ZX12 will be a black
wire with a white tracer. Other models consult your service manual or call us.
Cut this wire.
Black Wire - Locate the end that runs to the switch and connect it to the black wire on
the controller harness
White Wire - Locate the end that goes toward the main wire harness and connect it to
the white wire on the controller
Blue Wire - Connect the blue wire to the blue wire on the MPS Sport Bike Electronic
Engine Kill and the negative side of the electric air valve as shown in the wire diagram.
Locate the harness coming out of your right handlebar switch pod.
Carefully slice back the protective covering around the harness in a convenient spot.
To Starter Solenoid Through Factory Wire Harness
Ground
Black
Black
Nitrous Solenoid
Horn
Factory Starter Switch
Red
Orange
Yellow
Black
White
Blue
Factory Horn Switch
Black
Black
To Horn Through Factory Wire Harness
Brown Wires
To Negative Side
Of Each Coil
Blue
Black
Red
Electric Air Valve
Ground
Shifter
&
Nitrous
Note: Horn position is
always with the toggle
arm toward the short
side of the box.
Ignition Switched 12V
MPS Sport Bike Engine Kill
•
•
Locate the starter switch wire. Hayabusa and GSXR1000 will be a yellow wire with a
green tracer. ZX12 will be a blue wire with a white tracer. Other models consult your
service manual or call us.
Cut this wire.
Yellow Wire - Locate the end that runs to the switch and connect it to the yellow wire on
the controller harness
Phone: 321.972.8282 – Fax: 321.972.5123
380 Orange Lane – Casselberry, Florida 32707
Innovative Racing Electronics
•
•
Orange Wire - Locate the end that goes toward the main wire harness and connect it to
the orange wire on the controller
Red Wire - Connect the red wire to the nitrous solenoid positive as shown in the wire
diagram.
Wiring Diagram
Factory Horn Switch Wire Colors
Hayabusa = Solid Black or Black/White
ZX12R = Black with White tracer
Factory Starter Switch Wire Colors
Hayabusa = Yellow with Green tracer
ZX12R = Blue with White tracer
Testing The System – First, turn off the nitrous bottle valve. Now turn on the key and arm the
nitrous. With your hand on the nitrous solenoid, push the starter button quickly. You should hear
and feel the nitrous solenoid open. Next flip the nitrous arm switch to the starter position and
push the starter button. This should engage the starter and not activate the nitrous solenoid.
Operation – The nitrous bottle weighs 2.2 lbs. empty and 3.2 lbs.full. Weighing the bottle is the
only way to tell if the bottle is full or empty. Pressure is not an indicator of how much nitrous is
left in the bottle. We highly recommend dynoing your bike before taking it to the track. Here are
a few tips to tuning and operating the system. Never use the nitrous at anything other than full
throttle operation. You will need a minimum of 93 octane fuel. Do not use any product that
advances the ignition timing more than stock. A Power Commander is recommended to deliver
extra fuel at full throttle. Starting as rich is the safest tuning method. Damage can result when
the rev limiter is activated while on nitrous. Avoid the rev limiter on nitrous or install the a RPM
switch to prevent it from happening. Use of the larger included nitrous jets should be done only
after the smaller jets are used successfully.
If you have any more questions we have a Frequently Asked Questions page at our web site as
well as the telephone tech support. Thank you for your purchase of this MPS product. All
products sold by MPS are for use at closed course competition events and not for use on public
streets or highways.
Phone: 321.972.8282 – Fax: 321.972.5123
380 Orange Lane – Casselberry, Florida 32707