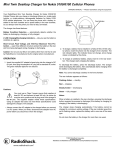
1
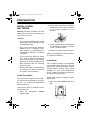
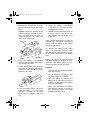
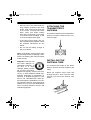
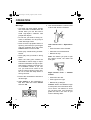
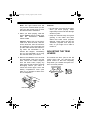
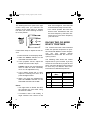
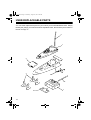
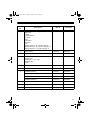
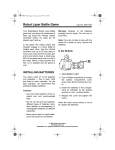
60-4240.fm Page 1 Thursday, August 19, 1999 6:40 AM
Cat. No. 60-4240
OWNER’S MANUAL
Please read before using this equipment.
60-4240.fm Page 2 Thursday, August 19, 1999 6:40 AM
INTRODUCTION
Your RadioShack Tsunami is a winner!
You'll be amazed by the speed of this
powerful boat — it’s our fastest. You can
race it at speeds up to 399 feet per
minute on ponds, lakes, rivers, and large
pools.
The boat's proportional speed and turn
radius give you precise control over its
maneuvers.
The Tsunami’s bilge pump automatically
pumps out any water that has collected
in its hull as it cruises.
Your Tsunami is available in four frequencies to let you race against other
radio-controlled boats. Check your
boat’s box to see which frequency it uses.
FCC NOTICE
Your boat or transmitter might cause TV
or radio interference even when it is operating properly. To determine whether
your boat or transmitter is causing the
interference, turn off your boat and release the transmitter's control levers. If
the interference goes away, Your boat
or transmitter is causing it. Try to eliminate the interference by:
• moving your boat and transmitter
away from the TV or radio
• contacting your local RadioShack
store for help
If you cannot eliminate the interference,
the FCC requires that you stop using
your boat.
The Tsunami is a fresh-water boat only.
It is not designed to be used in salt water.
When you are not playing with the Tsunami, place it on the supplied stand to
protect the propeller from damage.
Note: You need six AA batteries for the
transmitter, at least one 7.2-volt battery
pack for the boat, and a battery pack
charger. All of the required items are
available at your local RadioShack
store.
© 1999 Tandy Corporation.
All Rights Reserved.
RadioShack is a registered trademark used by Tandy Corporation.
2
60-4240.fm Page 3 Thursday, August 19, 1999 6:40 AM
PREPARATION
INSTALLATING
BATTERIES
Warning: Dispose of batteries and the
battery pack promptly and properly; do
not bury or burn them.
2. Press down and slide the battery
compartment cover in the direction
of the arrows marked on it to
remove it.
Cautions:
• Use only fresh batteries and a fresh
battery pack of the required size and
recommended type.
• Do not mix old and new batteries,
different types of batteries (standard, alkaline, or rechargeable), or
rechargeable batteries of different
capacities.
• If you will not be using the vehicle
for a week or remove the batteries
from the transmitter and the battery
pack from the vehicle. Batteries can
leak chemicals that can damage
electronic parts.
• Never leave dead or weak batteries
in the boat (or a dead or weak battery pack in the transmitter).
3. Put the batteries in the compartment
as indicated by the polarity symbols
(+ and –) marked inside.
4. Replace the cover and snap it shut.
When the transmitter's range decreases, replace its batteries.
In the Boat
Your Tsunami requires a rechargeable
7.2-volt battery pack. Before you use the
battery pack, you must charge it, using a
special battery charger (both items
available at your local RadioShack
store). Follow the charger's instructions
to charger the battery pack.
In the Transmitter
The transmitter requires six AA batteries. For the best performance and longest life, we recommend RadioShack
alkaline batteries.
Follow these steps to install the boat's
battery pack.
1. Slide the boat's ON/OFF switch to
OFF.
Follow these steps to install the transmitter's batteries.
1. Slide the transmitter's
switch to OFF.
ON/OFF
3
60-4240.fm Page 4 Thursday, August 19, 1999 6:40 AM
2. Remove the antenna tube if necessary and lift off the upper hull of the
boat.
6. Close the battery compartment
cover, then turn the latch counterclockwise until it stops.
Caution: Carry the Tsunami by its
rear wing, not the upper hull. Otherwise, you might drop the boat if it
comes loose from the upper hull
while you are carrying it.
7. Thread the wire antenna through its
matching hole on the upper hull,
then replace the upper hull so it
snaps shut.
If the Tsunami loses power or does not
respond to the transmitter, recharge the
battery pack according to the battery
charger’s instructions.
Upper Hull
To remove the battery pack, follow
Steps 1–3, unplug the connector, then
slide the battery pack toward its connector and lift the other side of the battery
pack.
Rear Wing
3. Turn the battery compartment
cover’s latch clockwise until it stops,
then lift open the cover.
4. Put the battery pack in the compartment with its connector pointing forward on the same side as the boat’s
matching connector.
Note: If you want to run your vehicle for
extended periods, we suggest you purchase an extra battery pack. You can
charge one while you use the other.
Cautions:
• Use only the recommended battery
pack and charger.
• Do not charge or recharge the battery pack while it is in the boat.
• After you charge or recharge the
battery pack, disconnect it from the
charger. Overcharging the battery
pack could damage it.
5. Loop the battery pack’s connector
back and attach it to the boat's
matching connector. Do not force
them! They fit together only one
way.
4
• When you disconnect the battery
pack from the charger, do not pull on
the connector's wires. You might
damage the battery pack.
60-4240.fm Page 5 Thursday, August 19, 1999 6:40 AM
• Running your boat continuously for
long periods generates high heat
levels. Heat causes wear and tear
on the motor. To keep heat levels
down, when your boat's battery
pack dies, let the boat cool at least
10 minutes before installing a new
or newly charged battery pack.
ATTACHING THE
TRANSMITTER’S
ANTENNA
Thread the antenna into the transmitter's
antenna connector. Make sure the connection is tight.
• If the boat moves slowly and you
have installed fresh batteries, check
the propeller mechanism for any
debris.
• Do not use the battery charger in
wet or hot areas.
Note: Occasionally, let the battery pack
fully discharge before recharging it. Otherwise, the battery pack loses its ability
to fully charge.
22
1-
Important: This boat can
use nickel cadmium rechargeable batteries. At
the end of a nickel
80
0-8 4 3-74
cadmium battery's useful
life, it must be recycled or
disposed of properly. Contact your local,
county, or state hazardous waste management authorities for information on
recycling or disposal programs in your
area or call 1-800-843-7422. Some options that might be available are: municipal curbside collection, drop-off boxes at
retailers such as your local RadioShack
store, recycling collection centers, and
mail-back programs.
INSTALLING THE
ANTENNA TUBE
The antenna tube holds up the boat's
antenna wire for the best reception and
range.
Route the antenna wire's loose end
through the tube. Then insert the tube
securely into the boat's antenna tube
holder.
5
60-4240.fm Page 6 Thursday, August 19, 1999 6:40 AM
OPERATION
Warnings:
• This boat can reach higher speeds
than most radio-controlled boats. Be
careful when you use the boat to
avoid high-impact collisions with
people and objects.
3. Use the transmitter's control levers
to drive and steer the Tsunami.
• Do not use your boat in strong currents, in salt water, or in any body of
water with large waves.
• Never touch the propeller while it is
spinning, and never put your fingers
near the propeller when the boat's
ON/OFF switch is turned to ON.
Left Control Lever — Speed Control
• Never play outside during thunderstorms.
• Pull back to move backward.
• Never play with your boat in strong
winds.
Note: The farther you push or pull
the speed control, the faster the
boat goes.
• When the boat goes outside the
transmitter's control range, it stops.
Hold the transmitter as high as possible with the antenna vertical to try
to re-establish contact. If you cannot, you must move closer to the
boat to control it again, but be careful not to wade into deep water or
strong currents!
• Push forward to move forward.
• Release to stop.
Right Control Lever — Rudder
Control
1. Extend the transmitter's antenna to
its full length.
• Push left to turn left.
2. Slide ON/OFF on the transmitter to
ON, then slide the boat’s ON/OFF
switch to ON.
• Release to go straight.
6
• Push right to turn right.
Caution: When the batteries begin
to lose power, the boat slows down.
To be sure it can make it to shore
(so you don’t lose your Tsunami!),
guide the boat in as soon as you
notice it slowing down.
60-4240.fm Page 7 Thursday, August 19, 1999 6:40 AM
Note: The right control lever will
only turn the Tsunami when you are
using the left control lever to move
the boat forward or backward.
4. When you finish playing, slide the
boat's ON/OFF switch to OFF, then
slide the transmitter’s ON/OFF
switch to OFF.
Caution: Always turn on the transmitter first, then the boat, and turn
off the boat first, then the transmitter. Otherwise, your boat might pick
up other radio waves and start moving while the transmitter is off.
Should this happen, immediately
turn on the transmitter on to bring
the Tsunami under your control.
5. Remove all batteries from the boat
and transmitter. Then turn over the
boat, remove the rubber stoppers
from the drain holes, empty any
water from the hull, and dry the boat
thoroughly before you store it.
Leave the boat's upper cover and
battery compartment cover open
while it is in storage to allow moisture to evaporate.
Cautions:
• Do not leave your boat in the water
when you finish playing. Water
might seep into the hull and damage
electronic parts.
• Keep the Tsunami away from grass
growing in the water and other
debris that could cause propeller
damage. These items can jam the
Tsunami's propeller and stop the
boat, so you might not be able to
retrieve it.
ADJUSTING THE TRIM
LEVERS
The neutral trim lever (next to the left
control lever) lets you fine-tune the
speed control so the boat completely
stops when you release the speed control to its center position.
Drain Holes
7
60-4240.fm Page 8 Thursday, August 19, 1999 6:40 AM
The steering trim lever (next to the right
control lever) lets you fine-tune the
steering so the boat sails in a straight
line when you set the steering control to
its center position.
boat. If this happens, move the boat
and transmitter away from the CB.
• You cannot operate the boat near
devices with transmitters that use
the same frequency. Check the Tsunami's box to see which frequency
your boat uses.
RACING TWO OR MORE
BOATS TOGETHER
Follow these steps to adjust the trim levers.
1. Place the boat on the display stand.
2. Slide the ON/OFF switches on the
transmitter and boat to ON.
3. If the propeller moves, adjust the
neutral trim lever until it stops.
Caution: Never use the neutral trim
lever to make the boat continually
move. It is for adjustment only.
4. If the rudder angles left or right,
adjust the steering trim lever so it
points straight forward.
5. When you finish the adjustments,
slide the ON/OFF switches on the
transmitter and the boat to OFF.
Notes:
• You might have to further fine-tune
the steering trim lever after using
the boat for a while.
• If someone uses a CB nearby, it
might interfere with control of the
8
The Tsunami and other radio-controlled
boats use specific frequencies to operate. Boats with different control frequencies can race together without
interference. Boats with the same frequency cannot.
The following chart shows the control
frequencies for your Tsunami. If you buy
more than one boat and you plan to race
them, check the stickers on the boxes to
be sure they are different band numbers/colors for different frequencies.
Band
Frequency
(MHz)
1
26.995
Brown
2
27.045
Red
3
27.095
Orange
5
27.195
Green
Sticker Color
60-4240.fm Page 9 Thursday, August 19, 1999 6:40 AM
CARE
Your is an example of superior design
and craftsmanship. Follow these suggestions to care for your boat so you can
enjoy it for years.
• Never play in salt water; doing so
might rust the Tsunami's parts.
• Do not expose the boat to temperature extremes.
• Wipe the boat clean with a dry towel
after playing. Do not use chemicals
as they can damage the body.
• Do not leave the boat or transmitter
outside overnight. Dampness can
damage their electronic circuits.
Modifying or tampering with the boat or
transmitter's internal components can
cause a malfunction, invalidate the warranty, and void your FCC authorization
to operate the boat. If the boat is not
performing as it should, take the transmitter to your local RadioShack store for
assistance.
9
60-4240.fm Page 10 Thursday, August 19, 1999 6:40 AM
USER-REPLACEABLE PARTS
You can order replacement parts for your boat at your local RadioShack store. Simply
identify the part(s) you need from these exploded views, then find the part number in
the list on Page 11.
5
1
2
3
4
6
8
10
7
60-4240.fm Page 11 Thursday, August 19, 1999 6:40 AM
.
Ref.
No.
Description
RSU #
NP Part #
1
Upper Hull Set, including:
Upper Hull
Cockpit
Steering Wheel
Air Scoop
Head
Right Hand
Left Hand
Body
Tapping Screw (3 × 8 (+) B Sus) (Qty 3)
Tapping Screw (3 × 8 (+) B #7.5 Zu) (Qty 1)
Tapping Screw (3 × 10 (+) B Sus) (Qty 1)
12184669
Z-92036
2
Battery Cover
12184677
DB-91055
3
Stand (Qty 2)
12184685
Z-92037
4
Screw Set, including:
Hexagon Key
Washer (8d × 4.1d × 0.5t)
Retaining Ring
Screw
12184693
HD-90105
5
Antenna Tube Set (Qty 5)
10681781
HC-4899
6
Transmitter Antenna
10537710
A-0039
7
Transmitter (Band 1)
12184701
ZA-90218
Transmitter (Band 2)
12184719
ZA-90219
Transmitter (Band 3)
12184727
ZA-90220
Transmitter (Band 5)
12184735
ZA-90221
8
Transmitter Battery Lid
11973534
DB-90216
9
Owner’s Manual (not shown)
12184743
MU-6004240
10
Service Manual (not shown)
12184750
MS-6004240
11
60-4240.fm Page 12 Thursday, August 19, 1999 6:40 AM
Limited Ninety-Day Warranty
This product is warranted by RadioShack against manufacturing defects in material and workmanship under normal use for ninety (90) days from the date of purchase from RadioShack companyowned stores and authorized RadioShack franchisees and dealers. EXCEPT AS PROVIDED
HEREIN, RadioShack MAKES NO EXPRESS WARRANTIES AND ANY IMPLIED WARRANTIES,
INCLUDING THOSE OF MERCHANTABILITY AND FITNESS FOR A PARTICULAR PURPOSE,
ARE LIMITED IN DURATION TO THE DURATION OF THE WRITTEN LIMITED WARRANTIES
CONTAINED HEREIN. EXCEPT AS PROVIDED HEREIN, RadioShack SHALL HAVE NO LIABILITY OR RESPONSIBILITY TO CUSTOMER OR ANY OTHER PERSON OR ENTITY WITH RESPECT TO ANY LIABILITY, LOSS OR DAMAGE CAUSED DIRECTLY OR INDIRECTLY BY USE
OR PERFORMANCE OF THE PRODUCT OR ARISING OUT OF ANY BREACH OF THIS WARRANTY, INCLUDING, BUT NOT LIMITED TO, ANY DAMAGES RESULTING FROM INCONVENIENCE, LOSS OF TIME, DATA, PROPERTY, REVENUE, OR PROFIT OR ANY INDIRECT,
SPECIAL, INCIDENTAL, OR CONSEQUENTIAL DAMAGES, EVEN IF RadioShack HAS BEEN ADVISED OF THE POSSIBILITY OF SUCH DAMAGES.
Some states do not allow the limitations on how long an implied warranty lasts or the exclusion of incidental or consequential damages, so the above limitations or exclusions may not apply to you.
In the event of a product defect during the warranty period, take the product and the RadioShack
sales receipt as proof of purchase date to any RadioShack store. RadioShack will, at its option, unless otherwise provided by law: (a) correct the defect by product repair without charge for parts and
labor; (b) replace the product with one of the same or similar design; or (c) refund the purchase
price. All replaced parts and products, and products on which a refund is made, become the property of RadioShack. New or reconditioned parts and products may be used in the performance of
warranty service. Repaired or replaced parts and products are warranted for the remainder of the
original warranty period. You will be charged for repair or replacement of the product made after the
expiration of the warranty period.
This warranty does not cover: (a) damage or failure caused by or attributable to acts of God, abuse,
accident, misuse, improper or abnormal usage, crash, collision, impact, violent contact, failure to follow instructions, improper installation or maintenance, alteration, lightning or other incidence of excess voltage or current; (b) any repairs other than those provided by a RadioShack Authorized
Service Facility; (c) consumables such as fuses or batteries; (d) cosmetic damage; (e) transportation, shipping or insurance costs; or (f) costs of product removal, installation, set-up service adjustment or reinstallation.
This warranty gives you specific legal rights, and you may also have other rights which vary from
state to state.
RadioShack Customer Relations, 200 Taylor Street, 6th Floor, Fort Worth, TX 76102
We Service What We Sell
04/99
RadioShack
A Division of Tandy Corporation
Fort Worth, Texas 76102
07A99
Printed in Malaysia