1
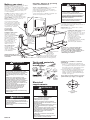
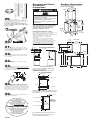
Exhaust requirements
!! WARNING
0
1
Fire Hazard
Do Not use non-metal, flexible duct.
Do Not use metal duct smaller than
10.2 cm (4 in) in diameter.
Do Not use exhaust hoods with magnetic
latches.
Check that exhaust system is not longer
than specified. Exhaust systems longer
than specified will:
— Accumulate lint.
— Shorten the life of the product.
— Reduce performance and result in
longer drying times and increased
energy usage.
Failure to follow specifications may result
in a fire.
Do Not exhaust the dryer into a chimney,
furnace, cold air duct, attic or crawl space,
or any other duct used for venting.
Clean the exhaust system every year.
Do Not install flexible duct under wall,
ceiling or floor materials.
Accumulated lint could be fuel for a fire or
cause moisture damage.
Exhausting your dryer indoors is Not
recommended. The moisture and lint
indoors may cause:
— Lint to gather inside and around the
dryer and be a fuel for fire.
— Moisture damage to woodwork,
furniture, paint, wallpaper, carpet,
etc.
— Housecleaning problems and
possible health problems.
Failure to follow these instructions could
result in fire damage, injury or health
problems.
If using an existing exhaust system, clean lint
from entire length of exhaust system. Make
sure exhaust hood is not plugged with lint.
The exhaust system should be inspected and
cleaned yearly.
Replace any vinyl or metallized plastic foil
exhaust duct with rigid metal or flexible
metal duct.
Use duct tape to seal all
joints. Do Not use screws to
secure duct.
exhaust air flow
10.2 cm (4 in)
rigid metal pipe
better
is preferred. Plan
installation to use the
fewest number of
elbows and turns.
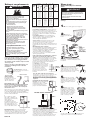
Maximum
length of
10.2 cm
(4 in) dia.
duct
NUMBER
OF 90°
TURNS
good
Metal flexible duct must
be fully extended and supported when the
dryer is in its final position. DO NOT KINK OR
CRUSH THE DUCT. The metal flexible duct
must be fully extended to allow adequate
exhaust air to flow.
Allow as much room as possible when using
elbows or making turns. Bend duct gradually
to avoid kinking. Remove excess flexible
duct to avoid sagging and kinking that may
result in reduced air flow.
2
3
0
1
2
3
10.2 cm
(4 in)
10.2 cm
(4 in)
6.4 cm
(2-1/2 in)
13.1 m
(43 ft)
10.1 m
(33 ft)
7.0 m
(23 ft)
5.5 m
(18 ft.)
9.1 m
(30 ft)
7.3 m
(24 ft)
4.9 m
(16 ft)
3.1 m
(10 ft.)
12.5 m
(41 ft)
9.5 m
(31 ft)
6.4 m
(21 ft)
5.5 m
(18 ft.)
11.0 m
(36 ft)
7.9 m
(26 ft)
4.9 m
(16 ft)
8.8 m
(29 ft)
7.0 m
(23 ft)
4.6 m
(15 ft)
2.7 m
(9 ft.)
rigid
metal duct
With washer/dryer in laundry
area.
!! WARNING
Injury Hazard
More than one person is required to lift,
tilt or move the washer/dryer because of
its weight and size.
Failure to follow this instruction may
result in injury.
Not
recommended
7.3 m
(24 ft)
5.5 m
(18 ft)
3.1 m
(10 ft)
Now start...
flexible
metal duct
Truck only from the rear to prevent product
damage.
Not
recommended
The maximum length using a 5.1 cm x 15.2 cm
(2 in x 6 in) rectangular duct with 2 elbows and a
6.4 cm (2-1/2 in) exhaust hood is 2.4 m (8 ft).
For exhaust configurations other than those
listed in chart, the back pressure MUST not
exceed 0.5 cm (0.2 inches) water column at
the back of the washer/dryer. The back
pressure should be checked by a qualified
technician.
For exhaust systems not covered by the
exhaust length chart, see Service Manual,
Part No. 603197, available from your
authorized parts distributor.
Service check: The back pressure in any
exhaust system used must not exceed
0.5 cm (0.2 inches) of water column
measured with an incline manometer at the
point that the exhaust duct connects to the
dryer.
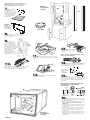
1.
Put on safety glasses and gloves.
2.
Remove
shipping cardboard
base.
rear legs
• 4 legs
• 1 drain hose
front legs clamp
• 1 plastic
beaded strap
• 4 flat, waterhose washers
• 1 small clamp
Exhausting the dryer outside is
recommended. Recessed installation that is
not exhausted outside must use Exhaust
Deflector Kit Part No. 694609, available from
your authorized parts distributor. See
“Recessed and closet installation
instructions,” Panel E, for unobstructed air
opening requirements.
If the washer/dryer is installed in a confined
area such as a bedroom, bathroom or
closet, it must be exhausted to the outside
and provision must be made for enough air
for combustion and ventilation. Check
governing codes and ordinances. Also refer
to the “Recessed and closet installation
instructions” on Panel E.
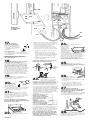
An exhaust hood should cap
the exhaust duct to prevent
exhausted air from returning
into dryer. The outlet of the
hood must be at least
30.5 cm (12 in) from the
ground or any object that
may be in the path of the
exhaust.
Remove parts from plastic
package. Check that all parts were
included.
4.
Insert a rear-leveling
30.5 cm
(12 in)
leg into the hole in the rear
minimum corner on the bottom of the
washer/dryer. Push leg in until it
snaps into place. Do the same
same thing with the other leveling
leg in the other rear corner.
10.2 cm (4 in) outlet hood is preferred.
However, a 6.4 cm (2-1/2 in) outlet may be
used with short systems only. A 6.4 cm
(2-1/2 in) outlet can result in longer drying
times than other hood types. For permanent
installation, a stationary exhaust system is
required.
Exhausting the dryer through
the side of the washer/dryer
requires the use of Side
Exhaust Kit Part No. 279823.
Follow kit instructions for
proper exhaust installation.
5.
Push up one leg;
check to see that the other
leg goes down. Check the
other leg the same way. (If
legs do not adjust, repeat
Step 4.)
6.
Mobile home installation
The exhaust duct can
be routed up, down,
left, right or straight out
the back of the washer/
dryer. Space
requirements are
provided on Panel E
and on the rear panel of
the washer/dryer. Use
the straightest path you
can, to avoid 90˚ turns.
3.
With one of the
front legs in hand, check
the ridges for a diamond
marking. That's how far the
leg is supposed to go into
the hole. Start to screw the
legs into the holes in the
front corners by hand.
outside
wall
skirting
floor enclosed area
Maximum length of the exhaust system
depends upon the type of duct used,
number of elbows and the type of exhaust
hood. The maximum length for both rigid
and flexible duct is shown in the chart.
Panel B
Mobile home exhaust requirements: The
washer/dryer must have an outside exhaust.
If the dryer is exhausted through the floor
and the area under the mobile home is
enclosed, the exhaust system must terminate
outside the enclosed area. Extension
beyond the enclosure will prevent lint and
moisture buildup under the mobile home.
Use slip-joint pliers to finish turning the front
legs until you reach the diamond mark.