1
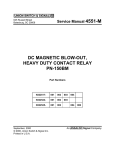
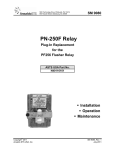
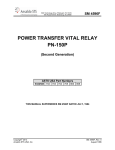
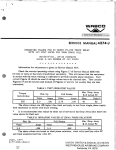
Service Manual 4596
645 Russell Street
Batesburg, SC 29006
DC Biased Vital Relay
(Second Generation)
PN-150B
Part Numbers
N322500- 701 702 703 704 705 706
711
713
N322500- 801 802 803 804
806 807 808 809 810
812
N322500- 901 902 903
907 908 909 910
September, 2000
© 2000, Union Switch & Signal Inc.
Printed in U.S.A.
An Ansaldo Signal Company
Revision Index
Revision Date
March, 1985
March, 1986
October, 1986
April, 1987
February, 1988
September, 2000
TABLE OF CONTENTS
Table of Contents
Section
Subject
1
1.1
1.2
1.2.1
1.2.2
1.2.3
1.2.4
1.3
1.3.1
1.3.2
GENERAL INTRODUCTION . . . . . . . . . . . . . . . . . . . . . . . . . . . . . . . . .1-1
INTRODUCTION . . . . . . . . . . . . . . . . . . . . . . . . . . . . . . . . . . . . . . . . . . . .1-1
DESCRIPTION . . . . . . . . . . . . . . . . . . . . . . . . . . . . . . . . . . . . . . . . . . . . . .1-1
General . . . . . . . . . . . . . . . . . . . . . . . . . . . . . . . . . . . . . . . . . . . . . . . . . . . .1-1
Coils . . . . . . . . . . . . . . . . . . . . . . . . . . . . . . . . . . . . . . . . . . . . . . . . . . . . . .1-1
Contacts . . . . . . . . . . . . . . . . . . . . . . . . . . . . . . . . . . . . . . . . . . . . . . . . . . . .1-1
Shock Indicator (only applies to Part Number N322500-807) . . . . . . . . . . . .1-1
SPECIFICATIONS . . . . . . . . . . . . . . . . . . . . . . . . . . . . . . . . . . . . . . . . . . .1-2
Electrical . . . . . . . . . . . . . . . . . . . . . . . . . . . . . . . . . . . . . . . . . . . . . . . . . . .1-2
Mechanical . . . . . . . . . . . . . . . . . . . . . . . . . . . . . . . . . . . . . . . . . . . . . . . . . .1-3
2
2.1
2.2
2.3
2.4
2.4.1
2.4.2
2.4.3
2.5
INSTALLATION . . . . . . . . . . . . . . . . . . . . . . . . . . . . . . . . . . . . . . . . . . . .2-1
GENERAL . . . . . . . . . . . . . . . . . . . . . . . . . . . . . . . . . . . . . . . . . . . . . . . . . .2-1
MOUNTING BASE . . . . . . . . . . . . . . . . . . . . . . . . . . . . . . . . . . . . . . . . . . .2-1
RELAY INDEXING . . . . . . . . . . . . . . . . . . . . . . . . . . . . . . . . . . . . . . . . . .2-1
RECEPTACLE CONTACT SPRINGS . . . . . . . . . . . . . . . . . . . . . . . . . . . . .2-2
Old-Style Base Only . . . . . . . . . . . . . . . . . . . . . . . . . . . . . . . . . . . . . . . . . .2-2
Improved One Piece Base Only . . . . . . . . . . . . . . . . . . . . . . . . . . . . . . . . . .2-2
Installing Wires in Receptacle Contact Springs . . . . . . . . . . . . . . . . . . . . . . .2-4
RELAY INSERTION . . . . . . . . . . . . . . . . . . . . . . . . . . . . . . . . . . . . . . . . . .2-4
3
3.1
3.2
3.2.1
3.2.2
FIELD MAINTENANCE . . . . . . . . . . . . . . . . . . . . . . . . . . . . . . . . . . . . .3-1
INTRODUCTION . . . . . . . . . . . . . . . . . . . . . . . . . . . . . . . . . . . . . . . . . . . .3-1
PERIODIC PERFORMANCE TEST . . . . . . . . . . . . . . . . . . . . . . . . . . . . . .3-1
Cleaning . . . . . . . . . . . . . . . . . . . . . . . . . . . . . . . . . . . . . . . . . . . . . . . . . . . .3-1
Service Requirements . . . . . . . . . . . . . . . . . . . . . . . . . . . . . . . . . . . . . . . . . .3-1
4
4.1
4.2
4.2.1
4.2.2
4.2.3
4.3
4.4
4.4.1
4.4.2
4.4.3
4.5
4.5.1
4.5.2
4.5.3
4.5.4
4.5.5
4.5.6
SHOP MAINTENANCE . . . . . . . . . . . . . . . . . . . . . . . . . . . . . . . . . . . . . .4-1
INTRODUCTION . . . . . . . . . . . . . . . . . . . . . . . . . . . . . . . . . . . . . . . . . . . .4-1
CLEANING AND INSPECTION . . . . . . . . . . . . . . . . . . . . . . . . . . . . . . . .4-1
Cleaning and Inspection Procedure . . . . . . . . . . . . . . . . . . . . . . . . . . . . . . . .4-1
Armature Stop Pin Conditioning . . . . . . . . . . . . . . . . . . . . . . . . . . . . . . . . .4-5
Cleaning Relay Contacts . . . . . . . . . . . . . . . . . . . . . . . . . . . . . . . . . . . . . . .4-6
CHECK-OUT PROCEDURE (Performance Test) . . . . . . . . . . . . . . . . . . . .4-7
REPAIRS AND REPLACEMENT . . . . . . . . . . . . . . . . . . . . . . . . . . . . . . . .4-7
Disassembly . . . . . . . . . . . . . . . . . . . . . . . . . . . . . . . . . . . . . . . . . . . . . . . . .4-7
Reassembly . . . . . . . . . . . . . . . . . . . . . . . . . . . . . . . . . . . . . . . . . . . . . . . . .4-8
General Parts Replacement . . . . . . . . . . . . . . . . . . . . . . . . . . . . . . . . . . . . . .4-8
ADJUSTMENTS . . . . . . . . . . . . . . . . . . . . . . . . . . . . . . . . . . . . . . . . . . . . .4-9
Recommended Tools and Test Equipment . . . . . . . . . . . . . . . . . . . . . . . . . .4-9
Magnet and Magnet Extension . . . . . . . . . . . . . . . . . . . . . . . . . . . . . . . . . . .4-9
Contact Adjustments . . . . . . . . . . . . . . . . . . . . . . . . . . . . . . . . . . . . . . . . . .4-9
Adjustments To Meet Calibration Values . . . . . . . . . . . . . . . . . . . . . . . . . . .4-13
Hold-Down Force . . . . . . . . . . . . . . . . . . . . . . . . . . . . . . . . . . . . . . . . . . . .4-14
Contact Openings . . . . . . . . . . . . . . . . . . . . . . . . . . . . . . . . . . . . . . . . . . . . .4-14
SM 4596 (09/00)
Page No.
i
TABLE OF CONTENTS
Table of Contents
Section
Subject
Page No.
4.6.1
4.6.2
4.7
4.7.1
4.7.2
Recommended Test Equipment . . . . . . . . . . . . . . . . . . . . . . . . . . . . . . . . . .4-14
Procedure . . . . . . . . . . . . . . . . . . . . . . . . . . . . . . . . . . . . . . . . . . . . . . . . . . .4-15
CALIBRATION REQUIREMENTS . . . . . . . . . . . . . . . . . . . . . . . . . . . . . . .4-16
In-Service Test . . . . . . . . . . . . . . . . . . . . . . . . . . . . . . . . . . . . . . . . . . . . . . .4-16
Contact Resistence . . . . . . . . . . . . . . . . . . . . . . . . . . . . . . . . . . . . . . . . . . . .4-16
Appendix A - Parts Lists and Drawings . . . . . . . . . . . . . . . . . . . . . . . . . . . . . . . . . . . . . . .A-1
A-1
Parts list for PN-150B Relay with Individual Contact Drivers . . . . . . . . . . .A-1
A-2
Parts List for Old-Style Mounting Base for PN-150B Relays . . . . . . . . . . . .A-4
A-3
Parts List for PN-150B Relay with One-Piece Molded Driver . . . . . . . . . . .A-6
A-4
Parts List for Improved Mounting Base PN-150B Relays . . . . . . . . . . . . . . .A-9
LIST OF FIGURES
2-1
2-2
4-1
4-2
4-3
4-4
A-1
A-2
A-3
A-4
Typical Plug-In Relay and Mounting Base . . . . . . . . . . . . . . . . . . . . . . . . . .2-3
Receptacle Spring Installed . . . . . . . . . . . . . . . . . . . . . . . . . . . . . . . . . . . . .2-3
Relay Parts Location . . . . . . . . . . . . . . . . . . . . . . . . . . . . . . . . . . . . . . . . . .4-4
PN-150B Relay . . . . . . . . . . . . . . . . . . . . . . . . . . . . . . . . . . . . . . . . . . . . . .4-5
Assembly of Permanent Magnet and Adjustment of Armature Position
Indicator . . . . . . . . . . . . . . . . . . . . . . . . . . . . . . . . . . . . . . . . . . . . . . . . . . . .4-10
PN-150B Relay Test Circuit . . . . . . . . . . . . . . . . . . . . . . . . . . . . . . . . . . . . .4-16
PN-150B Relays with Individual Contact Drivers . . . . . . . . . . . . . . . . . . . . .A-3
Old-Style Mounting Base for PN-150B Relays . . . . . . . . . . . . . . . . . . . . . . .A-5
PN-150B Relays with One Piece Molded Contact Driver . . . . . . . . . . . . . . .A-8
Improved Mounting Base for PN-150B Relays . . . . . . . . . . . . . . . . . . . . . . .A-10
LIST OF TABLES
1-1
4-1
4-2
ii
Electrical Specifications . . . . . . . . . . . . . . . . . . . . . . . . . . . . . . . . . . . . . . . .1-2
Mechanical Adjustments and Hold-Down Torque . . . . . . . . . . . . . . . . . . . . .4-17
Calibration Values . . . . . . . . . . . . . . . . . . . . . . . . . . . . . . . . . . . . . . . . . . . .4-17
SM 4596 (09/00)
SECTION 1 GENERAL INFORMATION
1.1
INTRODUCTION
This service manual covers the PN-150B Plug-In DC Biased Relay used for line and logic circuit
applications requiring contact capacities up to 4 amperes.
Since the relay is biased, it operates to ensure that the logic energy is of the proper polarity. This is
especially important where some circuits are polarity responsive, such as switch repeating and polar
line circuits.
PN-150B relays of earlier design are covered in Service Manual 4551 and its supplements. The earlier
designed relay suffixes were -0XX, versus -7XX, -8XX and -9XX. For a given relay resistance and
contact combination, these second generation PN-150B relays will fit into the same mounting base and
have the same operating characteristics as the corresponding earlier design relay. The design of the
PN-150B relay conforms to all applicable AREMA specifications.
1.2
DESCRIPTION
1.2.1
General
The relay is factory-calibrated to operate across a wide environmental range. All moving parts are
enclosed in a sturdy, transparent, dust and moisture resistant cover. To ensure the relay is inserted in its
proper mounting base, all relays have indexing pins. Relays lock securely in the plug-in position.
1.2.2
Coils
Coil resistance of PN-150B relay is dependent on part number. See Subsection 1.3.1 to correlate part
numbers to coil resistance values. The resistance selected depends on the system voltage and circuitry.
1.2.3
Contacts
Contacts of the PN-150B relay are standard low-voltage silver-to-silver impregnated carbon front and
silver-to-silver back. See Figures A-l or A-3 for a pictorial representation of the contact assembly.
1.2.4
Shock Indicator (only applies to Part Number N322500-807)
WARNING
ANY RELAY SHOWING SHOCK INDICATOR ACTIVATION SHOULD BE
SHOPPED BEFORE PLACING RELAY INTO SERVICE. FAILURE TO
ASSURE PROPER FUNCTION OF THIS RELAY MAY RESULT IN SEVERE
PERSONAL INJURY OR DEATH.
The shock indicator (P/N J680167-0012) shows red when the relay has been subjected to shock in
excess of a safe level (i.e., dropped) during shipment or transport. This is an indication that the relay
may have mechanical damage and may not meet electrical specifications.
SM 4596 (09/00)
1-1
SECTION 1 GENERAL INFORMATION
1.3
SPECIFICATIONS
The following subsections provide the electrical and mechanical specifications of the PN-150B relays
covered in this manual.
Note
The 900 series once referred to relays with Lexan covers, while the 800 series had covers made from a
different material. This material is no longer used, so all relay covers are Lexan. The 900 series is
obsolete and the 800 series is the direct replacement.
1.3.1
Electrical
Relay electrical specifications are tabulated below:
Part No.
With
No
No
Front Front Front
Testing Testing Testing
N322500
N322500
N322500
N322500
N322500
N322500
N322500
N322500
-801
-802
-803
-804
-806
-807
-701
-702
-703
-704
-705
-706
-901
-902
-903
-907
-808
-908
N322500
-809
-909
N322500
N322500
-810
-910
N322500
N322500
-711
-812
-713
Contacts
6FB Std
6FB Std
6FB Std
6FB Std
6FB Std
6FB Std
4FB, 2F,
1B Std
4FB, 2F,
1B Std
4FB, 2F,
1B Std
6FB Std
2FB, 4F,
2B Std
6FB Std
6FB Std
Energization
System
Voltages
Coil
Resis.
Ohms
400
800
1300
100
240
25
Amps
Volts
0.0132
0.0105
0.0082
0.0264
0.0177
0.0504
5.3
8.4
10.7
2.64
4.24
1.26
10
12-14
16-24
***
***
***
1300
0.0082
10.7
16-24
800
0.0105
8.4
12-12
400
4300
0.0132
0.004
5.3
17.58
10
24
400
400/400
2730
0.0132
0.023
0.0052
5.3
9.0
14.1
10
12-14
24
All relays are presently furnished with a Lexan cover.
***Normally used in series with another relay
Contacts - Standard (Std) 4 amps, low-voltage silver-to-silver impregnated carbon front and
silver-to-silver back.
Mounting Base - N451376-0302 - improved style for all relays above.
- N433830 - old-style for relays N322500-807, -808, -809.
- N334266 - old-style for all other relays above.
TABLE 1-1. ELECTRICAL SPECIFICATIONS
1-2
SM 4596 (09/00)
SECTION 1 GENERAL INFORMATION
1.3.2
Mechanical
The following mechanical specifications are common to all PN-l50B relays covered in this manual.
Relay Dimensions:
Height 7-1/16” (17.93 cm)
Width 2-7/16” (6.19 cm)
Depth 8-7/32” (20.88 cm)
Temperature:
-40° F (-40° C) to +185° F (+85° C)
Indexing:
Refer to Section 2.3
Weight:
6-3/4 Lbs.
Mounting Base Weight:
17.5 oz. (Old-style Base)
9.5 oz. (Improved Base)
Mounting Base Dimensions: Height 7-15/16” (20.16 cm)
Width 2-7/16” (6.19 cm)
Depth 2-7/16” (6.19 cm) (Old-Style Base)
Depth l-25/32” (4.52 cm) (Improved Base)
SM 4596 (09/00)
1-3
SECTION 1 GENERAL INFORMATION
This page is intentionally blank.
1-4
SM 4596 (09/00)
SECTION 2 INSTALLATION
2.1
GENERAL
Relays plug directly into a mounting base that is secured to a rack. The only installation instructions
required are for the mounting base.
2.2
MOUNTING BASE
Secure the mounting base directly to the rack using the hardware furnished. All wiring terminates at the
rear of the mounting base to solderless terminals (receptacle contact springs).
Mounting base details are shown in Figures A-2 (Old-Style Base) and A-4 (Improved Base) of the
Appendix.
2.3
RELAY INDEXING
Relays are factory equipped with indexing pins to prevent insertion of an incorrect relay into a mounting base. Each relay is accompanied by an indexing plate that is applied to the mounting base at the
time of initial installation. A typical plug-in relay with indexing pins and base with indexing plate is
shown in Figure 2-1.
The following data defines the indexing that has been established for relays covered by this manual.
a. The index code always consists of four figures (such as 0001, 0002, or 0101) and is used for
both the relay and the indexing plate on the mounting base.
b. The index code for each relay can be determined from the relay part number and its suffix,
which is marked on the nameplate attached to the front of the relay. The first two digits of the
index code are the last two digits of the part number, and the second two digits of the index
code are the last two digits of the suffix. The index number should agree with the placement of
the indexing pins in the numbered vertical rows on the back of the relay starting with the top
pin and reading down.
c. The index code for each mounting base is determined by the placement of the holes in the numbered vertical rows of the large white nylon indexing plate that is affixed to the front of the
mounting base. This indexing plate should not be removed from the mounting base unless it is
damaged or the indexing is to be purposely changed to accommodate a relay of a different part
number. Discard the indexing plate that comes in a bag tied to the handle of all new relays,
unless it is needed for replacement of damaged indexing plate or for application to a new
mounting base.
SM 4596 (09/00)
2-1
SECTION 2 INSTALLATION
WARNING
NEVER DRILL NEW HOLES IN A BASE INDEXING PLATE THAT
WILL PERMIT APPLICATION OF RELAYS WITH DIFFERENT
PART NUMBERS OR CHANGE INDEXING PINS ON THE BACK OF
A RELAY UNLESS IT IS BEING CONVERTED TO A NEW PART
NUMBER. OTHERWISE, A HAZARD WILL BE CREATED THAT
MAY COMPROMISE SAFETY CIRCUIT FUNCTIONS.
2.4
RECEPTACLE CONTACT SPRINGS
2.4.1
Old-Style Base Only
The mounting base will normally be equipped with the required quantity of J680165 solderless receptacle contact springs, and will accommodate one or two #14 or #16 wires. It can, however, be equipped
with receptacle contact springs for one or two #10 or #12 wires (J680181), or for one or two #18 or
#20 wires (J680179). Make certain which type of solderless receptacle contact springs accompany the
mounting base before proceeding with their installation.
2.4.2
Improved One-Piece Base Only
The one-piece mounting base with hardware (N451376-0302) includes a full complement of receptacle
contact springs (M451142-2702) to accommodate one or two #14-#16 wires, mounting fasteners and
tags. However, it may be equipped with receptacle contact springs for one or two #18-#20 wires
(M451142-2701), or for one or two #l0-#12 (M451142-2703) wires.
Each solderless receptacle contact spring should be inspected for physical damage and straightness
before proceeding with installation.
The following is recommended when installing solderless receptacle contact springs:
a. Receptacle contact springs must be inserted into the base cavity with the lock side down (See
Figure 2-2).
b. Make certain that the lanced tab is slightly compressed when the receptacle contact spring is
inserted along the top of the cavity. The lanced tab could have been bent during handling, and
therefore might not provide the required contact pressure after the relay is inserted. If the lanced
tab does not touch, pull it up slightly using fingers or a suitable tool.
c. After insertion, pull firmly on the wire to make certain the receptacle contact spring is locked in
the cavity.
2-2
SM 4596 (09/00)
SECTION 2 INSTALLATION
FIGURE 2-1. TYPICAL PLUG-IN RELAY AND MOUNTING BASE
FIGURE 2-2. RECEPTACLE SPRING INSTALLED
SM 4596 (09/00)
2-3
SECTION 2 INSTALLATION
2.4.3
Installing Wires in Receptacle Contact Springs
Use the following procedure to ensure a good electrical and mechanical connection between the conductor wire and the receptacle contact spring. The following table identifies the correct crimping tool
to be used when installing wires in receptacle contact springs.
Crimping Tool
Old Style
Improved Base
Receptacle
Receptacle
(Amp Type)
Wire Size
Contact Spring
Contact Spring
J397138
J397139
J397188
#10/#12 AWG
#14/#16 AWG
#18/#20 AWG
J680181
J680165 (Std)
J680179
M451142-2703
M451142-2702
M451142-2701
a. Strip 3/16 in. (0.187 in. or 0.47 cm.) of insulation from the end of the wire.
b. Place the receptacle contact spring into the jaws of the proper crimping tool. When using only
one terminal, of any wire size, use the shortest terminal.
c. Partially close the crimping tool jaws against the receptacle contact spring to hold it in place.
(Do not crush the receptacle contact spring barrel at this time.)
d. Insert the stripped end of wire all the way into the receptacle contact spring barrel. Squeeze the
tool handles until crimping is completed and the jaws release. When using both terminals, it is
more convenient to attach the first wire to the longest terminal.
e. Remove the crimped receptacle contact spring from the tool and inspect the connection. Make
certain that the wire is flush with the crimped barrel and that there are no loose strands of wire.
2.5
RELAY INSERTION
Orient the relay to the mounting base with the push rod to the left-hand side; then plug the relay into
the base. The relay should be pushed firmly against the mounting base while depressing the latch rod.
After the relay is completely seated in the base, release the latch rod and pull on the handle to ensure
that the relay has locked in place.
2-4
SM 4596 (09/00)
SECTION 3 FIELD MAINTENANCE
3.1
INTRODUCTION
This section provides the necessary periodic preventive maintenance procedures which must be performed to ensure continuous, proper, and efficient operation of the PN-150B relays covered in this
manual. Field maintenance covers periodic inspections and performance tests.
3.2
PERIODIC PERFORMANCE TEST
3.2.1
Cleaning
Before inspecting and testing the relay, if necessary use a soft cloth to clean the exterior to remove any
dirt or dust that may have collected. A safe cleaning solution of alcohol and water may be used for
removal of accumulated dirt, grease, etc.
3.2.2
Service Requirements
3.2.2.1 General
All vital relays must be inspected and tested at least once every four (4) years. The tests and inspections are to include: pick-up current, drop-away current, timing of slow operating and timing relays;
and visual inspection of contacts for damage or misalignment, corrosion or other contamination of
parts, loose parts inside of the cover, broken seal, and cracked or broken cover.
All vital relays installed in locomotive or car-carried equipment are to be removed from service and
adjusted, repaired and tested at least once every six (6) years.
Relays not passing the above stated tests and inspections must be replaced and not returned to service
until the operating characteristics and conditions are in accordance with US&S specifications.
3.2.2.2 In-Service Test
It is recommended that line relays in service be removed from service for shop repairs when one or
more of the following conditions occur: (Use as a reference the calibration values given in Table 4-2.)
a. If the Drop-Away value (D. A.) falls below 67% of the value given.
b. If the Full-Drop-Away value (F. D. A.) falls below 33% of the value given.
c. If the Full Stroke value (F. S.) increases to more than 110% of the value given.
3.2.2.3 Test Procedures
Test the operating characteristics of the PN-150B relays as given in Section 4.6 in this manual.
SM 4596 (09/00)
3-1
SECTION 3 FIELD MAINTENANCE
This page is intentionally blank.
3-2
SM 4596 (09/00)
SECTION 4 SHOP MAINTENANCE
4.1
INTRODUCTION
This section provides the information necessary to perform shop level repairs of the PN-150B style
relays covered in this manual. In general, relays arriving at the shop for repair have been checked in
the field and have been found to perform unacceptably or have been physically damaged.
4.2
CLEANING AND INSPECTION
Before inspecting the relay and initiating repairs, use a soft cloth to clean the exterior carefully to
remove any dirt or dust that may have collected. A safe cleaning solution of alcohol and water may be
used for removal of accumulated dirt, grease, etc.
Inspect the relay exterior for signs of physical damage, such as cracked or broken cover, cracked or
damaged housing, and damaged and or missing contact block terminals and indexing pins. If severe
damage is found, a careful inspection of the interior components should be made for physical damage.
Remove the cover and proceed with inspection, cleaning, stop pin conditioning and relay contact cleaning, using the following recommended cleaning materials:
Recommended Cleaning Materials
Order Reference
A relay contact cleaning kit, part number X451646-0901, is available that consists of the following
three items, or which may be ordered individually:
Burnishing Tool, P. K. Neuses Co. No. 3-316 . . . . . . . . . . . . . . . . . . . . . J397187 (pkg. of 5)
Burnishing Tool, P. K. Neuses Co. No. N318 (Heavy Duty) . . . . . . . . . J397187-00l (pkg. of 5)
Paper Strip, strips cut from 67 pound white Springhill Vellum
Bristol Paper . . . . . . . . . . . . . . . . . . . . . . . . . . . . . . . . . . . . . . . . . . . . . J793094 (pkg. of 50)
Also recommended:
Emery Paper, Wet or Dry, 600 Grit, cut in strips . . . . . . . . . . . . . . . . . . . (Commercially Available)
Alcohol #1 Solvent (Ethyl Alcohol Proprietary 190 or Equivalent . . . . . (Commercially Available)
Stop Pin Conditioning Graphite Stick . . . . . . . . . . . . . . . . . . . . . . . . . . . N451151-3203
4.2.1
Cleaning and Inspection Procedure
The following procedure (reference Figure 4-1) should be performed any time the cover is removed
from the relay for inspection or any type of maintenance. Only after this procedure is performed may
the cover be reinstalled on the relay. The cover should only be removed from the relay in a clean work
area, i.e., an area free of any metal particles, dirt, or other material that may interfere with the proper
operation of the relay.
SM 4596 (09/00)
4-1
SECTION 4 SHOP MAINTENANCE
NOTE
The use of an inspection magnifying lens is suggested for the following
procedure.
1. Carefully examine the permanent magnet area (including the magnet extension) for any particles that may interfere with the proper operation of the relay, such as dirt, fibers, metal slivers,
etc. Use compressed air to blow out the particles, or wipe the area to remove the particles.
CAUTION
MAINTAIN A LOW AIR PRESSURE (10 TO 50 PSI) OR ELSE DAMAGE
MAY OCCUR TO THE CONTACT SPRINGS. CLEAN OR FILTERED AIR
SHOULD BE USED AT ALL TIMES, OR ELSE CONTAMINATION MAY
RESULT. CARE MUST BE TAKEN SO THAT PARTICLES ARE NOT
MOVED TO ANOTHER PART OF THE RELAY.
2. Examine the stop pin counterbored hole (located on the bottom of the armature) for any particles. Use compressed air to blow out any particles. If the particle cannot be removed via compressed air, the particle should be checked to see if it is loose and has a possibility of becoming
dislodged. This check can be performed by using a sharp tool (resembling an angled dental
pick) to dislodge the particle.
3. Move the armature to the energized position and examine the space between the armature and
the face of the magnet extension. This area must be clean and free of any particles. Pay special
attention to the teflon tape (see note below) which is located on the bottom of the armature.
CAUTION
PARTICLES CAN BECOME EMBEDDED IN THE TEFLON TAPE.
REMOVE ANY SUCH PARTICLES OR THEY MAY INTEFERE
WITH THE PROPER OPERATION OF THE RELAY.
4. Move the armature to the deenergized position and examine the area between the armature and
the pole faces. Use compressed air to blow out any particles. Examine the area of the hinge
spring and safety stop for particles and clean when required.
NOTE
This area is difficult to inspect. Backlighting the area will help considerably.
4-2
SM 4596 (09/00)
SECTION 4 SHOP MAINTENANCE
5. Use the compressed air to blow out all relay surfaces.
CAUTION
DO NOT AIM THE AIRFLOW DIRECTLY ONTO THE CONTACT
SPRINGS, AS THEY CAN BE DAMAGED OR MISALIGNED.
6. Use the compressed air to blow out the inside of the cover. If the air pressure does not sufficiently clean the cover, wipe the inside of the cover with a clean, lint-free cloth.
7. After cleaning is complete, perform the armature stop pin conditioning (Section 4.2.2). The
relay surfaces should be blown out with compressed air to remove any stray graphite particles
following the stop pin conditioning procedure.
8. When the relay is completely cleaned and inspected, the cover may be replaced and the seal and
sealing wire installed.
CAUTION
THE SEALING WIRE MAY BE MAGNETIC. WHEN THE WIRE IS
CUT (AFTER THE SEALS HAVE BEEN APPLIED) THE CUT-OFF
PIECES CAN BE ATTRACTED TO THE PERMANENT MAGNETS
OF ADJACENT RELAYS OR CAN FALL ONTO THE WORK SURFACE. KEEP ALL ADJACENT RELAYS COVERED AT ALL TIMES
AND CLEAN UP THE CUT-OFF PIECES. GOOD HOUSEKEEPING
PRINCIPLES APPLY AT ALL TIMES. ALSO, CARE MUST BE
TAKEN THAT METALLIC PARTICLES ARE NOT ACCIDENTALLY
CARRIED TO THE RELAY ON HAND TOOLS THAT HAVE
BECOME MAGNETIZED. IF THESE PROCEDURES ARE NOT FOLLOWED, THE RELAY MAY NOT FUNCTION PROPERLY.
9. Perform a final visual inspection once the cover and seal have been applied. Pay particular
attention to the permanent magnet area and the inside of the cover.
SM 4596 (09/00)
4-3
SECTION 4 SHOP MAINTENANCE
FIGURE 4-1. RELAY PARTS LOCATION
4-4
SM 4596 (09/00)
SECTION 4 SHOP MAINTENANCE
4.2.2 Armature Stop Pin Conditioning
The following instructions are for conditioning the armature stop pin (See Figure 4-2). This procedure
should be followed wherever a relay is shopped for failure to meet its calibration specifications during
scheduled field inspection and tests.
a. After removing the cover, clean the stop pin and adjacent surface by saturating a paper strip
(contained in J793094) with Alcohol #1 Solvent (Ethyl Alcohol Proprietary 190 or equivalent
and then placing it between the armature and pole face. Apply moderate pressure on the armature and draw the paper out. Continue until no residue is removed from the surfaces. Dry the
surfaces using a clean strip of paper.
b. The next step is to apply a dry lubricant such as graphite to the relay stop pin and its point of
contact on the pole face.
Insert the Stop Pin Conditioning Graphite Stick (N451151-3203) between the armature stop pin
and its point of contact on the pole face with graphite against stop pin. While applying moderate pressure on the stick, pull the stick back and forth in a circular motion over the stop pin,
continuing several seconds to ensure a sufficient amount of graphite transfer.
It is not necessary to observe a significant deposit of graphite since most of what is required can
only be determined by means of a microscope.
c. Recheck relay calibration and prepare relay for return to service.
FIGURE 4-2. PN-150B RELAY
SM 4596 (09/00)
4-5
SECTION 4 SHOP MAINTENANCE
4.2.3
Cleaning Relay Contacts
This section covers recommended methods for the preparation and cleaning of relay contacts.
After contacts have been dressed and/or after adjustments have been made to meet calibration requirements, the contacts should be cleaned in accordance with the following procedures.
NOTE
In the final cleaning procedures outlined in the following sections, it is
recommended that all silver contacts be cleaned first and then all silver
impregnated carbon contacts in order not to contaminate the silver tips
with residue that might adhere to the cleaning tool from cleaning the silver impregnated carbon contacts.
NOTE
When using the paper strip, clean the back contacts first, then the front
contacts last. Discard the paper strips when dirty.
4.2.3.1 Contacts That Are Severely Burned
a. Using a 600-grit emery paper strip folded with the grit side out so that both contacts can be burnished simultaneously, stroke the contacts in the direction of contact wipe.
b. Using the burnishing tool, stroke the contacts several times in the direction of contact wipe.
c. Place the paper strip between the open contacts, then close the contacts and withdraw the strip.
d. Repeat step "c" several times, if necessary.
e. Using the alcohol spray, give the contacts a degreasing/wash.
f. Place the paper strip between the open contacts, then close the contacts and withdraw the strip.
g. Repeat step "f" several times if necessary.
4-6
SM 4596 (09/00)
SECTION 4 SHOP MAINTENANCE
4.2.3.2 Contacts With Heavy Tarnish, Slightly Rough or Pitted
a. Perform the procedure in Subsection 4.2.2.1, Steps "b" to "g".
4.2.3.3 Contacts With Surface Film or Oxidation (Not Pitted)
a. Perform the procedure in Subsection 4.2.2.1, Steps "f" and "g".
4.3
CHECK-OUT PROCEDURE (PERFORMANCE TEST)
Perform calibration in accordance with Section 4.6.
4.4
REPAIRS AND REPLACEMENT
NOTE
PN-150B relays manufactured after April, 1976, have been made using glass cloth epoxy laminate drivers. The date of manufacture can be found on the nameplate or on the calibration tag.
These cloth epoxy drivers are tan in color and have fabric grain appearance. Older drivers were
red brown or dark brown and had no grain or fabric appearance. Any relay field modified or
repaired that has the older drivers should be assembled to include the glass epoxy drivers.
PN-150B relays are also manufactured in a style utilizing a molded driver instead of the individual drivers.
Since the contacts are the only wearing parts in this relay, in most cases the relay can be restored to
proper operation by cleaning (Subsection 4.2.2) and readjusting them (Subsection 4.5.3).
4.4.1 Disassembly
Dismantle the relay only to the degree necessary to complete repairs. Refer to the parts list appendix
for part information and location of parts. In general, to dismantle the plug-in relay, proceed with the
following sequence:
a. Remove relay cover seal.
b. Carefully remove plastic cover.
c. Remove/disassemble relay components as required.
d. Remove contacts/contact block as required.
e. Remove permanent magnet as required.
SM 4596 (09/00)
4-7
SECTION 4 SHOP MAINTENANCE
NOTE
These magnets are of a special alloy that permits retention of proper
strength indefinitely if not abused. When not in place on relays, magnet
assemblies should be kept separated from other magnetic objects and the
screws, which hold the extension to the magnet, be kept tight. Should a
magnet become weakened, it should be returned to the factory for
recharging where there is special equipment to fully charge the magnet
and then age it to its best working strength.
4.4.2
Reassembly
Reassembly is accomplished generally in the reverse order of disassembly. The following subsections
provide additional instructions to be followed during reassembly of the relay.
4.4.3
General Parts Replacement
Do not overtighten or force parts when reassembling a relay. Upon completion of reassembly, calibrate
the relay as directed in Section 4.6.
4.4.3.1 Replacing Contact Block
If the contact block is to be replaced by another, remove the old block, then use a small punch to
remove the small dowel pins. Attach the new block with the four screws torqued to 10 ± 2 inch pounds.
Run a #42 drill (0.0935 Dia.) thru the dowel pin holes into the epoxy contact block for a total depth of
9/16" + 1/32 - 0.
NOTE
Replacement contact blocks MUST be of the same general design.
Carefully install the dowel pins, tapping in until they are flush with the surface.
If it is necessary to install a used contact block from another relay, remove only one of the dowel pins
from the frame. Carefully press the block on the remaining pin and fasten in place with the screws
torqued to 10 ± 2 inch pounds. One dowel pin will adequately hold the block in place.
Do not overtighten or force parts when reassembling a relay. Upon completion of reassembly, calibrate
the relay as directed in Section 4.6.
4-8
SM 4596 (09/00)
SECTION 4 SHOP MAINTENANCE
4.4.3.2 Permanent Magnet
The polarity of the magnet should be such that the top end farthest from the two notched holes will
attract the end of a compass needle which points toward geographic south.
The permanent magnet assembly should be applied to the relay as shown in Figure 4-3 making sure
that the shunt between the magnet and the magnet extension is touching the pole piece. Tighten the two
long screws holding the magnet assembly to the pole piece sufficiently to straighten the curved strap
against the magnet. Bend the nut locks securely up against the sides of the screw heads after the adjustments are made.
4.5
ADJUSTMENTS
All adjusting and testing must be done with the relay in its normal upright position.
4.5.1
Recommended Tools and Test Equipment
Gap Gauge - 0.001 in. to 0.200 in.
Gram Gauge - 250 Grams
Screw Driver - Torque Measuring
4.5.2
Magnet and Magnet Extension
Insert a 0.117 inch spacer between the stop pin and the pole face and adjust the permanent magnet
extension so that it touches the Teflon “back stop” tape or the back stop pins, whichever is present on
the bottom of the armature.
After adjustment, the magnet and magnet extension should be centered on each other and on the armature. On relays without “back stop” pins, the bottom of the armature should fit flush on the surface of
the magnet extension, with no air gaps. On relays with “back stop” pins, the air gap should be of uniform width across the surface of the magnet extension.
4.5.3
Contact Adjustments
NOTE
Contacts should be adjusted when a new contact block is installed or
when the relay does not meet the calibration requirements
SM 4596 (09/00)
4-9
SECTION 4 SHOP MAINTENANCE
FIGURE 4-3. ASSEMBLY OF PERMANENT MAGNET AND ADJUSTMENT OF ARMATURE POSITION INDICATOR
4.5.3.1 Relays With Individual Contact Drivers
(Refer to Subsection 4.5.3.2 for relays with one-piece molded drivers.)
a. If a new block is used, install contact block in relay frame. Torque mounting screws to 10 ± 2
inch pounds. On relays just being adjusted, check to see that mounting screws are also torqued
to 10 ± 2 inch pounds.
b. Align the fingers of the driver bracket with each other and parallel with the armature.
NOTE
When adjusting contact springs, do not bend the heavy members (terminals).
c. Rough align the heel springs with each other and straighten, if necessary, to correct for bowed
springs.
d. Perform a bowing check of the contact drivers by laying the bowed side down on a flat surface
and pushing down on one end. Check the other end with a 0.010 inch spacer and if the clearance is greater than 0.010, discard the driver.
e. With the relay in its normal operating position, install the contact drivers and the driver clips
loosely (to be removed later).
4-10
SM 4596 (09/00)
SECTION 4 SHOP MAINTENANCE
f. Insert the nominal Front Closed spacer (Table 4-1) over the stop pin. With the relay energized
against the spacer, adjust the front contacts so that they are all just closed with little or no pressure (both contact tips must be just touching).
g. Remove the spacer and insert the Back Closed spacer (Table 4-1). With the relay energized
against the spacer, adjust the back contacts so that they are all closed with little or no pressure
(both contact tips must be just touching).
h. Replace the spacer with the Heel Contact spacer (Table 4-1) and check for free play between
the heel spring and the driver slot. There should be no binding of the drivers or excessive play.
i. Remove the driver clips and contact drivers. Adjust the heel springs by bending at the thin sections near the block so that light is visible (0.005 - 0.010 inches) between the front and back
contacts and so that they are in line with each other.
j. With the Heel Contact spacer still inserted, install the contact drivers and check that the slots in
the driver align with the heel springs and driver bracket. If necessary adjust the driver bracket.
k. Install the contact drivers and driver clips loosely. Mount the relay in its normal operating position.
1.
Using the nominal Front Closed spacer (Table 4-1), adjust the front contacts to just closed.
m. Remove spacer and replace with the nominal Front Open spacer and adjust the front contacts to
just opened.
n. Remove spacer and replace with the nominal Back Closed spacer and adjust the back contacts
to just closed.
o. Remove spacer and replace with the nominal Back Open spacer and adjust the back contacts to
just opened.
p. With the armature fully released, pull each contact driver toward the front of the relay and
check that the slots in the driver remain properly engaged. The heel springs should engage at
least 1/2 of each narrow slot of the driver and the large slot should fully engage the thick section of the bracket finger. The driver shall be free of any binding in all armature positions.
NOTE
New driver clips must be installed any time that the drivers have been
removed.
q. Recheck calibration, Section 4.7.
SM 4596 (09/00)
4-11
SECTION 4 SHOP MAINTENANCE
4.5.3.2 Relays with One-Piece Molded Driver
a. If new block is used, install contact block in relay frame. Torque mounting screws to 10 ± 2
inch pounds. On relays just being adjusted, check to see that mounting screws are also torqued
to 10 ± 2 inch pounds.
b. Check heel springs for bow and adjust as required.
c. With the relay in its normal operating position, place the molded contact driver in place on the
relay.
NOTE
Nominal spacers are to be used for adjustments. The "min." or "max."
spacers are to be used only for special calibration problems following the
guide lines of Subsection 4.5.4.
When adjusting contacts using "closed" spacer, the contacts are to be
adjusted to just touch. As a guide, there should be no more than 2 grams
spring pressure between the contact tips. For any contact adjusted closed
(using nominal spacers per Table 4-1), an 0.005" thicker spacer for the
fronts and an 0.005" thinner spacer for the backs must allow the contacts
to be open. Both contacts should be touching at the "closed" spacers. It is
permissible for light to be perceptible on one tip, but both must be touching (no light perceptible) at full stroke.
d. Insert the nominal Front Closed spacer (Table 4-1) over the stop pin. With the relay energized,
adjust the front contacts so that they are all just closed with little or no pressure (both contact
tips must be touching).
e. Remove the spacer and insert the Back Closed spacer (Table 4-1). With the relay energized,
adjust the back contacts so that they are all just closed with little or no pressure (both contact
tips must be touching).
f. Remove the contact driver from the relay. Adjust the heel springs by bending at the thin section
near the block so that light is visible (0.005 - 0.010 inches) between the front and back contacts
and so that they are in line with each other.
g. Reinstall the driver on the relay.
h. Using the nominal Front Closed spacer (Table 4-1), adjust the front contacts to just closed.
i. Remove spacer and replace with the nominal Front Open spacer and adjust the front contacts to
just opened.
4-12
SM 4596 (09/00)
SECTION 4 SHOP MAINTENANCE
j. Remove spacer and replace with the nominal Back Closed spacer and adjust the back contacts
to just closed.
k. Remove spacer and replace with the nominal Back Open spacer and adjust the back contacts to
just opened.
1. Repeat adjustment ‘h’ to ‘k’ until each contact is open on its respective "open" spacer and
closed on its respective "closed" spacer.
m. Check to see if heels are floating. Adjust heel clip as required.
NOTE
When the armature is held at mid-stroke with neither fronts nor backs
making, all heel springs should ideally rest flat against the bottom edge
of the driver slot. For those relays which do not meet the above condition, there is a maximum clearance allowable between the bottom of the
heel spring and driver slot measureable by a (0.010) feeler gauge not
going between the spring and the driver slot. Under no circumstances is
the upper edge of the heel spring clip to be below the bottom of a driver
slot. Also, no heel spring is permitted to rub against the sides of the driver. The driver clip on the armature has slotted holes to allow the clip to
be adjusted so that no rubbing is evident.
n. Recheck calibration, Section 4.7.
4.5.4
Adjustments To Meet Calibration Values
The contact adjusting spacers and armature stroke may vary from the values in Table 4-1 if the following rules are adhered to:
NOTE
It should be understood that the following listed variations from standard
adjustments are permissible only when necessary to make individual
relays meet calibration and timing requirements.
a. The Back-Just-Make Spacer must always be at least 0.031" greater than the Front-Just-Make
Spacer. (To provide 0.020" AREMA minimum transfer opening).
b. The armature stroke must be at least 0.070" greater than the Front- Just-Make Spacer. (To provide 0.050" AREMA minimum contact opening).
c. The difference between the front open and front closed, or back open and back closed should
not exceed the values given in Table 4-1.
SM 4596 (09/00)
4-13
SECTION 4 SHOP MAINTENANCE
d. The Front-Just-Make Spacer should never be less than 0.032" (80% of the 0.040 average value
for PN-150B front contacts).
e. The armature stroke should always be at least 0.030" greater than the Back-Just-Make Spacer
(80% of the average 0.38" value for PN-150B backs).
4.5.5
Hold-Down Force
With the relay in the normal upright position and deenergized, a force of at least 190 grams (refer to
Table 4-1) should be required to move the armature away from the permanent magnet assembly. This
upward force should be measured with a gram gage at the bottom end of the centermost contact driver.
The hold down force can be increased, if necessary, by bending away from the permanent magnet the
shunting strip which is fastened to its forward face. If one or both of the two vertical screws which fasten the permanent magnet assembly to the relay frame is steel, a further increase in hold-down force
can be obtained by changing to bronze screws. The steel screw, J463078, has dull (tin) plating and its
head is 3/32 inch thick. The bronze screw, M327179, has brighter (nickel) plating and its head is 1/8
inch thick.
Any change in the hold-down force will affect the relay calibration, as discussed in Sections 4.6 and
4.7.
4.5.6
Contact Openings
In obtaining proper calibration it is permissible to vary the adjustments given in the foregoing subsections, however:
a. With the armature in its fully released position, the front contacts must be open at least 0.050
inch.
b. When a front contact is just making, the corresponding back contact must be open more than
0.020 inch.
4.6
CALIBRATION
4.6.1
Recommended Test Equipment
Test Equipment
Power Supply, 0-70 Vdc
Digital Multimeter (two required)
DPDT (double pole, double throw-S1)
SPST Switch (S2)
4-14
SM 4596 (09/00)
SECTION 4 SHOP MAINTENANCE
4.6.2
Procedure
Connect the circuit as shown in Figure 4-4, and proceed as follows:
a. Set ammeter to appropriate current range.
b. Set voltmeter to appropriate voltage range.
c. Set dc power supply to appropriate output range.
d. Set switch S1 to Normal.
e. Turn dc power supply on, and close S2.
f. Observe ammeter and adjust dc power supply output control to obtain the charge current reading indicated in the Amps portion of the Charge column in Table 4-2. Note that relay energizes
and remains energized as voltage is increased.
g. Set switch Sl to Reverse. Relay should deenergize.
h. Set switch Sl to Normal. Relay should again energize.
i. Adjust dc power supply output control to reduce the current at a rate so as not to overshoot
the actual value and measure the Dropaway, which is the value at which the front contacts open
(refer to Table 4-2 for acceptable value).
j. Further reduce the dc power supply output control setting at a rate so as not to overshoot the
actual value and check Full Dropaway, which is the value at which the armature rests against
the permanent magnet (refer to Table 4-2 for acceptable value).
k. Reduce current to zero then open circuit momentarily using switch S2.
1. Adjust dc power supply output control to increase current at a rate so as not to overshoot the
actual value, and obtain Pickup, which is the value at which the front contacts make. Refer to
Table 4-2 for acceptable values.
m. Further increase the dc power supply output control at a rate so as not to overshoot the actual
value to obtain the relay Full Stroke value, which is the value at which the armature is tight up
to its stop pins. Frequently, Pickup and Full Stroke will be the same value.
n. Test concluded. Disconnect test circuit, and return relay to service if it meets the calibration values. If relay does not meet calibration values, check adjustments per Section 4.5.
SM 4596 (09/00)
4-15
SECTION 4 SHOP MAINTENANCE
Figure 4-4. PN-150B Relay Test Circuit
4.7
CALIBRATION REQUIREMENTS
4.7.1
In-Service Test
Calibration requirements will be met when the relay adjustment values are the same as those given in
Table 4-2 of this manual.
After any shop adjustments are made, check the calibration values (Section 4.6) and if they are not
within the values given in Table 4-2 of this manual the relay should not be placed in service.
4.7.2
Contact Resistance
Resistance of front contacts should be measured with the armature in its full-stroke position, and resistance of back contacts should be measured with the armature fully released. Cleaned contact resistances should not exceed the following values.
Type of Contacts
Silver to Silver Impregnated Carbon
Silver to Silver
Ohms
Front Contacts
0.09
---
Ohms
Back Contacts
--0.03
Contact surfaces should not be disturbed unless there is evidence of severe pitting from excessive loading or an accidental short through the contacts. When contacts must be dressed, refer to Subsection
4.2.3. Visually inspect per Subsection 4.2.1 prior to sealing.
4-16
SM 4596 (09/00)
SECTION 4 SHOP MAINTENANCE
Arm. Air Arm.
Gap (in.) Stroke
Relay
PN-150B 0.026
Min.
Hold
Down
Grams
0.117*
Adjusting Spacers (inches)
Front Contacts
Back Contacts
Closed Open
Open Closed
0.038
0.032
0.042
190
0.043
0.037
0.047
0.076
0.082
0.078
0.081
0.087
0.083
Nom.
Min.
Max.
* May be reduced to 0.110 to meet calibration values.
NOTE: Nominal spacers shall be used for standard adjustments. The minimum maximum spacers are
used for special calibration problems. In that case, always maintain 0.020 transfer open and 0.050 full
stroke.
TABLE 4-1. MECHANICAL ADJUSTMENTS AND HOLD-DOWN TORQUE
Charge
Style
Ohms
Volts
Amp.
Minimum
Drop-Away
Volts
Amp.
150B
150B
150B
150B
150B
150B
150B
150B**
150B
1300
800
400
240
100
25
4300
400/400
2730
42.8
33.6
21.2
16.9
10.6
5.05
70.3
36.0
56.4
0.033
0.042
0.053
0.07
0.106
0.202
0.016
0.09
0.02
3.8
3.0
1.9
1.5
0.94
0.448
6.29
4.5
4.82
0.0029
0.0037
0.0047
0.0063
0.0094
0.0179
0.0015
0.011
0.0018
Min. Full
Drop-Away
Volts
Amp.
2.53
2.0
1.25
1.0
0.63
0.299
4.15
3.0
3.2
0.0019
0.0025
0.0031
0.0042
0.0063
0.0119
0.00096
0.0075
0.0012
Max. Pick-Up
& Full Stroke
Volts
Amp.
10.7
8.4
5.3
4.24
2.64
1.26
17.58
9.0
14.1
0.0082
0.0105
0.0132
0.0177
0.0264
0.0504
0.004
0.023
0.0052
** For this dual coil relay, each coil must be checked separately
TABLE 4-2. CALIBRATION VALUES
SM 4596 (09/00)
4-17
SECTION 4 SHOP MAINTENANCE
This page is intentionally blank.
4-18
SM 4596 (09/00)
APPENDIX A - PARTS LIST
A.1 Parts List for PN-150B Relay with Individual Contact Drivers (Figure A-1)
Item Number
1
2
3
4
5
6
7
8
9
10
11
11
12
13
14
15
16
17
18
19
20
21
22
23
24
24
24
24
24
24
24
24
24
24
24
24
24
24
25
SM 4596 (09/00)
Description
Frame
Latch Rod
Roll Pin
Deleted
Latch
Dowel Pin
Spring
Armature Assembly
Contact Driver
Driver Clip
Contact Block (Relays N322500-807, 808, 809)
Contact Block (For Relays not Listed Above)
Screws #6-32 x 3/4” FH SST
Armature Shim
Hinge Block
Bolt Lock
Screw, #8-32 x 5/8 Hex. SST
Permanent Magnet Assembly
Strap
Washer SST .170 ID FLT
Seal, Vent
Handle
Lock Washer, #10 SHAK PF
Screw, #10-32 x 3/8 PH SST
Coil Complete 25-Ohm (For Relay N322500-706, 806)
Coil Complete 100-Ohm (For Relay N322500-704)
Coil Complete 240-Ohm (For Relay N322500-705)
Coil Complete 400-Ohm (For N322500-701 -711)
Coil Complete 400-Ohm (For Relays N322500-801, 809, 901,
909)
Coil Complete 800-Ohm (For N322500-702 Only)
Coil Complete 800-Ohm (For Relays N322500-802,
808, 902, 908)
Coil Complete 1300-Ohm (For N322500-703 Only)
Coil Complete 1300-Ohm (For Relays N322500-803,
807, and 903)
Coil, Complete 100-Ohm (For Relay N322500-804)
Coil Complete 4300-Ohm (For Relays N322500-810, 910)
Coil Complete 400/400-Ohm (For Relay N322500-812)
Coil Complete 2730-Ohm (For Relay N322500-713)
Shim
Part Number
M433355
M388888
J487087
M321728
J048716
M321861
N433399
M433403
M433404
N433831
N433354
J5072980120
M433358
J026105-0401
J792919
J5072950120
N435191
M321853
J4751210127
J790257
J561111
J4751210125
J5072960129
N379650
N321647-003
N333975
N321647
N433498
N321647-00l
N433498-00l
N321647-002
N433498-002
N433498-006
N433498-012
N436791
N321647-008
M434091
A-1
APPENDIX A - PARTS LIST
A.1
PARTS LIST FOR PN-150B RELAY WITH INDIVIDUAL CONTACT DRIVERS (FIGURE A-1) (CONTINUED)
Item Number
26
27
29
30
31
32
35
36
37
38
39
39
40
41
41
41
41
41
41
41
41
41
41
41
41
41
44
45
46
47
48
A-2
Description
Shim
Screw, 1/4-20 x 3/4 Hex. SST
Name Plate (Order should specify piece number of relay for
which Name Plate is desired.)
Indexing Pin
Gasket
Cover, Lexan
Screw, 8-32 x 7/16, FH
Seal Wire
Seal
Armature Spring
Calibration Tag
Adhesive Film (for applying Ref. 39)
Washer, SST LK #6
Parts Bag (Relay N322500-701)
Parts Bag (Relay N322500-702)
Parts Bag (Relay N322500-703)
Parts Bag (Relay N322500-704)
Parts Bag (Relay N322500-705)
Parts Bag (Relay N322500-706)
Parts Bag (Relay N322500-807)
Parts Bag (Relay N322500-808)
Parts Bag (Relay N322500-809)
Parts Bag (Relay N322500-810)
Parts Bag (Relay N381500-711)
Parts Bag (Relay N322500-812)
Parts Bag (Relay N322500-713)
Screw, #8-32 x 1-1/4 Hex. Hd. St. (Tin P1.)
Bolt, Hex. Hd. Bz.
Tag, Nomenclature
Screw, 4 x 3/16 Rd Hd
Shock Indicator (only for N322500-807)
Part Number
M434092
J5000970112
J630654
J487090
J047081
J776596
J5072950119
A043013
J079351
M4334ll
S003665
J791665
J4751210107
N330681-000l
N330681-0002
N332681-0003
N330681-0004
N330681-0005
N332681-0006
N330681-0007
N330681-0008
N332681-0009
N330681-0010
N330681-0011
N330681-0012
N330681-0013
J463078
M327179
J075828
J052674
J680167-0012
SM 4596 (09/00)
APPENDIX A - PARTS LIST
Figure A-1. PN-150B Relays With Individual Contact Drivers
SM 4596 (09/00)
A-3
APPENDIX A - PARTS LIST
A.2
PARTS LIST FOR OLD-STYLE MOUNTING BASE FOR PN-150B RELAYS (FIGURE A-2)
Item Number Description
Base Complete for 6BF Relays (Note A)
Base Only
Base Complete for 4FB-2F-1B Relays (Note A)
Base Only
la
Receptacle Contact Springs, Solderless Type, for #18 to #20
Wire
lb
Receptacle Contact Springs, Solderless Type, for #14 to #16
Wire
1c
Receptacle Contact Springs, Solderless Type, for #10 to #12
Wire
2
Base, Basic Mounting
3
Plate, Contact Clamping (Order should specify piece number of
mounting base for which contact clamping plate is desired.)
4
Plate, Coil Clamping (Order should specify piece number of
mounting base for which coil clamping plate is desired.)
5
6
7
*8
*9
*10
*11
*12
13
14
15
16
17
18
Strike
Tag
Screws, #4-40 x 3/16 Rd. Hd. (F) Self Tape (Tin P1.)
Screws, 1/4-20 x 1—1/4 Rd. Hd. S. Mach. (Tin P1.) (Not
Shown)
Washers, Lock (M) (Not Shown)
Washers, Plate 1/4 Stl. (Tin P1.) (Not Shown)
Nut, Hex 1/4 Stl. (Tin P1.) (Not Shown)
Washers (Not Shown)
Screws, #6-32 x 1-1/4 Fil. Hd. S. Mach. (Tin P1.)
Nut
Screws, #6-32 x 5/8 Fil. Hd. S. Mach. (Tin P1.)
Indexing Plate (Order should specify piece number of Relay for
which indexing plate is desired.)
Meter Test Plug
Insulated Test Plug (For opening any coil or contact circuit and
for removing receptacle springs)
Part Number
N334266
N334266-099
N433830
N433830-099
J680179
J680165
J680181
J078455
J078458
J078459
M321745
J075828
J525024
J052667
J047775
J047501
J048002
J047711
J052246
M267499
J522090
M322078
N322965
J077931
* Hardware for attaching mounting base to rack.
NOTE A: When Mounting Base complete is ordered a muslin bag of parts 4-1/8” x 51/2” is included in
the inner carton with the mounting base and instruction prints. Bag Contains: Tags (Item 6), Screws
(Item 7), Items 8, 9, 10, 11 and 12 which are for attaching mounting base to rack, and required quantity
of receptacle contact springs (solderless J680165 for #14 to #16 wire. If other wire size is used request
the proper part number as shown in Item 1 when ordering base complete (i.e. N334266 except using
receptacle contact springs, solderless J680181).
A-4
SM 4596 (09/00)
APPENDIX A - PARTS LIST
Figure A-2. Old-Style Mounting Base for PN-150B Relays
SM 4596 (09/00)
A-5
APPENDIX A - PARTS LIST
A.3
PARTS LIST FOR PN-150B RELAY WITH ONE PIECE MOLDED DRIVER (FIGURE A-3)
Item Number
1
2
3
4
5
6
7
8
9
11
11
11
12
13
14
15
16
17
18
19
20
21
22
23
24
24
24
24
24
24
24
24
24
24
24
24
25
A-6
Description
Frame
Latch Rod
Roll Pin
Nut, .006 x 5/16 Steel Lock
Latch
Dowel Pin
Spring
Armature Assembly
Arm, Molded Operating
Part Number
M433355
M388888
J487087
M275388
M321728
J048716
M321861
N438599
M373632-001
Contact Block (Relays N322500-907, 908, 909)
Contact Block (Relays N322500-711)
Contact Block (For Relays not listed above)
Screws SST #6-32 x 3/4” Phil. Fil. Hd.
Armature Shim
Hinge Block
Bolt Lock
Screw, SST #8-32 x 5/8 Hex.
Permanent Magnet Assembly
Strap
SST Washer
Seal, Vent
Handle
Lock Washer, SST #10 SHAK PF
Screw, SST #10-32 x 3/8 PH
Coil Complete 25-Ohm (For Relay N322500-706, -806)
Coil Complete 100-Ohm (For Relay N322500-704)
Coil Complete 240-Ohm (For Relay N322500-705)
Coil Complete 400-Ohm (For Relay N322500-701, -711)
Coil Complete 400-Ohm (For Relay N322500-801, -809, -901, 909)
Coil Complete 800-Ohm (For Relay N322500-702 Only)
Coil Complete 800-Ohm (For Relay N322500-802, -808, -902, 908)
Coil Complete 1300-Ohm (For Relay N322500-703 Only)
Coil Complete 1300-Ohm (For Relay N322500-803, -807, -903)
Coil, Complete 100-Ohm (For Relay N322500-804)
Coil Complete 4300-Ohm (For Relay N322500-810, -910)
Coil Complete 400/400-Ohm (For Relay N322500-812)
Shim
N438690
N438844
N437550
J5072980120
M433358
J26105-0401
J792919
J5072950120
N435191
M321853
J4751210127
J790257
J561111
J4751210125
J5072960129
N379650
N321647-003
N333975
N321647
N433498
N321647-00l
N433498-00l
N321647-002
N433498-002
N433498-006
N33498-012
N436791
M434091
SM 4596 (09/00)
APPENDIX A - PARTS LIST
A.3
PARTS LIST FOR PN-150B RELAY WITH 1-PIECE MOLDED DRIVER (FIGURE A-3) (CONTINUED)
Item Number
26
27
28
29
30
31
32
35
36
37
38
39
39
40
41
41
41
41
41
41
41
41
41
41
43
44
45
46
47
48
SM 4596 (09/00)
Description
Shim
Screw, 1/4-20 x 3/4 Hex. SST
Spring, Operating Arm
Name Plate (Order should specify piece number
of relay for which Name Plate is desired.)
Indexing Pin
Gasket
Cover, Lexan
Screw, 8-32 x 7/16, FH SST
Seal Wire
Seal
Armature Spring
Calibration Tag
Adhesive Film (for applying Ref. 39)
Washer, LK #6 SST
Parts Bag (Relay N322500-701, -801, -901)
Parts Bag (Relay N322500-702, -802, -902)
Parts Bag (Relay N322500-703, -803, -903)
Parts Bag (Relay N322500-704, -804)
Parts Bag (Relay N322500-705)
Parts Bag (Relay N322500-706, -806)
Parts Bag (Relay N322500-807)
Parts Bag (Relay N322500-808, -908)
Parts Bag (Relay N322500-809, -909)
Parts Bag (Relay N322500-810, -910)
Screw, #6-32 x 1/4 Hex. SST
Bolt, #8-32 x 1-1/4 Stl
Bolt, Hex. lid. Bz.
Tag, Nomenclature
SST Washer
Indicator, Arm. Pos.
Part Number
M434092
J5000970112
M349785
J630654
J487090
J047081
J776596
J5072950119
A043013
J079351
M433411
S003665
J791665
J4751210107
N330681-000l
N330681-0002
N332681-0003
N330681-0004
N330681-0005
N332681-0006
N330681-0007
N330681-0008
N332681-0009
N330681-00l0
J5072980121
J463078
M327179
J075828
J4751210127
M432380
A-7
APPENDIX A - PARTS LIST
Figure A-3. PN-150B Relays With One Piece Molded Contact Driver
A-8
SM 4596 (09/00)
APPENDIX A - PARTS LIST
A.4
PARTS LIST FOR IMPROVED MOUNTING BASE PN-150B RELAYS (FIGURE A-4)
Item Number
1a
1b
1c
1d
3
4
*5
6
7
8
9
10
11
12
13
Description
Base Complete for Wayside Relays (See Note A)
Base Only
Base Complete for Car Carrying Relays (See Note A)
Base-Mounting Molded
Strike-Relay
Nut-Speed Push-on
Spring-Cont. Receptacle
Screw, SST 1/4-20 x 1-1/4 Rd.
Washer, SST LOCK 1/4
Washer, SST 1/4 Plate
Nut, 1/4-20 SST Hex.
Tag, Relay Identification
Sheet, Instr. Form #8
Bag, Plastic
Extraction Tool
Part Number
N451376-0302
N451376-0301
N451376-0303
J780055
J792848
J480280
M451142-2702
J5001360120
J4751210111
J4751200112
J4802110108
J075951
S000008
J078399
J772383
NOTE A: When Mounting Base complete is ordered, a plastic bag of parts is included in the inner carton with the mounting base and instruction prints.
Bag Contains: Tags (Item 10), Screws (Item 6), Items 6, 7, 8 and 9 which are for attaching mounting
base to rack.
*Included receptacle contact springs are normally (M451142-2702) for #14 and #16 wire, unless otherwise specified. If other wire size is used, the proper part number (M451142-2701 for #18-20;
M451142-2703 for #10-12) should be specified when ordering the complete base (i.e. N451376-0302,
except using receptacle contact springs, solderless M451142-2703).
SM 4596 (09/00)
A-9
APPENDIX A - PARTS LIST
Figure A-4. Improved Mounting Base for PN-150B Relays
A-10
SM 4596 (09/00)