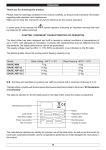
1
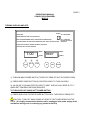
Foodservice Equipment Specialists
P.O. Box 880 Saco, ME. / U.S.A. 04072
877-854-8006 * FAX (207) 283-8080
OPERATIONS MANUAL
CONVEYOR OVEN MODEL
MGD-18
FOR SERVICE ASSISTANCE
U.S. AND CANADA CALL: 1-877-854-8006
24 HOURS/DAY 7 DAYS/WEEK
TABLE OF CONTENTS
UNCRATNG AND INSPECTION
PAGE 1
ASSEMBLY AND INSTALLATION
PAGE 1
ELECTRICAL INSTALLATION
PAGE 1
TURNING OVEN ON AND OFF
PAGE 2
CONVEYOR OPERATION
PAGE 3
RECIPE AND HEAT ZONE PROGRAMMING
PAGE 4
POWER SAVER
PAGE 5
DOUGH HANDLING TIPS
PAGE 5
GENERAL CLEANING
PAGE 6
GENERAL MAINTENANCE
PAGE 7
TROUBLE SHOOTING GUIDE
PAGE 8
NOTES
PAGE 9
WARRANTY
PAGE 10
PRODUCT REGISTRATION
PAGE 11
02/22/2013-MJC
OM-015
Page 1
OPERATIONS MANUAL
CONVEYOR OVEN MODEL
MGD-18
UNCRATING AND INSPECTION
Unpack the unit and components from the shipping container. Remove all visible packing
materials including those that may be inside the baking chamber. If damage is discovered, file a
claim immediately with the carrier that handled the shipment.
ASSEMBLY AND INSTALLATION
The equipment is shipped fully assembled and ready to plug into a matching outlet specified for
its specific voltage and amperage rating. Removal or replacement of the power cord and plug
will VOID the warranty. For assistance, contact the Belleco, Inc. Service Team at 1-877-8548006. Please refer to the appropriate schematic at the rear of this manual for plug
configurations. Consult with a licensed electrician prior to installation. Do not operate this
equipment without the crumb trays properly installed as this may cause overheating and loss of
productivity.
CAUTION – During installation: Do not place on surfaces or near walls, partitions or
kitchen furniture and the like – unless they are made of non-combustible material or clad
with non-combustible heat-insulating material, and pay attention to fire prevention
regulations.
CAUTION – To reduce the risk of fire, the appliance is to be installed in non-combustible
surroundings only, with no combustible material within 18 inches of the sides, front, or
rear of the appliance or within 40 inches above the appliance. Food may burn. Therefore
equipment must not be used near or below curtains and other combustible materials.
They must be watched.
ELECTRICAL INSTALLATION
WARNING – Disconnect the unit from its power source before installing or removing any
parts.
WARNING – Check with your local power company or licensed electrician before
installation to determine the actual voltage at the outlet. For a unit rated 208 volts, never
plug it into 240 volts as serious overheating and damage could occur. For a unit rated
240 volts, never plug it into 208 volts as the lower voltage will greatly reduce the
productivity of the unit.
WARNING – NEVER operate any piece of equipment without proper GROUND
connection. Improper grounding may result in serious personal injury or could be fatal!
PAGE 2
OPERATIONS MANUAL
CONVEYOR OVEN MODEL
MGD-18
TURNING OVEN ON AND OFF:
POWER
OPERATION:
ON - PRESS ONCE
PRESS POWER BUTTON TO TURN OVEN ON
DISPLAY READS WARMING UNTIL OVEN REACHES TEMPERATURE
OFF - PRESS AND
HOLD UNTIL DISPLAY
READS OFF
-TO VIEW/CHANGE SETTING PRESS DESIRED BUTTON -SPEED, RECIPE OR TEMP
-PRESS KEYS ON RIGHT TO MAKE CHANGES TO SETTING
-PRESS SET KEY TO SAVE CHANGES
ZONE 2
ZONE 1
7:00
SPEED
RECIPE
REDY
ZONE 4
ZONE 3
TEMP
UP
SET
DOWN
1). TURN ON MAIN POWER SWITCH (TOGGLE AT REAR OF UNIT BY POWER CORD)
2). PRESS RED POWER BUTTON ON CONTROL PANEL TO TURN ON OVEN
3). ALLOW UP TO 20 MINUTES FOR OVEN TO HEAT. DISPLAY WILL READ “R E D Y”
WHEN SET TEMPERATURES ARE REACHED.
TO TURN OVEN OFF USING SOFT POWER BUTTON
1). PRESS AND HOLD THE RED POWER BUTTON UNTIL THE DISPLAY READS OFF.
CAUTION - TURN OFF MAIN POWER AT REAR OF UNIT WHEN SERVICING THE
OVEN. (It is highly recommended that the unit be unplugged from power supply at the
wall before moving oven or removing any panels for service)
PAGE 3
OPERATIONS MANUAL
CONVEYOR OVEN MODEL
MGD-18
CHANGING DIRECTION OF CONVEYOR TRAVEL
POWER
OPERATION:
ON - PRESS ONCE
PRESS POWER BUTTON TO TURN OVEN ON
DISPLAY READS WARMING UNTIL OVEN REACHES TEMPERATURE
OFF - PRESS AND
HOLD UNTIL DISPLAY
READS OFF
-TO VIEW/CHANGE SETTING PRESS DESIRED BUTTON -SPEED, RECIPE OR TEMP
-PRESS KEYS ON RIGHT TO MAKE CHANGES TO SETTING
-PRESS SET KEY TO SAVE CHANGES
ZONE 2
ZONE 1
7:00
SPEED
RECIPE
REDY
ZONE 4
ZONE 3
TEMP
UP
SET
DOWN
1). PRESS AND HOLD THE SPEED BUTTON.
2). RELEASE THE SPEED BUTTON AFTER THE SECOND BEEP FROM THE PANEL.
3). THE CONVEYOR WILL STOP AND RESUME TRAVEL IN THE OPOSITE DIRECTION
AFTER APPROXIMATELY 15 SECONDS.
NOTE: FOR LEFT TO RIGHT CONVEYOR TRAVEL THE ENTERANCE ZONES ARE 1 AND
3. FOR RIGHT TO LEFT CONVEYOR TRAVEL ZONES 2 AND 4 BECOME THE ENTRANCE.
COOKING TEMPS WILL NEED TO BE ADJUSTED ACCORDINGLY.
TO SET CONVEYOR SPEED:
1). PRESS SPEED BUTTON. PANEL WILL BEEP AND INDICATOR LIGHT WILL TURN ON.
2). PRESS UP OR DOWN BUTTON TO SELECT DESIRED TIME (SPEED CHANGES IN 30
SECOND INCRIMENTS)
3). PRESS THE SET BUTTON TO SAVE CHANGES
(CHANGES WILL NOT BE SAVED IF SET BUTTON IS NOT PRESSED WITHIN 10 SECONDS)
PAGE 4
OPERATIONS MANUAL
CONVEYOR OVEN MODEL
MGD-18
TO SELECT RECIPE:
THE MGD-18 IS PREPROGRAMMED WITH 6 PROGRAMMABLE MENU OPTIONS:
PIZZA 1 – 2 TOPPINGS, PIZZA 3 – 4 TOPPINGS, CALZONE, SANDWICH. M1, M2
1). PRESS THE RECIPE BUTTON. PANEL WILL BEEP AND INDICATOR LIGHT WILL TURN
ON.
2). PRESS THE UP OR DOWN BUTTONS TO SCROLL THROUGH RECIPE OPTIONS
3). PRESS THE SET BUTTON TO SAVE THE DESIRED RECIPE
(CHANGES WILL NOT BE SAVED IF SET BUTTON IS NOT PRESSED WITHIN 10 SECONDS)
TO CHANGE ZONE TEMPERATURES:
THE MGD-18 HAS FOUR PROGRAMMABLE TEMPERATURE ZONES
ZONE 1
ZONE 3
ZONE 2
ZONE 4
1). PRESS THE TEMP BUTTON – FIRST HEAT ZONE IS DIPLAYED AS Z 1 S.
(Z 1 S = ZONE 1) (Z 2 S = ZONE 2) (Z 3 S = ZONE 3) (Z 4 S = ZONE 4)
2). PRESS THE TEMP BUTTON TO SCROLL AND SELECT DESIRED HEAT ZONE.
3). ONCE HEAT ZONE IS SELECTED PRESS UP OR DOWN BUTTON TO INCREASE OR
DECREASE TEMPERATURE.
4). PRESS THE SET BUTTON TO SAVE CHANGES AND TOGGLE TO THE NEXT ZONE.
REPEAT THE INSTRUCTIONS IN STEP 2 TO CHANGE ADDITIONAL TEMPERATURES
OR PRESS THE SET BUTTON TO TOGGLE TO THE NEXT TEMPERATURE ZONE.
(CHANGES WILL NOT BE SAVED IF SET BUTTON IS NOT PRESSED WITHIN 10 SECONDS)
PAGE 5
OPERATIONS MANUAL
CONVEYOR OVEN MODEL
MGD-18
TO PLACE OVEN IN POWER SAVER MODE:
1). PRESS AND THE TEMP AND RECIPE BUTTONS AT THE SAME TIME
2). DISPLAY WILL READ STANDBY
TO CANCEL POWER SAVER MODE
1). PRESS ANY BUTTON ON THE CONTROL PANEL TO RETURN THE OVEN TO FULL
POWER
2). DISPLAY WILL READ WARMING UNTIL THE OVEN REACHES TEMPERATURE FOR
THE SELECTED RECIPE SETTING.
Suggested Dough Handling Procedures
•
Remove frozen dough balls from their wrapper and place into a proofing box or on a
sheet pan. (Some dough manufacturers provide different techniques for their dough that
may not agree with the following therefore, some trials may be required)
•
Place the dough balls a few inches apart, lightly spray release over the dough balls then
cover with a layer of freezer paper. Refrigerate over night. Only remove enough
products from the sheet pan to accommodate what you will require for a few hours.
•
Roll the ball flat (onto a light sprinkling of flower, cornmeal or pizza crisp) starting from
the center and working your way to the outer edges. Make sure you turn the dough as
you work towards the outer edges to maintain a round configuration. Then, use either a
rolling pin or dough press or dough sheeter to form the dough to the desired size and
thickness.
•
Place the flattened shell onto a screen or a seasoned pizza pan. (Shiny aluminum pans
may reflect heat away from the pizza preventing browning) Dock it, sauce it, and cheese
it. Remember to spread the sauce from the center to the outer edges of your crust to
ensure a uniformed thickness of sauce. Leave an inch of space to the outer edge of the
crust to enable browning (sauce too close to the edge prevents browning).
•
When adding vegetables with high moisture contents remember to spread them out and
to avoid over saturation of these toppings. Excessive high moisture toppings will prevent
baking in the surrounding areas until ALL the moisture has been evaporated.
•
Place the prepared pizza at the entry end of the oven and adjust as required. A
consistent product going in will result in consistent product coming out.
REECOMENDED BAKING BANS:
FOR OPTIMAL BAKING PERFORMANCE THE USE OF A SEASONED/ BLACKEND PAN OR
SCREEN IS RECOMMENDED.
PAGE 6
OPERATIONS MANUAL
CONVEYOR OVEN MODEL
MGD-18
CLEANING PROCEDURE
Preventive Maintenance programs on your equipment will provide many years of production at
full capacity. Lack of Preventive Maintenance can shorten the life cycle of the equipment and/or
result in reduced capacities. The following cleaning guidelines should be performed as shown:
WARNING – ALWAYS DISCONNECT YOUR EQUIPMENT FROM POWER PRIOR TO
CLEANING OR MAINTENANCE
WARNING – NEVER SPRAY YOUR EQUIPMENT WITH WATER. NEVER SUBMERGE
INTO WATER.
Daily – 1) Clean the two air intake areas under the equipment with a slightly dampened cloth.
2) Wipe the conveyor surface and exterior surfaces.
3) Remove and wash the Crumb Trays and then replace the Crumb Trays.
Weekly -
1) Clean the two air intake areas under the equipment with a brush or slightly
dampened cloth.
2) Plug the equipment in but adjust all Heat Zones to the lowest setting.
3) Turn the Conveyor Speed Control to fastest setting (90 seconds).
a. For lightly soiled conveyors belts, wipe with a damp cloth.
b. For heavily soiled conveyor belts, wipe with a light abrasive pad.
NEVER OPERATE YOUR EQUIPMENT WITHOUT THE CRUMB TRAYS IN PLACE AS
THIS MAY CAUSE OVERHEATING IN AND AROUND THE CONTROLS AND
MOTORS.
HIGH TEMPERATURE LIMIT
Belleco equipment is equipped with a high temperature limit switch that prevents overheating in
the control box. This switch is re-settable by pushing the button located at the back of the right
control housing (call the Belleco service team at 1-877-854-8006 for assistance).
PAGE 7
OPERATIONS MANUAL
CONVEYOR OVEN MODELS
MGD-18
GENERAL MAINTENANCE
1. REPLACING HEATER TUBES (Tip – replace only one tube at a time to prevent
confusion when re-wiring)
a. DISCONNECT EQUIPMENT FROM POWER SOURCE.
b. Remove both side panels.
c. Disconnect heater tube wires from the terminal blocks by pressing firmly on the
d. + sign where each wire is inserted in the terminal block.
e. Slide the heater tube retainer by loosening the screws and sliding the retainer to
the side so that the holes line up.
f. Gently pull the tube to be replaced out of the unit (TIP: Use a long straw or tube
as a wire guide when passing wires from one end to the other).
g. Gently slide the replacement tube into the unit.
h. Slide the retainer back in place to secure the tubes in place and tighten the
screw.
i. Locate position on terminal block old wire was removed from. Press firmly on the
+ sign where each wire is inserted in the terminal block.
2. REPLACING FAN MOTOR (Tip – make note of which side the label on the fan motor is
prior to removal)
a. DISCONNECT EQUIPMENT FROM POWER SOURCE.
b. Remove the bottom cover.
c. Unplug the fan motor power supply cord.
d. Remove the (4) screws (and grill) that hold the fan motor in place.
e. Put the replacement fan motor and grill in place. Using the same (4) screws;
secure in place in the same manner as removed.
f. Reconnect the fan motor power cord.
g. Replace panels and test under power.
3. REPLACING BELT DRIVE MOTOR:
a.
b.
c.
d.
e.
f.
g.
h.
i.
j.
k.
l.
DISCONNECT EQUIPMENT FROM POWER SOURCE.
Remove right 9” x 10” rear panel (power cord side)
Remove control box cover beneath right rear side of unit. .
Remove the drive sprocket and chain from the drive motor shaft. (Tip – Loosen
the drive motor mounting screws and slide the motor to loosen the chain)
Trace and remove the drive motor wires from the terminal block. (Tip – mark the
wires and/or terminal connection points to ensure proper re-wiring)
Disconnect the green ground lead from the mounting plate.
Remove the drive motor mounting screws and slide the motor out of the unit.
Put the new drive motor in place and loosely replace the mounting screws.
Replace the drive sprocket and chain. (Tip - measure the distance from the
inside of each sprocket to the inside wall for perfect alignment)
Slide the drive motor so the chain has between 1/8” and 1/4” play, and then
tighten the four mounting screws.
Reconnect the ground and power leads for motor.
Replace panels and test under power.
PAGE 8
OPERTIONS MANUAL MGD-18 Troubleshooting Guide
Symptom
Oven will not turn on, display is blank
Cause
No power at outlet
Master On/Off switch at rear of
unit in the Off position.
30 amp fuse is blown.
Display shows Probe Alarm
(prb1, prb2, prb3, prb4).
Control emits a continuous beep
One heat zone will not turn on
Display will not change from WARMING
to REDY
Display changes from WARMING to
HEATING and does not read REDY
Temperature probe in zone is
not responding
Possible burned out heater tube
in zone.
Loose connection at terminal
block (see wire diagram)
Loose connection at heat relay
or defective relay
One heat zone may not be on.
One or more Temperature
settings may be set too high
Supplied voltage to oven may
be too low (i.e. 240 volt oven
running on 208 volts)
Temperature threshold has been
reached.
If zone temperatures are set
above 455° (F) the oven
changes to heating mode as the
elements are now at full
intensity and will not cycle on
and off.
Conveyor will not reverse direction
Obstruction in conveyor belt
Speed button has not been
pressed.
Relay for drive system is not
engaging.
Conveyor speed will not change
Set button not pressed after
setting new speed.
Driver board defective
Conveyor will not turn, heat works
Obstruction in conveyor belt
No power to speed board from
control.
No voltage signal to driver
board or drive motor
Drive motor defective
Solution
Verify voltage at outlet.
Check breaker in wall panel to make sure it is not
tripped.
Put Master On/Off in the ON position
Check for broken element and Identify potential short to
ground. Replace fuse after issue is resolved.
Press any key to turn off the beep.
Check for loose connections to probes at terminal block
and control board.
Examine all heater tubes in heat zone. Check for
physically broken heater tube or burned coil inside glass
covering.
Inspect connections at terminal block and heat relays.
If possible swap heat relay with a working relay to see if
heat comes on. If heat comes on replace defective relay.
Examine heat zones to be sure all elements are working.
Factory default temperatures are set at 350° (F).
Verify voltage at the outlet. Supplied voltage must
match rating on data label.
Reduce zone temperatures to allow the elements to
cycle. Due to airflow and heat zones most products can
be cooked at lower temperatures.
Check for and clear obstructions in conveyor belt.
Press and hold speed button until unit beeps once then
release button. Conveyor will stop and after
approximately 10 seconds conveyor will reverse
direction.
Replace relay
Once new conveyor speed has been entered press the set
key to save changes.
Verify signal to the driver board and replace board if
necessary. (see troubleshooting in service manual)
Check for and clear any obstructions in conveyor belt.
Verify there is 24 volts AC from controller to speed
board.
Verify voltage signal from speed board to driver board.
Verify DC voltage to drive motor from drive board.
Check 1 amp fuse at rear of oven to make sure it is not
blown.
Check DC power supply to make sure it is providing 24
VDC to drive board.
7/9/13
For additional assistance contact Belleco’s Factory Service Team at 877-854-8006
PAGE 9
OPERATIONS MANUAL
CONVEYOR OVEN MODELS
MGD-18
NOTES
THIS PAGE INTENTIONALLY LEFT BLANK
PAGE 10
Foodservice Equipment Specialist
P.O. Box 880 Saco, ME. / U.S.A. 04072
877-854-8006 * FAX (207) 283-8080
ORIGINAL EQUIPMENT WARRANTY
BELLECO, Inc. warrants to the original purchaser, that it’s electrically heated cooking
equipment shall be free from defects in material and workmanship, subject to the following
conditions;
1. BELLECO, Inc.’s obligation under this warranty shall be expressly limited to replacing or
repairing without charge, any component of the electrically-heated cooking equipment
which, in the sole opinion of BELLECO, Inc. is deemed to be defective. This warranty shall
be effective for a period of twenty-four (24) months for parts (excluding heater tubes)
and twelve (12) months for labor and heater tubes commencing from the date the
equipment is INSTALLED BY THE ORIGINAL PURCHASER, WHO SHALL PROVIDE A
COPY OF THE SALES INVOICE OR OTHER PROOF OF PURCHASE IF THE
WARRANTY PERIOD IS IN QUESTION (or 18 MONTHS FROM ORIGINAL SHIP DATE FROM
BELLECO).
2. BELLECO, Inc. agrees to pay any recognized kitchen equipment service agency within the
48 Continental United States and Canada for any FACTORY-AUTHORIZED labor required
to repair or replace (does not include general maintenance, cleaning or resetting the thermal
overload), at the sole option of BELLECO, Inc., any part of the electrically heated cooking
equipment which proves to be defective in either material or workmanship provided,
however, that the repairs or replacement have been duly authorized by BELLECO, Inc.
before the work is performed. This warranty includes travel time not to exceed one (1)
hour and mileage not to exceed fifty (50) miles (80 km). Excluded from the travel and
mileage coverage are the JW and JT1 series.
3. This warranty does not apply to repairs or replacement of any component(s) of your unit,
which have been damaged or abused due to accident, alterations, unauthorized repairs,
misuse or improper maintenance. Belleco will NOT assume any responsibility for loss
revenue.
4. INSTALLATION TO IMPROPER VOLTAGE WILL VOID ANY AND ALL IMPLIED
WARRANTIES.
5. This warranty is expressly in lieu of all warranties and representations expressed or implied
INCLUDING THE IMPLIED WARRANTIES OF MERCHANTABILITY AND FITNESS FOR A
PARTICULAR PURPOSE, and all other obligations or liabilities on the part of BELLECO,
Inc.
6. This warranty becomes effective upon e mail registration sent to
[email protected]
PAGE 11
Foodservice Equipment Specialist
P.O. Box 880 Saco, ME. / U.S.A. 04072
877-854-8006 * FAX (207) 283-8080
PRODUCT REGISTRATION
Thank you for your purchase of Belleco, Inc. food service equipment. It shall remain our primary
goal to ensure your satisfaction. To assist us in our efforts to maintain accurate records, please
complete this form and return it to our Corporate Headquarters via e-mail (see below) or US
Mail. Be sure to include the following details:
Owners Name:
Model Number:
Address:
Serial Number:
Date Purchased:
Business Name:
Dealer Name:
Phone Number:
Comments:
THIS REGISTRATION MAY BE FAXED TO BELLECO AT 207-283-8080 OR SENT BY EMAIL
TO [email protected]