1
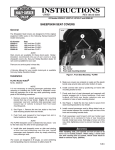
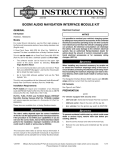
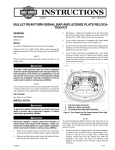
INSTRUCTIONS
REV. 07-31-2002
-J02671
®
Kit Number 90707-00
SADDLEBAG LATCH SPRING KIT
General
CAUTION
This replacement latch spring fits all 1993 and later model
FLHT and FLT hard saddlebags, except FLHRCI (Road King
Classic).
This kit consists of one Saddlebag Latch Spring, Part
Number 90707-00.
NOTE
A Service Manual for your year and model motorcycle is
available from your Harley-Davidson dealer.
The remaining instructions assume that the latch IS
NOT removed from the saddlebag lid. If there is any
doubt as to whether the procedure can be accomplished
without scratching the painted surfaces of the lid, then
remove the five remaining T-15 TORX screws to completely remove the latch.
4. See Figure 2. Position the lid right side up with the latch
closest to you. Raise the latch slightly and rotate the
bag hinge out so that it is in front of the latch with the
two plastic rub bars pointed upward.
Removing the Old Spring
1. Lay a clean pad or blanket on the work surface to protect the saddlebag painted surfaces.
Rub Bars Pointed Up.
2. Open the saddlebag lid. Remove the saddlebag from
the motorcycle, leaving the lid open. See SADDLEBAG
REMOVAL in the Service Manual. Lay the saddlebag
flat on the pad or blanket with the inboard side facing up
and the lid closest to you.
3. See Figure 1. Using a T-15 TORX® drive head, remove
the two screws (2) holding the check strap (4) and latch
assembly (3) to the saddlebag (1). Remove the remaining two screws holding the latch assembly to the saddlebag. Set the saddlebag aside, safely out of the way.
1
2
i04699.eps
3
4
Bag Hinge Rotated Out.
8862.tif
Figure 2. Left-Hand Lid Right Side Up,
Latch on Near Side
5. See Figure 3. Rotate the rub bar segment of the hinge to
expose the hinge pin and spring. Using a flat tip screwdriver, carefully pry the crimped end loop open slightly.
NOTE
The loop at the opposite end of the hinge is spot welded to
prevent pin removal.
Rotate Rub Bar Hinge Segment Down.
1.
2.
Saddlebag
Torx Screws (4)
3.
4.
Latch Assembly
Check Strap
Figure 1. Saddlebag Cover Removal (Left Side Shown)
Pry Crimped
Loop Open.
8863.tif
Figure 3. Rotate Hinge Down to Expose Spring
1 of 2
Installing the New Spring
8864.tif
1. Orient the new spring in the same direction as the old.
Slide the new spring onto the end of the pin at the hinge
opening.
Grasp Pin Through
Opening & Push Out.
Grasp Pin & Pull Out to
Remove Spring.
Rotate Rub Bar Hinge
Segment Beneath Latch.
Figure 4. Left-Hand Lid Upside Down,
Latch on Far Side
6. See Figure 4. Reposition the lid so that it is upside
down with the latch farthest from you. Rotate the hinge
so that the plastic rub bars are positioned beneath the
latch and the latch spring is exposed.
7. Using a needle nose pliers, grasp the pin through the
opening just alongside of the spring and push the pin
toward the end hinge loop opened in Step 5. Work the
pin in this manner until the pin end extends out of the
hinge. If necessary, pry the loop open a little more to
allow pin movement.
NOTE
DO NOT pull the pin out any further than necessary to
remove and replace the spring.
Once the pin is protruding sufficiently from the hinge
loops, grasp the end with the needle nose pliers and
slowly pull the pin out until the spring can be slid off the
opposite end. See Figure 5. Pull the pin out only as far
as necessary to access the spring. Note the orientation
of the spring ends, as the new spring will install the
same way.
8. Remove the old spring.
2. Slide the pin back through the hinge loops. Using the
tapered end of the needle nose pliers, push the end of
the pin into the pried-open loop.
3. See Figure 2. Reposition the lid so that it is right side up
with the latch closest to you. As before, raise the latch
slightly and rotate the bag hinge out so that it is in front
of the latch with the two plastic rub bars pointed
upward.
4. See Figure 3. Rotate the rub bar segment of the hinge to
expose the hinge pin and spring.
Holding the lid down with your elbow if necessary, use a
pliers to bend the opened link back into its original position, capturing the pin so it will not back out of the hinge.
5. Reposition the lid so that it is upside down with the latch
farthest from you. Retrieve the saddlebag set aside earlier and place it on the pad or blanket, behind the lid.
Align the four holes in the latch with those in the saddlebag.
Install two T-15 TORX screws removed earlier through
the inboard holes in the saddlebag and into the weld
nuts in the latch. Tighten the screws to 20-25 in-lbs
(2.3-2.8 Nm).
6. Align the holes in the check strap with the two outboard
holes in the saddlebag.
Install two T-15 TORX screws through the holes in the
check strap and saddlebag, and into the weld nuts in the
latch. Tighten the screws to 20-25 in-lbs (2.3-2.8 Nm).
7. Close the saddlebag and install it on the motorcycle.
See SADDLEBAG INSTALLATION in the Service
Manual.
8865.tif
Figure 5. Pull Pin Out As Necessary to Remove Spring
(Left Side Shown).
-J02671
2 of 2