1
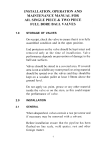
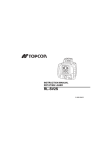
CONTINENTAL DIESEL ENGINE TMDT OPERATORS MAINTENANCE & OVERHAUL MANUAL WISCONSIN MOTORS, LLC 2020 Fletcher Creek Drive, Memphis, Tennessee 38133 www.wisconsinmotors.com (800) 932-2858 2006 All Rights Reserved Wisconsin Motors, LLC USE IN CONJUNCTIONWITH TMD OPERATORS MAINTENANCE AND OVERHAUL MANUALTTP10148 IMPORTANT SAFETY NOTICE Proper repair is important to the safe and reliable operation of an engine. This Service Manual outlines basic recommended procedures, some of which require special tools, devices or work methods. Improper repair procedures can be dangerous and could result in injury or death. READ AND UNDERSTAND ALL SAFETY PRECAUTIONS AND WARNINGS BEFORE PERFORMING REPAIRS ON THIS ENGINE Warning labels have also been put on the engines to provide instructions and identify specific hazards which if not heeded could cause bodily injury or death to you or other persons. These labels identify hazards which may not be apparent to a trained mechanic. There are many potential hazards for an untrained mechanic and there is no way to label the engine against all such hazards. These warnings in the Service Manual and on the engine are identified by this symbol: ! WARNING Operations that may result only in engine damage are identified in the Service Manual by the word CAUTION. Wisconsin Motors, LLC cannot anticipate every possible circumstance that might involve a potential hazard. The warnings in this manual are therefore not all inclusive. If a procedure, tool, device or work method not specifically recommended by Wisconsin Motors, LLC is used, you must satisfy yourself that it is safe for you and others. You should also ensure that the engine will not be damaged or made unsafe by the procedures you choose. IMPORTATNT the information, specifications and illustrations in this book are on the basis of information available at the time it was written. The specifications, torques, pressures of operation, measurements adjustments, illustrations and other items can change at any time. These changes can effect the service given to the product. Get the complete and most current information before you start any job. Continental Distributors/Dealers have the most current information which is available. For a list of current Distributors/Dealers, refer to directory LIT1017 or www.wiscosninmotors.com. 1 ! WARNING Most sub-systems used in conjunction with Wisconsin Motors, LLC industrial engines including, but not limited to, radiators, hoses, fans fuel tanks, fuel lines or other fuel systems components, hydraulic pumps and generators, are not supplied by Wisconsin Motors, LLC, but are provided by the manufacturer of the end item in which the eingine is used. Some of the dangers assoicatied with servicing such items are generally mentioned in this manual; however, the appropriate handbooks and safety instructions procided by the manufactureer of the end item should always be consulted prior to undertaking any work on sub-systems attached to the engine, to avoid any hazards inherent to these sub-systems. ! WARNING Read and observe all individual safety warnings as you use this manual to operate, service or repair your engine. Always exercise caution whenever working with an engine or any associated system. Injuries may be caused by lack of care when working with, or near, moving parts, hot parts, pressurized systems, electrical equipment, or fuel systems. Always wear eye and hearing protection when working on or near engines. Improper attire such as loose clothing, ties, rings, soft shoes or bare feet could be hazardous and should be avoided when servicing engines. Use or service of the engine (including the use of modified parts or materials) not in accordance with manufacturer’s specifications could damage your engine or cause personal injury. ! WARNING Starting fluids or aids such as ether or gasoline must not be used in a diesel engine air intake system. The use of these fluids will cause severe internal engine damage and/or bodily injury. ! WARNING Some equipment and materials used in the overhaul or maintenance of an engine such as machine tools, electrical equipment, compressed air, solvents, diesel, gasoline or other fuels may be dangerous and can cause injury. Always observe safety precautions associated with these items. 2 CAUTION: Whn r placing guides do not ream sincetheseare all pre-reamed beforeb ing ferrox coated--any further reamingwill removethe coating. SEE TTP10148 FOR ADDITIONAL Cleaning INFORMATION Combustion Pocket Clean insert and combustion pocket. Inspect carefully for cracks. VALVESEAT INSERTS 4. Removeall carbon from combustion areas using scraper and wire brush. Thevalve seat inserts are held in place by a shrinkfit. 5. Clean the cylinder head thoroughly with a solvent or degreasingsolution and blow it off with air pressure,Inspect carefully for cracks, Inspect all valve inserts in the head and replace any that are loose, cracked or otherwise damaged.Use puller for removingfaulty insert. VALVEGUIDES 1. Clean the valve stem guides, removing lac* quer or other deposits. Do not use tools that removemetal. 2. Checkguides for wear by using a telescope gaugeand 1" micrometer. Replaceall guides that are worn bell-mouthed or have increased 0.038mm (.0015) in diameter. SeeLimits and ClearanceSection for maximum diameter permissible to determine actual amountit has increased. Remove all valve guides when necessary by pressing them out from the combustion chamberside. 3. Replaceworn guides as required by pressing in newguides to the correct depth as given in the valve guide data (TTP10148, page42). Whenrequired to replace with new insert, clean and counterbore for 0.25mm(o010") larger insert using cotmterboretool with correct fitting pilot. Whenmachining the counterbore, be sure to go deep enoughwith the tool to clean up the bottom so that the insert will have full contact to carry awaythe heat. Continental does not recommend installing newinserts having the sameoutside diameter as the one removed. Newinsert installation musthave a press fit. Chill insert in containerwith dry ice for 20 minutes before assembling. Insert maythen be installed in the counterbore using a piloted driver and arbor press, without the possibility of shearing the side walls. This assures it being seated firmly on the bottom of the counterbore. Removing Valve Guides from Combustion Chamber Side 3. Grindthe intake andexhaust valveseatsin the head in accordance with instructions in the ValveGuideData (TTP10148,page 42). Before removing the arbor, indicatethe seat. Total indicator readingof the run-out mustnot be morethan 0.05mm (.002"). Use a pilot havinga solid stemwith a longtaper, as all valveseats mustbe groundconcentricandsquarewith either new or wornvalve stemguideholes. VALVE GUIDE DATA Model TMDT Intake Exhaust A Valve Seat Angle 30 °15’ 45° 15’ B Diameter of Seat 39.77 (1.566) 33.50 (1.319) C Diameter of Choke 35.0 (1.38) 29.0 (1.14) D Distance (From Bottom of Cylinder Head) 43.0 (1.69) 43.0 (1.69) E Length of Guide 60.4 (2.38) 60.4 (2.38) F Inside Diameter Guide 8.71718.692 (.34321.3422) 8.717/8.692 (.3432/.3422) G Distance Intake to Exhaust 47.65 (1.876) Outside Diameter of Insert (Free State) 44.013/43.987 (1.733/1.732) 36.713/36.687 (1.445/1.444) Inside Diameter of Counterbore 43.910/43.885 (1.729/1.728) 36.610/36.585 (1.441/1.440) 4 NOTE: Oil leakagewill occur if any voids are left along these slots. 7. Dip the curing insert in clean water. Install insert until approximately 5/8" protrudes from slot. Cut off flush with oil pan rail. This insert insures complete cure of the RTV. Crankshaft Oil Sealin Block 3. Apply a light coat of cement(national oil seal or EC-847)to the butting ends of the crankshaft oil seal halves. Allow to becometacky before assembling. Lightly coat the crankshaft contact edge of the seal with graphite grease to prevent damageprior to use. 4. Install Crankshaft. 5. Apply a light coating of RTVGasket Material to surface "B" and graphite grease to the oil seal lip. Carefully install the combination rear bearing cap and filler block on to the dowels. Insert the capscrews and torque to 150-162 Nm (110-120Lb. Ft.) Install CuringInsert 8. Prior to installing oil pan, apply a small bead of RTVmaterial to the rear bearing cap and filler block as shown. Dowelholes with RTV ApplyingRTVto RearFiller Block 6. After the rear cap is in. place and torqued, inject RTVinto each side seal slot "D" as shown in illustration. Force the RTVinto the channels until a steady flow comes out the corner chamfers. ~/ ApplyingRTVto RearBearingCapandFiller Block OIL PUMP The oil pump is assembled to the front of the cylinder block and front main bearing cap and is held in place by capscrews. The extended portion of the body acts as a pilot, fitting closely in a counterbore in the block and bearing cap; maintaining a definite relationship between the crankshaft and the oil pump assembly. Installing RTVin RearFiller BlockChannels The pumpis driven by a hardened key mounted in the crankshaft. INSTALLING Whenengine is completely assembled and filled with proper oil, (See Lubrication Sec.) set tappets according to the following chart: OIL PAN Before assemblingthe oil pan makesure the contactsurfacesare flat andclean of anygasket materialor oil. A form-in-placegasketmaterialis usedfor sealing the engineoil panto the crankcase.The form -in-place gasketshouldbe applied to the oil pan and filler blocksas shown here. MODEL INTAKE EXHAUST TMDT/TMD 0.36ram (.014") 0.46mm (.018") Tighten the screws in accordancewith limits prescribed in the torque chart--to avoid loosenessor overstressing. NOTES: 1. Parts must be assembled within 20 minutesafter applying gasket material. 2. Caution must be used in handling the gasket materials. ReadLabels. Setting i ~.(See ~ Tappets Notes 1 and 2) J~’J Form.in.Place gasketmatedalappliedto oil panandfiller block as shown || ~, Ill JJJ I~1 ~] This area of Form-" ~n PI ¯ ace gasket must intersect vertical cavities both sides ~ -~.~J Top ¯ View ~ Crankcasecontact face~""RearBearingCapandFiller BI (Seenotea1 and 2)/=~..~...---~(,0---) Form-in-Place gasket matedal to plug holes. MIn 6.0ram(.236) deepfrom contact surface. (See Notes 1 and 2) Form.in.Place gasket material must extend from side sea, recess to inner edgeof seal re- #/ tMPORTANT-- After assembly ol the ~ %--r "~’’’-a¢’~ ~’ J bearing capto the crankcase,fill bearing =~/.5ram(.30)/ cap side slots to capacity using RTVand _ _ " ............ ,~ ~" ~,.,,,~01 lOJJ .syringe furnished in kit. Sealant must /~__----~,~’]Dleed out chamferat crankcase split line. ~ "~ssli~[]IThe two curing inserts (pipe cleaners) in~ r j cluded in the kit must be used as follows: ~ ,f~ Dip the curing insert into a container of ~ J J J, ’~,~," II lean water and insert full length into bearing capside slot cavities filled with RTVmaterial, makingcertain the insert is centrally locatedin side slot. install insert until approximately %" protrudes fromslot. Cut off flush with oil panrail. or..~_t(~°~ ~Bottom View Oil Pan Contact Face Typical RTVOil Pan Application for the Diesel Overhead Valve Engine. 6 TURBOCHARGER DESCRIPTION, OPERATION AND TROUBLESHOOTING Garrett/AiResearch turbochargers are built for dieseland gasolineinternalcombustion engines.The turbocharger is composedof an exhaust-gas-driven turbineand a radialair compressor on a commonshaft. The turbineand compressorwheelsare mountedat oppositeendsof the shaft, whichis enclosedand supportedby a center housing.The turbineand compressor wheelsare enclosedby casthousingsattachedto the centerhousing. The turbineis madeup of a cast turbine wheel,a wheelshroud,and a housingthat directsthe flow of gas throughthe turbine.The inletto the turbineis at the outerdiameterof the housing.Exhaust gas flowsinward,past the bladesof the turbinewheel,and exitsat the centerof the housing’sdiameter.This meansthe turbineis a centripetal, or radialinflow, machine.(SeeFigure 1.) The compressor is madeup of a castcompressorwheel,a backplate, and a housing that directsthe flow of air throughthe compressor. The inletto the compressor is at the centerof the housing’sdiameter. Air flowsoutward,past the blades of the compressor wheel,and exitsat the outer diameterof the housing.This means the compressor is a centrifugal, or radial-outflow, machine. The center housing supports the compressor andturbine wheelshaft in a pair of floating journal bearings. (See Figure 2.) Passages drilled in the center housingdirect oil (from the enginelubricating system)from the inlet port to oil groovesmachinedin the center Figure1 Turbineand Compressor Operation housing bearing bores. Thesegrooves align with holes in the journal bearings. Oil flows throughthe holes in the bearingsto lubricate and cool the bearing bores and shaft journals. Oil is also directed from the inlet port through a passagein the backplate to the thrust bearing. Oil drains from the center housingby gravity. Sealsare installed at eachend of the shaft betweenthe journal bearing and the adjacent wheelto prevent lubricating oil from entering the compressorand turbine areas and to reduce the flow of gases from the compressor and turbine into the center housing. Figure 2 showsa sectional view of a typical turbocharger. 4 5 23 6 7 8 9 10 11 12 13 22 21 20 19 18 17 16 Figure 2. Sectional View of TypicaITurbocharger ITEM I. 2. 3. 4. 5. 6. 7. 8. 9. I0. Ii. 12. 13. NOMENCLATURE SELF-LOCKINGHEXAGON NUT COMPRESSOR HOUSING COMPRESSOR WHEEL PISTONRING THRUSTCOLLAR CLAMP LOCKPLATE MACHINEBOLT THRUSTBEARING CENTERHOUSINGASSY JOURNALBEARING WHEELSHROUD PISTONRING ITEM NOMENCLATURE 14. 15. 16. 17. 18. 19. 20. 21. 22. 23. TURBINEWHEELASSY TURBINEHOUSING CLAMP LOCKPLATE MACHINEBOLT RETAININGRING MACHINEBOLT LOCKPLATE SEAL RING BACKPLATE ASSY THEORY OF OPERATION TURBOCHARGER During operation of a turbochargedengine, exhaust gas from the engine exhaust manifold flows into the turbine. (See Figure 3.) The exhaust gas pressure and the heat energy extracted from the gas causethe turbine wheel to rotate which, in turn, causesthe compressor wheelto rotate. TURBINE COMPRESSOR EXHAUST INLET The cooledand expandedexhaustgas leaving the turbinewheelis directedby the turbinehousingto the engineexhaust system,whichexpelsit to the atmosphere. Rotationof the compressor wheeldraws ambientair throughthe engineair cleaner into the compressorhousing,whereit is compressed and directedthroughducting to the engineintakemanifold. The increaseddensityof the air deliveredto the enginecylinderspermitsa corresponding increasein the amountof fuel thatcan be deliveredto the cylinders whilemaintaining the air-fuelratio requiredfor propercombustion. Because enginepoweroutputchangeswith the amountof fuelburned,the increasein the amountof fuel deliveredresultsin an increasein enginepoweroutput. Shaftrotationalsoactivatesthe turbochargeroil seals.At the oil slinger groove,thereis a difference in tip speed betweenthe bottomof the grooveand the largerdiameterof the shaft.Centrifugal forcethrowsthe oil outwardto the walls of the centerhousing.Oil is not allowed past the groovetotheturbineor compressor areaswhilethe shaftis rotating. ENGINE 6LOCK ~ FILTERED AMBIENTINLET AIR iHiHi~cOMPRESSEO AIR [~ENGINE EXHAUSTGAS EXHAUST GAS ~TURBINE Figure 3. Turbochargerand Engine Operation PREVENTIVE MAINTENANCE Since no calibrationor adjustmentprocedures are possibleon in-serviceturbochargers,and since all lubricationrequirementsare suppliedby the engine on which the turbochargeris mounted,no periodic maintenancein the usual sense is requiredon a Garrett/AiResearch turbocharger. In addition, due to the wide variationin operatingmodes and conditions to which turbochargersare subjected, maintenanceproceduresbased upon specificnumbers of engine operating hours, vehicle miles, or calendarperiods are not practicable. Therefore,preventivemaintenanceof a turbochargerconsistsprimarily of ensuringthat the integrityof the turbochargerand engine as a system is maintained,and that the engine is not operatedin a manner that is detrimental to the turbocharger. CAUTION:Do not attempt to dismantle the turbocharger. Service may only be performed by specially trained personnel. Improper torques, clearances, or adjustments can ruin the unit. lO PROPER OPERATING PROCEDURES ON-ENGINE TROUBLESHOOTING The most commonsymptomsof turbocharger failureare relatedto engineperformance: Turbochargeroperation is entirely automatic. No special proceduresbeyondthose listed below are required. As engine poweroutput increases and decreases, the turbocharger respondsto deliver the required amountof air. To ensure maximum turbocharger service life, observethe following precautions: ¯ ¯ ¯ ¯ Lackof power Excessiveexhaustsmoke Unusualnoise Excessiveoil or fuelconsumption. Of course,any of thesesymptomscouldbe the resultof an internalengineproblem, and mightnot involvethe turbocharger at all. CAUTION: 1. Do not operatethe engineabove idle beforenormalengineoil pressurehas been established. Applyingfull throttleimmediatelyupon initialstart-upcan operate the turbocharger at excessivespeed beforethe bearingsreceiveadequatelubrication(thisis referredto as "oil lag").Operationof the turbocharger withouta sufficient oil supplyfor a period as shortas 5 secondscan causebearing failure. 2. During exposure to temperatures low enoughto congealengine oil, or following long periods of nonoperationcrank the engine without starting until normaloil pressurehas beenestablished. Thenstart the engine and run at idle speedfor a few minutesbefore operating at higher rpm. Before the turbocharger is removedfrom the engine, the turbochargerandits installation should be examined.In manycases, the brief troubleshootingprocedureoutlined in this section will help to determinewhetherthe turbochargeris at fault in the complaint.Also, external or engine-related causesof turbocharger failure maybe found. Suchproblems must be corrected before another turbocharger is installed, or the newunit will fail just as the old onedid. Thetroubleshooting procedure contains these four steps: 1. Examinethe exteriorof the turbochargerand its installation. 3. After an engine oil changeor any service that involves oil drainage,pre-oil the turbocharger by cranking the engine as aboveuntil normaloil pressure has beenestablished. Thenstart the engineand run at idle speedfor a few minutes before operating at higher rpm. 2. Examinethe turbinewheeland housing. 3. Examinethe compressorwheel and housing. 4. Beforeengineshut-down,operatethe engineat low idlespeedfor a few minutes to allowthe turbocharger to decelerate. Shuttingthe enginedown froma high operatingspeedcan causethe turbocharger to continueto rotateafterengineoil pressure has droppedto zero,damagingthe turbocharger bearings. 11 4. Check the rotatingassemblyfor noiseor excessive play. TURBIN£ I~ASTIRONHOUSINg) The following detailed explanations of these steps tell how to makethe inspection and what the results mean. Remember,these steps are to be taken before the turbocharger is removed from the engine. Any external or engine-related faults found must be corrected before a replacement turbocharger is installed. 1. EXAMINE THE TURBOCHARGER EXTERIOR AND INSTALLATION Visually check for: Missing or loose nuts and bolts ¯ ¯ Loose or damaged intake and exhaust ducting ¯ Damagedoil supply and drain lines Cracked or deteriorating turbocharger ¯ housings ¯ External oil or coolant leakage. Figure 4. Turbine and Compressor Inlet and Outlet Identification Correct any installation problems. If turbocharger parts are damaged, the unit should be overhauled after completion of the remainder of this troubleshooting procedure. 2. INSPECT TURBINE WHEEL AND HOUSING / WARNING OPERATION OF THE TURBOCHARGER WITHOUT THE INLET DUCT AND AIR FILTER CONNECTEDCAN RESULT IN PERSONAL INJURY AND DAMAGE TO EQUIPMENT FROM FOREIGN OBJECTS ENTERING THE TURBOCHARGER. OPERATION OF A TURBOCHARGER WITH DAMAGED COMPONENTS MAY RESULT IN SERIOUS INJURY. DUE TO VERY HIGH ROTATION SPEEDS, SMALL IMBALANCES MAY CAUSE DISINTEGRATION OF TURBOCHARGERUNIT. Figure 5. Turbine Wheel-to-Housing Rub Removethe ducting from the turbine outlet (Figure 4). Using a flashlight, check the turbine for wheel-to-housing rub (Figure 5), evidence of oil leakage (Figure 6), or foreign object damage. Foreign object damageto the turbine is not usually visible through the turbine outlet unless the damageis severe. 12 Try to avoid long periods of idle. Continued low pressure exhaust gasses and low turbocharger rotation speed mayallow oil to seep past the shaft seal. Makesure to properly maintain the engine lubrication system, as outlined in the service manual. Contaminated oil can restrict the turbocharger oil drain line and force oil past the shaft seal. ¯ Other possible causes of oil on the turbine: ¯ oil drain line damage ¯ engine crankcase pressurization caused by restricted breather or excessive blowby ¯ over filled crankcase Foreign Object / Figure 6. Turbine Oil Leakage Whe I-to-Housing WARNING OPERATION OF THE TURBOCHARGER WITHOUT THE INLET DUCT AND AIR FILTER CONNECTEDCAN RESULT IN PERSONAL INJURY AND DAMAGE TO EQUIPMENT FROM FOREIGN OBJECTS ENTERING THE TURBOCHARGER. Rub If wheel rub is found, and the housing attaching hardware is secure, then the turbocharger is probably damaged internally and must be overhauled. Oil Damage L akage If oil deposits are found, determine whether the oil has come from the engine exhaust or from the turbocharger center housing. If the oil has comefrom the engine, consult the engine service manual and correct the problem. If oil deposits on the wheel are heavy, the turbocharger should be removed and serviced by an authorized service center. 13 If foreign object damage to the turbine is visible, the turbocharger must be overhauled. Such damage destroys the wheel’s balance and causes internal damage to the seal bores and journal bearings. Be sure to find the source of the foreign object. In many cases, the object has come out of the engine, and there may be engine damage as well. 3. EXAMINE COMPRESSORWHEEL AND HOUSING. / WARNING OPERATION OF THE TURBOCHARGER WITHOUTTHE INLET DUCTAND AIR FILTER CONNECTED CAN RESULTIN PERSONALINJURY AND DAMAGETO EQUIPMENT FROM FOREIGN OBJECTS ENTERING THE TURBOCHARGER. OPERATION OF A TURBOCHARGER WITH DAMAGEDCOMPONENTSMAY RESULTIN SERIOUSINJURY. DUE TO VERY HIGH ROTATIONSPEEDS, SMALL IMBALANCESMAY CAUSEDISINTEGRATION OF TURBOCHARGER UNIT. Remove the ducting from the compressorinlet (Figure 4). Usinga flashlight, checkthe compressor for wheel-to-housingrub (Figure 7), evidenceof oil leakage(Figure 8), or foreign object damage (Figure 9). Figure 8. CompressorOil Leakage Figure9. Figure 7. CompressorWheel-to-Housing Rub 14 CompressorForeign Object Damage Wh el-to-H u ing Rub creates a slight vacuumin the compressor housing, sucking oil from the center housing past the shaft seal and into the compressor housing. In this case, nothing is wrongwith either the engineor the turbocharger, but frequent compressorwheel and housing cleanup is recommended. If wheelrub is found,and the housing attachinghardwareis secure,then the turbocharger is probablydamagedinternallyand mustbe overhauled. Foreign Object Damage 011 L akage / Oil leakage into the compressorcan be causedby long periods of idling or a restricted oil drain line, as discussedin Step2. Check the items listed there. Remember, if oil deposits are heavy, the unit should be removed and serviced. If the leakage wascausedby a restricted drain line, the center housingmay be full of sludgedor cokedoil andthe unit mayrequire overhaul. Be sure the causeof the leakagehas beencorrected before installing another turbocharger. WARNING OPERATION OF A TURBOCHARGER WITH DAMAGEDCOMPONENTSMAY RESULTIN SERIOUSINJURY. DUE TO VERY HIGH ROTATIONSPEEDS, SMALL IMBALANCESMAY CAUSEDISINTEGRATION OF TURBOCHARGER UNIT. Oil leakage into the compressorcan also be causedby a restricted air intake system.If the turbochargercannotbreathe freely, oil pressure in the center housing can exceedair pressure in the compressorhousing. Oil will be forced past the seals into the compressorarea. In this case, there is probably nothing mechanically wrongwith the turbocharger.If oil deposits are heavy, the unit should be removed and serviced. Besure to correct the air intake problem, which mayhave been caused by a dirty air cleaner or debris or damage in the intake ducting. If the compressor wheelhas been damaged by a foreignobject,the turbocharger mustbe overhauled, as explainedabove. In most cases,the foreignobjecthas come throughthe intakesystem.Check for looseducting,or debristhat may have been left in the system.The object or piecesof the wheelmay haveentered the intakemanifoldand engine,so be sure to checkfor enginedamagebefore installinganotherturbocharger. 4. CHECK ROTATING ASSEMBLY FOR NOISE OR EXCESSIVE PLAY . If no damageis visiblein the turbine and compressor areas,spinthe rotating assemblyby hand.It shouldspin freely withno drag or grindingnoises. Finally, oil leakageinto the compressorcan be causedby frequent use of the engine as a brake; for example,descendinga long grade with the transmissionin low gear. During this type of operation, engine air demandcan be high, but energyinput to the turbine is low and so turbochargerrotating speedis low. The engine draws air through the compressorand Side-loadeach wheelby handwhileturning the assemblyand checkwhetherthe wheelsare contactingtheir housings.If contactis seen,the turbocharger is probablyworn or damagedinternally and mustbe overhauled. 15 Table 1. Troubleshooting-Engine Lacks Power or Engine Exhaust Emits Black Smoke SYMPTOMOR TROUBLE OR .~J ENGINE LACKS POWER ENGINE EXHAUST POSSIBLE CAUSESAND REMEDIES ~ (See Notes A and H*) Dirty air cleaner elementor inlet screenrestricted in oil bath air cleaner I YES Viscosityof oil in oil bathair cleaner too high intake-manifold duct connections -- NO I YES Replaceair cleaner elementor clean inlet screenin oil bath air cleaner. I YES Referto engine service manual. Referto engine service manual. (See Note K*) Leakageat turbocharger mounting flange Turbochargerrotating assemblybinding or dragging ! YES I YES Checkcondition of gasket at turbocharger mounting flangeandtigt~ten loose bolts. Performtroubleshooting procedures outlinedin Table5. Leakageat engine intake manifold YES Tighten duct connections as required. (See Notes D and F*) --NO~ NO-.~,, YES Serviceair cleaner in accordance with manufacturer’s service manual. (See NotesD, F, and G*) Leakageat engine exhaust manifold (See Notes B and C*) (See Note A*) (See Note H*) NO~ Restricted duct be- | tweenair cleaner and turbocharger NO. compressor YES Remove restriction or replace damaged parts as necessary. (See Note H*) [~ Restricted duct between compressor and engine intake ~- N 0 ,--~,manifold. J I YES Remove restriction or replace damaged parts as necessary. Restricted engine exhaust System (after turbocharger) - NO~ Restricted engine intake or exhaust manifold I YES I YES Remove restriction or replace damaged parts as necessary. Refer to engine service manual. Enginemalfunction (fuel systemcomponent, valves, valve timing, rings, pistons,etc.) ~ YES Refer to engine service manual. *Shownon Table 8 Servicemayonly be performed byspecially trained CAUTION:Donot attemptto dismantlethe turbocharger. personnel.Improper torques,clearances,or adjustments canruin the unit. 16 Table 2. Troubleshooting-Engine Exhaust Emits Blue Smoke SYMPTOM OR TROUBLE ENGINE EXHAUST EMITS BLUE SMOKE POSSIBLE CAUSES AND REMEDIES ~ (See Notes A and H*) Dirty air cleaner elementor inlet screenrestricted in oil bath air cleaner (See Note,A*) mNO oil bathair cleaner tooofhigh _~ Viscocity oil in (See Notes B and C*) -NO intake-manifold duct connection __~ Loose compressor-to- YES (See Note F*) -NO .-~=. Leakageat engine intake manifold. YES Replaceair cleaner elementor clean inlet screenin oil bath air cleaner, Serviceair cleaner in accordance with service manual. Tighten duct connections as required. Referto engine service manual. (See Note H*) Pluggedengine oil filter I YES Serviceoil filter in accordance with engineservice manual. --NO~ Restricted duct betwee~air cleaner and turbocharger compressor Seal leakage at compressorend of turbocharger Enginemalfunction (rings, pistons, valves,etc.) I YES I YES I YES Remove restriction or replace damaged parts as necessary. Performtroubleshooting procedures outlined in Table6. Refer to engine service manual. *Shownon Table 8 Servicemayonly be performed by speciallytrained CAUTION:Donot attemptto dismantlethe turbocharger. personnel.Improper torques,clearances,or adjustments canruin the unit. 17 Table 3. Troubleshooting-Engine Oil ConsumptionExcessive SYMPTOM OR TROUBLE ENGINE OIL CONSUMPTION EXCE~IVE POSSIBLE CAUSESAND REMEDIES Wrongtype or viscosity of engine lubricatingoil I YES Seal leakageat compressorendof tud:>ocharger (indicated by oil in housingor on wheel) I YES Seal leekageat turbine end of turbocharger (indicated by oil in housingor on wheel) I YES Performtroubleshooting proceduresoutlined in Table6. Performtroubleshooting procedures outlined in Table7. Oil in engineexhaust manifold(indicating malfunctionof rings, pistons,valves, etc.) I YES , Serviceengineiube systemin accordance with engineservice manual. Refer to engine service manual. CAUTION:Donot attemptto dismantlethe turbocharger. Servicemayonly be performed by specially trained personnel. Improper torques,clearances,or adjustments canruin the unit. 18 Table 4. Troubleshooting-Noisy Turbocharger SYMPTOM OR TROUBLE TURBOCHARGER NOISY POSSIBLE CAUSESAND REMEDIES (See Notes A and H*) Dirty air cleaner / elementor inlet screenrestricted in oil bath air cleaner (See Note H*) N~ Foreign object or material in compressor inlet ducting or compressor housing Foreign object or material in compressot-to-intake-manifold ducting Foreign object in engine exhaust system t NO- YI~S , . LI Replaceair cleaner elementor clean inlet screenin oil bath air cleaner. Remove foreign object. Repairair intake systemand have turbochargerserviced as necessary. Carbonbuild-up in turbine housing Turbochargerrotating assemblybinding or dragging I YES I YES Clean housingor have turbochargerserviced if required.Check engineoperating procedures. Remove foreign object. Repairair intake systemand have turbochargerserviced as necessary. Remove foreign ob)eEl. Repairexhaust systemand haveturbocharger servicedas necessary. Performtroubleshooting procedures outlined in Table5. "Shownon Table 8 CAUTION:Donot attemptto dismantlethe turbocharger. Servicemayonly beperformed by speciallytrained personnel.Improper torques,clearances,or adjustments canruin the unit. 19 Table 5. Troubleshooting-Turbocharger Rotating AssemblyBinding or Dragging SYMPTOM OR TROUBLE TURBOCHARGER ROTATING ASSEMBLY BINDING OR DRAG- POSSIBLE CAUSESAND REMEDIES ~ (See Note J*) Damagedcompressor wheeldue to foreign object impact I YES NO-"~ Damagedturbine wheeldue to foreign object impact Compressorwheel or turbine wheelrubbing on housing I YES I YES I YES Cleanand repair engine exhaust system as necessary.Have turbochargerserviced. Wornbearings, shaft journals, or bearing bores. Have turbochargerserviced. Cleanandrepair air intake systemas necessary.Clean compressoror have turbochargerserviced. t Cleanandrepair air intake systemas necessary.Have turbochargerserviced --NO~ Excessive dirt buildup in compressor(on housingor wheel) ~ NO. (See Note I*) I Excessive carbon build-up behind turbine wheel Cokedoil or combustiondeposits. Haveturbocharger serviced. m NO ~1 Sludged or coked center housing. 1 yl~$ Serviceenginelubrication system. Haveturbocharger serviced. *Shownon Table 8 CAUTION: Do not attempt to dismantle the turbocharger. Service mayonly be performed by specially trained personnel. Improper torques, clearances, or adjustments can ruin the unit. 2O Table 6. Troubleshooting-Seal Leakage at CompressorEnd of Turbocharger SYMPTOMOR TROUBLE SEAL LEAKAGEAT COMPRESSOREND OF TURBOCHARGER POSSIBLE CAUSESAND REMEDIES Dirty air cleaner elementor inlet screenrestricted in oil bath air cleaner oil bath air cleaner too high NO I YES ~ Restricted duct betweenair cleaner and turbocharger compressor Loosecompressor-tointake-manifold duct connection I YES I YES Replaceair cleanel elementor clean inlet screenin oil bath air cleaner. Serviceair cleaner in accordance with service manual. Remove restriction or replace damaged parts as necessary. Leakageat engine intake manifold Restricted turbochargeroil drain line Pluggedengine crankcase breather Worn or damagedcompressor wheel Tighten duct connections as required. I YES I YES I YES I YES Refer to engine manufacturer’sservice manual. Clean and remove restriction or replaceoil drain line as required. Refer to engine manufacturer’sservice manual. Cleanand repair air intake systemas necessary. Overhaul turbocharger. Turbochargerbearings, bearingbores, or shaft journals worn ! YES Haveturbocharger serviced. t NO. Enginemalfunction (excessivepiston blowbyor high internal crankcase pressure) I YES Referto engine service manual. CAUTION:Donot attemptto dismantlethe turbocharger. Servicemayonly be performed by speciallytrained personnel. Improper torques,clearances,or adjustments canruin the unit. 21 Table 7. Troubleshooting-Seal Leakage at Turbine End of Turbocharger SYMPTOMOR TROUBLE SEAL LEAKAGE AT TUR81NE END OF TURBOCHARGER POSSIBLE CAUSESAND REMEDIES Pluggedengine crankcase breather Restricted turbochargeroil drain line Sludged or coked center housing I YE~ I YES I YES I YES Oil will burn away. NOaction required. Referto engine service manual. Turbochargerbearings, bearing bores, or shaft journals worn Enginemalfunction (excessivepiston blowbyor high internal crankcase pressure) Excessivepre-oiling I --NO--~=,- Cleanand remove restriction or replaceoil drain line as required. t NO. Servie enginelubrication system. Overhaulturbochsrger. I YES YES Haveturbocharger serviced. Refer to engine service manual. CAUTION:Donot attemptto dismantlethe turbocharger. Servicemayonly be performed by specially trained personnel.Improper torques,clearances,or adjustments canruin the unit. 22 Table 8. Troubleshooting ProceduresNotes A. Refer to the engine service manualfor inspection requirementsand replacementspecifications. B. With engine stopped, check duct clamping devices for / tightness. WARNING "Starting fluid" shouldneverbe usedto start an engine.Seriouspersonalinjury mayresult from improperuseof suchmixtures. Explosionmayresult from improperuse. Useonly for the diagnostic purposeoutlined below.Neverapply"starting fluid" or similar mixturesto hot surfaces. Ce With enginerunningat idle speed,lightly sprayintake duct connectionswith "starting fluid." Leaksat connectionswill be indicated by an increase in enginespeeddueto the starting fluid being drawninto the compressorand pumpedinto the engine combustionchambers. De With enginerunning at idle speed, checkexhaustduct connectionsfor leaks by applying lightweight oil or liquid soapto areas of possible leakageandcheckingfor bubbles. Exhaust gas leakagebetweenthe engineblock and the turbochargerinlet will also create a noise level change. With engine running at idle speed, check for unusual noise and vibration. If either conditionis noted, shut down the engine immediatelyto protect the turbochargerand engine from further damage. With the engine stopped, check the turbochargershaft wheel assemblyfor damage as outlinedin Note I, below. With engine running,a change in the noise level to a higher pitch can indicate air leakage between the air cleaner and the engine or a gas leak between the engine block and the turbochargerinlet. Exhaust gas leakage may be indicated by heat discolorationin the area of the leak. He With the engine running,noise level cycling from one level to another can indicate a plugged air cleaner, a restriction in the air-cleaner-to-compressor duct, or a heavy build-up of dirt in the compressorhousing or on the compressorwheel. Internal inspectionof the center housing can be accomplishedby removing the oil drain line and looking through the oil drain opening. When a sludged or coked conditionexists, a heavy sludge build-upwill be seen on the shaft between the bearing journalsand in the center housing from the oil drain opening back to the turbine end. Thorough cleaningof the air intake system is essential followingcompressor wheel damage due to foreign object impact. In many cases, metal pieces from the wheel become imbedded in the air cleaner element. If the element is not changed, these metal pieces can be drawn into the replacement turbochargerand cause it to fail in the same manner as the original unit. 23 Table 8. Troubleshooting ProceduresNotes (Continued) With the air inlet and exhaustgas ducting removedfrom the turbocharger, examine both the compressorand turbine wheels for blade damage.Examinethe outer blade tip edgesfor evidenceof rubbing on housingsurfaces. Ko Turn the rotating assemblyby handand feet for dragging or binding. Pushthe rotating assemblysidewayswhile rotating to feel for wheelrub. If there is any indication of rubbing havethe turbochargerserviced. If the rotating assembly rotates freely andthere is no evidenceof binding or rubbing, it can be assumed that the turbochargeris serviceable. E D 24 TURBOCHARGER REMOVAL 1. Disconnectoil drain line (A) at engineblock andallow oil to drain. 2. Disconnectoil feed line (B) at engineblock. 3. Remove air inlet ducting betweenturbocharger and air cleaner (not shown). compressoroutlet hose (C) at intake manifold. 4. Remove 5. Disconnectexhaust pipe (D) from turbine outlet. 6. While supportingthe entire turbochargerunit, disconnectturbine inlet pipe (E) exhaust manifold and removeturbocharger assemblyfrom the engine. 7. After the entire assemblyis removed,disconnect all the above-mentionedhoses and lines (A,B,C,E) from the turbocharger. Also removeoil drain line flange (F). 8. Cover all turbocharger openings as soon as removalis complete. TURBOCHARGERINSTALLATION Remove all protective coverings from turbocharger openings. CAUTION: Do not allow any dirt or foreign matter to enter the openingsduring installation. 2. Usinga newstainless steel gasket, mountthe turbine inlet pipe (E) on the turbine housingflange. Use3/8 grade8 bolts andtorque 40 ft. Ibs. 3. Also using a newstainless steel gasket, mountthe turbocharger assemblyon the engineexhaustoutlet flange. Use3/8 grade8 bolts andtorque 40 ft. Ibs. 4. Connect the compressorhose (C) betweenthe compressoroutlet and engine intake manifold. Be sure to tighten clamps. 5. Connectthe oil feed line (B) fromthe engineto the oil inlet port of the turbocharger center housing. CAUTION: Donot use any type of pipe thread sealant at the oil inlet port. This material can clog internal oil passages. Withoutallowing the engineto fire, crankthe engineuntil a steady streamof oil is seendraining from the turbochargercenter housingoil drain port. Usinga newgasket, connectthe oil drain line flange (F) to the turbochargeroil drain outlet. Use3/8-16x1 bolts andtorque25 ft. lb. Connectoil drain line (A) betweenflange (F) and engine. Makesure the slopes downward the full length of its course and has no sharp bendsor kinks. Tighten clamps. Using a newstainless steel gasket, connect the exhaustpipe (D) to the turbocharger. 10. Connectducting betweenair cleaner and turbocharger compressorinlet. 11. Checkall connectionsfor leaks. SERVICE AND PARTS Available from your Authorized WISCONSIN Service Center ! WARNING ! California Proposition 65 The engine exhaust from this product contains chemicals known to the State of California to cause cancer, birth defects or other reproductive harm. WISCONSIN MOTORS, LLC SALES OFFICE: 2020 Fletcher Creek Drive, Memphis, Tennessee 38133 Phone: (901) 371-0353 or Toll Free (800) 932-2858 www. wisconsinmotors.com JUN 2006 TTP10069