1
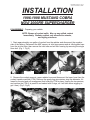
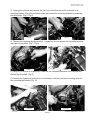
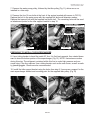
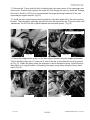
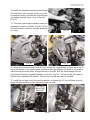
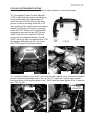
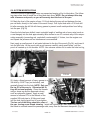
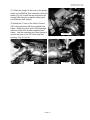
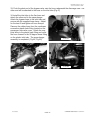
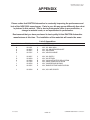
Kit # 1001814-1
Owner’s Installation Manual
for the
PAXTON AUTOMOTIVE
NOVI 2000 SUPERCHARGER
for
1996-1998
MUSTANG COBRA
(NON-TUNED KIT)
PAXTON AUTOMOTIVE . 1300 Beacon Place . Oxnard, CA 93033
(805) 604-1336 . FAX (805) 604-1337
P/N 4809609d
COPYRIGHT 2000 PAXTON AUTOMOTIVE
ASSEMBLY MANUAL for the
1996-98 MUSTANG COBRA
Introduction
Congratulations! You have purchased the finest street supercharger available for the
Mustang Cobra. The centerpiece of this kit is the High Efficiency PAXTON Supercharger, a
mechanically driven centrifugal blower.
This kit comes with all the parts you will need to install the supercharger. The instruction
manual has been edited in order of sequence, and photographs and drawings have been
included to illustrate the text. This will allow you quick part identification and orientation.
The installation will require metric and SAE sockets and wrenches, a hand drill and bits, an
Air Hammer (and compressor), a 3/8” x 18 NPT tap, screwdrivers, and a supply of buckets for
the reserve of coolant and oils.
We suggest that you obtain a copy of a Mustang shop manual for your model of car. This
may be obtained from your dealer, or may be ordered by mail from Helm Publications at (800)
782-4356. Become familiar with the details of your car’s system. If it is not operating within
normal parameters, we do not recommend the installation or use of the supercharger.
For the quickest installation time, we suggest that you read this manual thoroughly before
beginning. Make sure that you understand the process, have identified the areas of the car
that you will be working on, and have the tools that you will need on hand. The average
installation time is 8 to 10 hours, but your time will depend on your working conditions, experience installing superchargers, personal skill level, and preparedness for the job. This estimate does not include time for the initial vehicle inspection, cleaning, fine tuning, or troubleshooting. Once again, we recommend reading the manual before beginning the process.
We are available for tech support at (805) 604-1336, Monday through Friday, 7AM - 3 PM
PST.
After reading the manual, verify that all major assembly groups are present in the main kit
box. As you remove a box or bag, note the identification label and compare it to the parts list.
PAXTON AUTOMOTIVE makes every effort to insure that all parts
are included in the box. If you discover that you are
missing any part, or that a part was damaged in shipping,
call PAXTON immediately. DO NOT begin installation if a part is missing.
Failure to contact PAXTON prior to beginning installation
will result in a charge for the missing part.
We suggest that the engine compartment be cleaned before the installation. You can clean
the engine with a pressure washer that is found at self-serve car washes. Use a safe-for-aluminum cleaner/degreaser, and cover the distributor and any electronics with a plastic bag to
prevent water from entering.
P/N 4809609
PAGE 1
COPYRIGHT 2000 PAXTON AUTOMOTIVE
ASSEMBLY MANUAL for the 1996-98 MUSTANG COBRA
You are undoubtedly eager to get started, but please take a little more time to insure that your
safety is not in jeopardy. A moment’s lack of attention may cause a serious injury to you, or
to someone else who happens to be standing around. By following some simple safety precautions, you can avoid many potential dangers. The following list is not meant to be a comprehensive list, but rather it is meant to make you aware of some of the risks, and encourage
you to take a safety minded approach to your work area.
Never rely solely on a floor jack when
working underneath a vehicle. Always
use jack stands that are rated for the
weight of your vehicle, use them at the
recommended lift points, and place your
vehicle in ‘PARK’ or ‘FIRST’ gear with the
parking brake set.
Always use eye protection when using power
tools, such as drills, saws, and grinders, or
when working underneath a vehicle.
Never smoke, use an open flame, or have spark
producing items around gasoline or flammable
objects. Always have a fire extinguisher that
is rated for chemical and electrical fires handy
when working on motor vehicles. Also, make sure
that the extinguisher is fully charged.
Operate engines only in a well ventilated area. Carbon
Monoxide, gasoline, and solvent vapors
are colorless and sometimes odorless, and
may asphyxiate or explode without
warning.
Always disconnect the battery from
your engine before doing work on the electrical
or fuel systems, or doing underdash work.
The chemicals used in the vehicle systems,
such as oils and coolants, are poisonous. Clean
up any spills immediately, and dispose of
waste materials properly. Pets, wild animals, and
children may die if they ingest the liquid.
PAXTON Automotive thanks you for your purchase. We welcome your comments and suggestions to help us improve our product.
P/N 4809607
PAGE 2
COPYRIGHT 2000
PAXTON AUTOMOTIVE
ASSEMBLY MANUAL for the
1996-98 MUSTANG COBRA
INSTALLATION
1996-1998 MUSTANG COBRA
NOVI 2000RR SUPERCHARGER
DISASSEMBLY-- Preparing your vehicle.
NOTE: Beware of coolant spills. Mop up any spilled coolant
immediately. Radiator coolant very attractive to animals,
and highly poisonous.
1. Drain approximately one gallon of coolant from the radiator and disconnect the negative
side of the battery. Disconnect the MAF sensor, air inlet temp sensor and air idle bypass hose
from the air inlet tube, then remove the inlet tube and air filter housing by removing the single
8mm bolt. (Fig. 1. Fig 2)
FIG 1
FIG 2
2. Remove the coolant reservoir, upper radiator hose and disconnect the lower hose from the
coolant transfer manifold (CTM). Remove the spark plug wire retainer atop the alternator, followed by the stud and nut arrangement that holds the CTM in place. Unplug the two sensors,
and remove the CTM (it is press-fit and sealed with O-rings, so it will take some wiggling to
get it free). (Fig 3, Fig 4)
FIG 3
P/N 4809609
FIG 4
PAGE 3
COPYRIGHT 2000 PAXTON AUTOMOTIVE
ASSEMBLY MANUAL for the
1996-98 MUSTANG COBRA
3. Unplug the coil pack and remove the four 7mm bolts that secure the coil pack to its
mounting bracket. Place the coil pack aside and remove the mounting bracket by removing
the three bolts. (Fig 5, Fig 6)
FIG 5
FIG 6
4. Remove the tensioner limiting bracket . Loosen but do not remove the four bolts securing
the water pump pulley. (Fig 7, Fig 8)
FIG 7
FIG 8
5. Using a 1/2” ratchet or breaker bar, rotate the belt tensioner clockwise then remove and
discard the drive belt. (Fig 9)
6. Remove the uppermost stud bolt on the tensioner. It will be used as a mounting point for
the supercharger bracket.(Fig 10)
FIG 10
FIG 9
P/N 4809609
PAGE 4
COPYRIGHT 2000 PAXTON AUTOMOTIVE
ASSEMBLY MANUAL for the
1996-98 MUSTANG COBRA
7. Remove the water pump pulley, followed by the idler pulley (Fig 11), which will be reinstalled in a later step.
8. Remove the four 18 mm bolts at the front of the engine (marked with arrows in FIG 12).
Replace the bolt in the water pump with the supplied bolt and small diameter washer.
Replace the topmost bolt with the supplied low profile bolt. The remaining holes will be used
as attachment points for the idler support bracket in step 10.
LOW PROFILE BOLT
REMOVE
FIG 11
FIG 12
PREPARING TO INSTALL THE SUPERCHARGER
9. Use a tubing bender to bend the metal A/C line. It is first bent upwards, then rotated downward to clear the bottom portion of the supercharger. (Fig 13) NOTE: Use extreme caution
during this step. The refrigerant contained within this line is under high pressure and can
cause injury if the line ruptures. Use a tubing bender such as the one shown, as well as safety glasses/goggles. Gloves are also recommended.
10. Install the idler support bracket using the holes from step 8. It serves as a support for the
main supercharger bracket and mounting point for the supplied idler pulley. (Fig 14)
FIG 13
P/N 4809609
FIG 14
PAGE 5
COPYRIGHT 2000 PAXTON AUTOMOTIVE
ASSEMBLY MANUAL for the
1996-98 MUSTANG COBRA
11. Remove the 13 mm stud bolt that is located under the lower corner of the passenger side
valve cover. This bolt stud supports the metal A/C line through the use of a small tab. Enlarge
the hole in the tab to 5/16-inch to accommodate the larger fastening hardware for the rear
supercharger support bracket. (Fig 15)
12. Install the rear supercharger mounting bracket in the three holes left by the coil mounting
bracket. The bolt/spacer assembly (arrow) bolts into the hole left by the 13 mm bolt stud, and
‘sandwiches’ the A/C line tab in place between the head and spacer. (Fig 16)
SPACER ASSEMBLY
FIG 15
FIG 16
13. Mount the supplied idler pulley on the idler support bracket using the supplied hardware.
Trial fit the idler pulley first; if it does not fit, one of the ribs on the alternator must be ground
off (Fig 17). When the pulley clears the alternator it can be bolted into place. Install the stock
idler pulley in its original location, followed by the water pump pulley using the factory hardware. (Fig 18)
FIG 17
P/N 4809609
FIG 18
PAGE 6
COPYRIGHT 2000 PAXTON AUTOMOTIVE
ASSEMBLY MANUAL for the
1996-98 MUSTANG COBRA
14. Install the supplied accessory/supercharger
drive belt and route as stock, but do not install
on alternator pulley until after the supercharger
is installed. Instead, leave a loop in the belt.
(Fig 19)
15. The main supercharger bracket comes preassembled. Install it as shown. (Fig 20, Fig 21)
The belt is shown looped around the alternator
for clarity
FIG 19
FIG 20
FIG 21
16. Insert bolts into the bracket from the back. Attach the supercharger oil drain line to the fitting at the bottom of the supercharger, and lower the supercharger into place on the bracket
while inserting the drive pulley through the loop in the belt. Bolt the supercharger onto the
main bracket using the supplied fasteners, as shown. (Fig 22) The lower bolts are easier to
tighten from underneath the vehicle. The belt can now be permanently installed.
17. Install the coil pack onto the mounting bracket, as shown.(fig 23) You will have to reconfigure the wires to allow for the relocation of the coil pack.
COIL PACK
MOUNTING
BRACKET
FIG 22
P/N 4809609
FIG 23
PAGE 7
COPYRIGHT 2000 PAXTON AUTOMOTIVE
ASSEMBLY MANUAL for the
1996-98 MUSTANG COBRA
COOLING SYSTEM MODIFICATIONS
These modifications are necessary in order to allow clearance for the supercharger.
18. The supplied Coolant Transfer Manifold
(CTM) is taller than the original, providing necessary clearance for the supercharger. To
mount the new CTM (Fig 24), trim the 6mm
portion of the two mounting stud bolts to 3/4
inch, and thread the supplied aluminum spacer
stands (Fig 25,arrows) into place to properly
locate the CTM. Remove the original coolant
temperature sensors from the old CTM and
install in the new unit. Install the CTM and
secure with the supplied fasteners. (Fig 26)
NOTE: Some kits may be supplied with a CTM
that appears differently than the unit shown.
Both CTM’s mount in the same manner.
FIG 24
SPACERS
FIG 26
FIG 25
19. Install the straight portion of the Y tube into the lower radiator hose, and orient the angled
portion towards the passenger side of the car. (Fig 27) Install the supplied upper radiator
hose and attach to the angled portion of the Y tube. Install the upper portion of the Y tube into
the CTM. (Fig 28)
‘Y’ TUBE
CONNECTED
‘Y’ TUBE
FIG 27
P/N 4809609
FIG 28
PAGE 8
COPYRIGHT 2000 PAXTON AUTOMOTIVE
ASSEMBLY MANUAL for the
1996-98 MUSTANG COBRA
20. Relocate the spark plug wire retainer by drilling a 17/64-inch hole across from an existing
hole in the bracket (Fig 29, arrow), and move the bracket forward. It will now be secured by
only two factory bolts. Fig 30 shows the completed spark plug wire retaining bracket in place.
NEW HOLE
EXISTING HOLE
BRACKET
3/8 “
9/16”
FIG 30
FIG 29
21. To provide clearance for the washer bottle, modify the driver’s side radiator support
bracket by cutting a notch in it as shown in Fig 31
22. Relocate the coolant reservoir by widening the notches in the plastic cover and installing
the Paxton-supplied aluminum relocation tabs using the stock hardware.(Fig 31, arrows) This
will move the reservoir over one inch towards the driver’s side. Install the thick round spacers
on the recut reservoir bracket. Reinstall the reservoir using the stock nut on the rear notch
and the supplied hardware on the front notches.
23. From under the vehicle, remove the two 8mm head bolts securing the coolant reservoir
support rod. Relocate the support rod by moving it one bolt hole towards the driver’s side
and secure with the original bolt. Using a 1/4” drill bit, drill through the remaining mounting
hole and secure with the supplied nut, bolt and washers. (FIG 32) You can gain access to the
hole through a slot in the body sheet metal directly above the hole you drilled.Slide the 3/8”
thick round aluminum spacer onto the threaded portion of the support rod. Reinstall the
reservoir.
NEW POSITION
CUT NOTCH
HERE
NEW LOCATION
SPACER
ORIGINAL
PLACEMENT
FIG 31
P/N 4809609
ORIGINAL POSITION
FIG 32
PAGE 9
COPYRIGHT 2000 PAXTON AUTOMOTIVE
ASSEMBLY MANUAL for the
1996-98 MUSTANG COBRA
OIL SYSTEM MODIFICATIONS
The Novi 2000RR supercharger relies on pressurized engine oil for its lubrication. The following steps show how to install the oil feed and drain lines. NOTE: Do not attempt this step
with a hammer and punch, as you will severely dent the front of the pan.
24. Mark the front of the engine oil pan 1-1/8 inch below the pan rail and between the two
pan rail bolts, directly in the center of the small ‘hump’. Drill a pilot hole with a 3/16-inch drill
bit after smearing the drill bit with heavy grease to prevent small metal particles from falling
into the pan. (Fig 33)
Once the hole has been drilled, insert a straight length of welding rod or heavy wire (such as
a coat hanger) into the hole approximately three inches to see if it contacts any of the reciprocating assembly (connecting rod, crankshaft counterweight). If it does, turn the engine over
and repeat the process until no interference is encountered.
Next, apply a small amount of anti-seize lubricant to the tip of the punch (Fig 34), and insert it
into the pilot hole. Hit the punch with an air hammer carefully using small bursts, until the
punch is inserted up to its shoulder. NOTE: Use extreme caution not to make the hole too big,
or the drain fitting will not fit and the pan will be ruined.
FIG 34
FIG 33
25. Apply a liberal amount of heavy grease to a
3/8-inch by 18 NPT tap (not included), and
gradually thread into the hole. NOTE: Only run
the tap 2/3 of the way in. Otherwise the fitting will not seal properly. Clean the threads
using a clean rag and an approved solvent,
such as carburetor cleaner. Apply a small
amount of silicone RTV to the threads of the
supplied 3/8-inch pipe to -8 fitting and insert
into the hole, being careful not to over-tighten.
FIG 35
The hex nut of the fitting should be clear of
the pan, leaving some thread showing. Install the supercharger drain hose fitting so that
the elbow is oriented toward the passenger side, away from the harmonic dampener, (Fig 35)
P/N 4809609
PAGE 10
COPYRIGHT 2000 PAXTON AUTOMOTIVE
ASSEMBLY MANUAL for the
1996-98 MUSTANG COBRA
26. The supercharger feed line is attached by removing an existing pipe plug in the bottom of
the oil filter housing, and installing the supplied ⁄-inch NPT to –4 90-degree fitting and steel
braided hose (Fig 36, arrow). Run the line up the side of the engine, between the valve cover
and the power steering reservoir bracket, under the coolant transfer manifold and attach it to
the supercharger.(Fig 37) Zip tie the oil feed line to the CTM.
FITTING
FIG 37
FIG 36
SMOG PUMP/INTAKE SYSTEM MODIFICATIONS
These steps illustrate how to relocate the smog pump and install the new intake system
27. Unbolt the smog pump and ignition module
from the passenger side fenderwell. Bolt the
smog pump and the module to the new bracket
using the supplied screws for the module and
factory bolts with supplied nuts for the smog
pump. The plug on the module should point
FIG 38
straight up. Connect the plug to the module
and bolt the assembly to the original mounting
point using the supplied bolts and spacers between the bracket and the body. APPENDIX I,
DRAWING 1017306 . Modify the smog pump hose as shown in Appendix I. Re-use the factory couplings and secure with the supplied hose clamp. (Fig 38)
P/N 4809609
PAGE 11
COPYRIGHT 2000 PAXTON AUTOMOTIVE
ASSEMBLY MANUAL for the
1996-98 MUSTANG COBRA
28. The mass air meter is removed from the
original air box (Fig 39), and attached to a
Paxton-supplied bracket. This assembly is
then bolted to the air filter adapter and air filter,
(Fig 40, Fig 41). NOTE: Be sure to install the
MAF screen as shown (Fig 40, arrow) or the
engine will not run properly.
FIG 39
MAF
SCREEN
FIG 40
FIG 41
29. Attach the the short side of the plastic elbow (the end with the lip) to the MAF/air filter
assembly (Fig 42). Leave the hose clamp loose so the elbow can be rotated once the assembly is mounted in the car.
30: Remove the two nuts located in the passenger side inner fender wall. Push the mass air
meter/air filter assembly and inlet tube up into the passenger side fender, and attach to the
existing studs in the inner fender panel using the two factory nuts. (Fig 43)
FIG 42
P/N 4809609
FIG 43
PAGE 12
COPYRIGHT 2000 PAXTON AUTOMOTIVE
ASSEMBLY MANUAL for the
1996-98 MUSTANG COBRA
31: Attach the length of flex hose to the plastic
elbow on the MAF/air filter assembly inside the
fender (Fig 44). Install the cast-aluminum discharge tube using the supplied rubber joints
and stainless steel clamps.
32 Attach the 4” hose to the Idle Air Control
(IAC) tube and retain with the supplied hose
clamp. Attach the other end to the discharge
tube and retain with another supplied hose
clamp. Use the remaining two hose clamps to
secure the hose to the IAC Valve and filter
housing. (Fig 45, Fig 46)
FIG 45
P/N 4809609
FIG 44
FIG 46
PAGE 13
COPYRIGHT 2000 PAXTON AUTOMOTIVE
ASSEMBLY MANUAL for the
1996-98 MUSTANG COBRA
33: Push the short end of the bypass valve onto the boss underneath the discharge tube. The
other end will be attached to the boss on the inlet tube.(Fig 47)
34 Install the inlet tube to the flex hose and
attach the other end to the supercharger.
Attach the bypass hose to the inlet tube and
secure with the supplied hose clamp. Adjust
for the best fit and tighten all hose clamps.
Remove the rubber hose from the crankcase
evacuation plastic barb fitting located on the
passenger side valve cover. Attach the supplied hose to the plastic barb fitting and route
the hose forward to the 90 degree brass fitting
on the plastic inlet tube. The supercharger
assembly is completed. (Fig 48, Fig 49)
FIG 47
FIG 49
FIG 48
P/N 4809609
BOSS
PAGE 14
COPYRIGHT 2000 PAXTON AUTOMOTIVE
ASSEMBLY MANUAL for the
1996-98 MUSTANG COBRA
CHECK OUT PROCEDURES
We know that you are anxious to get out and drive your new vehicle, but please take a little
bit more time to perform these simple check-out steps.
A. Inspect all wiring harnesses and electrical connections.. Make sure
that all items are properly routed, connected and secured.
B. Check all hoses, lines, and fittings for properly secured connections..
C. Make certain all fasteners, brackets, and clamps are installed and
properly tightened.
D. Check serpentine accessory belt and supercharger drive belts for
proper tension and alignment.
E. Cycle ignition key from “off” to the “on” position.
F. Check the entire fuel system for possible leaks.
G. Start engine and verify that the oil pressure is within normal range.
H. Allow the engine to come up to normal operating temperature.
I. Check the coolant level in the coolant recovery bottle and top off as
needed.
J. Check the following:
Fluid Leaks
Fluid Levels
Belt Slippage
Throttle Response
Now that the work is done, it’s time to enjoy. PAXTON Automotive wants to thank you for
choosing our product, and wants to remind you that the performance and response of your
vehicle is now different that what you are used to. Please drive cautiously until you have
grown accustomed to the feel of your vehicle.
Please see the service manual included in your kit for information on the service and maintenance of your PAXTON Supercharger. Belt tightening, troubleshooting, special tuning
requirements, and warranty information is also included in the Service Manual.
P/N 4809609
PAGE 15
COPYRIGHT 2000 PAXTON AUTOMOTIVE
ASSEMBLY MANUAL for the
1996-98 MUSTANG COBRA
APPENDIX
Please realize that PAXTON Automotive is constantly improving the performance and
look of the NOVI 2000 supercharger. Parts in your kit may appear differently than what
is pictured in this manual. This is due to photographs taken in pre-production, a
change in material costs, or an improvement in performance.
Rest assured that you have purchased to best quality kit that PAXTON Automotive
manufactures at this time. The installation of the materials will remain the same.
List of Appendices
Appendix Number.. ..DWG Number......Rev.............DWG Title
A
1001814-1
C
KIT, PARTS LIST
B
1011807
C
ASY, S/C NOVI 2000
C
1016607
E
ASY, S/C MOUNTING BRACKET
D
1015927
B
ASY, AIR INTAKE
E
1017007
E
ASY, AIR DISCHARGE
F
G
H
I
J
K
1019327
1019328
1015406
1017306
1015506
1015307
C
C
B
B
D
E
ASY,
ASY,
ASY,
ASY,
ASY,
ASY,
L
1015206
B
ASY, A/C LINE SPACER
P/N 4809609
OIL SUPPLY
OIL RETURN
COOLANT BOTTLE RELOCATION
SMOG PUMP RELOCATION
COMPRESSOR BYPASS
RADIATOR TUBE MODIFICATION
PAGE 16
COPYRIGHT 2000 PAXTON AUTOMOTIVE