1
Rams 01DFU Eng rev B.qxd
28-11-05
07:37
Side 2
Resusci Anne Modular System
Resusci Anne Modular System
Resusci Anne
R
Modular System
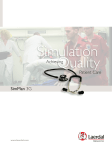
Your new Resusci Anne
Models
Today's Resusci Anne manikin preserves the classic features which
made the original Resusci Anne synonymous with CPR instruction.
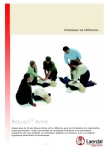
Each Resusci Anne model simulates an adult of
average physiology, and is designed for realistic training of
basic life support techniques in accordance with international
recommendations.
Resusci Anne is available in different models
to meet varying needs for CPR programmes.
- Basic versions come without electronics.
- Skillguide versions come with light signals showing
CPR performance.
Features included in the manikin are:
- Natural obstruction of the airway
- Movable jaw
- Human-like compliance for inflations and compressions
- Chest rise with inflations
- Realistic landmarks for compression point location
- Carotid pulse, manual
- Carotid pulse, automatic (CPR-D manikin only)
- Indication of inflation and compression practice
(with Skillguide or SkillReporter)
- Feedback according to ILCOR guidelines
(with Skillguide or SkillReporter)
- Log function of training sequence
(SkillReporter manikin only)
- Printer with both real-time and report printing
(SkillReporter manikin only)
- Easy to mount and remove arms and legs
(full body versions)
- Hard, articulated arms and legs are available (optional)
- Defibrillation chest skin (CPR-D manikin only)
- MicroHeartsim for ECG simulation (CPR-D manikin only)
- AED chest skin allows for training of proper pad placement
when used together with the Laerdal or Heartstream branded
AED Trainer 2 device (Skillguide and SkillReporter manikins only).
- AED Skillguide versions, in addition to the above Skillguide
features, come with a special chest skin with LEDs showing
proper pad placement.
- SkillReporter versions come with a combined light signal
box showing CPR performance in real-time, and
a printer that can print both real-time curves and
statistical report of CPR performance.
- AED SkillReporter versions, in addition to the above
SkillReporter features, come with a special chest skin with
LEDs showing proper pad placement.
- CPR-D versions come with SkillReporter and
MicroHeartsim for simulation of heart rhythms
and controlling the defibrillation part of the scenario.
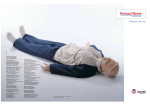
The Resusci Anne Full Body provides realism to your training.
For the Resusci Anne Torso models arms and legs may be
added if desired. In addition to the soft arms and legs, hard
articulated arms and legs are available.
The modular manikin construction allows easy expansion of
basic models to complete models and/or Resusci Anne Torso
models to Resusci Anne Full Body models.
Use of a ventilation mask (e.g. the Laerdal Pocket Mask)
and a manual bag-valve-mask resuscitator (e.g. the Laerdal
Silicone Resuscitator with a size 4 mask) can be practised
on Resusci Anne.
4
28-11-05
07:37
Side 3
Resusci Anne Modular System
Limited Warranty
Contents
Laerdal Medical warrants to the purchaser that its product(s)
is/are free from defects in material and workmanship for a
period of one (1) year from the date of purchase by the
original user. During the designated one (1) year period,
Laerdal Medical will, upon receipt of a product found to be
defective due to materials or workmanship from the purchaser
and notification in writing of the defect at its option repair or
replace any parts found to be defective or the entire product.
Products found to be defective and notification of defects may
also be sent to the authorized Laerdal Medical dealer from
whom the product was purchased. All postage, shipping,
or handling charges shall be the sole responsibility
of the purchaser.
Unpacking and repacking . . . . . . . . . . . . . . . . . . . . . . . . . 6
Laerdal Medical is responsible for the effects of safety,
reliability and performance of its product(s) only if:
- service, repair, readjustment or modification is carried
out by Laerdal Medical or persons authorized
by Laerdal Medical.
- the product is used in the proper manner in strict
compliance with its Directions for Use.
Early defibrillation training . . . . . . . . . . . . . . . . . . . . . . . 12
Operation and function . . . . . . . . . . . . . . . . . . . . . . . . . . . 6
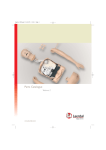
Skillguide . . . . . . . . . . . . . . . . . . . . . . . . . . . . . . . . . . . . . . 7
SkillReporter . . . . . . . . . . . . . . . . . . . . . . . . . . . . . . . . . . . . 8
Sanitation . . . . . . . . . . . . . . . . . . . . . . . . . . . . . . . . . . . . . 10
During class . . . . . . . . . . . . . . . . . . . . . . . . . . . . . . . . . . 10
After class . . . . . . . . . . . . . . . . . . . . . . . . . . . . . . . . . . . . 11
Maintenance . . . . . . . . . . . . . . . . . . . . . . . . . . . . . . . . . . . 12
Periodic cleaning . . . . . . . . . . . . . . . . . . . . . . . . . . . . . . . 12
Miscellaneous replacements . . . . . . . . . . . . . . . . . . . . . . 13
Laerdal Medical shall not be liable under this warranty for incidental or consequential damages if unauthorized repairs or
modifications have been made or attempted or when the product, or any part thereof, has been damaged by accident, misuse or abuse.
This warranty does not cover batteries, fuses, normal wear and
tear, staining, discoloration or other cosmetic irregularity that
does not impede or degrade product performance.
Some states in the USA do not allow the exclusion or limitation
of incidental or consequential damages, so those limitations or
exclusions may not apply to you.
There are no other express or implied warranties, whether
of merchantability, fitness or purpose, or otherwise, on the
product, its parts and accessories.
AED Resusci Anne . . . . . . . . . . . . . . . . . . . . . . . . . . . . . . . 14
Parts list . . . . . . . . . . . . . . . . . . . . . . . . . . . . . . . . . . . . . . .15
Standards/Approvals
The product is in compliance with essential requirements of council
directive 89 / 336 / EEC;EMC - directive.
Expansion of models
The modular manikin construction allows easy expansion of
models.
To attach arms and legs:
a) Arms
Take off the manikin's jacket.
Identify right and left arm.
Be sure that the arm bolt is
mounted in the shoulder hole
of the arms. Attach the arms
by "clicking" them in place
in the holes in the torso and dress manikin. To remove,
press the arm bolt and pull the arm out of the hole
in the shoulder of the torso.
Service
All manikin parts are replaceable. Should any part break or
wear out, it can be identified by referring to the exploded view
drawing and parts list (see page 15). Spare parts are available
from Laerdal or the local Laerdal distributor.
Since the Resusci Anne manikin is easy to disassemble and
reassemble, the manikin's owner can accomplish many repairs.
Should a problem arise, however, we will be glad to assist you.
b) Lower body with legs
Attach lower body by moving
the connecting part into the
hole in the lower part of the
torso and secure it by using
the fastening bolt. To remove,
pull out the fastening bolt
and move the lower body
away from the torso.
A separate technical service manual is available.
The SkillReporter, Skillguide, MicroHeartsim and Loadbox
must be serviced by an authorized service technician.
Call your Laerdal representative for more information.
Product specifications are subject to change without notice.
5
ENGLISH
Rams 01DFU Eng rev B.qxd
Rams 01DFU Eng rev B.qxd
28-11-05
07:37
Side 4
Resusci Anne Modular System
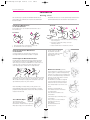
Unpacking and set-up
Operation and function
1. Remove head protection box (full body manikins only)
and lift manikin out of the case.
2* - Remove the Skillguide, SkillReporter or MicroHeartsim
protective pouch(es).
- Plug the Skillguide or SkillReporter cable into
the connector on the right side of the manikin
(if you want to practice with SkillReporter connected).
- Remove the paper tab coming from the battery
compartment on the backside of the Skillguide.
3. The Resusci Anne Torso Models (not for SkillReporter
and CPR-D manikins) can be supplied with a softpack,
which also serves as a training mat when opened and
laid flat on the floor.
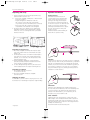
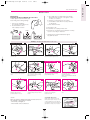
Airway patency
When the Resusci Anne head is in
a neutral position, the inspiration tube
will be closed. This prevents air from
passing to the lungs, thus having the
same effect as an obstructing tongue in
an unconscious person. To obtain an open
airway it is necessary to tilt the head
sufficiently backwards and lift or support
the chin. This opens the airway and
allows air to pass.
Moderate head tilt combined with jaw
thrust will also open the airway.
a
Repacking in carrying case
1* Disconnect Skillguide or SkillReporter and place upper
part of the manikin in the case with head to the right
and face up.
2 Put head protection box over manikin's head and place
arms down on each side of the manikin and fold legs
upwards, one on each side of the head protection box
(full body manikins only).
3* Replace Skillguide, SkillReporter or MicroHeartsim
protective pouch(es) and place unit between the wall
of the carrying case and the manikin.
4 For those having hard legs and arms, these have to be
removed and placed in the softpack following this set.
b
c
e
g
f
h
d
Inflation
Inflation practice directs air to the lung (a) via face coupling (b),
airway connector with one-way valve membrane (c), inspiration
tube (d), non-rebreathing valve (e), and lung tube (f). During
inflation, air pressure moves the valve membranes (g and h) to
open positions so that the air can pass. As soon as inflation
stops, the membrane (g) closes, thereby preventing return of
inflated air to mouth and nose.
Repacking in softpack
1. Place manikin and extra accessories
on one side of the mat.
2* Disconnect Skillguide and replace Skillguide
protective pouch.
i
Shipping, all models
It is advisable to put the manikin's carrying case into a cardboard carton to avoid damage if exposed to rough handling.
g
h
Exhalation
When the lung is deflated by the weight and elasticity of
the chest wall, the membrane (h) in the non-rebreathing valve
closes the passage to the inspiration tube and opens the
passage to the exhaust tube (i), to vent expiratory air out
through a port (j) in the manikin's side.
Pulse simulator
Palpable pulse in the carotid arteries on either side of the
Adam's Apple can be simulated when the bulb is squeezed
rhythmically. Palpable pulse in the carotid arteries is also present when effective chest compressions are being performed
(SkillReporter manikin only).
The CPR-D manikin has an automatic pulse.
*If applicable.
6
j
28-11-05
07:37
Side 5
Resusci Anne Modular System
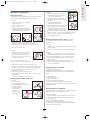
Skillguide
To use
See 2) under Unpacking and set up on page 6.
The Skillguide will turn "off" automatically if no activity takes
place for 5 minutes.
Note: If the Skillguide is turned "on" and the red signal light
for wrong hand position comes on, the Skillguide is not completely plugged into the manikin.
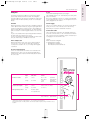
Consistent and objective feedback on performance during
practice helps develop and reinforce skills. The Skillguide
provides feedback to the instructor and student to support the
student's initial skill development by means of a colour light
display.
Inflation
When lung inflation volume reaches 0.7 l (standard ventilation)
or 0.4 l (O2 enriched ventilation), the green signal light will be
activated. If lung inflation volume exceeds 1.0 l (standard ventilation) or 0.6 l (O2 enriched ventilation), an orange warning
light is activated. A red warning light indicates a too fast inflation.
To get correct feedback when performing standard ventilation,
the larger lung (15 22 50) has to be used.
To get correct feedback when performing O2 enriched ventilation, the smaller lung (15 26 00) has to be used.
Power Supply
The four 1.5 V alkaline batteries, size C, will provide approximately 125 hours of use in the classroom. This will vary
depending on use patterns and brand of batteries.
Connection Cable
This is permanently connected to the Skillguide and has an
8 pin male connector that is to be connected to the manikin.
The connector has been moulded for proper orientation prior
to plugging it into the manikin's side.
Caution
Make sure that the Skillguide
is unplugged from manikin:
- when airway is changed, or
- when internal service is carried out.
Chest compression
When the breastbone area of the chest is depressed about
4 cm (at least 1 1/2"), the green signal light is activated.
If compression exceeds 5 cm (2" ) an orange warning light
is activated.
Incorrect hand position
Sensors are located under the switch cover mounted on the
underside of the chest cover. The red warning light will be
activated if the chest is depressed with hands placed outside
the correct area.
Light
Indication
Limits*
green
correct
orange
too much
0.7 l - 1.0 l
0.4 l - 0.6 l
>1.0 l
>0.6 l
Compression depth:
green
orange
correct
too much
Wrong hand position:
red
Pressure outside
of acceptable area
Too fast inflation:
red
Inflation volume:
(standard)
(O2 enriched)
(standard)
(O2 enriched)
4 cm (1 1/2") - 5 cm (2")
>5 cm (2")
Flow > 1 l/sec.
Flow > 0.5 l/sec.
(standard)
(O2 enriched)
*Measurement tolerance in the manikin: +/- 15% in normal room temperature.
Measurements based on ILCOR guidelines. O2 enriched ventilation requires airway 15 26 00 for correct
feedback.
7
ENGLISH
Rams 01DFU Eng rev B.qxd
Rams 01DFU Eng rev B.qxd
28-11-05
07:37
Side 6
Resusci Anne Modular System
A
B
C
D
The log function
To be able to print a report the CPR data first need to be
logged by activating the log function. The log function can
be activated either on the SkillReporter if connected to the
manikin, or on the manikin. To activate the log function on
the SkillReporter you first have to connect it to the manikin
(the SkillReporter has no internal power source), then press
the "On/Off" button once and after the selftest is complete
press the "LOG" C button.
If you decide to use the manikin without the SkillReporter
attached, press the "On/Off" button at the right side of the
torso and then press the "LOG" C button to activate the log
function.
To stop the log function press the "LOG" button a second
time. The CPR data is now logged and can be printed multiple
times. Just connect the SkillReporter and press one of the print
buttons. The data will not be lost even if the SkillReporter and
the manikin are switched off. When starting a new log, the
current log will be cleared and data cannot be retrieved.
E
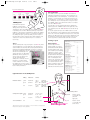
SkillReporter
Consistent and objective
feedback on performance
during practice helps develop
and reinforce skills. The SkillReporter has a metronome B built
in providing a rate of 80 or 100 strokes/minute, and provides
feedback to the instructor and student to support the student's
initial skill development by means of colour LEDs. In addition
the SkillReporter gives you the possibility to print a report of
the performance (either complete report with ventilation and
compression curves and a statistical report or a statistical
report only).
Student name:
_______________________
Instructor name:
_______________________
Duration of the session: (min : sec)
____
Printing a report
To use
Turn the SkillReporter on by pressing the "on/off" A key either
on the SkillReporter or on the right side of the manikin torso.
Caution: Make sure the chest skin is properly fastened before
turning on the SkillReporter/manikin. Pressing a second time
will turn the SkillReporter off. The SkillReporter and manikin
will turn off automatically if no
AC
activity takes place for 10 minutes
(60 minutes if the log function is
active). Note: The manikin can
also be used without the
SkillReporter connected. You are
then able to log the training
scenario and later on reconnect
the SkillReporter to print a report.
The light indicators as described below will give instant feedback on CPR performance.
Short report D
The short report format
(statistical data), can only be
printed after the CPR(-D) data
has been logged. If the "short
print" button is pressed during
logging of a scenario, a summary report (statistical data) of
the performance will be printed
with data collected up to the
time of activating the short
report. If the "short print" button is pressed after the logging
of a scenario has been completed, a summary report of the
performance will be printed
with data for the whole session.
Ventilations:
Average volume (ml)
Average number per min. (#/min)
Minute volume (ml/min)
Total number (#)
Number correct (#)
Percent correct (%)
Too much (#)
Too little (#)
Too fast (#)
____
____
____
____
____
____
____
____
____
Compr. / Vent. ratio
____
Compressions
Average depth (mm)
Average number per min. (#/min)
Average compression rate (#/min)
Total number (#)
Number correct (#)
Percent correct (%)
Too deep (#)
Too shallow (#)
Wrong hand position (#)
Hand position too low
(#)
Incomplete release (#)
____
____
____
____
____
____
____
____
____
____
____
Defibrillation (CPR-D models only)
Time from scenario start
to first shock (min : sec)
Time from call for help
to first shock (min : sec)
Time from arrival of defibrillator
to first shock (min : sec)
____ ____
____ ____
____ ____
Light indicators on the SkillReporter
Inflation volume:
LED(s)
Indication
Limits*
yellow
insufficient
green
sufficient
red
excessive
<0.7 l
(standard)
<0.4 l
(O2 enriched)
0.7 l - 1.0 l (standard)
0.4 l - 0.6 l (O2 enriched)
>1.0 l
(standard)
>0.6 l
(O2 enriched)
Pulse
Wrong hand position:
Compression depth: yellow
green
red
Too fast inflation:
red
insufficient
sufficient
excessive
<4 cm (1 1/2")
4 cm - 5 cm
(1 1/2" - 2")
>5 cm (2")
Flow > 1 l/sec.
Resusci Anne
R
*Measurement tolerance in the manikin: +/- 15% in normal room temperature.
Measurements based on ILCOR guidelines.
8
SkillReporter
yellow
Pressure outside
of acceptable area
(sides and
upper part)
red
Pressure outside
of acceptable area
(lower center)
TM
28-11-05
07:37
Side 7
Resusci Anne Modular System
Long report E
The long report format can be printed either during logging or
after logging of the CPR data.
This report consists of an analog part showing ventilation
and compression curves along with a time-line, and also the
different actions taken during the session, followed
by statistical data as described above.
fast inflation (stomach insufflation).
Stomach insufflation will be indicated by "!" next to the
ventilation curve in the printout.
Chest compression
The compression depth is shown by a bar graph with different
LED colours indicating insufficient, sufficient and excessive
compressions. When the breastbone area of the chest is
depressed between 0 and about 4 cm (1 1/2"), the yellow
LED(s) will be activated to indicate insufficient compression
depth. Between 4 cm (1 1/2") and 5 cm (2"), the green LED(s)
will be activated to show sufficient compression depth.
If compression exceeds 5 cm (2") the red LED(s) will be
activated indicating excessive compression depth.
Print-out during logging
When pressing the "long print" key during CPR performance,
an analog printout in real time of the CPR curves will be
printed if the log function has been activated.
When the logging is stopped, a statistical report of the CPR(-D)
performance data as described above, will be printed.
Print-out after logging
It is also possible to print a long format report (both analog
curves and statistical data) after a scenario is finished if the log
function has been active.
Wrong hand position
The yellow LEDs will be activated if chest is depressed outside
the correct area either on one of the sides or at the upper part
of thorax. The red LED will be activated if the chest is
depressed with hands placed outside the correct area at the
lower center part of thorax. This will in addition to visual feedback also be recorded on the printout report as "!" next to
the compression curve.
1
Installing new paper
Be sure that the SkillReporter
is connected to the manikin
and turned "ON". Open the
paper lid at the back of the
SkillReporter. Place the paper
roll as shown on illustration.
ON/OFF
Insert the paper end into the paper
inlet and the paper will automatically
feed into the SkillReporter. Close the
paper lid. If paper jam occurs, move the
handle at the side of the SkillReporter to upright
position, pull paper from front until paper roll is rotating.
Move the handle back to its original (horizontal) position.
Responsiveness check
The manikin has a shake sensor installed that will be activated
by gently shaking the manikin. This will result in a "r" in the
printout report. This will only be possible if responsiveness
check is done before any other CPR is performed.
2
Open airway
The manikin has a neck sensor installed that will be activated
by head tilt/ chin lift to indicate open airway. This will result in
an "a" in the printout report and will only be possible before
any other CPR activity is performed.
3
Diagnostic printout (Teststrip)
To activate the diagnostic printout: Press ''short print'' key and
hold, then press ''long print'' key and release both.
Pulse check
The manikin has sensors installed that will be activated by carotid pulse check for 10 seconds on either side of the throat. This
will result in a "c" in the printout report. If pulse is re-checked,
it will only show in the report if CPR activity is performed
between the two pulse checks.
Manual paper feed
To activate manual paper feed: Press ''long print'' key and
hold, then press ''short print'' key and release both.
Change of limits used for CPR feedback
The SkillReporter will be preprogrammed with a language
depending on country and standard ventilation limits.
At the moment we have two ventilation limits available;
"standard" and "O2 enriched".
If you need to change limits, this is possible to do by simply
pressing both "LOG" (C) button and the "Metronome" (B)
button at the same time for 5 seconds.
You will then get a print-out showing the new active
ventilation limits.
Power Supply
The eight 1.5 V alkaline batteries, size D, are located inside the
manikin chest and will provide approximately 125 hours of use
(without printing) in the classroom. This will vary depending on
use patterns and brand of batteries. These batteries are the
"power supply" for both the manikin and the SkillReporter.
Battery low indication
"On" LED on SkillReporter will start to flash when only 25 %
of battery capacity is left. At this level the print-out function
may stop.
When "On" LEDs on both manikin and SkillReporter start
flashing, you should replace batteries to avoid that
logging/feedback stops.
Inflation
The inflation volume is shown by a bar graph with different
LED colours indicating insufficient, sufficient and excessive
volumes. Between 0 and 0.7 l (standard ventilation) or 0.4 l
(O2 enriched ventilation), the yellow LED(s) will be activated
indicating insufficient inflation volume. When lung inflation
volume reaches 0.7 l to 1.0 l (standard ventilation) or 0.4 l
to 0.6 l (O2 enriched ventilation), the green LED(s) will be
activated indicating sufficient inflation volume. If lung inflation
volume exceeds 1.0 l (standard ventilation) or 0.6 l (O2 enriched ventilation), the red LED(s) will be activated indicating
excessive inflation volume. A red warning light indicates a too
Connection Cable
This is permanently connected to the SkillReporter and has an
8 pin male connector that is to be connected to the manikin.
9
ENGLISH
Rams 01DFU Eng rev B.qxd
Rams 01DFU Eng rev B.qxd
28-11-05
07:37
Side 8
Resusci Anne Modular System
S A N I TAT I O N
During class
We recommend you provide an individual Manikin Face to
each student. This eliminates the need for decontamination
between students.
All students can also use one face permanently installed on the
manikin and disinfect the face between each student's use.
Using Resusci Manikin Faces
on an individual basis
Each student in the class should install and remove his or
her manikin face.
To remove
To install
1
2
3
2
1
1 Turn manikin face inside out and push face coupling
into airway valve.
2 Push face coupling into airway connector
until fully seated.
3 Fasten manikin face to retainers at each ear.
1 Detach manikin face from retainers at each ear.
2 Lift manikin face off valve coupling.
Using the same Resusci Manikin Face
for all students
If several students are using the same manikin face,
thorough disinfection between students is required.
Let stay in place for 30 sec.
Dry manikin's face with
a clean paper towel or similar.
Ventilation practice may
now continue.
Laerdal High Level Manikin Disinfectant
Laerdal High Level Manikin Disinfectant (Virkon) Rapid Pack
make disinfection practical. Fill the 100ml bottle with luke
warm water, open sachet and add Virkon to water. Leave for
2 minutes. Push cap firmly onto the bottle until it clicks.
Shake bottle gently to ensure Virkon is fully dissolved.
1 2 3
Manikin Face Shields (optional)
Proper disinfection of manikin's face provides
proper hygienic conditions during training.
However, for aesthetic reasons students may
feel more comfortable having a clean barrier
between own lips and surfaces touched
by another person's lips.
The Manikin Face Shields are designed
to allow inexpensive barrier protection
and to train the use of Resusci Patient
Face Shields made for use in real cases.
30 sec.
Spray manikin surface (mouth and nose area) until fully wetted
(6-8 sprays). Do not allow Virkon to run off surfaces. Leave for
30 seconds and wipe thoroughly with a disposable cloth until
dry. Ventilation practice may now continue.
Note: Depending on local policies you may prefer to use
Resusci Manikin Wipes (see below) for cleaning or a freshly
prepared sodium hypochlorite solution, but other procedures
must then be followed.
To use
Disinfect as instructed above.
Pull a shield out of the roll and tear
off at perforation.
Place shield over manikin's face
as illustrated.
Hold shield in place and airway open,
as illustrated.
Place your lips over the ventilation
opening, pinch the nose,
and ventilate.
Discard shield after each
practice session.
To use Manikin Wipes
Tear foil packet open.
Take out and unfold wipe.
Rub manikin's mouth and nose vigorously.
Wrap wipe snugly over mouth and nose.
10
28-11-05
07:37
Side 9
Resusci Anne Modular System
After class
Disinfection:
Preparing the Resusci Manikin Face for reuse
Laerdal High Level Manikin Disinfectant
Note: Wear gloves* during cleaning.
a) Use a 50g sachet of Laerdal High Level Manikin
Disinfectant (Virkon) which is enough for 5 litres
of water (1% solution).
b) Immerse all components into the solution.
c) Scrub stubborn stains where necessary and leave
for 10 minutes.
d) Rinse with fresh water.
1. Remove face and detach
the coupling from inside the face.
2. Clean and disinfect faces
and couplings as follows:
3. Allow parts to dry.
4. Reassemble face coupling and face skin.
5. Remount face on manikin after reinstallation of airway
or put in a clean bag for future use.
10 min.
* Vinyl gloves are recommended as latex gloves
may stain face mask.
5 litres
Airway is designed for disposal after each class.
To remove the airway
1
Having removed face, remove neck
skin from chin.
Pull to remove jaw.
5
Connect expiration and inspiration
tubes.
Detach airway connector and pull
inspiration tube through the neck.
To install the airway
6
Slide tubing through slot in lung
plate, to detach airway assembly.
Discard used airway.
3
Push expiration tube into retainer in
manikin's side until end
protrudes about 2-3 cm (1").
3
2
Push inspiration tube through neck
and click airway connector into its
holder.
Caution
Make sure that the SkillReporter/manikin has been turned off /
the Skillguide is unplugged from manikin:
- when airway is changed, or
- when internal service is carried out.
Pull expiration tube from its retainer
in the manikin's side.
1
Slide tubing through slot in lung
plate, with lung on top.
4
4
2
Push on lung connector until fully
seated in lung plate.
Make sure the ventilation slider can
move freely.
5
Install jaw by sliding its forked
portions over steering pins
in the inner head.
To reinstall chest cover:
Make sure the switch cover for the
hand position impulse unit (a) is on top
of the protruding end of the slider for
the ventilation-compression impulse unit
(b). Button the chest cover onto torso
11
6
Fold neck skin over jaw, and install
face.
a
b
ENGLISH
Rams 01DFU Eng rev B.qxd
Rams 01DFU Eng rev B.qxd
28-11-05
07:37
Side 10
Resusci Anne Modular System
Cardiac rhythm
Presenting rhythm is shown on the long print format as
"NSR","VTs", "VTf", "VF" or "Asy".
Defibrillation shock
A defibrillation shock is shown by a "lightning symbol" on the
long print format.
On the short print format (statistical data) "time from scenario
start to first shock", "time from call for help to first shock"
and "time from arrival of defibrillator to first shock" will be
shown.
Early defibrillation training
To use the CPR-D manikin you need a semi-automatic
defibrillator in addition to the manikin. The CPR-D manikin is
a SkillReporter manikin but has in addition a MicroHeartsim to
simulate rhythms, a defibrillation chest skin with loadbox, and
an “automatic” pulse device. Training type electrode pads are
also included.
MicroHeartsim
Instructor sets the scenario by selecting and activating one of
the following rhythms via the MicroHeartsim keyboard:
Normal Sinus Rhythm ("NSR"),
Ventricular Fibrillation ("V.fib"), fast Ventricular
Tachycardia ("VT.fast"), slow Ventricular Tachycardia
MicroHEARTSIM
("VT.slow") or "Asystole". At start-up of the MicroV.fib
Asystole
Heartsim "NSR" is the presenting rhythm.
Presenting rhythm is shown at the keyboard by
VT.fast
VT.slow
a steady light next to the actual rhythm.
NSR
PEA
Waiting rhythm may then be preselected to follow
a defibrillatory shock released to the manikin or as
Change
Call
a result of pressing the "Change rhythm" button.
rhythm
help
The waiting rhythm is shown by a blinking light next
Ignore
Check
shock
breathing
to the actual rhythm.
Arrival
By pressing "Ignore shock" button, the waiting
defib.
rhythm will not be activated after the first shock.
ON/off
This is shown by a steady light next to "Ignore shock"
button. Repress to nullify.
Cautions
1 Only apply the defibrillator to a defibrillation
chest skin which is properly mounted on
the manikin's chest.
2 Do not provide more than 2 x 360J defibrillator
discharges per minute as an average over
a period of time to prevent overheating.
3 Do not apply conductive gel or conductive
defibrillation pads intended for patient use
to prevent chest skin pitting.
4 Do not use cables or connectors
with visible damage.
5 Observe all normal safety precautions
for use of defibrillators.
MAINTENANCE
Preventive maintenance is the best method of ensuring long
and trouble free operation.
A general inspection should be conducted at regular intervals.
Pulse feature
The CPR-D manikin provides a palpable pulse in carotid arteries
only when the "NSR" button on the MicroHeartsim is selected
and activated, and the PEA (Pulseless Electrical Activity or
Electromechanical Dissociation) function is not activated.
Impulses are produced by an asynchronous pulse generator
inside the manikin and are not synchronized with the QRS
complexes
Periodic cleaning
Periodically wash all skin parts that are not regularly sanitized
during and after each class, using warm soapy water or Virkon.
Outer skin and moulded hair
A factory applied protective coating on the neck and chest skin
helps retard, but does not prevent staining. Most stains can be
removed with alcohol or warm water and soap. However, the
older the stains are, the more difficult they are to remove. Nonabrasive household cleaners that are safe for plastics may produce desirable results. It is wise to test other cleaning agents
on a non-critical area, e.g., under the chest cover, before general use. Note that pigments from lipstick and ballpoint pens
quickly travel into the plastic skin. Such stains may be impossible to remove.
SkillReporter
When log function is activated, the following CPR-D data will
be logged in the manikin, in addition to what is described
above:
Call for help
If the "Call help" button is pressed on the MicroHeartsim, this
will be shown as a "phone symbol" on the long print format.
Check breathing
If the "Check breathing" button is pressed on the
MicroHeartsim, this will be shown as a "b" on the long print
format.
Arrival defib.
If the "Arrival defib." button is pressed on the MicroHeartsim,
this will be shown as a "d" on the long print format.
Clothes
Hand or machine wash with soap or laundry detergent in
warm water, max. 40°C (100°F). Iron with warm iron. May be
dry cleaned. Please note that hot air dryer may cause garment
shrinkage.
12
28-11-05
07:37
Side 11
Resusci Anne Modular System
Miscellaneous replacements
To install
1. Apply new pulse collar over neck.
Push tubing through the lower hole
of the cushion pad and neck.
2. Thread tubing from inside through
the upper circular hole (a) in the back
of the neck.
3. Thread tubing inside the neck
a
under the two retainers (b).
4. Insert the white retention plug through
b
holes in both ends of collar, and into
the lower hole in the back of the neck,
and connect tubing from neck collar
to nipple on tubing from pulse simulator, as illustrated
under "To remove", steps 2 and 3 “Changing neck skin”.
5. Mount neck skin, foam ring, head, airway and face.
See “Changing neck skin”.
Changing neck skin
Replace neck skin when damaged or discoloured by long term
contact with student's hands without regular cleaning.
To remove
1. Lift off face, remove jaw and detach
airway connector
(See "To remove airway"
steps 1-3, page 11).
2. Disconnect head from shoulders by
rotating head 180° (face turned backwards) and pull it away from torso.
3a
3b
3c
Changing compression pulse collar (if applicable)
The compression pulse collar is placed under the pulse
simulator collar.
3. a) Unbutton elastic bands at the back of the neck.
b) Remove foam ring from the base of the neck.
c) Undo the two screws in the curved securing piece.
To remove
1. Unbutton chest skin and detach compression pulse tubing
from the nipple.
2. Lift off the compression pulse collar as described above.
4. Remove the old neck skin.
To install
1. Apply the lower portion of the neck
skin over the rim of the inner part of
the curved securing piece, so that
the two holes in the skin are placed
over the screw holders.
To install
1. Apply a new compression pulse collar around the neck.
Push tubing through the upper hole of the cushion pad.
2. Thread tubing through the oval canal in the neck base.
Make sure the tubing is held in place by the retainers
inside the neck.
3. Attach compression pulse tubing to the nipple.
4. Fasten in neck with plug together with pulse simulator
collar as described above.
For the following procedure see ill.
under "To remove", steps 2 and 3 above:
2. Apply the outer part of curved securing piece over
the lower rim of the neck skin. Align holes and fasten skin
between outer and inner securing piece with two screws.
3. Fasten the elastic bands in the back of the neck.
4. Put on the foam ring.
5. Mount the head on the manikin's torso.
6. Mount airway connector and jaw, fold neck skin over chin,
and mount face
(See "To install airway", steps 4-6 page 11).
Changing batteries in manikin
(SkillReporter manikin only)
When replacing worn out batteries in your SkillReporter
manikin, replace them with eight 1.5 V alkaline batteries,
size D.
To replace batteries:
1. Remove chest skin.
2. Open the battery cover.
3. Remove and discard old batteries.
4. Replace new batteries as indicated on battery cover.
5. Align battery cover with grooves in battery compartment.
6. Replace chest skin.
Changing pulse simulator neck collar
To remove:
1. Remove neck skin.
(See “Changing neck skin”).
2. Then disengage nipple on tubing
for pulse simulator.
3. Remove the white
retention plug
and lift off
the pulse collar
with tube.
Changing batteries in Skillguide
When replacing worn out batteries in your Skillguide, replace
them with four 1.5 V alkaline batteries, size C.
To replace batteries:
1. Place your thumb on the marked area next to the arrow.
2. Push firmly in the direction of the arrow to slide open
the battery cover.
3. Remove and discard old batteries.
4. Replace new batteries as indicated on battery cover.
5. Align battery cover with grooves in battery compartment.
6. Slide cover and snap closed.
13
ENGLISH
Rams 01DFU Eng rev B.qxd
Rams 01DFU Eng rev B.qxd
28-11-05
07:37
Side 12
Resusci Anne Modular System
AED Resusci Anne
Pause (remote control only): When using a remote
control with the AED Trainer 2 device you have the option to
"pause" a scenario by pressing the pause button on the remote
control. You may reactivate the scenario by pressing the play
button on the remote control. This function allows an instructor
to stop a scenario, including the elapsed time, for any given
period of time. You may then re-continue the scenario where it
was paused. If the pause button is pressed the
symbol will
be logged. (Refer to the AED Trainer 2 Directions for Use for a
detailed description of this function)
Intended Use
The AED Resusci Anne Skillguide and SkillReporter manikins were
developed to work in combination with the Laerdal or
Heartstream branded AED Trainer 2 device as a complete training
system that introduces our new Laerdal Link technology. Laerdal
Link technology, in this training system, requires the student to
properly place the training pads on the manikin chest before the
AED Trainer 2 will proceed through the selected scenario. If pads
are improperly placed the AED Trainer 2 will respond with the
appropriate voice prompts*. This is accomplished without visible
connectors on the chest skin. The AED Resusci Anne also has
LEDs in the chest skin indicating the center of correct pad placement. If an electrode is loose or incorrectly placed on the manikin, the AED Trainer 2 will repeat the voice prompt to apply the
pads before continuing on with the selected training scenario.
Battery low indication for chest skin LEDs
AED Resusci Anne Skillguide
There are two different ways to check for "low battery"
indication:
- Open the chest skin. Locate the "test" label on the communication box fastened to the lower left side of the manikin's
torso. Depressing the test button, located on the underneath
side of the battery board where you see "test”, will illuminate the LEDs in the chest skin if battery strength is sufficient
for operation. If the LEDs do not illuminate when the button
is depressed a new battery is required.
- A "Battery low" voice prompt from the AED Trainer 2 will be
heard immediately after connecting Laerdal Link training
pads if the manikin battery is low.
Note: For use with the AED Resusci Anne manikins with
Laerdal Link Technology, training pads with a white connector
must be used:
Cat. No. 94 50 90 (these training
pads are also marked with the
Laerdal Link Technology logo).
Additional features for the AED Resusci Anne
Skillguide system
- Sensors in the chest skin detect proper pad placement.
- Visual pad placement feedback provided by LEDs in the
chest skin.
- The selected scenario in the AED Trainer 2 device will not
proceed until proper pad placement is accomplished*.
AED Resusci Anne SkillReporter
Press, and hold down for at least five seconds, the manikin's
On/Off "A" key located on the right side of the SkillReporter
manikin (see illustration on page 8) to activate the LEDs in the
manikin's chest skin. This will illuminate the LEDs in a blinking
mode for approximately five seconds if the battery strength is
sufficient for operation. If the LEDs do not illuminate and blink
when the On/Off "A" key is depressed new batteries are
required.
Additional features for the AED Resusci Anne
SkillReporter system
- Sensors in the chest skin detect proper pad placement.
- Pad placement feedback provided by LEDs in the chest skin.
- The selected scenario in the AED Trainer 2 device will not
proceed until proper pad placement is accomplished*.
- If the log function is activated these new events may be
presented on the SkillReporter long print format:
Turn AED on: When the AED is turned on the
will be logged.
To change the batteries for the chest skin's LEDs
AED Skillguide manikin
The AED Resusci Anne Skillguide comes with a standard alkaline
6LF22 / 6LR61 9 Volt battery for powering the LEDs in the chest
skin.
- Open the chest skin.
Note: Be aware of wires connecting the chest skin to the
battery box under the rib plate.
- Remove the old battery and install 1 new standard 9 Volt
alkaline battery. Be sure to follow the positive (+) and
negative (-) battery icons etched into the inside of the battery
holder when inserting the new battery.
symbol
Attached pads in proper place*: When pads are
positioned correctly on the manikin's chest the
symbol
will be logged.
Loose electrodes*: If the pads are too loose to
analyze a heart rhythm the
symbol will be logged.
AED SkillReporter manikin
Refer to the previous section titled changing batteries in
manikin (SkillReporter manikin only) for this procedure.
No shock indicated*: If no shock is indicated the "no shock
indicated"
symbol will be logged.
Motion*: If motion from the manikin is detected the
symbol will be logged.
Low battery*: If a scenario presents a "low battery" situation
for the AED the
symbol will be logged.
* These functions may also be manually controlled by the optional AED
Trainer 2 remote control (Cat. No. 94 50 50: Remote control for Laerdal
AED Trainer 2)
AED error*: If a scenario includes a device error the
symbol will be logged.
14
28-11-05
07:37
Side 13
Resusci Anne Modular System
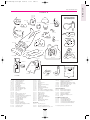
P A R T S
31 02 10
31 02 20
For Resusci Anne
with SkillReporter
31 02 01
15 20 16
30 05 02
20 01 01
20 03 03
31 05 00
15 21 02
30 05 04
15 22 50
15 26 00
15 21 03
30 05 03
15 20 02
20 15 00
31 03 10
31 03 41
30 07 00
15 04 00
31 03 40
31 03 21
31 50 01
31 03 20
31 03 45
31 03 30
20 31 01
31 03 51
31 50 00
31 50 50
14 39 03
31 03 50
15 38 00
15 12 01
31 03 52
15 39 00
11
11
04
15
18
31
31
15
30
30
20
15
15
15
31
30
32
01
12
20
35
39
02
02
20
05
05
01
21
21
20
04
05
01
00
00
00
00
10
00
01
02
02
04
01
02
03
16
00
03
00
20
20
32
30
15
20
31
03
31
02
07
04
15
03
03
01
00
00
00
00
50
Carrying case full body
Head protecting box
Carrying case Torso
Softpack Res.Anne Torso
Training mat
Head cpl. basic
Moulded hair
Neck skin w/elastic bands
Pulse collar w/Adam's apple
Pulse collar pad
Foam ring
Jaw
Holder for airway connector
Mask couplings (pkg.10)
Head cpl. w/electronics (for SkillReporter)
Inner pulse collar (compression)
Head cpl. w/automatic pulse
(for CPR-D manikin)
Pulse bulb w/tubing
Chest skin
Defib. chest cover cpl.
Lung plate (SkillReporter)
Lung plate (basic, Skillguide & CPR-D)
Compression spring
Jacket & Trousers
15 42 00
31
31
31
31
31
31
31
31
31
31
15
31
31
31
31
31
15
14
15
32
03
03
03
03
03
03
03
03
03
05
38
15
15
50
50
50
39
39
39
50
51
52
10
20
21
30
40
41
45
00
00
00
90
00
01
10
00
03
10
00
Jacket
Trousers
Lower body, soft
Right arm
Fastening bolt f/arm (pkg.2)
Left arm
Adapter f/lower body
Fastening bolt f/lower body
Soft stomach
Sensor unit cpl. (SkillReporter manikin)
Side connection unit (Skillguide manikin)
Directions for use
Technical manual
SkillReporter cpl.
Paper cover SkillReporter
Protecting pouch SkillReporter
Skillguide cpl.
Battery cover
Protecting pouch Skillguide
MicroHeartsim cpl.
Accessories
31 02 10
Face skin, pkg. of 6
31 02 20
Face skin decorated, pkg. of 6
15 22 50
Airways ‘’Guidelines 2000’’, pkg. of 24
15
15 42 20
15 26 00
15
15
15
31
31
42
42
12
50
20
00
20
01
50
29
Airways 400-600ml, pkg. of 24
(Skillguide manikin only)
Manikin Disinfectant Terminal (10x50g)
Manikin Disinfectant Rapid (3g + bottle)
Manikin Face Shields, 6 rolls
Paper x5 f/SkillReporter
Skin & vein for IV Arm
Optional equipment
31 20 00
Rescue module w/softpack
31 20 50
Trauma module w/softpack
31 03 00
Arms/soft legs w/softpack
15 40 00
Update kit, Skillguide
28 21 00
Manual Defib. adapters set of 2
31 20 25
IV Arm
For AED Resusci Anne only
31 03 56
Jacket, AED Resusci Anne
32 70 00
Chest skin AED SkillReporter
32 60 00
Chest skin AED SkillGuide
32 70 10
Communication box AED SkillReporter
32 60 10
Communication box AED SkillGuide
For complete parts list, see our internet site.
ENGLISH
Rams 01DFU Eng rev B.qxd