1
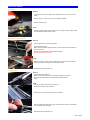
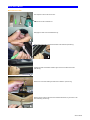
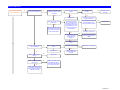
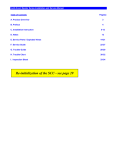
 Spoiler Service Guide Offered by Signature Automotive Products For 2011 Spoiler Service Manual
Glass Panel
Removal:
Cycle the glass panel into the open position. Allowing access to the four (4) T-25 torx
screws.
Remove four (4) T-25 torx screws, save for new glass installation.
Remove the Glass Panel.
Install:
Install the new glass panel using the existing four (4) T-25 glass screws. Apply a thread
lock material before reattaching the screws.
Sunshade Panel (450 HS only)
Removal:
Cycle the glass panel to full slide open position.
Pull the sunshade forward.
With a hook tool release the side blocks from one side, lift and pull the sunshade from
the sunroof housing.
Wrap the new sunshade with matching headliner material
(see C10. Wrapping the Sunshade)
Install:
With the sunshade in position, insert the sliding blocks on one side, pull opposite the
sliding blocks inward and engage into the mechanism guides.
Re-install the Glass Panel (see D.2.1).
Locking Sliders
Removal
Remove Glass Panel (see D.2.1)
Remove both locking sliders from the mechanism by sliding it to the front. If
at one side the locking slider is not broken break the part as shown in
image.
Install
Slide the new locking slider from the front side in a
backwards movement on the mechanism.
Click the front hook of the locking slider on the mechanism.
Prior to re-installing the glass panel, fully cycle the mechanism. Return the mechanism
to the full open position afterwards.
Re-install the Glass Panel (See D.2.1)
Service Guide
Spoiler Service Manual
Mechanism LH/RH
Removal
Remove Glass Panel (see D.2.1).
Remove the Headliner substrate assembly.
Remove the motor connector from the SCU.
Remove the clamp frame and motor; take the frame assembly out of the vehicle and lay
the frame assembly upside down on a bench.
Clean the roof skin of the vehicle
Remove the four plastic pop rivet caps using a hook tool.
(450 Series only)
Drill out the four rivets, retaining the mechanism guides to the mainframe.
(450 Series only)
Remove the mechanism guide and drive cable center plate T-25 torx
screws.
Remove the drive cable from the mainframe.
Lift the guide and cable mechanism from the mainframe.
Install
Replacement component.
Position the new mechanism assemblies, drive cables and tubes. Ensure the
mechanisms are in the fully closed position. Align the drive tubes and return tubes
correctly.
Apply
super glue along the sides of each of the four tubes; bonding the tubes to the
frame.
Re-install the guide screws and the Drive Cable Center Plate.
Re-install the frame assembly in the vehicle and mount clamp frame
(See- C7 Mainframe / Clamp Frame Installation)
Re-install the motor, ensure the mechanisms still are in the full closed position (locking
sliders fully forwards) and re-connect the connector to the SCU.
Cycle the unit, checking for correct operation and alignment.
Re-install the glass panel (See D.2.1)
Re-install the substrate and headliner or trim ring
(See- C.9.2 Substrate mounting.)
Service Guide
Spoiler Service Manual
Motor Removal / Install
Tools required to remove the SCU & motor.
For 450 HS use the screwdriver tool.
1
Disengage the switch from the headliner/trim ring.
2
Using a hook tool pull the material from backside of the hardboard. (450HS only)
3
4
Carefully peel back the headliner material to gain access to the attachment screws.
(450 HS only)
5
Remove the T-25 screws retaining the bezel to the mainframe. (450 HS only)
6
Remove enough screws so the bezel can be deflected downwards, to gain access to the
motor assembly. (450 HS only)
7
Service Guide
Spoiler Service Manual
Motor Removal / Install cont.
Remove the motor from the mainframe by removing the three(3) T-25 screws.
8
Retain the three(3) T-25 screws for the motor replacement.
9
Remove the motor assembly.
Re-install the motor following steps 10 thru 1.
10
Re-install the headliner.
SCU Removal and Replace
Follow the motor removal procedure steps 1 thru 7.
Disengage the SCU from the mainframe.
Unplug the harness connector from the SCU.
Unplug the motor connector from the SCU and replace the SCU.
Follow the removal procedures for reattaching the SCU and motor
assembly.
Re-install the headliner.
Tuck the headliner material into position.
Service Guide
Spoiler Service Manual
Seal Removal
Removal
Cycle the Glass Panel to full slide open position.
Using a screwdriver, lift the seal section from the mainframe.
Remove the seal section from the mainframe.
Clean and remove any excess silicone from the seal retaining channel.
Install
Apply a 3mm bead of silicon adhesive in the outer corner of the frame groove.
Apply an additional bead of silicon adhesive in the inner corner of the groove along the
front of the frame.
Insert the new seal, starting in the four corners. equally dividing the seal.
Insert the Seal in between the corners. Ensure that the seal is not pulled out or pressed
down in the corners. Cycle the glass panel during the mounting of the seal; to achieve
easy access.
Cycle the glass panel to closed position and allow for a minimal of 4 hours currying time.
Service Guide
Spoiler Trouble Guide
Mechanical Failures
Problem
Possible Cause
Solution
Panel misaligned LH/RH
Timing of drive cables incorrect
Re-time drive cables
Glass panel stopping prematurely.
Obstacle in mechanism or guide rail
Remove obstacle
Cable ratcheting
Check the motor and cable tube at
motor bracket and motor insert
Align cable tube to motor bracket and reinstall motor properly.
Electrical Failures
Problem
Possible Cause
Solution
Operating of the sunroof is possible, no
auto close, no one touch
SCU in degraded mode due to
malfunction
Refer to B.2. Re-initilization Procedure
SCU makes clicking noise but panel will
not move
Low voltage
Check power supply
Panel is sliding too slowly. With a 13.5v
power supply, the panel should not take
more than 7sec. To close from fully
opened position.
Weak battery
Misaligned panel creating drag
Weak motor
Dirty mechanism
Change or replace motor
Clean and grease mechanism or replace.
Rattling Noise
Problem
Possible Cause
Solution
Hardshade
Loose attachment screws
Tighten all T-25 attachment screws
Sunshade rattling
Check for felt pads on sunshade
Add felt pads to sunshade
Rattle in motor area
Loose screws on motor
Tighten screws or replace
Wind Noise
Problem
Excessive wind noise when the panel is
in the closed position
Possible Cause
Solution
Locking slider broken, replace Locking Slider
Panel seal not tight to glass panel
Seal deformed, replace seal
Water Leaks
Problem
Water coming through panel opening
area or headliner wet
Possible Cause
Solution
Locking slider broken, replace Locking Slider
Panel seal not tight to glass panel
Seal deformed or damaged, replace seal
Trouble Guide
Spoiler Trouble Guide
Testing Electrical Components
Make sure that during the test of electrical components the Inalfa EVENT Spoiler is connected to a 12V source.
If the roof is installed in a car, the battery needs to be connected and operable. During test period, the ignition/accessory switch must
be on. This test can be accomplished with a voltage meter or test light.
Inspect and make sure that the fuses are not blown.
Cable harness and motor inspection requires the removal of the headliner.
Wire Harness SCU to Battery
Connector
Wire number 1 (red)
Wire number 2 (black)
Wire number 3 (blue)
Power on wire if ignition is off
12V
Ground
0V
Power on wire if ignition is on
12V
Ground
12V
Motor
Disconnect the motor wire from the SCU. If the mechanism is jammed remove the motor from the frame. Use a double wire of
sufficient length, connect directly to battery and inspect the motor for proper operation in both directions. This is done by reversing the
connection of the double wire. The motor has an inbuilt thermal cut-out device that automatically switches the motor off during periods
of overload. After a cooling down period the motor will function properly.
SCU
Testing is covered in the electronic trouble chart. The following failures could be a result of a defective SCU
No action on continues operation
One Touch operation inoperative
Auto Close function inoperative
No action on continues operation
One Touch operation inoperative
After replacing the SCU, the SCU must then be re-initialized. Proceed with the electronic trouble chart if the problem is not solved by
initialization.
Re-initialization of the SCU
To re-initialize, the following closed position must be defined.
Turn on ignition.
In the closed position operate the front button of the switch until the relay clicking noise is noticed (Max 5 seconds).
To complete the reinitalization process, the glass panel must be moved to the fully opened position using One Touch™ mode.
Trouble Guide
Spoiler Trouble Chart
Is the motor running with
ignition switched on?
no
Is the switch illuminated?
(ignition contact switched on).
yes
no
yes
Is the fuse of the red contact
wire blown? ignition contact
switched on
yes Has the fuse been replaced
before?
no
yes
no
no
Break or bad contact in wire
harness between fuse and
SCU, replace wire harness
or solve bad connection.
yes
yes
Mount a fuse of 20
amps (red)
no
Short circuit in wire harness,
replace wire harness
Replace Fuse
Power (12v) on red contact
wire of SCU?
Fuse smaller than 20
amps?
yes
Disconnect motor from
SCU. Check the correct
functioning of the motor by
connecting the motor wires
to a separate power source.
Is the motor functioning in
both directions?
Re-connect motor connector to
SCU and replace switch.
Is the roof functioning normal?
no
yes
Switch failure
no
SCU failure, replace SCU
no
Remove motor from sunroof
frame. Is the motor
functioning in both
directions?
yes
Mechanical problem. Check
mechanism for obstruction or
failure
no
Motor broken, replace
motor
motor.
Is the fuse of the blue ignition
contact switched on
yes
Has the fuse been replaced
before?
yes Fuse smaller than 5 amps? yes
no
Replace Fuse
no
Short circuit in wire
harness, replace wire
harness
no
Replace switch, problem
solved?
yes
Mount a fuse of 5 amps (blue)
Switch failure
no
Power (12v) on blue contact
wire of SCU?
no
yes
Break or bad contact in flat
cable between fuse and
SCU, replace wire harness
or solve bad connection.
Break or bad contact in wire
harness between fuse and
SCU, replace wire harness or
solve bad connection.
Trouble Chart
Spoiler Trouble Chart
Is the motor running
in both directions?
no
yes
yes
Disconnect motor from SCU.
Check the correct functioning of
the motor by connecting the
motor wires to a separate power
source.
Is the motor functioning in both
directions?
yes
Re-connect motor connector
to SCU and replace switch.
Is the roof functioning
normal?
Switch failure
no
no
SCU failure, replace SCU
no
Remove motor from sunroof
frame. Is the motor functioning in
both directions?
yes
Mechanical problem. Check
mechanism for obstruction
or failure
no
Motor broken, replace motor.
yes
Is the motor
running
normal?
no
Is the motor running for only a
short time after operating the
switch?
yes
Motor connector not properly
mounted. Remove connector
and mount properly. Problem
solved?
yes
Problem solved
yes
no
Replace motor
Is the one touch
functioning?
no
yes
Re-initialize SCU by running the
sunroof to closed position and
keep-on pushing the switch. After
3 seconds the SCU confirms reinitialization by kicking back.
Problem solved?
yes
Problem solved
no
Replace SCU
Is it possible to open
the roof in its
maximum opened
position?
no
Re-initialize SCU by running the yes
sunroof to closed position and
keep-on pushing the switch. After
3 seconds the SCU confirms reinitialization by kicking back.
Problem solved?
Problem solved
yes
no
Can the sunroof be placed in all
positions using the manual
override on the motor?
no
Mechanical problem. Obstruction
or failure of mechanism. Remove
obstruction or solve failure.
yes
Blue wire is not connected
via ignition. Search for
another contact wire which is
switched by the ignition
contact.
Trouble Chart
Spoiler Trouble Chart
no
The roof is
experiencing false
reversal during one
touch or auto close
operation
Re-initialize SCU by running the yes
sunroof to closed position and
keep-on pushing the switch. After
3 seconds the SCU confirms reinitialization by kicking back.
Problem solved?
Problem solved
yes
no
False reversal also occurs during yes
one touch closing motion?
no
Sunroof does not close also yes
not after completing the 5
retry closing motions
Remove glass panel and
test the sunroof. Problem
solved?
no
Obstacle in mechanism.
no
High resistance of
mechanism whereby the anti
trap protection is activated.
Clean and lubricate
mechanism with Molycoat
based grease.
False reversal only occurs during yes
auto-close
Is the auto close
functioning?
no
Power (12v) on blue wire SCU
with ignition off?
no
yes
Replace SCU
yes
High resistance of
mechanism whereby the anti
trap protection is activated.
Clean and lubricate
mechanism with Polycoat
based grease.
Blue wire is not connected
via ignition. Search for
another contact wire which is
switched by the ignition
contact.
Electronics Fully Tested and Okay.
Remaining problems are not caused
by the SCU, Motor, Wire harness or
Switch. Please continue with the
mechanical trouble shooting guide.
Trouble Chart